1
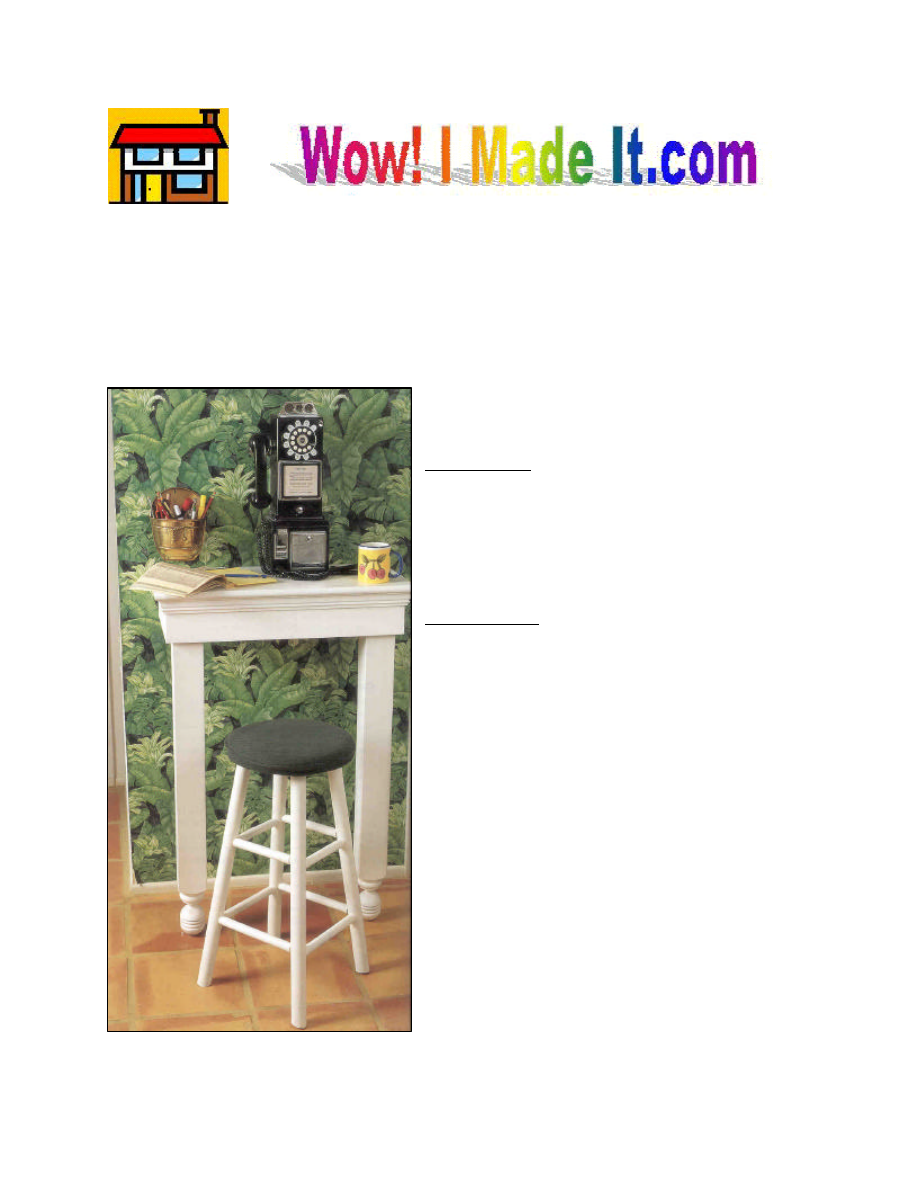
elephone Table
We have a kitchen wall phone, but had nowhere to sit and write. This telephone table
serves the purpose nicely. It’s a snap to make and serves as a very convenient area for
phone books, notepads and writing instruments.
Materials
§ 7 linear feet of 1 x 6 pine
§ 3 linear feet of 1 x 12 pine
§ 5 linear feet of 3” chair rail molding
§ 2 newel posts*
Hardware
§ 20 1” long nails
§ 24 1-1/2” screws
§ 12 2-1/2” screws
T
2
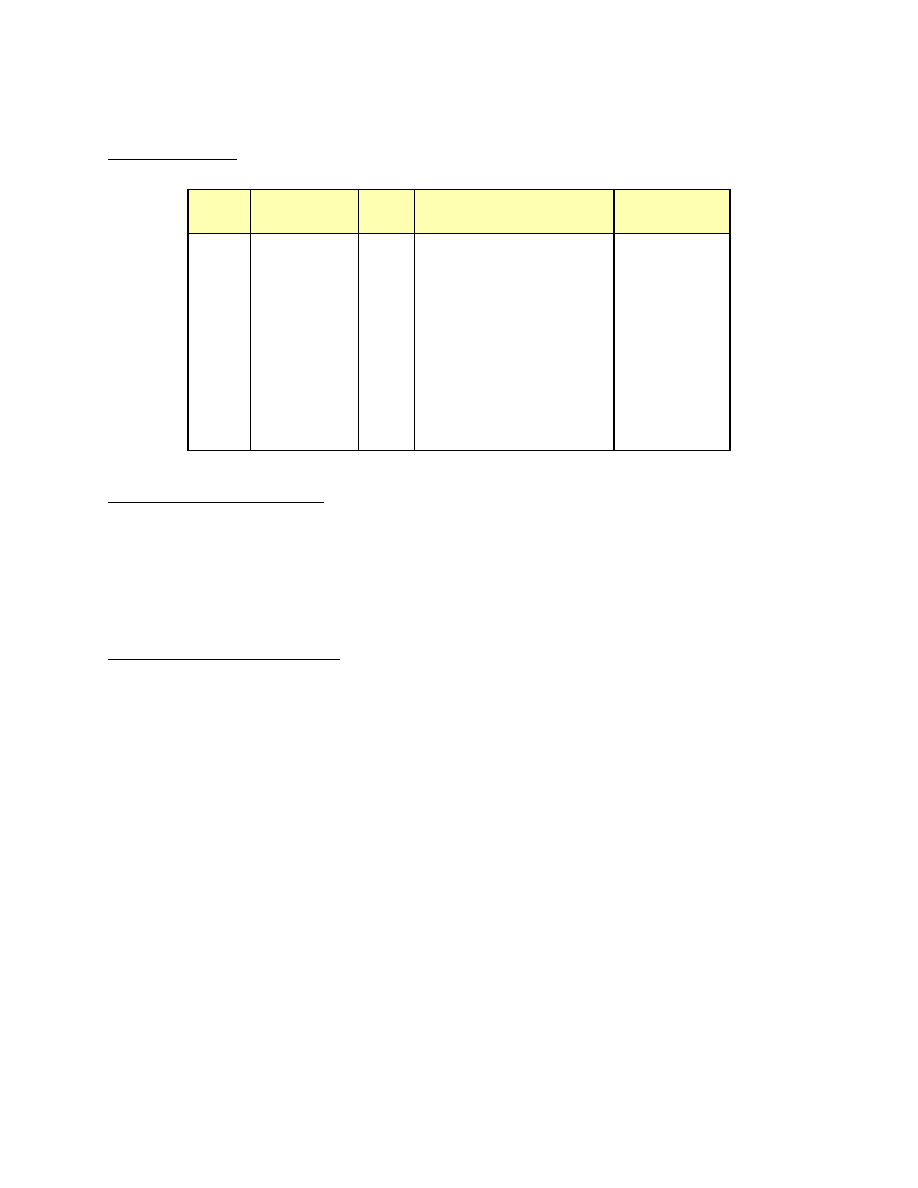
Cutting List
Code Description Qty. Materials
Dimensions
A
Top
1
1 x 12 pine
24” long
B
Front/Back
2
1 x 6 pine
24” long
C
Side
2
1 x 6 pine
12-3/4” long
D
Leg
2
Newel posts*
39” long
E
Trim
3
3-inch chair rail molding Cut to fit
*Notes on Materials
We purchased newel posts at a building supply store, turned them upside down, and used
them for the legs. If you can’t find the exact kind we used, you can substitute a 4 x 4 and attach a
fence-post finial on the end--or simply use a 4 x 4 by itself. Just make certain that the total length
of the leg is 39 inches.
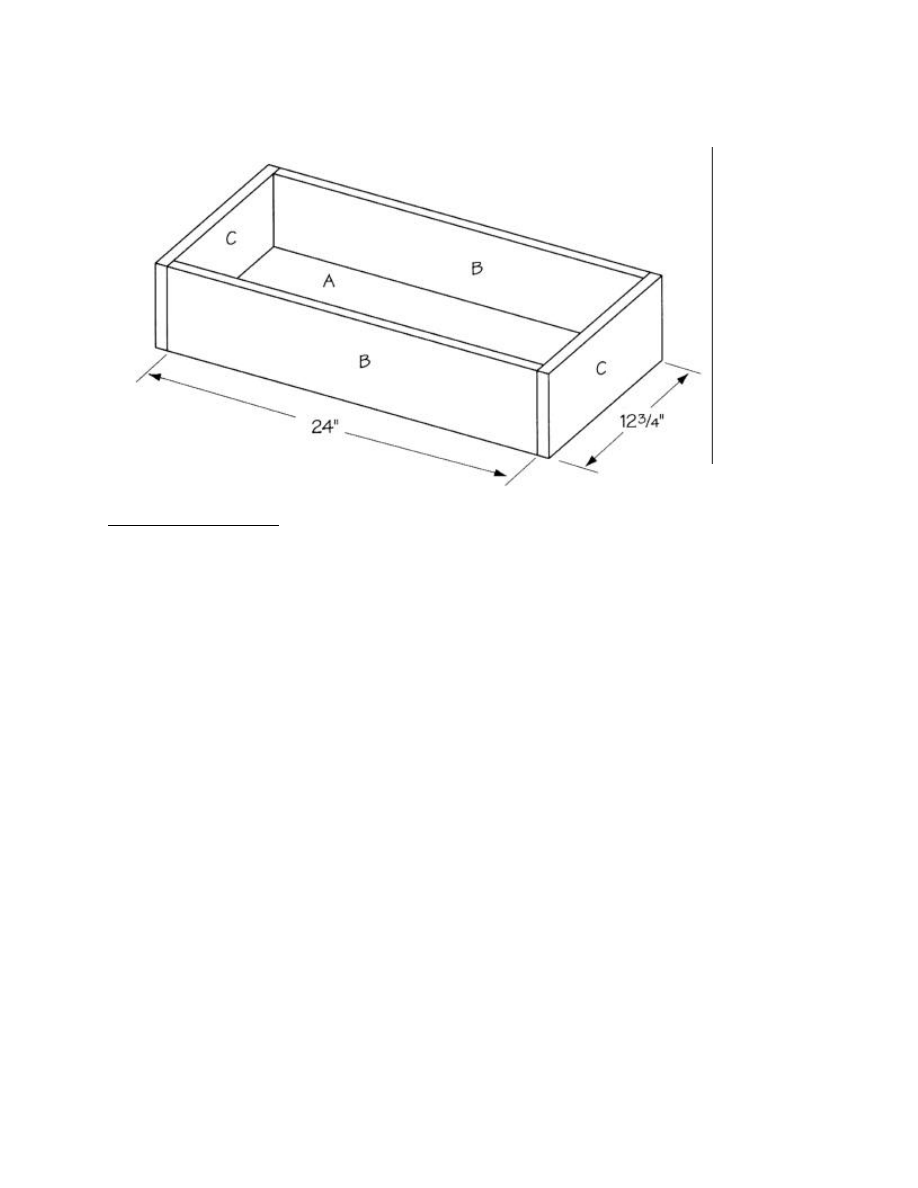
Making the Table Top
1. Cut one top (A) from 1 x 2 pine measuring 24 inches long.
2. Cut two front/backs (B) from 1 x 6 pine, each measuring 24 inches long.
3. Cut two sides (C) from 1 x 6 pine, each measuring 12-3/4 inches long.
4. Place the top (A) on a level surface. Place the two front/backs (B) on edge on either side
of the top (A), matching the 24-inch-long sides, as shown in Figure 1. Apply glue on the
meeting surfaces, and screw through the front/backs (B) into the edges of the top (A)
using six evenly spaced 1-1/2-inch screws on each joint.
5. Place the two sides (C) over the ends of the two front/backs (B), as shown in Figure 2.
Apply glue on the meeting surfaces, and screw through the sides (C) into the ends of the
front/backs (B), using three 1-1/2-inch screws on each joint.
3
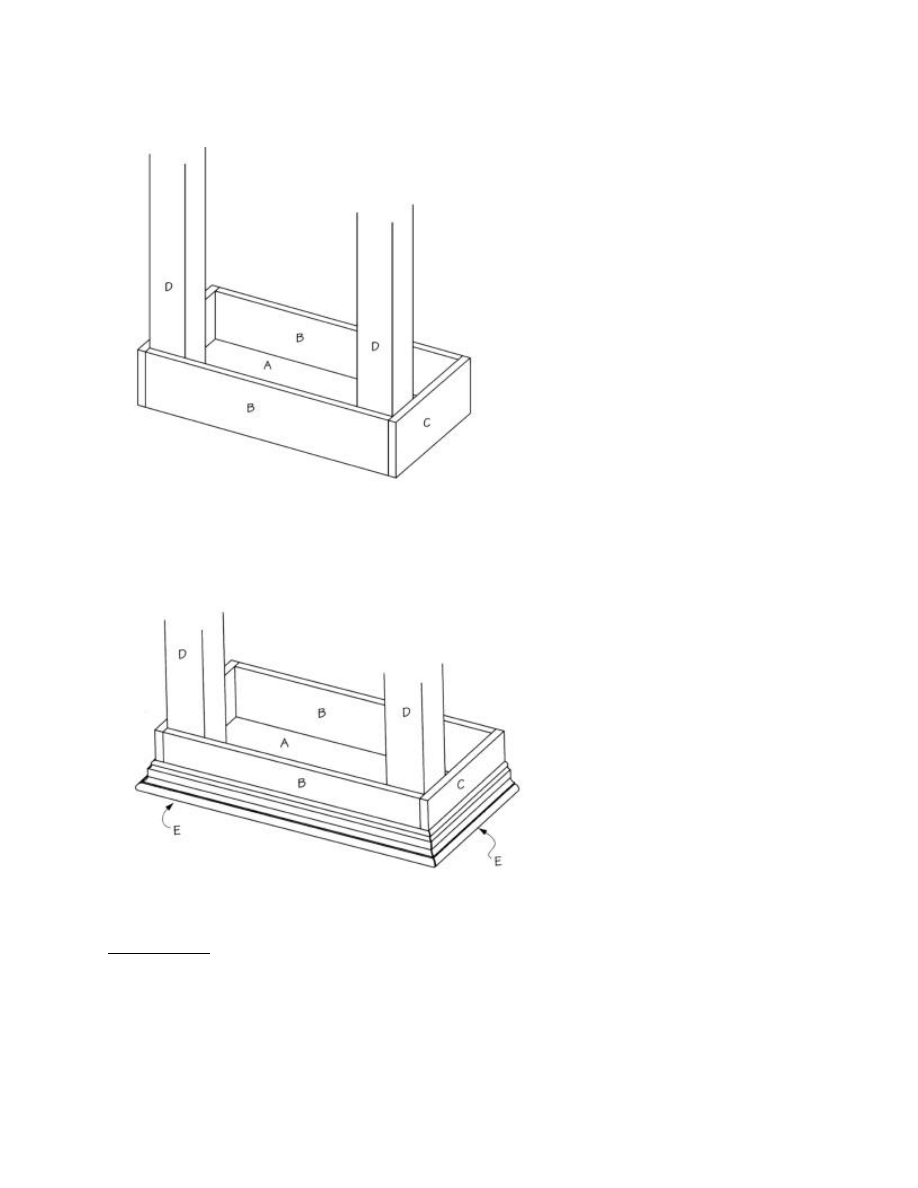
Adding the Legs
1. Trim the two legs (D) to 39 inches long.
2. Place the legs (D) inside the table assembly, as shown in Figure 2. Note that both legs (D)
are attached to the same front (B). Apply glue on the meeting surfaces, and screw through
the front (B) and sides (C) into the legs (D) using two 2-1/2-inch-long screws on each
joint. After driving each screw, use a try square to make sure that the legs (D) remain at
right angles to both front (A) and side (C). Also screw through the top (A) into the legs
(D) using two 2-1/2-inch screws on each leg (D).
Figure 1
4
Finishing
1. Measure carefully, and cut outer trim (D) from 3-inch-wide molding, as shown in Figure
3, mitering the molding at each of the corners. Do not attach molding to the back of the
telephone table, as the back will be attached to a wall. Apply glue on the meeting surfaces,
Figure 2
Figure 3
5
and nail through the outer trim (D) into the front, back, and sides (A and B). Use 1-inch
(2d) finishing nails spaced about every 4 inches.
2. Fill any screw holes or imperfections in the wood with wood filler.
3. Thoroughly sand the telephone table.
4. Stain or paint the table the color of your choice. Since we use it in our kitchen, we chose a
bright white paint to coordinate with our other kitchen items.
5. Use molly bolts or other appropriate hardware to secure the finished table to a wall.
Need more room? Build your own kitchen island from
www.wowimadeit.com
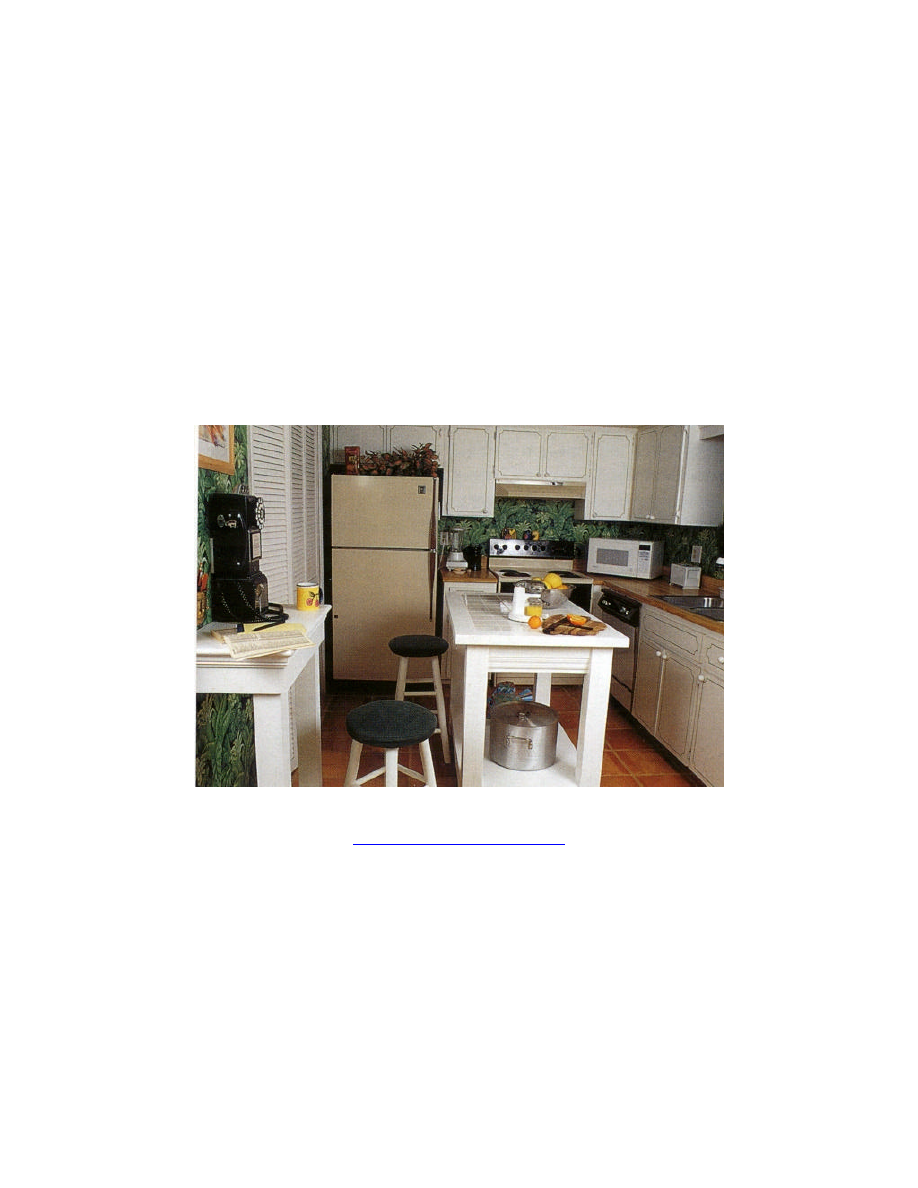
Face facts! If you’re preparing food while guests or family are in the house, chances are good
that you’ll have an audience. Because we enjoy relaxed entertaining, and especially kitchen
company, our kitchen hutch, island and telephone table are designed to serve as coordinated
pieces. (The island and telephone table also serve as “people perches.”) A plate of appetizers on
the island and self-serve beverages on the telephone table make everyone feel at home while we
finish preparing the meal.
Wyszukiwarka
Podobne podstrony:
Grubość ścianek w SARELU Thickness Wall Mounted S3D
Table European Telephone Console
oak dining table
Coffee Table 1
table style2, ♥Dokumenty
table cellspacin5, ❀KODY RAMEK I INNE, Ramki
table border (2)
Foresight Resolution Table
Chess Table
multiplication table
Effic Table (Table 4(V18)
Drill Press Table
table styl4, MOJE RAMKI, RAMKI 2
table cellspacin9, MOJE RAMKI, RAMKI 2
Table
A picnic table is a project you?n buy all the material for and build in a?y
Table of Contents 2
więcej podobnych podstron