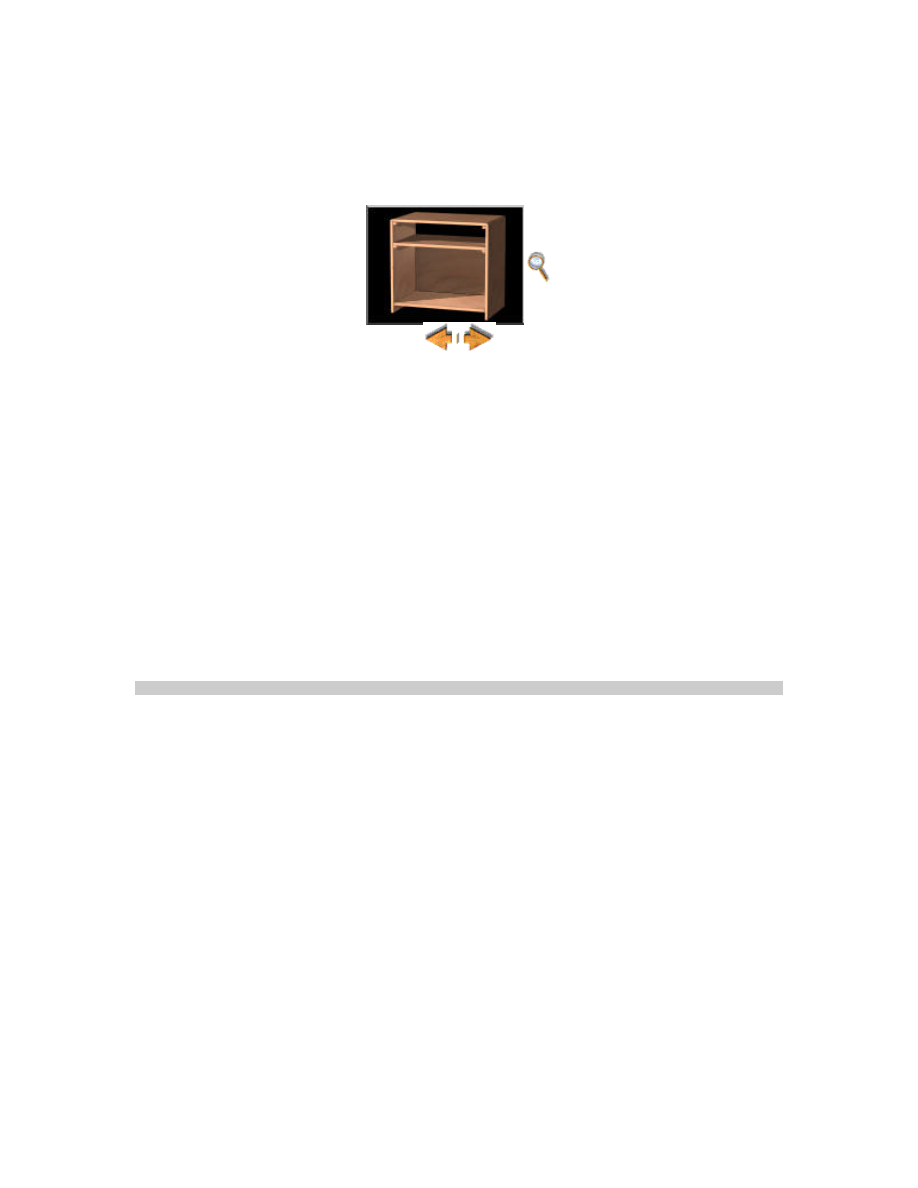
TV Stand
Use arrows to view the project from different angles & magnifying glass to enlarge image.
The Project
This TV stand will accommodate a television up to 27" and also hold a VCR on the shelf. The project
is for the more experienced woodworker; it is assumed that you already have a solid background of
woodworking skills. Through it, you'll practice basic cabinet and face-plate construction techniques
using hardwood plywood and solid stock. You'll also practice working with tolerances; in this case,
matching two doors to an opening. Oak or birch plywood is used to eliminate glue-ups. However,
solid wood could be used.
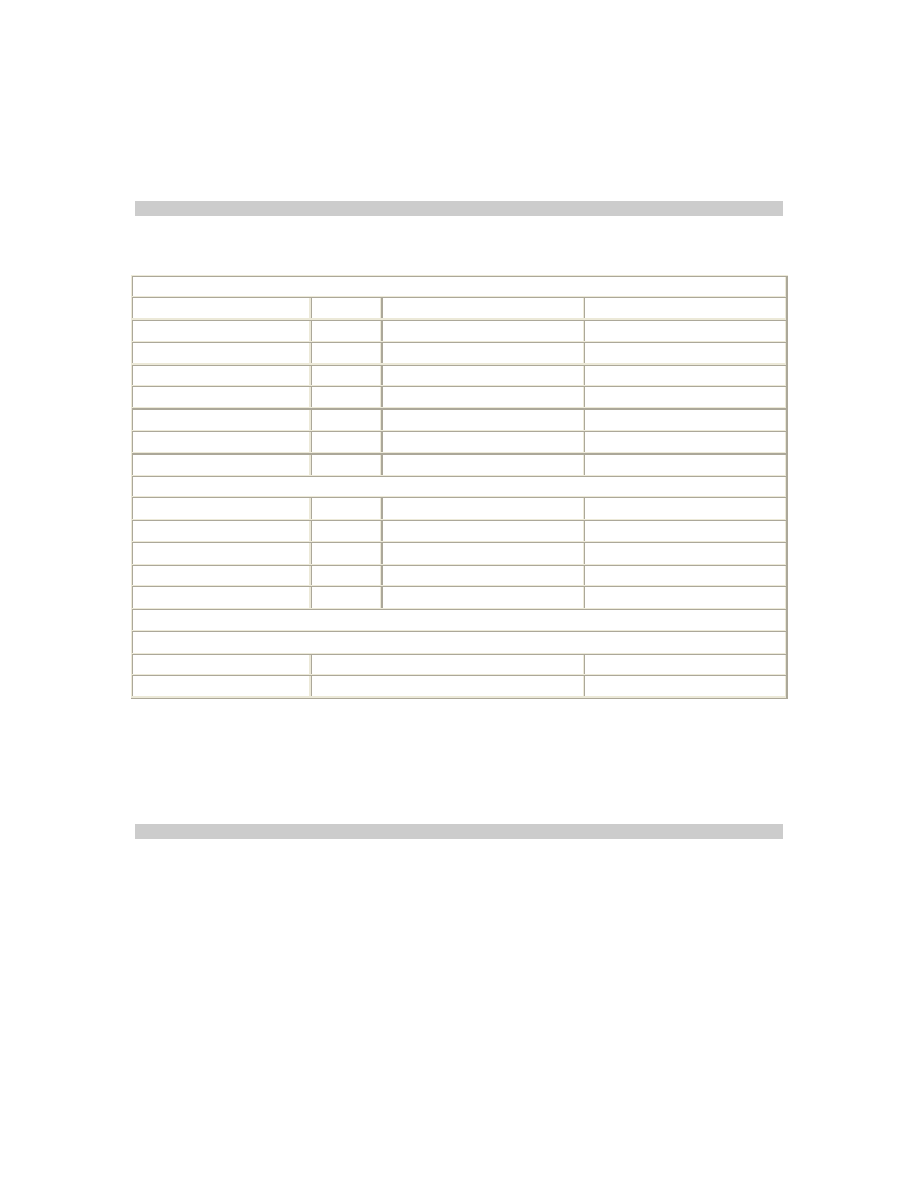
Tools & Materials
A fairly well-equipped shop is required for the completion of this project. The following are the
minimum tools required:
Tools Required
•
Pencil
•
Tape measure
•
Table saw
•
Planer
•
Drill
•
Router
•
Countersink
•
9/64" drill bit
•
7/64" drill bit
•
1/2" roundover bit
•
3/8" roundover bit
•
Philips bit or screwdriver
•
Professional Strength Wood Glue
•
#6 x 1-1/4" drywall screws
•
High-quality brush
•
Clean cloths
Alternate
•
Air nail gun (15 or 18 gauge nails)
•
Drill press
•
Router table
Materials
CABINET
Item
Number Dimensions
Wood Species
Top
one
3/4" x 19-1/4" x 28-1/2"
oak plywood
Sides
two
3/4" x 19-1/4" x 27-1/4"
oak plywood
Shelf
one
3/4" x 19-1/4" x 28-1/2"
oak plywood
Bottom
one
3/4" x 19-1/4" x 28-1/2"
oak plywood
Shelf support cleats
four
3/4" x 3/4" x 19"
solid oak
Bottom support cleats
two
3/4" x 2-1/4" x 19"
solid oak
Back
one
1/4" x 18" x 29-1/4"*
oak plywood or masonite
FACEPLATE
Top rail
one
3/4" x 2" x 30"
solid oak
Center rail
one
3/4" x 2" x 30"
solid oak
Bottom rail
one
3/4" x 2" x 30"
solid oak
Stiles
two
3/4" x 2" x 26"
solid oak
Top corner molding
two
7/8" x 7/8" x 20"
solid oak
DOORS
Approximate dimensions. Match to opening and type of door.
Inset doors
2 @ 3/4" x 12-7/8" x 15-7/8"*
solid oak
Hinges
2 pr. 35mm style inset hinges*
solid oak
* Bill of materials written using oak plywood and solid oak for trim and cleats. Substitute maple or
birch if birch plywood is used.
Finishing Products
•
Minwax
®
Wood Finish™
and
Minwax
®
Fast-Drying Polyurethane
Procedure
I. Roughing Out Stock
1. Cut the top, shelf, bottom and two sides from a sheet of oak or birch plywood to the
finished size as per bill of materials.
2. Cut the four shelf support cleats and the two bottom cleats to size.

II. Cabinet Construction
1. Drill pilot holes approximately every four inches on two adjacent sides of the cleats.
(Stagger the holes.)
2. Countersink the pilot holes.
3. Glue and screw the cleats to the inside of the two sides as indicated in the front view "basic
cabinet - no trim" drawing. Keep the countersunk holes pointing in and down.
NOTE: These must be located exactly alike on both sides and be perpendicular to the front
edge.
4. Using a partner to hold the sides for you, attach the bottom to the bottom support cleats
using glue and thread into the bottom of the shelf.
5. Attach shelf by using 1 1/4"drywall screws and glue. Screws should fit freely through cleat
and thread into the bottom shelf.
6. Attach top: Refer to corner detail.
NOTE: There will be a square void left on each end when attached. No fasteners are visible
on the top. The screws will thread into the underside of the top.
7. Check to make sure that the cabinet is square.
8. Fabricate the top corner molding from two pieces of wood measuring 3/4" x 3/4" x 24"
each. The wood should match the cabinet. Rout one edge with a 1/2" round over bit. (A
table mounted router makes this step much safer and easier than freehand.)
9. Adjust table saw and make the 1/8" x 1/8" kerfs on corner molding. Square cut one end of
corner molding, cut to 20".
10. Attach to cabinet with glue and finish nails. (An air nailer is great for this step.) Drive nails
at a 45-degree angle, driving into the cleat
11. Countersink and fill nail holes.
III. Faceplate Construction
1. Cut faceplate rails and stiles to length as per bill of materials.
2. Mark and cut half-lap joints. (Check depth on a piece of scrap wood before using your good
piece.)
NOTE: Notice half-laps are cut on the BACK side of the stiles and the FRONT side of the
rails.
3. You may glue and assemble the faceplate as a separate unit, then attach it to the cabinet
or assemble it on the cabinet as you go. (If you assemble it on the cabinet, attach the rails
first, then the stiles.)
4. After the faceplate is attached, sand the top right and left corners to match the radius of
the corner molding.
5. Using a 3/8" round over bit, rout all edges of the faceplate.
6. Sand to remove any ridges or machine marks.

IV. Doors
1. Inset doors are planned to keep with the smooth and uninterrupted lines of this project, but
half or full overlay doors may also be used. Match the dimensions to the opening and type
of door used.
NOTE: Solid stock should be used for the doors.
2. The door dimensions should be approximately 1/16" to 1/8" smaller than the door opening.
3. Drill holes for the inset hinges; 35mm style inset recommended.
NOTE: Spacer blocks will have to be added to the inside of the sides to accommodate the
35mm hinges.
V. Sanding, Staining and Finishing
1. Finish sand cabinet, faceplate, and doors.
2. Pre-treat wood with
Minwax
®
Pre-Stain Wood Conditioner
if necessary. Stain all parts using
Minwax
®
Wood Finish™
as per label instructions. Later finish using
Minwax
®
Fast-Drying
Polyurethane
as per label instructions.
VI. Final Assembly
1. Attach the hinges.
2. Hook up your TV, sit back in your favorite chair, and ENJOY!
VII. Cleanup
•
If you have product left over, wipe the can rim so that product in the rim doesn't dry out
and cause lid not to form a tight seal. After sealing, store cans away from heat.
•
Clean brushes used for oil-based finishes with mineral spirits; soap and water are all that is
needed for brushes used for water cleanup products.
VIII. Safe Disposal of Rags & Waste
Please be mindful of the safe way to dispose of used rags and other waste. Rags, steel wool and
other waste soaked with oil finishes may spontaneously catch fire if improperly discarded. Place
rags, steel wool and waste immediately after use in a water-filled metal container. Tightly seal and
then dispose of in accordance with local regulations. Be sure to keep the container out of reach of
children.
Wyszukiwarka
Podobne podstrony:
Cabinet TV Stand (Part 1)
Cabinet TV Stand (Part 2)
Cabinet TV Stand #2 (Part 1)
Cabinet TV Stand #2 (Part 2)
Apex Tv At20022002Spn
Kody TV do pilota DM 800HD
Grundig TV Lcd
Audyt wewnetrzny (SGHowy) Stand Nieznany (2)
Wpływ TV na dzieci! (art z sieci)
Backup of Tv Tuner Cards Waikato Li
Apex Tv Gb43 65Hd09Pn
checklist radio tv theatre events
arkusz ang stand pr cz2 A
2 misja publiczna tv
lumber cut off stand
Stand.V.8 kom, Wycena gruntów
24 DZIECI A TV
Ballada o lekkim zabarwieniu erotycznym TV a reklama sutenerstwa
więcej podobnych podstron