
Rough Lumber Cut-off Stand
Here's a fixture that makes cutting
rough lumber to length a snap.
Most garage woodworkers put their rough
lumber across a couple sawhorses and
crosscut it to length using a circular saw or
jigsaw. After the cut, something usually falls
to the floor – missing your foot if you’re
lucky. After some thought, we designed and
built this cut-off stand to improve the life of
the garage woodworker.
Adjustable in height to accommodate
almost any cutting location, this stand
works with two sawhorses (or your bench or
table saw) to keep your lumber fully
supported during a cut.
But that’s not all this stand does (our
philosophy is if it’s going to take up space in
a garage shop, it better have more that one
use). So we added a removable roller stand
to the top that turns the fixture into an
adjustable outfeed stand for most of your
woodworking machines.
The stand is remarkably simple to build.
Make the lower support using ¾"-thick
hardwood of your choice that’s glued and
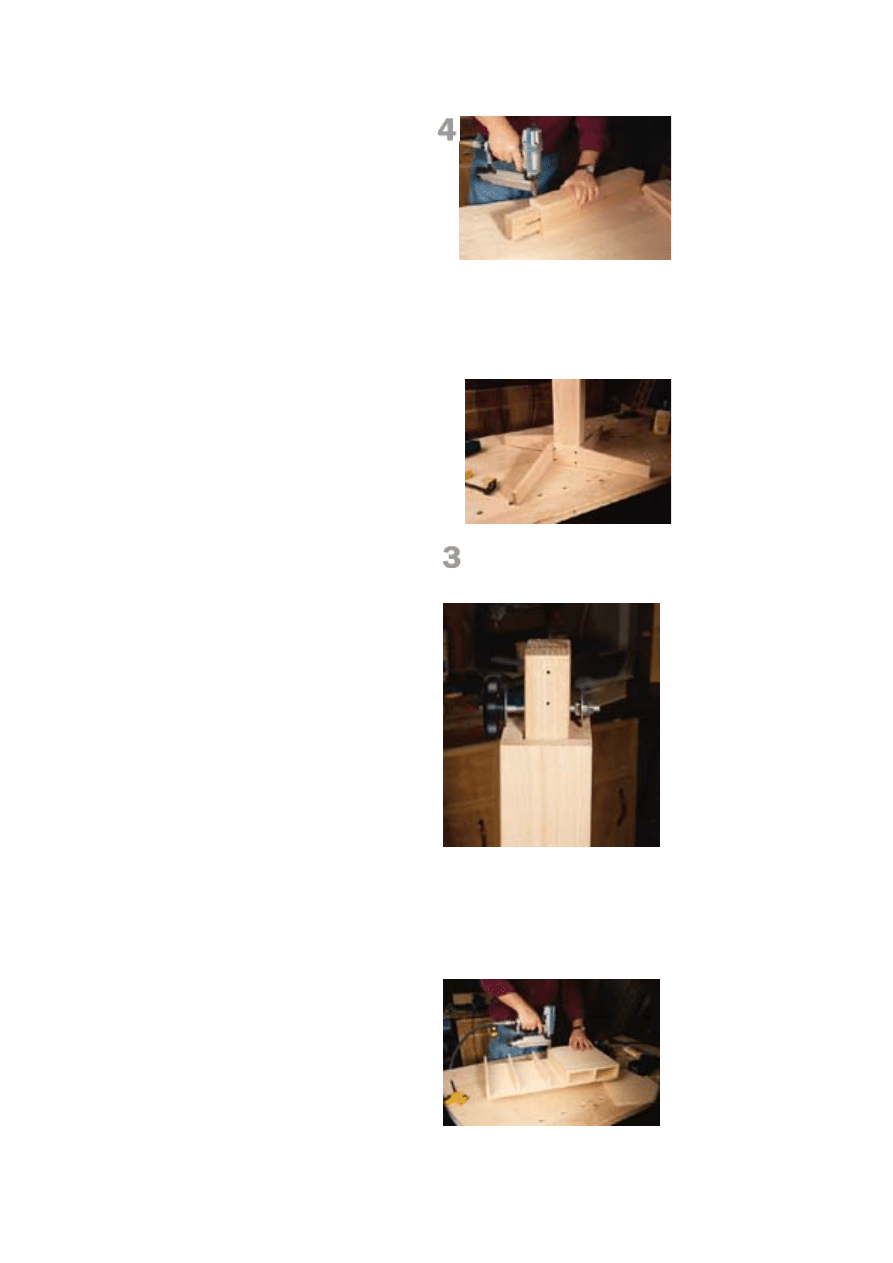
To form the post, the rough piece is ripped
into three pieces, the center piece is cut to
form two small blocks, and then the whole
thing is glued back together.
screwed together using butt joints. The
slotted post supporting the top section is
formed by cutting, then regluing the pieces
– no complicated router work. The top is
½"-thick Baltic birch plywood pieces nailed
together to form a torsion box for extra
strength.
From the Bottom Up
To make the stand easily adjustable in
height, I chose a post-in-sleeve design.
Start with the post. The finished size of the
post is given in the materials list, but start
with a length of wood that is ¼" wider,
thicker and longer than the finished size.
This leaves room for saw cuts to form the
slotted post and fitting room for overall size.
Next, take a look at the square ¼"-20 nut
you have for the locking hardware. Measure
the width across the nut and add a fraction
of an inch to that dimension. This will be the
gap that you want to leave in the center of
the post. The square nut will need to move
freely up and down the gap, but not turn in
the space.
Form the post by ripping the board into
three lengths, with the two outer pieces
being equal in width, and the center piece
being the same width as the nut. Then
crosscut the narrow piece into two 1-¾"-
long pieces. Glue those between the long
outer sections and your post is almost
complete.
Once the glue has dried, remove it from the
clamps and run it through your planer to
fine tune the thickness. Trim the post to
length and move on to the sleeve.
The sleeve is formed by cutting the pieces
to size, then simply gluing the four pieces
together to form a rectangular column. Be
careful to align the pieces to avoid cleanup
and provide a square (and glue-free) center
sleeve.
Lock-n-slide
The locking mechanism for the post is a
length of threaded rod with nuts, a couple of
fender washers and a handle slipped
through the column. To make the clearance
holes in the column, measure down 1-½"
from the top on the front side and make a
mark in the center of the column. Take the
column to your drill press and, using a
As you glue up the column, use the post to
check the spacing. The post should slip
easily into the sleeved column. You want
the post to move easily, but don't make
make it too loose or you'll make the stand
wobbly.
The feet are attached to the column
with flat-head screws. Watch the s
ment or you'll drill into another scre
crew
align
w.
Some simple hardware from your local
he
home center store allows you to lock the
post solidly, but quickly loosen the post
and readjust for any height. The hardware
is shown at right, resting on top of the
column before being attached through t
holes.

5/16"-diameter drill bit, drill completely
through both sides of the column.
Now switch to a 1-½"-diameter Forstner bit
and, using the 5/16" hole on the back side
as your center, drill a larger hole in the
back.
The rest is hardware. Spin the two hex nuts
onto the end of the threaded rod and use
wrenches or pliers to tighten the nuts
against one another to lock them in place.
Then slip one fender washer on the long
end of the rod and against the pair of hex
nuts.
Now thread the square nut on after the
washer and tighten it against the washer
and hex nuts. Insert the assembly (long end
first) into the larger hole in the back of the
column, threading it into the center slot in
the post (which you’ve slipped into place).
When the threaded rod pokes out the 5/16"
hole on the front side, add another washer
and the star handle. You’re done. Make
sure the square nut is rotated to slip into the
slot to make a tight fit.
Add the Feet
The last part of the base is the feet. These
are just four boards screwed to the bottom
of the column. I trimmed a long taper on the
top of each to make it a little more
aesthetically pleasing.
When you drill the clearance holes for the
screws, pay attention to where the screws
are located, or you’ll end up drilling into
another screw. Offset them slightly and
you’ll be fine.
With the feet attached, I added four
adjustable leveler feet to make sure the
stand would sit solidly on my uneven
garage floor.
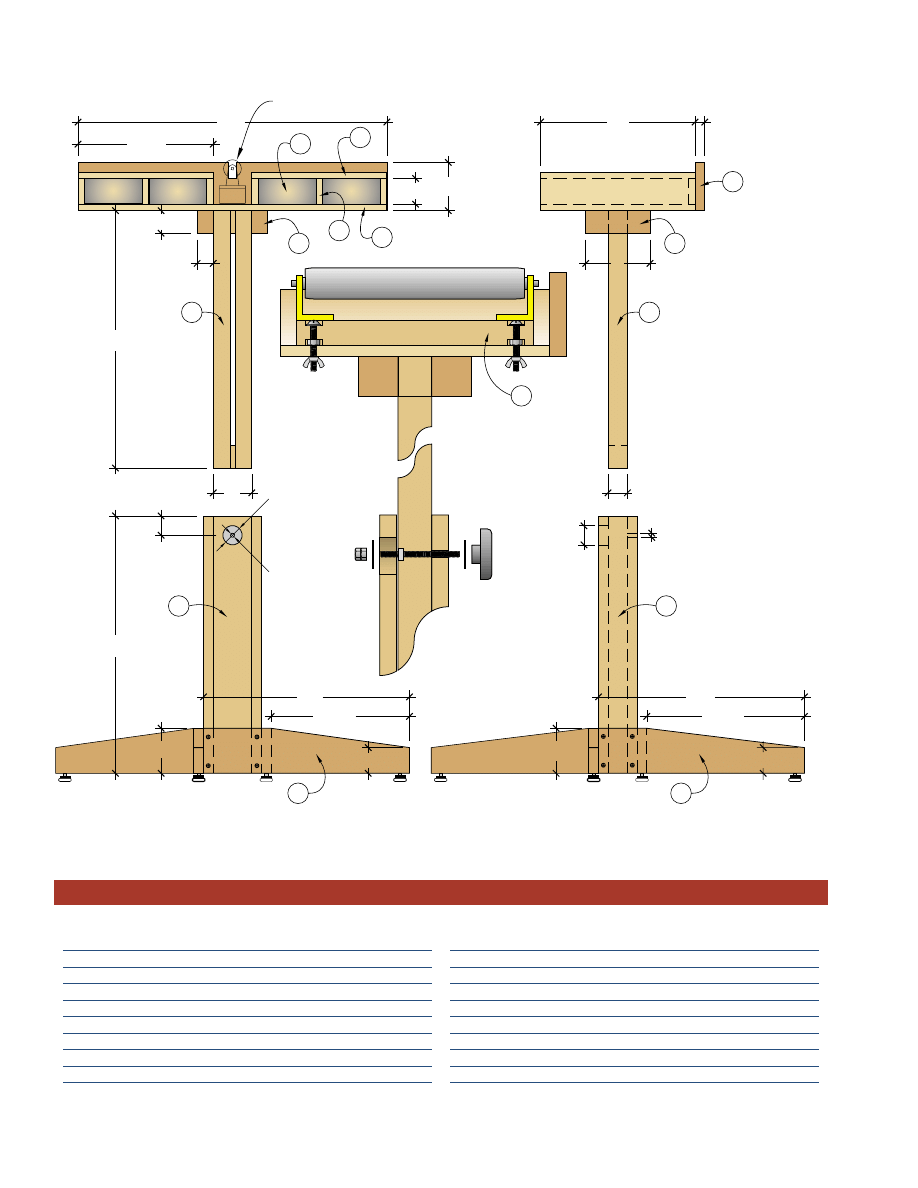
Torsion-box Top
I wanted to make the top of the stand as
lightweight and strong as possible, but still
stable. To accomplish this I used ½"-thick
Baltic birch plywood and built an open-front
torsion box.
Before making the box, locate the center
position on the bottom plywood piece and
mark where the top of the post will meet the
This shot shows the partially a
table, with three exposed dividers and
other side covered with the top. You
can also see the screws through the
bottom that hold the mounting blocks in
place. While the box itself is nailed
together, the fence is attached with screws
to allow for replacement if it gets cut up to
much in use.
ssembled
the
o

box. Then screw two 1-¼" x 1-¾" x 5" solid-
wood blocks to the underside of the
plywood, centered and on either side of the
post’s location. Use these two mounting
blocks to attach the table to the post after
you have completed the table.
To form the box, simply assemble it with a
brad nailer, making sure to align all the
edges to keep things square. The two tops
are held flush to the outside ends, leaving a
3"-wide gap in the center to allow plenty of
room for a circular saw or jigsaw blade. The
space in “the valley” ends up at a 2-½"
depth, which should allow clearance for
almost any jigsaw blade and lots of room
for the blade of a circular saw.
With the table frame complete, nail ½" x 2"
x 4-½" backs into the spaces at the rear of
the box, closing up the opening. The
hardwood fence is next. Drill four clearance
holes and screw the fence to the back of
the box, screwing into the backs.
To avoid any concern of binding a saw
blade during the first few uses, cut a notch
in the fence 1" wide and as deep as the
blade depth you’re most likely to use.
You’re now ready to attach the table to the
base. Drill clearance holes in the center of
the mounting blocks under the table, then
screw the table to the post.
A Little Something Extra
The roller is really inexpensive, and is quick
to put together and attach. Simply drill two
¼" clearance holes in the 1-1/8" x 2" x 9-½"
roller block, 1-½" from each end, and
centered on the block. Use a ½"-diameter
drill bit to countersink the top of the holes to
fit the head of a machine bolt and a locking
washer. Then flip the block over and use a
1-½" Forstner bit to countersink the bottom
of the hole to accept a hex nut.
Before attaching the hardware, place the
block in the table valley and use a pencil to
mark the hole locations on the table bottom.
Then drill oversized ¼" holes at those
locations.
With the bolts inserted and tightened down,
screw the roller mounting brackets in place
on the block. The ends of the bolts will slide
easily into the holes in the table, and the

roller can then be attached using two wing
nuts. When the roller isn’t needed, it fits
snugly inside any one of the open-end
spaces in the table.
No matter where you use this stand, you’ll
find rough-cutting lumber a more pleasant
experience. I’m pretty sure there are a few
other uses for this stand as well. Just give
me some time. PW
2"
1
3
/
4
"
24"
12"
5"
16"
2"
16"
20"
20"
1
1
/
4
"
10
1
/
2
"
3
3
/
4
"
3
/
4
"
1
1
/
2
"
1
1
/
2
"
5
/
16
"
3
1
/
2
"
12
1
/
4
"
2"
3
1
/
2
"
3"
1
1
/
2
"
10
3
/
4
"
1
1
/
2
"
5
/
16
"
Outline of optional roller
B
B
J
A
A
H
F
C
C
I
D
D
E
G
N O . L E T.
I T E M
D I M E N S I O N S ( I N C H E S )
M AT E R I A L
T
W
L
❏
4
A
Column sides
3
⁄
4
3
20
Hardwood
❏
1
B
Post
1
1
⁄
2
3
20
Hardwood
❏
4
C
Feet
3
⁄
4
3
1
⁄
2
16
Hardwood
❏
2
D
Mounting blocks
1
1
⁄
4
1
3
⁄
4
5
Hardwood
❏
1
E
Bottom
1
⁄
2
12
24
Plywood
❏
2
F
Tops
1
⁄
2
12
10
1
⁄
2
Plywood
❏
6
G
Dividers
1
⁄
2
2
12
Plywood
❏
4
H
Backs
1
⁄
2
2
4
1
⁄
2
Plywood
❏
1
I
Fence
3
⁄
4
3
3
⁄
4
24
Hardwood
❏
1
J
Roller block
1
1
⁄
8
2
9
1
⁄
2
Hardwood
H A R D WA R E
N O .
I T E M
❏
1
Star knob, (item# 862214)*, $1.49
❏
1
Threaded rod,
1
⁄
4
"-20 x 3
1
⁄
2
"
❏
4
1
⁄
4
"- 20 hexagonal nuts
❏
1
1
⁄
4
"- 20 square nut
❏
2
1
⁄
16
" x 1
1
⁄
2
" fender washers
❏
2
1
⁄
4
"- 20 x 1
3
⁄
4
" machine bolts
❏
2
1
⁄
4
"- 20 wing nuts
❏
2
1
⁄
4
" lock washers
❏
1
10" roller (item #921635)*, $7.69
❏
1
Bracket set (item #95-505)*, $3.29
CUT-OFF STAND
Wyszukiwarka
Podobne podstrony:
lumber cut off stand
Lumber Cut Off Stand
lumber cut off stand
Cut Off Bin
Pump Cut Off
ace iii cut off scores
Audyt wewnetrzny (SGHowy) Stand Nieznany (2)
arkusz ang stand pr cz2 A
Stand.V.8 kom, Wycena gruntów
bassinet and stand
Jacques Derrida Taking A Stand For Algeria
stand
Make Your Resume Stand out From the Pack
ang PR stand cz1 rozw
rozp zm stand
MicroOven Stand
więcej podobnych podstron