Stirling Walking Beam Engine
By Darryl Boyd
This is a set of plans for a Stirling “hot” air engine. It incorporates a “walking beam” to transfer mechanical actions from one part of the engine to the other. The walking beam is on the upper half of the engine and looks like an old weight scales. Walking beams were quite common on early steam engine of the 1800's.
Caution should be used when building this project. Hazards exist while building any mechanical device and care must be taken during construction and use. We do not assume any liability for damage resulting in the use of the enclosed material.
Things to keep in mind while building and attempting to run for the first time.
Friction is this engine's biggest enemy. It hates anything being too tight. The bearings have to be loose. Sloppy is better than close tolerances.
If you are running the shafts and rods in the wood (I now don't recommend this), it's better to be loose and oiled very well. Friction becomes more of an issue if no bearings are used. I recommend bearings made of brass tubing and sloppy on the shafts.
The piston (1") should fit loose in the cylinder, not tight. This is not a situation where the piston needs to be tight like in an internal combustion engine. It is better to loose some pressure and vacuum that to create too much friction. If it is loose, oil it well (see oiling below) before running. This will help seal the piston without causing too much friction. The lighter the piston, the better also. I make my pistons from 1" alum. rod drilled out in the back. This will slide into 1" copper pipe very nice. I have been told that brake cylinder pistons work very good.
Oiling and lube. You can lube the piston cylinder and the rods and moving parts with a very light oil like WD40 or 3 in 1 oil, but if you use 30 wt oil or something heavy, It will not run. I oil the power cyl. with WD40 and use 3 in 1 oil (sewing machine oil) on every thing else. Make sure you oil the rod that goes into the displacer on the top.
Remember - friction is our mortal enemy.
These engines are very fussy about friction. That is, all the joints and moving part have to be "loose", very loose. If the parts fit too tight, it will not work. This is the reason most of the engines won't work right off. Make it loose (but not sloppy).
Oil the heck out of all the joint and the inside of the power piston cylinder and the rod going into the displacer with something like WD40 or a very light oil.
Page 1
Displacer Cylinder
We will begin with the main section of the engine or “displacer cylinder”. It is made of a spray paint can. There are generally two sizes of spray paint cans. You will be looking for the larger size measuring 7 �” high X 2 5/8” diameter at the base. This is where some care must be observed. With the spray can completely empty, remove the top with a can opener, but leave the top bead on the can. You can see why it is important to have the can empty. If you don't empty the can, you will find paint and propellant coming out everywhere. This could be very dangerous. See Figure No.1
Page 2
Piston Cylinder
Next is the piston cylinder. This is made from a piece of 1” ID seamless tubing. Cut a 3 �” long piece. Cope one end with a round file to pick up the diameter of outside of the displacer cylinder. See Figure No. 2
Main Engine Assembly
Next we will build the main engine assembly. The main engine assembly is made up of the displacer cylinder and the piston cylinder. At 3 7/8” down from the top of the displacer cylinder, braze or silver solder or lead solder the piston cylinder on. Try to keep the piston cylinder 90 degrees to the displacer cylinder. After this is done, drill a 3/8” hole through the displacer cylinder down through the piston cylinder. This will make a port for the air that is expanding during heating to push the piston forward, and when cooled, pull the piston back. This is a double action piston.
Page 3
Top Assembly
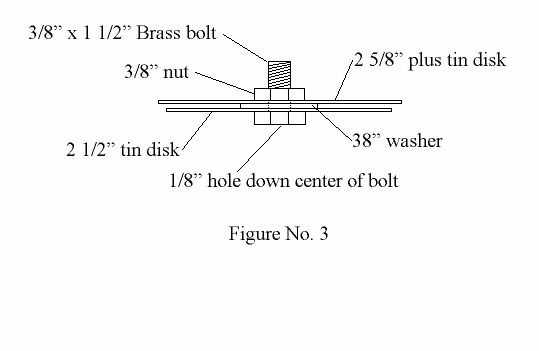
Next we will make the top assembly for the displacer cylinder now part of the main engine assembly. Refer to Figure No. 3. Drill a 1/8” hole through the middle of a 3/8” x 1 �” brass bolt. This is best done with a lath, but if you are very careful, you can use a drill press. Doing it with a hand drill motor is very difficult. Care must be taken to get it straight down the middle. Slightly counter sink both ends of the bolt with a counter sink or a larger drill bit. This counter sink allows for the rod to fit in much easier at a later time, and allows for oiling during running.
Figure 3A
Now you must make two disks from the lids of old tin cans. One must be 2 5/8” plus in diameter and the other 2 �” in diameter. The 2 �” diameter disk must fit inside the top bead of the displacer cylinder. At the center point of each disk, you must drill a 3/8” hole. Be careful when drilling the lids that they don't spin on you and cut your fingers.

Now to assemble the top of the displacer cylinder or top assembly, place the 2 �” diameter disk on the brass bolt, followed by a 3/8” washer, then the 2 5/8” disk, followed by a 3/8” nut. Tighten up just snug. See Figure No. 3.
Page 4
Set these assemblies to the side for now.
Displacer Piston
The next item to make is the displacer piston. The displacer piston goes inside the heat transfer cylinder. Using a small tomato sauce can 3 3/8” tall by 2 1/8” in diameter with the sauce still in it, drill a 1/8” hole in the center of the top and bottom lid. You can remove the tomato sauce from inside by blowing into one side and letting the sauce come out the other hole (not a pretty site!). Rinse with water and try to get as much out as possible. When dry, push a brass 1/8” rod 14” long through the hole on one side through the can and out the other hole. The rod should stick out the other side about 1/16” or so. Solder this rod on at the top and bottom. See Figure No. 4
Page 5
Back to the Main Engine Assemblies
Now take the displacer piston and insert it into the 1/8” hole in the middle of the brass bolt on the top assembly. The rod is inserted into the side with the smaller disk (2 �”). This assembly is placed displacer piston end first into the displacer cylinder and soldered or brazed onto the top of the displacer cylinder. See Figure No. 5
Page 6
Water Tank
The water tank is a 1 quart paint can. In the bottom cut a 2 /12” plus hole. Slide this over the top of the main engine assembly. Solder the tank on making sure it is water tight when done. See Figure No. 6. Water Tank is almost the same as the Fire Box in Figure No. 7 except it does not have the 1/4” to 3/8” holes for venting and the hole in the bottom is only 2 �” plus.
Page 7
Fire Box
The fire box is also made from a 1 quart paint can. Cut a 2 5/8” hole in the bottom and drill 1/4” to 3/8” holes in side around the bottom end. Slide this on the bottom of the main engine assembly. It is held up in place with wires placed in the holes and taken up the side of the main engine assembly and bent over the top lip of the water tank. See Figure No. 6
Page 8
Power Piston

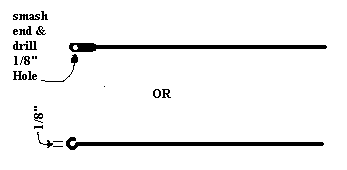
The power piston goes into the piston cylinder on the main engine assembly. It is made up of a 1” piston from an automotive brake cylinder. You can get this from any auto parts store in a rebuild kit or from an auto wrecker. Drill a 1/8” hole in the side about half way down. The connecting rod is a 1/8” x 12” + or - brass rod. I rolled the brass rod around a small needle nose pliers and made a closed loop on the end. I worked it down till it made a good fit. All the joints on this engine wants to be very loose. This engine hates friction and hates to be "tight". Keep it loose. Another way is to smash down the rod if you like and drill it out, just keep it loose. We will put a loop in it later. See Figure No. 8.

Figure 8
Wrist pin.
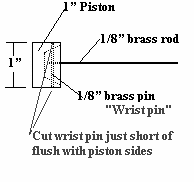
After drilling the hole in the side of the piston (1/8" for 1/8" rod) take a piece of 1/8" rod and slide it through the piston. cut it off just short of the outside of the piston. The wrist pin just sits in the piston and can't come out because of the side walls of the cylinder. Figure 8b
Page 9
Page 10
Stirling Walking Beam Engine
Main engine assembly support. Wood 2 �” W x 1 �” D x 8” H with hole drilled in 1 �” side to accommodate piston cylinder OD at 7 3/16” up.
Walking beam support. Wood �” W x 1 �” D x 17” H with pivot hole at 16 �” from bottom.
Fly wheel. Wood 7 �” diameter x �” thick with hole in center and one at 1 1/8” from center.
Walking beam. Wood �” H x �” D x 13” W with holes as noted in Figure No. 10
Base. Wood 12” x 22” �”. Base can be made smaller if desired.
Fly wheel to walking beam rod. Brass 1/8” round rod x 9 5/8” center to center. I make my rod slightly larger and place a kink in the middle to measure 9 5/8” center to center. This allows me to fine tune the timing of the engine by adding or removing some of that kink.
Piston rod. Brass 1/8” round rod. Length is determined by rotating point “J” to the three o'clock position and placing the piston in the cylinder where it is flush with the end of the cylinder. The rod should be able to reach to point ”J”.
Fly wheel support. 1 �” W x 3” D x 8” H with hole at 7 �” up.
No “I” on drawing.
Crank point on fly wheel 1 1/8” from center of flywheel “C”.
Connecting pin. Brass 1/8” round rod 1 �” center to center shaped as noted on Figure No. 10
Special Notes:
REMEMBER…..While assembly you make things too tight, it won't run. Without the piston installed and the rod from the piston to the flywheel removed, and after oiling up, the entire walking beam and crank and displacer should rotate and move very freely. If you can't get the flywheel to turn around 3 to 5 times freely after spinning the flywheel lightly with your hand (like a roulette wheel), then it is too tight.
Distance between A and B is 15/16”
Distance between A and H is 5”
The face of C and D and the centerline of the piston cylinder and the main engine assembly are all on the same plane.
Crank Point J is made from a 10-32 machine screw.
The pivot point on the walking beam is made with a 10-32 machine screw or can be screwed into B with a wood screw, but hole in B must have clearance to move freely.
You can make this engine too tight. It runs best when there is a bit of “slop” in all the moving parts except the piston which should not be too tight either.
Where moving bolts or shafts make pivot points or bearings in wood, you can “line” the wood with brass tubing from hobby shops or hardware stores. This will create a “bearing” so the machine screws are running on brass and not wood. This is highly recommended.
Put water in upper cooling tank and use sterno for fuel. Other things can be used as fuel also. Don't make it too hot, but it will not run if it is too cold.
Keep all moving joints well oiled.
Fly wheel rotates in a counter clockwise direction.
Oil all joints before operating.
Start heat and rotate fly wheel where the “crank point” is down. As the engine heats up you will see the piston try to push out of the cyl. slightly. This will rotate the fly wheel just a little. This happens as the air in the main cyl. heats up and expands. This will be an indication the engine is almost ready to start.
The air in the bottom of the main engine assembly heats up when the displacer piston is in the up position. The air expands and pushes the piston out rotating the flywheel and moving the walking beam in the opposite direction. That lowers the displacer piston down, pushing the heated air up into the top of the main engine assembly. The air now cools rapidly with the aid of the water tank. The air condenses and pulls the piston back into the piston cylinder, which rotates the flywheel and moves the walking beam in the opposite position, which raises the displacer piston to the upper position forcing the cool air down to the bottom where it is heated again and the cycle starts all over.
As the water in the top heats up the engine will run slower because there is less of a difference between the hot side and the cold side. This engine will run at different speeds depending on the difference between temps of the water in the upper tank and the heat source.
© Darryl Boyd
April 2001, January 2003, Feb 2003
darryl@boydhouse.com
Page 12
Wyszukiwarka
Podobne podstrony:
How Make An Stirling Motor
How to make an inexpensive exte Nieznany
How to Make an Atomic Bomb
How To Make An Origami Star Knife (Aka Ninja Death Star, Shuriken)
How to make an inexpensive exte Nieznany
How To Make An Igloo
Tutorial How To Make an UML Class Diagram In Visio
How To Make An Origami Star Knife (Aka Ninja Death Star, Shuriken)
Logan How to make an Orgone field pulser (sample) (2005)
GUE 2B Bauanleitung 11 03 STIRLING MOTOR
How I built an electricity producing wind turbine
więcej podobnych podstron