
http://www.instructables.com/id/How_I_built_an_electricity_producing_wind_turbine/
How I built an electricity producing wind turbine
on September 17, 2008
Table of Contents
intro: How I built an electricity producing wind turbine
.
.
.
.
.
.
.
.
.
.
.
.
.
.
.
.
.
.
.
.
.
.
.
.
.
.
.
.
.
.
.
.
.
.
.
.
.
.
.
.
.
.
.
.
.
.
.
.
.
.
.
.
.
.
.
.
.
.
.
.
.
.
.
.
.
.
.
.
.
.
.
.
.
.
.
.
.
.
.
.
.
.
.
.
.
.
.
.
.
.
.
.
.
.
.
.
.
.
.
.
.
.
.
.
.
.
.
.
.
.
.
.
.
.
.
.
.
.
.
.
.
.
.
.
.
.
.
.
.
.
.
.
.
.
.
.
.
.
.
.
.
.
.
.
.
.
.
.
.
.
.
.
.
.
.
.
.
.
.
.
.
.
.
.
.
.
.
.
.
.
.
.
.
.
.
.
.
.
.
.
.
.
.
.
.
.
.
.
.
.
.
.
.
.
.
.
.
.
.
.
.
.
.
.
.
.
.
.
.
.
.
.
.
.
.
.
.
.
.
.
.
.
.
.
.
.
.
.
.
.
.
.
.
.
.
.
.
.
.
.
.
.
.
.
.
.
.
.
.
.
.
.
.
.
.
.
.
.
.
.
.
.
.
.
.
.
.
.
.
.
.
.
.
.
.
.
.
.
.
.
.
.
.
.
.
.
.
.
.
.
.
.
.
.
.
.
.
.
.
.
.
.
.
.
.
.
.
.
.
.
.
.
.
.
.
.
.
.
.
.
.
.
.
.
.
.
.
.
.
.
.
.
.
.
.
.
.
.
.
.
.
.
.
.
.
.
.
.
.
.
.
.
.
.
.
.
.
.
.
.
.
.
.
.
.
.
.
.
.
.
.
.
.
.
.
.
.
.
.
.
.
.
.
.
.
.
.
.
step 4: Building the turbine mounting
.
.
.
.
.
.
.
.
.
.
.
.
.
.
.
.
.
.
.
.
.
.
.
.
.
.
.
.
.
.
.
.
.
.
.
.
.
.
.
.
.
.
.
.
.
.
.
.
.
.
.
.
.
.
.
.
.
.
.
.
.
.
.
.
.
.
.
.
.
.
.
.
.
.
.
.
.
.
.
.
.
.
.
.
.
.
.
.
.
.
.
.
.
.
.
.
.
.
.
.
.
.
.
.
.
.
.
.
.
.
.
.
.
.
.
.
.
.
.
.
.
.
.
.
.
.
.
.
.
.
.
.
.
.
.
.
.
.
.
.
.
.
.
.
.
.
.
.
.
.
.
.
.
.
.
.
.
.
.
.
.
.
.
.
.
.
.
.
.
.
.
.
.
.
.
.
.
.
.
.
.
.
.
.
.
.
.
.
.
.
.
.
.
.
.
step 6: Paint all the wood parts
.
.
.
.
.
.
.
.
.
.
.
.
.
.
.
.
.
.
.
.
.
.
.
.
.
.
.
.
.
.
.
.
.
.
.
.
.
.
.
.
.
.
.
.
.
.
.
.
.
.
.
.
.
.
.
.
.
.
.
.
.
.
.
.
.
.
.
.
.
.
.
.
.
.
.
.
.
.
.
.
.
.
.
.
.
.
.
.
.
.
.
.
.
.
.
.
.
.
step 7: The finished head of the wind turbine
.
.
.
.
.
.
.
.
.
.
.
.
.
.
.
.
.
.
.
.
.
.
.
.
.
.
.
.
.
.
.
.
.
.
.
.
.
.
.
.
.
.
.
.
.
.
.
.
.
.
.
.
.
.
.
.
.
.
.
.
.
.
.
.
.
.
.
.
.
.
.
.
.
.
.
.
.
.
.
.
.
.
.
.
.
.
.
.
step 8: Build the charge controller
.
.
.
.
.
.
.
.
.
.
.
.
.
.
.
.
.
.
.
.
.
.
.
.
.
.
.
.
.
.
.
.
.
.
.
.
.
.
.
.
.
.
.
.
.
.
.
.
.
.
.
.
.
.
.
.
.
.
.
.
.
.
.
.
.
.
.
.
.
.
.
.
.
.
.
.
.
.
.
.
.
.
.
.
.
.
.
.
.
.
.
.
.
.
.
.
.
.
.
.
.
.
.
.
.
.
.
.
.
.
.
.
.
.
.
.
.
.
.
.
.
.
.
.
.
.
.
.
.
.
.
.
.
.
.
.
.
.
.
.
.
.
.
.
.
.
.
.
.
.
.
.
.
.
.
.
.
.
.
.
.
.
.
.
.
.
.
.
.
.
.
.
.
.
.
.
.
.
.
.
.
.
.
.
.
.
.
.
.
.
.
.
.
.
.
.
.
.
.
.
.
step 10: Erect the wind turbine
.
.
.
.
.
.
.
.
.
.
.
.
.
.
.
.
.
.
.
.
.
.
.
.
.
.
.
.
.
.
.
.
.
.
.
.
.
.
.
.
.
.
.
.
.
.
.
.
.
.
.
.
.
.
.
.
.
.
.
.
.
.
.
.
.
.
.
.
.
.
.
.
.
.
.
.
.
.
.
.
.
.
.
.
.
.
.
.
.
.
.
.
.
.
.
.
.
.
.
step 11: Connect the electronics
.
.
.
.
.
.
.
.
.
.
.
.
.
.
.
.
.
.
.
.
.
.
.
.
.
.
.
.
.
.
.
.
.
.
.
.
.
.
.
.
.
.
.
.
.
.
.
.
.
.
.
.
.
.
.
.
.
.
.
.
.
.
.
.
.
.
.
.
.
.
.
.
.
.
.
.
.
.
.
.
.
.
.
.
.
.
.
.
.
.
.
.
.
.
.
.
.
step 12: Enjoy having power in the middle of nowhere
.
.
.
.
.
.
.
.
.
.
.
.
.
.
.
.
.
.
.
.
.
.
.
.
.
.
.
.
.
.
.
.
.
.
.
.
.
.
.
.
.
.
.
.
.
.
.
.
.
.
.
.
.
.
.
.
.
.
.
.
.
.
.
.
.
.
.
.
.
.
.
.
.
.
.
.
.
.
.
.
.
step 13: How much did it cost?
.
.
.
.
.
.
.
.
.
.
.
.
.
.
.
.
.
.
.
.
.
.
.
.
.
.
.
.
.
.
.
.
.
.
.
.
.
.
.
.
.
.
.
.
.
.
.
.
.
.
.
.
.
.
.
.
.
.
.
.
.
.
.
.
.
.
.
.
.
.
.
.
.
.
.
.
.
.
.
.
.
.
.
.
.
.
.
.
.
.
.
.
.
.
.
.
.
.
.
.
.
.
.
.
.
.
.
.
.
.
.
.
.
.
.
.
.
.
.
.
.
.
.
.
.
.
.
.
.
.
.
.
.
.
.
.
.
.
.
.
.
.
.
.
.
.
.
.
.
.
.
.
.
.
.
.
.
.
.
.
.
.
.
.
.
.
.
.
.
.
.
.
.
.
.
.
.
.
.
.
.
.
.
.
.
.
.
.
.
.
.
.
.
.
.
.
.
.
.
.
.
.
.
.
.
.
.
.
.
.
.
.
.
.
.
.
.
.
.
.
.
.
.
.
.
.
.
.
.
.
.
.
.
.
.
.
.
.
.
.
.
.
.
.
.
.
.
.
.
.
.
.
.
.
.
.
.
.
.
.
.
.
.
.
.
.
.
.
.
.
.
.
.
.
.
.
.
.
.
.
.
.
.
.
.
.
.
.
.
.
.
.
.
.
.
.
.
.
.
.
.
.
.
.
.
.
.
.
.
.
.
.
.
.
.
.
.
.
.
.
.
.
.
.
.
.
.
.
.
.
.
.
.
.
.
.
.
.
.
.
.
.
.
.
.
.
.
.
.
.
.
.
.
.
.
.
.
.
.
.
.
.
.
.
.
.
.
.
.
.
.
.
.
.
.
.
.
.
.
.
.
.
.
.
.
.
.
.
.
.
.
.
.
.
.
.
.
.
.
.
.
.
.
.
.
.
.
.
.
.
.
.
.
.
.
.
.
.
.
.
.
.
.
.
.
.
.
.
.
.
.
.
.
.
.
.
.
.
.
.
.
.
.
.
.
.
.
.
.
.
.
.
.
.
.
.
.
.
.
.
.
.
.
.
.
.
.
.
.
.
.
.
.
.
.
.
.
.
.
.
.
.
.
.
.
.
.
.
.
.
.
.
.
.
.
.
.
.
.
.
.
.
.
.
.
.
.
.
.
.
.
.
.
.
.
.
.
.
.
.
.
.
.
.
.
.
.
.
.
.
.
.
.
.
.
Customized Instructable T-shirts
.
.
.
.
.
.
.
.
.
.
.
.
.
.
.
.
.
.
.
.
.
.
.
.
.
.
.
.
.
.
.
.
.
.
.
.
.
.
.
.
.
.
.
.
.
.
.
.
.
.
.
.
.
.
.
.
.
.
.
.
.
.
.
.
.
.
.
.
.
.
.
.
.
.
.
.
.
.
.
.
.
.
.
.
.
.
.
.
.
.
.
.
.
.
.
.
.
.
.
.
.
.
.
.
.
.
.
.
.
.
.
.
.
.
.
.
.
.
.
.
.
.
.
.
.
.
.
.
.
.
.
.
.
.
.
.
.
.
.
.
.
.
.
.
.
.
.
.
.
.
.
.
.
.
.
.
.
.
.
.
.
.
.
.
.
.
.
.
.
.
.
.
.
.
.
.
.
.
.
.
.
.
.
.
.
.
.
.
.
.
.
.
.
.
.
.
.
.
.
.
.
.
.
.
.
.
.
.
.
.
.
http://www.instructables.com/id/How_I_built_an_electricity_producing_wind_turbine/
intro:
How I built an electricity producing wind turbine
Several years ago I bought some remote property in Arizona. I am an astronomer and wanted a place to practice my hobby far away from the terrible light pollution found
near cities of any real size. I found a great piece of property. The problem is, it's so remote that there is no electric service available. That's not really a problem. No
electricity equals no light pollution. However, it would be nice to have at least a little electricity, since so much of life in the 21st century is dependent on it.
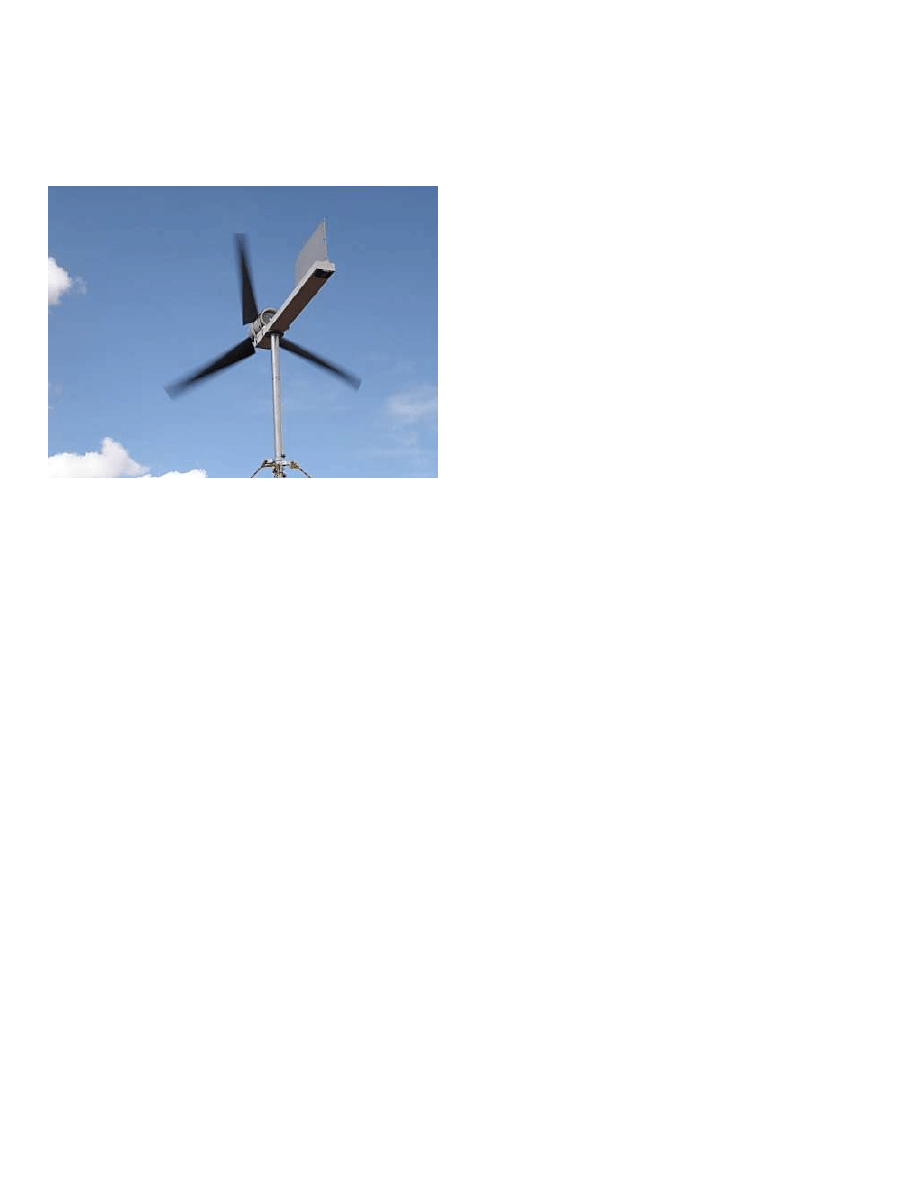
One thing I noticed right away about my property is that most of the time, the wind is blowing. Almost from the moment I bought it, I had the idea of putting up a wind
turbine and making some electricity, and later adding some solar panels. This is the story of how I did it. Not with an expensive, store-bought turbine, but with a home-
built one that cost hardly anything. If you have some fabricating skills and some electronic know-how, you can build one too. More details on this and my other projects
can be found on my web site at
step 1:
Acquiring a generator
I started by Googling for information on home-built wind turbines. There are a lot of them out there in an amazing variety of designs and complexities. All of them had five
things in common though:
1. A generator
2. Blades
3. A mounting that keeps it turned into the wind
4. A tower to get it up into the wind
5. Batteries and an electronic control system
I reduced the project to just five little systems. If attacked one at a time, the project didn't seem too terribly difficult. I decided to start with the generator. My online
research showed that a lot of people were building their own generators. That seemed a bit too complicated, at least for a first effort. Others were using surplus
permanent magnet DC motors as generators in their projects. This looked like a simpler way to go. So I began looking into what motors were best for the job.
A lot of people seemed to like to use old computer tape drive motors (surplus relics from the days when computers had big reel to reel tape drives). The best apparently
are a couple of models of motor made by Ametek. The best motor made by Ametek is a 99 volt DC motor that works great as a generator. Unfortunately, they are almost
impossible to locate these days. There are a lot of other Ametek motors around though. A couple of their other models make decent generators and can still be found on
places like
. This web site talks about the virtues and vices of various Ametek motors when used as generators.
http://www.tlgwindpower.com/ametek.htm
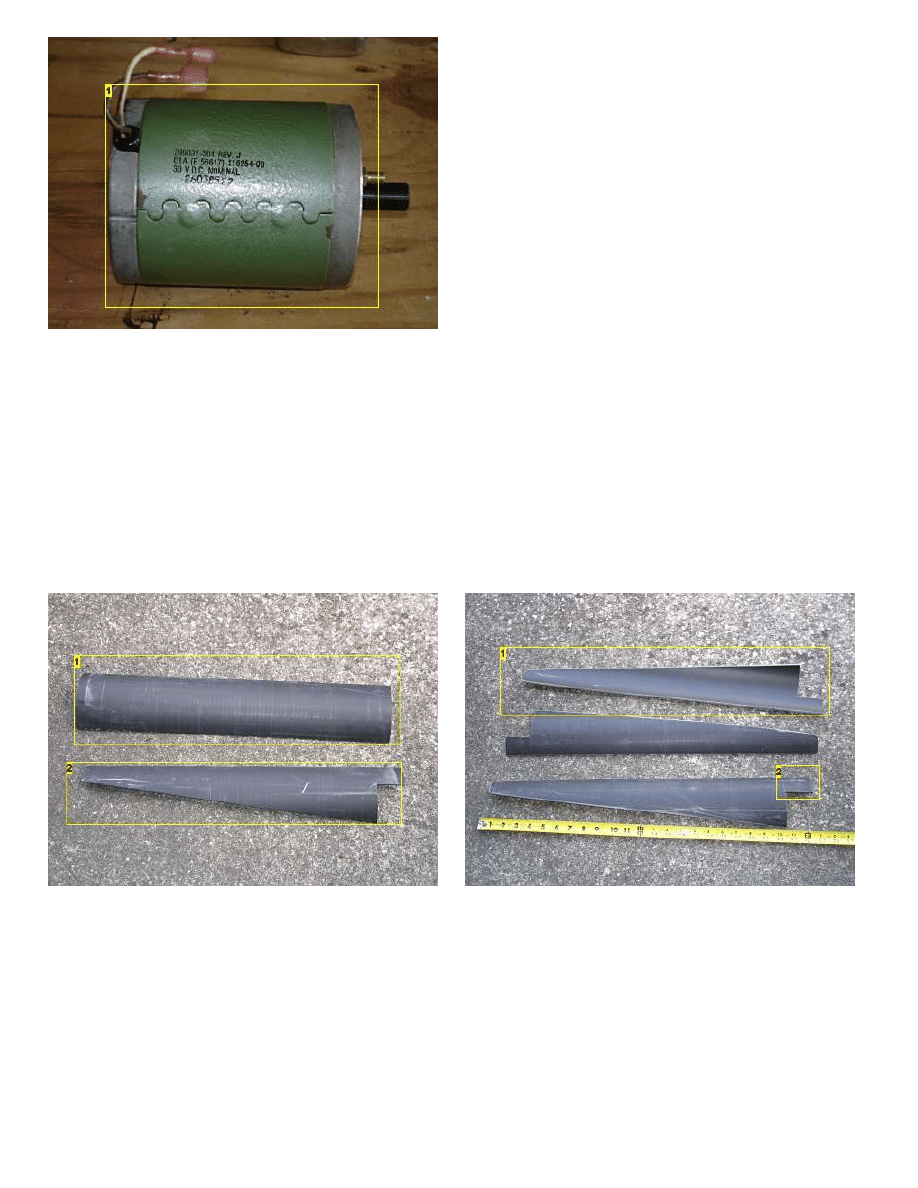
I managed to score one of the good 30 volt Ametek motors off of
for only $26. They don't go that cheap these days. People are catching on to the fact that they
make great wind generators. Other brands will work, so don't fret about the price Ameteks are going for. Shop wisely. Anyway, The motor I got was in good shape and
worked great. Even just giving the shaft a quick turn with my fingers would light a 12 volt bulb quite brightly. I gave it a real test by chucking it up in my drill press and
connecting it to a dummy load. It works great as a generator, putting out easily a couple hundred Watts with this setup. I knew then that if I could make a decent set of
blades to drive it, it would produce plenty of power.
There is more information on how to choose a motor for use as a generator on my web site at
http://www.instructables.com/id/How_I_built_an_electricity_producing_wind_turbine/
Image Notes
1. Surplus Ametek 30V tape drive motor bought on Ebay will be the generator.
step 2:
Making the blades
Blades and a hub to connect them to were the next order of business. More online research ensued. A lot of people made their own blades by carving them out of wood.
That looked like an outrageous amount of work to me. I found that other people were making blades by cutting sections out of PVC pipe and shaping them into airfoils.
That looked a lot more promising to me. This web site tells you how to make a set of blades for a small wind turbine using PVC pipe.
http://www.yourgreendream.com/diy_pvc_blades.php
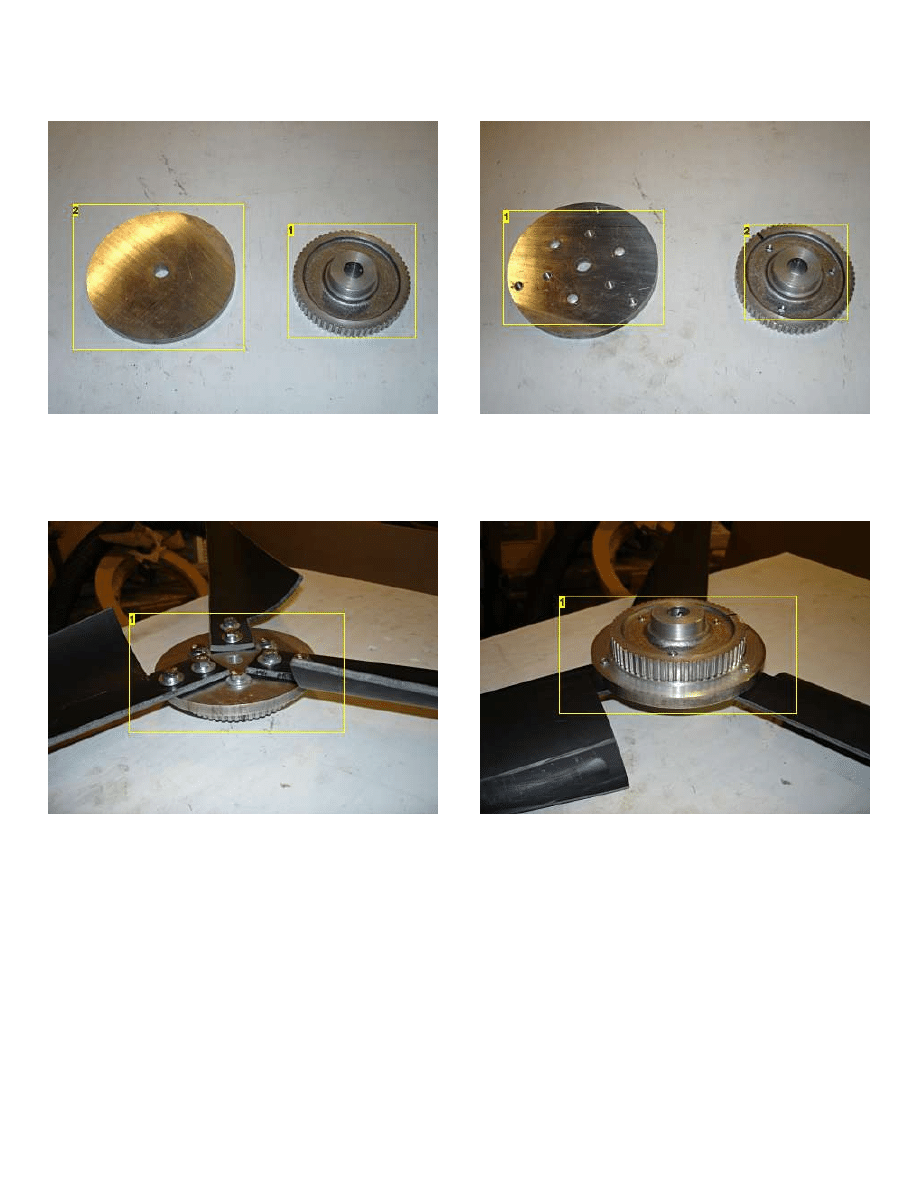
I followed their general recipe. I did things a little differently though. I used black ABS pipe since my local homecenter store just happened to have pre-cut lengths of it. I
used 6 inch pipe instead of 4 inch and 24 inches long instead of 19 5/8. I started by quartering a 24 inch long piece of pipe around its circumference and cutting it
lengthwise into four pieces. Then I cut out one blade, and used it as a template for cutting out the others. That left me with 4 blades (3 plus one spare).
I then did a little extra smoothing and shaping using my belt sander and palm sander on the cut edges to try to make them into better airfoils. I don't know if it's really
much of an improvement, but it didn't seem to hurt, and the blades look really good (if I do say so myself).
Image Notes
1. Cut a piece of plastic pipe 6 inches in diameter and 24 inches long into
quarters lengthwise. A jigsaw comes in handy for this.
2. Shape a blade out of each quarter.
Image Notes
1. I used a sander to round off the rough edges and shape them into better
airfoils
2. These tabs are a problem. I learned the hard way that the blades will
eventually break where the tab joins the body of the blade. I recommend not
bothering making tabs.
http://www.instructables.com/id/How_I_built_an_electricity_producing_wind_turbine/
step 3:
Building the hub
Next I needed a hub to bolt the blades to and attach to the motor. Rummaging around in my workshop, I found a toothed pulley that fit on the motor shaft, but was a little
too small in diameter to bolt the blades onto. I also found a scrap disk of Aluminum 5 inches in diameter and 1/4 inch thick that I could bolt the blades onto, but wouldn't
attach to the motor shaft. The simple solution of course was to bolt these two pieces together to make the hub. Much drilling, tapping and bolting later, I had a hub.
Image Notes
1. A toothed pulley that fits the shaft on the generator, but is too small to bolt the
blades to. Solution: Bolt the two pieces together.
2. A disk of Aluminum large enough to bolt the blades to, but with no method to
attach to the generator.
Image Notes
1. Holes drilled and tapped so the two pieces can bolt together to make the
hub.
2. More holes drilled and tapped.
Image Notes
1. Here the two pieces are bolted together and the blades are bolted on.
Image Notes
1. Another view of the completed hub with the blades mounted.
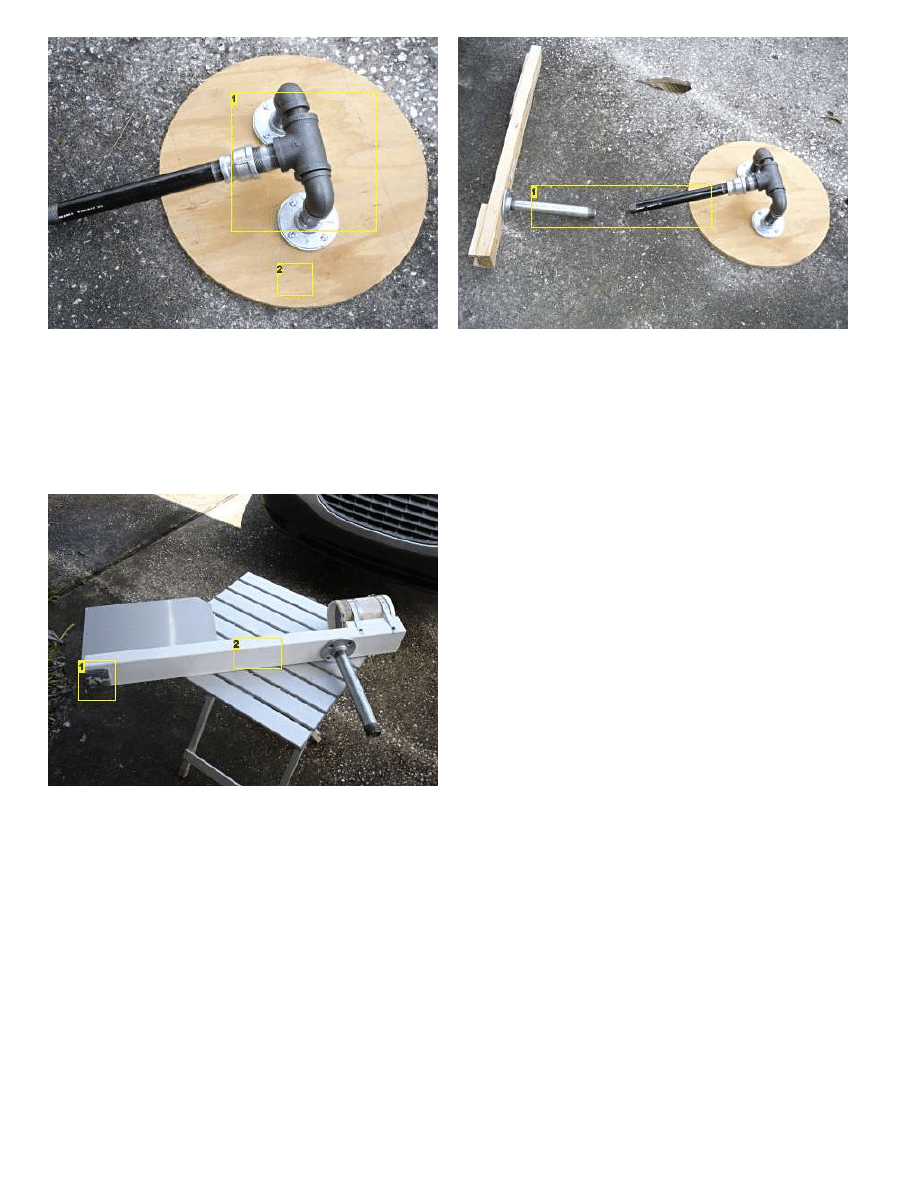
step 4:
Building the turbine mounting
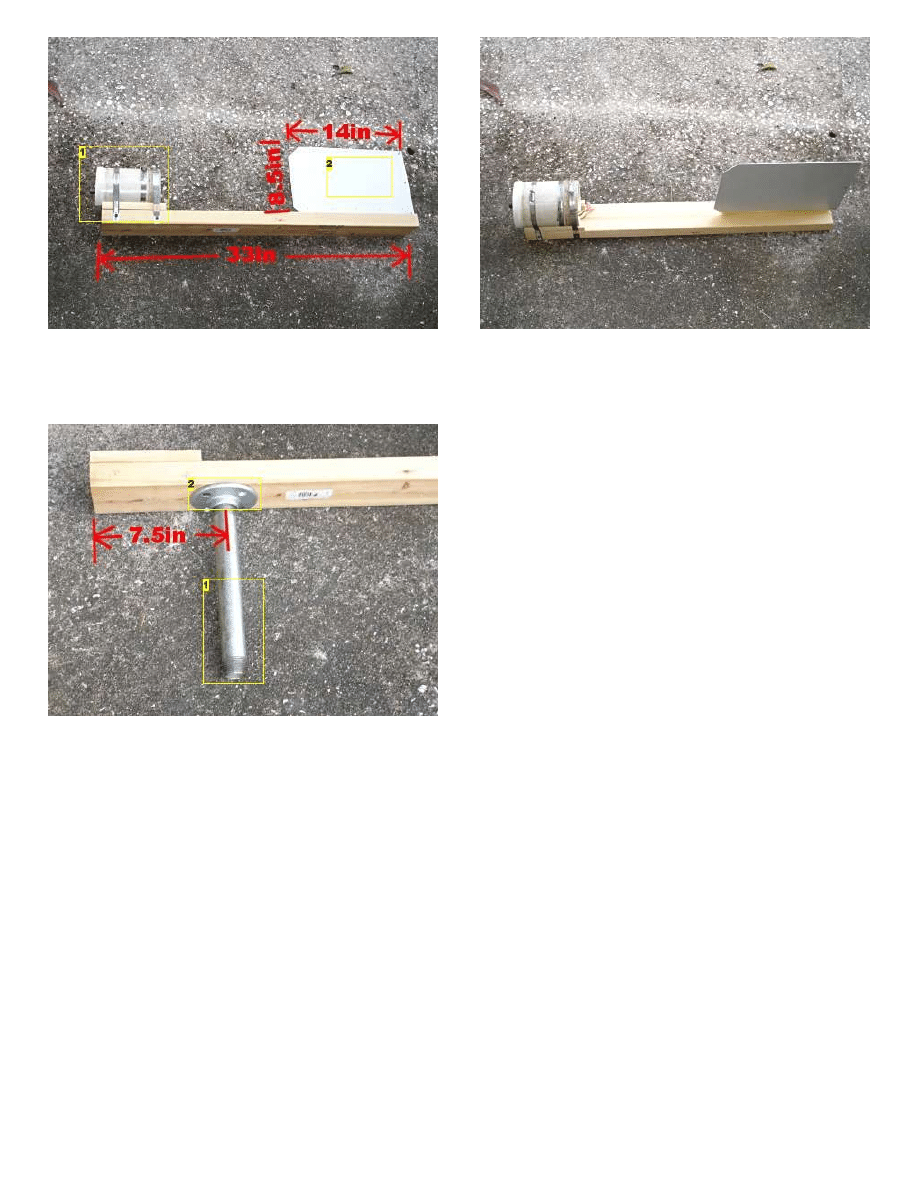
Next I needed a mounting for the turbine. Keeping it simple, I opted to just strap the motor to a piece of 2 X 4 wood. The correct length of the wood was computed by the
highly scientific method of picking the best looking piece of scrap 2 X 4 off my scrap wood pile and going with however long it was. I also cut a piece of 4 inch diameter
PVC pipe to make a shield to go over the motor and protect it from the weather. For a tail to keep it turned into the wind, I again just used a piece of heavy sheet
Aluminum I happened to have laying around. I was worried that it wouldn't be a big enough tail, but it seems to work just fine. The turbine snaps right around into the wind
every time it changes direction. I have added a few dimensions to the picture. I doubt any of these measurements is critical though.
Next I had to begin thinking about some sort of tower and some sort of bearing that would allow the head to freely turn into the wind. I spent a lot of time in my local
homecenter stores (Lowes and Home Depot) brainstorming. Finally, I came up with a solution that seems to work well. While brainstorming, I noticed that 1 inch diameter
iron pipe is a good slip-fit inside 1 1/4 inch diameter steel EMT electrical conduit. I could use a long piece of 1 1/4 inch conduit as my tower and 1 inch pipe fittings at
either end. For the head unit I attached a 1 inch iron floor flange centered 7 1/2 inches back from the generator end of the 2X4, and screwed a 10 inch long iron pipe
nipple into it. The nipple would slip into the top of the piece of conduit I'd use as a tower and form a nice bearing. Wires from the generator would pass through a hole
drilled in the 2X4 down the center of the pipe/conduit unit and exit at the base of the tower. Brilliant! (if I do say so myself)
http://www.instructables.com/id/How_I_built_an_electricity_producing_wind_turbine/
Image Notes
1. Piece of PVC pipe to protect the generator from the weather. Mounted with
large hose clamps.
2. Random piece of sheet aluminum found on my junk pile used as a tail.
Image Notes
1. 1 inch steel pipe 10 inches long used as a bearing.
2. Floor flange screwed to underside of mounting board. A hole drilled through the
board allows the wires from the generator to pass down the center of the flange
and pipe.
step 5:
Build the tower base
For the tower base, I started by cutting a 2 foot diameter disk out of plywood. I made a U shaped assembly out of 1 inch pipe fittings. In the middle of that assembly I put
a 1 1/4 inch Tee. The Tee is free to turn around the 1 inch pipe and forms a hinge that allows me to raise and lower the tower. I then added a close nipple, a 1 1/4 to 1
reducing fitting, and a 12 inch nipple. Later I added a 1 inch Tee between the reducer and the 12 inch nipple so there would be a place for the wires to exit the pipe. This
is shown in a photo further down the page. I also later drilled holes in the wooden disk to allow me to use steel stakes to lock it in place on the ground.
The second photo shows the head and base together. You can begin to see how it will go together. Imagine a 10 foot long piece of steel conduit connecting the two
pieces. Since I was building this thing in Florida, but was going to use it in Arizona, I decided to hold off on purchasing the 10 foot piece of conduit until I got to Arizona.
That meant the wind turbine would never be fully assembled and not get a proper test until I was ready to put it up in the field. That was a little scary because I wouldn't
know if the thing actually worked until I tried it in Arizona.
http://www.instructables.com/id/How_I_built_an_electricity_producing_wind_turbine/
Image Notes
1. Hinge made of pipe fittings to allow for raising and lowering the tower.
2. 4 holes (not shown) were eventually drilled in the base for hold-down
stakes.
Image Notes
1. A ten foot length of conduit will serve as a tower. Both these pipes slide into the
conduit.
step 6:
Paint all the wood parts
Next, I painted all the wooden parts with a couple of coats of white latex paint I had leftover from another project. I wanted to protect the wood from the weather. This
photo also shows the lead counterweight I added to the left side of the 2X4 under the tail to balance the head.
Image Notes
1. Lead counterweight to balance the turbine.
2. Paint all the wood parts to protect them from the weather.
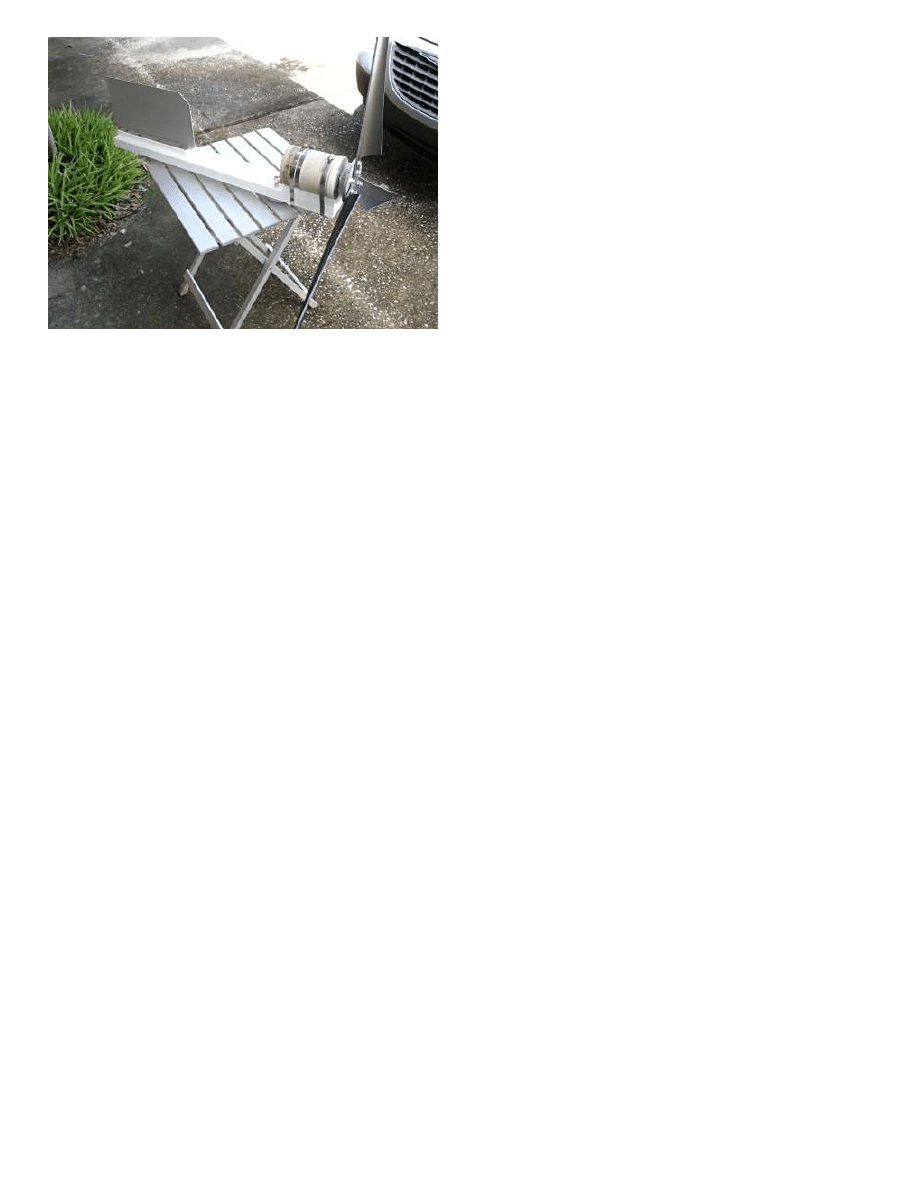
step 7:
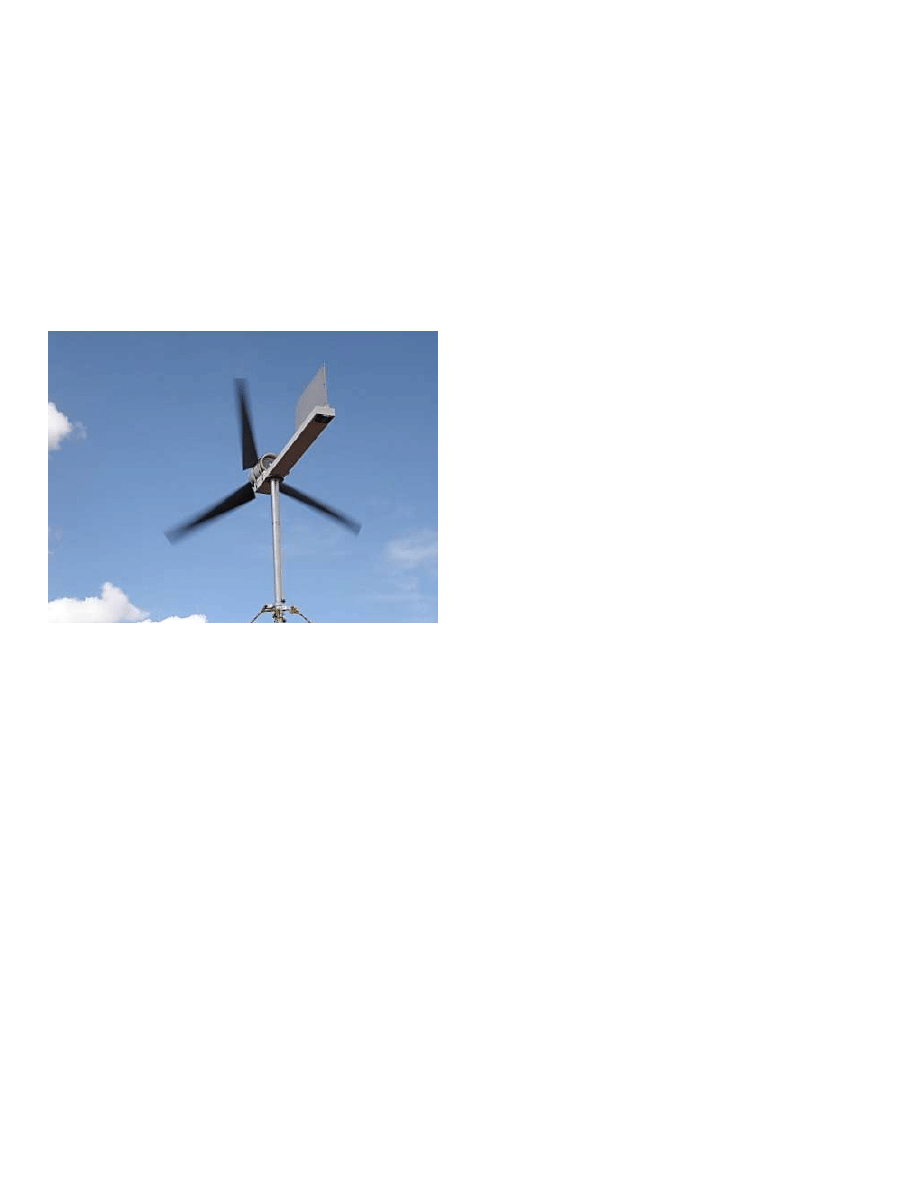
The finished head of the wind turbine
This photo shows the finished head unit with the blades attached. Is that a thing of beauty or what? It almost looks like I know what I'm doing.
I never got a chance to properly test the unit before heading to Arizona. One windy day though, I did take the head outside and hold it high up in the air above my head
into the wind just to see if the blades would spin it as well as I had hoped. Spin it they did. In a matter of a few seconds it spun up to a truly scary speed (no load on the
generator), and I found myself holding onto a giant, spinning, whirligig of death, with no idea how to put it down without getting myself chopped to bits. Fortunately, I did
eventually manage to turn it out of the wind and slow it down to a non-lethal speed. I won't make that mistake again.
http://www.instructables.com/id/How_I_built_an_electricity_producing_wind_turbine/
step 8:
Build the charge controller
Now That I had all the mechanical parts sorted out, it was time to turn toward the electronic end of the project. A wind power system consists of the wind turbine, one or
more batteries to store power produced by the turbine, a blocking diode to prevent power from the batteries being wasted spinning the motor/generator, a secondary load
to dump power from the turbine into when the batteries are fully charged, and a charge controller to run everything.
There are lots of controllers for solar and wind power systems. Anyplace that sells alternative energy stuff will have them. There are also always lots of them for sale on
Ebay . I decided to try building my own though. So it was back to Googling for information on wind turbine charge controllers. I found a lot of information, including some
complete schematics, which was quite nice, and made building my own unit very easy. I based my unit on the schematic of the one found on this web site:
http://www.fieldlines.com/story/2004/9/20/0406/27488
That web site goes into a lot of detail about the controller, so I'm only going to talk about it in fairly general terms here. Again, while I followed their general recipe, I did do
some things differently. Being an avid electronics tinkerer from an early age, I have a huge stock of electronic components already on hand, so I had to buy very little to
complete the controller. I substituted different components for some parts and reworked the circuit a little just so I could use parts I already had on hand. That way I had
to buy almost nothing to build the controller. The only part I had to buy was the relay. I built my prototype charge controller by bolting all the pieces to a piece of plywood,
as seen in the first photo below. I would rebuild it in a weatherproof enclosure later.
Whether you build your own, or buy one, you will need some sort of controller for your wind turbine. The general principal behind the controller is that it monitors the
voltage of the battery(s) in your system and either sends power from the turbine into the batteries to recharge them, or dumps the power from the turbine into a secondary
load if the batteries are fully charged (to prevent over-charging and destroying the batteries). The schematic and write-up on the above web page does a good job of
explaining it. Much more information on building the charge controller, including larger and easier to read schematics, can be found on my web site at
http://www.mdpub.com/Wind_Turbine/index.html
In operation, the wind turbine is connected to the controller. Lines then run from the controller to the battery. All loads are taken directly from the battery. If the battery
voltage drops below 11.9 volts, the controller switches the turbine power to charging the battery. If the battery voltage rises to 14 volts, the controller switches to dumping
the turbine power into the dummy load. There are trimpots to adjust the voltage levels at which the controller toggles back and forth between the two states. I chose
11.9V for the discharge point and 14V for the fully charged point based on advice from lots of different web sites on the subject of properly charging lead acid batteries.
The sites all recommended slightly different voltages. I sort of averaged them and came up with my numbers. When the battery voltage is between 11.9V and 14.8V, the
system can be switched between either charging or dumping. A pair of push buttons allow me to switch between states anytime, for testing purposes. Normally the
system runs automatically. When charging the battery, the yellow LED is lit. When the battery is charged and power is being dumped to the the dummy load, the green
LED is lit. This gives me some minimal feedback on what is going on with the system. I also use my multimeter to measure both battery voltage, and turbine output
voltage. I will probably eventually add either panel meters, or automotive-style voltage and charge/discharge meters to the system. I'll do that once I have it in some sort
of enclosure.
I used my variable voltage bench power supply to simulate a battery in various states of charge and discharge to test and tune the controller. I could set the voltage of the
power supply to 11.9V and set the trimpot for the low voltage trip point. Then I could crank the voltage up to 14V and set the trimpot for the high voltage trimpot. I had to
get it set before I took it into the field because I'd have no way to tune it up out there.
I have found out the hard way that it is important with this controller design to connect the battery first, then connect the wind turbine and/or solar panels. If you connect
the wind turbine first, the wild voltage swings coming from the turbine won't be smoothed out by the load of the battery, the controller will behave erratically, the relay will
click away wildly, and voltage spikes could destroy the ICs. So always connect to the battery(s) first, then connect the wind turbine. Also, make sure you disconnect the
wind turbine first when taking the system apart. Disconnect the battery(s) last.
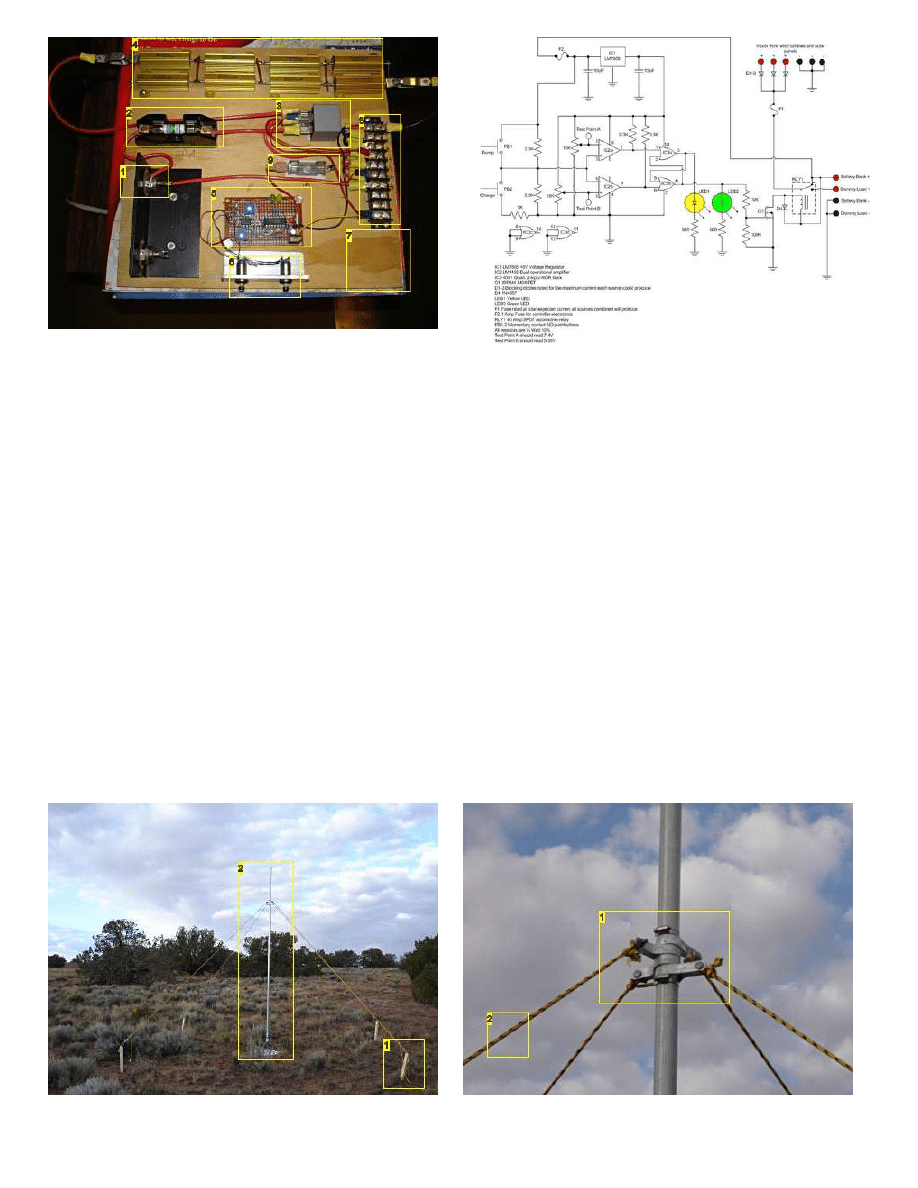
http://www.instructables.com/id/How_I_built_an_electricity_producing_wind_turbine/
Image Notes
1. The blocking diode
2. The main fuse.
3. 40 Amp SPDT automotive relay.
4. Dummy load.
5. Controller electronics.
6. Charge and Dump buttons.
7. I built the prototype charge controller by bolting all the pieces onto a piece of
plywood. Later I would rebuild it in a weatherproof enclosure.
8. Terminal block for connecting everything together, and for connections to the
battery and wind turbine.
9. Fuse for controller electronics.
step 9:
Erect the tower
At last, all parts of the project were complete. It was all done only a week before my vacation arrived. That was cutting it close. I disassembled the turbine and carefully
packed the parts and the tools I'd need to assemble it for their trip across the country. Then I once again I drove out to my remote property in Arizona for a week of off-
grid relaxation, but this time with hopes of having some actual electricity on the site.
The first order of business was setting up and bracing the tower. After arriving at my property and unloading my van, I drove to the nearest Home Depot (about 60 miles
one way) and bought the 10 foot long piece of 1 1/4 inch conduit I needed for the tower. Once I had it, assembly went quickly. I used nylon rope to anchor the pole to four
big wooden stakes driven in the ground. Turnbuckles on the lower ends of each guy-line allowed my to plumb up the tower. By releasing the line from either stake in line
with the hinge at the base, I could raise and lower the tower easily. Eventually the nylon line and wooden stakes will be replaced with steel stakes and steel cables. For
testing though, this arrangement worked fine.
The second photo shows a closeup of how the guy-lines attach near the top of the tower. I used chain-link fence brackets as tie points for my guy-lines. The fence
brackets don't quite clamp down tightly on the conduit which is smaller in diameter than the fence posts they are normally used with. So there is a steel hose clamp at
either end of the stack of brackets to keep them in place.
The third photo shows the base of the tower, staked to the ground, and with the wire from the wind turbine exiting from the Tee below the conduit tower. I used an old
orange extension cord with a broken plug to connect between the turbine and the controller. I simply cut both ends off and put on spade lugs. Threading the wire through
the tower turned out to be easy. It was a cold morning and the cord was very stiff. I was able to just push it through the length of the conduit tower. on a warmer day I
probably would have had to use a fishtape or string line to pull the cord through the conduit. I got lucky.
Image Notes
1. 4 wooden stakes to anchor the guy lines. Eventually will be replaced with
Image Notes
1. A stack of 4 chain link fence brackets used as anchor points for the guy wires.
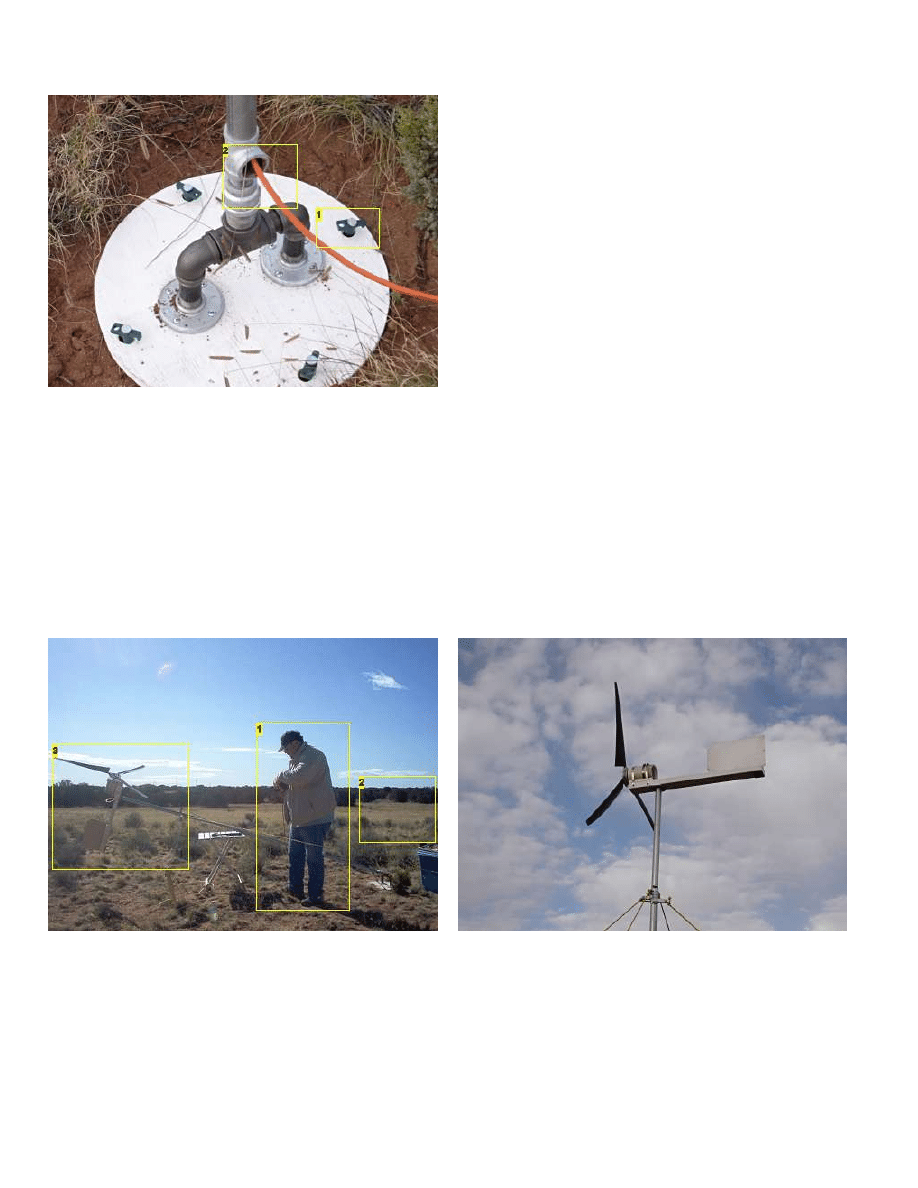
http://www.instructables.com/id/How_I_built_an_electricity_producing_wind_turbine/
steel stakes and steel cables.
2. 10 foot length if 1 1/4 inch conduit used as the tower for the wind turbine.
Steel hose clamps above and below the stack keep them in place.
2. Nylon rope used for guy wires. Will eventually be replaced with steel cables.
Image Notes
1. Stakes driven through holes in the base into the ground to stabilize the base.
2. The power cable from the wind turbine exits the bottom of the tower through
a tee connector.
step 10:
Erect the wind turbine
The first photo shows the turbine head installed on top of the tower. I greased up the pipe on the bottom of the head and slid it into the top of the conduit. It made a great
bearing, just as I'd planned. Sometimes I even amaze myself.
Too bad there was nobody around to get an Iwo Jima Flag Raising type picture of me raising the tower up with the head installed.
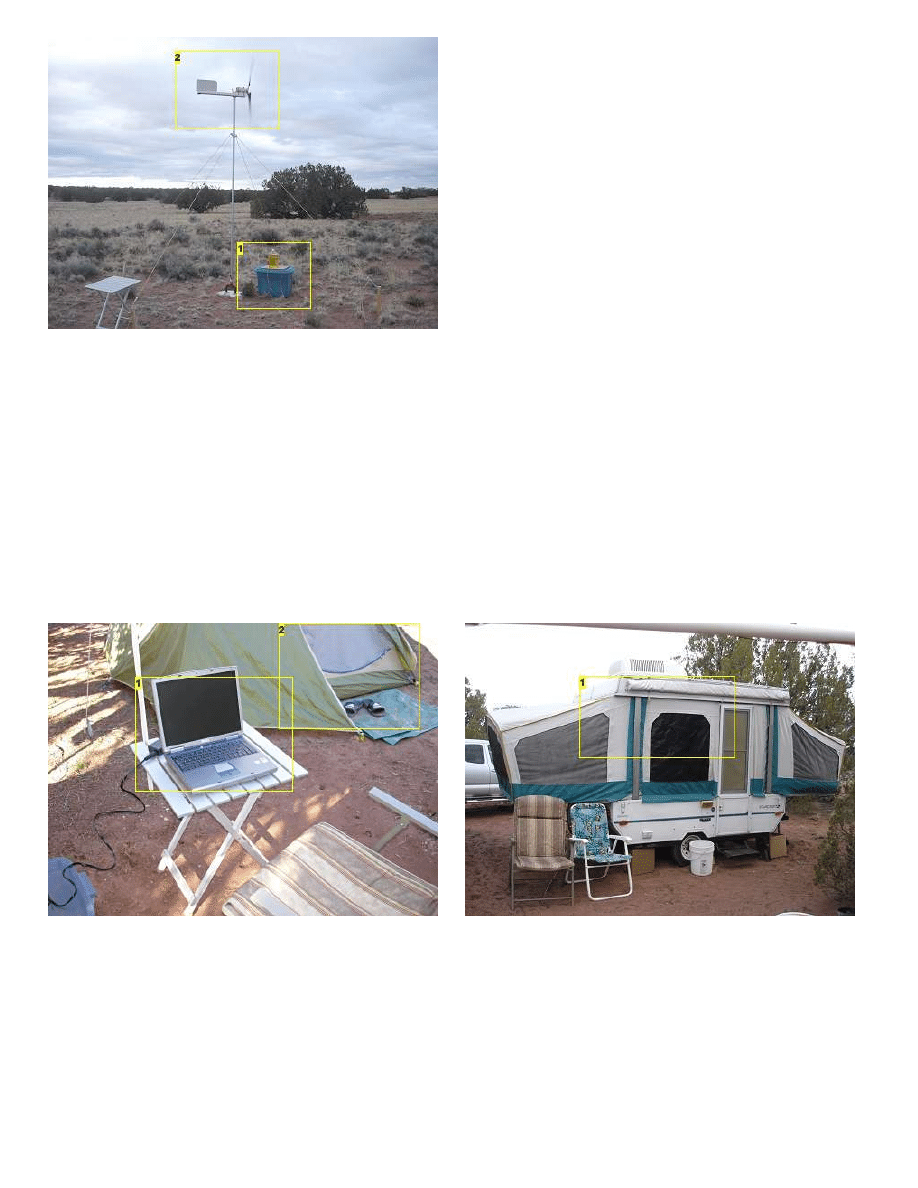
The second photo shows the wind turbine fully assembled. Now I'm just waiting for the wind to blow. Wouldn't you know it, it was dead calm that morning. It was the first
calm day I had ever seen out there. The wind had always been blowing every other time I had been there. Well, nothing to do but wait.
Finally! The wind was up and the turbine was spinning, and the lovely electricity is is starting to be produced.
Image Notes
1. Me.
2. My 40 acre parcel of remote Arizona property.
3. Tower hinged down for installation of the turbine head.
http://www.instructables.com/id/How_I_built_an_electricity_producing_wind_turbine/
step 11:
Connect the electronics
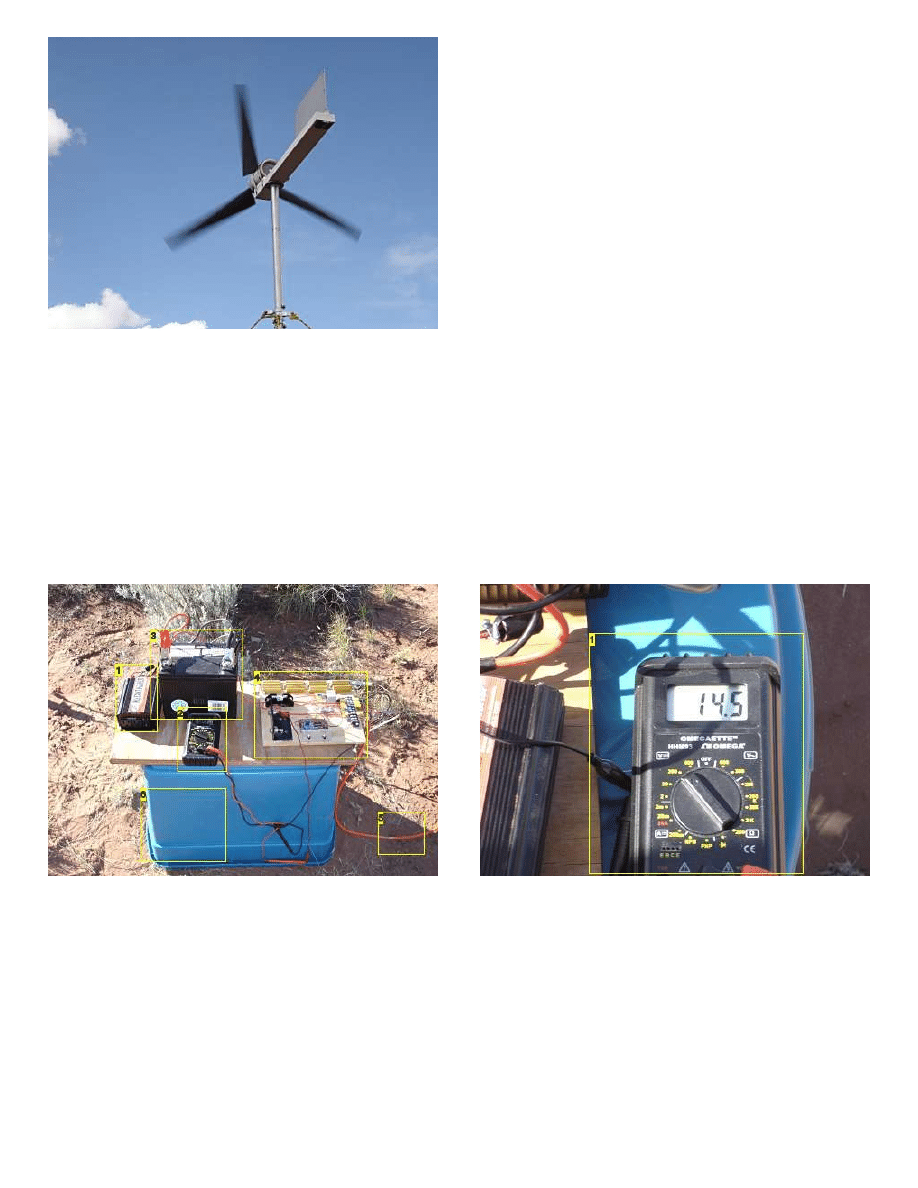
The first photo below shows the electronics setup. The battery, inverter, meter and prototype charge controller are all sitting on a plywood board on top of a blue plastic
tub. I plug a long extension cord into the inverter and run power back to my campsite. Lots more information of the electronics set-up can be found on my web site at
http://www.mdpub.com/Wind_Turbine/
Once the wind starts blowing, the turbine head snaps around into it and begins spinning up. It spins up quickly until the output voltage exceeds the battery voltage plus
the blocking diode drop (around 13.2 volts, depending on the state of the battery charge). it is really running without a load until that point. Once the that voltage is
exceeded, the turbine suddenly has a load as it begins dumping power into the battery. Once under load, the RPMs only slightly increase as the wind speed increases.
More wind means more current into the battery which means more load on the generator. So the system is pretty much self-governing. I saw no signs of over-reving. Of
course in storm-force winds, all bets are off.
Switching the controller to dump power into the dummy load did a good job of braking the turbine and slowing it way down even in stronger gusts. Actually shorting the
turbine output is an even better brake. It brings the turbine to a halt right now, even in strong winds. Shorting the output is how I made the turbine safe to raise and lower,
so I wouldn't get sliced and diced by the spinning blades. Warning though, the whole head assembly can still swing around and crack you hard on the noggin if the wind
changes direction while you are working on these things. So be careful out there.
Image Notes
1. Inverter to provide 120V AC power. I plug an extension cord in here and run it
back to my camp site to provide power.
2. Meter to monitor voltage and current.
3. 12V deep cycle lead-acid battery.
4. Prototype charge controller.
5. Cable to wind turbine
6. Blue plastic tub serving as a table for the electronics set-up. Later I would put
everything inside the tub to protect it from the weather.
Image Notes
1. My meter shows the wind turbine producing 14.5 volts in a stiff wind.
http://www.instructables.com/id/How_I_built_an_electricity_producing_wind_turbine/
Image Notes
1. Electronics put inside a blue plastic tub to protect them from rain showers. The
large jug of lamp oil on top keeps the wind from ripping the lid off.
2. The wind turbine just spinning away in a stiff wind from an approaching storm
front.
step 12:
Enjoy having power in the middle of nowhere
How sweet it is! I have electricity! Here I have my laptop computer set up and plugged into the power provided by the inverter, which in turn is powered by the wind
turbine. I normally only have about two hours of battery life on my laptop. So I don't get to use it much while I'm camping. It comes in handy though for downloading
photos out of my camera when its memory card gets full, making notes on projects like this one, working on the next great American novel, or just watching DVD movies.
Now I have no battery life problems, at least as long as the wind blows. Besides the laptop, I can also now recharge all my other battery powered equipment like my cell
phone, my camera, my electric shaver, my air mattress pump, etc. Life used to get real primitive on previous camping trips when the batteries in all my electronic stuff ran
down.
I used the wind turbine to power my new popup trailer on a later vacation. The strong spring winds kept the wind turbine spinning all day every day and most of the nights
too while I was in Arizona. The turbine provided enough power for the interior 12V lighting and enough 120V AC at the power outlets to keep my battery charger, electric
shaver, and mini vacuum cleaner (camping is messy) all charged up and running. My girlfriend complained about it not having enough power to run her blow-dryer
though.
Image Notes
1. The wind turbine powers my laptop computer, battery charger, electric
shaver,, cell phone, air mattress pump, and lots of other things.
2. The first time I used the wind turbine I was tent camping alone on my
property, and my power needs were modest.
Image Notes
1. On a later camping trip, my girlfriend and I stayed on the property in my popup
camper. The wind turbine powered the lights and provided 120V AC at he outlets
for light loads.
http://www.instructables.com/id/How_I_built_an_electricity_producing_wind_turbine/
step 13:
How much did it cost?
So how much did all this cost to build? Well, I saved all the receipts for everything I bought related to this project.
Part Origin Cost
Motor/Generator Ebay $26.00
Misc. pipe fittings Homecenter Store $41.49
Pipe for blades Homecenter Store $12.84
Misc hardware Homecenter Store $8.00
Conduit Homecenter Store $19.95
Wood & Aluminum Scrap Pile $0.00
Power Cable Old extension cord $0.00
Rope & Turnbuckles Homecenter Store $18.47
Electronic Parts Already on hand $0.00
Relay Auto Parts Store $13.87
Battery Borrowed from my UPS $0.00
Inverter Already on hand $0.00
Paint Already on hand $0.00
Total $140.62
Not too bad. I doubt I could buy a commercially made turbine with a comparable power output, plus a commercially made charge controller, plus a commercially made
tower for less than $750-$1000.
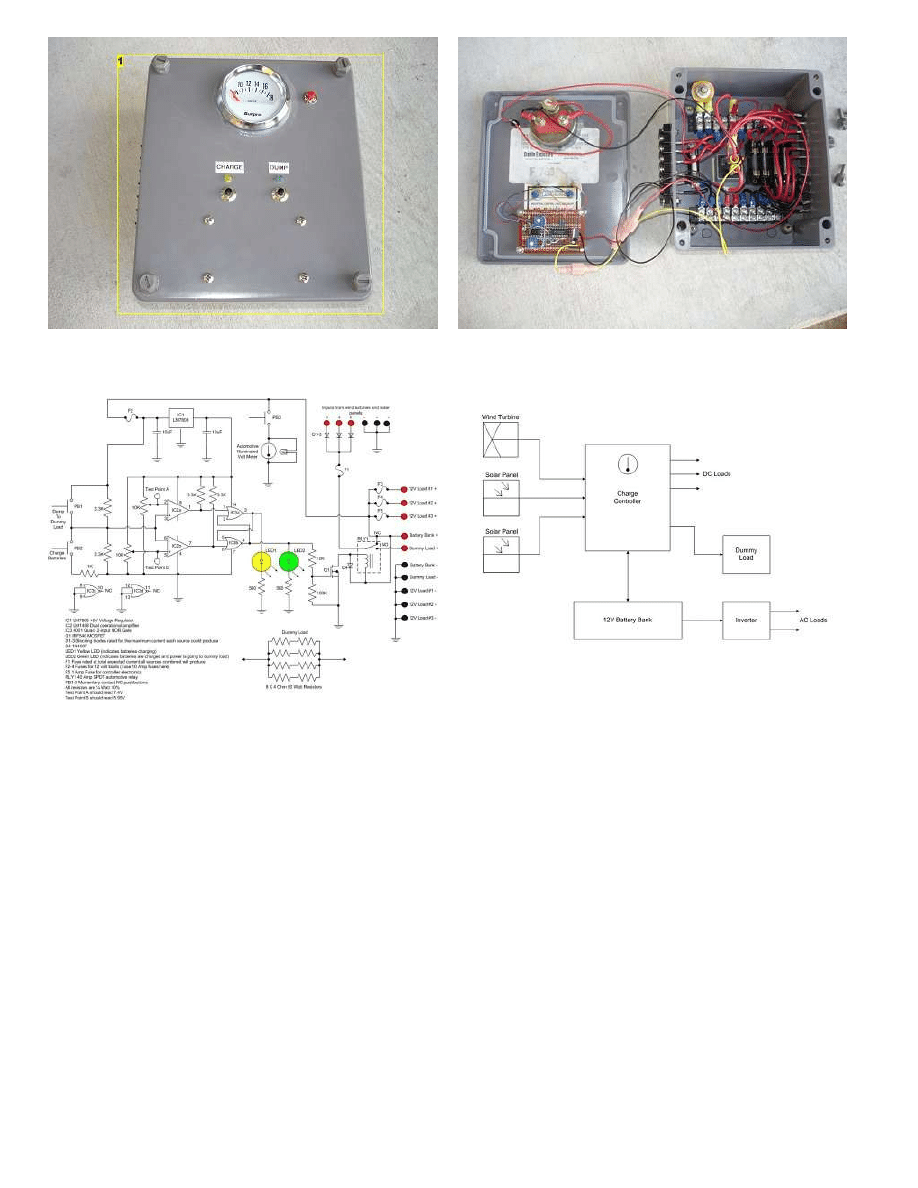
step 14:
Update
I have completed the rebuild of the charge controller. It is now in a semi-weatherproof enclosure and I have also added a built in voltage meter. Both were bought cheap
on
. I have also added a few new features. The unit now has provisions for power inputs from multiple sources. It also has built-in fused 12V power distribution for
three external loads.
The second photo shows the inside of the charge controller. I basically just transferred everything that I originally had bolted onto the plywood board in the prototype into
this box. I added an automotive illuminated voltage gage and fuses for 3 external 12V loads. I used heavy gage wire to try to reduce losses due to wire resistance. Every
watt counts when you are living off-grid.
The third image is the schematic for the new charge controller. It is pretty much the same as the old one above, except for the addition of the Volt meter and extra fuse
blocks for the external loads. A larger, easier to read version of the schematic, and more information on the new charge controller can be found on my web site at
http://www.mdpub.com/Wind_Turbine/
This is a block diagram of the whole power system. Note that I only have one solar panel built right now. I just haven't had the time to complete the second one. Please
visit my home-built solar panel page at
http://www.mdpub.com/SolarPanel/
for more information on home-built solar panels.
http://www.instructables.com/id/How_I_built_an_electricity_producing_wind_turbine/
Image Notes
1. The new charge controller built into a weatherproof box.
step 15:
Update 2
Once again I stayed on my remote property during my recent vacation in Arizona. This time I had both my home-built wind turbine and my home-built solar panel with me.
Working together, they provided plenty of power for my (admittedly minimal) electricity needs.
The second photo shows the the new charge controller unit. The wires on the left side are coming from the wind turbine and solar panel. The wires on the right side are
going to the battery bank and dummy load. I cut up an old heavy-duty 100 ft. extension cord to make cables to connect wind turbine and solar panel to the charge
controller. The cable to the wind turbine is about 75 feet long and the cable to the solar panel is about 25 feet long. The battery bank I am currently using consists of 11
sealed lead-acid 12V batteries of 8 Amp-Hour capacity connected in parallel. That gives me 88 Amp-Hours of storage capacity, which is plenty for camping. As long as it
is sunny and windy, (nearly every day is sunny and windy on my property), the wind turbine and solar panel keep the batteries well charged.

http://www.instructables.com/id/How_I_built_an_electricity_producing_wind_turbine/
Image Notes
1. Wind turbine.
2. Solar panel.
3. My 40 acre parcel of remote Arizona property.
Image Notes
1. Cables bringing power from the wind turbine and solar panel.
2. The new charge controller unit in its weatherproof box.
3. Cables carrying power to the battery bank and dummy load.
Related Instructables
Advertisements
Customized Instructable T-shirts
Comments
50 comments
says:
Nice job but I have a question for all of the people who have made one. What happens when the whole blade motor unit keeps turning in the direction of the
wind and the wires twist and twist inside the pole? Does it get to a point where the wires might break or bind up enough to cause it not to rotate any more? I
really want one bad but can't afford a commercial one and don't have the electrical know how to build one. But I might give it a try. Another project that will
piss off the wife.
says:
All in all, how much would a project like this cost? looking to put this project into action for myself and would like an idea on a rough estimate total cost.
says:
That's in step 13, "How much would it cost?"
says:
Hi that turbine is great, OUTSTANDING you must be very smart i am starting to make one that will power 3 volts not much but ok for me i saw this one on
mdpub.com does it power 30 volts? How much did the generator cost?
Best Regards, Dean

http://www.instructables.com/id/How_I_built_an_electricity_producing_wind_turbine/
says:
Jan 24, 2009. 3:16 PM
It seems you'd increase efficency by wiring the laptop directly into the 12-volt, instead of inverting to to 120 volt and then having the laptops own inverter
convert back to 12 volt.
says:
Jan 25, 2009. 5:56 AM
The laptop doesn't run on 12 Volts. It requires 20 Volts. The external powersupply/charger unit converts 120 VAC to 20 VDC. I suppose I could use a
high efficiency 12 to 20 Volt DC-DC converter and improve efficiency somewhat. But I'm not sure where I would find one.
says:
Jan 25, 2009. 3:43 PM
http://www.powerstream.com/dc2.htm
seems to have a fairly comphrehensive list of DC-DC adapters for laptops. The prices are around $80 though,
so you'd have to work out whether or not it's saving money in long-term over DC-AC-DC system you have going.
says:
Jan 24, 2009. 9:08 AM
would a washing machine motor possibly work?
says:
Jan 25, 2009. 6:04 AM
Most washing machines use AC motors, which really don't work as generators. There is an Australian model of washing machine made by Fisher &
Paykel that uses a motor that can be converted to a generator, but they are hard to find here in the States.
says:
Jan 22, 2009. 5:25 AM
Nice simple to build design for the turbine. I'm a little intimidated by the electrical is there some kind of off store built system you can use in it's stead. I was
also wondering also if it isn't too intrusive were abouts in Arizona do you have your property, just a general area nothing too specific for your peace of mind. I
have been looking at property in Arizona for the same reasons, got my scope and want a place to go, and I wondering what area's are good.
Thanks, for a Really Useful project.
Gordon Kern
says:
Jan 25, 2009. 6:00 AM
There are commercially available charge controller units. I just preferred to build my own. But you could buy an off the shelf unit.
If you take a map of Arizona and draw a line between St. Johns and Snowflake, my property is almost dead center between those two towns.
says:
Jan 22, 2009. 5:41 AM
Nice work friends!!!
says:
Sep 28, 2008. 5:16 AM
I've been asking around the net but no one seems to want to answer me. Can you connect a motor to a dynamo and the dynamo to the motor which will give
you an unlimited supply of electricity? Assuming that there is no such thing as wear and tear. Of course maybe you'll need to spin the dynamo yourself first
but after that, could that circuit give you an endless supply of electricity?
says:
Jan 18, 2009. 7:40 PM
Dude. No. Read a physics book. The conservation of energy applies everywhere.
says:
Jan 13, 2009. 8:18 PM
Tesla, who was a genius at AC and DC Voltages and how to control them. He Designed a way to take DC to incredible Voltages and then run them thru
a spark gap and then trap or quench them in such a way to stop the electrons and let pure energy thru. This energy he called "radiant" and he said it was
the very wheel work of nature and considered it better than AC/DC. Once "radiant" energy is released, the more load you give it the more it provides and
becomes self sustaining. Hope this helps.
says:
absolutely not. resonance is the closest thing and still absolutely not.
says:
You can never do that on our earth. There's way too many forces acting on the machines when you're not looking. For example, your machine may
encounter air friction, disturbing the energy equilibrium. Even if you , in a hypothetical scenario, manage to get it running for at least a minute, even the
energy of photons deflected from it will be enough to send it into chaos.
Of course, in outer space, find a place without gravity and newton's first law ensures perpetual motion, even without a dynamo and a motor.

http://www.instructables.com/id/How_I_built_an_electricity_producing_wind_turbine/
says:
What you are dreaming of is "perpetual motion"!! The energy losses in the system will always result in the system winding down and stopping. you will
have to add more energy to the system in order for it to do "work".
Hope this helps you in your quest !!!
says:
well actually scientists have thought of a way to get infinite conductivity, its a theory. This theory states that if a certain plastic was to freeze to
absolute zero then the conductivity would be infinite. Such as if you have a loop of this frozen plastic and send a pulse of elec. into it it will continue
forever. but its a theory so who knows.
says:
Dec 14, 2008. 9:55 AM
To get anything to the temperature known as "absolute zero" or 0 kelvin, it will require an infinite amount of energy, which defeats the purpose of
making a perfect conductor. It would be a very cool thing, but more of a baking soda + vinegar experiment, with no real practicality
says:
absolute zero is impossible to reach (except maybe in space)
says:
well actually it wouldn't require infinite, but yes it would need a lot, you know people are almost there already? so yeah maybe not infinite but
a great deal
says:
Dec 14, 2008. 6:02 PM
0 Kelvin is a theoretical temperature, in which there is actually no heat, or no movement, however you would like to interpret it. It was
established essentially to be the beginning of the scale, since you have to start somewhere. It is theoretical because it is the temperature
at which electrons stop moving around the nucleus.
However, what you were saying before is correct about superconductivity. Some materials do show this unusual property at very low
temperatures, things like 1/1,000,000,000th of a degree over 0 Kelvin.
Quoted from Wikipedia:
"Though it is not theoretically possible to cool any substance to 0 [2]K, scientists have made great advancements in achieving
temperatures close to absolute zero, where matter exhibits quantum effects such as superconductivity and superfluidity. In
2000 the Helsinki University of Technology reported reaching temperatures of 100 pK (1×10?10K), which is the coldest temperature ever
produced in a lab."
Very cool (get it?) stuff indeed though!
says:
Dec 17, 2008. 4:21 PM
intresting...ok well, if 0 kelvin isnt THEORETICALLY possible then at least we've got the next best thing right? :)
says:
Sep 28, 2008. 5:34 AM
No. What you are envisioning is a perpetual motion machine. They are impossible. They violate several laws of physics. You can never get as much
energy back out of a system as you put in, let alone an endless amount.
says:
Jan 12, 2009. 9:26 PM
i am just wondering how much energy it puts out
says:
Jan 7, 2009. 12:53 PM
With our economy I'm looking at some land in central Oregon. This would be a good article to submit to Mother Earth News.
says:
nice job
says:
i wish you had taped that that would have made my day

http://www.instructables.com/id/How_I_built_an_electricity_producing_wind_turbine/
says:
i was thinking of making a small, experimental wind turbine out of a few computer fans, i am planning to use about 5 or 6 inline, would they generate much
electricity? In science at school my teacher said that any motor could be a generator, but it just might not be a very efficient one.
says:
Most computer fans use brushless DC motors, and unless I'm mistaken, I don't think brushless motors will act as generators. Someone feel free to
correct me if I'm incorrect.
says:
they won't
says:
Thank you. I do wonder what the next best small scale alternative is?
says:
I tried it with 2" abs 10" long it works great
says:
Jan 2, 2009. 11:40 PM
why would u dump electricity? just connect a bulb and have a light or something.
says:
I would like to know what are some alternative generators (/motors) that can be used for this project instead of something that may be hard to find. I
understand it takes a certain type of generator to accomplish this but additional list of devices would be nice instead of just the Ametek motors.
Does any one have other motors to be able to use for this type of project?
says:
The type of Ametek motor I used isn't really all that hard to find, but they have gotten very expensive as people have come to realize they make great
generators for wind turbines. There are other alternatives. Just about any permanent magnet DC motor rated for relatively high voltage and relatively low
RPMs would make a decent generator. Motors from battery powered electric lawn mowers, battery powered floor buffers and lots of types of servo
motors would work too. Also lots of other industrial DC motors.
says:
how bout a vacuum?
says:
i like your design. but can you tell me where to find a good used dc motor?
says:
treadmills
says:
can you tell me
why cannot we measure current at nutral point
says:
Well done mdavis 19! Nice web page also.
For those of you wanting to know more about slip rings try this
,.
If you don't find the two photos of a red plastic stuff on top of a tower, let me know.
As you can see, there are tree ring and tree double brushes.
Good luck!
says:
very very very verygood wind turbine

http://www.instructables.com/id/How_I_built_an_electricity_producing_wind_turbine/
says:
that's really cool!
says:
Kudos on a great project, and also on your 60 watt PV panels. Great to see Yankee enginunity work.
says:
I'm no physicist, but would adding blades increase your efficiency, or diminish it?
Great Job! I like it!
says:
From what I understand, turbines with even numbers of blades tend to suffer badly from vibration. So you have to add blades two at a time. More blades
means more torque, but also more drag and slower speeds. Eventually you wind up with turbines like the water pumping mills you see on farms and
ranches that have lots of blades and turn slowly, but have tremendous torque. Generators like to turn fast, so most electricity generating wind turbines
don't have more than 5 blades. Three is more normal.
says:
Eventually the wire coming down from the generator could possibly twist until it breaks. Have you investigated some means of connecting the generator
through brushes or something?
says:
have you seen the brakes that are used for BMX bikes? something like that would be great to prevent breakage...
says:
Any info or contacts for building bicycle driven electric generator? You know like the one the Professor on Gilligan's Island had to run the transitor radio.
Wyszukiwarka
Podobne podstrony:
[Engineering] Electrical Power and Energy Systems 1999 21 Dynamics Of Diesel And Wind Turbine Gene
Innovative Solutions In Power Electronics For Variable Speed Wind Turbines
Distillation How to build an Electric Still
piggott how to build a wind turbine
HOW TO fit an electric shower
Wind Turbine Connected to Electrical
[2001] State of the Art of Variable Speed Wind turbines
3 Wind Turbine PL
CEI 61400 22 Wind turbine generator systems Required Design Documentation
How Make An Stirling Motor
1801 Design Analysis of Fixed Pitch Straight Bladed Vertical Axis Wind Turbines
[2006] Application of Magnetic Energy Recovery Switch (MERS) to Improve Output Power of Wind Turbine
DIY 1000 watt wind turbine id 1 Nieznany
Darrieus Wind Turbine Design, Construction And Testing
How Make An Stirling Motor
więcej podobnych podstron