POLISH-JAPNESE INSTITUTE OF INFORMATION TECHNOLOGY Warsaw, 2000
Henryk A. Kowalski, M.Sc.
CorelDRAW 8 Lesson 2 ver.1.0 Short Summary
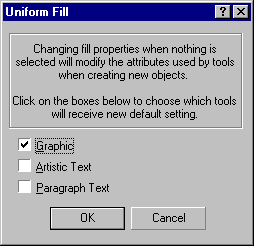
Very Important Note:
If no object is selected and you choose a function the dialog box with information that you try to change the default settings is shown. Click on the Cancel button!
8. Organizing objects
Welding objects
Combining objects
9. Shaping ellipses and rectangles
Changing an ellipse to an arc or a pie shape
Round the corners of a rectangle or a square
Converting an ellipse or rectangle to a curve object
10. Creating effects with text
Fitting text to an open or closed path
11. Special effects
Remove an effect.
11.1 Contouring objects
Setting color progressions in a contoured object
11.2 Extruding an object
Filling extrusions
Rotating an extrusion
11.3 Adding drop shadows to objects
11.4 Working with envelopes
Exercise 1: A keyhole
Draw a cycle and a rectangle.
Round the corners of the rectangle. Simply position the cursor over the node (the cursor changes to the Shape tool cursor) and drag the cursor as necessary.
Put the rectangle over the cycle and weld.
Apply a texture using the Texture Fill dialog box.
Select the object with the Pick tool. Open the Fill Tool flyout, and click Texture Fill Dialog. Choose a library containing the texture (Samples) you want from the Texture Library list box. Choose a texture you want from the Texture list box (Gouache wash). The Preview window inside the dialog box displays the fill attributes that are assigned to the selected object.
Exercise 2: Pie Chart (Extrude)
Draw a big yellow ellipse. (select it)
Choose EFFECTS/Extrude. (Open the Extrude Roll-Up.)
Click the Vanishing Point Page tab. (It looks like a short piece of rail.)
Choose an extrusion type Back Parallel from the top list box.
Click the Color Wheel tab.
Click the From color picker, then click the color you want at the start of the gradient fill's color progression.
Click the To color picker, then click the color you want at the end of the gradient fill's color progression.
Drag the vanishing point marker (represented by “X”) to set the depth and direction of the extrusion.
Click the Apply button. (Observe the control ellipse and Extrusion Group in the Object Manager dockers.)
To edit extrusion effect select the object you want to edit and click the Edit button on the Extrude Roll-Up.
Copy the ellipse, change the fill color and create a pie shape. Put it on the top of ellipse. (If you copy the ellipse with the effect choose EFFECTS/Clear Extrude).
Exercise 3: ABCD
Write the word "ABCD" (Artistic text , color is unimportant) with Font: Arial Black, Font Size: 100, in the center of the Drawing Page.
Note: Choose Text Tool, click on the Drawing Page (create the new object Artistic Text) and then change options).
Choose the Shape tool.
Select the node of the first character. (Small, white square located left to the character. After selection it turns black.)
Drug it down. Set the blue fill and the yellow 8-point outline.
Double click on the node of the second character (open Format Text dialog box). Click the Align tab.
Type appropriate rotation and shift value of the character. Click Apply button. Don't click on OK button.
Apply rotation to other characters.
Choose Interactive Fill Tool.
Click on the first character and drag over the last character.
Apply linear fountain fill from blue color to red color. Use the Property Bar options.
Set the mid-point slider after the first character. (Drag the mid-point slider that appears inside the object.)
Exercise 4: Contour effect 1
Draw a big cycle with yellow fill and 8 point blue outline. (Select it.)
Choose the EFFECTS//Contour. (Open the Contour dialog window).
Click the Outside. Set 10 mm offset and 2 steps.
Click the Color Wheel tab.
Click the Outline color picker, then click the color you want at the end of the outline progression (red color).
Click the Fill color picker, then click the color you want at the end of the fill progression (green color).
Click Apply button.
Try out another options: To center, Inside, and Color progression clockwise or counterclockwise.
Exercise 5: Contour effect 2
Type an Artistic Text and apply the Contour effect.
Exercise 6: NEON (interactive extrude)
Set the landscape orientation of the Drawing Page. Use the Property Bar options.
Write the word " NEON " (Artistic text , color is unimportant) with Font: Arial Black, Font Size: 200, in the center of the Drawing Page.
Set the blue fill and the yellow 8 points outline.
Choose the Interactive Extrude Tool.
Click on the text and drag the vanishing point marker (represented by “X”) to position in the upper right corner of the Drawing Page.
Drag the mid-point sliders that appear inside the object towards the upper right corner of the Drawing Page (and back).
Click on the start handle (white square with X marker). The cursor changes the shape to form two arcs.
Click and hold the mouse button in the middle of the dashed line cycle and drag clockwise (X and Y directions).
Click and hold the mouse button outside the dashed line cycle and drag clockwise (Z direction).
Try to position the vanishing point marker in the upper left corner of the Drawing Page with the vertical text orientation.
Exercise 7: A straight-line blend
Draw a red rectangle in the lower left corner of the Drawing Page.
Draw a yellow cycle in the lower right corner of the Drawing Page.
Choose the Interactive Blend Too.
Click the rectangle and drag the end handle over the cycle and release the mouse button. (The end handle appears after you start dragging the object.)
Drag the mid-point sliders that appears inside the object towards the rectangle and next towards the cycle.
Double click on one slider and drug it separately.
Change the number of steps to 50. Use the Property Bar options.
Exercise 9: Blending objects along a freehand path
Draw a red rectangle in the upper left corner of the Drawing Page.
Draw a yellow cycle in the upper right corner of the Drawing Page.
Choose the Interactive Blend Tool.
Hold down ALT key and draw a freehand path from the rectangle to the cycle, then release the mouse button.
Choose the Shape Tool and change the path to form “S” shape.
Exercise 10: Drop Shadow
Draw a small green rectangle (select it).
Choose the Interactive Drop Shadow Tool.
Click the rectangle and drag the end fill handle to position the drop shadow. Release the mouse button.
Change the color of a drop shadow.
Using the Interactive Drop Shadow tool, select the object whose drop shadow color you want to change. Drag a color from the on-screen Color Palette to the end fill handle.
Use the Property Bar option.
Adjust the opacity of a drop shadow. In the Drawing Window, drag the slider to adjust the opacity of the drop shadow.
Exercise 11: Distortion
Choose the Spiral Tool.
Click on the Drawing Page and drag.
Choose the Interactive Distortion Tool.
Click inside the spiral and drag.
For exercise 12 and 13 you can download the multimedia presentation files Lesn1.exe and Lesn2.exe from ftp://ftp.pjwstk.waw.pl/kowalski/grafika/coreldraw (originally located in www.unleash.com).
Exercise 12: HELLO (multimedia)
Write the word " HELLO" (Artistic text , fill None) with Font: Arial Black, Font Size: 50, in the center of the Drawing Page.
Zoom in the text to about 400%. (Open the Zoom flyout and click the Zoom tool. Click and drag diagonally in the Drawing Window to create a marquee box around the area you want to magnify.)
Set the outline width to 1,2 points and color to black. (Open the Outline Tool flyout, and click Outline Pen dialog box.)
Open the Contour Roll-Up.
Select: To center and 0,1 mm offset value. Click on the Color Wheel tab.
Set the Outline color to white.
Set the Fill color to black.
Click Apply.
Exercise 13: Unreal (multimedia)
Write the word " Unreal" (Artistic text , fill blue) with Font: Arial Black, Font Size: 150, in the center of the Drawing Page.
Create the duplicate and move it upwards.
Select the original, open the Outline Pen dialog box, set 80-point width and select Behind fill checkbox. Click OK button.
Select duplicate and place it on the top of the original text. It doesn't have to be perfect.
Set the yellow outline.
Open the Fountain Fill dialog box. Enable Custom checkbox.
Double click on the center of the color blend preview ribbon. Select the white color (first element from the left in the second row in the color palette).
Click on the end color marker of the custom fill (white small square). Select the blue color (third element from the left in the second row in the color palette).
Type in 90 degrees in the Options Angle window.
Select all objects.
Choose the Blend Roll-Up and click Apply.
Wyszukiwarka
Podobne podstrony:
Corel Lesson1
Corel Lesson2
por´¬Żd fizjologiczny ss
lesson4
Lesson15
Corel Paint Shop Pro X Obrobka zdjec cyfrowych cwiczenia
mg ss 2011z 3 w
face painting lesson 3 id 16748 Nieznany
2 3 Unit 1 Lesson 2 – Master of Your Domain
Nie fair by Mroczna88, Fanfiction, Harry Potter, ss hg
cw 2 czesc dosw SS, Szkoła, Chemia
konspekty gimnazjum Lesson Plan 3
grammar lesson mk
konspekty gimnazjum Lesson Plan Ib
konspekty gimnazjum lesson plan 5
A cóż z tą dzieciną 2 głosy (SS) i fortepian
mg ss 2011z 9 w
Etyka w biznesie org 2015 ss
więcej podobnych podstron