p60 (2)
3. Clean up throttle disc by rubbing both sides on ©mery clotb on a fiat piąte and clean edge of the disc all around, being careful not to round the cor-ners or cut into the metal.
4. Clean out idle holes in throttle barrel next to the disc with proper size drills of clean-up tool set described on Page 61. Proper sizes for both holes are listed in "Carburetor Specifications," Page 61.
5. Clean out the slot of all models by inserting tool with .009" blade through slot between the two idle holes.
6. Clean out idle channels with #42 drill. When cleaning vertical idle channel do not completely bot-tom drill as doing so may damage Iow speed needle seat.
7. Clean out Iow speed (idle) needle valve seat hole with correct size drill. The M-64, M-65, M-84, M-88, M-90, and M-97 carburetors are cleaned with #53L drill. The M-641 is cleaned with #53L#2 drill which has a smaller handle. (This tool has two rings around its handle).
8. Blow out all channels and holes with com-pressed air and wash all parts in gasoline.
9. Reassemble parts, being surę lift lever spring seat (washer) is between the spring and carburetor body when assembling the Iow speed lift lever and needle valve assembly back into place. This spring seat or washer limits the air bleed to the idle system and must be in place; otherwise carburetor cannot be adjusted for satisfactory engine idling.
Be surę throttle disc is properly assembled in barrel and closes off tight..Have correct side of disc up or toward flange ahd with the lines previously scratched lining up with each other exactly. Push up shaft collar (on throttle shaft) firmly against body before tightening throttle disc screws. Throttle lever should be clamped to shaft with disc wide open, with throttle lever "wide-open" stop against body lug and with wear take-up spring between throttle lever and bearing.
Attention to Carburetor Bowl
10. If carburetor bowl continually leaks or runs over, remove it from carburetor body and first re-move all dirt by cleaning it out with gasoline and compressed air. Hołd bowl up-side-down so that float valve closes and suck on bottom of float valve seat. Valve and seat should hołd this suction. If valve and seat leak after repeated testing, replace with new float valve and float valve seat.
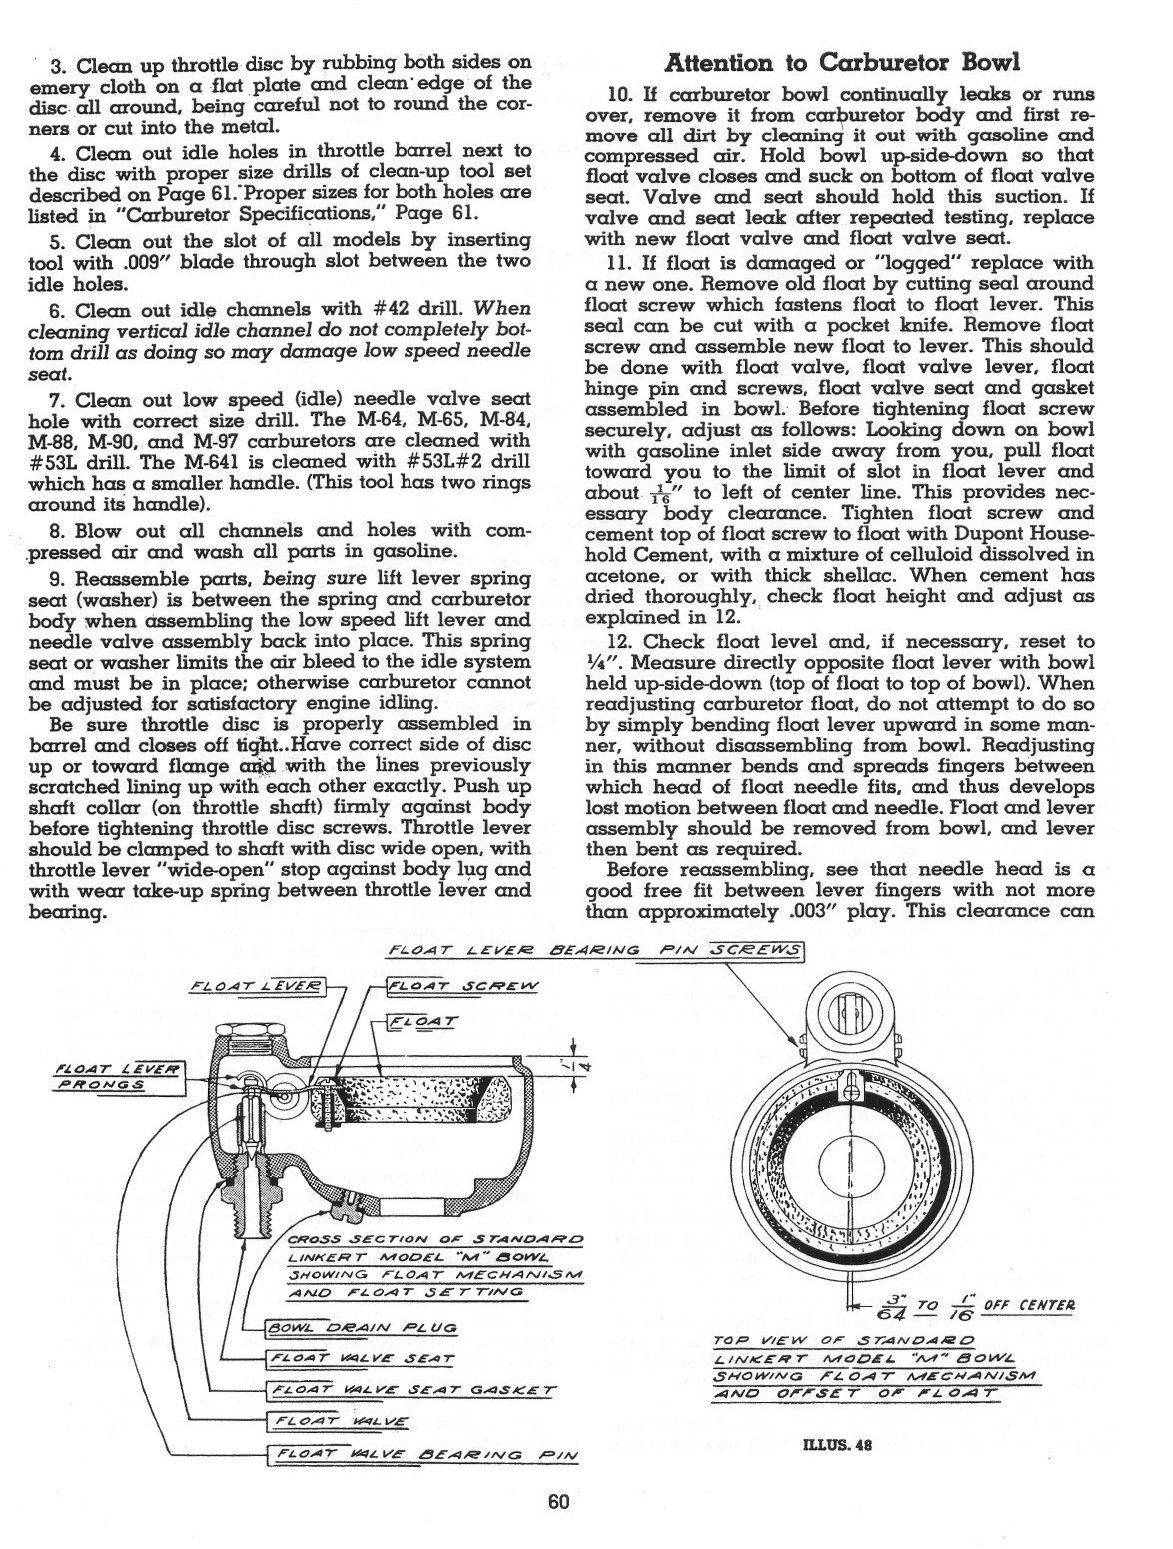
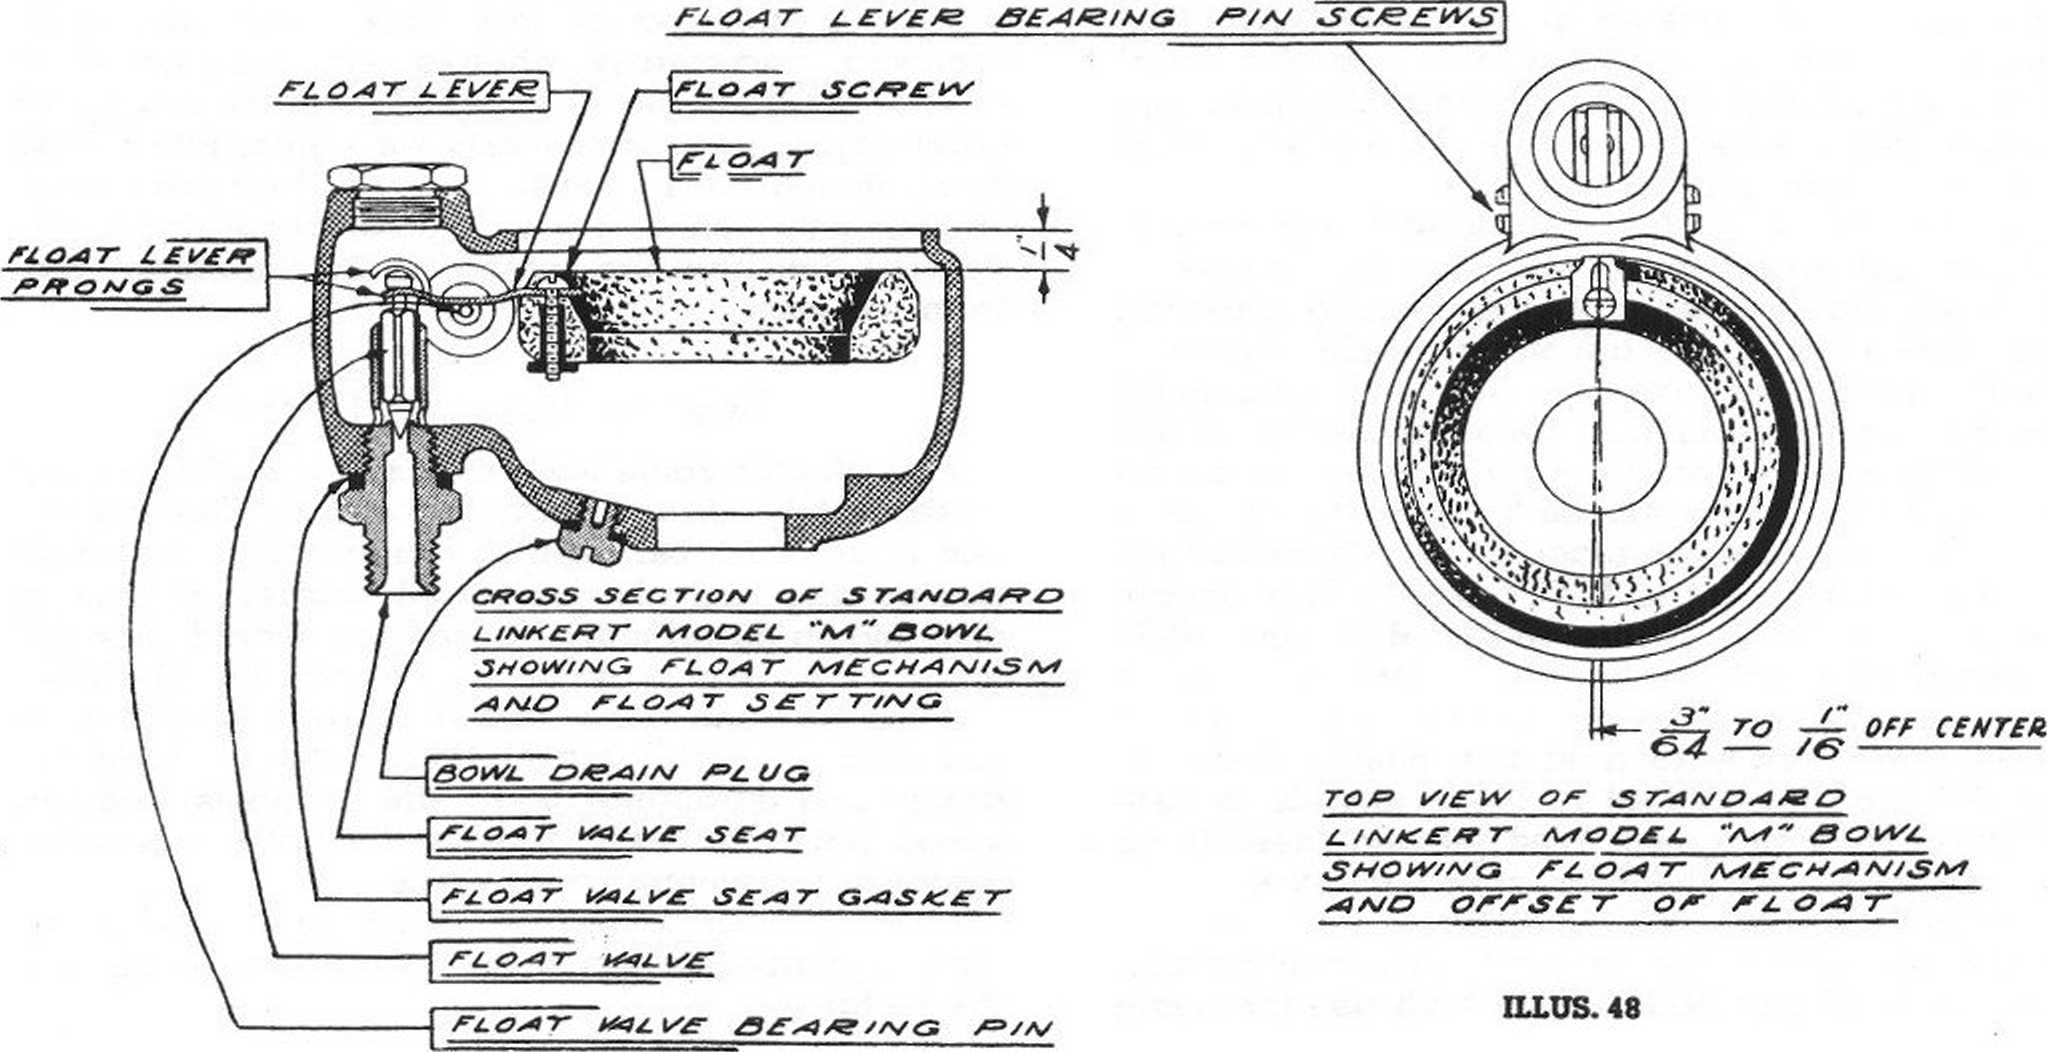
11. If float is damaged or "logged" replace with a new one. Remove old float by cutting seal around float screw which fastens float to float lever. This seal can be cut with a pocket knife. Remove float screw and assemble new float to lever. This should be done with float valve, float valve lever, float hinge pin and screws, float valve seat and gasket assembled in bowl. Before tightening float screw securely, adjust as follows: Looking down on bowl with gasoline inlet side away from you, puli float toward you to the limit of slot in float lever and about 3^" to left of center linę. This provides nec-essary body clearance. Tighten float screw and cement top of float screw to float with Dupont Household Cement, with a mixture of celluloid dissolved in acetone, or with thick shellac. When cement has dried thoroughly, check float height and adjust as explained in 12.
12. Check float level and, if necessary, reset to Vi". Measure directly opposite float lever with bowl held up-side-down (top of float to top of bowl). When readjusting carburetor float, do not attempt to do so by simply bending float lever upward in some man-ner, without disassembling from bowl. Readjusting in this manner bends and spreads fingers between which head of float needle fits, and thus develops lost motion between float and needle. Float and lever assembly should be removed from bowl, and lever then bent as reąuired.
Before reassembling, see that needle head is a good free fit between lever fingers with not morę than approximately .003" play. This clearance can
60
Wyszukiwarka
Podobne podstrony:
the resulting disc by widening thc fre-qucncy response and increasing the dynamie rangę. The difficu
UHAM040 What do they feel like? Most of this chapter is taken up with writings by actual patients th
iris folding Octagon Fold Fold lower comers up to center as shown Fold both sides of top layer down&
59638D6582475379374(4300404 n www.FB.com/TributetoStephenCoveyTHINGS you must give up tomove forward
back (98) % Annę Hooper’sf&MAgUTRA THE ANC1ENT MASTERPIECE OF EROTIC LITERA BROUGHT UP TO DATĘ B
Refemng to Figur* 4-22, begin wcavtng thc iuxklacc by uking both nredles thiougłi one brown scc
skanuj0028 (43) stworzenie w Domu Opieki przyjaznej atmosfery, domowego ciepła. Sprawienie by nie st
PROGRAM ROZWOJOWY^1 POLITECHNIKI WARSZAWSKIEJ By adjusting the turn-on and turn-off angles so that t
Section 2 Standing committee Artide 51 1. The Commission shall be assisted by the Standing Comm
Research Papers 1 Characteńzation of PF ńngs by the finite topology on duals of R
74 Aleksandra Leśniewska managed by instructor. The heart ratę of everv participant is registered an
S6304341 • lwi 280 Zalecana lektura RllMh T ,,15porz,dztnk5 mapy mentalnej ny. Use Both Sides ofYour
więcej podobnych podstron