essent╩rving░47

First C i' t s: Chip C a r v i n c,

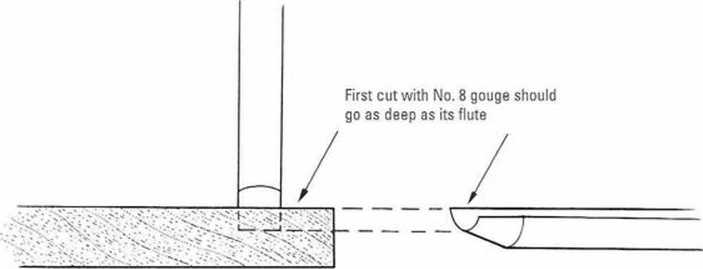
Fig 3.3 The depth of the stab cut.
exercise. Cut in frorn the sides to form a flower pattern (Fig 3.7, top cxamplc). You will find that if you make the first tapering cuts along the grain the wood will crumble when you make the cuts at right angles to them. It is safer to cut across the grain first. If you use a No. 8 you will need to make smali chip cuts in the angles before doing the next cxcrcise (Fig 3.7, bottom).
To make the centrc domed use the same gouge inverted. Cut along the grain (never across) from just beyond the centre, raising the handle as it travels until the edge rests on the original circle and the blade is vertical (see Fig 4.7). Repeat in the opposite direction. If the gouge cuts across the centre the height is reduced and there is a risk of leaving a sharp ridge. A round eye or berry and the pea or shot moulding in Chapter 4 arc carved in the same way as this boss.
The chisel can create a saucer-shaped depression by entering the wood across the grain at a Iow angle and being swivelled around the centre (Fig 3.8).
If the circle is stabbed too dccply or is slanted under the centre the chisel aers as a wedge or a lever. These holes can be used decorativelv (Fig 3.9).
Triangular Pockets
The ncxt exercise is to make triangular pockcts. The straighc-edged chisel is tilted down on one corncr and Icancd slightly away from the carver. A second cut is mad─Ö at 90┬░, certainly at the same angle as or mor─Ö than the angle at the end of the tool, with the corner lower where the two cuts mect. It is helpful to make this angle on a lin─Ö and

Fig 3.4 Cutting in from the side to meet a stab cut.
ÔÇö 47 ÔÇö
Wyszukiwarka
Podobne podstrony:
84 Z. Michalczyk, M. ┼üo┼Ť The depth of underground waters is very differentiated and is generally rel
essent?rving?14 pp Essential Woodcarvixg Techniques W Fig 1.17 Ttoo grounders. Very narrow old Engli
essent?rving?31 S K L K C T lG AND B l Y I N G Sl l T A B I E W O O D Fig 2.7 The tiuisted bark on t
EFFECTS OF GAMMA-IRRADIATION ON PEROXIDE FORMATU)N IN PALM OI.EIN to radiaiion among the commonly us
CCF20110521�015 stu i iun a03 Surgery:word building 3 Use the word on the right to form a suitable w
society posesses less and less of a ┬╗socialist consciousness┬ź, and that it, in fact, even refuses to
67743 In Pursuit of Excellence 5th?ition Fifth Edition In Pursuit ofExcellence How to win in sport
essent?rving?49 First Cuts: Chip C a r v i n g Fig 3.9 A hole mad─Ö by rotating tbe No. 8 gotige whil
essent?rving?51 First Cuts: Chip C a r v i n g Fig 3.14 Startinga mor─Ö complex flower. The centre ri
skanuj0004 PARABOLA PF- PM Fig. 1 The axis, the width and depth ( or span and rise) of the parabola
DSC07734 Płytki hydroksyapatytu - górny kambr 520-505 min l.l Fig. 3.2 The arrnour of Anatolepis, on
essent?rving?42 Essential Voodcarving Techkiques Fig 2.24 Vaulter carued in cauilpa by Dick Oniatis.
wi─Öcej podobnych podstron