
Mastering Checkmates
Neil McDonald
B.T. Batsford Ltd, London

First published in
2003
© Neil McDonald 2003
ISBN
0 7 1 34 8774 7
British Library Cataloguing-in-Publication Data.
A catalogue record for this book is
available from the British Library.
All rights reserved. No part of this book may be
reproduced, by any means, without prior pennission
of the publisher.
Printed in Great Britain by
Mackays of Chatham Ltd, Chatham, Kent
for the publishers
B.T. Batsford Ltd,
64 Brewery Road,
London N
7
9NT
A
member
of
Chrysalif
Books pic
Distributed in the United States and Canada by Sterling Publishing Co.,
387 Park Avenue South, New York, NY 10016, USA
A BATSFORD CHESS BOOK

Contents
Introduction
5
Back Rank Mate
7
2
The Magnificent Seventh
21
3
Mating the Fleeing King
30
4
Mate from the Front with Queen and Rooks
39
5
Knight and Queen against the Fianchetto Position
47
6
The Greek Gift and Other Queen and Knight Mates
60
7
The Deadly Diagonal: Queen and Bishop Mates
73
8
The Killer Pawn
85
9
Rook and Minor Piece Mates
105
10
Mates with the Minor Pieces
1 1 9
Solutions to Puzzles
132


Introduction
T
he aim of this book is
to give you lots of
ideas about how to
carry out a check
mating attack on the
opponent's king. By
presenting all the typical mating
patterns, it will enable you to spot
what moves have the capacity to be
strong in any attacking scenario.
Naturally it is by no means easy
to decide what a good move looks
like. Choose a move-however
ridiculous-and I can tell you a
game or position where it was the
best move. Nevertheless, if you
have a pawn on f6 right in the heart
of the enemy kingside, with the
black king sitting on g8, then
certain queen moves have the
capacity to be strong-notably 'ir'g7
has a good chance of being mate!
The exact positions given in this
book will never come up in your
games and lots of the factors will be
different;
even
changing
the
position of one piece might stop the
idea working. But knowledge of the
basic ideas will allow you to make
imaginative decisions.
Once you have decided what
moves might be good, you then
have to calculate to see if they
work. Calculation in chess is about
turning speculation--or
guesses-
into wonderful triumphs. You ask
yourself' what ifl do that?' or 'will
this idea work?' Lots of your
guesses will be failures, but
sometimes you will come up with a
bullseye-a wonderful, unexpected
and beautiful idea that gives you
creative satisfaction.
In an ideal world before making a
sacrifice you would either calculate
everything right up to a checkmate
or have enough experience-and
confidence!-to be able to say to
yourself 'the opponent's king is
wide open if I make the sacrifice; it
cannot possibly survive the attack!'
But even the best players are neither
infallible calculators of variations
nor blessed with perfect intuition. In
reality these two methods are
usually blended into a statement
such as the following: 'well, I've
checked
the variations
as well as
I
can
and it
feels
like the sacrifice is
strong. Let's do it!'
Computers don't make guesses,
they dredge up every possibility in
the position and along with the sand
and seaweed and old boots and mud
and fish they will haul up a clam
with a diamond inside it. There is
no creativity in this process, they
cannot fail to discover the diamond
if they look at everything. So where
is the beauty?

6 Introduction
In contrast, there is something
mystical,
beyond
logic about
guessing. We call it a hunch or our
sixth sense or intuition-when it
works!
Which brings us to the next point.
Once you have dared to dream that
there is a mate in three, that all the
requirements fall in place, and feel
the glow of excitement at your
incredible idea ... stop! You must
check it. In fact you must be
absolutely ruthless in analysing it.
Players that never guess will
never come up with anything
original or clever; they might play a
decent game, by applying the logic
of chess to build up their position
sensibly and rationally; but they
will miss the brilliant coup.
On the other hand some players
are full of imagination but they lack
the discipline to put these guesses
under the microscope and reject
them if they don't work. It becomes
wishful thinking; unsound but
exciting attacks dominate.
In post-mortems between players
after the game, most of the time is
spent looking at exciting, quirky
possibilities rather than musing on
strategy. Sacrificing a piece goes
against everything we have learnt
about looking after our pieces, so
when it becomes a possibility it is
thrilling. That is what interests us:
the magic of making an assumption
based on the data available and
finding, almost unbelievably, that it
works!
This book doesn't tell you what
moves to play, but it tells you what
ideas you will need to succeed. I
wish you the best of luck in
developing a checkmating style.
1 Back Rank Mate
T
his is one of the most
common checkmating
patterns. It is seen in
tournaments
of
all
levels,
from
those
involving beginners to
the world elite. It is especially
valuable as a counter attacking
weapon since a player lunging
forwards can often miss the
unobtrusive threat to his first rank.
Indeed, a back rank mate is one
of the most dangerous of mating
themes as it often comes without
any fanfare. When a player is trying
to mate on g7 with a queen and
knight it is usually obvious to the
defender; but a back rank mate is
sometimes well concealed.
Here is the best known example.
a
b
c d e
f g h
8
8
7
6
a
b
c
d
e
f g h
7
6
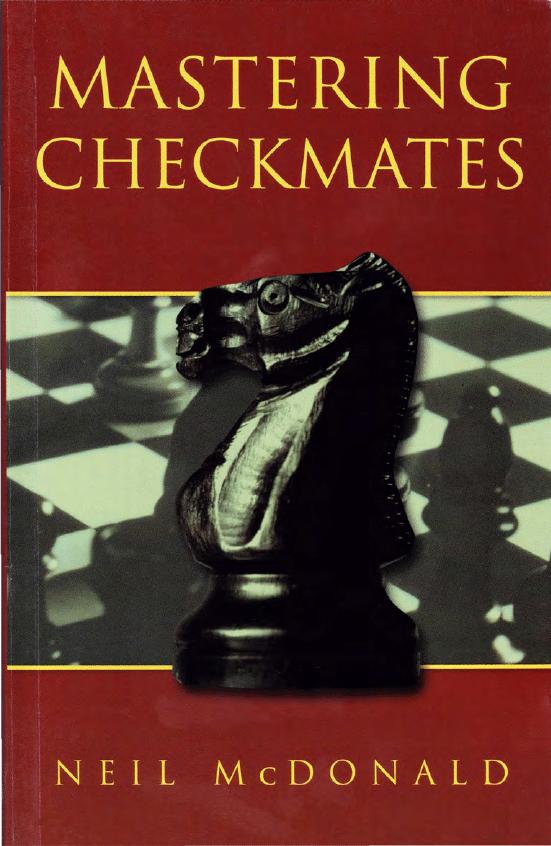
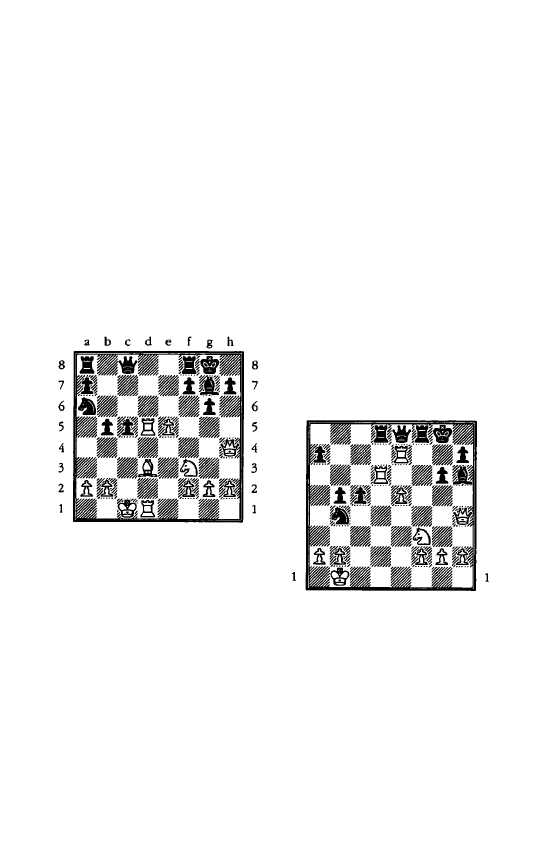
The black king is in checkmate as
his own pawns prevent him escap
ing to the second rank.
8
7
6
5
4
3
2
Setting up the back rank mate
pattern
First Example
a
b
c d
e
f g h
8
7
6
5
4
3
2
a
b
c d
e
g h
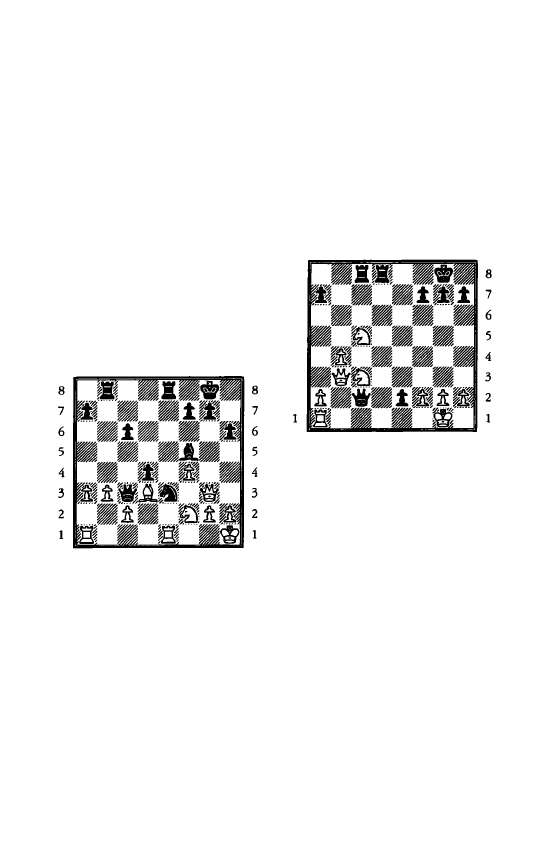
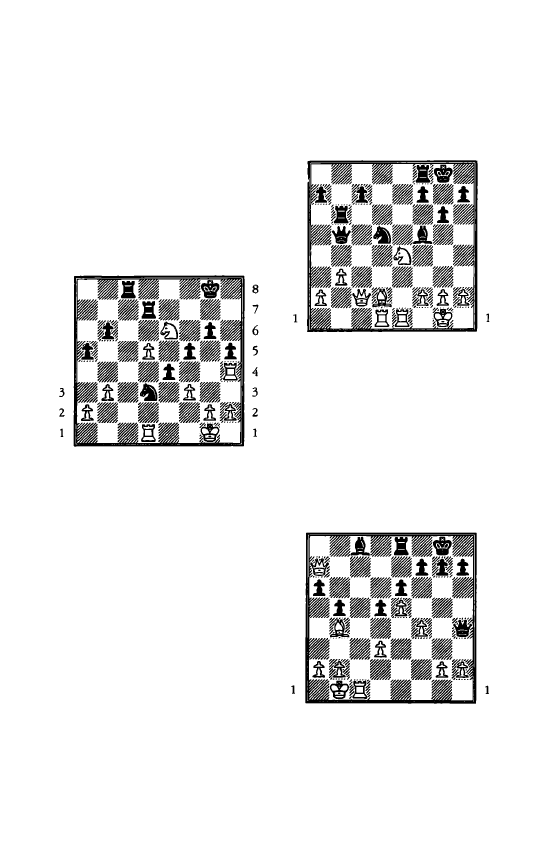
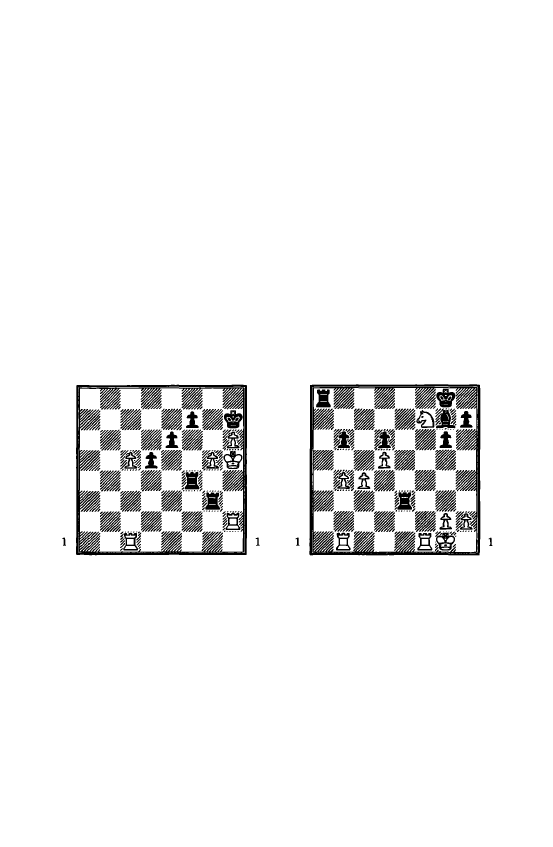
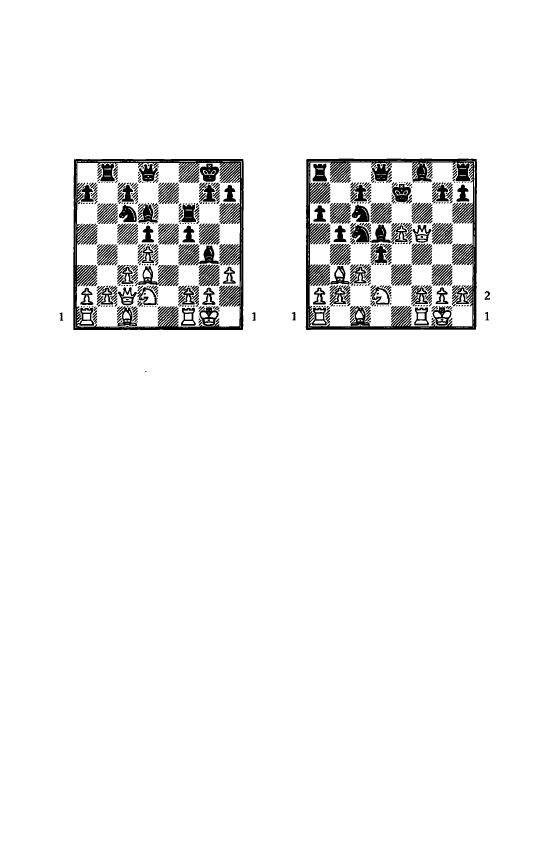
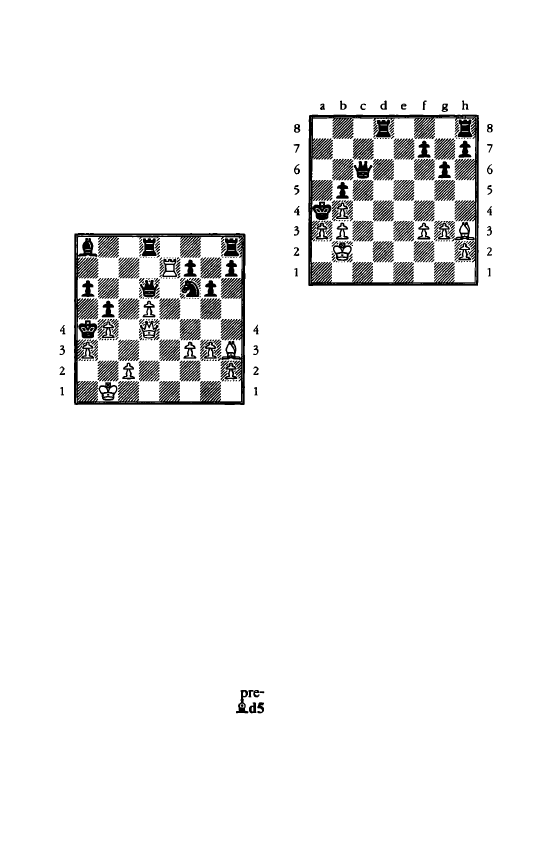
White can upset the defence of
Black's back rank with
1 'it'xb8!
when after
1.
••
%lxb8
2
l:re8+ l:rxe8
3
%lxe8
is mate. Note that if Black
saw the mate and tried to play on a
rook down with
l
...
h6,
then White
has another instant mate with
2
'it'xf8+! 'itxf8 3 l:re8.
8 Back Rank Mate
8
7
6
5
4
3
2
Second Example
a
b
c
d e
f
g
h
a
b
c
d e
f
g
h
8
7
6
5
4
3
2
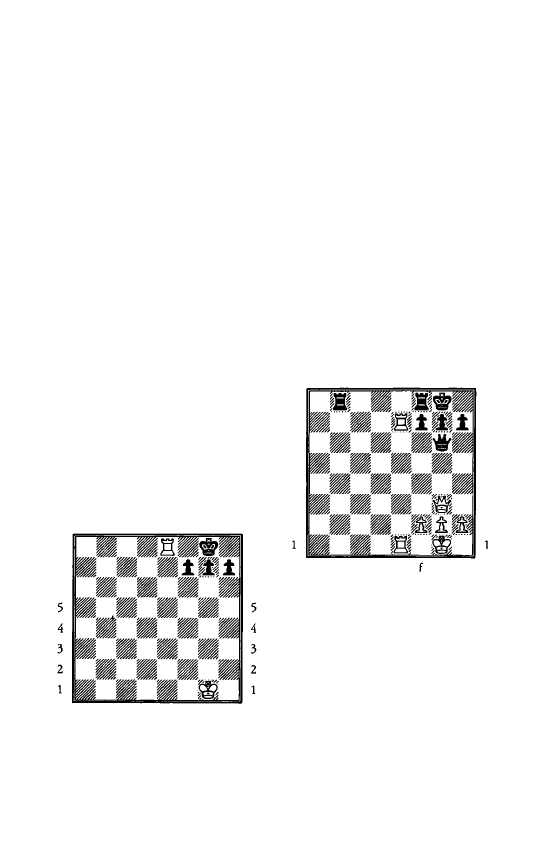
Here is another mating pattern of
which the defender has to beware.
White to move softens up the
defences with 1
1hf8+! 'ifi>xf8
then
clears the way with gain of time to
land a rook on the back rank:
2
.i.cS+ �g8 3 :es mate.
Third Example
a
b
c
d e
g
h
8
8
7
7
6
6
5
5
4
4
3
3
2
2
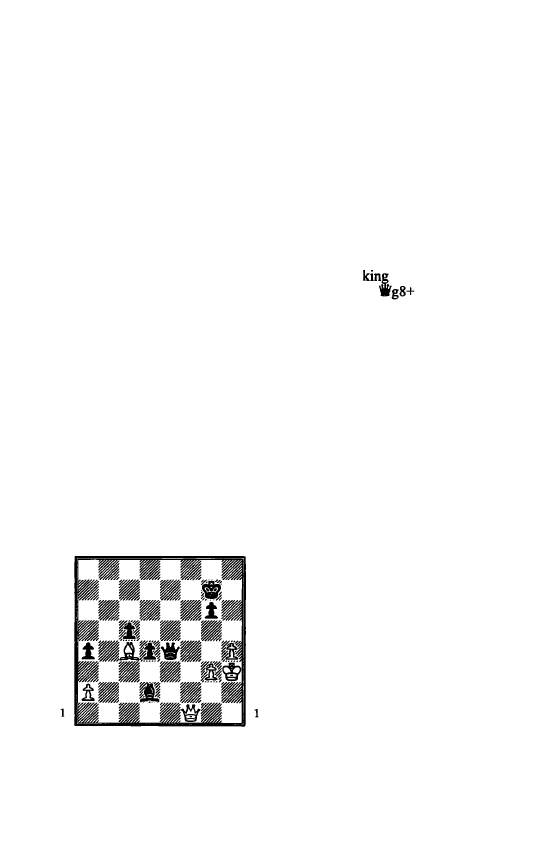
Sometimes a weak back
rank
can
lead to a disaster on the
f7
square.
White mates with 1
•xfi+! ltxfi
2
l:r.e8 mate.
The black rook was
unable to carry out its dual role of
defending the back rank and the
f7
square.
8
7
6
5
4
3
2
Fourth Example
a
b
c
d
e
f
g
h
a
b
c
d e
f
g
h
8
7
6
5
4
3
2
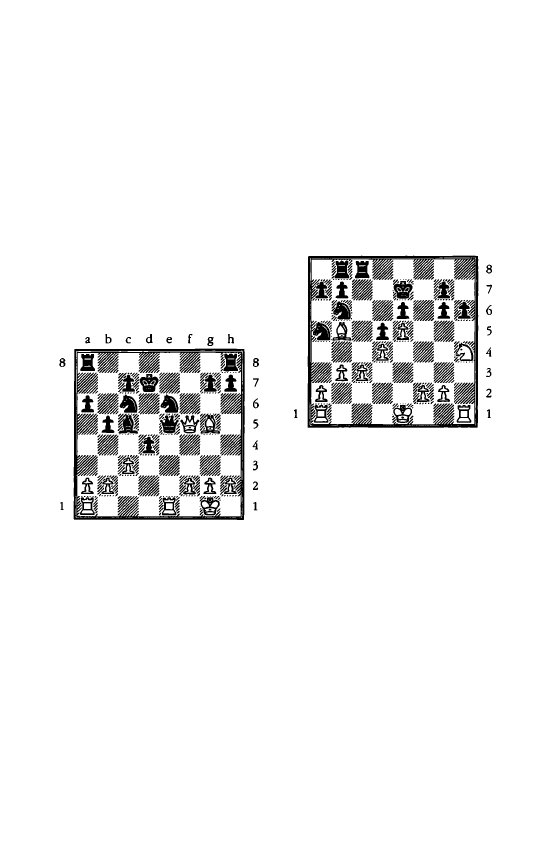
Black has played g7-g6, making a
hole for his king, but that doesn't
stop him being mated by rook and
bishop after
1 .,xfB+!
�18 2
.i.h6+ 'ifi>g8 3 l:e8 mate.
Now let's look at how the back
rank mate works in practice. It can
take many forms in addition to the
familiar fl/g7/h7 pawn coffin, but
the basic mechanism is always the
a
b
c
d
e
f
g
h
same.
Tiviakov - Forintos
San Giorgio 1994
a b c d e
f
g h
8
8
7
7
6
6
5
5
a
b c
d e
g h
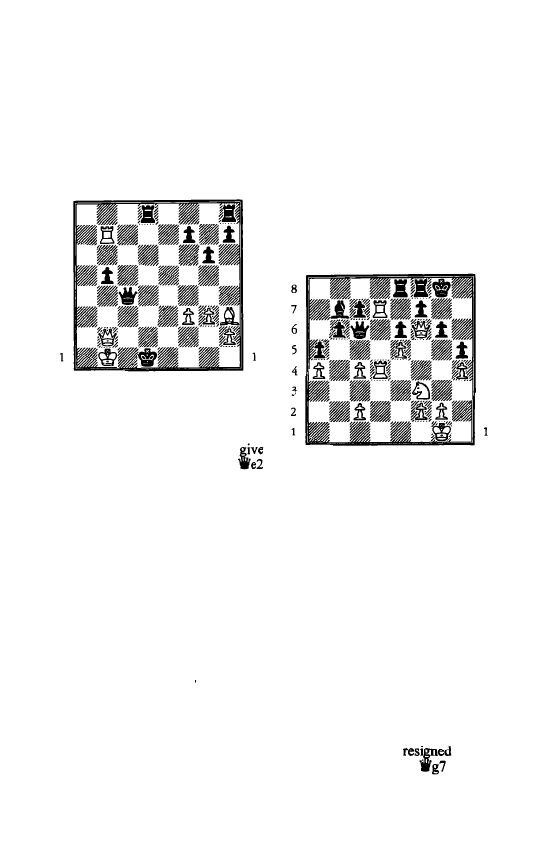
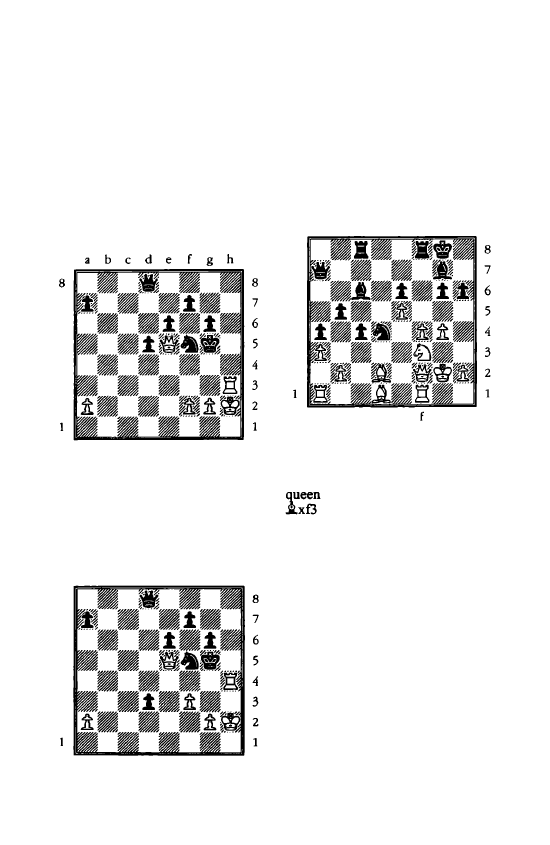
Here Black exploited the weak
back rank with
26 .. .'ii'xg3!
when if
27
fxg3 it is mate all the same after
27
...
l:thl as the black bishop is con
trolling the
f2
square. Tiviakov tried
27 l:te3
but resigned after
27 ... l:thl+
28 �e2 _.g4+
0-1
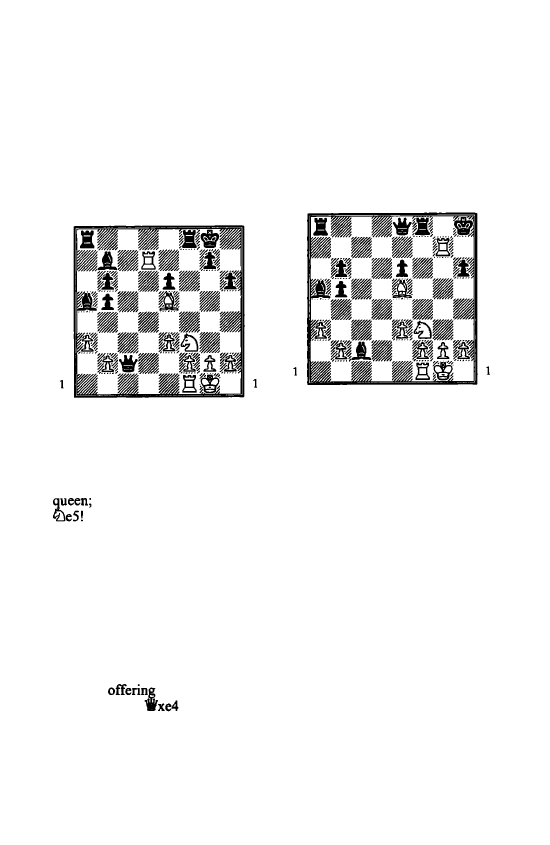
Xie Jon - Seirawan
China
2002
a b c d e
a b c d e f
g h
Back Rank Mate 9
The former Women's World
Champion has a penchant for the
attack. Here she played
23 ll'lf6+
�xf6 24 �xf6,
when her control of
the long dark diagonal looks
ominous for the black king.
However, there came
24 ..... e4! !
and White resigned as she is mated
after
25
i
h
e4 l:txdl+ or else loses
at least a rook. Note that if
25
l:lxd8
it would be a mistake to play
25
.
..
..
xg4 as
26
�e7 allows White
to fight on strongly; but
25
...
'ir'e l
mate will do very nicely.
Topalov - Morozevich
Cannes
2002
a b c d e
g h
8
8
7
7
6
6
5
5
4
4
3
3
2
2
a b c d e f
g h
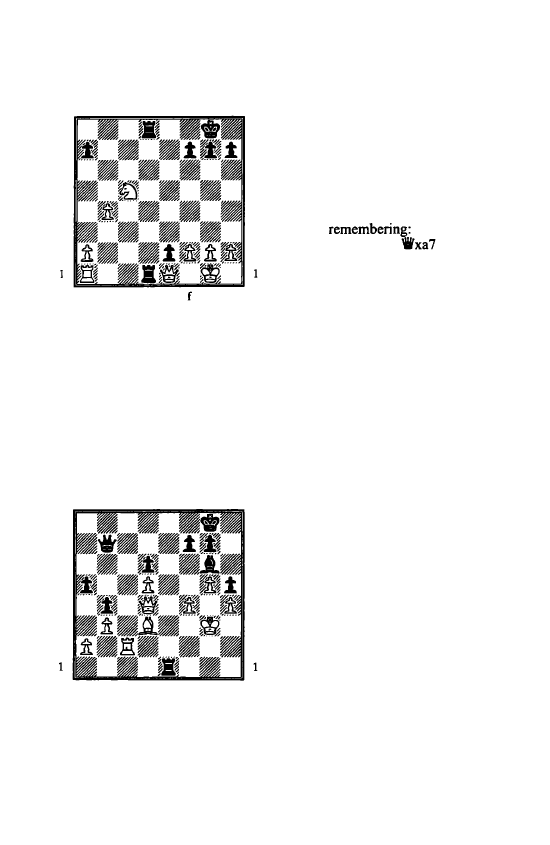
Back rank tricks can fool the
strongest players as the following
extract shows. Alexander Moro
zevich has a fantastic eye for tactics
but in this position he played
31 ... l:te7
pinning and apparently
the white bishop. But after
32
there came
33 �e4! !
10 Back Rank Mate
Only a pin on the king is
absolute! The bishop bounds free
and Black sees to his horror that he
is
mated after 33 ... l:lxa7 34 l:lxb8 or
more slowly after 33 ... l:lxb5 34
liaS+ or 33 ... lDxf2+ 34 �g2 :Xb5
35 l:r.a8+. I suspect that having
played h7-h6 to make a hole for his
king way back at move 13 Moroze
vich was no longer looking for back
rank
tricks.
Rozentalis - Adams
Olympiad, Elista 1998
a
b
c
d
e
f
g
h
�
b
c
d
e
f
g
h
Here White played
30 �xfS,
no
doubt expecting an endgame after
30
•••
lbxf5 31 l:lxe8+ l:lxe8 32 1fxc3
dxc3.
Instead there followed
30
•••
1fxel+!!
and
White resigned.
Posterity doesn't record whether he
fell off his chair. After
31 l:lxel
lDxfS 32 l:lxe8+ l:lxe8
there is no
way for White to deal with the
double threat to his queen and the
back rank, for example if
33 'ifd3
l:lel+ 34 'iffl llxfl
is
mate.
A pawn on the seventh rank often
introduces threats of a back rank
mate, as it is only one square from
being a queen or equally a rook.
8
7
6
5
4
3
2
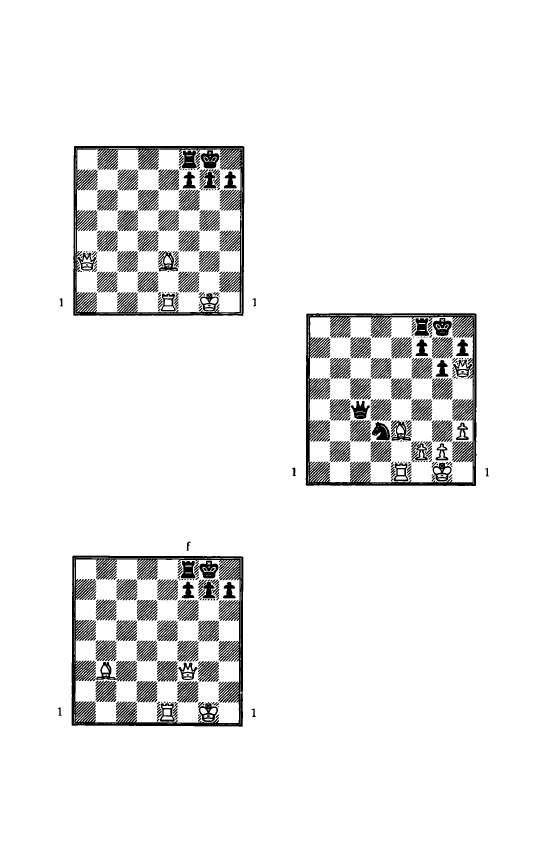
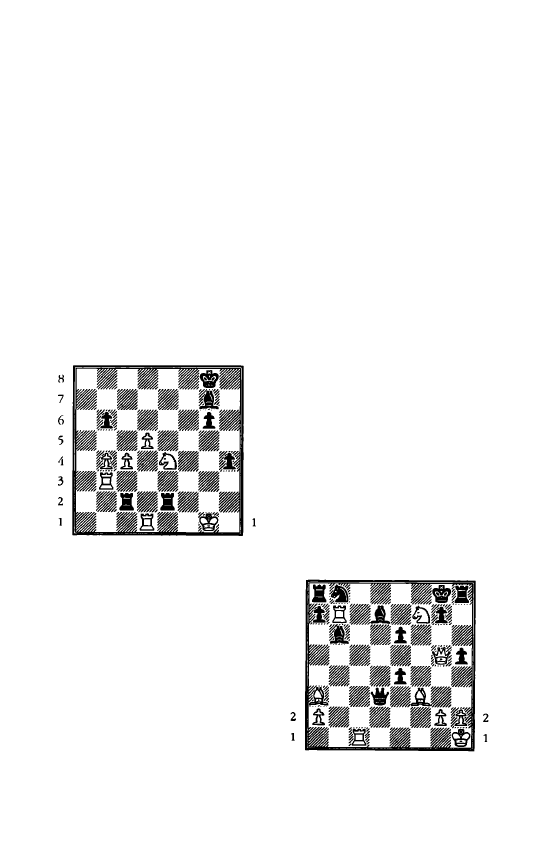
Kir.Georgiev - Gulko
Saint John 1988
a
b
c
d
e
f
g
h
a
b
c
d e
f
g
h
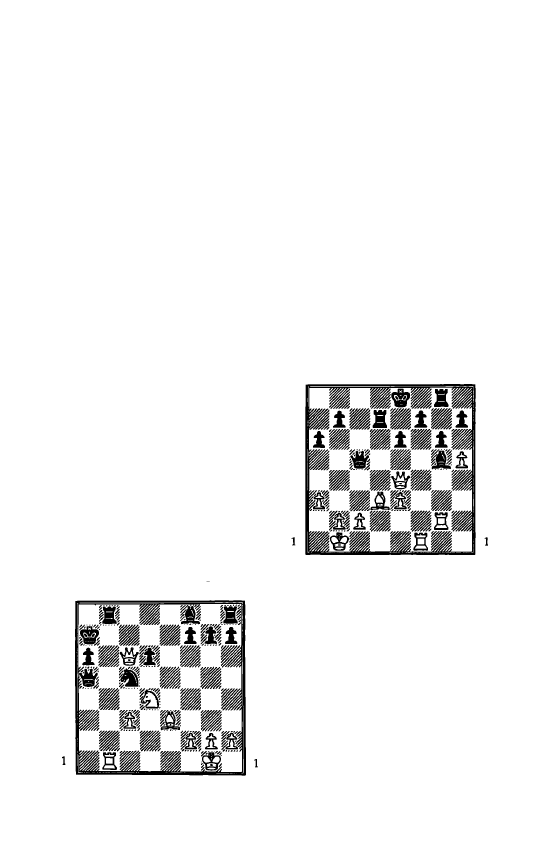
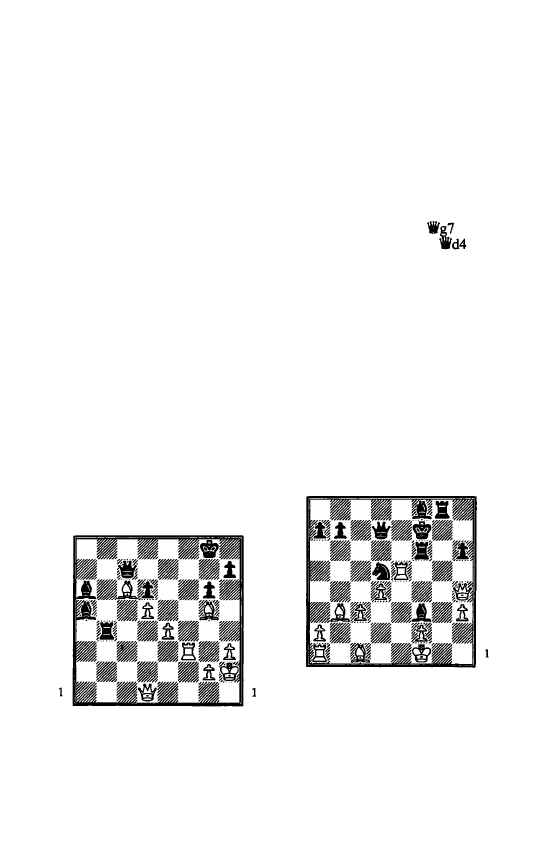
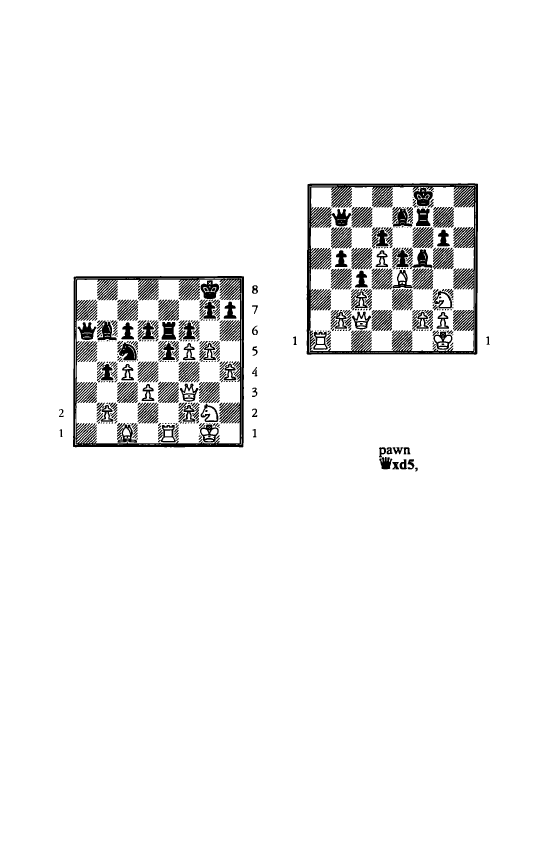
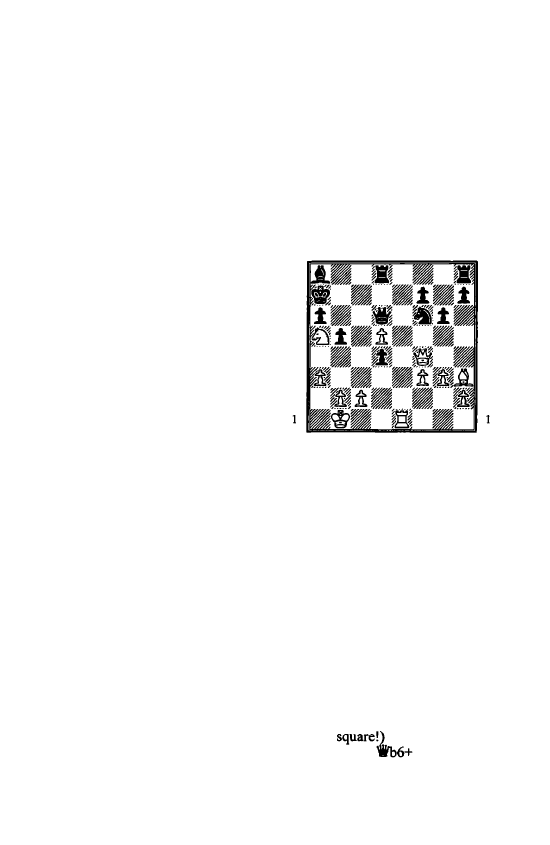
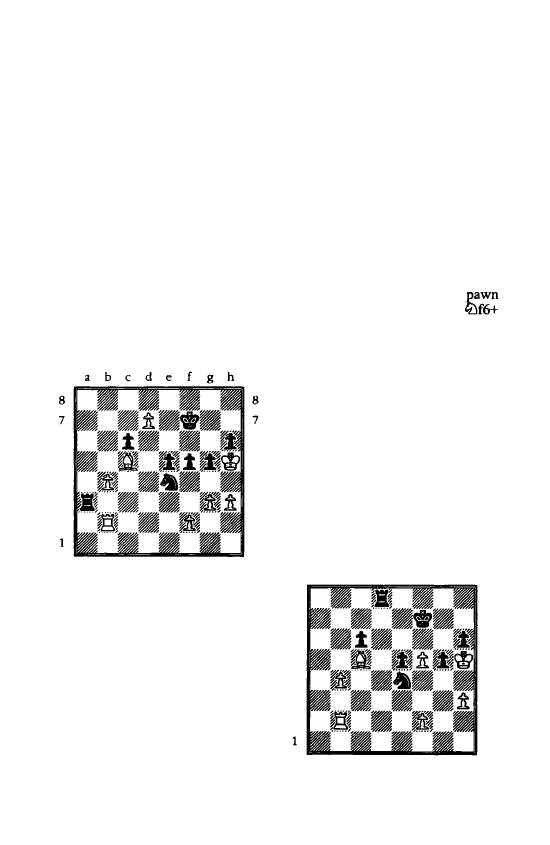
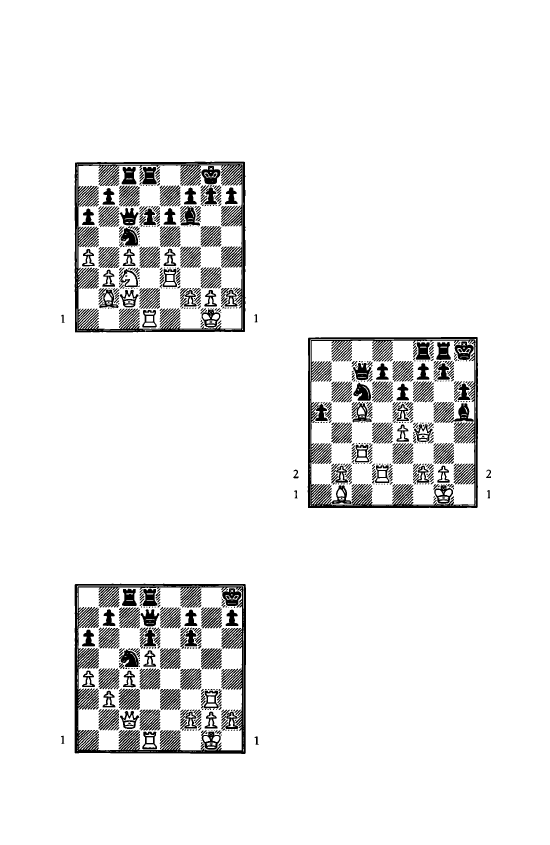
With the d1 square covered three
times White might have thought he
was safe from a back rank mate.
After 25 ... 1fd2 White could fight on
by giving up a knight with 26
c!Dxe2.
Instead Gulko found
25
•••
l:ldl+! 26 :Xdl 1fxc3!
and
White resigned
as Black threatens
to queen and he is mated after 27
1fxc3 exd 1 promoting to a queen or
rook, while 27 'ifh1 exd1='1i'+ 28
1fxd1 1fxb4 is entirely lost.
Gulko played the most accurate
series of moves, but such is the
strength of the passed pawn that
even if he had played less incisively
he would still have won, for
example
25
.••
1fxc3 26 1fxc3 l:ldl+
27 'ifel
(the only move)
27
•••
llcd8!
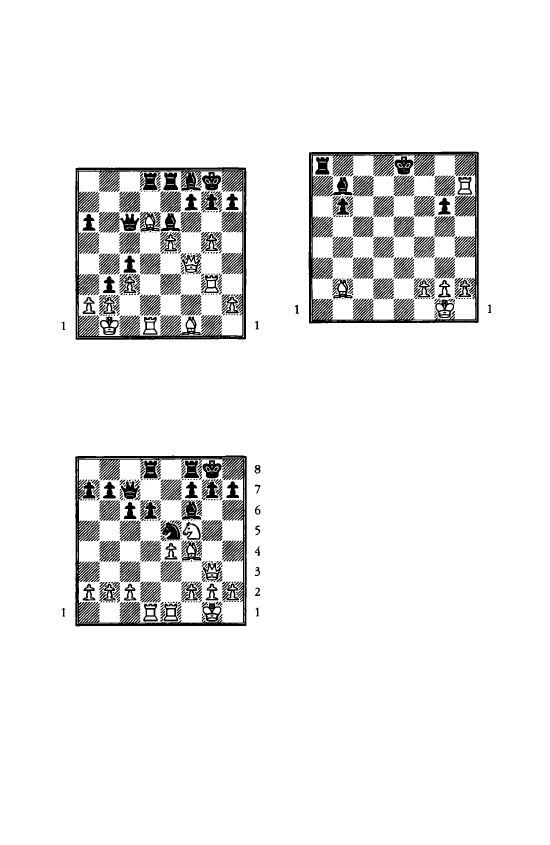
a
b
c
d
e
f g
h
8
8
7
7
6
6
5
5
4
4
3
3
2
2
a
b
c
d
e
g
h
and notwithstanding White's
huge material advantage he has no
good reply to the threat of
28 .. Jha1 29 'ii'xa1 lld1+ followed
by queening and mating. He can
only limp on in a lost endgame after
say 28
f3
llxa1 29 �f2 l:lxe1 30
'it>xel .
8
7
6
5
4
3
2
Grischuk - Sokolov
Olympiad, Bled 2002
a
b
c
d
e
f g
h
a
b
c
d
e
f
g
h
8
7
6
5
4
3
2
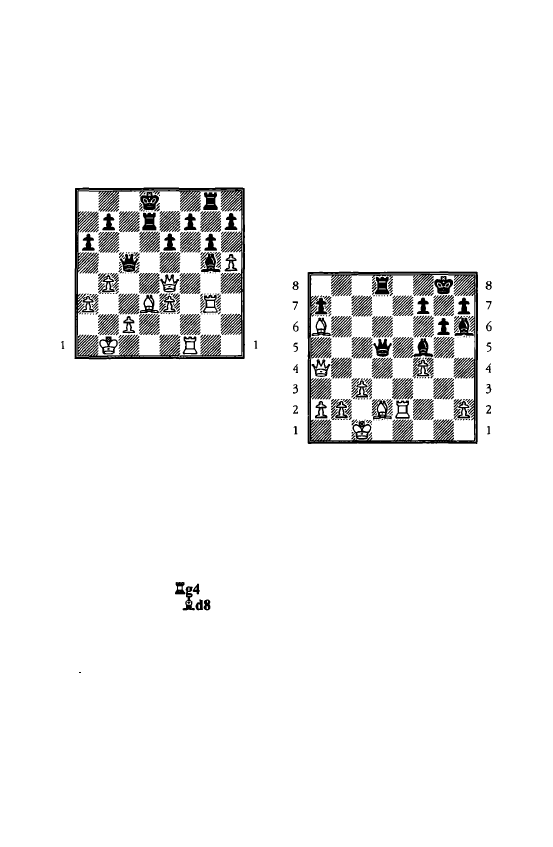
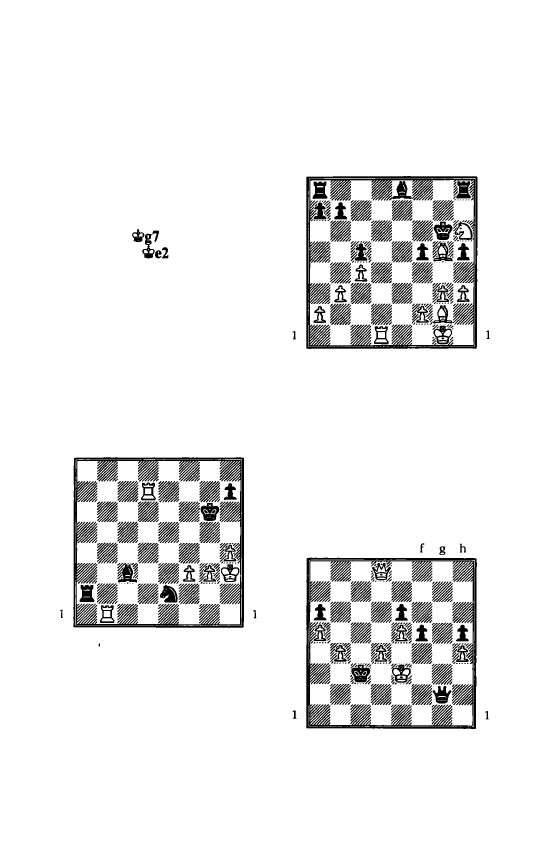
You might not think that Black's
back rank is weak here, as the
queen is defending c8 against the
white rook and besides there is a
Back Rank Mate 11
bolt hole for the king on h7. None
theless,
39 fS!
was lethal as if the
bishop retreats to h7 it becomes the
equivalent of the pawn on h7 in our
standard back rank mate scenario.
Then the black queen can be
crowded out from defending c8 by
a sham queen sacrifice that is well
worth
39 ... .i.h7 40
1i'a7! If then 40 ...
41 l:lc8+
and mate follows, or similarly
40 ... lle7 41 1i'xb7 :txb7 42 l:lc8
mate.
In the game Sokolov tried for a
swindle to exploit the rather
exposed state of the white king:
39
.•.
1i'd7!? 40 fxg6 .l:.hl 41
gxt7+
'it>f8
A simple answer to 4 l...'�xf7 is
42 .i.f5 1i'xf5 43
l:lf2
lth3+ 44
'itg2.
42 .l:.h2 l:ldl 43 l:le2 l:lhl 44
l:le8+!
There is an old saying that 'patzer
sees a check, patzer gives a check'.
It is true that inexperienced players
often waste valuable time with
needless checks, as if sticking to
another dubious adage: 'always
give a check, it might be mate!' As
if in support of this assertion, the
future GM Paul Motwani recounts
that his first game of chess ever,
against another absolute beginner,
went
I
e4 d6 2 .i.bS+ and here the
game finished, with both players
convinced
that
Black
was
checkmated!
On
the other hand, when it comes
to combinations if you see a line of
play with checks you should always
12 Back Rank Mate
give it preference over an equally
good looking line without checks,
as it cuts down the opponent's
options. In other words it is a more
forcing line of play than a sequence
without checks, as it gives the
opponent
fewer
chances
to
counterattack.
Here White is a piece and a pawn
up, but he could still have lost if he
had played the unforcing 44 i.g6??
with the threat of 45 l:te8, as Black
gets in first with 44 ... 'ii'h3+ 45 �f4
(or 45 �f2 l:lfl mate) 45 ... 'ii'g4+ 46
�e3 l:.h3+ and White loses his
queen.
The line Grischuk chooses in the
game does everything with check.
44 ... �xfi 45 i.g6+! �xg6 46
'ii'e4+
and Sokolov resigned as after
46 ... �f7 (or else 46 ...
'ii'f5
47 l:le6+
wins the queen) 4 7 g6+ �f6 48
l:lffl+ he is mated next move.
Golubev - Mantovani
Biel l992
a
b
c
d
e
f
g
h
8
8
7
7
6
6
5
5
4
4
3
3
2
2
a
b
c
d
e
f g
h
Black's back rank appears to
be
adequately defended, and he has an
extra rook .. . However after
26
'ii'xc5+!
White was winning since if
26 ... 'ii'xc5 27ll'lc6+
�a8 (the black
queen is pinned)
28 l:.xb8
is
mate.
The black rook was defending
every important square on the b file
and first rank apart from b8. It is
worth remembering that a piece
doesn't control the square it stands
on!
8
7
6
5
4
3
2
Adams - Sasikiran
Olympiad, Bled 2002
a
b
c
d
e
f
g
h
a
b
c
d
e
f
g
h
8
7
6
5
4
3
2
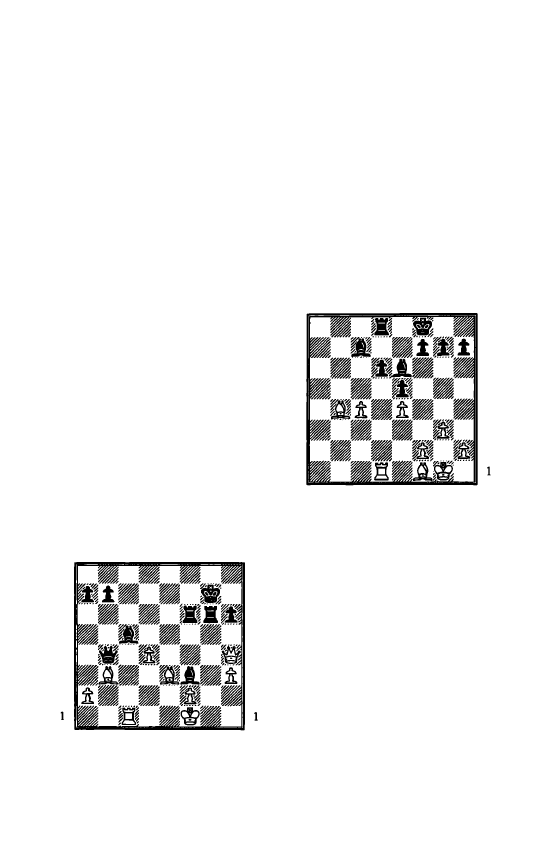
Here black back rank looks
perfectly safe. But besides being a
highly gifted strategian, Michael
Adams is also adept at spotting
tactical nuances. Here he played the
quiet
28 IZ.g3,
which defends e3 and
waits for his opponent to fall for the
trap.
Sasikiran-concemed at White's
potential pressure on f7 and keen to
evacuate his king to the queenside
-duly fell for it with 28
••.
�d8??
when
Adams
pounced with the
unexpected 29 b4!!
8
7
6
5
4
3
2
a
b c
d e
f
g
h
a b c d e f g h
8
7
6
5
4
3
2
Now out of the blue the back
rank
becomes a problem for Black as he
is mated after 29 ... 1i'e7 30 'ife5!
..th4--or any other move that saves
the bishop--31 'ifb8 is mate!
So Black had no choice but to
play 29
.••
'ifdS, the only other queen
move
that
keeps
the bishop
defended. However, it led to a lost
endgame as the white rook crashed
through on
fl:
30 'ifxdS l:txdS
(forced, or else the bishop is lost)
31
l:.xti ..th4 32
l:txhS 33
l:.xb7 �e8 34 l:tc4
35 l:tc8
l:tdS 36 l:txh7 l:td7 37 l:th6 �f7 38
..txa6 and Black's pawn structure
having collapsed on the queenside
White eventually ground out a win
with his passed pawns.
In the next position in order to
find the winning combination for
Black you have to look at the whole
board: not just glance down the
Back Rank Mate 13
open diagonal leading to h 1 or
forwards at d 1. It is the bishop on
f5,
taking away the b 1 and c2
squares from the white king, that is
central to the combination.
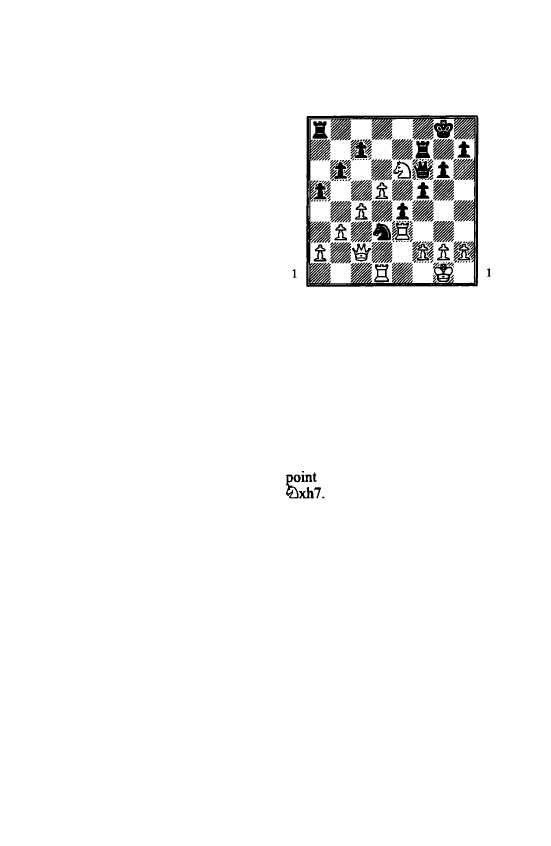
Adams - Fedorov
Wijk aan Zee 2001
a b c d e f g h
a b c d e f g h
27
..•
..txf4!!
When you have the ascendancy
on squares of one colour-here it is
control of the light square complex
on b 1, c2 and h 1-the winning
breakthrough occurs on a square of
the other colour.
The first point is that 28 .i.xf4
1i'h1 + mates. Meanwhile if 28 'ifxf4
disaster strikes in a completely
different direction: 28 ... 'ifxa2! and
there is no good answer to 29 ... 'ifa1
or 29 ... 'ifb1 mate. For example if 29
l:te4 Black can win easily with
29 ... .i.xe4 30 'ifxe4 'ifxa6, but
much more effective is the showy
29 ... 'ifa1+ 30 �c2 'ifa4+!! �c1
.i.xe4.
14 Back Rank Mate
In the game Adams tried
28 lle8+
but was dropping material after
28
••
.'�>g7! 29 Wxf4
(if 29 llxd8
�xd2+ 30 �d1 ..Wxd8 wins a piece)
29
•.•
llxe8 30 �c4 ..Wbl+ 31 �n
�g8
and the exchange down he
resigned.
Next up is a great fighting game
with tactical themes that range
across several chapters in this book.
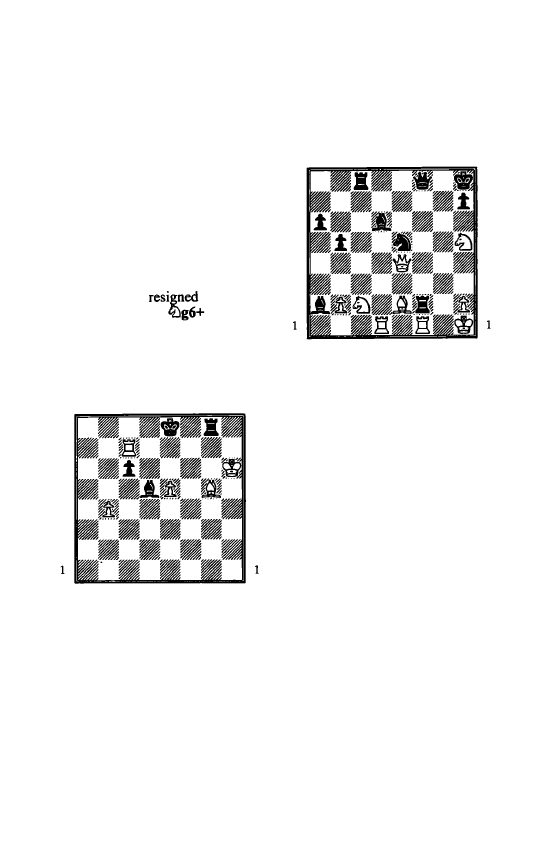
Beliavsky - Kasparov
Belfort 1988
a
b
c
d
e
f
g
h
A
battle royale began after
18 ... tilb4! 19 �xg6! fxg6!
The alternative 19 ... hxg6 forms
one of the puzzles in the chapter on
the Greek Gift and other queen and
knight mates.
20 lld7
Threatening 21 ..We7 with a quick
mate on the seventh rank. Black's
reply is therefore forced.
20
.••
..We8 21 lle7
Now Black appears to be in
desperate straits, for if the queen
moves, say 21.....Wc8, then 22 lldd7
leads to a massacre on the seventh
rank. But Kasparov had ready an
unexpected defence:
2l.
..
�h6+! 22 'iti>b1
Of course if 22 ..Wxh6 1Wxe7.
22
•••
l:.d8!
The back rank outwits the
magnificent seventh (see the next
chapter!). White is mated if he takes
the queen, while 23 llxd8 ..Wxd8
leaves him defenceless against the
threat of 24 ... ..Wd 1 mate or if need
be 24 ... 1i'd3+.
8
7
6
5
4
3
2
23 lld6
a
b
c
d
e
f
g
h
a
b
c
d
e
f
g
h
23
.••
1i'c6! !
8
7
6
5
4
3
2
A brilliant coup. White is mated
on d 1 if he takes the queen or in the
comer if he takes the bishop: 24
..Wxh6 ..We4+ 25 �a 1 lilc2+ 26 �b 1
lila3+ 27 �a1 ..wb1: a queen and
knight attacking mechanism seen in
the chapter on smothered mate.
24
a3
l:txd6 25 exd6 'ifxd6!
The only move but sufficient to
win. If instead 25 ... c!Dd5? 26 'ifxh6
c!Dxe7-hoping for 27 dxe7 'ife4+
picking up the e7 pawn-27 c!Llg5!
and we are in the queen and knight
mate chapter!
26 axb4
If 26 'ifxh6 Black could take the
rook but simplest is 26 ... 'ii'd3+! (the
intermediate check cuts out the de
fence 26 ... 'ifdl +? 27 'ii'cl) 27 'itta1
'ifd 1 + and mate follows.
26 ... cxb4 27
'ife4
b3
0-l
Too gruesome to contemplate is
28 'ife2 'ifa6! 29 'ii'e6+ (or else
mate on a2) 29 ... 'ifxe6 30 l:he6
l::.c8 (threatening mate on c1) 31
1:.e1 l::.c2 32 l:fl J.g7 and White
can only watch as his position is
eaten up.
8
7
6
5
4
3
2
Karjakin - Shlrov
Benidorm 2002
a
b
c
d e
f
g
h
8
7
6
5
4
3
2
Back Rank Mate 15
35 J.h6! l:tb8
The only move.
Now Karjakin sees that if he gets
his queen to f6 he will be winning.
There would be the threat of 'ifffi+!
1:.xffi; 1:.xffi mate. Black wouldn't
be able to reinforce his back rank,
say with 'ii'd8, as then
mates.
However, if he plays 36
then
Black can reply 36 ... We7, keeping
the white queen out of f6. He found
a way to prevent the 'ife7 defence
with
36 'iVai!
The queen gets to f6 as 36 ... 'ife7
drops the bishop on a5.
36 ... J.e2 37
:.a
i.d3 38 'iff6 t-o
Sulskis - Seirawan
Olympiad, Bled 2002
a
b
c
d e
f
g
h
8
8
7
7
6
6
5
5
4
4
3
3
2
2
1
a
b
c
d e
f
g
h
a
b
c
d
e
f
g
h
White is a piece for two pawns
down but he has attacking chances
Karjakin exploited his opponent's
against the black king. However,
weak back rank as follows:
the white king is in danger as well.
16 Back Rank Mate
Not only does Black have an extra
piece, but even more importantly he
has every piece active, whilst White
still has a rook slumbering on a 1.
Seirawan therefore decided to strike
immediately to exploit his considel"'
able advantage in firepower.
28 ... 'ii'b5+!
There is a tendency when ma
terial up to play defensively and
hope to win 'on points'. Seirawan
knows better. It is ironic that he en
tices Sulskis to play c3-c4, which
looks like the sort of attacking
move he should be happy to play,
but in fact it creates more mating
chances against the white than the
black king!
29 c4 'ii'b4 30
:eJ
Giving up a further exchange
leaves him a rook down, but if 30
cxd5 'iib5+ 31 �e1 .ib4+ 32
.id2
ltgl is mate!
30 ... lbxe3+ 31 .ixe3 ltgg6 32
l:lcl �g7 33 c5 .txcS!
a
b
c
d
e
f
g
h
8
8
7
7
6
6
5
5
4
4
3
3
2
2
a
b
c
d
e
f
g
h
34 .ic4
Since 34 :xc5 :gl+! 35 �g1
'ii'e1+ 36 �h2 'ii'h1+ 37 �g3 'ii'g2
is another mate of the wrong kind
for White he might as well resign.
He did so after
34
•••
.id6 35 .id3
.ih2 36 .ixh6+ :xh6 37 'ii'gS+
:hg6 0-1
Mnatsakanian - Fominyh
Katowice 1993
a
b
c
d
e
f
g
h
8
8
7
7
6
6
5
5
4
4
3
2
1
a
b
c
d
e
f
g
h
3
2
White showed some ingenuity in
turning what looks like a complete
ly drawn position into a losing one.
The obvious move is 28 c5 to ex
change off the last of the queenside
pawns. Instead he played
28 .ig2?
with the idea that after 28 ... .ixc4 29
:c 1 wins a bishop. But instead
there came
28
•••
:b8!
when White
suddenly realised that after 29
.ixd6+ .ixd6 30 :xd6 :b 1 + 31
.tfl
.ih3 he is mated! (note that
this is even better than 3l.. . .ixc4,
when White could limp on with 32
'iti>g2). Nevertheless, he could avoid
disaster with 29 .i.d2! when
29 ... .txc4? 30 l:.cl would win the
piece safely, as if 30 ... .i.e6 31 l:.xc7
l:tb I+ White can block with 32 ltc 1.
Instead he completed the road to
ruin with
29 .tel? .txc4 30 l:r.cl
.ta6.
Now 31 l:.xc7 l:r.b1 regains the
bishop and leaves Black with an
extra pawn. The game ended
31 .tn .txn 32 �xn l:.b7 33
.td2 <i;e7 34 .i.e3 �e6 35 g4 g6 36
l:tal .l:tb4 37 l:.cl .i.d8 38 f3 l:.b3
0-1
I leave the reader to decide why
the game ended here as there is still
some fight left in the white position.
Maybe White lost on time, or
perhaps he went to play 39 'ite2
before noticing that 39 ... l:.xe3+ 40
�xe3 .i.g5+ wins a piece.
Who gets
in
first?
As was mentioned at the begin
ning of the chapter, it is often the
case that a player falls for a back
rank mate because he has become
carried away with his own attacking
ideas and has forgotten that his own
king might need a bolt hole.
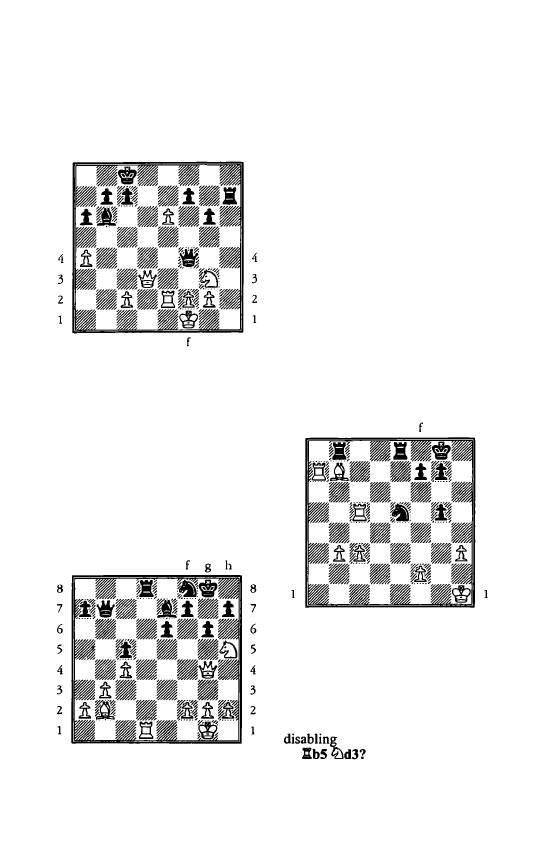
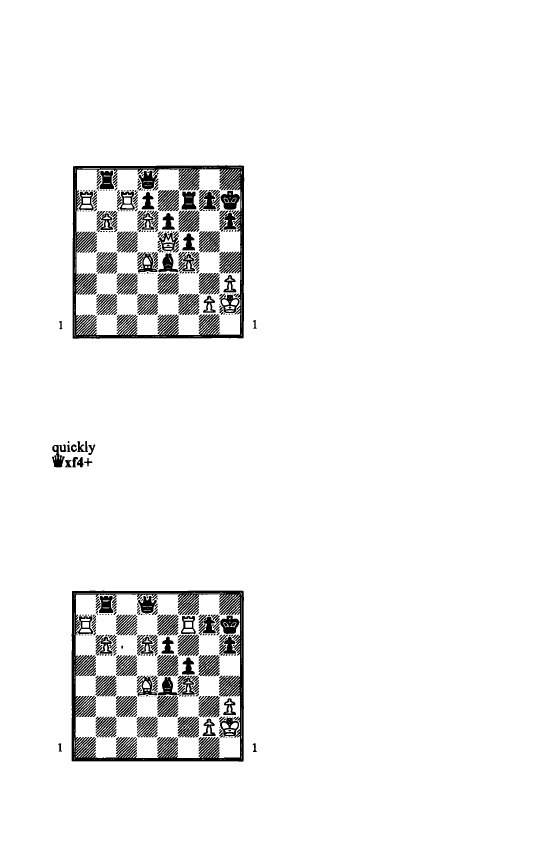
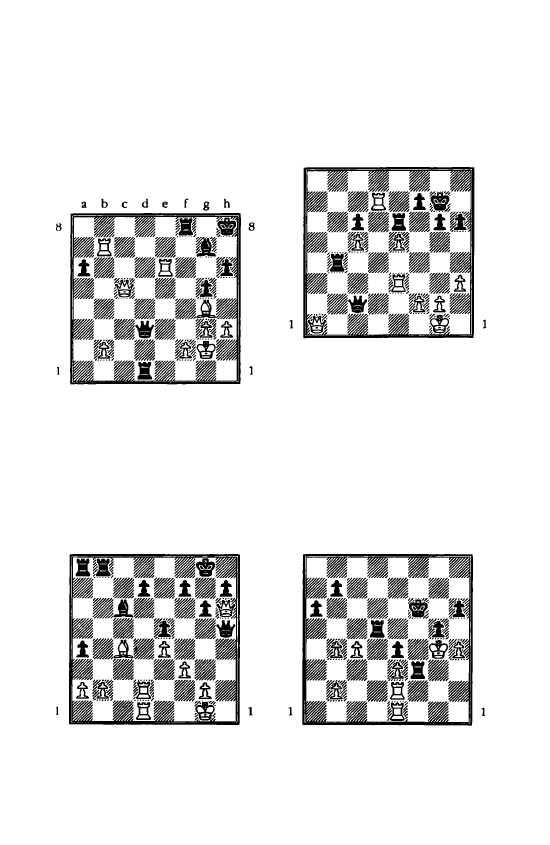
In th� next position, based on a
game played at Loughborough,
2001, chances are approximately
even: the two knights cancel each
other out. Now White to move
should have prepared a strategy to
undermine Black's centre, perhaps
with an immediate 25 f3!?
Back Rank Mate 1 7
a
b
c
d
e
f
g
h
8
8
7
7
6
6
5
5
4
4
3
3
2
2
a
b
c
d
e
f
g
h
Instead he came up with the plan
of attacking along the h file. How
ever, this leads to the white pieces
becoming one by one decentralised:
not a good state of affairs when the
centre is still open.
25 Wd2 c6 26 .l:th3? cxd5 27
cxd5 We5 28 ..Wh6 .l:d7 29 lbg5
White's attack reaches its high
and there is the threat of 30
Nevertheless, it is intolerable
that the rook on d 1 is expected to
look after the first rank, second rank
and centre while the other pieces
attack!
It
is no wonder that the poor
rook proves unequal to this huge
task.
29
• • .
'ii'f4!
Attacking
f2 and stopping the
threat to h7, for in reply Black can
exchange queens then capture the
knight.
30 ..Wh4
Offering an exchange of queens is
an admission of failure, but if 30
.l:tfl then 30 ... l:r.c8 31 g3 Wd2 32
18 Back Rank Mate
�g2 l:lcl 33 l:lxcl 'ihf2+ 34 'iti>hl
lL!xc
1 and there is no way to pre
vent 'ii'fl mate. All the white pieces
are uselessly placed on the h file.
30
...
h5 31
lL!
e6 'ifxh4 32 l:lxh4
l:tc8 33
tJ
A desperate move as otherwise
Black will simply capture the d5
pawn.
8
7
6
5
4
a
b
c
d
e
f
g
h
a
b
c
d
e
f
g
h
33
..
. e3!
A powerful response. Black
defends the knight by leaving it en
prise, for if 34 l:txd3
lie 1 mates.
34 �fl
l:lxd5 35 �e2
If 35 l:lc4 then 35 .. Jle8 is a
simple reply.
35 ... f4 36 lL!xf4
Losing a piece, but it is in any
case hopeless. If instead 36 l:lxd3
l:lc2+ 37 �el l:txd3 wins.
36
••
.:c2+ 37 �xe3 lL!xf4 38
l:lxdS lL!xdS+
and Black has an extra piece.
8
7
6
5
4
3
2
Puzzles
1
a
b
c
d
e
f
g
h
a
b
c
d
e
f
g
h
White to play
8
7
6
5
4
3
2
White played
1 �h6. What
happens if Black responds
1 ... l:te8
increasing the pressure on the
pinned white knight?
2
Rudolf- Moritz
Rostock 2002
a
b
c
d
e
f
g
h
8
8
7
7
6
6
5
5
4
4
3
3
2
2
a
b
c
d
e
f
g
h
White to play
The difference in value between
the bishops gives White a decisive
positional advantage, but how after
22
g3 1i'xh2
did he clinch the
game?
H
7
6
5
4
3
3
Movsesian - Godena
Olympiad, Elista 1998
a
b
c
d
e
f
g
h
a
b
c
d
e
f
g
h
Black to play
The rook on
e6
is attacked. Not
liking the look of 28 .. Jle8 29
'iixc6, Godena decided that the
lesser evil was
28
.••
e4,
offering the
pawn immediately, when if 29 dxe4
l:le8 he maintains a solid formation.
Was this a good decision by Black?
8
7
6
5
4
3
2
Back Rank Mate 19
4
Adams - Giorgadze
Groningen 1997
a
b
c
d
e
f
g
h
a
b
c
d
e
f
g
h
8
7
6
5
4
3
2
Adams
had
been
exerting
positional pressure on his opponent
throughout the game but here he
gave up the d5
with
39 .i.xfS
gxf5 40 lbxf5
when Black
had a strong centre. What was the
tactical justification for Adams'
play, or had he just gone mad?
Black has a strong centre, but
don't forget the white knight
hovering menacingly over his king!
It is also a good idea not to forget
that this chapter is on back rank
mates ...
20 Back Rank Mate
s
Ljubojevic - Kasparov
Belfort 1988
a
b
c
d
e
f
g
h
8
8
7
7
6
6
5
5
4
4
3
3
2
2
a
b
c
d
e
f
g
h
How did Kasparov break through
White's defences?
8
7
6
5
4
3
2
6
a
b
c
d
e
f
g
h
a
b
c
d
e
f
g
h
White to play
The question here is whether
White can safely play
17 l:.xd6--
investigate back
rank
tricks for both
players!
7
a
b
c
d
e
f
g
h
8
8
7
7
6
6
5
5
4
4
3
3
2
2
a
b
c
d
e
f
g
h
White to play
Can White safely take the bishop?
2 The Magnificent Seventh
M
any a catastrophe
in the endgame has
been suffered due
to an underestima
tion of the power
of the rook on the
seventh rank. As this chapter shows
the rook can be equally deadly in
the middlegame if it breaks into the
king's defences from the side.
8
7
6
5
4
3
2
Mating pattern one:
rook supported by bishop
-the windmill
a
b
c
d
e
f
g
h
a
b
c
d
e
f
g
h
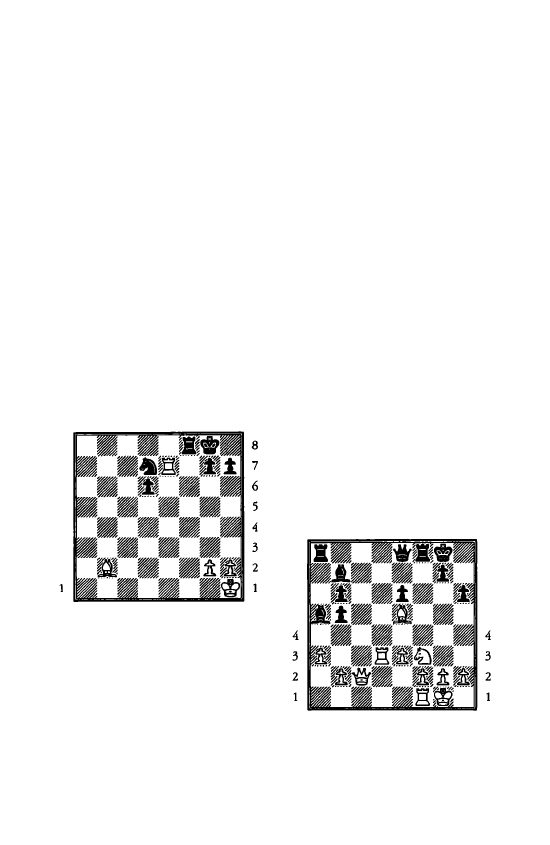
The rook on the seventh rank sup
ported by the bishop can wreak a
fatal discovered check on the g7
square. Here
1 .l:.xd7? loses to mate
on fl, but
I .l:.xg7+ �h8 2
.l:.x
d7+
has bought time to snatch the knight
with check. Note that 2 l:lg3+?
allows the defence 2 ... lt:le5!
2
•••
�g8
If 2
.
.. l:lf6 3 .txf6+ is useless for
Black.
3 l:lg7+ �h8 4 l:lg6+
or any other
available square on the g file
4
...
l:lf6
5
.txf6 Black is mated.
The action of taking a piece with
discovered check from the bishop
followed by checking again with
the rook and then giving another
discovered check is sometimes
referred to as a 'Windmill' in view
of the repetitive nature of the
combination.
8
7
6
5
Bareev - Adams
Wijk aan Zee 2002
a
b
c
d
e
f
g
h
a
b
c
d
e
f
g
h
8
7
6
5
22 The Magnificent Seventh
Here
20
. .
. 'ii'g6 looks tempting,
with the threat of 2I.. . .i.xf3. But
Bareev had prepared the crushing
reply
21 l:td7 !!
when the full force
of the windmill is seen after
21 ... 'ihc2:
a
b
c
d
e
f g h
8
8
7
7
6
6
5
5
4
4
3
3
2
2
a
b
c
d
e
f g h
22 l:bg7+ 'il>h8 23 l:txb7+ �g8
(also hopeless is 23 ... l:.f6 24 .i.xf6+
'il>g8 25
b4
when White emerges
with a rook and two pieces for the
alternatively the attacking 25
also looks lethal)
24 l:.g7+
(back again to win some more
booty)
24 ... �h8 2S l:.c7+ �g8 26
l:.xc2
and White has recouped his
queen offer with a piece as a bonus.
So in the game Black played
20 ... .i.e4,
pinning the rook and
maintaining the idea of 21...'ii' g6,
when there would be the double
threat of .i.xd3 and .i.xf3.
Nevertheless, the response was still
21 l:ld7 !
the queen. If now
21...'ii'xd7 22
leaves Black
the exchange up, but he would be
facing the threat of 23
b4,
snuffing
out the bishop on a5. So Adams
decided to call it a draw with
21 ... .i.xc2 22 l:.xg7+ 'il>h8
•h-•h
a
b
c
d
e
f g h
8
8
7
7
6
6
5
5
4
4
3
3
2
2
a
b
c
d
e
f g h
If they had played on then 23
l:tf7+ �g8 24 l:lg7+ is a draw with
out any fuss. However, if Bareev
wanted to give Black the chance to
lose then
23 l:lb7+
is the compliant
move, when 23 ... �g8 draws, but
23 ... l:.f6?
aiming to give the king
the ffi square is a terrible mistake:
24 .i.xf6+ �g8 2S l:lg7+ �fB 26
�eS !
(with the threat of 27 �d7+
picking up the queen for the knight,
so the black queen has to flee)
26 ..... c8 27 �d7+ �e8 28 l:te7+
�d8 29 �eS !
(back again and this
time the threat of mate on f7 forces
the queen to the edge)
29 ... 'ii'a6 30
l:.cl !
and Black has no moves as if
30 ... l:.c8 or 30 ... .i.e4 then 31 �f7 is
mate.
Kasparov - VaUejo Pons
Linares 2002
a
b
c
d
e
f
g
h
8
8
7
7
6
6
5
5
4
4
3
3
2
2
a
b
c
d
e
f
g
h
Kasparov realised that conquering
the g7 square would lead to a quick
win and so he played
48 'ifxe6 !
offering his queen. Now Black lost
after
48
•••
Wb4 49 Wxf7
50 �g1 1-0-
there
are
no
more good checks and he is a rook
down. So why was Vallejo so un
willing to accept Kasparov's queen?
After
48
.•.
dxe6 49 llxf7
Black
has various defensive tries.
a
b
c
d
e
f
g
h
8
8
7
7
6
6
5
5
4
4
3
3
2
2
a
b
c
d
e
f
g
h
The Magnificent Seventh 23
Ignore the threat.
I recall some advice that the best
response to a threat is to ignore it.
Here
49
•••
Wxd6
is suitably laid
back, but the black king perishes
after
50 llxg7+ �h8 51 llh7+ �g8
52 llb8 mate.
Give up the queen for a rook.
Alas, any attempt to give up the
queen will cost a rook as well as
Black falls into the familiar
windmill after
49
••
.'iVg8 50 llxg7+
Wxg7 51 llxg7+ �b8 52 llb7+
followed by 53 llxb8+.
Run with the king to h5.
In that case he is mated after
49
•.•
�g6 50 llxg7+ �b5 51 g4+
fxg4 52 bxg4+ �h4 53 i.fl mate.
So even in this line the black king is
unable to escape the attentions of
the white bishop!
Try to hide the king on h6.
This is a noble attempt to get out
of range of White's bishop, but
Black is mated after
49
••.
b5 50 llxg7+ �b6 51 llh7+
�g6 52 llag7
Run with the king towards the
centre.
49
•.•
�g8 50 llxg7+ �fB 51
llaf7+ �e8
Now White can win the queen
with 52 d7+ Wxd7 53 :Xd7, when
it will
be
mate in a couple of
moves. But even deadlier is
52
i.c5 !
introducing the threat of
53
d7+ llxd7 54 llfB mate.
Black then
has to give up his queen with
52 ... Wd7 just to stave off mate for a
couple of moves.
24 The Magnificent Seventh
Mating pattern two:
doubled rooks
You must always judge the posi
tion very carefully before letting
your opponent's rooks have free
rein on your second or first
rank.
8
7
6
5
4
3
2
a
b
c
d
e
f
g
h
a
b
c
d
e
f
g
h
8
7
6
5
4
3
2
Whoever is to move mates as
follows:
1 l:bg7+ �h8 2 l:.xh7+ �g8 3
Abg7 mate
or
l
.
.
.
Afl+ 2 'it>g2 l:l8f2
mate.
8
7
6
5
4
3
2
a
b
c
d
e
f
g
h
a
b
c
d
e
f
g
h
8
7
6
5
4
3
2
I learnt about the power of rooks
on the seventh rank the hard way.
Here is a position I reached as
White at 12 years old. With two
extra pawns, White should win
easily if he defends his second rank
with 43
.l:f2 or-a bit more compli
cated-goes after the d pawn with
43 Ad6! when 43 ... Ac8 44 A6xd5
Ae2 45 Ac4! removes all danger.
Instead I was oblivious to any
danger and went grabbing more
pawns with
43 :a6?? :cs!
Now it is possible that White is
already losing as there is no way to
prevent 44 ... Ae2 followed by a
massacre on c2. The white rooks
are simply unable to defend the
vital c2 square. It turns out that the
white king-which looks very safe
on b2-is actually in terminal
danger.
44 Axa5 Ae2 45 Af4
There is no way out for the white
king. If 45 �cl Acxc2+ 46 �b l
(it's the same old story after 46
�dl Aed2+ 47 �e l l:lh2 48 �d l
Acg2) 46 ... Ab2+ 47 �c
I
Aec2+ 48
�dl Ag2! Note the way Black has
pushed the white king out of contact
with either rook, so that he menaces
both
49
... Abl+ and
49
... Ag l+. All
White can do is play
49
�c
I,
getting back in contact with a rook,
but after
49
..
.
Abf2 he is out
distanced and will be mated with
50 ... :n or 50 ... Agl.
45 .. J:texc2+
Stronger than 45 ... Acxc2+ as
there is an immediate mate.
The Magnificent Seventh
25
46 'it>bl l:tcl + 47 'iii>b2 l:t8c2
neutralises his opponent's counter-
mate.
play based on the g3 pawn.
a
b
c
d
e f g
h
8
8
7
7
6
6
5
5
4
4
3
3
2
2
a
b
c
d
e f g h
Here is another example based on
the previous game which shows the
danger to the white king if it is
caught on b2 when the black rooks
infiltrate. This time the attack on c2
fails after I...l:tf2 2 lL!e4 or I...l:te2
2 lL!e4, when if necessary White can
always defend c2 with l:tc8. There
fore with no less than four pawns
for the exchange, you might imag
ine that White has every chance to
win. Not so: Black can attack along
the back rank by playing l
...
l:tm!
when White cannot avoid being
mated. Once again the pawn on
b4
proves to be lethal as it takes away
the a3 and c3 escape squares from
the white king. White is mated after
both 2 c4 l:tfl mate and 2
a3
l:tbl+
3 �a2 l:tal + 4 'iti>b2 llfbl mate.
The next position was reached in
a game between two strong
amateurs
in
2002.
White's
connected passed pawns give him
every chance to win as lonJ!; as he
a
b
c
d
e f g
h
8
8
7
7
6
6
5
s
4
4
3
3
2
2
a
b c
d
e f g
h
This can be done with 39 �f3!
stopping the pawn advancing and
preparing to answer 39 ... l:tf7 with
40 l:tfl, when 40 ... l:txf7? 41 l:txf7
�xf7 42 'it>g2+ wins a rook.
Instead White played 39 l:.f3?
losing vital time, after which the
black rooks swung into action:
39 ... l:.ah7 40
:gi
l:th2+ 41 �e3
l:txc2 42 eS?
The
passed
pawns
look
marvellous, but meanwhile the
white king is getting very short of
squares. Here he should bail out
with 42 f7 :xf7 43 l:tgxg3 l:txf3+
44 l:txf3 when he might well save
the endgame for if 44 ... :c3?! 45 e5
and the passed pawn is difficult to
stop.
42 ... llhh2 !
The mate threat on e2 will prove
decisive.
43 llel
The only chance was 43 �e4 but
then 43 ... llce2+ 44 l:[e3 l:.hf2!
26 The Magnificent Seventh
threatening 45 .. Jlf4 mate, when 45
l%xe2 l%xe2+ 46 �£3 l%xe5 47 l%xg3
�f6 is a lost endgame for White.
43 ... g2 44
f1
It looks as though White's
strategy is going to triumph after
all, as the pawn is about to queen.
Alas, it all proved a mirage:
44
•••
gl='if+ !
and
White resigned
as after 45
l%xg 1 it is mate with either rook to
e2.
Chapman - Kasparov
Charity Odds Match, London 2001
a
b
c
d
e
f g h
8
8
7
7
6
6
5
5
4
4
3
3
2
2
a
b
c
d
e
f g h
In bygone days a strong player
would often give an amateur oppo
nent material odds, ranging from a
pawn and the first move all the way
up to a queen according to the
supposed difference in playing
strength. This seems to have died
out as a regular practice by about
1920. However, in 2001 Terence
Chapman, a strong amateur and bu
sinessman, took on Kasparov re
ceiving the odds of two pawns. The
result was creditable for both
players with Kasparov winning
narrowly 2•h-l•h. Here is the
conclusion to the first game. Having
regained his material Kasparov was
always odds-on (so to speak!) to
outplay Chapman in the endgame.
Perhaps White thought his king was
well placed on h5, but this square
became its tomb after
3S
.•.
f6 ! 36
gxf6 l%xf6 37 ..th4
l%
g8
when there
was no way to prevent mate.
Velikhanli - Hunt
Olympiad, Bled 2002
a
b
c
d
e
f g h
8
8
7
7
6
6
5
5
4
4
3
3
2
2
a
b
c
d
e
f g h
Here Black realised that seizing
the seventh rank with both rooks
was far more important than
defending the d6 pawn:
33
•.•
l%e2 ! 34 lbxd6 l%aa2 35
l%fdl .llxg2+
When making such a sacrifice it
is comforting to know that there is
always a perpetual check to fall
back on if you suddenly discover
that you have missed something.
36 �hl l:.xh2+ 37 �gl l:.ag2+
38 'iftn hS!
The black rooks need some extra
help to mate the white king. Black's
idea is to advance the rook pawn to
h3 and then play l:.h I mate.
39 lLle4 h4 40 llb3! llc2
White was hoping for 40 ... h3 41
l::txh3!
41 �gl
If
41 d6 l:.h
I
mate.
41. .
.
l:.he2
a
b
c
d
e
f
g
h
a
b
c
d
e
f
g
h
42 d6
8
7
6
5
4
3
2
Also after 42 lLlgS .id4+! the
entry of the bishop is decisive: 43
<Ji>fl
(or 43 �h1 l:.h2 mate)
43 ... llf2+ 44 �g1 (this time it is 44
q;,el l:tce2 mate) 44 ... l:.fd2+ 45 q;,fl
l:.xd 1 mate.
42
..•
.id4+! 43 lLlfl
If 43 l:.xd4 l:.el or 43 �fl l:.h2
44 l:.xd4 l:.h 1 are both mate.
43 ... .ixfl+ 44 �n .ig3 45 l:.xg3
The Magnificent Seventh 27
Or 45 d7 l:r.f2+ 46 �g1 l:tg2+ 47
�hi (if 47 ..tfl l:.cf2+ 48 'iftel l:.gl
mate) 47 ... l:.h2+ 48 �g1 l:.cg2+ 49
�fl
l:.h 1 + as in the game.
4S ... hxg3 46 d7
The pawn is about to queen with
check. Has White pulled off a
swindle?
46 ... l:r.fl+ 47 �gl l:r.g2+ 48 'itthl
l:r.h2+ 49 'iftgl l:.cg2+ so
'iftn
.l:[hl+!
A simple solution. There is no
mate but Black will have an extra
rook after 5 1 �xg2 l:txd
I.
There
fore White resigned.
Other mating scenarios
Naturally there are other mating
possibilities with a rook on the
seventh
rank
.
Here are three
examples.
8
7
6
5
4
3
Veroci - Glaz
Olympiad, Malta 1980
a
b
c
d
e
f
g
h
a
b
c
d
e
f
g
h
8
7
6
5
4
3
28 The Magnificent Seventh
White wants to mate Black on g7
but there are two pieces in the way:
the white knight on
f7
and the black
bishop on d7. Veroci found a way
to remove both obstacles with gain
of time:
23 lile5! Wxa3 24 l:.c8+!
If now 24 ... .i.xc8 25 'ii'xg7 mate,
while 24 .. .'�h7 25 'iVxh5 (or 25
'iVg6) is also mate.
So Black tried the entirely useless
24
.•.
'iVf8 but
after 25
l:.xf8+ 'it>xf8 26
'it>g8 27
.i.xe4 1-0
8
7
6
5
4
3
2
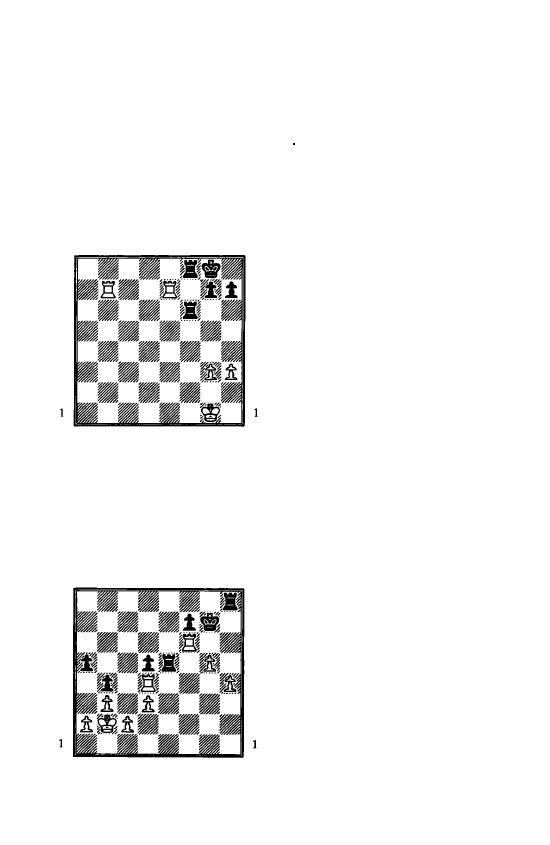
Ponomariov - Vallejo Pons
Olympiad, Bled 2002
a
b
c
d
e
f
g
h
a
b
c
d
e
f
g
h
8
7
6
5
4
3
2
Here the black pieces are doing a
good job in shutting out the white
king. The only way to break the
blockade is with 59 e6! when the
black king is terrorised with 60 l:.c8
mate. There is no escape except by
59 ... .i.xe6,
but this costs a piece
after 60 l::te7+ �d8 61 l:xe6+.
White soon exploited his advantage.
Anand - Topalov
Monaco 2001
a
b
c
d
e
f
g
h
8
8
7
7
6
6
5
5
4
4
3
2
a
b
c
d
e
f
g
h
3
2
It appears at first glance that there
is a hard fight ahead, despite
Black's extra pawn. However, after
30 ... lild3!
Anand resigned straight
away. The discovered attack on h2
is fatal. If
31
l:.x£2 lilxf2+ wins the
queen, while all three ways of
capturing the knight fail:
31 .i.xd3
looks a good reply as
White is threatening mate himself
on h7. But after 31 ... l::txh2+ 32 �g1
'iVg8+!
the only move way to ward
off mate is
33
'ii'g6, stopping one
square short of Nirvana on h7,
when
33
.
.. hxg6 nabs the queen.
If 31 l:.xd3 then 31 .. Jhfl+ when
the back
rank
collapses.
Finally 31 'iVxd3 is the most
resistant but 31 .. .lbh2+ 32 �g1
'ii'g8+ 33 lilg3 .i.xg3
leaves White
facing a decisive discovered check
on the g file.
7
6
5
4
3
2
Puzzles
8
Lputian - Spraggett
Olympiad, Bled 2002
a b c d e f g h
White to play
How did White force the win?
R
7
6
5
4
3
2
9
Short - Rogers
Olympiad, Manila 1992
a b c d e f g h
a b c d e f g h
White to play
7
6
5
4
3
2
8
7
6
5
4
3
2
The Magnificent Seventh 29
10
Korchnoi - Kraidman
Beersheba 1978
a b c d e f g h
8
8
7
6
5
4
3
2
a b c d e f g h
White to play
7
6
5
4
3
2
Black has just played 34
...
'ii'c2,
threatening to win the white queen
with 35 .
.
Jlb1+. What is the best
reply?
8
7
6
5
4
3
2
1 1
Sahovic - Korchnoi
Biel 1979
a
b c d e
f g h
a b c d e f g h
8
7
6
5
4
3
2
Can you see Black's mating attack?
3 Mating the Fleeing King
W
hereas there are
standard
mating
patterns you can
call to mind when
attacking a castled
position, it is hard-
er to find recurring themes in the
pursuit of a king across the board.
Basically you have either to mate
the king or failing that allow it to
escape to shelter but at the cost of
material or some other irreparable
damage to the defender's position.
Beyond this general statement I
can only think of one theme that is
special to the king hunt and I have
made it the subject of this chapter.
Namely if the opponent's king has
been forced forwards, try to see if
you can get your king or pawns, or
even both, involved in the attack.
8
7
6
5
4
3
2
Karpov - M.Gurevicb
Reggio Emilia 1991
a
b
c
d
e
f
g
h
a
b
c
d
e
f
g
h
8
7
6
5
4
3
2
Karpov forced the king forwards:
75 '1Vt7+ �h6
The only move as if 75 ... 'ith8 76
'it'g8 mate.
76 '1Vf8+ �h5
Again the
has to advance as
if 76 ... ..t>h7 77
�h6 78 'ii'hs
mate.
77 '1Vh8+ J.h6
Now, however, it looks as
if
Black has escaped as there are no
more obvious checks and he has a
mate threat of his own on hi. But
Karpov had realised that his king
wasn't a target on h3: it was part of
a mating net.
After 78 'ii'eS+!! Gurevich
resigned
as 78 ... 'it'xe5 29 g4 is
mate. The presence of opposite
coloured bishops and Black's
weakened king position (besides of
course the first move from the
diagram!) all played a major part in
White's success, but he still
wouldn't have won without the help
of his pawns and king forming a
barrier around the enemy monarch.
If you have sacrificed a piece or
more to drive out the enemy king
you will need to look for every
attacking resource possible to finish
off the king, as your army will be
numerically inferior to your
opponent's.
Oza - Lindermair
ffiCA World Championship
2002
a
b
c
d
e
f g h
8
8
7
7
6
6
s
s
4
4
3
3
2
2
a
b
c
d
e
f g h
White's kingside is weak for two
reasons: firstly, there are no pieces
defending it; and secondly there is a
pawn weakness on h3. The first of
these weaknesses can be remedied
if White is given time to organise
his defences, so Black struck at
once with
15
.••
-t
xhJ!
when if 16
gxh3 l:r.g6+ 17 �h1 'iVg5 and there
is no way to prevent mate on g2. So
White tried 16 f3, but after
16
.••
l:r.g6 11
.:.n
'ifh4 1s
lb
n
:m
19 -td2
l:.ff6
20 l:r.e1
Black found a forced mate by
driving his opponent's king outside
of its defences:
20
•••
1Vxfl+! 21 �xfl l:r.xg2+ 22
�eJ
f4 mate!·
I don't know at what point Black
found the forced mate; perhaps
when he played 15 ... -txh3 he was
relying on his judgement that told
him 'I will have a very strong
attack' rather than on deep
calculation.
Mating the Fleeing King 31
J.Polgar - Mamedyarov
Olympiad, Bled
2002
a
b
c
d
e
f g h
8
8
7
7
6
6
s
s
4
4
3
3
2
a
b
c
d
e
f g h
Judith Polgar has sacrificed a
piece to catch the black king in the
centre. If Black is given a free move
then he could block the centre with
-te6. Polgar realised that it was
essential to keep lines open with
16 e6!
which also introduces ideas of
'iVf7+ and reveals a double attack
on d5.
16
•••
-txe6
If instead 16 ... -txb3 17 lbxb3
lbxe6 (if 17 ... lbxb3 18 -tg5+ wins
the queen) 18 :e1 gives White a
winning attack, for example
18 ... 1Vd6 19 -tg5+ �d7
20
lbc5+
�c8 21 :Xe6 etc.
17 l:r.el !
White resists the urge to claw
back some material with 17 1Vxc5+
when 17 ... 1Vd6 puts up a staunch
defence. Polgar refuses to give
Black any breathing space: her
objective is to mate and she doesn't
32 Mating the Fleeing King
waver for a moment. The threat is
now 18 l:lxe6+ ltlxe6 19 'iVxe6
mate.
17
•••
'iVd6 18 .i.xe6 ltlxe6 19 ltle4
Everything flows smoothly: one
by one the white pieces fmd excel
lent attacking squares.
19 ... 1Ves
If 19 ... 'ii'd7 20 ltlcS.
20 .i.gS+ Cifi>d7 2l ltlc5+! .i.xcS
It is immediate mate after
2 l ... 'ifxc5 22 'ifxe6.
7
6
5
4
3
2
a
b c d e
f g h
22 'ii't7+! Citi>d6 23 .i.e7+! �dS
Or 23 ... ltlxe7 24 AxeS �xeS 2S
lie l+ �d6 26 'iVxe6 mate. Here
Black resigned.
You can bet that
having resisted the urge to take
Black's queen for so long Polgar
wouldn't have fallen for 24 l:lxeS+?
ltlxeS, when suddenly Black is at
least equal. Instead there is a pleas
ing mate after 24 'ii'f3+ �c4 25 b3.
A very pretty game in which Pol
gar showed a lot of attacking flair
and determination. Most notable
was her refusal to be sidetracked
from the aim of mate by the chance
to win material. Once again, the
honour of mating the king went to a
humble pawn!
8
7
6
5
4
3
2
Kasparov - Korchnoi
ZUrich 200
I
a b c d
e
f g h
a b c d e f g h
This game is taken from a tourna
ment held to celebrate the 70th
birthday of the magnificent tourna
ment fighter Viktor Korchnoi. It
was Kasparov who broke the
monopoly of Karpov-Korchnoi
matches for the World Champion
ship by defeating Korchnoi in their
semi-fmal match of 1984, before
eventually claiming the crown him
self. It must be said that Kasparov
didn't show much birthday spirit in
this tussle with the great veteran.
Both sides have pawns hanging
and 19 ltlxg6+ �t7 followed by
20 ... l:lxc3 looks good for Black.
The lazy move would be 19 �d2,
when 19 ... gS chases back the knight
with equality. Instead Kasparov
played 19 l:lhJ!!
He had to calculate what follows
to the end, or at least rely heavily
on his intuition, because White is
now committed to a piece sacrifice.
19 ... g5 20 !ilg6+
There is no way back for if 20
!ilf3 g4.
20
..•
<itrt7
Korchnoi decides to test White's
calculation-not necessarily a good
idea when it is Kasparov sitting op
posite you. However, 20 .. .'�d8 21
Af3 is just horrible.
21 l:U3+! �xg6 22 �d3+ <ifrh5 23
l:h3+ <ifrg4 24 0+ �f4
So far White has forced everyth
ing with checks. But now comes a
deadly quiet move:
25 �f2!!
Keeping the black king out of e3,
after which he suffocates through
lack of space.
25 ... g4 26 g3+ 1-0
Mate follows after 26 ... �g5 27
f4.
So what gave Kasparov the idea
for his combination? First and fore
most, it was the fact that every
black piece was out of action on the
queenside. J1,1st look at those
knights on a5 and b6-what were
they doing when the king needed
some protection? Even after the
piece sacrifice, White had an over
whelming advantage in firepower
aimed at the black king-as well as
rook and bishop, don't forget the
role of the king and pawns.
Mating the Fleeing King 33
Next is an amazing king hunt by
Kasparov. The variations are ex
tremely complicated but the overall
effect is so beautiful that I couldn't
resist choosing it.
Kasparov - Topalov
Wijk aan Zee 1999
a
b
c
d
e
f
g
h
8
8
7
7
6
6
5
5
4
4
3
3
2
2
a
b
c
d
e
f
g
h
The world number one has
already sacrificed a rook as we join
play, and here he offered the other
rook with
25 l:.e7+!
If 25 1i'xd4+? safe for Black is
25 .. .'6b6, so White wants to deflect
the black queen from d6 to rule out
this defence.
Black dare not accept as it is mate
after 25 ... 1i'xe7 26 'ii'xd4+ <itrb8 27
1i'b6+ �b7 28 lilc6+ �aS 29 1i'a7
mate. Also bad is 25 .. .'iti'b8 26
'ihd4 !ild7 (to block mate on a7-
note the bishop on h3 is guarding
the c8
27 �xd7 when
27 ... 'ilxe7 28
mates while
27 ... l:.xd7 28 1i'xh8+ leaves Black
34 Mating the Fleeing King
material down. The black king has
therefore to advance.
8
7
6
5
26 'ifxd4+! 'it>xaS
Or 26 ... 'ifc5 27 'ifxf6+.
27 b4+ 'it>a4
a
b
c
d
e
f
g
h
a
b
c
d
e
f
g
h
8
7
6
5
The black king is now trapped
deep in White's territory on a4, but
how can it be mated? One idea
would be to get the queen to a5,
probably via b6 or c7. But the two
main mating set ups are as follows:
frrstly, White plays :a7 and then
after deflecting the black queen
from d6, mates with :Xa6. The
second scenario is to get in 'ifb3
mate. With his next move White
aims directly for this idea, but after
the game Kasparov found that
28
:a7!
immediately was stronger. He
then gives the following wonderful
fmish:
28
••.
lLlxdS 29 :xa6+!! 'ifxa6
30 'ifb2 lLlc3+
(the only way to
vent 31 'ifb3 mate)
31 'ifxcJ
32 �b2!!
and Black has no defence
against a smothered mate on b3, for
example
32
•..
Wc6 33 '1Vb3+!! .i.xb3
34 cxb3 mate.
a
b
c
d
e
f
g
h
A
wonderful picture. Black has a
huge material advantage and the
only white piece, the bishop on h3,
is doing nothing; but the white
pawns and king checkmate the
black king all by themselves.
28 'ifc3
Not as strong as 28 :a7, but still
leading to a spectacular fmish.
28
.••
'ifxd5 29 :a7 .i.b7
There is no way else to defend a6,
for if 29 ... :d6 30 'it>b2! (with the by
now familiar threat of 31 'ifb3+ and
mate next move) 30 ... 'ifd4 31 'ifxd4
:xd4 32 :Xa6 mate.
30 l:[xb7 'ifc4
Topalov gives up the knight to
break up the pawn cage around his
king.
31 'ifxf6 Wxa3 32 Wxa6+ 'it>xb4
33 cJ+!
Now the nature of White's attack
changes. Instead of trying to
smother the black king within a
compact wall of pawns Kasparov
wants to open all the lines so that
every piece can join in the assault.
And, as shall be seen, that includes
the king and bishop!
33 ... 'iti>xc3 34 'iVai+ 'iti>d2 35
'ifb2+ 'iti>d1
8
7
6
5
4
3
2
a b c d e f g h
a b c d e f g h
36 i.fl !!
8
7
6
5
4
3
2
The forgotten bishop finally
enters the battle. Black has to
up the queen for if 36 ... 1i'c5 37
is mate or 36 ... 1i'xfl 37 'ifc2+ �e1
38 l:te7+ and mate next move. You
will see that the white king played a
part in both of these mates: in the
first it took away the c2 and c 1
squares from the black king, while
in the second it supported the queen
check on c2.
36
.•
J:td2 37 l:.d7!
White saves his own queen before
taking Black's. A little care is still
needed 'but K.asparov efficiently
broke the remaining resistance:
37
••.
l:.xd7 38 i.xc4 bxc4 39
'ii'xhB l:.d3 40 'ii'aB
c3
41 'ii'a4+
lte1 42 f4 f5 43 �cl l:.d2 44 'ii'a7
1-0
A fantastic attacking game.
Mating the Fleeing King 35
In the middlegame it is rare for
the attacker's king to be able to
advance up the board and become
directly involved in a mating
pattern: it is simply too dangerous
an enterprise. Here is a marvellous
exception.
Short - Timman
Tilburg 1991
a b c d e f g h
a b c
d e
f g h
8
7
6
5
4
3
2
The white rooks dominate the
only open file and the queen is un
challenged on the key f6 square.
Yet how is White to finish off the
game? If 3 1 lbg5?? then 31...1i'xg2
is mate. An advance of the g pawn
to break open the kingside would
require careful preparation and
again would allow the black queen
and bishop to come alive along the
light square diagonal.
Instead Short came up with an
ingenious solution: 31 �h2! l:.c8
The only fighting move is 3l.
.•
i.c8,
but understandably Timman hadn't
yet realised White's intention.
32 �g3! AceS 33 �f4 i.cB 34
�gS
and Timman
in the
face of 35 �h6 and 36
mate. If
36 Mating the Fleeing King
Black had played �h7 at any point
then llxf7+ would have won at
once.
A most remarkable king advance,
made possible by the paralysis of
the black pieces.
Here is another example which
shows the potential for mate when a
king moves forwards and becomes
surrounded by his opponent's
pawns.
6
5
4
3
2
M.Prizant
-
Sowray
England 2002
Black to play
a
b
c
d
e
f
g
h
6
5
4
3
2
1
The position above was reached
in an English club match between
Mushrooms and Wood Green. My
thanks to my Wood Green team
mate Peter Sowray for explaining to
me what was going on in this inter
esting endgame.
With a passed pawn on the
seventh
rank
White appears
to
have
an excellent position. True, his king
is deep in enemy territory but
everything seems fme as soon as
you notice that 42 .. .C�g7, with the
intention of
43
... l£lf6 mate, can be
answered simply by
43
d8=• l£lf6
45 'ii'xf6+, or even better with
43
.if8+! destroying the mating net
and queening next move.
Nonetheless, there is a decisive
mating idea in the position that is
revealed after the game move
42
.•.
:as
Black not only stops the
queening but threatens 42 .
. .
44
�6 l:r.h8+ 45 �xg5 l:h5 mate!
43 g4
White must try to prevent the
mate outlined above by controlling
the h5 square.
43
.
.
.
llh8!
Not
43
. .
. �g7? 44 .ie7, but now
the other mating pattern is back on
the cards with
44
... l£lf6. White has
to give up the passed pawn as a
delaying tactic.
44 d8='ii' llxd8 45 gxfS
There is nothing better.
a
b
c
d
e
f
g
h
8
8
7
7
6
6
5
5
4
4
3
3
2
2
1
a
b
c
d
e
f
g
h
45 ...
�f6?
After the game Sowray admitted
he had become confused by the
different mating ideas. Here
45 ... lDf6+ 46 �xh6 :hs+ 47 <itxg5
.l:.h5 mates! After this error Black
had to win all over again which he
managed to do as follows: 46 �b6
.l:.d3 47 � 3
48 �g4 lbf6+ 49
WO
4+ 50
lbd5 51 .l:.d2
lDxb4 52 .l:.b2 lbd5 53 .l:.b7+ �f6
54 :h7 �xf5 55 :xh6 :cJ 56 �d2
.l:.c2
with an extra pawn Black
should win but White's next move
makes it easy 57 l:lh5? lDf4+ 0-1
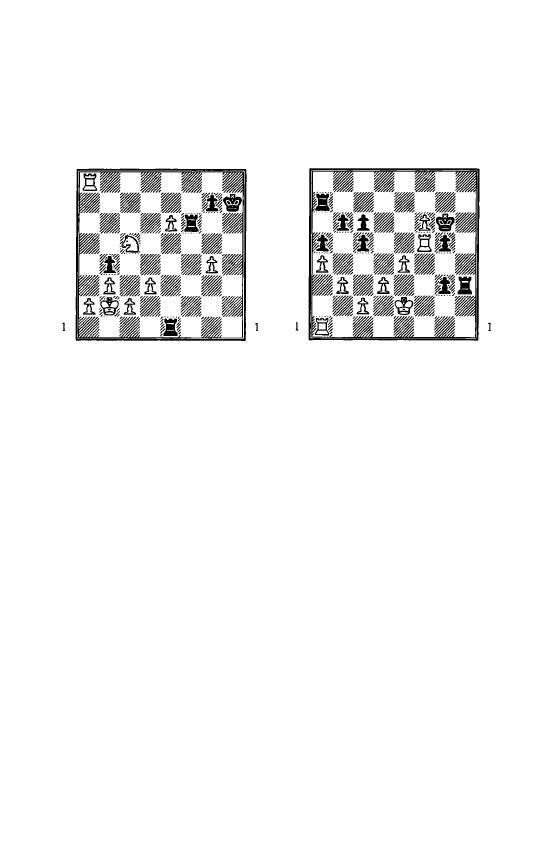
Puzzles
12
Kotronias - Hausrath
Germany 1996
a
b
c
d
e
f
g
h
8
8
7
7
6
5
4
3
2
a
b
c
d
e
f
g
h
White to play
6
5
4
3
2
Can White win with 43 .l:.b6+
i.f6
(if 43 ... �h5 44 g4 mate or
43
... �f5 44
.l:.f7+
�e5 45
.l:.xh7
with
an easy win) 44 .l:.dd6, pinning
the
bishop?
Mating the Fleeing King 37
13
Kalinin - Skotorenko
Correspondence 1991
a
b
c
d
e
f
g
h
8
8
7
7
6
6
5
5
4
4
3
3
2
2
a
b
c
d
e
f g
h
Black to move
Black resigned
in the position
above, but what if 26 .. !�xg5
winning the bishop and intending to
take the knight next move?
8
7
6
5
4
3
2
14
Topalov - Kasparov
Linares 1999
a
b
c
d
e
a
b
c
d
e f g
h
Black to play
8
7
6
5
4
3
2
38 Mating the Fleeing King
Again Topalov is the hapless
victim of a Kasparov attack. How
did the world number one force
mate? You will need to use the
queen, king and a pawn, though not
necessarily in that order!
7
6
5
4
3
2
15
Schaefer
-
Novik
Sofia 1994
a
b
c
d
e
f
g
h
Black to play
Find a mate for White if Black
plays 45 ... 1i'd6 aiming to exchange
queens. The game actually went
45 ... d4 46 f3
now after 46
.•.
d3 47
:h4!
8
7
6
5
4
3
2
a
b
c
d
e
f
g
h
a
b
c
d
e
f
g
h
Work out a mate for White after
both 4
7
.
.
. •iti>xh4 and 4
7
... d2
Remember to use your king and
pawns when necessary!
8
7
6
5
4
3
2
16
a
b
c
d
e
f
g
h
a
b
c
d
e
g
h
Black to play
Here Black decided to offer his
with 27
..•
lbxt3!?
Now 28
is safe enough for White, but
instead he played 28 Wxa7 lbxd2+
29 Citfl,
with the idea that if
29 .. .lbf4+ 30 'it;le3 forks the black
knight and rook and wins for him.
Is this correct?

4 Mate from the Front
with Queen and Rooks
I
n thffi chap"" we exammo
mates with the queen and
rooks that occur after
decisive frontal pressure is
applied on the enemy castled
position. A typical scenario
is seen in the diagram.
8
7
6
5
4
3
2
Typical mate with two rooks
a
b
c
d
e
f
g
h
a
b
c
d
e
f
g
h
The black kingside pawn cover
has been swept away and so the
king is mate<I by the two rooks. I
was much addicted to this scenario
when I first began playing chess, as
it is the simplest of all mating
methods.
a
b
c
d
e
f
g
h
8
8
7
7
6
6
5
5
4
4
3
3
2
2
a
b
c
d
e
g
h
Here's a way that the mating
scenario in the first diagram could
arise. If White takes the black queen
he is mated himself on the back
rank
after 1 :xe7? :al+ 2 .:.el
:xel. Instead 1 1hh7+!! �xh7 2
:h3+ 1Vh4 3 .l:bh4
is mate.
Knowing the wmnmg theme
above allowed White to find a
brilliant combination
in
the
following game:
40 Mate from the Front with Queen and Rooks
Tkachiev - Watson
London 1993
a
b
c
d
e
f
g
h
8
8
7
7
6
6
5
5
4
3
2
a
b
c
d
e
f g
h
20 liJd5!! exd5
4
3
2
There is little choice for if
20 ... �xb2 21 lDe7+ wins the queen.
21 exd5 'iVd7 22 �xf6 gxf6 23
.:.g3+ ..th8
Black is destroyed after 23 .. .'�f8
24 'ifxh7, for example 24 ... 1:r.e8 (or
else 25 l:.e 1 cuts off the black
king's retreat followed by mate
with llg8 or 'ith8) 25 l:r.g8+ <i;e? 26
l:tel+ �d8 27 l:texe8+ etc.
a
b
c
d
e
f
g
h
8
8
7
7
6
6
5
5
4
4
3
3
2
2
a
b
c
d
e
f g
h
Black might have thought his
king was safe on h8, but after see
ing the mating pattern above you
wiii know that he is about to be hit
by a thunderbolt:
24 'i'xh7+!! <i1i>xh7 25 l:td4
and Black resigned because there
is no way to stop l:r.h4 mate.
8
7
6
5
4
3
Adams - Shirov
Linares 2002
a
b
c
d
e
f
g
h
a
b
c
d
e
f
g
h
8
7
6
5
4
3
White resisted the urge to win the
exchange with 3 1 �xf8. Instead 31
.:r.h3!
was strong enough to
persuade Shirov to resign. If 3 1 ...g6
32 'ifxh6 is mate, so 31...�g6 32
l:txh6+!
when 32 ... �h7 33 l:txh7+
<i1i>xh7 34 'i'h4+ �g6 35 'iVg4+
<i1i>h6.
Now 36 lld3 would win
quickly, but the most accurate
sequence is 36 �e3+! g5 37 'ifh4+
�g6 38 'i'xg5+ ..th7 39 1Vh6 mate.
If instead 32 ... gxh6 33 'i'xh6+
�h7 34 'iff6+! .:r.g? 35 �xf8 is
crushing.

Mate from the Front with Queen and Rooks 41
After the game Shirov admitted
that in his earlier calculations he
had only looked at lines with 3 1
.ixf8? l:lxf8 32 :h3, when after
32 ... .ig6 33 :xh6+? gxh6 34
'ii'xh6+ Black has 34 ... �g8.
Here is a more complicated
example in which White gradually
builds up an attack with his rooks
along the h file.
8
7
6
5
4
3
2
I.Sokolov - Short
Olympiad, Bled 2002
a
b
c
d
e f g
h
a
b
c
d
e
f
g
h
8
7
6
5
4
3
2
White has an excellent knight on
d6 and a semi-open h file, but how
is he to exploit his advantage? Note
that if it were Black to move he
could play 24 ... fxe5 breaking up the
centre. If White lost control of the
position he could well find that it is
his own king that is in trouble!
One of the 'rules' in such
positions is that when you have a
queen and bishop in an attacking
formation aiming at the opponent's
king it is better to have the queen in
front. Thus if the white queen were
on d3 and the bishop on c2 we
would already be talking about 24
1i'h7 mate.
It so happens that a move which
prepares to put the queen in front of
the bishop along the diagonal also
defends against the threatened
24 ... fxe5. When things work out
like that it is a sure sign that things
are going well with the position!
25 'ii'e2! a6
Black has no constructive plan for
if 25 ... fxe5 26 'ii'e4 g6 27 :xh6
.l:lg7 28 0-0-0 intending l:[dhl and
.l:lh8 mate is too much to bear.
26 1We4!
White provokes f6-f5 for two
reasons. Firstly it takes the pressure
off the e5 pawn and so ensures that
Black has no potential counterplay
by opening the centre, and secondly
it creates a target on f5.
8
7
6
s
4
3
2
26 .
.
. f5 27 1We2 :e7 28 g4!
a
b
c
d
e
f
g
h
a
b
c
d
e
f g
h
8
7
6
5
4
3
2
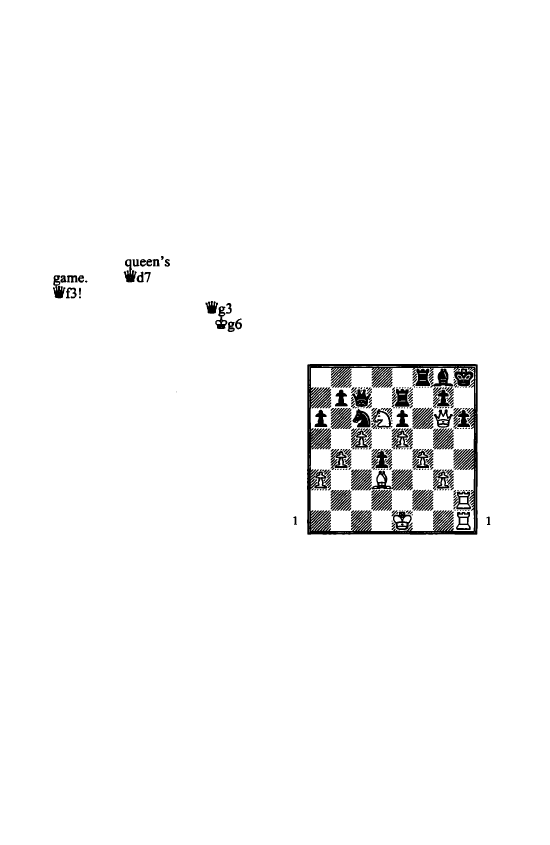
42 Mate from the Front with Queen and Rooks
Giving Black the grim choice
between opening the diagonal again
for White's queen and bishop or
allowing the g4 pawn to join in the
attack.
28
•••
fxg4
Here is what might have
happened after 28 ... �g6: 29 o-o-o!
As there is no need to hurry, White
brings his
rook into the
29 ...
30 g5 hxg5 31
g4 (If 3 l...gxf4 32 'ii'h3 and
mate follows on h8 ) 32
�h7
33 lbh7 �xh7 34 'ii'h4+
(or
34 ... �g8 35 llh1) 35 1i'g5+ �h7 36
llhl+ �g8 37 1i'h5 g6 38 'ii'h8
mate. In this variation you can see
the importance of the knight on d6
taking away the f7 square as an
escape route for the black king.
29 1i'xg4!
Sokolov plays according to the
motto: no counterplay at all for the
opponent! Nigel Short, a resource
ful defender, had prepared to
answer 29 1i'e4 with 29 ... g5! which
gains some counterplay after 30
lbh6 .llxf4. If instead 30 fxg5 the h
file closes for the white rook and
opens for the black rook on e7 after
30 ... h5 though even here White's
initiative is strong.
29
••.
�h8
Now how can White strengthen
his attack?
30 g3!
A little move but deadly. The
attack can only be carried with the
assistance of the rook on al. This is
just as fast as 0-0-0, llh2 and lldh1
and by defending f4 rules out any
tricks.
30
••.
�f7
31 lla2
In a nutshell the battle is decided
by the fact that White succeeds in
activating his rook on a 1 whilst
keeping the black rooks passive.
3l.
•.
�g8
32 llah2
White has achieved his optimum
build up which was enough to
provoke Black to resign. A possible
finish is:
8
7
6
5
4
3
2
32 .
..
1i'd7
33
1i'g6 1i'c7
a
b
c
d
e
f
g
h
a
b
c
d
e
f
g
h
34 �e4!
8
7
6
5
4
3
2
Defending the rook on hl but not
immediately 34 llxh6+? gxh6 35
1i'xh6+ when Black can
turn
the
tables with 35 ... llh7 36 �xh7 1i'xh7
37 'ii'xm 'ii'xhl+. Now 35 :Xh6+
followed by picking up the rook is
really a threat.
34
•••
lld8
The rook saves itself but leaves
the f file undefended. If instead
34 ... 1i'd8 35 llxh6+ mates in a
couple of moves.
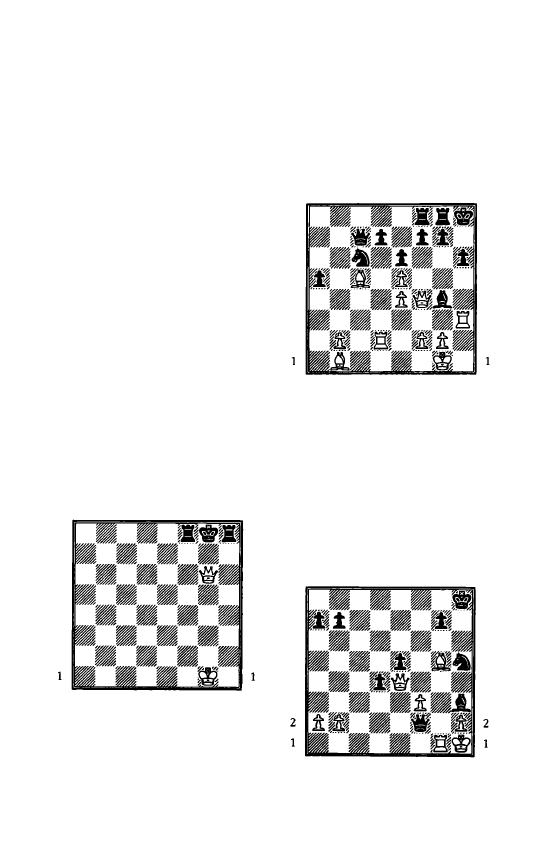
Mate from the Front with Queen and Rooks 43
35 l:bh6+ gxh6 36 'ii'f6+ l:lg7 37
lhh6+ .i.h7 38 l:lxh7+ �g8 39
'ii'xe6+
with a quick mate.
Note that White's thoughts were
always about how he was going to
get the rook on al into the attack on
the h file. The attack couldn't have
succeeded without this vital
reinforcement. Also remarkable was
Sokolov's patience: he was just as
concerned with stopping his
opponent's counterplay as rushing
forwards with his kingside pawns.
The epaulette mate
You may have noticed that in the
examples above and
indeed
throughout the book one or more of
the defender's pieces often does
more harm than good by getting in
the way of the king's escape route.
A startling example of this is seen
in the so called epaulette mate.
a
b
c
d
e
f
g
h
8
8
7
7
6
6
5
5
4
4
3
3
2
2
a
b
c
d
e
f
g
h
Here the black king is in check
mate for no other reason than that
his rooks are boxing him in! A less
extreme example of a self inflicted
mate may occur when the king is on
h8 and a defending rook is on g8.
For example, in the Adams-Shirov
game above imagine if after 3 1 l:lh3
Black had played 3 I ... .i.g4.
a
b
c
d
e
f
g
h
8
8
7
7
6
6
5
5
4
4
3
3
2
2
a
b
c
d
e
f
g
h
Now White could simply capture
the bishop, but why bother when he
can end the game with 32 lbh6+
gxh6 33 'ii'xh6 mate:
the rook on
g8 shuts in the king.
I
once managed to use the idea of
the epaulette mate to win from the
following position:
8
7
6
5
4
3
Stanton - McDonald
London 1990
a
b
c
d
e
f
g
h
a
b
c
d
e
f
g
h
8
7
6
5
4
3
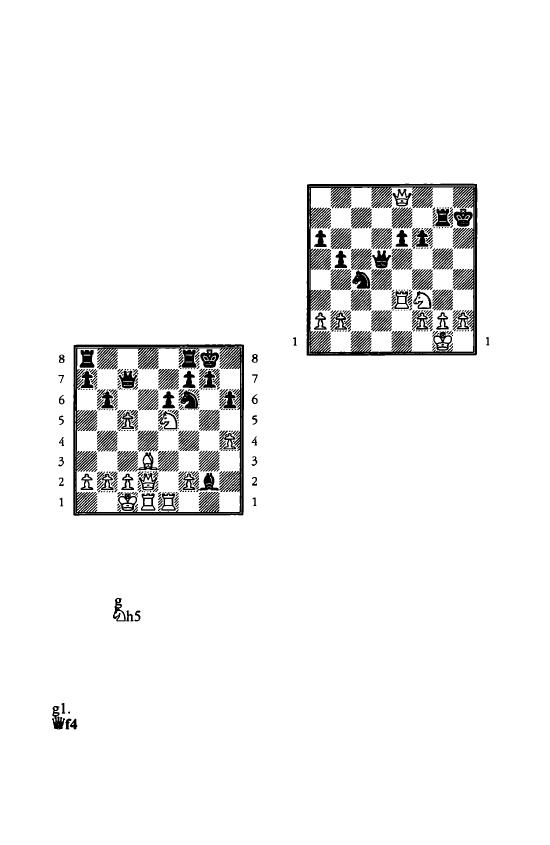
44 Mate from the Front with Queen and Rooks
Black
forced
mate
with
27
..•
.tg2+! 28 l:r.xg2 •n+ 29 llg1
ll:)g3+! 30 bxg3 'ifh3 mate!
Whilst we have concentrated in
this chapter on a frontal attack
down the h file, it is naturally
possible to launch a similar assault
down the g file, or any other file
that occasion demands.
Anand - Korchnoi
Wijk aan Zee 2000
a
b
c
d
e
f
g
h
a
b
c
d
e
f
g
h
Korchnoi has just grabbed the g2
pawn · with 15 ... i.xg2, no doubt
thinking that White can't quickly
utilise the file as if 16 llg1 'ifxe5
1 7 .l:.xg2
looks solid enough
for Black e.g. 18 'ifxh6 'iff4+ 19
'ifxf4 ll:)xf4. But he had missed the
fiendish move 16 l:r.e2!! which
keeps e5 defended and clears the
way for the other rook to come to
After 16 ... �h8 17 llg1 i.d5 18
'ihc5 19 lle3! Black resigned.
He is quite defenceless against the
threat of 20 l:r.xg7! �g7 21 .l:.g3+
'it>h8 22 'iVxf6 mate.
Pert - Ganguly
British Championship,
Torquay 2002
a
b
c
d
e
f
g
h
8
8
7
7
6
6
5
5
4
3
2
a
b
c
d
e
f
g
h
4
3
2
By sacrificing his knight White
cleared the way for his rook and
queen to launch a decisive attack
against the under-defended black
king:
28 ll:)g5+! l:r.xg5
If 28 ... fxg5 29 .l:.h3 mate.
29 •n+ 'it>h6
Or 29 .. .<it>h8 30 .l:.h3+ .
30 'ifxf6+ 'iti>b7
Black is mated after 30 ... �h5 3 1
.l:.h3+ 'iti>g4 32 f3 + etc.
31 'ift7+!
White realises that he has to
combine threats of the rook going
forwards and sideways in order to
force the win. Black resigned as if
3 l ...�h6 32 .l:.xe6 (forwards!) or
3 l...'it>h8 32 llh3+ (sideways!) is
decisive.
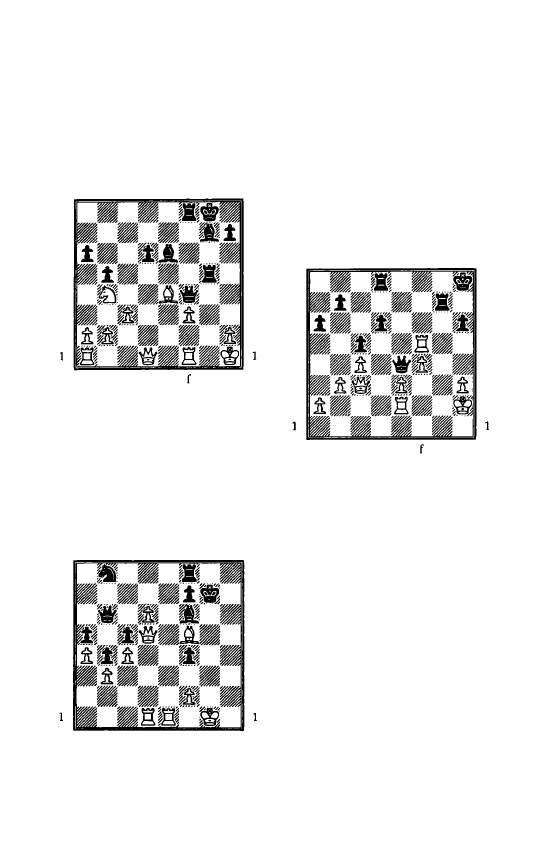
Mate from the Front with Queen and Rooks 45
8
7
6
s
4
3
2
Puzzles
17
Prokopp - Scholz
Correspondence, 1996
a
b
c
d
e
f
g
h
a
b
c
d
e
g h
Black to play
8
7
6
s
4
3
2
Does Black have enough activity
to compensate for White's extra
pawn and control of the d5 square?
18
Kasparov - Grischuk
Cannes 2001
a
b
c
d
e
f g
h
8
8
7
7
6
6
s
s
4
4
3
3
2
2
a
b
c
d
e
f g
h
White to play
White is winning easily with a
rook for knight and a passed pawn,
but how did Kasparov most
efficiently end the game?
19
Malaniuk - Tseitlin
Hastings 1995
a
b
c
d
e
f
g
h
8
8
7
7
6
6
s
s
4
3
2
a
b
c
d
e
White to play
g h
4
3
2
White's rook is hanging, but
Malaniuk thought he had found the
complete answer with 40 'ii'f6,
which threatens both the rook on d8
and the h6 pawn. Was he right?
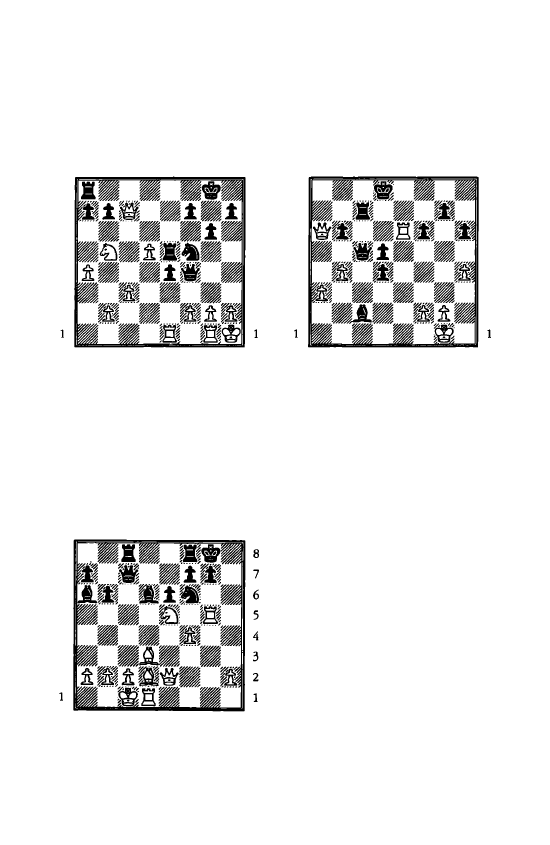
46 Mate from the Front with Queen and Rooks
20
Yudasin - Kramnik
Wijk aan Zee 1994
a
b
c
d
e
f g h
8
8
7
7
6
6
5
5
4
4
3
3
2
2
a
b
c
d
e
f g h
Black to play
How did Kramnik break through?
8
7
6
5
4
3
2
21
Baklan - Matzat
Bad Zwesten 1999
a
b
c
d
e
f g h
a
b
c
d
e
f g h
White to play
22
Baba - Khenkin
Koszalin 1999
a
b
c
d
e
f g h
8
8
7
7
6
6
5
5
4
4
3
3
2
2
a
b
c
d
e
f g h
Black to play
Despite being a piece down with
his previous move 36 'ifa6 White
has spumed the chance to draw by
repetition. Was he right to do so?
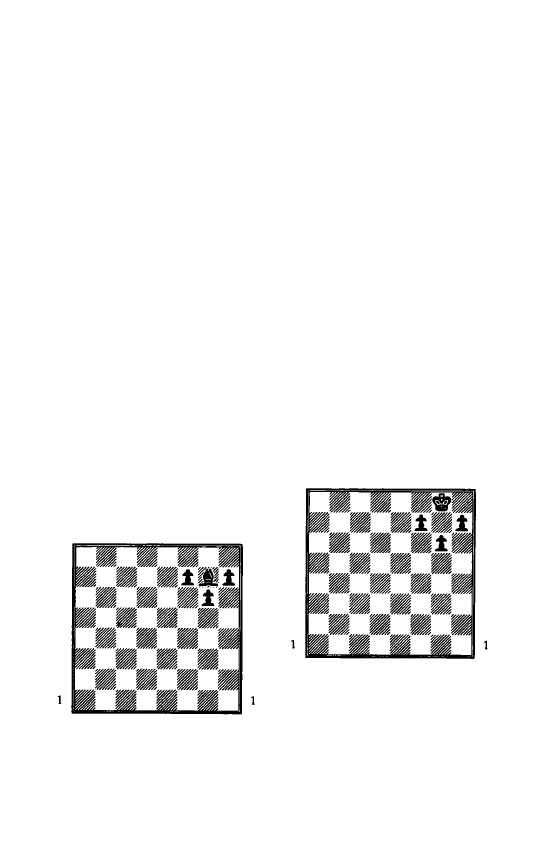
5
Knight and Queen against
the Fianchetto Position
I
n this chapter we shall
investigate mates with the
queen and knight that
exploit the loosened pawn
structure created by a
fianchetto. The examples
won't be
exclusively
White
attacking Black's kingside but in
practice this is often the case due to
the popularity of the black
fianchetto on g7.
In many opening set ups Black
fianchettos his king's bishop-for
example
the King's
Indian,
Grunfeld, Benko Gambit and Pirc
Defences. The bishop on g7
controls an important diagonal
aiming at the d4 square: naturally
this makes it a favourite of players
seeking to counterattack.
8
7
6
5
4
3
2
a
b
c
d
e
f g h
a
b
c
d
e
f g h
8
7
6
5
4
3
2
In addition, the bishop on g7
helps to fortify the kingside. Thus
in the King's Indian it isn't unusual
to see Black push forwards all his
kingside pawns in attack against the
white king, despite the fact that he
himself has also castled kingside: he
trusts in the bishop on g7 to protect
his king.
But what if this bishop is
exchanged off, or is lost through an
accident? Or what if it loses contact
with the g7 square? In that case
Black may well be left with the
following pawn structure on the
kings ide:
8
7
6
5
4
3
2
a
b
c
d
e
f g h
a
b
c
d
e
f g h
8
7
6
5
4
3
2
Without the bishop on g7 this set
up has the potential to be disastrous
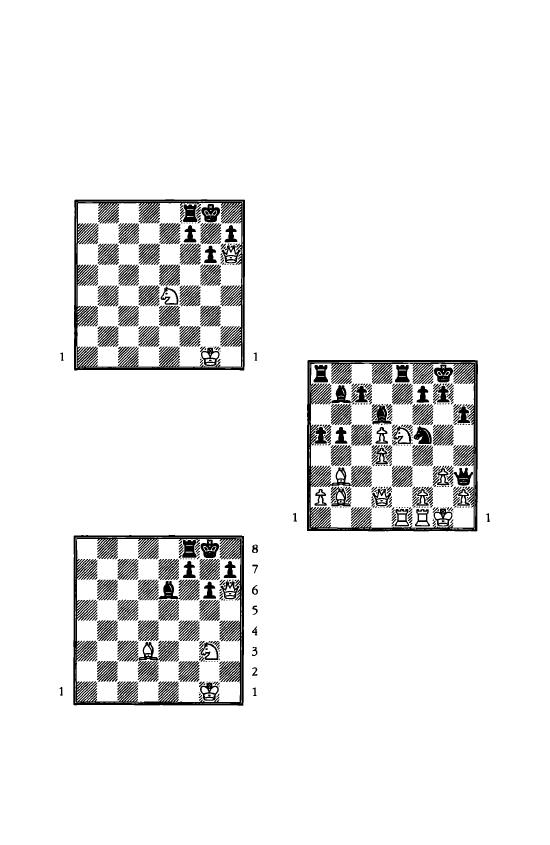
48 Knight and Queen against the Fianchetto Position
for the black king. Just look at the
dark square holes on f6 and h6: they
are simply inviting an attack by a
white knight and queen!
8
7
6
5
4
3
2
a
b
c
d
e
f g h
a
b
c
d
e
f g h
8
7
6
5
4
3
2
Here the worst has come to pass
for the black king. White can mate
with either 1 ltJf6+ CiiPh8 2 •xh7 or
2 'ii'xf8 mate,
or one move longer
with 1 ltJgS lle8 2 'ii'xh7+ CiiPf8 3
'ii'xti mate.
8
7
6
5
4
3
2
a
b
c
d
e
f g h
a
b
c
d
e
f g h
A
slightly
more
complex
example. If 1 lbe4 Black can
defend against both lbf6 and lbg5
with l...f6. But 1 lDhS! does the
trick: Black can only prevent 2 'ii'g7
mate with 1 .
.
. gxh5
when 2 'ii'xh7 is
mate.
Here the mating honours go
to the bishop, but it was the knight
that provided the vital build up by
attacking f6 and g7.
In the first example from a practi
cal game Black gets some revenge.
8
7
6
5
4
3
2
Morozevich - Adams
Wijk aan Zee 2001
a
b
c
d
e
f g h
a
b
c
d
e
f g h
8
7
6
5
4
3
2
Black threatens 24 ... a4, when
after the bishop moves to safety,
say 25 .tc2, 25 ... .txd5 will win a
pawn and threaten 26 ... 'ii'g2 mate.
So Morozevich played
24 a3
clearing the a2 square for the
bishop.
24 ... b4 25 axb4?
White is thinking about the pawn
structure in the endgame and so
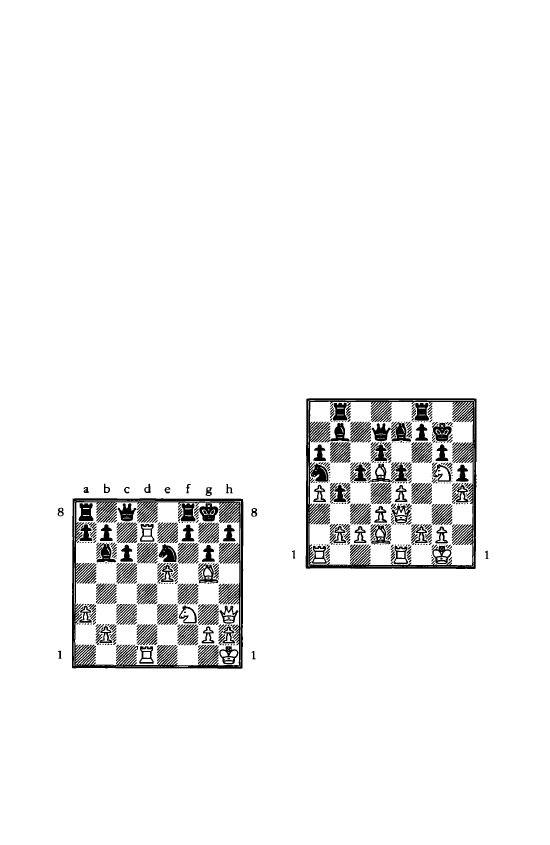
Knight and Queen against the Fianchetto Position 49
forgets about the danger to his king
in the middlegame. Obviously he
has no wish to leave his opponent
with a protected passed pawn after
25 a4, but that was the only chance.
2S
••.
.txb4 26 .tc3
Saving the exchange but losing
his queen. Still, against a world
class player it was only a question
of the speed of defeat.
26 ... .txc3 27 'Wxc3 ltJh4! 0-1
There is no way to prevent mate
on g2 apart from giving up the
queen with 28 gxh4 'Wxc3. Such a
drastic finish is seldom seen in a
game between players rated over
2740.
7
6
5
4
3
2
Debowska - Mikhalev
Krynica 1999
a
b
c
d
e
f
g h
7
6
5
4
3
2
With absolute control of the d file
it is easy for White to exploit the
weakness created by g7-g6:
25 'ifh6!
The plan is to overwork the black
knight with .tf6 and ltJg5, when the
reply lDxg5 will allow mate on g7,
while otherwise 'Wxh7 will be mate.
There is nothing Black can do to
prevent this.
2S
••.
.td8 26 .tf6 .txf6 27 exf6
Black has got rid of the white
bishop but the pawn on f6 is just as
murderous in controlling g7.
8
7
6
5
4
3
2
27 ... �h8 28 ltJgS 1-0
It is mate on g7 or h7 next move.
Kasparov - Vladimirov
Batumi 2001
a
b
c
d
e
f g h
a
b
c
d
e
f
g h
8
7
6
5
4
3
2
This time it is Black who has a
loose kingside pawn structure. If
you put the black king on g8 and
the black bishop on g7 he would
have a tenable defence. But as
things stand the bishop is misplaced
on e7. Furthermore, Black has a
knight off side on a5. All these
considerations are enough to justify
an outright attack. Kasparov played
23 ltJh7! .txdS
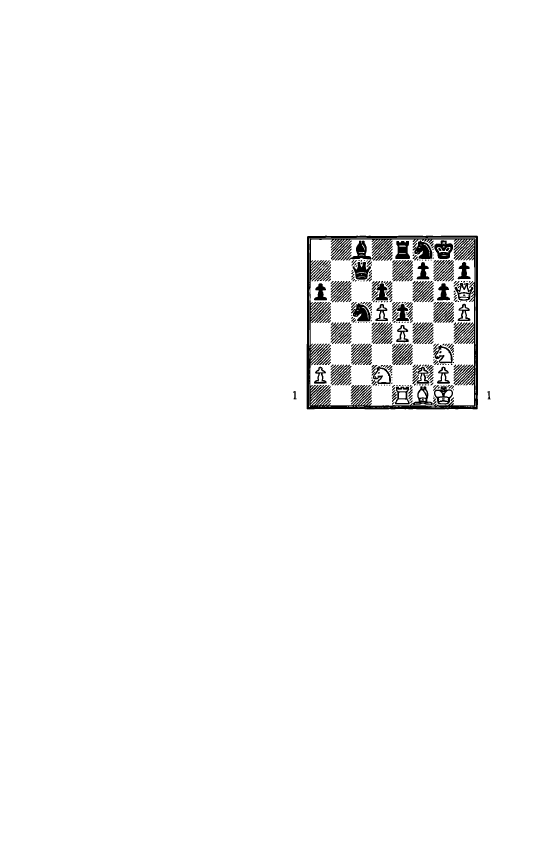
50 Knight and Queen against the Fianchetto Position
There is a quick massacre after
23 ... �xh7 24 'ii'h6+ �g8 25
'ii'xg6+ �h8 26 'ii'xh5+ <bg7 27
l:e3 as Black has no defence to 28
.l:lg3+. The 'quiet' bishop on c4
plays an important part in the attack
by pinning the
f7
pawn and so
making 25 Wxg6+ possible in this
sequence. It is no wonder that in the
game Black eliminates it as soon as
possible.
24
Wh6+ <bg8 25 �gS!
The invasion on the dark squares
continues. Kasparov isn't going to
waste any time recapturing on d5.
Now Black tried 25
...
�xe4 but
resigned immediately as he is mated
on g7 or h8 after 26 ltlf6+ �xf6 27
�xf6. Other moves were also hope
less, for example 25 ... Wd8 (to pre
vent 26 ltlf6+) 26 ltlxffi �xffi 27
�xd8 �xh6 28 �xa5, or 25 ... �xg5
26 hxg5! f5 (he has to prevent 27
ltlf6+ with a familiar mate on g7
after 27 ... Wxf6 28 gxf6) 27 ltlxffi
llxffi 28 Wxg6+ Wg7 29 Wxg7+
�xg7 30 exd5 and in both cases
Black is the exchange down with a
hopeless endgame.
Next up are two high class
demolitions of the fianchettoed
position.
In the first example we see the
usual ominous feature for the black
king: a bishop missing from g7
which Leko has exploited by
putting his queen on the h6 square.
The question is whether White can
find a way to break through with his
other pieces in support of the queen,
or will Black's defensive wall shake
a little but still hold firm?
Leko - Beliavsky
Olympiad, Bled 2002
a
b
c
d
e
f
g
h
8
8
7
7
6
6
5
5
4
4
3
3
2
2
a
b
c
d
e
f
g
h
Here Black to move should have
played defensively with 30 ... We7,
but instead he developed his bishop
with 30
..•
�d7? This move not only
cuts off his queen's defence along
the second rank but also takes away
the d7 square from the knights.
Leko began his onslaught with
3l ltlc4 f6
Perhaps when he played his
previous move Black was hoping to
exchange off his bishop for the
knight with 3 l ...�b5. This makes a
lot of positional sense, but unfortu
nately for him tactics come before
strategy and White has the excellent
reply 32 ltlf5! gxf5 33 ltlxd6.
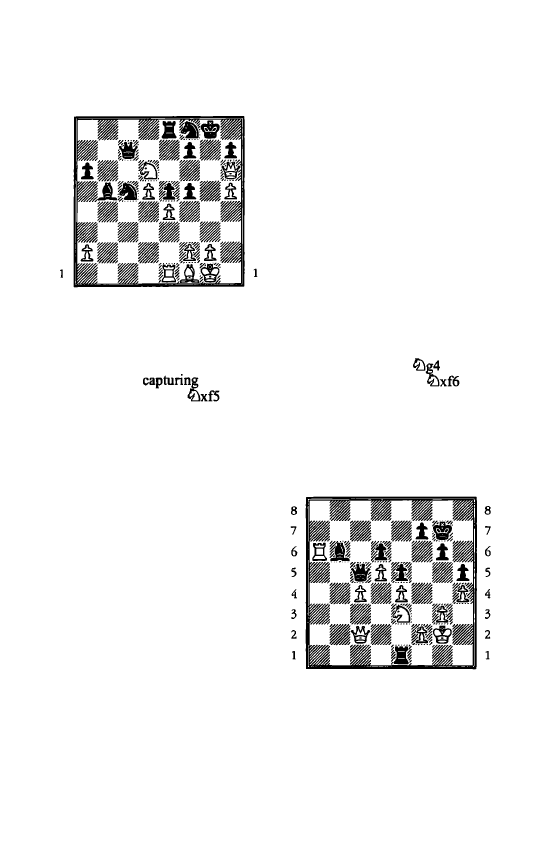
Knight and Queen against the Fianchetto Position 51
a
b
c
d
e
f
g
h
8
8
7
7
6
6
5
5
4
4
3
3
2
2
a
b
c
d
e
f
g
h
(diagram ofvariation)
If now 33 ... .txfl 34 lDxe8 with
the unanswerable double threat of
mate on g7 or
the queen.
Instead 33 .. J:lb8 34
f6 35
'ifxf6 h6-to stop 36 lDh6 mate-
36 lDe7+ c;Ph7 37 'ii'f7+ �h8 38
'Wg8 is mate. Finally if 33 ... 'ii'd7 34
li:Jxe8 'ii'xe8 35 'ii'g5+ �h8 36
'ii'f6+ c;Pg8 37 h6 and here warding
off mate on g7 will cost too much
material.
32 lle3!
Leko might have reasoned as fol
lows before making this move: 'if I
can get a knight to h5 I will have
the double threat of 'ilg7 mate and
lDxf6+. This would be unanswer
able apart from the obvious reply
gxh5, eliminating the knight. There
fore I'll put the rook on e3, so that
after I play lDh5 and Black captures
the knight, I'll have llg3+, when the
entrance of the rook is decisive! '
32 ... l:r.e7
Everything also goes to plan for
White after 32 ... .tc8 33 hxg6 hxg6
34 li:Jh5 ! gxh5 (if 34 ... 'ii'f7 35 li:!xd6
or 34 ... 'ii'e7 5 lDxd6!) 35 ltg3+ �f7
36 l:.g7 mate.
33 hxg6 hxg6 34 lDhS! gxhS 35
l:r.g3+ .tg4
If 35 ... �f7 36 'ii'xh5+ lDg6 37
'ii'xg6+ and mate next move.
36 'ifxhS lDxe4 37 'ii'xg4+ lDgS
38
lDe3 e4 39 'iff4
Here Beliavsky resigned or more
likely lost on time. In any case he
loses a pawn and faces a decisive
attack. For example 39 ... lDfh7 (or
39 ... ltf7 40 lDf5! lDg6 41 :Z.xg5
fxg5 42 'ii'xg5 �h7 43 'ifh5+ then
44
'Wxg6+ etc.) 40
'ittf7 (or
40 ... l:.f7 41 li:Jh6+) 41
lDxf6
42 Wxg5 etc.
Adams
-
Torre
Olympiad, Bled 2002
a
b
c
d
e
f g h
a
b
c
d
e
f
g
h
First of all we notice that White
has an extra pawn. Torre still has
his dark squared bishop, but it has
wandered a long way from its
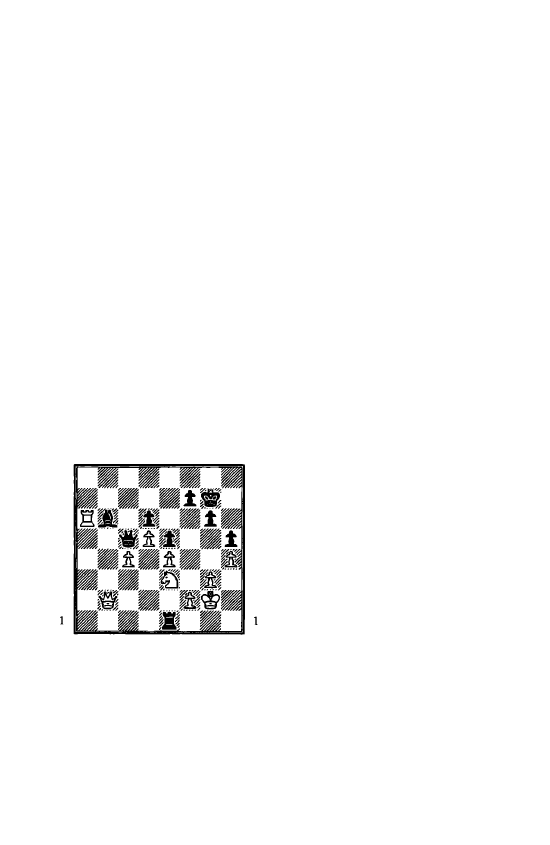
52 Knight and Queen against the Fianchetto Position
defensive role on b6. Nevertheless,
all the black pieces are actively
placed and the c5 square appears to
be firmly in his grasp. In fact, if it
were Black to move he might well
consider the exchange sacrifice
43 ... .l:.xe3! 44 fxe3 'ifxe3 forcing 45
l:[al, when it is difficult to see how
White could make any progress
with his queen tied to the defence of
e4 and f2 and his rook having to de
fend g l .
With all the pieces on the queen
side and the centre, you might have
forgotten about Black's king which
is sitting unobtrusively on g7 hop
ing not to be noticed. But Adams is
always alert to tactical chances and
with his next couple of quiet moves
prepares a deadly attack.
44 'ifb2!
a
b
c
d
e
f g h
8
8
7
7
6
6
5
5
4
4
3
3
2
2
a
b
c
d
e
f g h
It is absolutely vital for the
success of White's plan that he wins
access for his rook to his
opponent's back rank and also has it
attacking the d6 square.
44
...
�
a
7
The bishop stands its ground on
the long diagonal. Going back to c7
or d8 was hopeless e.g. 44 ... �c7 45
l:[c6 1Wa7 46 c5 dxc5 47 d6 fol
lowed by 'iVxe5+ etc. is fatal.
As a rule a strong player will
always prefer 44 ... �a7 in such
situations as the best fighting
chance: if White plays insufficiently
energetically Black might emerge
with a good game, whereas
44 ... �c7 doesn't give White much
chance to go wrong.
45
'iVd2 l:tbl 46 :c6
Completing his preparation. The
rook both attacks d6 and can get to
the back rank.
46
...
'iVd4
This looks very strong, as if 4 7
'iVxd4 ?? exd4 when the passed
pawn will probably win the game
for Black while moving the queen
away to e2 is also disastrous: 4 7
ile2?? l:[b2 (even stronger than
47 ... 'iVxe4+) 48 lDc2 (or 48 'iVD
'ii'xe3) 48 ... 'ii'c3 wins a piece. But
Adams had prepared a tactic of his
own!
47 lDf5+!
It soon turns out that the black
pieces, so threateningly placed on
the queenside, aren't doing any
defensive duty for the king!
47
•••
g:d5 48 1Vg5+ �b7
Naturally if 48 .
.
.<�ffl
49 l:[c8
mate.
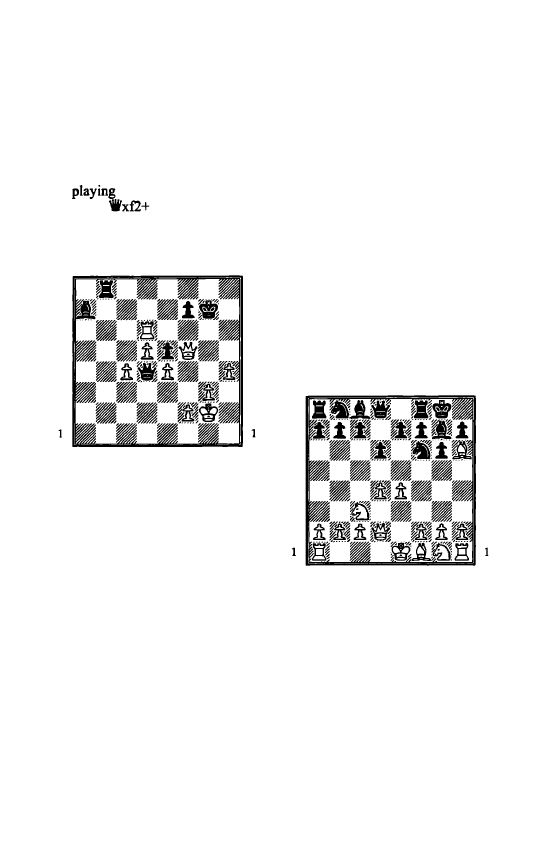
Knight and Queen against the Fianchetto Position
53
49 '1Vxh5+ �g7 50 '1Vg5+ 'Ot>h7 51
'1Vxf5+ �g7 52 llxd6! llb8
If 52 ... llb2 53 '1Vg5+ �h7 (or
53 ... 'iii>f8 54 l:ld8 mate) 54 llh6
mate. Meanwhile there was no point
in
on three pawns down
after 52 ...
53 'IVx£2 i.x£2 54
'iii>x£2.
a
b
c
d
e
f g h
8
8
7
7
6
6
5
5
4
4
3
3
2
2
a
b
c
d
e
f g h
53 h5!!
The pawn proves the vital
reinforcement of the attack. Black
resigned
here as he always ends up
being mated by lidS or llh6, e.g.
53 ... i.c5 54 h6+ 'itif8 (if 54 ... �g8
55 'ifg5+ �f8 56 l:.d8+ l:.xd8 57
'ifxd8 mate) 55 h7 (or 55 lld7 i.e7
56 d6) 55 ... �g7 56 'iff6+ �xh7 57
'ihf7+ �p8 58 llh6 mate.
White's choice of winning plan in
the game wasn't influenced by
emotion-that is, preferring the
excitement of a kingside attack to
the exploitation of a pawn on the
queenside. Instead he chose to
sacrifice because that was the best
way to break down the defensive
layout adopted by Torre.
Exchanging off the dark squared
bishop
If Black still has his dark squared
bishop defending the squares f6, g7
and h6 the first stage of a successful
kingside assault is often to ex
change it off. Thus one of White's
best responses to the Pirc or Mod
em Defence set ups is 1 e4 g6 2 d4
d6 3 lDc3 i.g7 4 i.e3 lDf6 5 'iVd2,
when if 5 ... 0-0 6 i.h6 gets rid of
Black's bishop without more ado.
8
7
6
5
4
3
2
a
b
c
d
e
f g h
a
b
c
d
e
f g h
8
7
6
5
4
3
2
This method of play seems rather
crude, hence its somewhat deroga
tory appellation in England as the
' 150 Attack', because lots of
players with this British grade
equivalent to Elo
1800-are
supposed to play it. In fact it has
also been adopted many times by
Michael Adams (rated 2745 as I
write) and occasionally by Garry

54 Knight and Queen against the Fianchetto Position
Kasparov (2838), so
I
guess the
number should be multiplied a
couple of times! The truth-as
revealed in many examples in this
chapter-is that the exchange of the
bishop on g7, even if White uses an
artificial looking means to achieve
it, is a blow to the safety of the
black king.
8
7
6
5
4
3
2
Kotronias - Kuntz
Olympiad, Bled 2002
a
b
c
d
e
f
g
h
a
b
c
d
e
f
g
h
White's basic plan here is to ex
change off dark squared bishops
and then mate by exploiting the
holes in Black's kingside with the
queen and knights. Let's see how
Grandmaster Kotronias does it:
24 .i.h6! .td7 25 .txg7 �xg7 26
b4!
White intends to win the e5
square for his knight after b4-b5.
Black obliges by giving up the
square straightaway!
26 ... ltle7 27 lLleS .ta4 28 'ii'cJ!
a
b
c
d
e
f
g
h
8
8
7
7
6
6
5
5
4
4
3
3
2
2
a
b
c
d
e
g
h
White's control of the dark
squares is so overwhelming that he
can ignore the threat to the rook for
if28 ... .txdl 29 ltlg4+ �g8 30 lLlh6
mate.
28
•.•
�g8 29 ltlg4 ltlfS 30 ltlxfS
1-0
Black gave up
as
it is mate next
move if he takes back the knight.
In
the following example a young
chess superstar found a clever pawn
sacrifice to get rid of Black's
important bishop, after which White
again became dominant on the dark
squares.
Black's king appears perfectly
safe. True, he has loosened his
pawn structure with both g7-g6 and
h5-h4, but it hardly seems right to
complain about this when he has
such a wonderful bishop on f6
guarding all the dark squares.
Harmless would be 2 1 ltlxf5+ gxf5
as it strengthens Black's hold over
the e4 square.
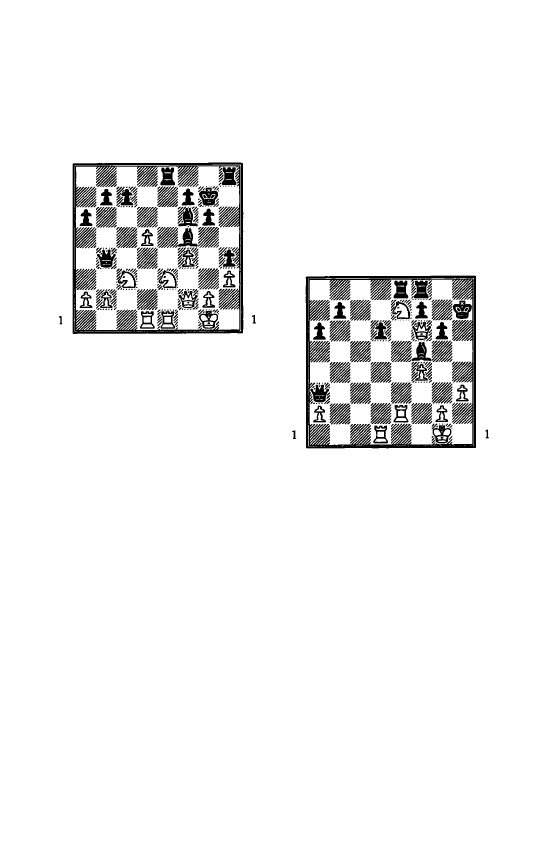
Knight and Queen against the Fianchetto Position 55
Radjabov - Estrada Nieto
Olympiad, Bled 2002
a
b
c
d
e
f g h
8
8
7
7
6
6
5
5
4
3
2
a
b
c
d
e
f g h
4
3
2
It is apparent that White can
hardly succeed in storming the
kingside with the bishop on f6.
With this in mind, Radjabov played
21 d6! cxd6
Black had the unenviable choice
between facing a big attack
as
in the
game or allowing his opponent a
strong passed pawn after 2 l...c6.
22 lLlcd5
Now the fate of the bishop on f6
is sealed.
22
.••
1bb2 23 l:le2!
A vital move. The black queen is
forced off the diagonal.
23 ... 1i'a3 ' 24 lt:lxf6 �xf6 25
li:ld5+ �g7 26 1i'd4+
Black's hold on the dark squares
has collapsed.
26 ... �h6 27 1i'f6! l:.hf8
Of course taking on e2 allows
mate in one.
28 1Wxh4+ �g7 29 'irf6+ �g8
The only chance was 29 ... �h6 30
l:.xe8 llxe8 3 1 1Wxf7 when Black is
mated after 3 I...l:.e2 32 'irffi+ �h5
(or 32 ... �h7 33 lLlf6 mate) 33 'irh8
mate, but 3 I...'ira4!? would have
slowed down the white attack.
30 lt:le7+ 'ith7
8
7
6
5
4
3
2
a
b
c
d
e
f g h
a
b
c
d
e
f g h
31 'ith2!!
8
7
6
5
4
3
2
It isn't always the most violent
move that is best. Radjabov resists
the urge to leap in with 3 1 lt:lxf5,
which allows 3 1 ... 1i'c5+! when
Black stays alive after 32 �hi (not
32 lLld4? ltxe2 dropping the
exchange.) 32 ... 'irxf5. After the
quiet king move in the game Black
no longer has this defence as if
3 1...1i'c5 32 l:l.d5 and f5 collapses.
31 ... i.d7 32 l:.xd6 i.b5 33 'iVh4+
Radjabov sees an absolutely
forced win and so is right to play it.
In fact 33 lLlf5 is one move faster,
e.g. 33 ... gxf5 (or 33 ... l:.g8 34 'irh4
mate) 34 1i'h6+ �g8 35 1i'g5+ �h7
36 l:.h6 mate.
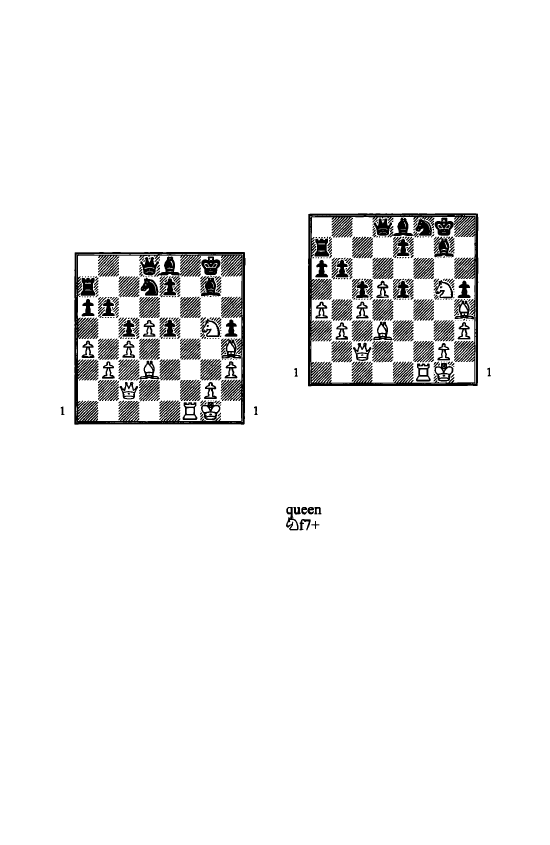
56 Knight and Queen against the Fianchetto Position
33 ... �g7 34 lDf5+ �g8 3S 'irf6
and Black resigned as if
3
5 ... gxf5
3
6 .. g5+ and mate follows on h6.
8
7
6
5
4
3
2
J.Levitt - D.Coleman
England 2002
a b c d e f g h
a b c d e f g h
8
7
6
5
4
3
2
In the previous examples the
defender had a kingside pawn
structure but no bishop on g7; here
the situation is reversed as he has
the bishop but no pawn structure to
speak of1 The white pieces are well
placed to exploit the multiple light
square holes on e6, f5, f7, g6 and
h7.
In the game Black lost on time
after 30 ... lDf6 31 lDe6 'ird6 32
'ird2!-which
was just as well as he
has no defence to
33
'1Vg5 with a
quick massacre on the kingside. The
black pieces on the queenside are
shut off from contributing to the
defence of the king by the barrier
on the e file, which consists of a
knight and two black pawns.
Instead Black could have tried
30 ... lDf8,
when the aim should be to
win as in the game without giving
Black any counterchances what
ever.
8
7
6
5
4
3
2
a
b c d e
f
g h
a b c d e f g h
8
7
6
5
4
3
2
A
clinical method is 31 j_h7+!
(also good enough is
31
l:.xffi+
j_xffi
32
lDe6
'1Vd6
33
j_h7+ �h8
34
�xffi) 31. .. �h8 32 l:.xtll+ j_xfB
33
'1Vf5! when the entry of the
is decisive. If
33
.
.. j_d7
34
�g7 35 '1Vg6 mate, while
33 .. ,j_g7 34 j_g8!
clears the h7
square for the queen with a mate
after either:
(a) 34 ... �xg8 3S '1Vh7+ �fB 36
�e6+ �f7 37 '1Vxg7 mate or
(b)
34
•••
J_g6 3S '1Vxg6 '1Vxg8 36
'irxbS+ J_b6 37 1Vxb6+ '1Vb7 38
'1Vxb7 mate.
In the final example the bishop
was again unable to compensate for
the collapse of the light squares
around him.
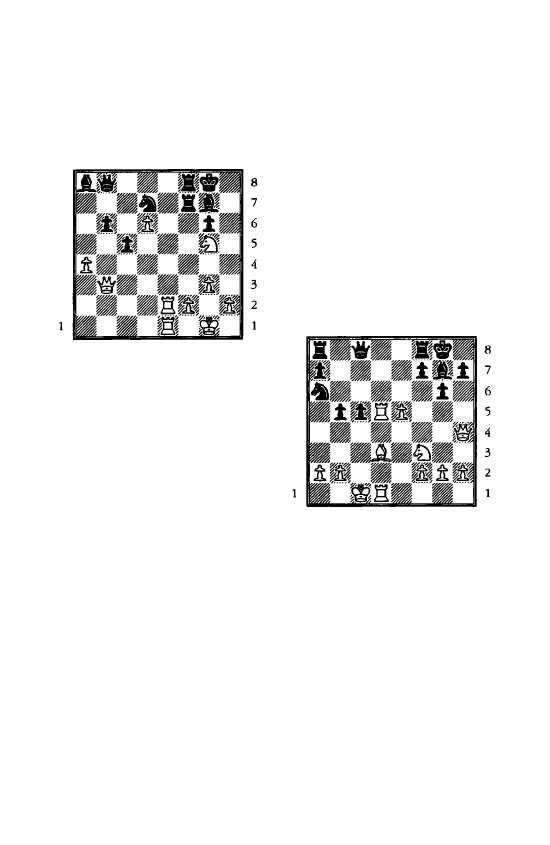
Knight and Queen against the Fianchetto Position 57
8
7
6
s
4
3
2
Karpov - Kir.Georgiev
Tilburg 1994
a b c d e f g h
a b c d e f g h
Black is two pieces up so White
had better do something fast!
Karpov exploited the weakness on
f7 to break through with
32 lle8!
Then followed
.
.
.
32
•.•
'ii'xd6
If 32 ... llxe8 33 'iVxf7+ �h8 34
:xe8+ winning the black queen.
33 'ii'xf7+ �h8 34 li:)e6!
But for the strength of this move
Black would still be fighting hard.
Now however all resistance came to
an end as Black can't deal with the
threat .of mate on g7 and also
prevent 35 li:)xf8 followed by 36
llxa8. Such is the strength of the
queen and knight when acting in
tandem against a fractured kingside.
8
7
6
s
4
3
2
Puzzles
23
Beliavsky - Kasparov
World Cup, Belfort 1988
a b c d e f g h
a
b c d e
f g h
Black to play
After
l8
•.•
li:)b4
19
.txg6
Kasparov played 19 ... fxg6. Here the
question is what happens after the
alternative recapture 19 ... hxg6-
can Black survive the attack?
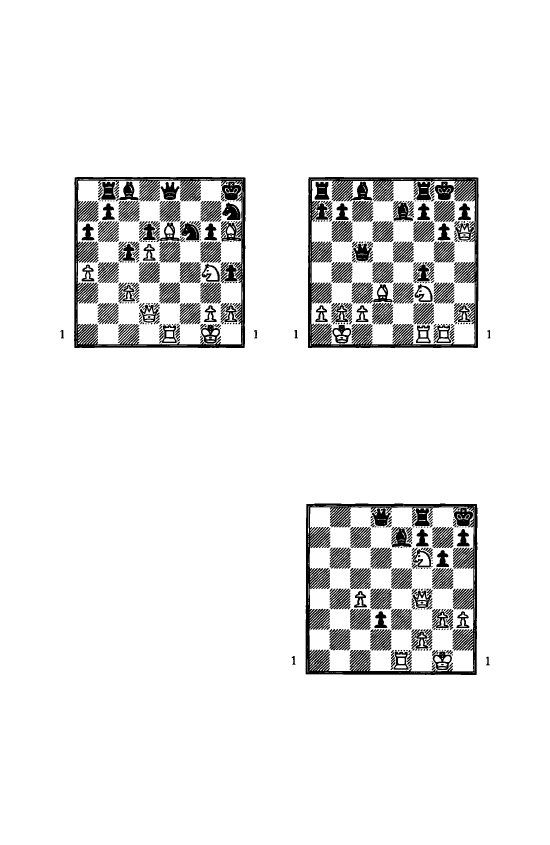
58 Knight and Queen against the Fianchetto Position
24
Mecking - Pace
Olympiad, Bled
2002
a
b
c
d
e
f
g
h
8
8
7
7
6
6
5
5
4
4
3
3
2
2
a
b
c
d
e
f
g
h
White to play
Positionally speaking Black is
busted with disorganised pieces and
a flimsy kingside. Nevertheless the
great Mecking, making a return to
the Olympiad after many years,
came up with an elegant fmish. The
question is how can he bring his
queen into the action
as
quickly as
poss�ble to finish things off'?
25
Khalifman - Bareev
Wijk aan Zee
2002
a
b
c
d
e
f
g
h
8
8
7
7
6
6
5
5
4
4
3
3
2
2
a
b
c
d
e
f
g
h
White to play
How did Khalifman fmish the
game?
8
7
6
5
4
3
2
26
a
b
c
d
e
f
g
h
a
b
c
d
e
f
g
h
White to play
8
7
6
5
4
3
2
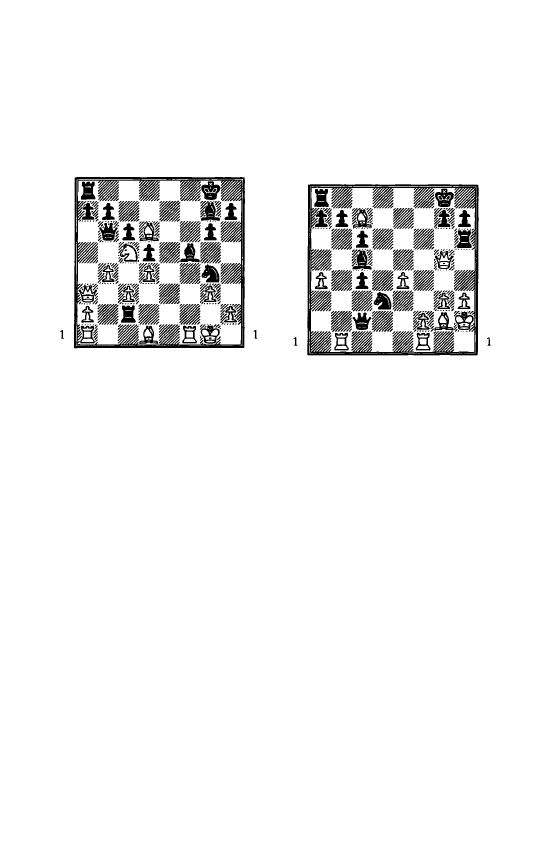
Knight and Queen against the Fianchetto Position
59
27
Szabolcsi - Legky
Val Thorens 1990
a
b
c
d
e
f g h
8
8
7
7
6
6
5
5
4
4
3
3
2
2
a
b
c
d
e
f g h
Black to play
Black played 26
...
'it'b5
Now what
happens after (a) White accepts the
rook with 27 .i.xc2 or (b) White
plays 27 :c1, declining the offer?
28
Topalov - Kramnik
Linares 1997
a
b
c
d
e
f g h
8
8
7
7
6
6
5
5
4
4
3
3
2
2
a
b
c
d
e
f
g
h
Black to play
Black played 26
•.•
lLlxf2.
What
happens after 27 'iVxc5, nabbing a
bishop?
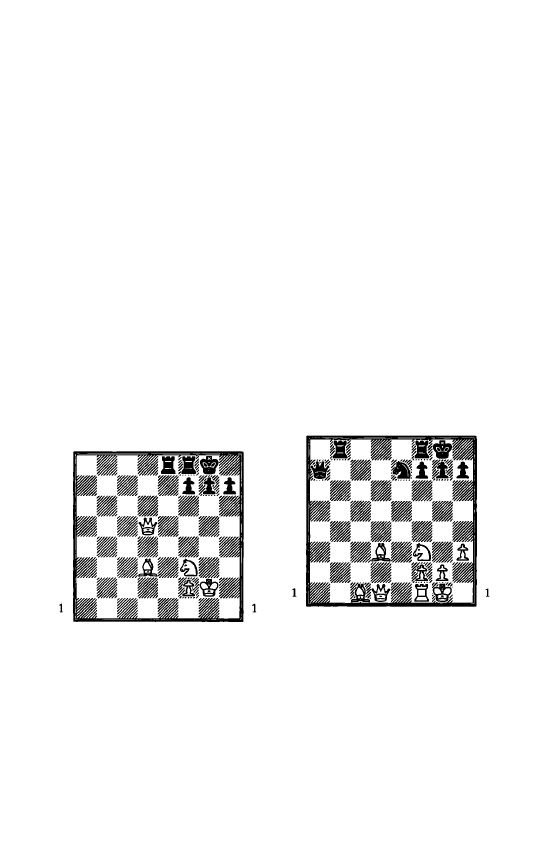
6
The Greek Gift and Other
Queen and Knight Mates
T
he Greek Gift sacrifice
is the most famous
method of launching an
attack with queen and
knight
against
the
enemy king. It comes at
all levels of sophistication, from
extremely complex to very simple;
in some positions it yields the
attacker an easy win, while at other
times the verdict can be unclear or
even downright bad! The basic
mechanism is as follows.
8
7
6
5
4
3
2
a
b
c
d
e
f
g
h
a
b
c
d
e
f
g
h
8
7
6
5
4
3
2
White begins by sacrificing his
bishop with
I
i.xh7+! �xb7
there
is little choice for after l
.
.
.
�
h8 2
ji'h5 Black is soon mated, for
example 2 .
.
. g6 3 1t'h6! followed by
4
i.xg6+ and 5 'iih7 mate.
2 '5'b5+ �g8 3 l:Dg5
The bishop sacrifice has gained
White the time to get his queen and
knight into the attack. Now Black
has no defence against
4 Wb7 mate.
As stated above, the Greek Gift is
by no means always gives such a
clear cut win. Here is another
scenario which I have composed:
8
7
6
5
4
3
2
a
b
c
d
e
f
g
h
a
b
c
d
e
f
g
h
I
i.xh7+! �xh7 2 ltlg5+
8
7
6
5
4
3
2
Already we see that things aren't
so concrete as in the previous
example where White could play
1t'h5+ before l:Dg5+ and so force the
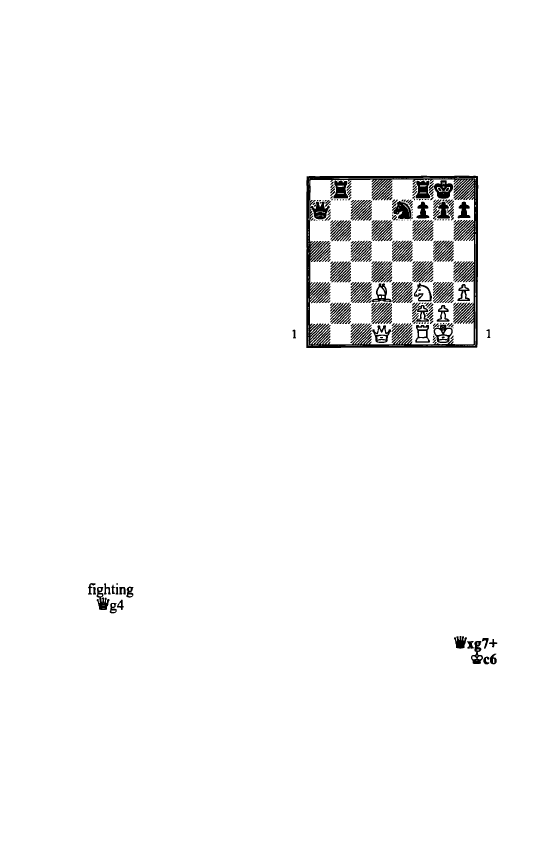
The Greek Gift and Other Queen and Knight Mates 61
black king back to g8. Here Black
has three possible king moves:
2
•••
�g8 3
..,_5 llfe8 In the previ
ous example Black couldn't make
an escape route for his king on
flt
Nevertheless here after 4 iVxf7+
�h8 White has seriously weakened
Black's pawn cover and in fact can
win with 5 i.b2! attacking g7 when
5 ... llxb2 (or 5 ... llg8 6 'ii1i5 mate) 6
'iVh5+! �g8 7 iVxe8 is mate.
The second alternative for Black
is 2
•.•
..ti>h6,
but this looks highly
dubious as it walks into a potential
discovered check. And indeed,
White has 3 lLle6+ when 3 .. .'�h7 4
'iVh5+ ..ti>g8 5 lLlg5 has transposed to
2 ... �g8, while 3
. • .
�g6 4 iVg4+ �f6
5 llel ! wins as if 5
••.
fxe6 6 iVxe6
is
mate, while otherwise 6 iVg5 mate
or if this is prevented 6 i.g5+ will
win.
That leaves 2
•••
�g6
but then 3
iVg4
looks killing, e.g. 3
...
fS 4 iVg3
llg8
(to meet the threat of 5 lLle6+
when g7 would drop) 5 'ird6+ �b5
6 g4+ fxg4 7 hxg4+ Wxg4 8 iVd3!
and there is no good way to stop 9
'ii'h3 mate
(if 8 ... .l:.h8
9
'ii'
f3+ �h4
10 'iVh3) Alternatively 4 ... f4 (the
best
chance) looks bad
after 5
or 5 i.xf4 lLlfS 6 iVg4
etc.
So here too the Greek Gift comes
out on to
p
, but note that in the start
ing position White already had two
pieces for a rook, so after the sacri
fice he still had two minor pieces
to
play with. Now let's see what
happens if we remove the bishop
from c 1 in the starting position:
Tbe bishop on cl
bas been removed
a
b
c
d
e
f
g
h
8
8
7
7
6
6
5
5
4
4
3
2
a
b
c
d
e
f
g
h
3
2
Now Black is the exchange up
and White can no longer wreak
havoc with his dark squared bishop.
Let's see if the Greek Gift main
tains its power:
I
i.xb7+ �b7 2
lLlg5+
If now 2
•••
�g8?
then 3 ..,_5 is
still very powerful: 3
•••
llfe8 4
iVxf7+ �b8 5 'irb5+ �g8 6 'irb7+!
Naturally White can never lose in
this scenario as he has a draw if he
wants it by repetition with 6 iVf7+
-a nice state of affairs when you
are a rook down! 6
...
�ftl 7 lLle6+
�f7 and now White has the choice
of a king hunt beginning 8
�xe6 9 llel+ �d7 10 lldl+
I I
iVf6+!
or the more restrained 8
llel
threatening mate on g7, when
8
•••
llg8 9 ll:lg5+
�fll 10 iVb5! g6
I I
1i'h7 llg7 1 2 ll:le6+
wins.
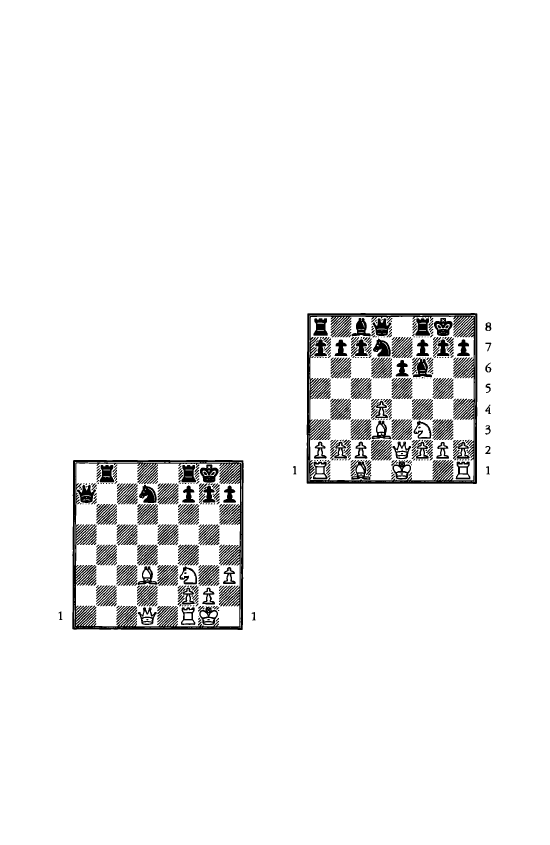
62 The Greek Gift and Other Queen and Knight Mates
If 2
...
�g6
then 3 'iVg4! and al
though there's nothing clear White
has a dangerous initiative for the
rook, for example 3
.
.. f5 4 'iVg3 l:g8
5 l:e1 ! keeping up the pressure.
Finally that leaves 2 .. .'�h6!-a
reasonable proposition with no
white bishop on cl. If now 3 1i'g4
lbg6! and the white attack has run
out of steam. So 3 'iVd2 looks the
trickiest, but after 3 ... �g6! White
no longer has 'iVg4 as an option.
Therefore the initiative is fading,
e.g. 4 'iVf4 l:.b5! and Black will
eventually win.
Note that in order for the Greek
Gift to work Black mustn't have the
option of a move like lbf6 or �f5
after his king has been driven back
to g8. Thus if you move the black
knight to d7 in the diagram above
8
7
6
5
4
3
2
a b
c
d
e
f
g
h
a b
c
d
e
f
g
h
8
7
6
5
4
3
2
then 1 �xh7+?? <il>xh7 2 lbg5+
�g8 3 'ifh5
can be answered
simply by 3 ... lbf6. If the black
knight on d7 metamorphosed into a
bishop, then Black would have
another complete defence with
3 ... �f5. Or finally, if the black
queen were on c7 rather than a7
there would be 3 ... 'ifc2. In every
case the h7 square is defended and
White can resign.
8
7
6
5
4
3
2
Jacobs - Carter
Las Vegas 2002
a b
c
d
e
f
g
h
a b
c
d
e
f
g
h
Here is another version of the
Greek Gift. White played 9 h4!
which prepared the bishop sacrifice
by giving the knight a support on
g5.
9
..•
e5
This loses by force, but Black is
already in a bad way as if 9 .
.
. g6
creates a target for 10 h5, while
after 9 ... h6 10 'iVe4 Black can't
defend h7 as if 10 ... g6
1 1
�xh6.
10 �xh7+! �:x:h7 1 1 lbg5+!

The Greek Gift and Other Queen and Knight Mates 63
a
b
c
d
e
f
g
h
8
8
7
7
6
6
5
5
4
4
3
3
2
2
a
b
c
d
e
f
g
h
The familiar sacrifice and check,
but here there is an extra ingredient:
if Black takes the knight then the
rook on hi joins in the attack. The
effect would be lethal, as after
1 I....i.xg5 12 hxg5+ c;;g6 (12 ... c;;g8
transposes to the game) White can
start a long series of checks that end
in mate:
8
7
6
5
4
3
2
a
b
c
d
e
f
g
h
a
b
c
d
e
f
g
h
8
7
6
5
4
3
2
13 'ii'h5+ c;;f5 14 'ii'h3+! (the
most difficult move in the se
quence) 14 ... c;;e4 (there is no way
back as if 14 ... c;;g6 15 'ii'h7 mate)
15 'ii'f3+ �xd4 16 .i.e3+ c;;c4 17
'ii'e4+ �b5 18 a4+ c;;a5 19 b4+
�a6 20 'iic4+ b5 21 'ii'xb5 mate.
The game continuation ended in
an even quicker defeat for Black.
ll../.t'g8 12 'ii'h5 .i.xg5?
A
bad blunder. The only move
was 12 ... :e8. Then 13 'ii'x£7+ �h8
14 'ii'h5+ �g8 15 'ii'h7+ {It turns
out that White was risking nothing
with the bishop sacrifice as he could
always force a draw by repetition
with 15 'iW£7+. Of course, he wants
much more than a draw, but when
he calculated the sacrifice some
moves ago it must have been
comforting to know that if he had
missed something he would still be
able to avoid defeat.) 15 ... c;;:m 16
'ii'h8+ ri;e7 17 'ii'h5 and White
maintains a strong attack after
17 ..
Jl:ffi
1 8 .i.d2 or 17 ... exd4 18
0-0.
13
hxg5 f5 14 g6 1-0
The killer pawn mate on h7 can
be countered by 14 ... lDf6, but that
still leaves a mate on h8.
By now you will have realised
that it is no easy matter to judge the
soundness of a Greek Gift sacrifice.
On
the other hand, simply being
aware of the pattern might give you
an
idea to win a game which would
never otherwise have occurred to
you. Or indeed it might save you
from falling into the mate by care
lessly castling!
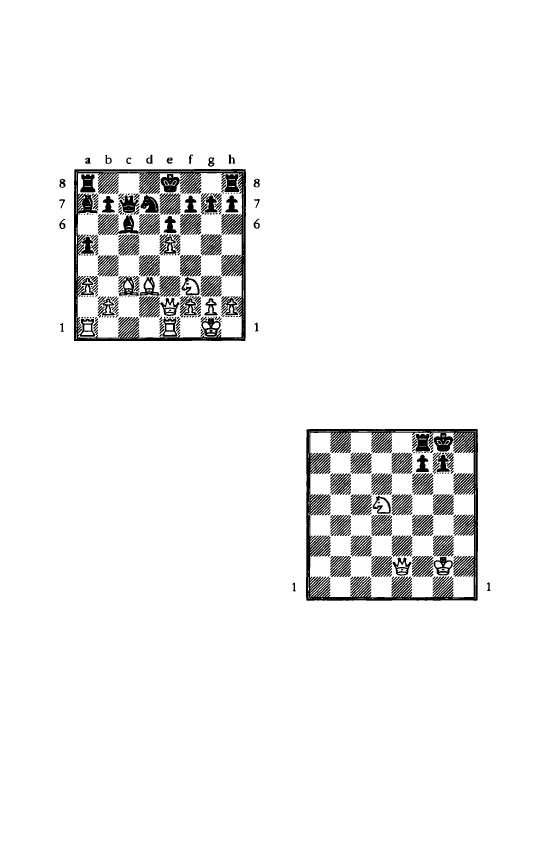
64 The Greek Gift and Other Queen and Knight Mates
5
4
3
2
Richards - Heymann
Battle Abbey 2001
a
b
c
d
e
f
g
h
5
4
3
2
Two girls were battling it out in
an England-Germany match, but it
seems only one of them knew about
the Greek Gift. Black 'castled into
it' with 16 ... 0-0?? when after 17
..txh7+! 'ifilxh7 18 lbg5+ �g8 19
1Vh5 l:.fe8 20 1Vxf7+ �h8
White
won after 21 l:lad1, when the only
way to stop 22 lld3 followed by 23
l:.h3 with a quick mate was by the
sad 21.
.•
..txfl+ 22 'iVxfl lDfB,
when
23 lld3 was still very strong.
In fact it was more accurate to
begin a long forcing variation with
checks: 21 1Vh5+ �g8 22 'ifh7+
�fB 23 W"h8+ �e7 24 1Vxg7+ �d8
25 lDf7+ �c8 26 lbd6+ �d8 27
1Vg5+ lle7 28 1Vg8+ lDfB 29 'iVxfB+
..te8
and only now, having captured
a knight and pawn, should White
pause for breath with the quiet 30
l:.ad1!
Here I should quote my own
comment about this game in Chess
magazine: 'If you think the Greek
Gift is an obvious trap, then try
giving the position after 16 ..txc3 to
a strong computer program and the
chances are that it will fall into it! It
is only obvious to players who have
seen the idea before.'
Cutting off the king
In storming the castled position, a
very common mating pattern
involves the queen or rook checking
from the front, while a bishop or
knight prevents the enemy king
running away to the side. Here is a
typical instance with queen and
knight:
8
7
6
5
4
3
2
a
b
c
d
e
f
g
h
a
b
c
d
e
f
g
h
8
7
6
5
4
3
2
It is mate in two. First the knight
drives the black king to the open h
file, then the queen gives the fatal
check: 1 lDe7+ �h8 2 1Vh5.
Here the mate isn't achieved
because the queen is giving a
deadly check protected by the
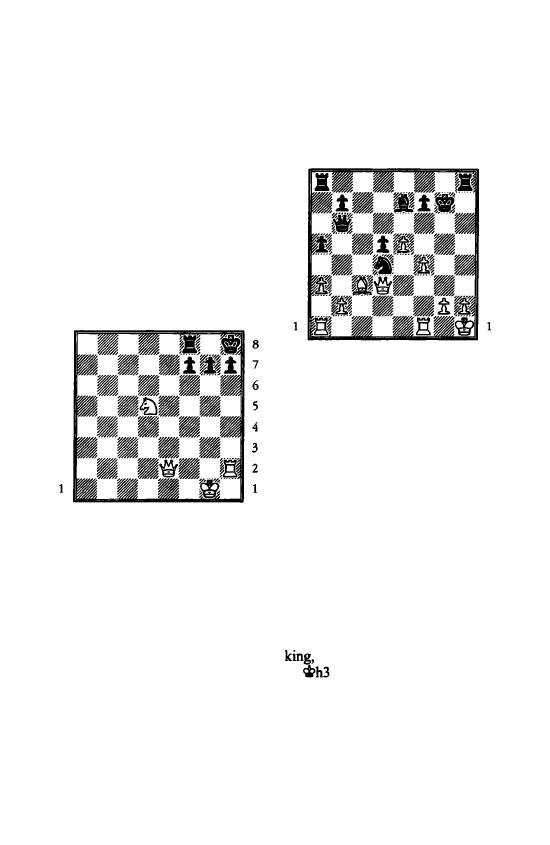
The Greek Gift and Other Queen and Knight Mates 65
knight. Nonetheless the white
pieces are acting perfectly together.
I have called this mating pattern
'cutting off the king'.
It
is very im
portant as it will be seen in other
chapters where the mate is given by
the rook in concert with a minor
piece, or by the queen and bishop.
Sometimes a slightly different
version of this mate is possible if
the black king is already on h8. In
that case it is the knight that gives
mate:
8
7
6
5
4
3
2
a
b
c
d
e
f
g
h
a
b
c
d
e
f
g
h
First of all the h file is forcibly
opened. Then White gains control
of it and drives the black king to g8,
where it is mated:
1 Axh7+! �xh7 2 Wh5+ �g8 3
0.e7 mate.
Here is a s'ophisticated example
of the knight mate involving two
players with Elo ratings well over
2600.
Grlschuk - M.Gurevich
Esbjerg 2000
a
b
c
d
e
f
g
h
8
8
7
7
6
6
5
5
4
4
3
3
2
2
a
b
c
d
e
f
g
h
At first glance things look great
for White, despite the fact that he is
a piece for two pawns down: after
all, he is attacking the black knight
and after it retreats the white pawns
will mow down the black king with
f4-f5 etc.
But the knight dido 't retreat.
Instead there came 27
•.•
Axh2+!! 28
�xh2 Ah8+.
Now 29 �gl allows
mate with 29 ... 0.e2 or 29 ... 0.£3-an
unanswerable double, discovered
check!
Grischuk tried 29 �g3 but
resigned
after 29
.••
.i.h4+ 30 �g4
'iVh6!
There is no escape for the
for example 3 1 .i.xd4
'ifh5+
32
.i.£2 mate.
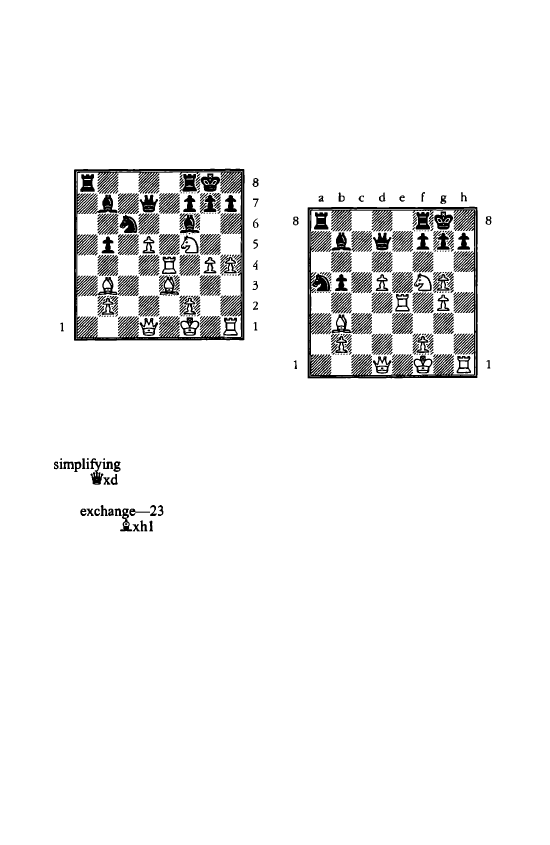
66 The Greek Gift and Other Queen and Knight Mates
8
7
6
5
4
3
2
Navara - Delchev
Olympiad, Bled 2002
a
b
c d
e
f
g
h
a
b
c
d
e
f
g
h
We join this sharp game just after
Black has played 20 ... tLlc6, putting
his knight en prise. His clever idea
is to escape White's middlegame
build up on the kingside by
to the endgame after 21
dxc6
1 + 22 .txd 1 .txc6 23
.tO-White cannot avoid losing
the
... .l:lal+ 24 �e2
.l:lxh1 25
.txe4 26 .txe4
.txb2 etc. Instead White ignored
the knight with 21 .tgS! when the
game
finished
quickly
after
2l. .. lbe5
(he can no longer afford to
leave his knight on c6 as if
2 l ....i.xb2 22 dxc6 'W'xd I+ 23
.txd 1 .txc6 runs into the fork 24
lbe7+)
22 .txf6 gxf6 23 'il'cl !
and Black
resigned
as there was nothing to be
done about 24 'il'h6 followed by
mate on g7: a striking example of
the power of the queen and knight
against a weakened kingside.
You may wonder why Delchev, a
strong GM, preferred to have his
kingside pawns wrecked rather than
play 2l. .. .txg5 22 hxgS and then
save his knight with 22 ... lba5.
7
6
5
4
3
2
a
b
c
d
e
f
g
h
7
6
5
4
3
2
The answer is the familiar mating
pattern: 23 lbe7+ �h8 24 .l:lxh7+!
�xh7 25 'ii'dJ!
This is far better
than 25 'iVf3 as not only does it
threaten mate with 26 'il'h3 all the
same but after Black gives up his
queen on e7 White can recapture
with a discovered check. After
2S
.•.
'il'xe7
(or 25 ... g6 26 'il'h3+ �g7
27 'il'h6 mate) 26 .l:lxe7+ �g8 27 g6
lbxb3 28 'il'xb3
etc. Black is in
ruins.
Queen and knight versus weak
kingside
A knight stationed near the king's
defensive line is very threatening as
it controls two squares. Thus it can
support a mate whilst at the same
time taking away a retreat square
from the king.
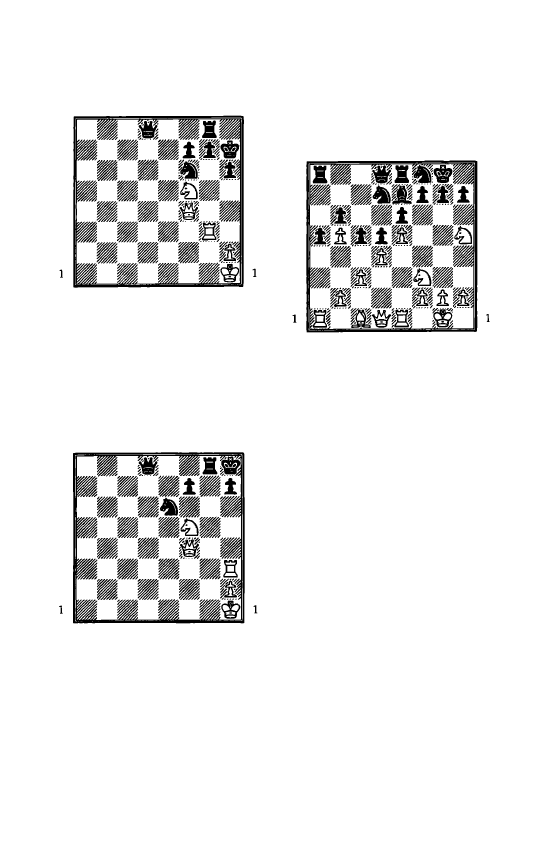
The Greek Gift and Other Queen and Knight Mates 67
a
b c d e
f g h
8
8
7
7
6
6
5
5
4
4
3
3
2
2
a b c d e f g h
A very common mating pattern: 1
l:t:xg7+!
destroying the defender of
h6. 1 .. Jhg7 Or l...�h8 2 Wxh6+
�h7 3 'Wxh7 mate. 2 'if:xh6+ �g8
3 Wxg7 mate.
8
7
6
5
4
3
2
a b c d e f g h
a b c d e f g h
8
7
6
5
4
3
2
Here Black has the g7 square
guarded, but his own rook on g8
takes away a retreat square from his
king. As usual a rook sacrifice
clears the way for mate: 1 l:txh7+
..t>xh7 2 'ifh6 mate.
Kasparov - Short
Ziirich 2001
a b c d e f g h
8
8
7
7
6
6
5
5
4
3
2
a b c d e f g h
4
3
2
In this book there are many
combinations, but you may wonder
how you get the positions in the
first place that contain favourable
combinations? The answer is to
learn all about strategy and tactics
-it is as simple and hard as that!
Here we see one of the greatest
chess minds at work. White has a
knight stationed threateningly on
h5, but there is no immediate com
bination. So what does Kasparov
do? He waits! Or rather he makes a
couple of pawn moves that tighten
his grip on the kingside and feign
an all out attack in the future. In
looking for counterplay Short al
lows a winning combination. The
game went 15 g3! �g6 16 h4 �df8
17 �g2
It seems that Kasparov is
thinking in the long term about l:lh
I
etc. but after the careless 17
•••
'Wd7?
he pounced with 18 ..th6!! gxh6
(the only move) 19 'ifd2. Suddenly
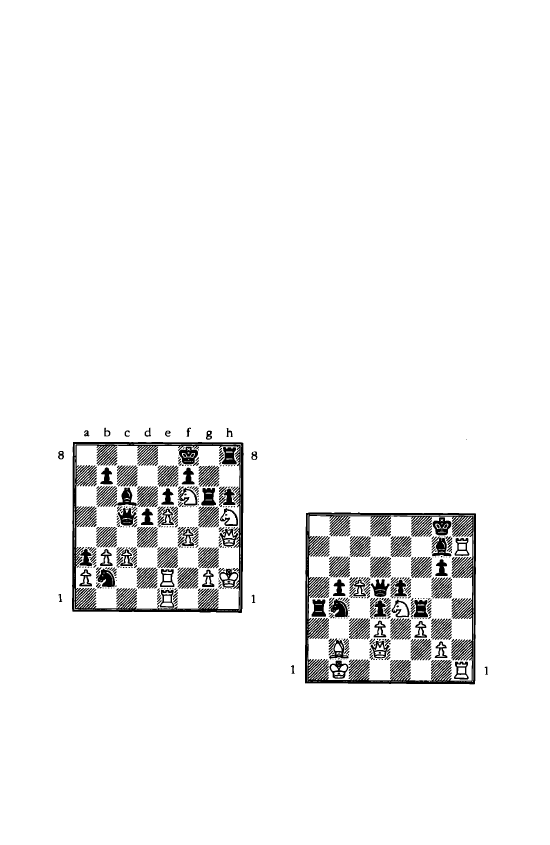
68 The Greek Gift and Other Queen and Knight Mates
there is no good answer to the threat
of 20 'ifxh6 followed by 21 Wlg7
mate. The queen and knight prove a
lethal combination, but if Black's
queen were on d8 rather than d7 he
would have the defence 19 ... ltl8d7
20 'flxh6 .tf8, refuting the attack.
As it is the black queen is blocking
the d7 square and he had no ad
equate defence. The game ended
19 ... fS 20 exf6 .td8 21 Wxh6.
Now
the second wave of the attack with
lllgS and f6-f7 will be decisive.
21 .. .1:137 22
ltlgS 'ifxbS 23 ti+
l:bti 24 lt:Jxti 1-0
It is mate on g7
if
he takes the knight.
7
6
5
4
3
2
Kasparov - Bareev
Cannes 2001
a
b
c
d
e
f
g
h
7
6
5
4
3
2
White should be looking for com
binations here as the black knight
on b2 is criminally out of play,
while there are weak dark squares
around the black king. Also it helps
if you notice that the black king and
queen are separated by the distance
of a knight fork.
Kasparov saw that the key to
breaking down Black's defence was
to exchange off the black rook on
g6, which is holding together the
kings ide.
There followed 37 l:te3! d4 38
l:tg3 dxc3?
If 38 .. J:txg3 39 'it'xg3, intending
40 'Wg7+, 39 .. .'�e7 40 'ifh4 looks
horrible for Black. Bareev gambles
that the passed pawn will give him
counterplay, but he has overlooked
the threat.
39 l:bg6 fxg6 40 lt:Jd7+! .txd7
41 'iff6+!
The loosening of Black's pawn
structure after the exchange of
rooks has made this killer check
possible. Black resigned, as it is
mate next move with either
4 l ...�g8 42 'it'g7 or 4 l ...�e8 42
lt:Jg7.
8
7
6
5
4
3
2
a
b
c
d
e
f
g
h
a b
c
d
e
f
g
h
8
7
6
5
4
3
2
White played 1 g3 hoping for
l ... :f7 2 llxg7+! when 2 ... l:xg7 3
lLlf6+ wins the black queen and
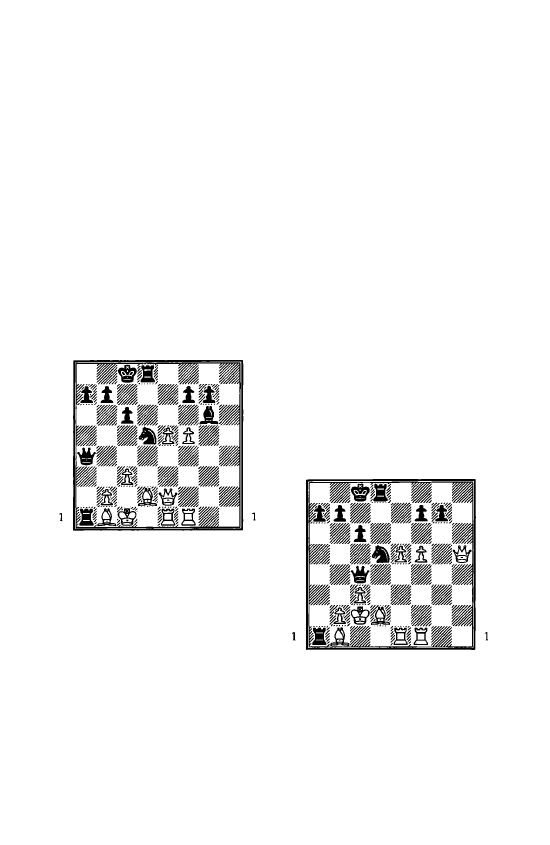
The Greek Gift and Other Queen and Knight Mates 69
2 .. .'itxg7 3 'iVh6+ �g8 4 'ifh8 is
mate. But Black got in first with
1 .
.
. 1Wb3!
If now 2 gxf4 Black mates with
2 ... .:tal+! 3 �xal 1Wa2.
Also hope
less for White was 2 �cl li:Jxd3+
with a massacre after 3 'iVxd3 'ii'xd3
4 gxf4 .:tc4+
or mate after 3 'it>bl
'ii'a2+ 4 'it>c2 'ii'xb2+ 5 'it>xd3
'i!kb3+ 6 'it>e2 'i!kxf3+ 7
'it>el .:tal+.
Nijboer - Hodgson
Holland 1994
a
b
c
d e
f
g
h
8
8
7
7
6
6
5
5
4
4
3
3
2
2
a
b c d e
f
g
h
Black not only has an extra pawn
but he also has the makings of a big
attack on White's beleaguered king.
Nevertheless after 25 ... �h7 his
bishop will be shut out of the game
and White with his superior cen
tralisation might one day come out
on top. Black could try to exploit
the pin on b 1 with the immediate
25 ... 'ifa2, but 26 'i!ke4 keeps every
thing protected. Perhaps it was a
consideration of these two factors
-not wanting a passive bishop and
the fact that White has 'i!ke4-that
led Hodgson to hit upon the
winning method in the game with
25 ... .i.h5! 26 'ilxh5
If White declines the offer with
26 'ii'e4 then the following sharp
continuation
was
possible:
26 ... lt:Jxc3 ! ! when 27 .i.xc3 l:tdl+!
28 .:txd1-forced-28 ... 'ile4 wins
White's queen. Or if 27 bxc3 'ila3+
28 'it>c2 .:ta2+ 29 �xa2 'i!kxa2+ 30
'it>c 1 'ii'xd2+ 3 1 �b 1 .:td5 ! 32 c4 (to
prevent 32 ... l:tb5+) 32 ... 'ilb4+ 33
'it>c 1 .:td2 and there is no good way
to stop 34 ... 'ifb2 mate. That only
leaves 27 'i!kxa4 lL!xa4 when White
is two pawns down.
26 ... 1i'a2 27 'it>c2
Now that White no longer has 27
'iVe4 this is forced.
8
7
6
5
4
3
2
27 ... 'i!kc4!
a
b
c
d
e f g
h
a
b c
d
e
f
g
h
8
7
6
5
4
3
2
With the unanswerable threat of
li:Jb4+ when the queen and knight
will combine to force a quick mate
on the light squares, for example 28
.:tf2 li:Jb4+ 29 �c1 .:txbl+! 30
'it>xb 1 ifa2+ 31 'it>c I 'i!ka1 mate.
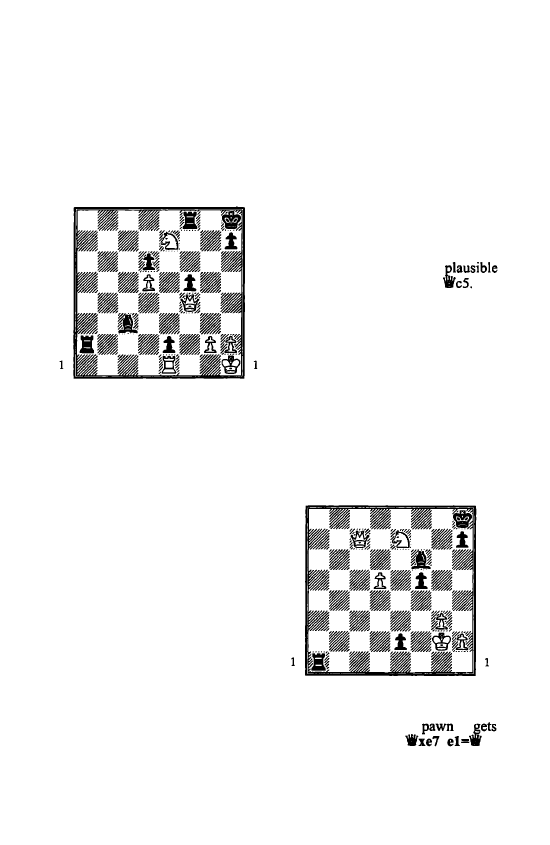
70 The Greek Gift and Other Queen and Knight Mates
28 b3 lbb4+ 29 �cl lbbl+ 0-1
After 30 �xb I Wxb3+ 3 I �c I
Black has three ways to mate on the
move.
a
b
c
d
e
f
g
h
8
8
7
7
6
6
5
5
4
3
2
a
b
c
d
e
f
g
h
4
3
2
This position was reached in a
casual game in Istanbul played
blindfold by Chris Ross, Julie
Leonard and other participants in an
international tournament. (An odd
encounter that judging from the
blunder on move two seems to
prove that in chess at least the
proverb 'many hands make light
work' is less valuable than 'too
many cooks spoil the broth! ')
Black had sacrificed his queen for
a rook in order to establish a pawn
on the seventh rank. There followed
1 1i'xd6! l:lfa8
The knight and queen will mate
the black king after I ....txe I 2
1i'e5+ l:.f6 3 ._xf6: a common
mating pattern.
Now however Black has the
strong threat of 2 .... l:lai forcing the
pawn to e
I.
The game actually
ended 2 �gl? .i.d4+ 3 'iti>hl l:.al 4
Wg3 .l:r.xel+ 10 Wxel l:.al
and
White
resigned:
Black
has
triumphed on the back rank.
Instead 2 Wc7! threatens 3 1i'xc3
mate, and if 2 ... .txei then 3 1i'e5 is
mate: note that from c7 the power
of the white queen expands to two
key squares on the diagonal, c3 and
e5. Therefore it is much more
powerful than the equally
looking moves 2 Wc6 or 2
After 2 'illc7 Black is forced to
ease the pressure on e I by retreating
his bishop, but this allows White
just enough time to neutralise the
threat to his king and carry out his
own winning attack.
Thus if 2
.••
.tg7 3 g3! :at 4
.l:r.xal l:.xal + 5 �g2 el ='ill 6 'illd8+
and mate next move.
Or 2 ... .tf6 3 g3 .l:r.al 4 l:.xal
.l:r.xal+ 5 �g2
a
b
c
d
e
f
g
h
8
8
7
7
6
6
5
4
3
2
a
b
c
d
e
f
g
h
5
4
3
2
and no matter how Black plays he
either loses the vital e2
or
mated: s .
.
. .txe7 6
7
'illt1J is mate, or equally S
.
.
.
el ='if 6
'ii'd8+ �g7 7 'ii'g8+ �h6 8 ll:lxf5+
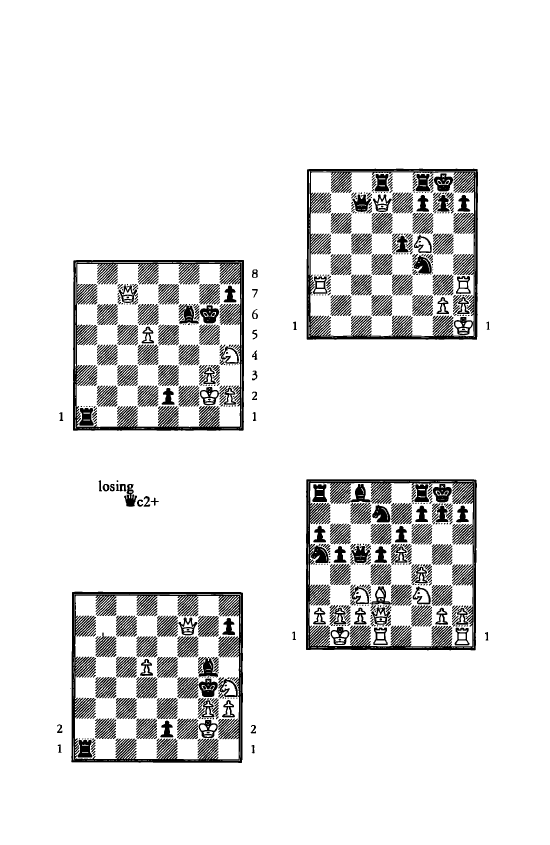
The Greek Gift and Other Queen and Knight Mates 71
'it>h5 9 g4
is mate. If 5
. . .
l:.a8 the
simple reply 6 �f2 to win the e2
pawn is quite sufficient.
Nor does running with the king
help:
8
7
6
5
4
3
2
5 ... �g7 6 l2Jxf5+ �g6 7 l2Jh4+!
a
b
c
d
e
f
g
h
a
b
c
d
e
r g
h
and Black has the sad choice be
tween
his e pawn after
7
. .
. .i.xh4 8
�h6
9 'ifxe2 or
being mated after 7
•••
�h6 8 'ii'f4+
.i.g5 9 'ii'tll+ �h5 10 'ii'ti+ �g4
(IO
. . .
�h6 I I l2Jf5 mate) l l h3
mate.
8
7
6
5
4
3
a
b
c
d
e
r g
h
a
b
c
d
e
r g
h
8
7
6
5
4
3
Puzzles
29
a
b
c
d
e
f
g
h
8
8
7
7
6
6
5
5
4
4
3
3
2
2
a
b
c
d
e
r g
h
White to play
Watch out for your weak back
rank!
30
a
b
c
d
e
f
g
h
8
8
7
7
6
6
5
5
4
3
2
a
b
c
d
e
f
g
h
White to play
4
3
2
Have a go at making the Greek
Gift work-remember the option of
'ifd3 to get the queen involved in
the attack.
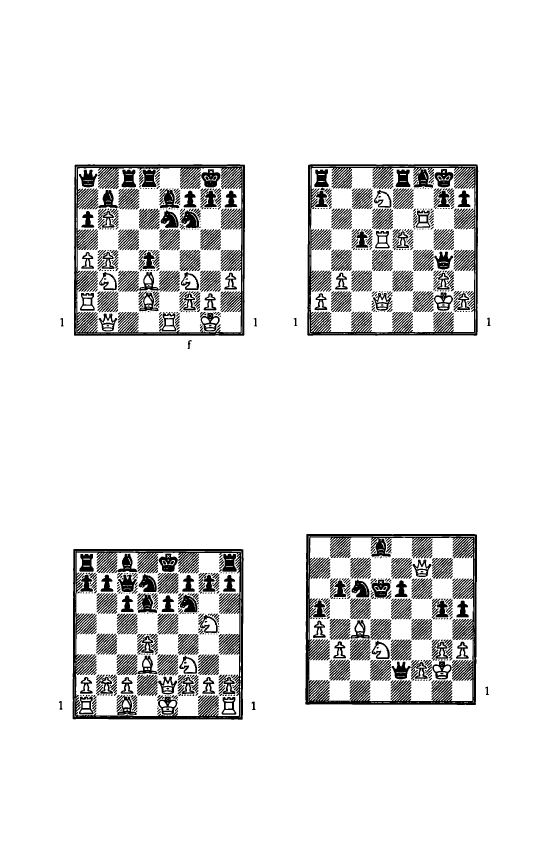
72 The Greek Gift and Other Queen and Knight Mates
8
7
6
5
4
3
2
31
Korchnoi - Kotsur
Olympiad, Bled
2002
a b c d e f g h
a
b c d e
g h
8
7
6
5
4
3
2
Korchnoi played 26 lbgS. Now
find a winning combination for
White if Black plays 26 ... .i.xg2.
32
You are White in the Caro-Kann
and the game begins l e4 c6 2 d4
dS 3 lbd2 dxe4 4 lbxe4 lbd7 5
lbgS lbgf6 6 .tdJ e6 7 lblt3 .td6
8 'ife2.
Now your opponent
surprises you with 8 ... 'ifc7.
a b c d e f g h
a
8
7
7
6
5
4
3
2
a b c d e f g h
6
5
4
3
2
Can you take advantage of this
non-theoretical move?
33
Beliavsky - Wu Shaobin
Olympiad, Bled
2002
a b c d e f g h
8
8
7
7
6
6
5
5
4
4
3
3
2
2
a b c d e f g h
The white rook is immune
because of the knight fork on f6, so
Belyavsky played 28 'ii'd3 to stop
'ife4+ and also set a little trap.
Black replied 28 ... l:lac8. Now what
should White play?
8
7
6
5
4
3
2
1
34
Christiansen - Mosquera
Olympiad, Bled
2002
a
b c d e
f g h
a b c d e f g h
White to play
8
7
6
5
4
3
2
How did Christiansen finish off
the black king?
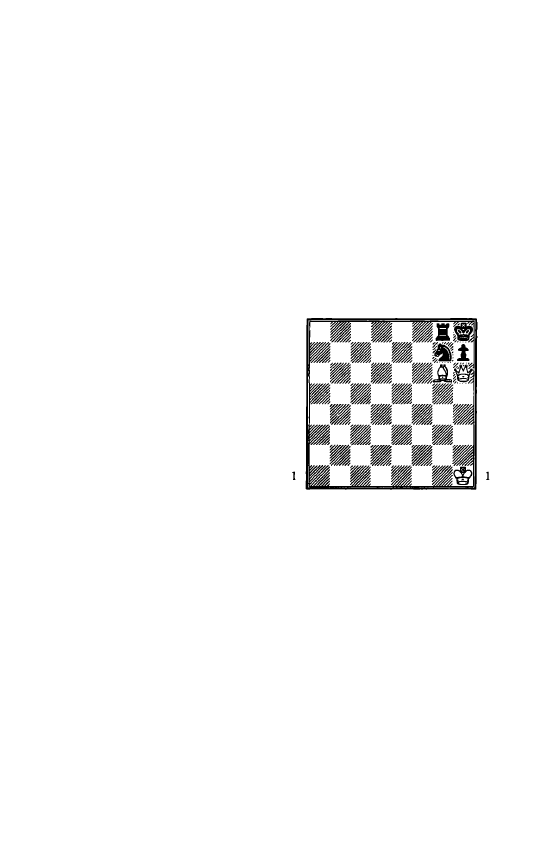
7 The Deadly Diagonal:
Queen and Bishop Mates
T
his chapter is con
cerned with all types
of mates in which the
queen and bishop play
a starring role. As you
will see chess has
come a long way from Scholar's
mate-1 e4 e5 2 1i'f3 ltJc6 3 .ic4
liJd4?? 4 'ii'xti mat
e-
but the
bishop and queen remain a
ferocious attacking force.
We'll start by looking at scen
arios in which the queen mates at
close range protected by the bishop.
This occurs when fatal pressure is
brought to bear against a key point
near or next to the defender's king;
when it collapses mate follows on
the square itself, or on another
square nearby that has become
fatally exposed.
When the defender has castled the
most frequent target is the square
held by his rook's pawn on the
second rank. As usual for the sake
of argument I have assumed that it
is White attacking the black king on
the kingside. In such cases the
target square is h 7.
Basic mating pattern of pressure
on the h file
8
7
6
5
4
3
2
a
b
c
d
e
f
g
h
a
b
c
d
e
f
g
h
8
7
6
5
4
3
2
The white queen and bishop
combine with deadly effect against
the h7 square, which often proves
the most vulnerable point in the
protective wall around the king.
Here Black has no piece capable of
thwarting 1 'ii'xh7 mate.
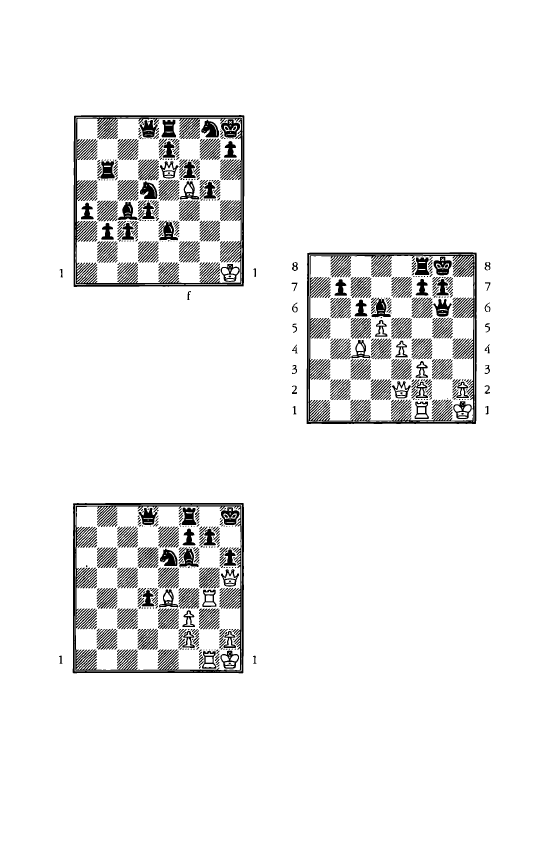
74 The Deadly Diagonal: Queen and Bishop Mates
a
b
c
d
e
f g
h
8
8
7
7
6
6
5
5
4
3
2
a
b
c
d
e
g h
4
3
2
Here Black has an invincible
material advantage and well placed
pieces that control the centre. But
all this does him no good after 1
'ikf7
as he can't prevent mate on h7.
The normal yardsticks for judging a
position, notably material advan
tage, are completely overturned by
the finality of mate.
a
b
c d
e
f g
h
8
8
7
7
6
6
5
5
4
4
3
3
2
2
a
b
c d e f g h
The g7 point is defended three
times, but White can nevertheless
win with 1 .l:txg7! when if I...lt:lxg7
2 'ikxh6+ �g8 3 1i'h7
mate,
or
l...�xg7 2 'ikfS!
when after
2
. . .
lLlg5 3 l:lxg5
mate follows on h7.
By eliminating the g7 pawn White
prevented Black from answering 2
1i'f5 with 2 ... g6. Therefore the h7
square again proved fatally weak.
I saw a tragedy unfold in a tour
nament game as follows.
a
b c d
e
f g
h
a
b
c d
e
f g
h
Black played l...cxd5, whereupon
White replied 2 .ixd5?? only to
find that after 2
.
.. 'ikh5!
he had no
good way to defend h2.
In fact 'the only way to avert mate
was
3
e5 �xe5 and now either 4
1Wxe5 giving up the queen or 4 f4,
allowing 4 .. .'iVxe2. If White had
played 2 exd5 he could have an
swered 2 ... 'ikh5 with 2 f4 as the
queen would be defended by the
bishop, and then 2 ... 'ifxe2 3 �xe2
�xf4 is only equal for Black.
Note that for the attack on h7 (or
h2) to succeed it is often important
that a knight on f6 (or f3) is
eliminated or at least driven away
from the defence. Here is a striking
example of the removal of this key
defender:

The Deadly Diagonal: Queen and Bishop Mates 75
s
4
3
2
a
b
c
d
e
f
g
h
7
6
5
4
3
2
After 1 lbdS! Black is in a hope
less dilemma: if he takes the knight
it is mate with 2 'ifxh7, while if he
saves his queen he is also mated,
e.g. l.
.
. 'ii'e6 2 lbxf6+ Wxf6 3 Wxh7
mate.
Nor does l...'ife4 help much
because of 2 lbxf6+ gxf6 3 Wxe4.
Remember this pattern and be care
ful of putting your queen on e7 in
such a situation!
8
7
6
5
4
3
2
An important tactical idea
a b c
d
e
f
g
h
a
b
c
d
e
f
g
h
8
7
6
5
4
3
2
Sometimes a little finesse is
required to force mate, even if the
queen and bishop have already
conquered the h7 square.
White won't achieve more than a
draw if he starts checking with 1
i.e4+ rtlg7 2 'iVh7+ �f6 3 'iff5+
�g7 etc. but the quiet 1 'ifh6!!
taking away the g7 escape square
from the black king is deadly. It
also
prepares
an
attacking
mechanism with the queen in front
of the bishop. If Black does nothing
he is mated after 2 i.f5 'iti>g8 3 'ifh7,
while if 1
.
.
.
l:le8
the f7 square is
fatally weakened and 2 i..g6+ �g8
3 Wh7+ 'it>fS 4 Wxf7
is mate.
8
7
6
5
4
3
2
Grischuk - Kasparov
Cannes 2001
a
b
c
d
e
f
g
h
a
b
c
d
e
f
g
h
8
7
6
5
4
3
2
Kasparov realises that the bishop
on d5 will win the game for him if
he can introduce a threat of 'iVxa2
mate. The first step is to clear the a3
square for the queen. This is
achieved with 34
•••
1lxe2! 35 1lxe2
'iVaJ. Now White has no time for 36
c3, when the rook on e2 guards a2,
because of 36 ... 'ifxc1 mate. So
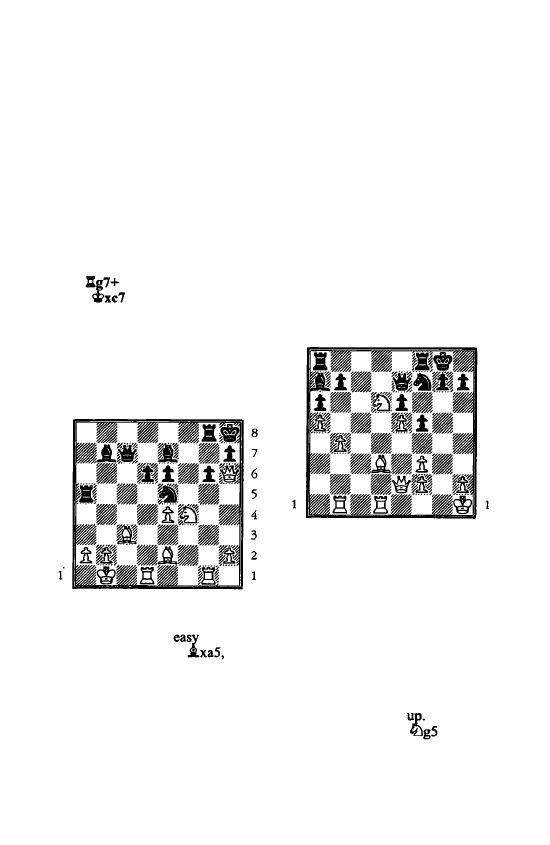
76 The Deadly Diagonal: Queen and Bishop Mates
Grischuk played 36 llgl. Now if
the rook on c4 moves backwards or
sideways, uncovering a threat of
37 ... 'il'xa2 mate, White again has
the defence 37 c3. So the only
move is 36 ... llc3! to mechanically
prevent the advance of the c pawn.
Now there is no defence to mate on
a2. White gave a couple of checks
but when they ran out he had to
resign:
37
�c6 38 llc7+ �b6 39
i.d4+
0-1
8
7
6
5
4
3
2
Svidler - Bischoff
Olympiad, Bled 2002
a
b c d e f g h
a
b c d e f g h
Here it would be
for White
to be tempted by 32
when
32 ... i.xe4+ 33 �al 'il'xa5 would
give Black counterplay along the a
file. Instead Svidler realised that his
bishop was performing a vital
function on c3: it paralyses the
black knight on e5 and so prevents
it from helping to defend the king.
Therefore he kept up his attack
with 32 ltlxg6+ :xg6 33 :xg6
i.xe4+
It looks like Black is also getting
play here, but after 34 i.d3!
Bischoff abruptly resigned. There
is no good way to prevent mate on
g7 after 34 ... i.xd3+ 35 l:txd3, while
34 .... i.xg6 35 i.xg6 is our familiar
attack on h7. None of the black
pieces is able to offer any help, not
least because moving the bishop
from e7 allows mate on f8.
8
7
6
5
4
3
2
a
b c d e f g h
'a b c d e
f g h
8
7
6
5
4
3
2
White's pride and joy in the dia
gram above is his excellent knight
on d6. Black would like to
eliminate it, but he saw that after
l
.
.. ltlxd6 2 exd6 'il'xd6----of course
he doesn't want to leave White with
a passed pawn-White has the
discovered attack 3 i.xf5, when
after the black queen moves to
safety he captures on
e6
and
emerges a pawn
Therefore
Black settled for l ...
allowing
the white knight to remain
unchallenged on the d6 square. Not
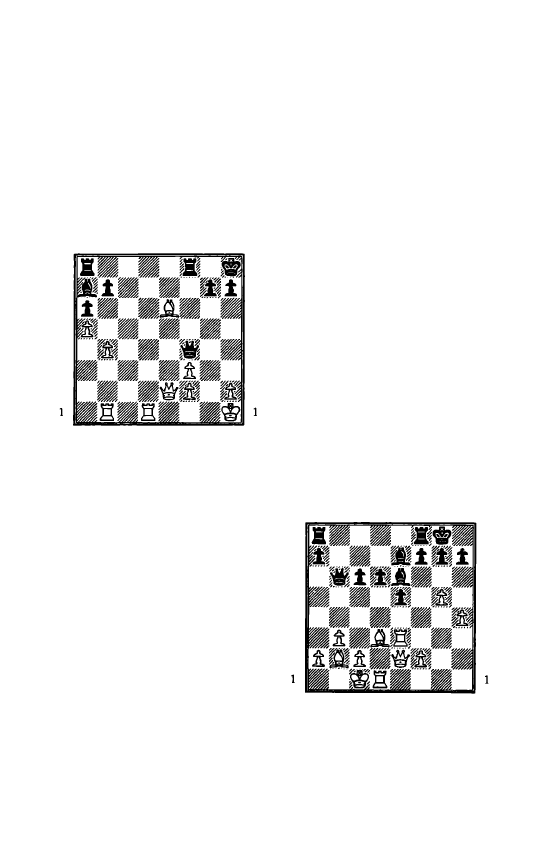
The Deadly Diagonal: Queen and Bishop Mates 77
surprisingly White was able to use
his positional superiority to break
through on the queenside and win.
Black was wrong to reject
l.
..
lt::lxd6, as after 2 exd6 'Wxd6 3
�xf5 he has the strong response
3 .
..
'Wf4!
when if 4 �xe6+ �h8.
a
b
c
d
e
f
g
h
8
8
7
7
6
6
5
5
4
4
3
3
2
2
a
b
c
d
e
f
g
h
White has an extra pawn, but
there is the unexpected and deadly
threat of 5
.•.
�b8!
when White has
no way to defend h2. Mate follows
on 6 'it>g2 'Wxh2+ 7 �n 'Whl. This
would be the reply to a move like 5
�d5. If instead White prepares to
defend with 5 l:[gi, then 5 ... l:r.ae8
puts his queen and bishop into a
fatal pin.
Such is the power of a queen and
bishop along a diagonal against an
underdefended point. Note that the
queen and bishop are the optimum
way round, with the queen in front.
It is quite possible that Black had
simply forgotten about his bishop
sitting quietly on a7 and never
dreamed that it could become the
star of the show.
Pressure against other key
squares
Generally speaking, when there
are only a couple of pieces, such as
queen and bishop, involved in the
attack there are more defensive
resources the closer the vulnerable
square is to the centre. It is easier
for the defender's pieces to come to
the rescue: thus a knight has four
ways of defending g2 but only three
ways to defend h2. Therefore a
piece that was performing some
other role in the centre might find
'by accident' that it can lend a hand
to its king.
Nevertheless, under the right cir
cumstances the queen and a bishop
can be a lethal combination against
the g7 square, as the following two
games demonstrate.
Hengles - Palacios Perez
IBCA World Championship 2002
8
7
6
5
4
3
2
a
b
c
d
e
f
g
h
a
b
c
d
e
f
g
h
8
7
6
5
4
3
2
A pawn up with a broad centre,
you would think that Black is doing
well in the diagram position. But
with his next move White unleashed
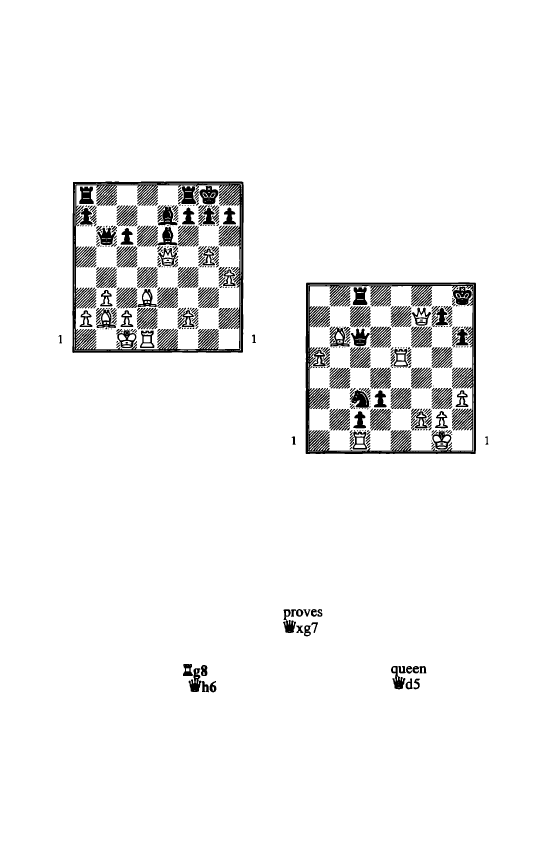
78 The Deadly Diagonal: Queen and Bishop Mates
the bishop on b2 in astonishing
fashion: 22 .llxeS!!
8
7
6
5
4
3
2
After 22
•.•
dxeS 23 'iheS
a
b
c
d
e
f
g
h
a
b
c
d
e
f
g
h
8
7
6
5
4
3
2
there is only one weak point in
Black's position, but it happens to
be on g7, which is of course one
square in front of his king. That is
why checkmate is such an unusual
feature of a chess game: here it
overthrows the laws of space,
material and development, as
according to every criteria Black is
doing OK or very well apart from
the fact that he is mated!
Black has to block the diagonal,
but it is only a temporary remedy:
23
.••
f6 24 'ihe6+ 'iii>h8
(or 24
.
.. .11f7
25 .tc4 l:.af8 26 1Wxe7) 25 'ifxe7
winning too much material or
23
.•.
.tf6 24 gxf6
and the f6 pawn
proves a killer, for example 24 ... g6
25 'iVgS �h8 26 hS!
27 hxg6
fxg6 28 ti+ .llg7 29
with a
quick mate.
In the game Black declined the
offer with 22
.•
..11ae8,
but he
couldn't stem the momentum of
White's attack: 23 .llxe6! .txgS+ (if
23 ... fxe6 24 .txh7+! r.ii>xh7 25
1Wh5+ �g8 26 g6 and the killer
pawn triumphs again) 24 hxgS
.llxe6 25 .txh7+
and Black
resigned.
If 25 ... 'iii>xh7 26 'iVh5+
r.ii>g8 27 .llh I f5 28 g6 when Black
has to give up a rook to stave off
mate on h8 or h7.
8
7
6
5
4
3
2
Anand - Karpov
Lausanne 1998
a
b
c
d
e
f
g
h
a
b
c
d
e
f
g
h
8
7
6
5
4
3
2
White has an extra rook but he
had better be careful as the black
passed .pawns are storming down
the board. Anand decided that
attack is the best form of defence:
38 .td4!
If now 38 ... d2 the pressure on g7
fatal: 39 l:te8+ .llxe8 40
mate.
38
•.•
l:lg8 39 .lle6!
Now the black
finds itself
in trouble as 39 ...
40 l:txh6 is
mate.
39
•••
d2 40 .llxc6 dxcl=1i'+ 41
�h2 1i'd2 42 .llc8! l-0
Disaster follows all the same on
g7.
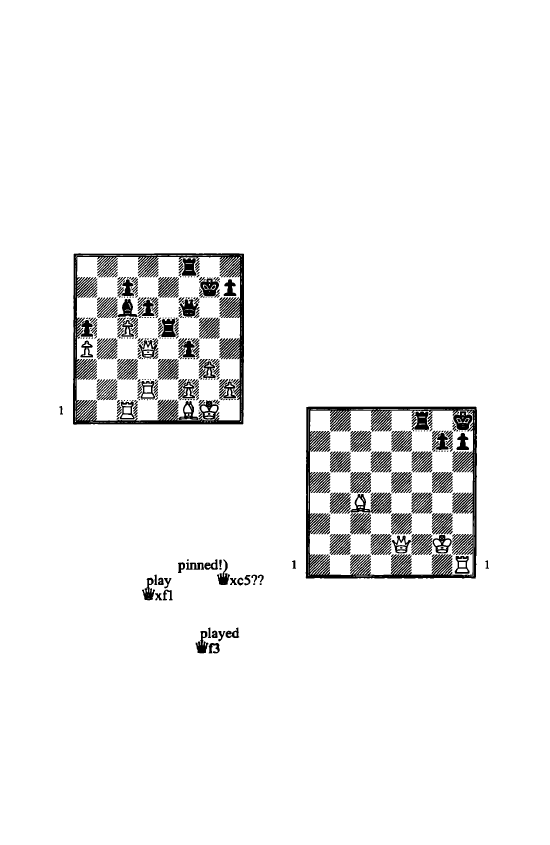
The Deadly Diagonal: Queen and Bishop Mates 79
Even the strongest players can
have blind spots when it comes to
certain squares. I think it is easy to
overlook combinations on the four
comer squares-a!, aS, h l and h8
-because most of the time nothing
much ever happens there.
a
b
c
d
e
f
g
h
8
8
7
7
6
6
5
5
4
4
3
3
2
2
1
a
b
c
d
e
f
g
h
From one of my own games. I
played 26 ... fxg3, delighted that
after 27 fxg3-'forced' the f file
would be open so that I could win a
pawn with 27 ... .:xc5! 28 :xeS dxc5
(of course 28 ... 'iVxfl is illegal
because the queen is
when
White can't
29
because of29 ...
mate.
Imagine my surprise when my
Grandmaster opponent
27
hxg3??
allmving 27
...
when
White had to resign as 28 'li'h4 .:hs
will win the queen or mate on h l .
H e had simply forgotten about the
hl square.
Cutting off the king's escape
So far we have looked at
examples in which the queen,
protected by the bishop, struck a
mating blow at close quarters
against the enemy king. In other
words they acted against a
particular square on the same
diagonal. Now we shall look at
some examples in which the pieces
co-ordinate their action to mate by
controlling different squares.
The most well known scenario is
what I have termed 'cutting off the
king' in the chapter on the Greek
Gift and other queen and knight
mates.
a
b
c
d
e
f
g
h
8
8
7
7
6
6
5
5
4
4
3
3
2
2
a
b
c
d
e
f
g
h
Here the queen checks from the
front, while the bishop prevents the
king running away to the g8 square:
1 .:xh7+! �xh7 2 'iVhS mate.
Besides giving the fatal check, the
queen also stops the king escaping
to g6.
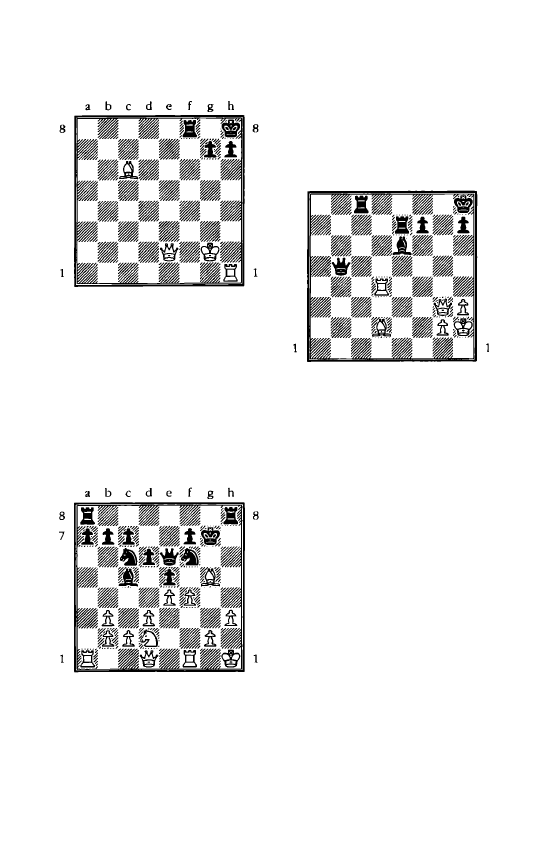
80 The Deadly Diagonal: Queen and Bishop Mates
7
6
5
4
3
2
a
b
c
d
e
f
g
h
7
6
5
4
3
2
Here mate is achieved by winning
time to get the bishop aiming at g8:
I
l:txh7+! 'iti>xh7 2 'iVhS+ 'iti>g8 3
.idS+.
Note that if Black had a
bishop rather than a rook on f8 it
would already be mate. As it is he
can last three moves longer: 3 .
.
.
:n
4 'ii'xti+ 'ifi>h8 5 'ii'hS mate.
6
5
4
3
2
a
b
c
d
e
f
g h
7
6
5
4
3
2
From a recent tournament game.
White played 1 fxeS, uncovering an
attack by the rook on the black
knight on f6. If he thought he was
doing well he was in for a rude
shock as l ... l:txh3+ 2 gxh3 'ifxh3
mate
followed.
8
7
6
5
4
3
2
a
b
c
d
e
f g h
a
b
c
d
e
f
g h
8
7
6
5
4
3
2
Despite being a rook down White
can win as follows:
I
l:td8+!
when
I
..
.
l:xd8 2 ..tc3+ mates
in two
moves or l
. . .
'ife8 2 .ig5!!
and
Black has no way to prevent a fatal
check on f6. Finally if l...l:te8 2
.!:.xeS+ 'ifxe8 3 .ig5!! 'ii'd8
(he has
to stop 4 .if6) 4 .ixd8 .!:txd8 5
'ife5+ 'iti>g8 6 'ii'g5+
and White
picks up the rook and wins easily.
An incredible example of queen and
bishop co-ordination.
The bishop and queen
in a king hunt
We end with two further exam
ples of the queen and bishop acting
against different squares in order to
achieve mate. In both examples the
enemy king has been driven out of
his defences.
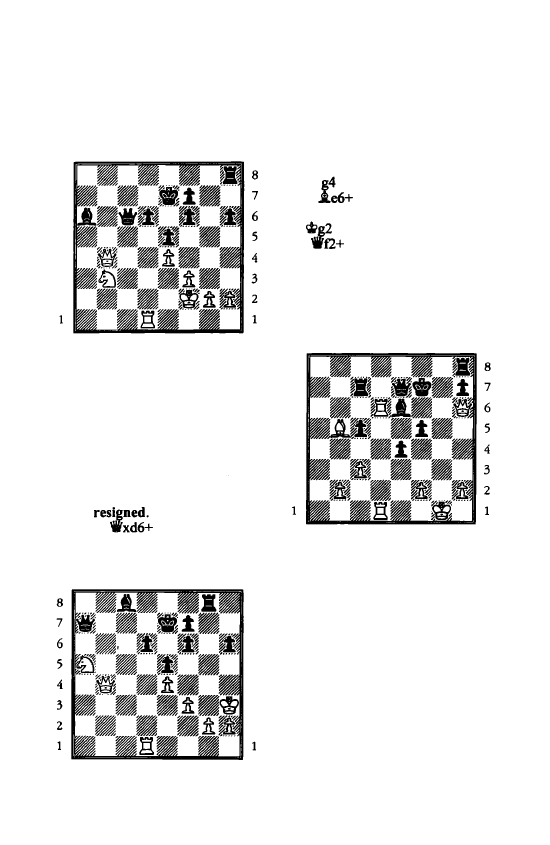
The Deadly Diagonal: Queen and Bishop Mates 81
8
7
6
5
4
3
2
Campos Moreno - Adams
Cala Galdana 2001
a
b
c
d
e
f
g
h
a
b
c
d
e
f
g
h
Here Adams played the crafty
26
.•
.'ifc7
when White should have
adopted a defensive stance with 27
1i'd2, for example 27 ... 'ifb6+ 28
'ife3. But he failed to see the danger
to his king and played the aggress
ive 27 lLlaS? when 27 ... 1i'a7+! was
fatal: 28 �g3. If 28 �e1 1i'e3 mate
28 .. Jlg8+ 29 �h3 i.c8+! and
White
White has his own
threat of
�d8; 1i'd8 mate,
so Black has to do everything with
check.
a
b
c
d
e
f
g
h
a
b
c
d
e
f
g
h
8
7
6
5
4
3
2
There are two variations:
30 �h4 1i'f2+ 3 1 g3 1i'xh2 mate
or if 3 1 �hS llgS+ 32 �6 1Wh4
mate.
30
i.xg4+! 3 1 fxg4 (or 3 1
�g3
32 �h4 1i'f2+ 33 �hS
1i'xh2 mate) 3 1 ...1i'e3+ 32 �h4 (or
32
l:lxg4+ 33 �h1 1i'f3 mate)
32 ...
33 �h3 1i'f3+ 34 �h4
1Vxg4 mate.
8
7
6
5
4
3
2
Kasparov - Ponomariov
Linares 2002
a
b
c
d
e
f
g
h
a
b
c
d
e
f
g
h
An
epic battle from the
penultimate round of the great
Linares 2002 tournament. For the
frrst time Ruslan Ponomariov was
playing in a world elite tournament
and he was lying equal first with
Kasparov. At least until he fell into
the bind in the position above.
Black's defences along the d file
are holding
firm,
but Kasparov
cleverly exploited an undefended
diagonal on the kingside with 36
i.e2! rerouting the bishop to hS.
Already there is the threat of 37
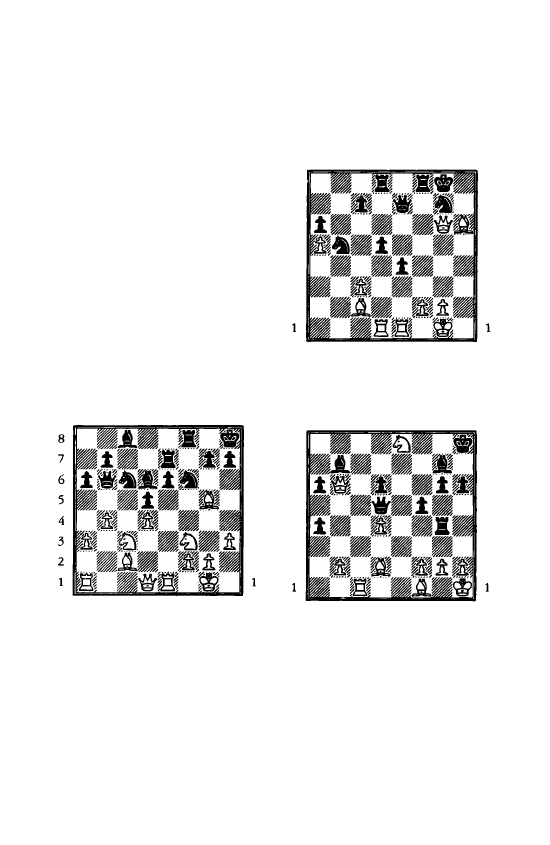
82 The Deadly Diagonal: Queen and Bishop Mates
.i.h5+ �g8 38 ll.d8+ 'iVxd8 39
ll.xd8 mate. If 36 .... l:l.g8+ 37 �h1
leaves Black defenceless against
either 38 .i.h5+ or 38 'iVxh7+. So
Ponomariov tried 36
•••
1i'f6,
but
resigned after 37 .i.hS+ �e7 38
l:txe6+!
as 38 ... 'iVxe6 39 'iVg7+ 'iVfl
40 'iVxfl is mate, while if 38 .. .C�>xe6
39 ll.d6+! �xd6 40 'i'xf6+ wins the
queen with mate to follow.
After winning the game above,
Kasparov beat Shirov in the final
round to win the tournament in
emphatic style.
Puzzles
35
V.Karpov
-
Rudykh
Novosibirsk 2002
a
b c d e
f g h
a b c d e f g h
White to play
8
7
6
5
4
3
2
Viktor Karpov might not be as
famous as Anatoly, but he can still
spot a combination. Here he played
19
'i'd3, no doubt trying not to look
too much at the h7 square ... Now
Black should play 19 ... g6, but
instead he fell for it with 19
.
..
.i.d7
And now?
36
Ramesh - D.Ledger
Torquay 2002
a b c d e f g h
8
8
7
7
6
6
5
5
4
3
2
8
7
6
5
4
3
2
a b c d e f g h
White to play
37
a b c d e f g h
a b c d e f g h
White to play
White is a piece up. Should he:
4
3
2
8
7
6
5
4
3
2
a) play 1 'iVd8, when the threat of
2 �f6+ wins for him.
b) attack the black queen with 1
rtk7, winning more material as if
2 ... 'i'e4 3
0
is a fork on queen and
rook.
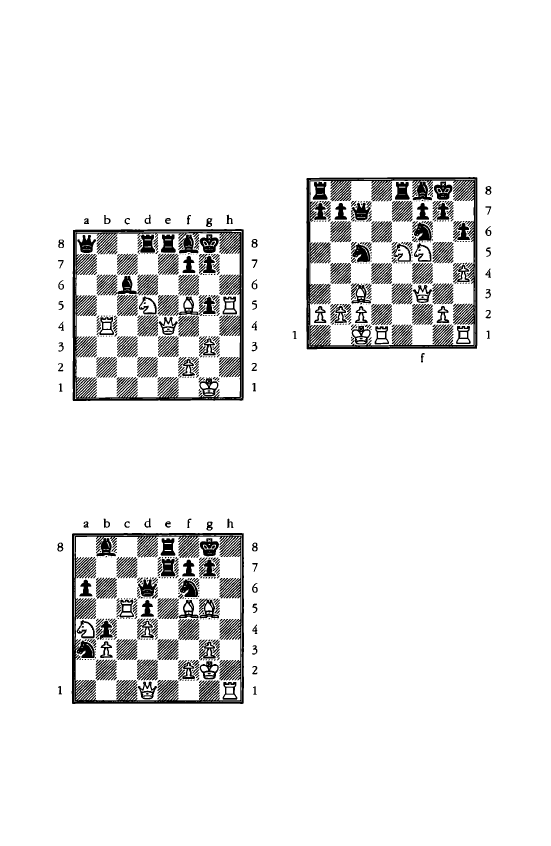
The Deadly Diagonal: Queen and Bishop Mates 83
c) play 1 f3 to rule out any tricks
against g2.
d) play 1 Ci:Jxg7 to continue the
attack on Black's king.
7
6
5
4
3
2
38
a
b
c
d
e
f
g
h
White to play
39
Karpov - Morovic Fernandez
Las Palmas 1994
a
b
c
d
e
f
g
h
White to play
8
7
6
5
4
3
2
40
Adams - Leko
Linares 1999
a
b
c
d
e
f
g
h
a
b
c
d
e
g
h
White to play
Another Adams-Leko encounter.
It looks like Black has a secure
defence here as 20 Ci:Jxh6+ gxh6 21
'iVxf6 can be answered by 2 1 .. . .i.g7
when the knight on e5 is en prise if
the queen moves. Can you spot the
improvement for White which gives
White an easy win?
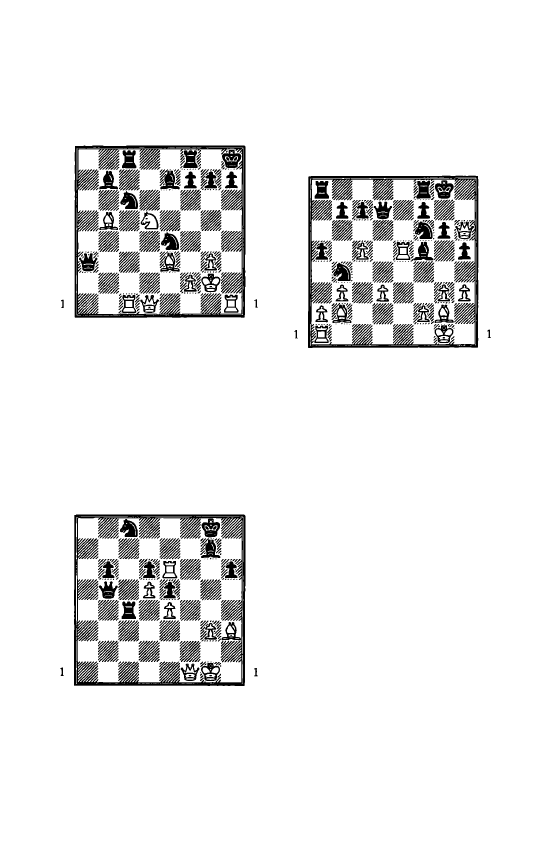
84 The Deadly Diagonal: Queen and Bishop Mates
41
a
b
c
d
e
f
g
h
8
8
7
7
6
6
5
5
4
4
3
3
2
2
a
b
c
d
e
f
g
h
White to play
Work out a forced win after
1
.l:.xh7+.
42
Kasparov - Smirin
Moscow 1988
a
b
c
d
e
f
g
h
8
8
7
7
6
6
5
5
4
4
3
3
2
2
a
b
c
d
e
f
g
h
White to play
Kasparov has just sacrificed his
knight on c4. Why did he do it?
43
Speelman - Koneru
Torquay 2002
a
b
c
d
e
f
g
h
8
8
7
7
6
6
5
5
4
4
3
3
2
2
a
b
c
d
e
f g
h
White to play
What has sacrificed the exchange
to get rid of Black's fianchetto
bishop. How did he force open the
defences?
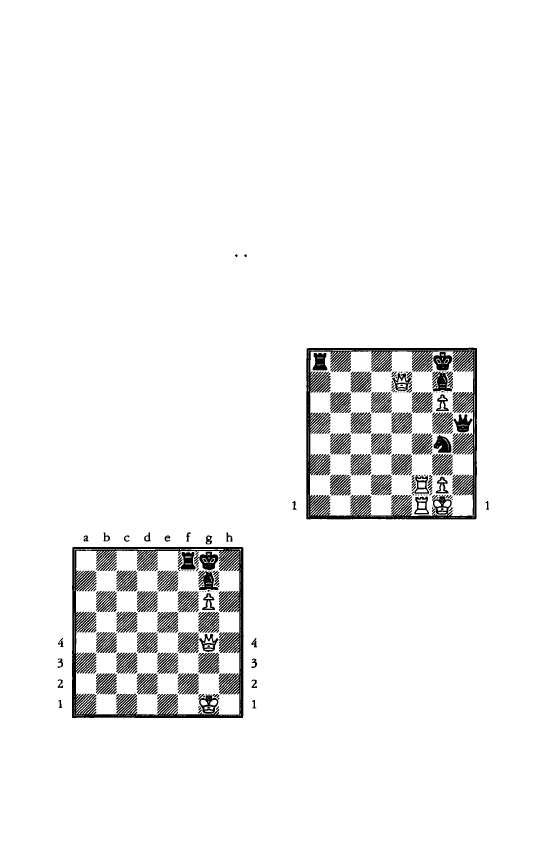
8 The Killer Pawn
T
he subject of this
chapter
is
mating
patterns created by an
advanced pavvn jammed
in the heart of the
enemy king posttiOn.
With good reason I have designated
this a 'killer pavvn'
A simple example is when the
queen, supported by an advanced
(or killer) pawn, is placed right next
to an enemy king to deliver
checkmate.
A killer pavvn creates mating
threats not only by supplying the
friendly queen or another piece with
support on a crucial square but also
by denying the defender's pieces
the use of a key square. This
becomes clear if we examine the
following diagram.
8
7
6
5
a
b
c
d
e
f
g
h
8
7
6
5
Black's king looks well defended,
but he cannot stave off mate after 1
'ife6+ �h8 2 'ifh3+ �g8 3 'ifh7,
or
equally 1
.•.
:n
2 'ii'xti+ �h8 3
'We8+ .tf8 4 'ifxf8.
The pavvn on g6
provided the white queen with the
perfect 'hook' to mate on h7 or
wreak havoc on fl. It also ruled out
the defensive move llfl by Black.
8
7
6
5
4
3
2
a
b
c
d
e
f
g
h
a
b
c
d
e
f
g
h
8
7
6
5
4
3
2
A more complicated example.
Black threatens
l
...
Wh2
mate, so
White had better find something
fast. In fact he can win by 1 :f8+!
with two variations:
1
.
.. :xf8 2 .l:.xf8+ .txf8 3 'ii'ti+
'ifrh8 4 'ii'xf8 mate.
1
..
. .txf8 2 'ifti+ �h8 3 g7+!
winning Black's queen. After
3 ... .txg7 4 'ii'xh5+ lDb6 5 g4!
the
second pavvn advance quells all
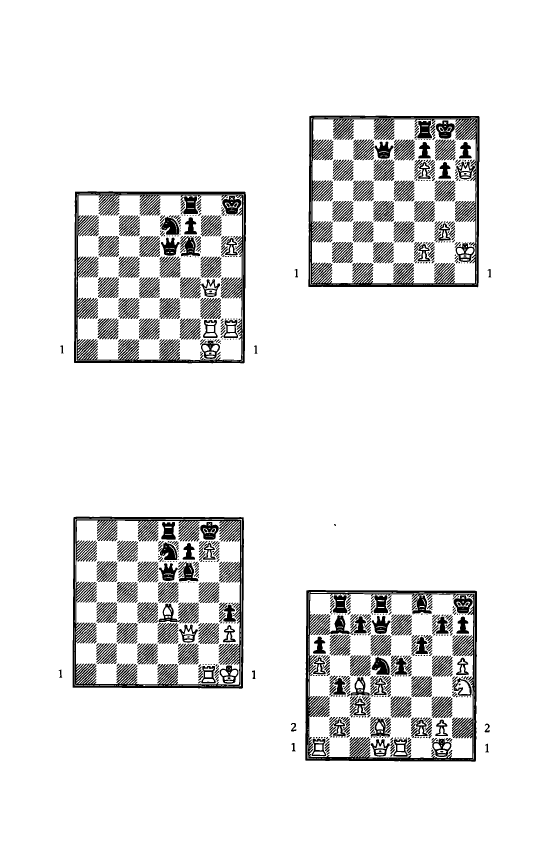
86 The Killer Pawn
resistance, for there is no answer to
6 g5 winning a further piece, as
5 .. .'�g8 6 'it'd5+ wins the rook.
a
b
c
d
e
f
g
h
8
8
7
7
6
6
5
5
4
4
3
3
2
2
a
b
c
d
e
f
g
h
Here the pawn on h6 provides a
lever for a mating combination:
l 'it'g7+! .i.:xg7 2 h:xg7+ �g8 3
l:th8 mate.
8
7
6
5
4
3
2
a
b
c
d
e
f
g
h
a
b
c
d
e
f
g
h
8
7
6
5
4
3
2
Again the killer pawn supports a
mate after l .i.h7+! �:xh7 2 'it'h5+
�g8 3 'it'h8 mate.
a
b
c
d
e
f
g
h
8
8
7
7
6
6
5
5
4
4
3
3
2
2
a
b
c
d
e
f
g
h
The final pattern shows every
player's nightmare when they
fianchetto the king's bishop on g7.
The dark square bishop has
vanished and now the pawn on f6
paralyses the black kingside. In this
instance mate is inevitable on g7,
but this type of set up should be
avoided at all costs by the .defender,
even if there is no immediate mate
looming.
Let's see how Michael Adams
utilises the theme of the killer pawn.
8
7
6
5
4
3
Adams - Tomorhuyag
Moscow Olympiad 1994
a
b
c
d
e
f
g
h
a
b
c
d
e
f
g
h
8
7
6
5
4
3
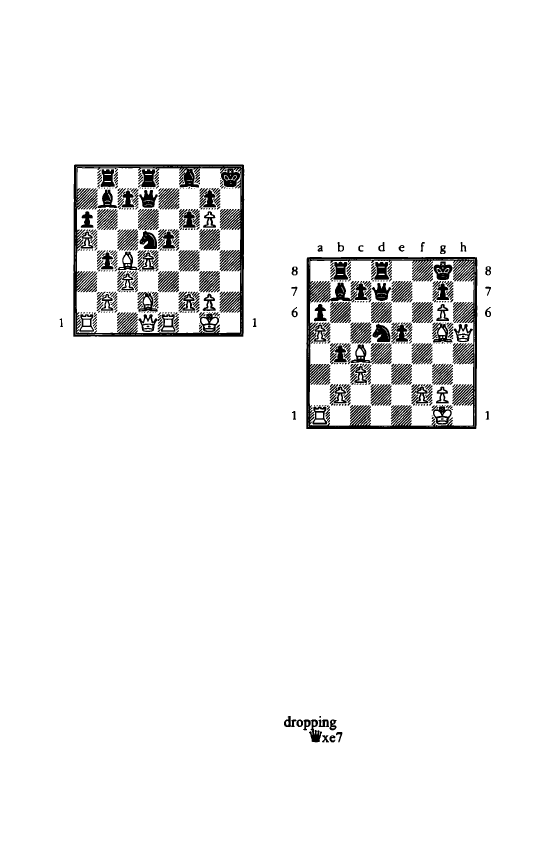
Here he played
23 lDg6+! hxg6
24 hxg6
8
7
6
5
4
3
2
a
b
c
d
e
f
g
h
a
b
c
d
e
f
g
h
8
7
6
5
4
3
2
with the threat of 25 1i'b5+ �g8
26 'W'h7 mate. The pawn on g6 both
supports the queen on the mating
square and takes away the
f7
flight
square from the black king. Black
has two possible defensive tries
against the mate.
Prevent White from playing
'il
h5
.
Unfortunately for him if
24
.••
'ilf5
White can deflect the black queen
from the defence of the hS square
with
25 J.d3!
as there
are
no safe
squares in the vicinity of hS. The
queen must either retreat or capture
the bishop when in either case mate
follows as above after say
25
...
'ilxd3 26 'iif1S+
Clear a flight square for the king
by moving the bishop from j8
which
is what occurred in the game:
24
.
.
.
J.d6 25 'ilbS+ �g8
Now the obvious 26 'W'h7+ �f8
27 'W'h8+ allows 27 ... �e7 when
Black can continue to resist after 28
The Killer Pawn 87
'ilxg7+ �e8 29 'ilg8+ i.f8. Adams
came up with a brighter idea: why
not prevent the black king escaping
to e7, when mate will follow sooner
or later on h8? With this in mind he
played the further sacrifice
26
dxeS! i.xeS 27 l:.xeS! fxeS 28
.tgS!
5
4
3
2
a
b
c
d
e
f
g
h
5
4
3
2
Now the threat is 29 'W'h7+
followed by mate on h8 because the
black king is denied e7. The bishop
on c4 is doing a good job in pinning
the black knight and so preventing a
defence based on lDf6. Black made
one last attempt to save his king
with
28
.
..
'ile6, so that if 29 'irh7+
�f8
30
'W'h8+ 'ilg8 blocks the at
tack. But Adams had one last trick
up his sleeve:
29 .te7!! 1-0
This takes away the f8 square
from the black king and so threatens
mate again on h7. The black knight
can't capture the bishop without
the queen and after
29 ...
30
'W'h7+ �f8
3 1
'ilh8 is
mate as the black queen boxes in
her king.
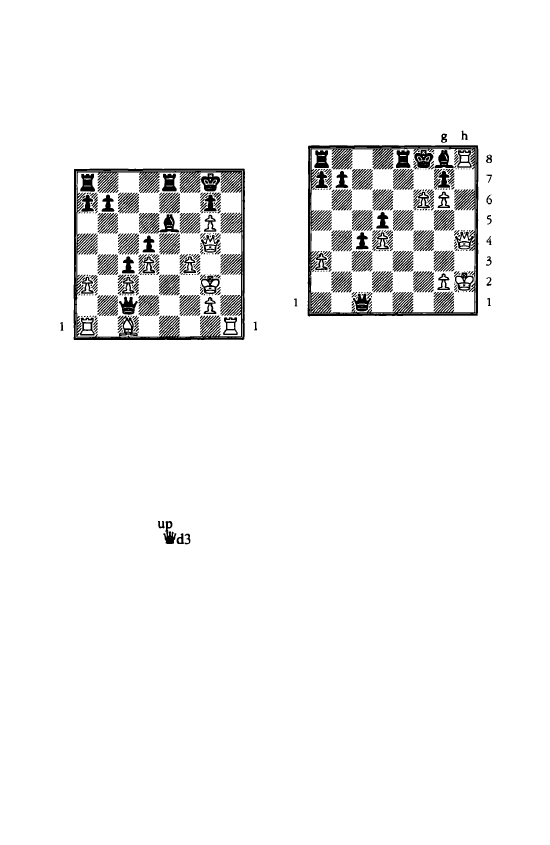
88 The Killer Pawn
Morozevich - Dolmatov
Moscow 1996
a
b
c
d
e
f
g
h
8
8
7
7
6
6
5
5
4
4
3
3
2
2
a
b
c
d
e
f
g
h
Such was Morozevich's belief in
the power of the killer pawn that he
was willing to give up a rook with
25 l:th5!!
to further his attack along
the h file. There followed
25 ... 'ii'xc3+ 26 �h2 'ii'xal
After 26 ... 'ii'xd4 27 Wh4 'li>f8
(forced) 2S .i.e3! 'ii'xe3 29 lle1
Black has to give
his queen as he
is mated after 29 ...
(if 29 ... 'ii'c5
the quickest win for White is 30
l:.fS+!
.i.xf5 3 1
Wits
mate) 30
l:.h8+ .i.gS 31 l:.xgS+ �xg8 32
'ii'h7+ �f8 33
Wits
mate.
27 'iVh4
�f8 28 f5 .ig8
If 2S ... 'ii'xc 1 29 fx.e6 and Black
will have to gi\'e up his queen to
avert 30 l:.h8 mate.
29 l:.h8 'ii'xcl 30 f6!
a
b
c
d
e
f
8
7
6
5
4
3
2
a
b
c
d
e
f
g
h
A pretty situation. One killer
pawn is bad enough but two are just
invincible!
Black has an extra rook and
bishop but has no good way to stop
3 1 l:.xg8+! �xg8 32 'Wh7+ 'li>f8 33
'Wh8 mate, for if 30 ... gxf6 3 1 'ii'xf6
is immediate mate.
30 ... 'ii'h6 31 l:.xh6 l:le4
Black. can't even recapture on h6
as 32 'ii'xh6 is mate.
32 'ii'h5 gxf6
Whereas now 32 ... gxh6 33 g7 is
mate. Morozevich made no mistake
in the mopping up phase:
33 g7+! �e7 34 'Wf5 l:te6 35
'ii'xd5 l:.d8 36 'ii'xc4 l:.e6 37 'ifb4+
l:.cd6 38 'ii'xb7+ l:.6d7 39 'ii'e4+
.i.e6 40 l:.h8 l:.xd4 41 'ii'h7 1-0
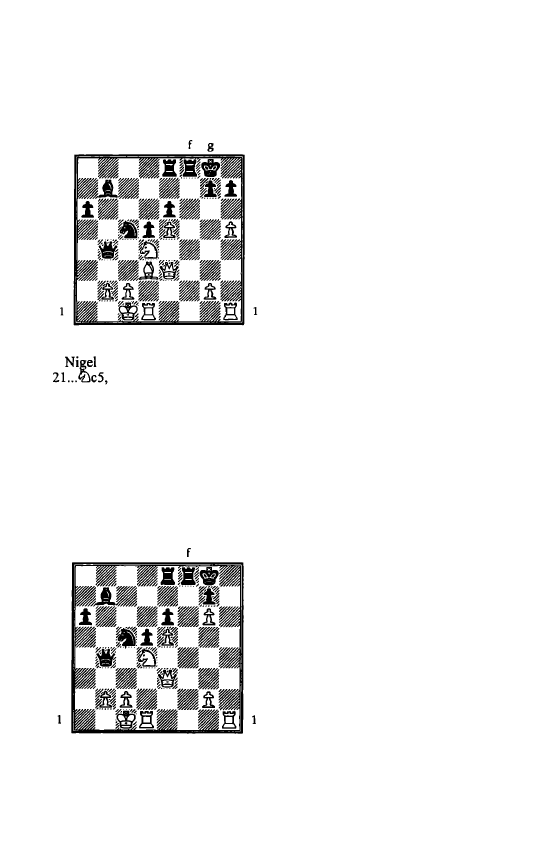
Svidler - Short
Dubai 2002
a
b
c
d
e
h
8
8
7
7
6
6
5
5
4
4
3
3
2
2
a
b
c
d
e
f
g
h
Short has just played
in order to eliminate the
strong white bishop with llJxd3+
and so weaken any attack on his
king. But Peter Svidler saw the
chance to exploit the idea of a killer
pawn and keep his bishop with 22
..ig6!!
Let's see what happens if Black
accepts the offer with 22 ... hxg6 23
hxg6
8
7
6
5
4
3
2
a
b
c
d
e
g
h
a
b
c
d
e
f
g
h
8
7
6
5
4
3
2
The Killer Pawn 89
Now the winning idea for White
is '6'h3, followed by '6'h7 or '6'h8
mate. Black could
try
23 .
.
.
llJa4,
when he has his own threat of mate
on b2. If then 24 b3?? 'ifa3+ 25
c;itb
I
'ifh2 is mate, while 24 lDb3?
allows 24 .... 'iff4! and Black forces
the exchange of queens.
But White has a way to get his
mate in first with checks:
24 1lh8+!
You may have noticed that
White's winning idea of 'ifh3
followed by 11i'h8 or 11i'h7 amounted
to an overkill-one mate is quite
enough to win the game, and by
giving up the rook on h8 White
wins time for the mate on h7.
24 ... <ihh8 25 11i'h3+ <ittg8 26 'ffh7
mate
Because every move is check,
Black had no chance to carry out
his own threat. As a general rule,
you should train yourself to always
play the most forcing series of
moves, even if you can't see any
counterplay for your opponent.
Now let's assume that from the
diagram above Black made a hole
for his king with 23 ... llf5.
Play could then go 24 'ii'h3 �fB
25 11i'h8+ 9;e7
Black's king has been driven out
into the centre. Now White has two
interesting winning methods.
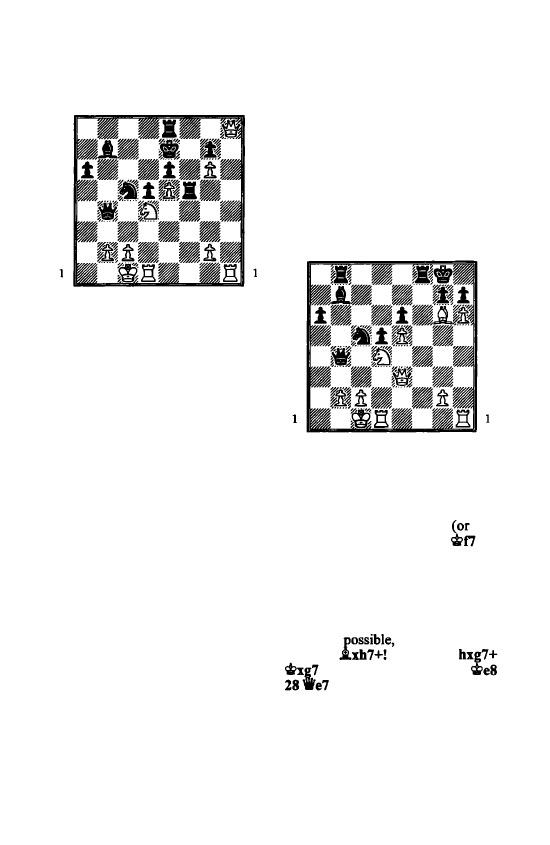
90 The Killer Pawn
a
b
c
d
e
f
g
h
8
8
7
7
6
6
5
5
4
4
3
3
2
2
a
b
c
d
e
f
g
h
The first is immediately decisive
but difficult to see: 26 'ifh4+!! q.,d7
27 .!i:lxf5
and as White threatens 28
,.xb4, Black has nothing better
than 28
•.•
Wxb4 29 .!Llxh4
when
White is the exchange and a pawn
up.
The second idea is more natural:
26 •xg7+ �d8 27 l:.b7 "ifb6
(to
stop mate on c7) 28 .!i:lxfS exfS.
Now White can create connected
passed pawns with 29 'ilf6+! 'il:d6
30 exf6
which will cost Black his
rook within a couple of moves.
These winning methods have
nothing to do with mate-but if
your opponent has to play a move
like 23 ... l:f5, then you are guaran
teed to regain all your sacrificed
material with lLlxf5 and keep up a
strong attack. So you are taking no
risk. Something good is bound to
tum
up: it might not be a mate, but
there will be a win there somewhere
if you look closely enough. In fact,
I suspect that Svidler didn't bother
looking very closely at the defence
23 ... l:f5 when he made his decision
to put the bishop on g6. He would
see that he was getting his material
back and so would have spent his
time looking at other lines.
So much for Black accepting the
bishop offer. Instead he could have
tried 22
••.
l:b8,
with ideas of a
counterattack against b2. However,
White then has the powerful 23 h6!
8
7
6
5
4
3
2
a
b
c
d
e
f
g
h
a
b
c
d
e
f
g
h
8
7
6
5
4
3
2
There is no time to be wasted in
prosecuting the attack. Now there
are two variations:
23
••
�hxg6 24 hxg7 �xg7
else
l:h8+ will win) 25 'ifh6+
26
l:[dfl+ �e7 27 Wg7+ <ite8 28 l:[xf8
mate.
23
•.•
.i.c8,
a despairing attempt to
hit b2. Now remembering our rule
that everything should be done with
check if
White can win
with 24
�xh7 25
26 Wg5+ �fT 27 l:h7+
mate.
Poor Black. In the game (see the
first diagram on page 89)
after 22
.i.g6
Short declined the offer with
22
•••
l:e7,
which bolsters his second
rank against a possible h5-h6
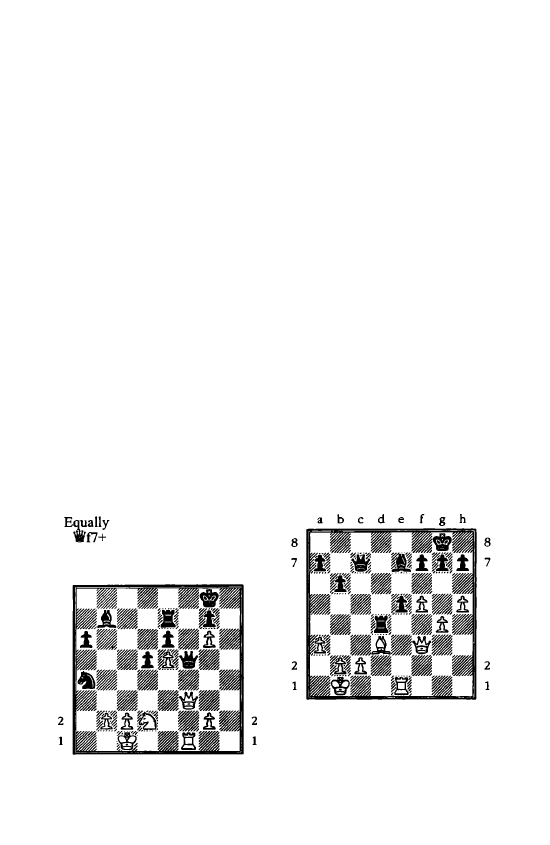
advance, but leaves his first
rank
under-defended.
The
game
continued
23
l:[dfl l:txn + 24 llxfl ll:la4 25
.!Llb3!
Here this is a necessary pre
caution. Not seeing much in the
way of defence after the threatened
'iVf3, Short finally decided to accept
the bishop.
25 ... hxg6 26 hxg6 'ii'b4
He has to stop 27 'ii'h3 or else be
mated on h7.
27 'ii'f3 'ii'gS+
And now the black queen has to
hurry to prevent disaster on the f
file.
28 .!Lld2!
Everything flows nicely in
White's attack. The fact that the
knight defends the rook proves
crucial on the next move.
28 ... 'ii'f5
disastrous are 28 ... lle8
29
and 28 ... Wxg6 29 'ii'f8+
..th7 30 llhl +.
8
7
6
5
4
3
a
b c
d
e
f
g
h
a
b
c
d
e
f
g
h
8
7
6
5
4
3
The Killer Pawn 91
29 Wg3!
Gradually Svidler edges his queen
to
h4,
where she will both threaten
mate on h7 and attack the rook on
e7.
In a recent interview the Russian
GM said he thought his greatest
strength in chess was maintaining
the initiative. It is hard to argue
with this verdict when you see his
skill in exploiting the killer pawn.
29
•••
'ifbs
30 Wf4 Wrs 31 Wh4
Wxe5
Hoping against hope that White
will take on e7, when 32 ... 'ii'xb2+
comes with a loud cry of check. In
any case 31...'ii'xg6 32 'it'xe7 was
entirely hopeless.
32 'it'b7 mate.
6
5
4
3
Van den Doel - Sakalauskas
Olympiad, Bled 2002
a
b
c
d
e
f
g
h
6
5
4
3
White began to undermine the
black kingside with 31 h6!
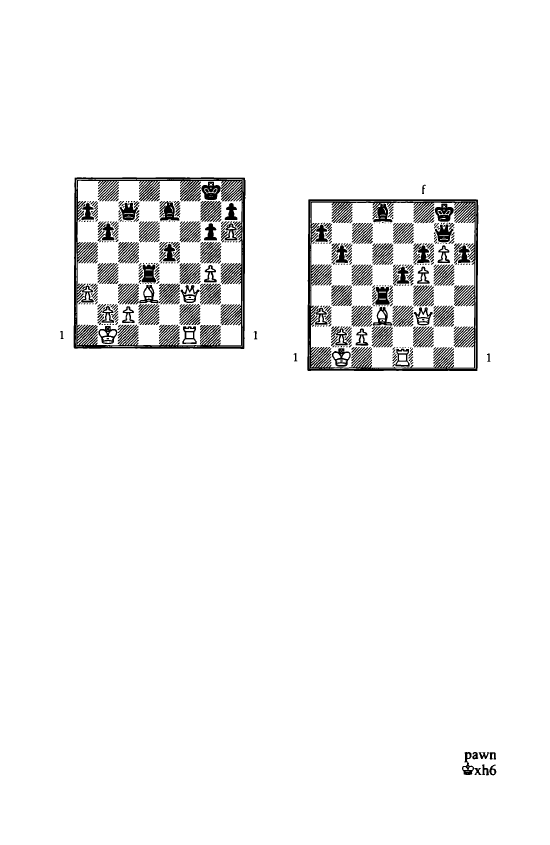
92 The Killer Pawn
Black has the miserable choice of
allowing a white pawn on h6 or g6.
If31 ... g6 32 fxg6 fxg6 33 :n
8
7
6
5
4
3
2
a
b
c
d
e
f
g
h
a
b
c
d
e
f
g
h
8
7
6
5
4
3
2
and Black cannot hold out for
long due to his weaknesses on the
light squares which are made
manifest by the presence of
opposite coloured bishops. Here are
two sample variations which
illustrate the danger down the f file:
33 ... .id6 34 WaS+ 'ii'b8 35
.ic4+! �h8 (Black loses the rook
after 35 ... l:txc4 36 'ii'd5+) 36
·Wxb8+ .ixb8 37 l:r.f8 mate.
33 ... l:r.f4 34 Wd5+ �h8 (or
34
.
.
.'1tiffi
35 l:r.xf4+ exf4 36 .ic4
followed by a devastating check on
the long diagonal e.g. 36 ... .ig5 37
'ii'g8+ q;e7 38 'ifxh7+) 35 llxf4
exf4 36 Wt7 .id6. There is no other
way to defend g7. 37 'il'e8+ and
mate follows.
The game actually went:
31 ... f6 32 hxg7 .idS
Or 32 .. .'1tixg7 33 g5!
33 g5!
This leads to the creation of a
killer pawn on g6 as abysmal for
Black is 33 ... fxg6 34 f6.
8
7
6
5
4
3
2
33 ... 'ifxg7 34 g6 h6
a
b
c
d
e
g
h
a
b
c
d
e
f
g
h
8
7
6
5
4
3
2
Black hopes to construct a solid
blockade, but when you have lost
control of the light squares there is
no hiding place on the dark squares!
White's winning plan is very
instructive: he will intensify the
pressure on the diagonal a2-g8 until
Black can no longer guard the fl
square and hold onto the h6 pawn.
35 .ic4+! �h8
Not 35 ... l:r.xc4 36 Wd5+ winning
the exchange.
36 .in Wts 37 l:r.h1 CiPg7 38 Wh3
'ifh8 39 .ia2!
White gradually carries out his
plan. The pawn on g6 severely
hampers
Black's
ability
to
manoeuvre.
39 ... .ie7 40 'ii'b3 'il'e8 41
c3
l:r.d8
42 'ifc4 .ic5 43 l:r.xh6! 1-0
Black resigned as the
queens with check after 43 ...
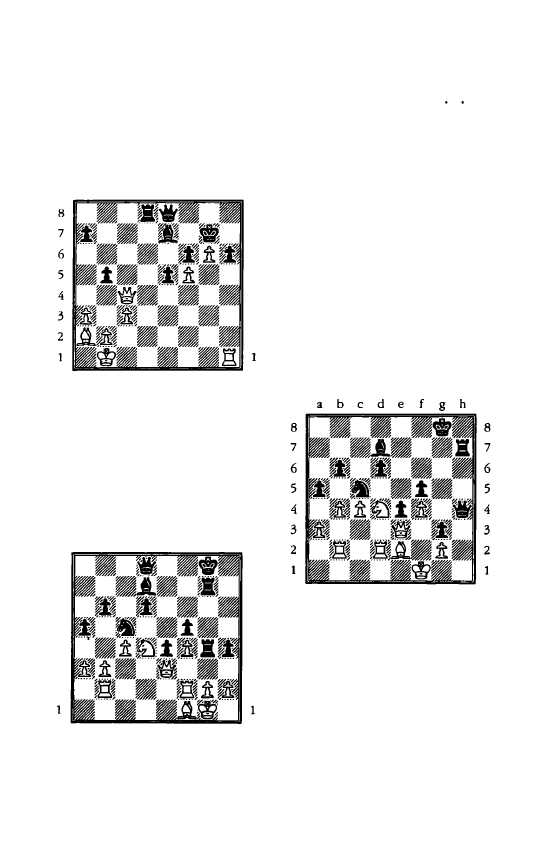
44 'ii'h4+ q;g7 45 'iVh7+ q;f8 46
g7+. If on the previous move Black
had played 42 ... bS, attacking the
queen, then I can offer you the
following brilliant win:
a
b
c
d
e
f
g
h
a
b
c
d
e
f
g
h
8
7
6
5
4
3
2
43 .fhh6!! bxc4 44 l::th7+ 'it>f8 45
i.xc4!!
and despite being a queen
up there is nothing Black can do
about 46 g7+
8
7
6
5
4
3
2
Keres - Petrosian
Candidates Tournament 1959
a
b
c
d
e
f
g
h
a
b
c
d
e
f
g
h
8
7
6
5
4
3
2
The Killer Pawn 93
Keres played 47 b4, atmmg to
push back the knight and gain the
initiative on the queenside. With the
g2 square securely defended he
didn't foresee any trouble on the
kingside. But Petrosian offered a
rook in order to establish a killer
advanced pawn:
47
.•
Jlg3!! 48 hxgJ
Retreating the queen allows
48 ... �d3.
48 ... hxg3 49 l:.fd2 'ilh4
It turns out that White's pieces
are well positioned to defend all
points apart from those on the h file.
so
i.e2 l:.h7 Sl �n
a
b
c
d
e
f
g
h
Apparently Keres, who was
renowned as a tactician in his
youth, had completely missed
Black's next move and thought he
was a rook up for nothing!
Sl
•••
'ii'xf4+! 0-1
It is mate after 52 'ii'xf4 l:hl.
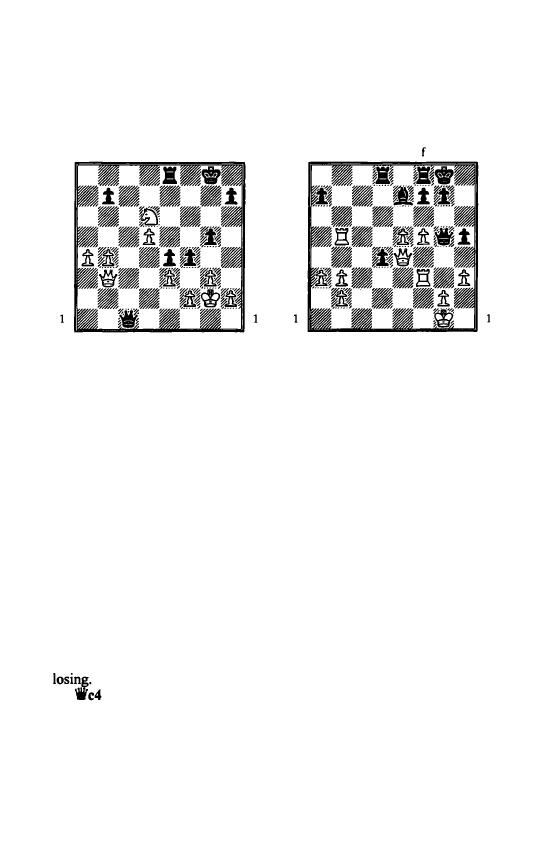
94 The Killer Pawn
Crouch - Summerscale
British Rapidplay 2002
a
b
c
d
e
f g h
8
8
7
7
6
6
5
5
4
4
3
3
2
2
a
b
c
d
e
f g h
Grandmaster Summerscale knew
the value of having a pawn on f.3
and won as follows: 32
.•.
f3+ 33
'ii;lh3.
Now a little finesse is
required as the obvious 33 ... 'iffl+??
allows 34 �g4 when the white king
escapes and suddenly it is Black
who has to start thinking about how
to draw the game! Instead
Summerscale played 33 ... hS! A
strong player knows from exper
ience that in such situations the king
should be kept imprisoned. In fact I
doubt that Summerscale did much,
if any, calculation before playing
this move: as soon as he saw the
threat of 34 ..
.
'iffl
mate he would
know this was the winning move.
1M
Colin Crouch resigned straight
away: he also knew that he must be
There is only one variation:
34
'ifhl!
(or 34 ... 'ifgl !) and
there is no defence against
35 ... 'ifg2. The fact that the rook on
e8 is hanging was a complete
irrelevance.
Dominguez - Johansen
Olympiad, Bled 2002
a
b
c
d
e
g h
8
8
7
7
6
6
5
5
4
4
3
3
2
2
a
b
c
d
e
f g h
White, who has already sacrificed
a piece for two pawns and the
initiative, was willing to give up
both rooks to establish a killer pawn
on f6:
30 f6! .i.xf6 31 exf6 'ifxbS 32
:g3!
Threatening 33 %lxg7+ 'ii;lh8 34
'ii'h7 mate. First of all let's see how
the game fmished:
32 ... g5 33 'ifh4 g4? 34 %lxg4+!
and Black resigned as he is mated
on g7 after 34 ... hxg4 35 'ifh6, while
if 34 .. .'�'h8 35 %lg5 'ii'xg5 (or else
disaster occurs on h5) 36 'ifxg5
%lg8 37 'ifh6 mate.
This looked very convincing, but
Black overlooked two adequate
methods of defence. Firstly, at
move 32 instead of 32 ... g5
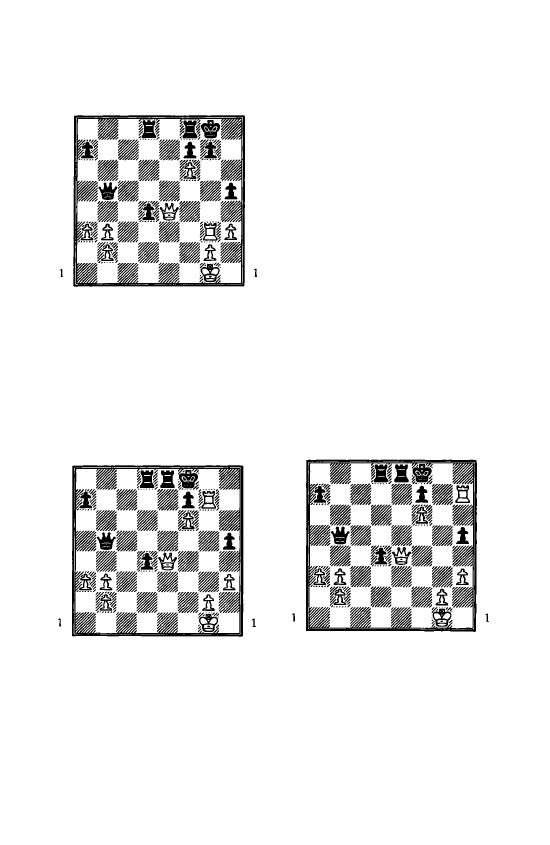
a
b
c
d
e
f
g
h
8
8
7
7
6
6
5
5
4
4
3
3
2
2
a
b
c
d
e
f
g
h
Black would be mated after
3
2
•..
g6? 33 1txg6+ fxg6 34 Wxg6+
'ith8 35 W'g7,
but he could have
played 32
..•
Afe8!
which clears the
f8 square for his king and attacks
the white queen. After 33 ltxg7+
(forced) 33 ... <li>f8
8
7
6
5
4
3
2
a
b
c
d
e
f
g
h
a
o c
d
e
f
g
h
8
7
6
5
4
3
2
it is very annoying for White that
Black has a pawn on h5 as other
wise he could force mate with 34
ltg8+ <li>xg8 35 W'g4+ �f8 (alas,
35 ... hxg4!) 36 'ifg7. Still, it looks
like 34 'ifh7 will do the job
as
the
The Killer Pawn 95
mates he is threatening on the back
rank look unavoidable. However,
Black has enough firepower to
counterattack and even win as
follows: 34 .. Jlel+ 35 'it>h2 (even
worse is 35 �f2 _.fl+ 36 �g3
lte3+ 37 �h4 W'xf6+) 35
.•.
W'e5+ 36
llg3 W'xf6
and by eliminating the
killer pawn Black destroys the
mating pattern, when he wins with
his extra rook.
So does this mean that White
would be losing after 32 ... 1tfe8
because he has over sacrificed? In
fact he can save a draw by
employing a method that is well
worth remembering. After 33 ... �£8
in the diagram above, he can ignore
the threat to his queen and play
8
7
6
5
4
3
2
34 l:lh7!
a
b
c
d
e
f
g
h
a
b
c
d
e
f
g
h
8
7
6
5
4
3
2
Black has no time to take the
queen as he is mated on h8. There
fore it is a draw by repetition after
34
.•.
�g8 35 ltg7+ �f8 36 .l:r.h7.
A
fantastic demonstration of the
power of a killer pawn!
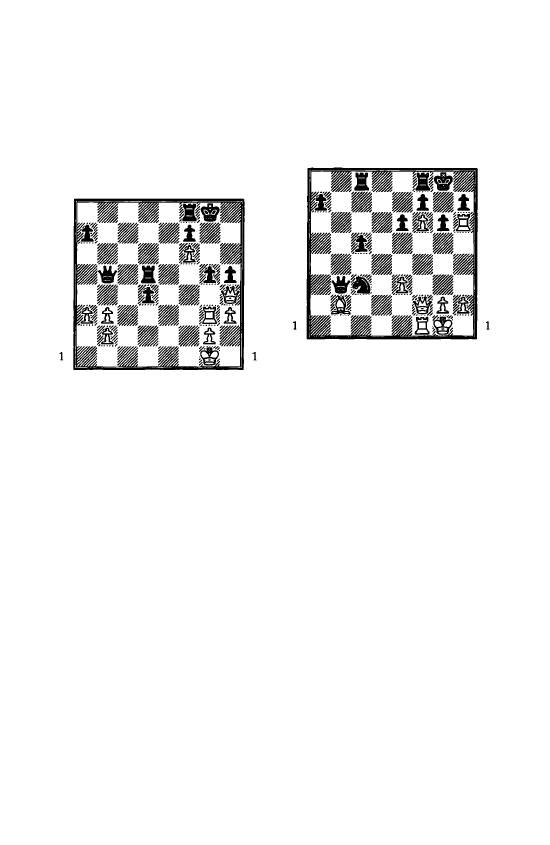
96 The Killer Pawn
Finally we should mention that
one move later instead of 33 ... g4?
Black
could
have
defended
adequately with 33
•••
1ld5!
a
b
c
d
e
f g h
8
8
7
7
6
6
5
5
4
4
3
3
2
2
a
b
c
d
e
f g h
Then 34 'ifxhS l:fS! prepares to
eliminate the killer pawn with 'iff)+
and l:xf6. Now White would lose
after the slow methods 35 'ith2?
'ii'e5, attacking f6 and pinning the
rook or 35
h4
l:fl+ 36 �h2 'ii'e5 37
hxg5 'ii'e 1 and Black gets in first
with mate on hI. So White has to
press on with 35 'ii'h6, when the
game finishes with perpetual check
after 35 ... 'ii'fl + 36 �b2 .:txf6 37
llxgS+ l:g6 38 llxg6+ fxg6 39
'ii'xg6+ �h8 40 'ii'h6+ �g8 41
'6'
g6+
etc.
When there are combinational
themes for both players, the out
come of the game can be decided
by the possession of the next move.
Take a look at the diagram above.
It is a very tense position: Black has
two extra pawns on the queenside,
but White has the monstrously
strong pawn on f6. Black has no
dark squared bishop to defend the
g7 square. But just how good is the
white rook on h6?
a
b
c
d
e
f g h
8
8
7
7
6
6
5
5
4
4
3
3
2
2
a
b
c
d
e
f g h
With White to move:
the white
rook is brilliant on h6: he has
played like a genius to get it to this
square!
With Black to move:
the white
rook is horribly misplaced on h6, as
it should be defending the back
rank. What an idiot White was to
put
it
on this square!
If it were White's move the attack
would break through at once with 1
llxh7!
with a quick mate whether or
not Black took the rook:
1. .. �xb7 2 'ii'h4+ �g8 3 'ii'h6
and mate inevitably follows with
'ii'g7.
1 .... l:fe8 2 'ii'h4
and mate with
llh8.
1 ....
lbe4 2 l:g7+ �h8 4 'il'h4
mate.
If Black throws in a check with
l ...lbe2+ White does best to ignore
the knight and play simply 2 'ifi'hl,
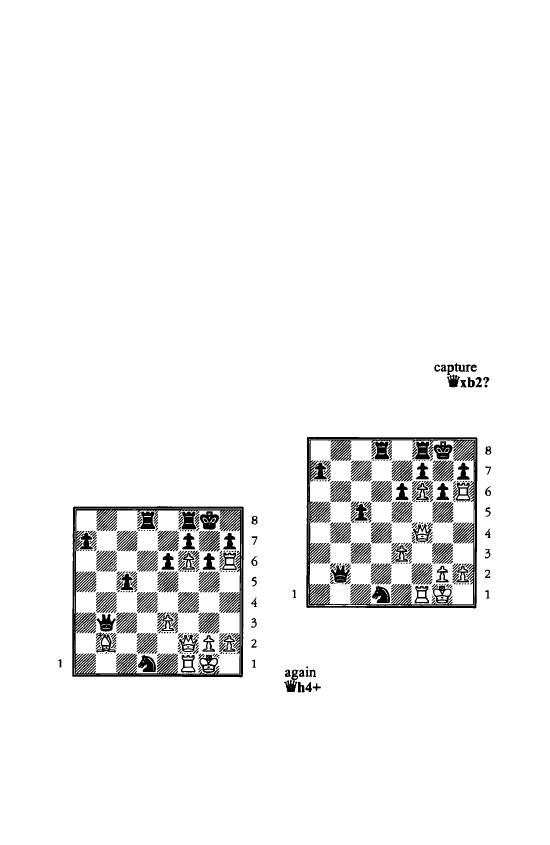
when he maintains the threats of
l:tg7+ or 'ii'h4. Then Black has one
more useless check with 2 ... �g3+,
when after 3 Wi'xg3 he must bow to
the inevitable on the kingside.
Note that if you see two equally
good ways of prosecuting attack it
is sensible to play the sequence that
involves giving checks as it cuts
down the defender's options. Thus
in the line above after l...�e4,
White could also win with 2 'ifh4,
but giving a check with 2 llg7+ and
then mating next move with 3 Wi'h4
is the safest and most precise
method.
In contrast, if it were Black's
move in the diagram above he
could save himself by getting in
first with l. .. �dl ! attacking
White's queen and clearing the way
for combinations based on exploit
ing the weakness of the e3 square.
8
7
6
5
4
3
2
a
b
c
d
e
f
g
h
a
b
c
d
e
f
g
h
Then after 2 'iVh4 'ifx
e
3+ 3
¢1hl
�f2+ White is mated after both 4
The Killer Pawn 97
llxf2 lldl+ or 4 'ifxf2 Wi'xf2 5 l:.xf2
lldl+. If instead he tries 4 ¢1gl he
walks right into a discovered check
and can resign after 4 ... �g4+ 5
¢1hl �xh6-the trapper trapped!
You will see that Black exploited
two tactical themes: firstly, the
power of the queen/knight attacking
mechanism (which is discussed
further in the context of smothered
mate in Chapter 1 0) and secondly
the weakness of White's back rank.
Now let's imagine that after
l ...�dl White had tried 2 'ii'f4.
Then
2 ... 1i'xe3+,
exchanging
queens, would win easily. But say
Black instead decided to
the
irrelevant bishop on b2: 2 ...
8
7
6
5
4
3
2
a
b
c
d
e
f
g
h
a
b
c
d
e
f
g
h
There follows 3 llxh7! and once
White gets in first: 3 .. .<.t>xh7 4
¢1g8 5 'Wh6 and in order to
stave off mate Black has to play
5 .. Ji'xf6 when 6 l:xf6 gives White
winning chances.
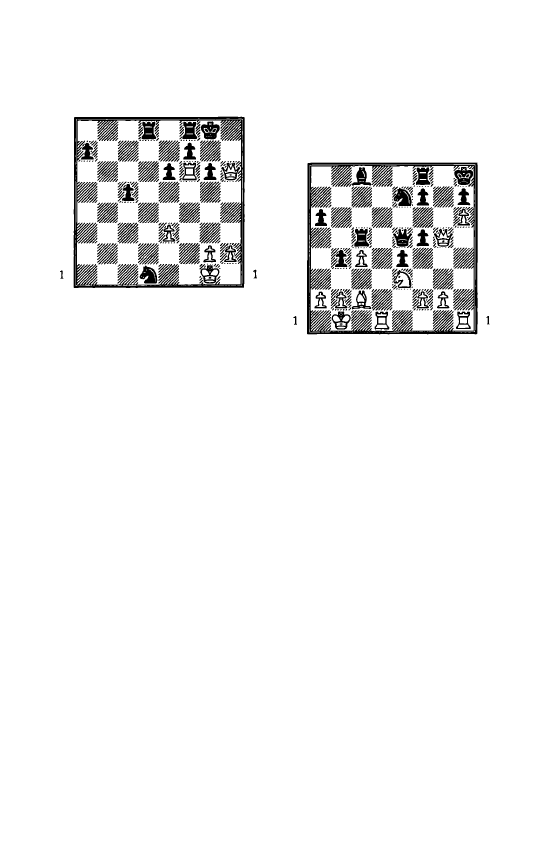
98 The Killer Pawn
a
b
c
d
e
f g h
8
8
7
7
6
6
5
5
4
4
3
3
2
2
a
b
c
d
e
f g h
Here is an exciting finish: 6
•.•
c4 7
h4!
If White wanted a draw he
could force it with 7 .:.xg6+ fxg6 8
'ii'xg6+ �h8 9 'ii'h6+ etc. with
perpetual check. With only a queen
and rook left to attack with he has
to utilise his rook's pawn as well if
he wants to win. 7
•..
c3
8 h5 c2
(or
8 ... hxg5 9 1i"g5+ �h8 10 l:th6
mate.) 9 hxg6 destroying the black
king's cover. Now he is mated after
9 ... c1='ii' 10 1i"h7 or 9
•••
fxg6 10
l::txg6+
(the quickest) 10 ... citti 11
'ifh7+ �e8 12 .l:he6
with a form of
the epaulette mate.
The next excerpt features the
themes of a killer pawn, weak back
rank and smothered mate. The pawn
on h6 looks impressiv!:, and White
has only to dislodge the black queen
from e5 for it to be mate on g7 ... but
how exactly can this be done? It is
also a matter of urgency
as
Lautier
is ready to play .:g8 next move or
even f5-f4!
Kasparov - Lautier
Olympiad, Moscow 1994
a
b
c
d
e
f g h
8
R
7
7
6
6
5
5
4
4
3
3
2
2
a
b
c
d
e
f g h
Kasparov came up with 27 l:h5!!
which pins the f pawn. And as the
black queen dare not move from e5
it threatens to win the exchange
with 28 ltlg4 fxg4 29 'ii'xe5 :xeS
30 l:txe5.
Lautier tried 27
•.
Jlg8
but
28 ltlg4!! was lethal all the same. If
28
.•
Jbg5 29 lilxe5
l:r.xh5-any
other move by this rook allows a
similar mate, while 29 .. Jlxe5 30
.l:lxg5 leaves him the exchange
down 30 .l:ld8+ ltlg8 31 lilxti with
a smothered mate!
Now a game from the World
Under 20 Championships. With his
next move White forced instant
resignation by exploiting both the
weakness of Black's back
rank
and
the e7 square. It is often said that
the attacker has an extra piece when
there are opposite coloured bishops!
Black's bishop on d5 does nothing
to defend the dark squares.
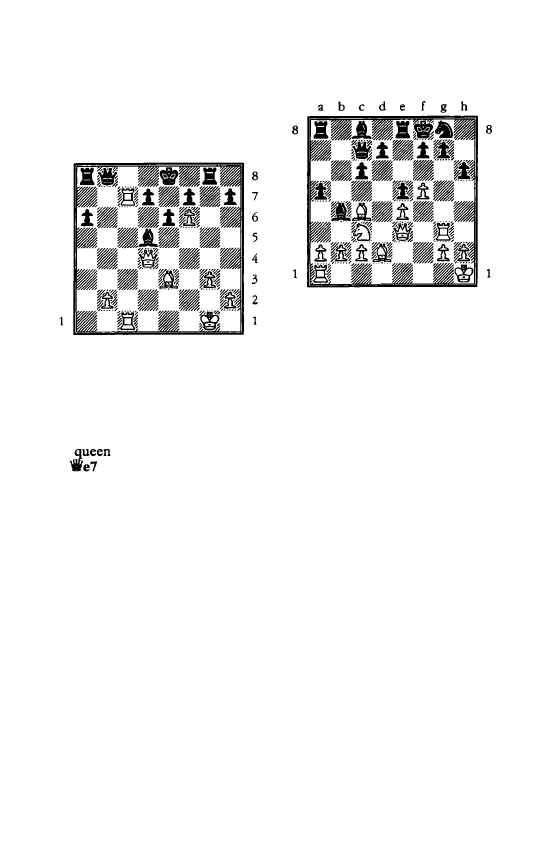
8
7
6
5
4
3
2
Solak - Djushin
Yerevan 2000
a
b
c
d
e
f
g
h
a
b
c
d
e
f
g
h
Play continued: 28 'ifb4! 1-0
After 28 ... 'iVxb4 29 .:.es+ l:xe8
30 l:.xe8
is mate, while 28
.•.
'ii'd8
only delays it: 29 .:.eB! deflecting
the
29 ... l:xe8 30 .:.xeS 'ii'xe8
31
mate.
The mobile killer pawn
So far we have seen the killer
pawn in a static role, like the
proverbial bone in the throat. In the
next couple of examples it is used
as a qattering ram to break up
Black's defensive line:
Kasparov - Movsesian
Simul, Prague 2001
Kasparov
reduced
Black's
kingside pawn structure to a pile of
rubble with
7
6
5
4
3
2
The Killer Pawn 99
a
b
c
d
e
f
g
h
18 f6! gxf6
7
6
5
4
3
2
If 18 ... g6 the pawn on f6 becomes
intolerable: the position forms a
puzzle in the chapter on minor piece
mates. Also hopeless would be
18 ... g5 19 l:.xg5! hxg5 20 'ii'xg5
lLlxf6 (if 20 ... .:.d8 21 'iVg7+ and
mate next move) 21 'ii'xf6 d5-to
ward off mate on fl-22 i..h6+
'iti>g8 23 W g7 mate.
If instead 1 8 ... lLlxf6 then 19
l:.xg7! 'itxg7 20 'ii'xh6+ <iti'g8 21
'ii'g6+! exploiting the pin on the f7
square to capture the knight with
check 2 l ...'ith8 22 'ii'xf6+ �h7 23
'ii'xf7+ 'ith8 24 'ii'f6+ (of course, 24
'ii'xe8+ isn't bad either!) 24 ... 'it>h7
25 'ii'h6 mate.
Incidentally in all these variations
you will see the importance of the
'quiet' bishop on c4. The king's
bishop frequently plays a key role
in an attack without receiving any
applause. In these lines it is easy to
forget it as it never moves even
once, but the themes of 'ii'xf7 mate
or the pin on f7 after '1Vg6+ or its
control of g8 are all central to the
winning combinations.
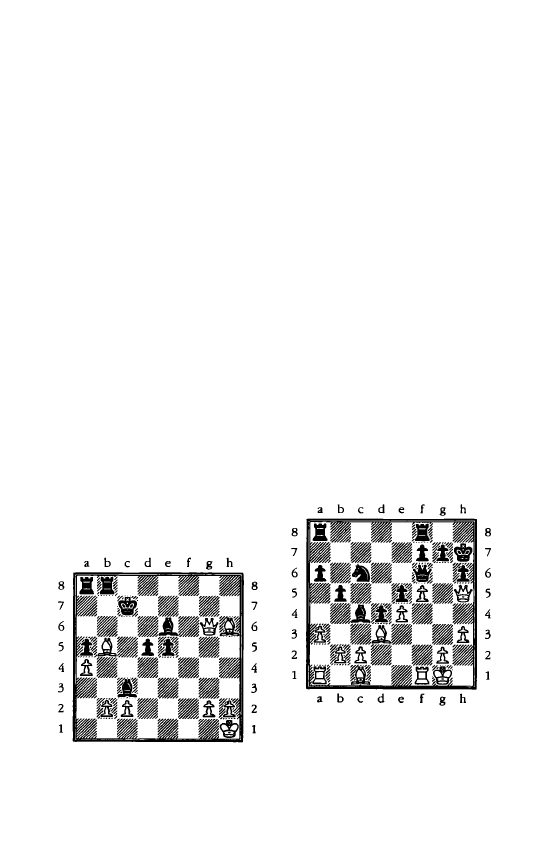
I 00 The Killer Pawn
19 l:[fl!
Kasparov's play is a wonderful
bl�nd of quiet moves that bring up
remforcements
and
aggressive
thrusts. Here for example he
methodically brings the rook into
the attack, whereas after
19
.•.
..txc3
. ...he forgoes the recapture on c3
m favour of a lightning attack:
20 l:txg8+! 'itxg8 21 'ifg3+
'it>f8
22 l:txf6!
Threatening 23 l:txf7 mate and if
22 ... l:te7 then 23 ..ixh6+ and mate
next move. So Black loses his
queen by force:
22 ... d5 23 ..ixh6+ 1;e7 24
l:txti+! c;j;ld6
Or 24 ... 1;xf7 25 'ifg7+ picking up
the queen straightaway.
25 'ii'g6+! ..ie6
If25 ... l:te6 26 ..if8+.
26 l:txc7 'iPxc7 27 exd5 cxd5 28
..ib5 l:teb8 29 a4!
a
b
c
d
e
f
g
h
The combinations end and Black
has
two
bishops
hanging.
Kasparov's tactical virtuosity is
evidently undimmed by the fact that
he is playing four games simul
taneously against the best players in
the Czech Republic. The rest is
easy; in fact I assume that Black
played on in the hope that it would
m some small way distract
Kasparov from the other games in
the simul.
29 ... ..id7 30 bxc3 ..ixb5 31 axb5
l:txb5 32 h4 a4 33 ..ig7 d4 34 'ifti+
�b6 35 _.e6+ �b7 36 ..ixe5 l:txe5
37 'ifxe5 a3 38 'iVd5+ �b8 39 cxd4
a2 40 'ii'b3+ <j;c7 41 'ifc3+ <itd7 42
_.a1 <j;d6 43 c4 1-0
Karjakin - Amura,
Benidorm 2002
The 12 year old Russian prodigy
played 19 g4! g5

It is too late to retreat the queen
for if 19 ... Wd8 it is the f pawn that
rampages forwards: 20 f6! �xd3 21
fxg7! </;xg7 (after 2 l ...�xfl 22
'ifxh6+ Black is mated on h8) 22
�xh6+ </;g8 23 cxd3-simplest
and Black faces ruinous material
losses.
20 h4! gxh4
Hopeless is 20 ... ltg8 21 hxg5
winning the exchange.
21 g5 .J:r.g8
Black had relied on this defence
pinning the g pawn. But the end
was abrupt:
22 g6+!
Cutting off the queen's defence of
h6. It is mate after 22 ... fxg6 23
1i'xh6, so Black resigned.
8
7
6
5
4
3
2
Kotronias -
Murshed
Olympiad, Bled 2002
a
b
c
d
e
f
g
h
a
b
c
d
e
f
g
h
8
7
6
5
4
3
2
Having seen what one killer pawn
can do in the examples above it will
The Killer Pawn 101
be no surprise that a pair of killer
pawns can sweep all before them as
they advance against an exposed
king. In the diagram above the
pawns just keep on rolling: all the
material he grabs doesn't save
Black:
24 e6! �xc4 25 f6! �xn 26
fxg7+ </;g8 27 ltxfl ltxe6
If 27 ... g5-to
the queen out
of h6---then 28
lte7 (or
28 ... ltxe6 29 1i't7+ and mate next
move, while 28 ... lbe5 29 �xeS
doesn't help) 29 exd7 1i'xd7 30
'ii'f8+
and mates.
28 1i'xh6 lbf6 29 �xf6 1-0
In the following game Black
showed fine judgement in sacrific
ing a piece to destroy his
opponent's potential killer pawns
whilst maintaining his own pawn
deep in the enemy camp.
Ponomariov - Akoplan
Olympiad. Bled 2002
a
b
c
d
e
f
g
h
8
8
7
7
6
6
5
5
4
3
2
a
b
c
d
e
f
g
h
4
3
2
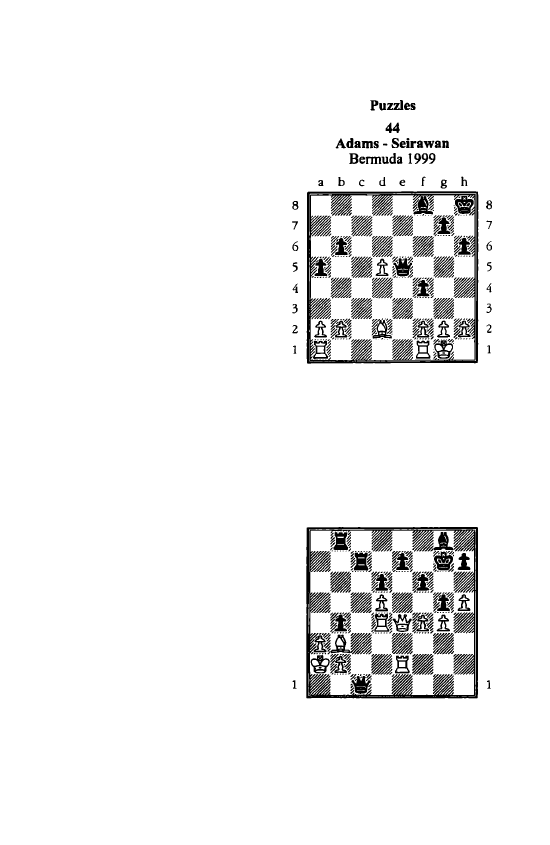
102 The Killer Pawn
White had adopted a very
aggressive set up against the
Sicilian Defence, but by now he
must have realised that Black's
attack was far faster: already there
is an open a file, while
as
yet there
are no lines of attack open on the
kingside. So Ruslan Ponomariov
tried 25 f6 hoping to break things
open and create some counterplay
after the plausible 25 ... i..xf6 26
gxf7+. But Akopian found a great
response: 25 ... hxg6!! just offering
the bishop to get rid of White's
advancing pawns.
After 26 fxe7 'ifxe7 there was the
threat of 27 ... l:lal+ 28 �d2 'We3
mate. In giving up the bishop Black
has also won time to cut off the
white king's escape route to d2.
There followed 27 'it'h3 to guard
the e3 square 27
...
'ifb4!
Again Black is more concerned
with preventing the flight of the
white king to d2 than in starting an
immediate attack with 27 ... l:tal+.
28 'it>bl 'it'a5 29 cxb3 l:lfc8!
Finally the white king has been
boxed in. There is the threat of
30 ... 'it'al mate, and 30 i..c4 dxc4 is
useless. So Ponomariov had to give
up his queen with 30 'it'xc8+ :txc8
when despite a long and stubborn
resistance he couldn't hold the
position. He resigned on move 4 7.
a
b
c
d
e
f
g
h
Black to play
After 26
..•
13
White played 27
:tfel.
Now what should Black do?
8
7
6
5
4
3
2
45
Bruzon - Felgaer
Olympiad, Bled 2002
a
b
c
d
e
f
g
h
a
b
c
d
e
f
g
h
White to play
8
7
6
5
4
3
2
How did White force a quick
win?
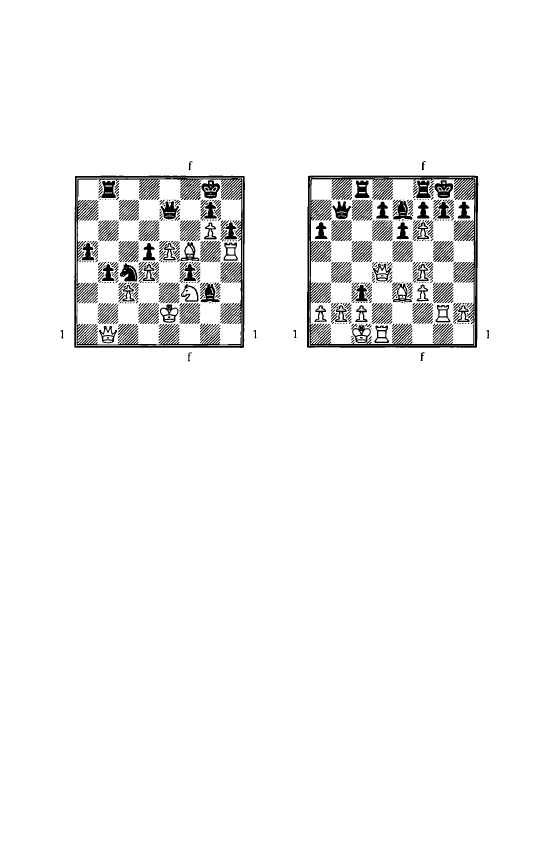
8
7
6
5
4
3
2
46
Ganguly - Barua
Nagpur
2002
a
b
c
d
e
g
h
a
b
c
d
e
g h
White to play
8
7
6
5
4
3
2
Black has an overwhelming
advantage on the queenside, so
White has to do or die on the
kingside. He came up with
40 ltJg5.
Now Black took the knight,
reasoning that if necessary he can
block the h file with �h4. Was he
right?
8
7
6
5
4
3
2
The Killer Pawn 103
47
Ehlvest - Andersson
Belfort
1988
a
b
c
d
e
g
h
a
b
c
d
e
g h
White to play
8
7
6
5
4
3
2
Here is a race between the wings
where at first glance it looks like
Black is winning: after all, with his
previous move
17
.
.
.
'6b7
he threat
ens mate on
b2.
However, White
got his attack in first. How?
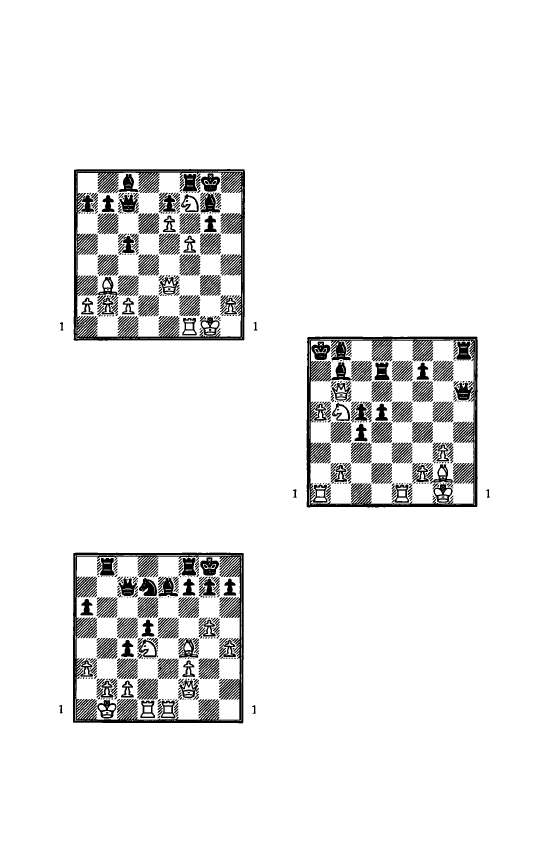
104 The Killer Pawn
48
Kislov - Zoltek
Polanica Zdroj 1995
a
b
c
d
e
f
g
h
8
8
7
7
6
5
4
3
2
a
b
c
d
e
f
g
h
White to move
6
5
4
3
2
Black has just played 24 ... c5, so
that he can meet the threatened 25
fxg6? with 25 ... .i.d4, winning the
white queen. What should White
do?
49
Kasimdzhanov - Ye Jiangchuan
Olympiad, Bled 2002
8
7
6
5
4
3
2
a
b
c
d
e
f
g
h
a
b
c
d
e
f
g
h
Black to play
8
7
6
5
4
3
2
White has just played 23 .i.f4,
with the idea that after 23 ... 'ii'xf4 24
l:lxe7 he dominates the centre. Now
try to work out if a 23 .. Jlxb2+
sacrifice is (a) winning (b) a
complete waste of a rook (c) giving
Black
some
pressure
but
unsuccessful.
50
Kasparov - Ivanchuk
Linares 1994
a
b
c
d
e
f
g
h
8
8
7
7
6
6
5
5
4
4
3
3
2
2
· a
b
c
d
e
f
g
h
White to play
White would like to play 30 a6 to
bludgeon his way forwards with the
killer pawn, but of course that
would leave his queen en prise.
What was the more subtle approach
found by Kasparov?

9
Rook and Minor Piece Mates
R
ather
unexpectedly,
looking at the games in
this chapter taught me
above all to respect the
power of the queen!
Even when the rook
and minor piece carried out a
successful attack, they often needed
the 'dead body' of the queen to
soften up the defences. There is no
doubt that the best advice to give to
someone who wants to avoid being
mated in the middlegame is to
exchange off queens as soon as
possible.
Nonetheless, compared to the
minor pieces acting on their own
the rook and minor piece are a most
formidable attacking force. In this
chapter we shall investigate all four
main mating patterns-two with
rook and bishop and two with rook
and knight.
Rook mates protected by bishop
In the first case the rook gives the
fatal check whilst protected by the
bishop. Much less frequently the
roles are reversed with the bishop
mating protected by the rook. Here
is a striking example of this
scenario in both its forms:
8
7
6
5
4
3
2
a
b
c
d
e
f
g
h
a
b
c
d
e
f
g
h
Black has a whole set of pieces
but he is punished for his non
existent development after 1
'il'd8+!!
winning time for a double
check.
1. .
.
�xd8 2 .i.gS+
Now Black is mated by either
rook or bishop:
2
•.•
�e8 3 l:td8 mate
or 2
.•
.'l;c7 3
.i.d8 mate.
This queen sacrifice on d8 was
brought off a couple of times in the
last century, but is hardly ever seen:
it requires a lot of help from the
opponent for everything to fall into
place.
It is more reasonable to expect a
scenario like the following in one of
your games.

106 Rook and Minor Piece Mates
a b
c
d e f g h
8
8
7
7
6
6
5
5
4
4
3
3
2
2
a
b
c d
e
f
g
h
Black has the g7 square guarded
against I 'ii'h6, but it is still mate in
three:
1
'ii'xh7+! 'it>xh7 2 �h2+ 'it>g8 3
�h8 mate.
a b c d e f g h
8
8
7
7
6
6
5
5
4
4
3
3
2
2
a b
c
d e f g h
White had sacrificed his queen to
reach this position and finish off the
attack in beautiful style:
1
l::th3+
'it>g8 2 ll:Jxf6+! ! 'it>f8 3 �h8+ 'it>e7
4
�e8+! l:lxe8
5
l:lxd7+ 'it>f8 6 l::txf7
mate!
(Capablanca-Souza Campos,
Sao Paulo 1 927)
If instead 2 ... gxf6 3 .i.xf6
Black is defenceless against 4
mate.
a
b
c
d e f g h
8
7
6
5
4
3
2
a b
c
d
e
f
g
h
The following position
reached in an English toumamet
2002.
a b c d e f g h
8
7
6
5
4
3
2
a
b
c
d e f g h
The lazy move for White w<
be 23 .i.xe4, which deals with
double threat of 23 ... ti:)g5
23 ... gxf5. However this would
all the momentum of his atti
Instead he applied the tact
device described above with
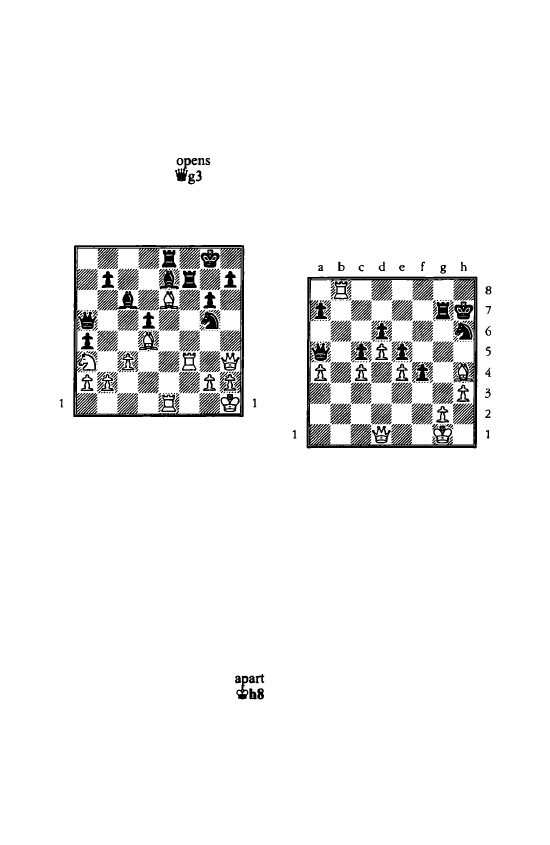
23
e6!
This threatens 24 'ifxh7+ �xh7
25 l:.h3+ �g8 26 l:.h8 mate. If now
23 ... gxf5 24 l:.xe4!
the way
for a mate with
or llg3.
Another way for Black to lose is
23 ... lllg5 24 exf7+ llxf7 25 �e6!
8
7
6
5
4
3
2
a
b
c d e f g
h
a
b
c
d
e f g
h
8
7
6
5
4
3
2
Again the rook and bishop come
out trumps: 25 ... lllxh3 26 �xf7+
�f8 27 �xg6+!
This takes away the h6 square
from the black king in contrast to
the immediate 27 �xd5+ �f6 28
:Xf6+ �g7.
27 ... Cii?g8 28 �f7+ Cii?f8 29
�xd5+ �f6 30 llxf6+ �g7 3 1
llfe6+ rJ;f7 3 2 llfl + �g8 3 3 llxe8
mate!
Returning to the diagram before
last, after 23 e6! f6 24 'it'b6! gxfS
(or else �xg6 next move tears
the black kings ide) 25 llxe4
(or 25 .
.
.
dxe4
26 llg3+ and mate
next move) allows White the by
now familiar mating pattern 26
'ifxh7+! �xh7 27 l:b4+ �g6 28
llgJ.
Rook and Minor Piece Mates 107
So Black has various responses
but for different tactical reasons
they all fail. If White hadn't been
aware of the queen sacrifice he
might never have thought of the
move 23 e6!
8
7
6
5
4
3
2
Eblvest - Kozul
Olympiad, Bled 2002
a
b
c
d
e f g
h
White played 47 �f6 whereupon
the game fmished 47
.•
Jig6??
and to
give him some credit Black got his
resignation in before White played
48 l:.b8 mate.
This position is most instructive if
we consider what White should do
if Black plays the superior
47
•.•
l:.g3!
keeping a bolt hole on g6
for his king. White has an extra
pawn, the superior minor piece in
the form of long range bishop
versus feeble knight, and a
succulent target for bishop and rook
on d6: indeed, if this pawn
collapses the whole black pawn
structure will follow. We can
reasonably state: there is absolutely
no reason for White to take any
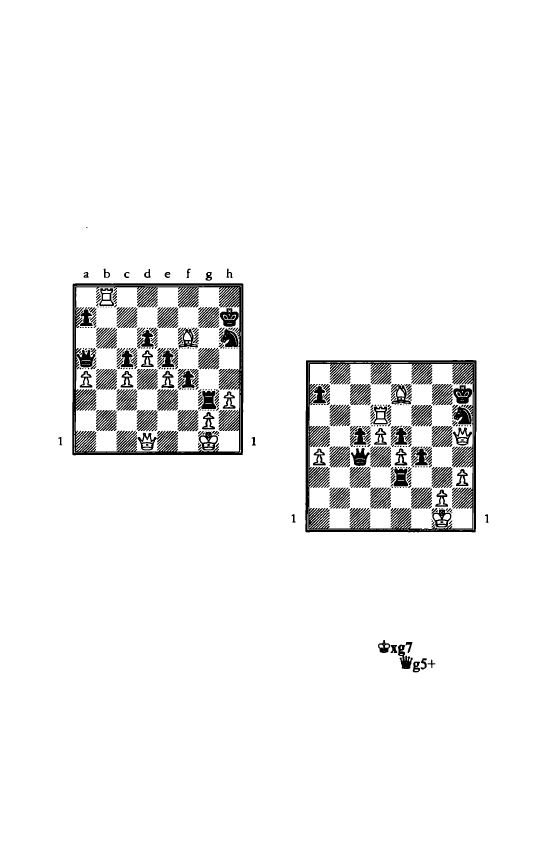
I 08 Rook and Minor Piece Mates
risks in trying to mate the black
king: the endgame will always be
winning for him.
Now we should ask ourselves if
there are any ways for White not to
win the game. Apart from gross
blunders, the only likelihood is if he
allows his king to be exposed to
perpetual check.
8
7
6
5
4
3
2
a
b
c
d
e
f
g
h
8
7
6
5
4
3
2
Here's what might happen if
White tries for an immediate knock
out blow with 48 'ifh5. On the face
of it, this looks fatal for the black
king as there seems no way to avert
49 l:th8 mate. But in fact Black can
counterattack with 48 ... 'ifel+ 49
�h2 l:txg2+! sacrificing the rook.
After 50 �g2 the question is
whether White's king can evade
perpetual check. It isn't obvious, for
example 50 ... 'ifxe4+ 5 1 'it>t2 (after
51 'itf3 'ii'g6+ Black picks up the
bishop with more than a fighting
chance) 5 l ... .. e3+ 52 �fl 'ii'cl+ 53
�e2 'ifc2+ etc. and the checks
continue. But even if there is an
escape route, why should White
jeopardise the win by allowing this
variation when he has such a
crushing positional advantage?
The solid, logical alternative is 48
l:tb7+!
to keep control. Then
48 ..
.
�g6 49 i.h4! lle3 50 l:td7!
(going after the d6 pawn. Note that
the bishop is doing an excellent job
on h4 guarding the e
I
square. If
now 50 ... Axe4 5 1 'ifd3 puts the
black rook in a fatal pin. 50
.•.
'ii'a6
51 i.e7 .. xc4
(or 5 I...lDf7 52
,.g4+) 52 llxd6+ 'it>h7 53 'ifh5!
8
7
6
5
4
3
2
a
b
c
d
e
f
g
h
a
b
c
d
e
f
g
h
8
7
6
5
4
3
2
Finally 'ii'h5 comes and this time
Black's pieces are unable to set up a
perpetual check.
Alternatively if 48
•••
'it>g8 49 i.h4
llg7 50 llxg7+
51 .. h5 ,.c7
(if 5 l ... .. xa4 52
'it>h7 53
,.e7+ 'iti>g8 54 'ifxd6 and the black
centre collapses) 52 'itg5+ 'it>h7 53
'ii'e7+!
forces an easily winning
endgame after 53 ... 'ifxe7 54 i.xe7
ll:)f7 55
�fl �g7 56 g3
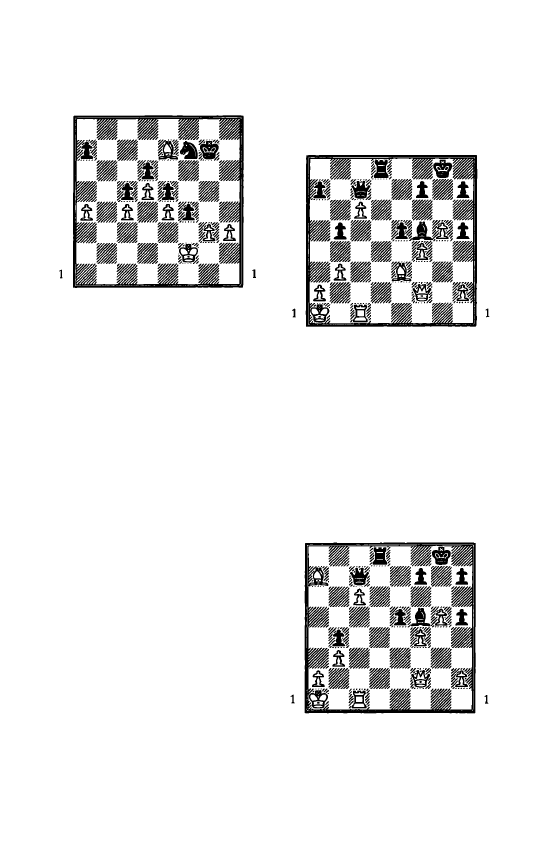
a
b
c
d
e
f g h
8
8
7
7
6
6
5
5
4
4
3
3
2
2
a
b
c
d
e
f
g
h
With his knight tied down to the
defence of the d6 pawn, and the
king unable to approach the white
bishop, Black is paralysed and can
only wait for the advance of the
white king. The situation here
seems a long way from checkmat
ing scenarios in the middlegame. In
fact, K.asparov and other great
masters of attack are always looking
for ways to simplify to such
technically winning positions, even
in the middle of an attack. This is
because first and foremost they
want to win in the most
straightforward, economical style.
If you have a winning material or
positional advantage, you should
never risk making a sacrifice unless
you are co,nvinced it works.
There is an old saying, with a lot
of truth in it, that when there are
opposite coloured bishops the
attacker is a piece up!
Rook and Minor Piece Mates 109
Gara - Mrvova
Olympiad, Bled 2002
a
b
c
d
e
f g h
8
8
7
7
6
6
5
5
4
4
3
3
2
2
a
b
c
d
e
f
g
h
A
game from the 2002 Women's
Olympiad. White has a strong
passed pawn, but the presence of
opposite coloured bishops compli
cates the winning task. Here Black
missed the chance of setting a devil
ish trap with 33
•.•
b4 when the reply
34 .i.xa7
looks strong as it prepares
to clear the way for the passed
pawn with
35
.i.b6.
a
b
c
d
e
f
g
h
8
8
7
7
6
6
5
5
4
4
3
3
2
2
a
b
c
d
e
f g h
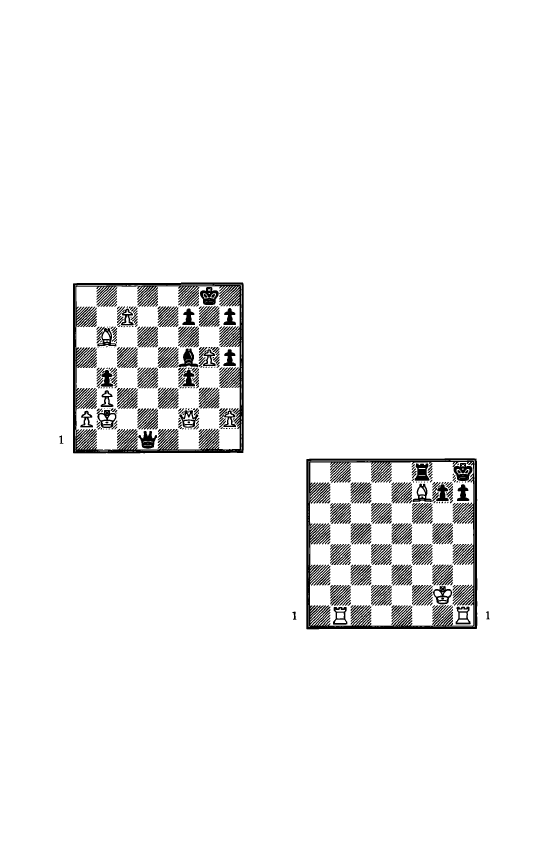
II 0 Rook and Minor Piece Mates
But Black would then have
34
.•.
'1i'xc6!!
winning the key passed
pawn for if 35 llxc6 l:tdl+ 36 �b2
l:lb1
is mate!
In the game Black actually played
33 ... l:.d5?!
losing a vital move on
the idea above:
34 .txa7 exf4 35 .tb6 '1Vd6 36 c7
l:ld1 37 l:lxd1 'li'xdl+ 38 'itb2 b4
a
b
c
d
e
f g h
8
8
7
7
6
6
5
5
4
4
3
3
2
a
b
c
d
e
f g h
2
1
The threat of mate forces White
to give up her passed pawn, but the
scenario is much worse for Black
here as the rooks have been
exchanged. This means that Black
cannot generate enough counterplay
against the white king to offset the
weakness of her own king or indeed
to prevent White creating connected
passed pawns on the queenside.
39 c8='if+ .txc8 40 .tc5 .trs 41
.txb4 'ifbl+ 42 �a3 'ifcl+ 43 '1Vb2
Giving Black an impossible
choice: either enter a losing end
game or keep the queens on, when
it is her own king that will
be
in the
most danger.
43 ... '1Vc6 44 'ifd2!
Now Black prefers to be mated
than to give up her passed pawn.
44
.
.
.
0
45 '1Vd8+ q;>g7 46 'iffB+
1-0
For if 46 ... �g6 47 'ifh6 is mate.
Cutting off the king
This is the second scenario of
mate with rook and bishop. We
have already seen this mating
pattern but with queen rather than
rook. The bishop mates, with the
rook cutting off the king's escape;
or vice versa, with the rook
checking and the bishop guarding
the only escape square or squares.
a
b
c
d
e f
g h
8
8
7
7
�
6
5
5
4
4
3
3
2
2
a
b
c
d
e
f
g h
The rook gives checkmate on the
h file whilst the bishop cuts off the
king's flight: 1 l:.xh7+! 'itxh7 2
llhl.
Note that the bishop is ideally
placed on f7 as it prevents the king
escaping to either g8 or g6.
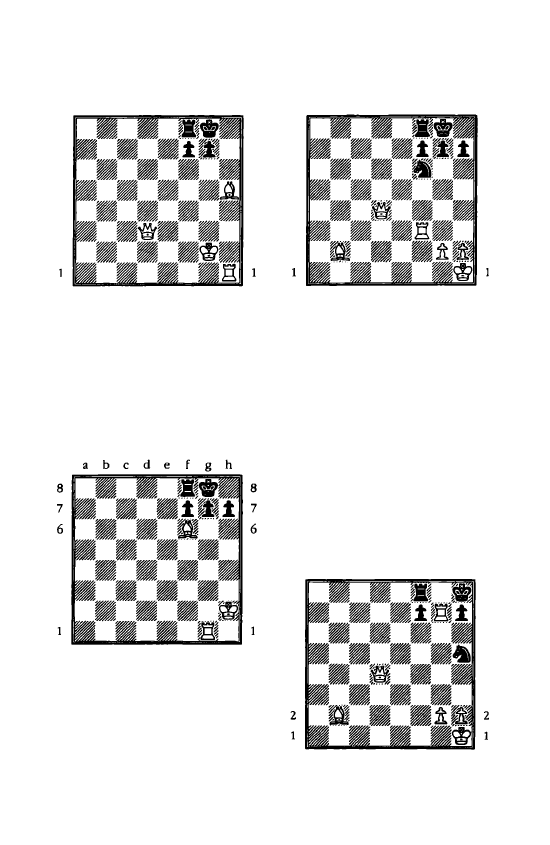
8
7
6
5
4
3
2
a
b
c
d
e
f
g h
a
b
c
d
e
f
g h
8
7
6
5
4
3
2
Here is another version of the
mate. White wins time to get the
bishop to f7 with
1 'ifh7+!
when 1
...
'it>xh7 2 ..txti
is mate.
Here is another very common
mating pattern.
5
4
3
2
a b
c
d
e
f
g
h
5
4
3
2
It is mate in two: 1 lbg7+ �h8 2
l:tgS
Moving the rook anywhere else
on the g file apart from g8 also
gives mate.
Rook and Minor Piece Mates 1 1 1
8
7
6
5
4
3
2
a
b
c
d
e
f g h
a
b
c
d
e
f
g
h
8
7
6
5
4
3
2
White forces mate with 1 'ifxf6!
gxf6 2 :g3+ �h8 3 ..txf6 mate.
Note that if 1 .l:.xf6 White mates
all the same after l ... gxf6 2 'ifg4+
'it>h8 3 ..txf6, but as there is no
immediate threat to g7 Black can
battle on with l ... l::te8 etc.
Now imagine if in the diagram
above White missed the strength of
the capture on f6 and instead played
1 :g3,
and Black responded
1
...
lDhS,
attacking the rook.
8
7
6
5
4
3
Here after 2 l:xg7+ 'it>h8
a
b
c
d
e f g
h
a
b
c
d
e f g
h
8
7
6
5
4
3
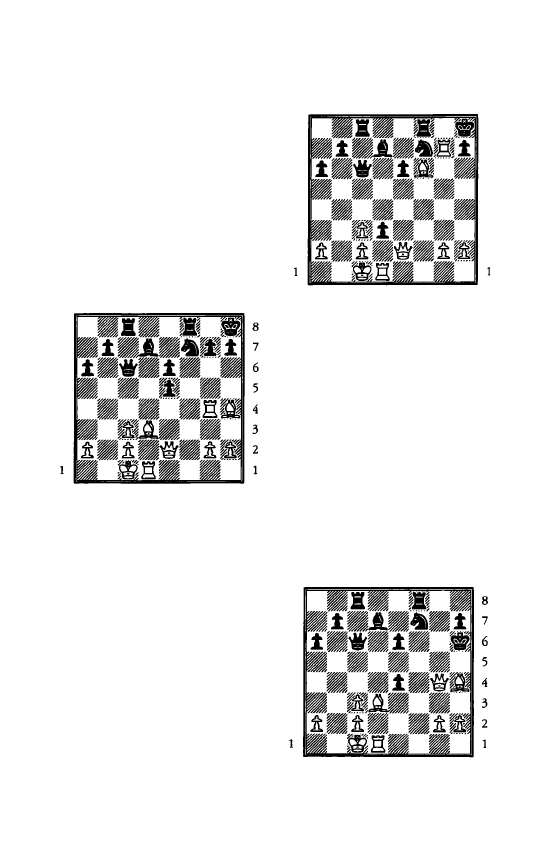
1 12 Rook and Minor Piece Mates
White has many ways to win, but
the most precise method-the way
you should always choose-is 3
l1g8+!
with double check. Now
entirely forced is 3 ... �xg8 when 4
'iVb8
is mate.
8
7
6
5
4
3
2
Ramesh - Kunte
Torquay 2002
a
b
c
d
e
f g h
a
b
c
d
e
f g h
After 23
.
.. e4
White ignored the
threat to his bishop and played 24
l::txg7!
Now we should investigate
the replies 24 ... exd3, 24 ... 'iVxc3 and
24 ... �xg7.
If 24 ... 'iVxc3 Black is mated in
three moves: 25 l1xh7+! �xh7 26
1i'xe4+ �g7 27 'ifh7 mate.
In the game 24 ... exd3 also led to
a quick defeat: 25 ..tf6! creating the
typical rook and bishop mating
pattern.
a
b
c
d
e
f g h
8
8
7
7
6
6
5
5
4
3
2
a
b
c
d
e
f g h
4
3
2
If Black takes the queen then the
rook gives mate by moving any
where on the g file apart from g8.
Black tried one last gamble with
25 ... 'iVxc3
but he resigned after 26
l1g8+!
as 26 ... �xg8 27 'iVg4+ llJg5
28 'ii'xg5+ �f7 29 'ii'g7+
will mate
on e7.
Finally after 24 ... ..ttxg7 25 'ii'g4+
Black is also lost. If 25 ... <i1i'h8 26
..tf6 mate, while 25 ... llJg5 26
'iVxg5+ �h8 27 ..tg3 ! leaves him
.defenceless against 28 ..te5. That
leaves 25 ... �b6, when White has
the following elegant winning
method:
8
7
6
5
4
3
2
a
b
c
d
e
f g h
a
b
c
d
e
f g h
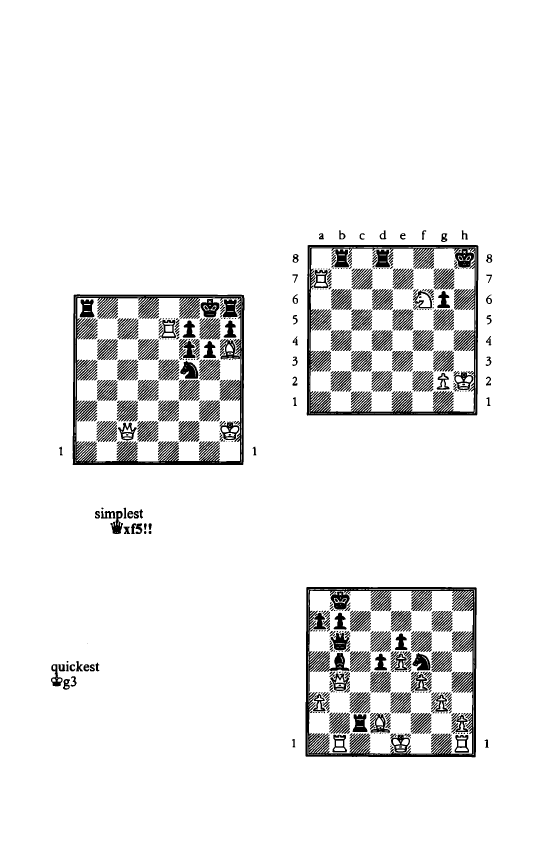
26 Ji.f6!
(threat 27 .1Lg7 mate)
26 ... 1lg8 27 'ii'h4+ �g6 28 l:[fi!
(spuming the crude 28 .1Lxe4+)
28
•..
exd3 29 9g4+ �h6 30 Ji.g7+
.:xg7 31 'ii'h4+ �g6 32 l:[f6 mate!
Here is one final mating pattern
with rook and bishop that deserves
attention
a
b
c
d
e
f g h
8
8
7
7
6
6
5
5
4
4
3
3
2
2
a
b
c
d
e
f g h
The
way for White to
win is 1
gxfS 2
lle2 with
inevitable mate by :es or l:[g2,
depending on how Black chooses to
lose. If there was just the threat to
e8 he could battle on with 2 ... .:a4,
but with two potential mates the
poor rook on aS is overwhelmed.
Note that if Black throws in
l ...lla:2+ then the most elegant and
win is 2 'ii'f2! llxf2+ 3
when the rook can't get back
to cover the back
rank.
Now we'll look at mates with the
rook and knight, beginning with
examples in which the rook gives
the check defended by the knight.
Rook and Minor Piece Mates 113
Rook mates defended by knight
If the king can be forced into the
comer then he becomes particularly
vulnerable to mate, as the following
diagram shows.
a
b
c
d
e
f g h
Despite his material advantage
Black cannot avert mate on h7.
Van der Weide - Werle
Groningen 2001
a
b
c
d
e
f g h
8
8
7
7
6
6
5
5
4
4
3
3
2
2
a
b
c
d
e
f g h
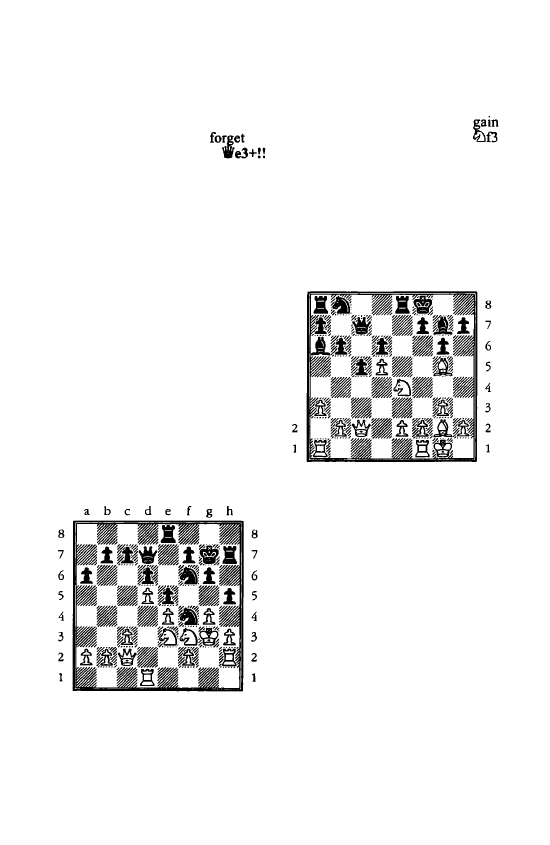
114 Rook and Minor Piece Mates
The opposite coloured bishops
and rook on the seventh rank are
decisive factors, but don't
the
knight! Black won with 23
. • .
when after 24 .txe3 l:.e2+ White
has the choice of being mated by 25
'it>dl lt:lxe3+ 26 'it>cl :Z.c2
or 25 'it>fl
lt:lxe3+ 26 'Ot>gl .l:g2.
In effect, the
c 1 and g 1 squares became like
comer squares, as White's own
rooks on b 1 and h 1 formed a barrier
to the further flight of the king.
The game actually went 24 'it>dl
'W'd3
and White resigned. If 25
'itte 1 'W'e2 mate, while 25 .:te 1
.l:xd2+ 26 'ii'xd2 'iVxbl+ 27 'ilc1
'iib3+ 28 'ii'c2 (28 �d2 'ii'd3 mate)
28 ... lt:le3+ 29 l:.xe3 'ii'xe3 and
Black is a piece up.
Esp1ana - Mannion
lt:lxh4
the only move 33 ... .l:.eh8 34
lt:lhfS+
A desperate attempt to
time with a check as if 34
l:.xh3+ 35 l:.xh3 .:txh3 is mate.
34
.
.
.
gxfS 35 lt:lxf5+ 1i'xf5!!
and
White resigned
as if 36 gxf5
l:hh3+ 3 7 .l:xh3 l:.xh3 mate.
8
7
6
5
4
3
Bu Xiangzhi - Barle
Olympiad, Bled 2002
a
b
c
d
e f g
h
Olympiad, Bled 2002
a
b
c
d
e
f
g h
a
b
c d e
f
g h
For some unfathomable reason
White had advanced his king to g3.
He was punished with 32 ... h4+! 33
Here the Chinaman, who was at
·One time the World's youngest
Grandmaster, sacrificed his e pawn
with
18 lt:lf6! .:txe2 19
'W'a4
The idea is to answer 19 ... h6 with
20 l:.fe 1 ! when if 20 ... hxg5? (in any
case 20 ... l:.xe 1 + 21 l:.xe 1 threaten
ing mate on e8 doesn't help much)
21 1i'e8+! .l:xe8 22 l:.xe8 mate.
Therefore Black took the knight,
but this meant he had lost his key
defensive piece.
19 .
.
. .txf6 20 .txf6 c4
If 20 ... lt:ld7? 21 'iVxa6 lt:lxf6 22
1i'xe2. Black therefore cannot
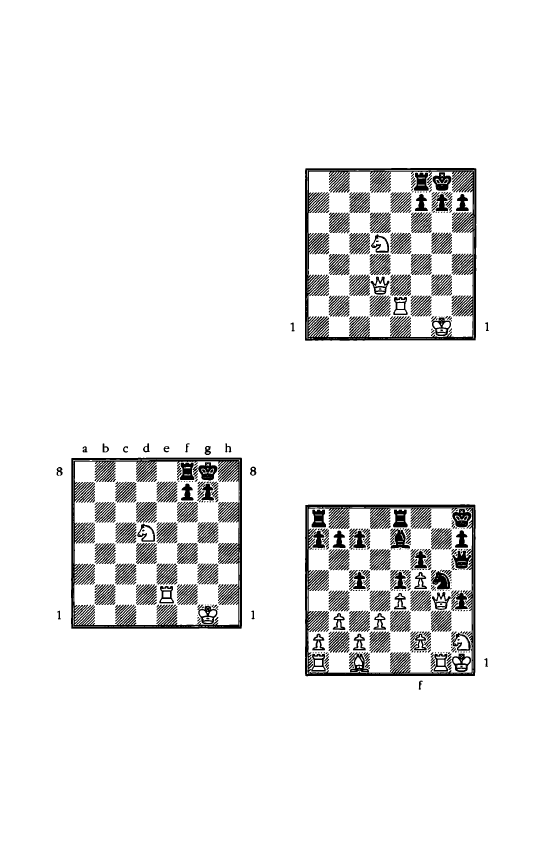
develop his queenside in time to
save his king.
21 l:lfe1 Wd7 22 1i'b4 �bel+ 23
l:xel bS 24 'ii'd2!
and Black
resigned
as the white queen gets to
h6 with a quick mate.
Cutting off the king with rook
and knight
This idea has already been
discussed in relation to the queen
and bishop, queen and knight and
rook and bishop. As always, one
piece has the task of mating while
the other piece cuts off the king's
escape.
7
6
5
4
3
2
.a
b
c
d
e
f g h
7
6
5
4
3
2
White to move mates with 1
lbe7+ �h7
(or equally
l
.
..�h8 2
l:th2) 2 l:h2 mate.
In effect this is a
form of smothered mate as Black's
defending pieces block up all the
escape routes of the black king.
Rook and Minor Piece Mates 115
Here is a spectacular method of
setting up the checkmate:
8
7
6
5
4
3
2
a
b
c
d
e
f g h
a
b
c
d
e
f g h
8
7
6
5
4
3
2
Black's king looks safe behind its
wall of pawns, but 1 lt:Je7+ �h8 2
'ii'xh7+! �xh7 3 l:th2
is mate.
8
7
6
5
4
3
2
1
Capablanca - Jaffe
New York 1913
a
b
c
d
e
f g h
a
b
c
d
e
g h
8
7
6
5
4
3
2
My greatest chess hero is former
World Champion Jose Raul Capa
blanca, who lost fewer games in his
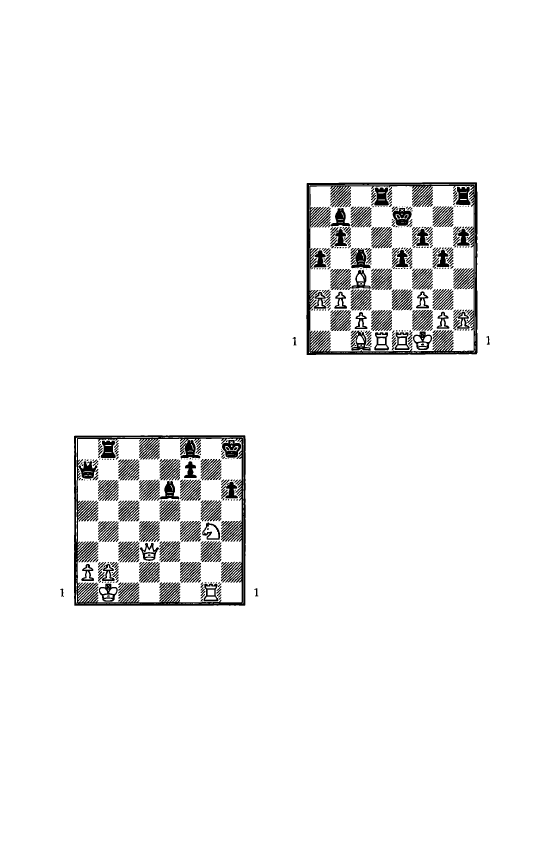
I I 6 Rook and Minor Piece Mates
career than any other top player. In
deed, he once went eight years
without suffering a single defeat!
Here is one of those exceptionally
rare instances in which his marvel
lous defensive radar suffered a
breakdown. Pressing for the advan
tage, he broke up Black's pawn
structure with 27 f4 e:d4 28 .i.b2
(threatening 29 'ii'xg5) 28 ... :g8 29
'ii'xf4.
All seems well but Capa was
rocked back by 29 ... ltlb3!! when
White is mated after 30 'ifxh6 ltlf2.
He tried 30 :xg8+ l:.xg8 31 •n
but resigned after 31. . .'ii'e3. One
finish would be 32 ltl£3 ltlf2+ 33
�h2 'ii'f4 mate.
Puzzles
51
a
b
c d
e
f g h
8
8
7
7
6
6
5
5
4
4
3
3
2
2
a
b
c
d
e
f
g h
White to play
52
Leko - Adams
Dortmund 1996
a
b
c
d
e
f g h
8
8
7
7
6
6
5
5
4
4
3
3
2
2
a
b
c
d
e
f g h
Black to play
An
extraordinary case of mutual
tactical blindness by two of the best
players in the world. From the
diagram the game went 29 ... h5 30
.i.e3 .i.xeJ 31 :xd8 :xd8 32 :xeJ
lldl + 33 l:.el :d2 34 :e2 l:.d4
and
Bl;lck eventually ground out a win
in the endgame. Someone some
where missed an instant win in this
sequence! Can you do better than
Adams and Leko and find it? There
is no actual mate, but if you want to
tum it into a mating puzzle simply
move the black pawn back from g5
to g7 and then start looking!
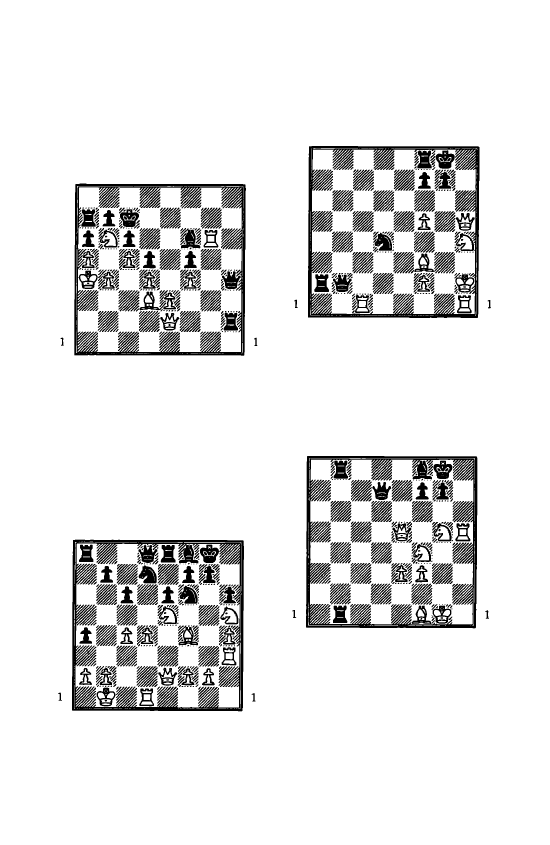
53
Wells - Berry
Torquay 2002
a
b
c
d
e
f g h
8
8
7
7
6
6
5
5
4
4
3
3
2
2
a
b
c
d
e
f g h
White to play. What is his best
line of play and does it win?
8
7
6
5
4
3
2
54
Kasimdzhanov - Rausis
Olympiad, Bled 2002
a
b
c
d
e
f g h
a
b
c
d
e
f g h
8
7
6
5
4
3
2
What is the best way for White to
continue his attack?
Rook and Minor Piece Mates 11 7
55
a
b
c
d
e
f g h
8
8
7
7
6
6
5
5
4
4
3
3
2
2
a
b
c
d
e
f g h
White to play
56
a
b
c
d
e
f g h
8
8
7
7
6
6
5
5
4
4
3
3
2
2
a
b
c
d
e
f g h
White to play
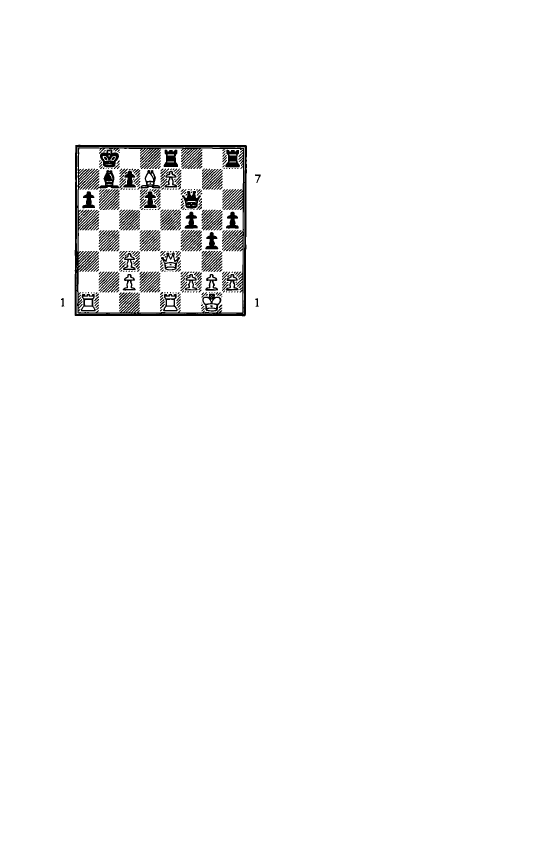
118 Rook and Minor Piece Mates
57
a
b
c
d
e
f
g h
8
8
7
6
6
5
5
4
4
3
3
2
2
a
b
c
d
e
f
g h
In this position White could win
the exchange with
I
.i.xe8, but how
did he save himself a lot of time in
finishing the game?
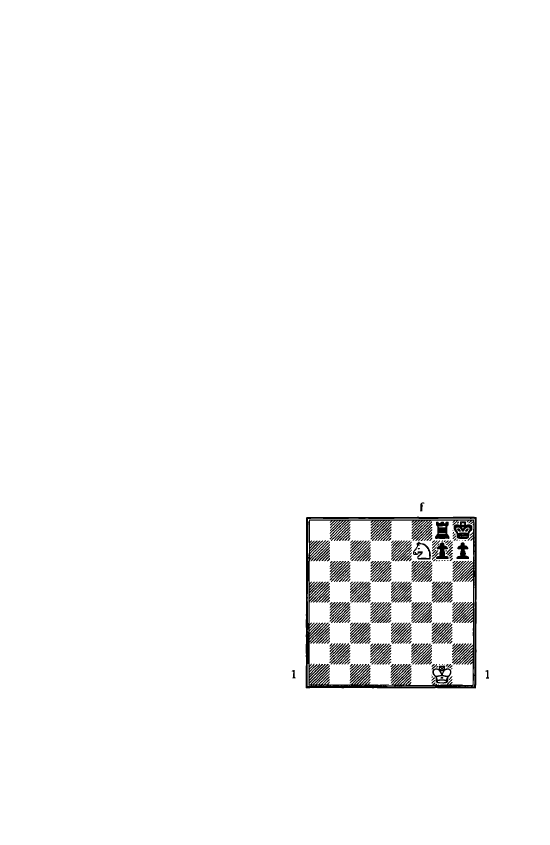
1 0 Mates with the Minor Pieces
A
combination in the
middlegame that con
cludes with mate by a
minor piece often
makes a stirring im
pression. It is aesthet
ically satisfying to see a knight or
bishop strike down a mighty king
without any help from the heavy
pieces.
Actually the phrase 'without any
help from the heavy pieces' needs
qualifying somewhat. Unless the
opponent is very obliging or very
badly placed, the mate will
frequently require the sacrifice of a
queen or rook as a prelude. Of
course this is no bad thing as it adds
to
the
excellence
of the
combination.
It also means that a mate with a
minor piece is highly unusual in
practice: a mating pattern that
derives its vitality from a preceding
queen sacrifice has to be extremely
rare, since queen sacrifices them
selves are extremely rare. Thus an
aura of magic surrounds the minor
piece mate.
Let's start with the most well
known of all the mating patterns.
The smothered mate
The mobility of the queen cannot
extend beyond the obstacles she
faces on each rank, file and
diagonal that she controls. If the
barrier is an enemy unit she can
capture it but go no further; if it is
one of her own pieces or pawns she
cannot even do that. In contrast, the
knight, for all its obvious weak
nesses compared to the queen, has
the power to look through the most
formidable of barriers. It can use
this ability to mate a king that is
surrounded by defenders - too
many defenders in fact!
a
b
c
d e
g h
8
8
7
7
6
6
5
5
4
4
3
3
2
2
a
b
c
d
e
f g h
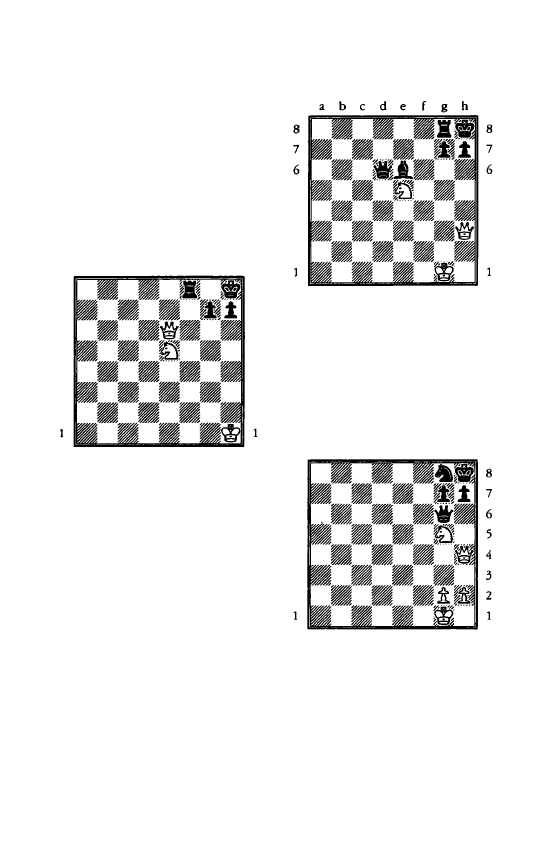
120 Mates with the Minor Pieces
This is the standard smothered
mate position. The black pieces
block all the escape routes for their
own king and so prevent him
moving out of check.
Here is a famous sequence of
moves involving a queen sacrifice
that leads to the position above.
8
7
6
5
4
3
2
a
b c d e
f g h
a b c d e f g h
8
7
6
5
4
3
2
White to play mates in four
moves:
I liJti+ �g8
If I...l:.xf7 2 'ife8+ l:t:ffl 3 'iWx:ffl is
a hack rank mate.
2 lLlh6+!
Note the destructive power of the
double check in this sequence.
When a king is in double check the
only response is flight-blocking or
capturing cease to be options.
2 ... �h8 3 'iWg8+!
Deflecting the rook from the
defence of f7.
J ..
.
l:txg8 4 lLlf7 mate.
5
4
3
2
a b c d e f g h
5
4
3
2
In this scenario the h pawn is
pinned and the king has no flight
square, so l lLlg6 is mate.
Here is example which combines
the idea of a pin on the h file with
mate on f7.
8
7
6
5
4
3
2
a b c d e f g h
a b c d e f g h
By winning control of the f7
square and keeping the black king
boxed in White forces mate: 1
'ii'xh7+! 'iWxh7 2 lLlrT mate.
The
black queen is both deflected from
her defence of f7 and becomes part
of the smothered mate apparatus.
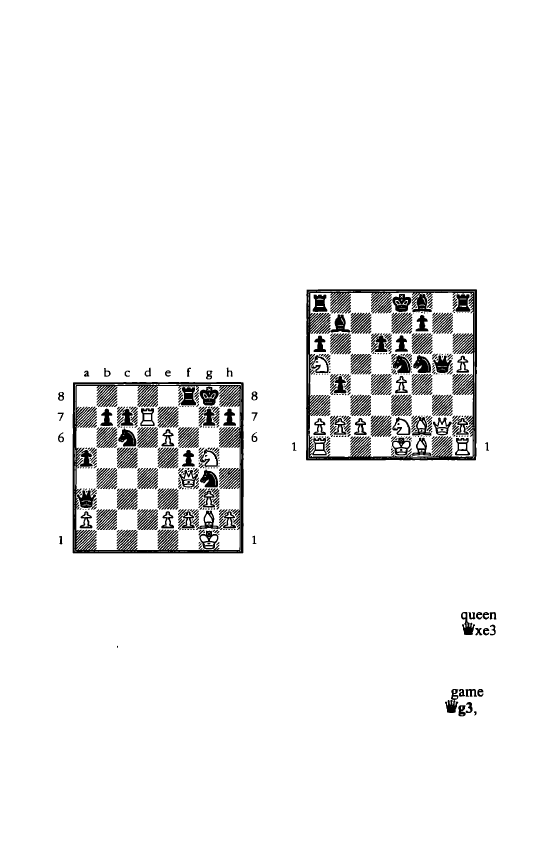
When you have a knight and
queen aimed at a king that is shut in
by its own pieces you should
always have half an eye on the
chance of a smothered mate.
In all the examples above the key
square was f7. White was prepared
to sacrifice heavily to gain control
of it, so that he could either use it
directly to mate with l£Jf7 or,
because he had eliminated the black
pawn on fl, mate with l£Jg6.
5
4
3
2
Timman - Short
Tilburg 1990
a
b
c
d e f g h
5
4
3
2
Tirnman found the cleanest way
to begin the combination.
24 �xc6!
If instead 24 e7 l£Jxe7 25 'iVc4+
�h8 26 l£Jf7+ White still has to find
a win after 26 ... �g8. It's there with
the sophisticated 27 lld8! but not 27
l£Jh6+ �h8 28 'ilg8+?? l£Jxg8 when
he would probably feel like giving
up chess.
Mates with the Minor Pieces 121
24 ... bxc6 25 e7
Now everything runs smoothly.
25
.••
lle8 26 'ifc4+
�h8 27 l£Jf7+
�g8 28
l£Jh6+ �h8 29 'Wg8+ :xg8
30 l£Jf7 mate.
Shirov - J.Polgar
Buenos Aires 1994
a
b
c
d e f g h
8
8
7
7
6
6
5
5
4
4
3
3
2
2
a
b
c
d e f g h
Smothered mate doesn't only
occur on the side of the board. Here
Judith Polgar looks to be in big
trouble as Black: she has a queen,
knight and bishop all hanging!
However, she came up with the fer
ocious move 16
..•
l£Je3!!
when if 17
'Wxg5 l£Jf3 is mate! White's
is attacked and if 17 �xe3
then there is no good way of de
fending the d2 square against l£Jf3+
or �h6: thus 18 l£Jxb7 l£Jf3+ 19
�dl 'ifd2 is mate. In the
a
downcast Shirov tried 17
so
that an escape square becomes
available for his king after the
exchange of queens. However, he
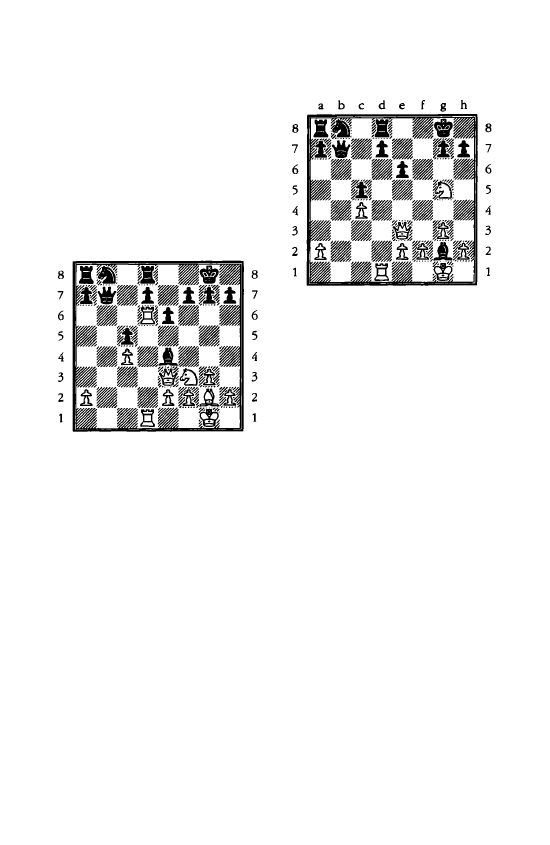
122 Mates with the Minor Pieces
faced ruinous material losses after
17 ..... xg3 18 lDxg3 lDxc2+ 19 �dl
lDxal 20 lDxb7 b3 21 axb3 lDxbJ
and resigned after another eight
moves.
H.Olafsson - Levitt
Reykjavik 1990
a
b
c
d
e
f
g
h
a
b
c
d
e
f
g
h
Here White came up with the
brilliant combination:
17 l:.xe6! ! fxe6 18 lDg5!
It seems like Olafsson has gone
mad: first of all he gives up a rook
on what looks like the most highly
defended point in Black's position,
and then he offers the bishop on g2
also 'for nothing'!
Such a sequence of moves does
indeed seem like madness if we are
unaware of two tactical themes
concealed in the position, namely
back rank mate and secondly
smothered mate.
Levitt turned down the offer of
the bishop and with good reason,
for if 18 ... .txg2
a
b
c
d
e
f
g
h
19 1i'xe6+!!
and Black is mated
no matter how he replies. If
19 .
.
. dxe6 20 :xd8 we have a back
rank mate, while if 19 ... �ffi White
has the choice of 20 lDxh7 or 20
'ii'fl.
The longest variation is the
standard smothered mate:
19 ... �h8 20 lDt7+ 'it;lg8 21 lDh6+
Again the double check is the
killer. Both the white queen and
knight are hanging but Black has no
time tp capture either piece.
21 ... �h8 22 ..,g8+ l:.xg8 23 lDn
mate.
So how did Olafsson come to
think of the combination? I guess
his Grandmasterly instinct told him
that it was worth looking for
something sharp and unusual: after
all, White's pieces are all poised for
action whilst Black still has a knight
on b8. More specifically, this
undeveloped knight no doubt
suggested that a back rank mate
might somehow be on the cards.
Nevertheless, it still required
imagination to see 17 :xe6!! Most
players wouldn't even dream of
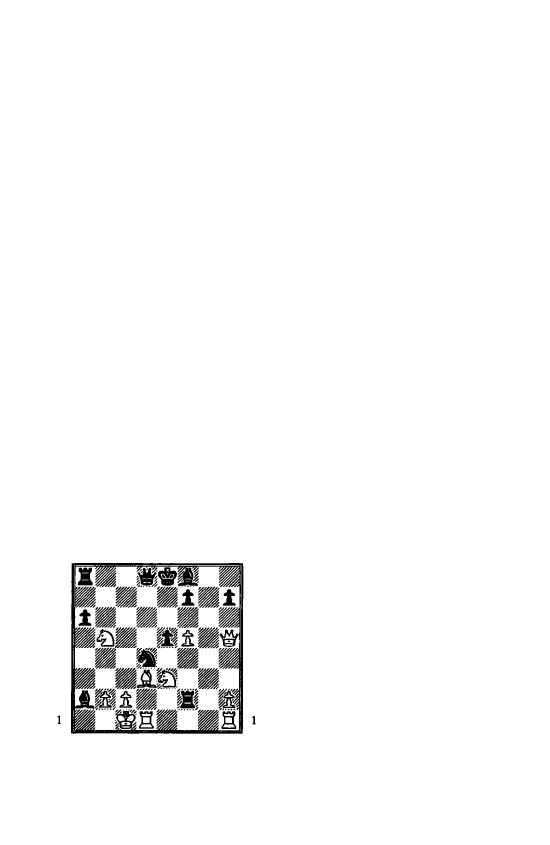
charging with a rook headlong
against e6. I showed the diagram
position to IM Afek, who has
composed some profound endgame
studies, but he didn't easily find the
idea of the sacrifice on e6: it is an
incredibly counter-intuitive move.
In the game Levitt-himself the
author of a book entitled Secrets of
Spectacular Chess
-avoided the
combinations above with 18
.••
h6,
but with his kingside shattered the
white attack eventually prevailed:
19 lt::lxe4 lt::lc6 20 lt::lxc5 ilc7 21
lt::lxd7! J:tac8
If 2 l ..Jixd7 22
iixe6+ l:.f7 23 .ixc6 and there is
no defence against the threats of 24
.ixa8, 24 lld7, 24 .ie8 or 24 .idS.
22 1Vxe6+ �h8 23 Jle4 lt::le7 24
lld6! 'ii'xc4
the knight dare not save
itself for if 24 ... lt::lg8 25 'ii'g6 lt::lf6
26 J:txf6 soon mates 25 'iVxe7 'iVcl+
26 �g2 l:.e8 27 'iVn l:.xe4 28 l:.g6
1-0
Brodsky - Kramnik
Kherson 1991
a
b
c
d e f g h
8
8
7
7
6
6
5
5
4
4
3
3
2
2
a
b
c
d e f g h
Mates with the Minor Pieces 123
White has just offered his knight
on b5, having worked out two vari
ations after 1 8 ... axb5 19 .ixb5+:
19 .. .'�e7? 20 1i'h4+ and he wins the
rook on f2 or 19 ... lt::lxb5 20 llxd8+
l:txd8 21 f6! with unclear play.
Instead
Kramnik
played
18 ... .ih6!!
If White takes the bishop he is
mated after 19 iixh6 l:.xc2+! ! 20
lt::lxc2 (or 20 .ixc2 lt::le2 mate)
20 ... lt::lb3 mate! In the game he tried
19 l:lhe1
but lost after 19 ... axb5 20
.ixb5+
(here 20 'iVxh6 no longer
allows smothered mate, but Black
has a lethal attack after 20 ... .ic4
when 21 .ixc4? allows 2 l ...l:la1
mate.) 20 ... �e7 21 'ifh4+ f6 22
'ifxf2 .in 23 .id3 -..,6
and Black
soon had an overwhelming attack
on the queenside.
Mate with the bishop
This isn't quite so interesting as
mate with the knight as it duplicates
more common mates with the queen
down the diagonal. Thus in the
famous Fool's Mate 1 g4 e5 2 f3??
'ifh4 mate
it would equally be mate
if it were a bishop rather than queen
on
h4.
The bishop mate also
requires a great deal of connivance
from the enemy pieces: namely
there must be clumsy defenders that
can neither block the check nor
eliminate the checking piece, but
still take away all escape squares
from their king. That sounds re
markably like a definition of smo
thered mate, even though formally
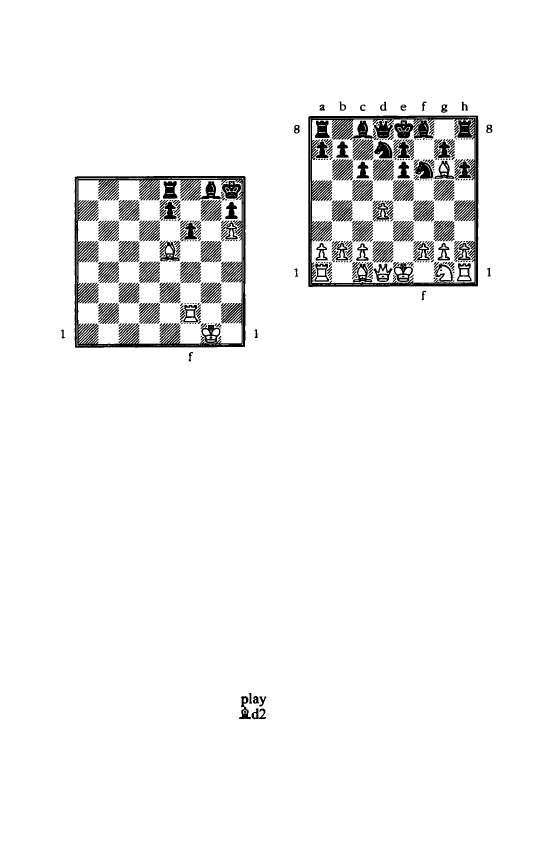
124 Mates with the Minor Pieces
the term applies only to mates with
the knight. Here is an example:
8
7
6
5
4
3
2
a b c d e f g h
a b c
d e
g h
8
7
6
5
4
3
2
The bishop on g8 lends White a
hand in mating after
1 l:lxf6 exf6
Or 1 ... Ji..fl 2 :g6 mate.
2 Ji..xf6 mate.
Another form of this mate could
occur in the Caro-Kann Defence.
Incidentally, it is curious how the
Caro-Kann, which is famed for its
solidity,
provides
so
many
examples of smothered mates!
1 e4 c6 2 d4 d5 3 �d2 dxe4 4
�xe4 �d7 5 �g5 �gf6 6 Ji..d3.
Now 6 ... e6 is the usual move, as if
Black tries to kick away the knight
with 6
..•
h6?!
he would fall for 7
�e6! fxe6??
(he has to
something like 7
..
.'ii'a5+ 8
'6b6, when 9 �xf8 is only a posi
tional advantage for White) 8 Ji..g6
mate.
7
6
5
4
3
2
a b c d e
g
h
7
6
5
4
3
2
The black pieces are making a
huge contribution by blocking all
the escape exits of their king: hence
the term smothered mate seems
valid.
Mate with knight and bishop
When it occurs the effect is often
very beautiful. Here for example is
a miniature game with a delightful
finish:
Perenyi - Eperjesi
Hungary 1986
1 e4 c6 2 d4 d5 3 �d2 dxe4 4
�xe4 �d7 5 il..c4 �gf6 6 �g5 e6
7 'ife2 �b6 8 Ji..d3 h6 9 �5f3 c5
10 dxc5 �bd7 1 1
b4 b6?! 12 �d4
bxc5?
Falling for the trap, but it
was already bad for Black. 13 �c6!
'flc7 14 'ifxe6+!! fxe6 15 Ji..g6
mate!
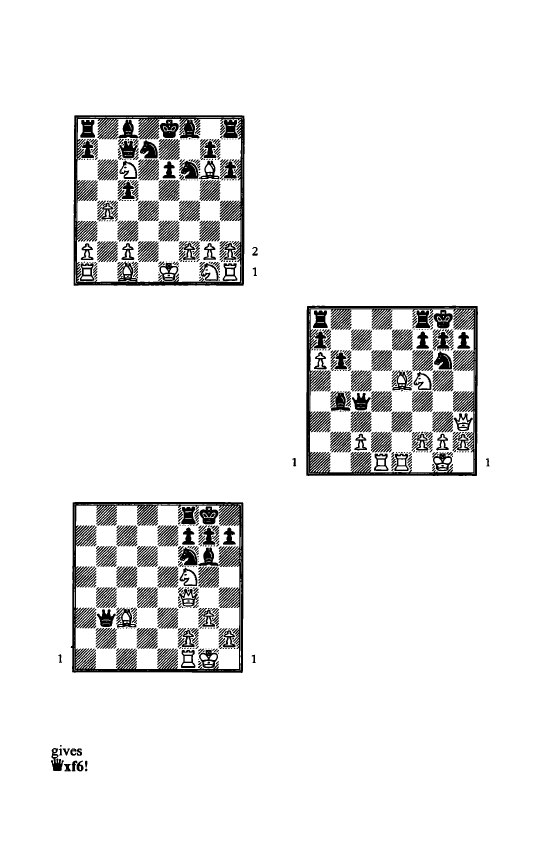
a b
c
d
e
f g h
8
8
7
7
6
6
5
5
4
4
3
3
2
1
a
b
c
d
e
f g h
The knight and the clutter of
black pieces take away all the
escape squares from the black king.
In the distant past I managed to
carry out the following type of
combination, which became the
first game I ever had published:
8
7
6
5
4
3
2
a
b
c
d
e
f g h
a
b
c
d
e
f g h
8
7
6
5
4
3
2
l ltlb6+ �h8
(if l ...gxh6 2 'iVxf6
and mate follows on h8 unless he
up the queen for the bishop) 2
gxf6 3 �xf6 mate.
Mates with the Minor Pieces 125
The mating pattern was seen in
practice in the following game. It is
very rare for such mates to occur in
games between titled players:
strong players are aware of these
attacking mechanisms and will do
all they can to avoid them.
Kotronias - King
New York 1990
a
b
c
d
e
f g h
8
8
7
7
6
6
5
5
4
4
3
3
2
2
a b
c
d
e
f g h
With the white bishop and knight
both aiming at the g7 square the
scene is set for a decisive combina
tion. Still, White has to
be
precise
as if 26 ltlh6+? gxh6 27 'iVxh6 f6 28
l:ld7 l:tf7 just leaves him a piece
down while 26 �xg7? �xe1 27
l:lxe 1 l:tfe8 threatening mate on e 1
is another disaster. However, 26
'ii'b6! !
does the trick. Black
resigned immediately. The sham
queen sacrifice attacks g7 a third
time, so if either 26 ... ltlxe5 or
26 ... f6 there is still the knight to
support a mate with 27 1i'xg7. And
on 26 ... gxh6 27 ltlxh6 is a pretty
mate.
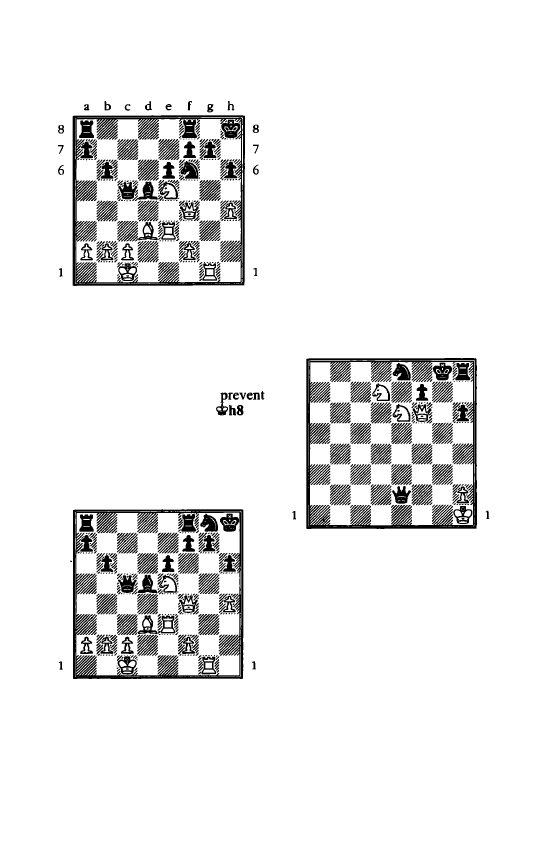
126 Mates with the Minor Pieces
5
4
3
2
a
b
c
d
e
f g h
5
4
3
2
This is the fmal position in the
Anand - Korchnoi
game given in
the chapter on queen and rook
mates. Black resigned because
there was no good way to
20 .:.xg7! �xg7 21 .:.gJ+
22
'ihh6+
with mate next move on g7
or h7. If he had defended g7 with
19 .
.
. .:.gs then 20 lDxfl is mate,
while on 19
...
lDg8
a
b
c
d
e
f g h
8
8
7
7
6
6
5
5
4
4
3
3
2
2
a
b
c
d
e
f g h
the most efficient way to fmish
the game is 20 'if:x:fi! threatening
mate on g7 and clearing the way for
'ifg6 or even better lDg6+ if needed.
If 20
.•.
.l:xti 21 lDxti is immediate
mate.
Mate with the two bishops
or two knights
Both these mates are very rare in
tournament play. Here is a double
knight mate
I
have constructed:
a
b
c
d
e
f g h
8
8
7
7
6
6
5
5
4
4
3
3
2
2
a
b
c
d
e
f g h
White would be in deep trouble if
he didn't have I 'ifg7+! lDxg7 2
lDf6 mate.
The double bishop mate is also
highly unusual in tournament play.
I just want to point out one
memorable mate that can occur in
the Caro-Kann.
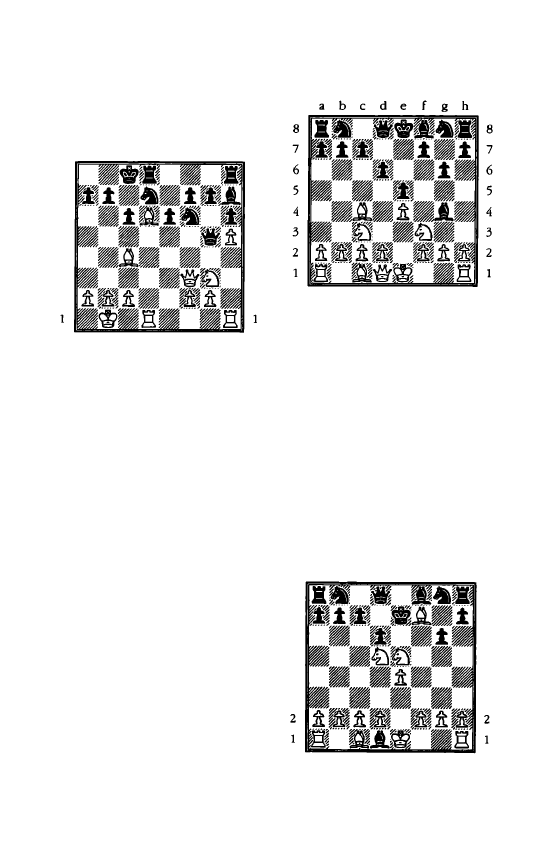
8
7
6
5
4
3
2
Movsesian - Schlosser
Germany 1998
a
b
c
d
e
f
g
h
a
b
c
d
e
f
g
h
8
7
6
5
4
3
2
Here Black played 17
.•.
lt:)e5
and a
draw resulted after 1 8 'ii'c3 lt:)xc4
19 'iVxc4 'ifb5 etc. Instead
17 ... 'iVg4?
would fall for a devilish
trap: 18 'it'xc6+! bxc6 19 i.a6 and
the black king is mated!
Legall's mate
Finally in this chapter we shall
look at a celebrated mating pattern
involving three minor pieces, in
which the knight has the honour of
mating. It dates back to the follow
ing game:
Legall - St Brie
Paris 1750
1 e4 eS 2 i.c4 d6 3 lt:)f3 i.g4 4
lt:)cJ g6?
A
terrible move that grants
immortality to the name of his
opponent.
Mates with the Minor Pieces 127
a
b
c
d
e
f
g
h
s lt:)xe5!!
Nowadays I would expect any
strong player to find the combina
tion that follows, but back in 1750 it
took some genius to be the first to
discover it.
5 ... i.xd1
A
far lesser evil was to be a pawn
down with 5 ... dxe5 6 'iVxg4, but in
old games they always take the
queen.
8
7
6
5
4
3
6 i.xf7+ �e7 7 lt:)d5 mate.
a
b
c
d
e
f
g
h
a
b c d
e f g
h
8
7
6
5
4
3
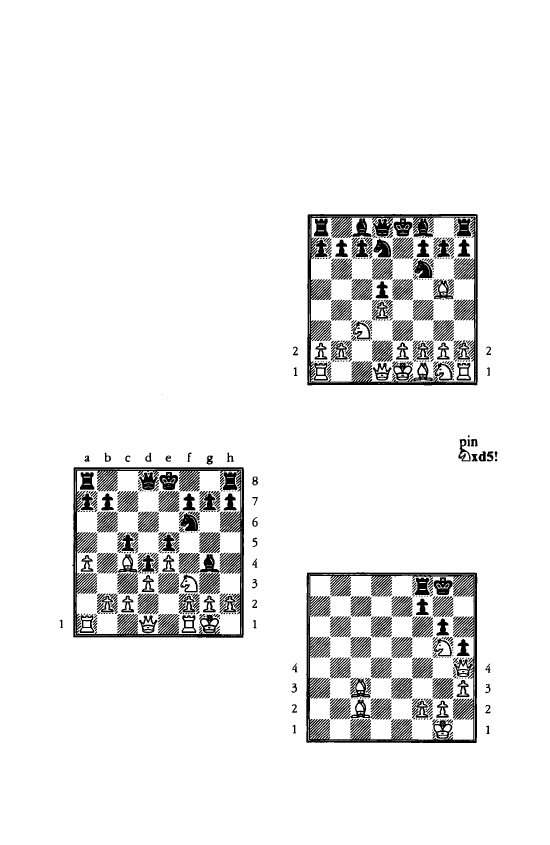
128 Mates with the Minor Pieces
It is very rare for Legall's mate to
occur these days. Indeed, in the
example above, it would only have
taken a sensible developing move to
prevent it, for example 4 ... l2Jf6
(defending the bishop on g4) or
4 ... l2Jc6 (so that 5 l2Jxe5?? can be
answered by 5 ... l2Jxe5 when the
bishop is defended and White loses
a piece). So in other words, even if
Black has never seen the pattern of
Legall's mate he might well avoid it
'by accident', simply by playing a
decent developing move!
Nevertheless the concept of
l2Jxe5! ignoring an apparent pin on
the knight by the bishop, frequently
comes up in tournaments as a useful
tactic.
8
7
6
5
4
3
2
a
b
c
d
e
f
g
h
Here we can apply the basic idea
seen in Legall's mate to set up a
fork on e5 with I .i.xt7+! �xt7 2
ltJxe5+ �e8 3 l2Jxg4
and White
wins two pawns.
The same device also occurs in a
well known trap in the Queen's
Gambit:
I
d4 d5 2 c4 e6 3 l2Jc3 l2Jf6 4
.i.g5 l2Jbd7 5 cxd5 exd5
8
7
6
5
4
3
a
b
c
d
e
f
g
h
a
b
c
d
e
f
g
h
8
7
6
5
4
3
and here White would lose a
piece after 6 l2Jxd5? as the
on
the knight can be broken: 6
..•
7 .i.xd8 .i.b4+ 8 'iM2 .i.xd2+ 9
�xd2 r,i;>xd8.
Lastly here is one other mating
pattern with three minor pieces that
is worth remembering.
a
b
c
d
e
f
g
h
8
8
7
6
5
a
b
c
d
e f g
h
7
6
5
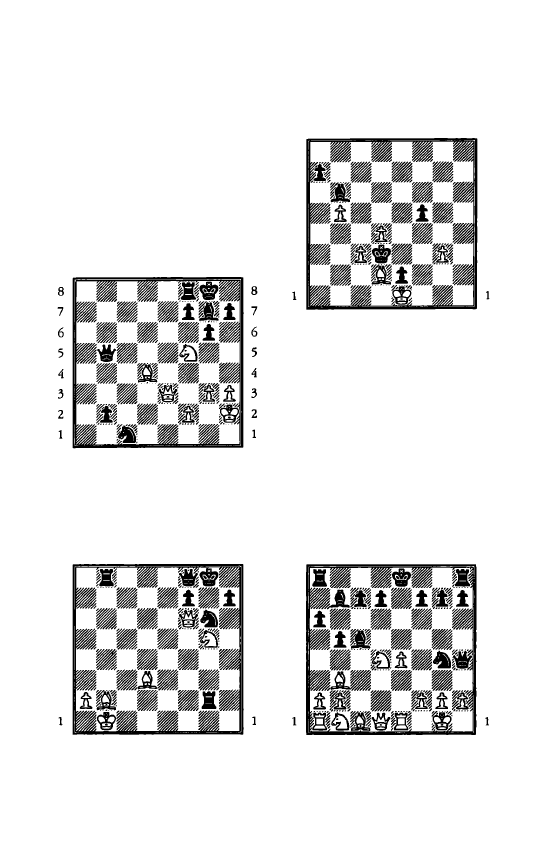
Black has responded to lDg5 with
h7-h5 to prevent 'it'xh7 mate, but
disaster strikes alo
1
the h file all
the same after 1
xb5! gxh5 2
.ih7 mate.
Puzzles
58
a
b
c
d
e
f
g
h
a
b
c
d
e f g
h
White to play
59
a
b
c
d
e
f
g
h
8
8
7
7
6
6
5
5
4
4
3
3
2
2
a
b
c
d
e
f
g
h
White to play
Mates with the Minor Pieces 129
8
7
6
5
4
3
2
60
a
b
c
d
e
f
g
h
a
b
c
d
e
f
g
h
Black to play
8
7
6
5
4
3
2
The deadly diagonal in the end
game: Black to play and win.
61
After the opening moves 1 e4 e5
2 li)f3 lDc6 3 .ib5 a6 4 .ia4 lDf6 5
0-0 b5 6 .ib3 .ib7 7 :et .ic5 8
c3
lDg4 9 d4 exd4 10 cxd4
Black
sacrifices a knight with lO
•••
lDxd4
11 lDxd4 'it'h4
hitting f2 and h2.
a
b
c
d
e
f
g
h
8
8
7
7
6
6
5
5
4
4
3
3
2
2
a
b
c
d
e
f
g
h
Is 12 lDf3 now a safe defence?
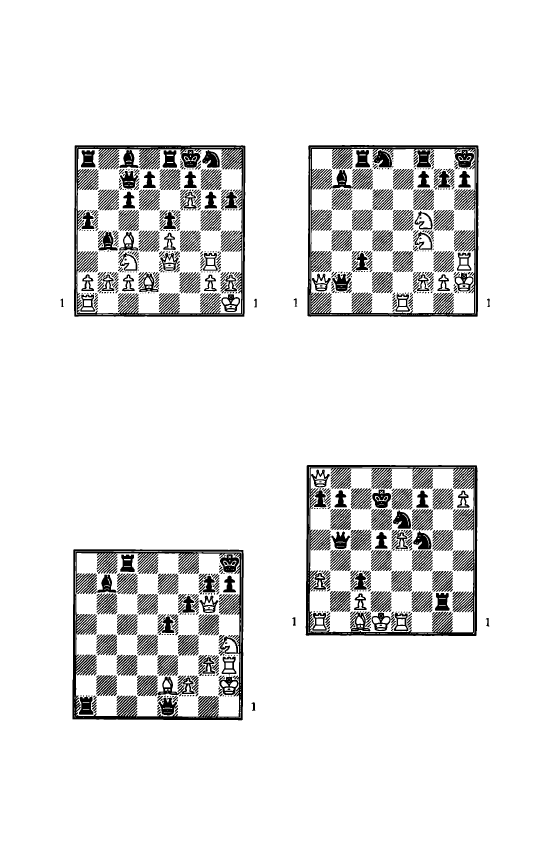
130 Mates with the Minor Pieces
8
7
6
5
4
3
2
62
a b c d e f g h
a b c d e f
g
h
White to play
8
7
6
5
4
3
2
This position could have been
reached in Kasparov-Movsesian in
the Chapter on the killer pawn if
Black had answered 18 f6! with
18
. . .
g6. How would Kasparov have
exploited his advantage?
63
a b c d e f g h
8
8
7
7
6
6
5
5
4
4
3
3
2
2
1
a b c d e f g h
White to play
8
7
6
5
4
3
2
8
7
6
5
4
3
2
64
a
b c d e
f g h
a b c d e f
g
h
White to play
65
Short - Neelotpal
Dhaka 1999
a b c d e f
g h
a b c d e f g h
White to play
8
7
6
5
4
3
2
8
7
6
5
4
3
2
Black's plight looks terrible. Not
only is he the exchange down but
White has a pawn on the seventh
rank waiting to queen. Surely this is
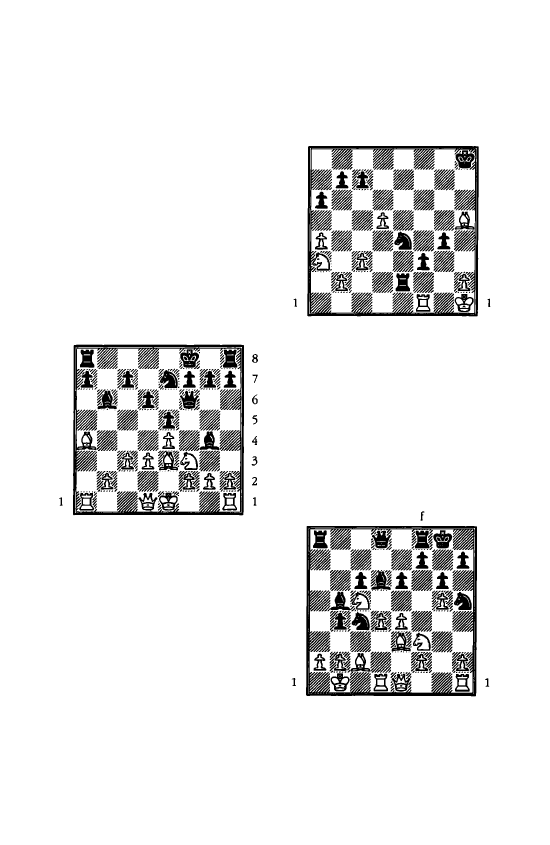
not a good situation to be in against
a fonner World Championship
finalist. It is even White's move.
And yet in three moves time,
White .... resigned!
What
skul
duggery was at work here? (in other
words, tell me what you would do
as Black here against 24 h8='if or
24 l:.a2.)
8
7
6
5
4
3
2
66
Short - Kupreichik,
Hastings 1981
a
b
c
d
e
f
g
h
a
b
c
d
e
f
g
h
White to play
There is no mate here, but find
something strong for White!
Mates with the Minor Pieces
131
67
a
b
c
d
e
f
g
h
8
8
7
7
6
6
5
5
4
4
3
3
2
2
a
b
c
d
e
f
g
h
Black to play.
Black has to do something fast as
he is a piece down!
8
7
6
5
4
3
2
68
Dao Thien Hai - McDonald
Budapest 1996
a
b
c
d
e
g
h
a
b
c
d
e
f
g
h
Black to play
8
7
6
5
4
3
2
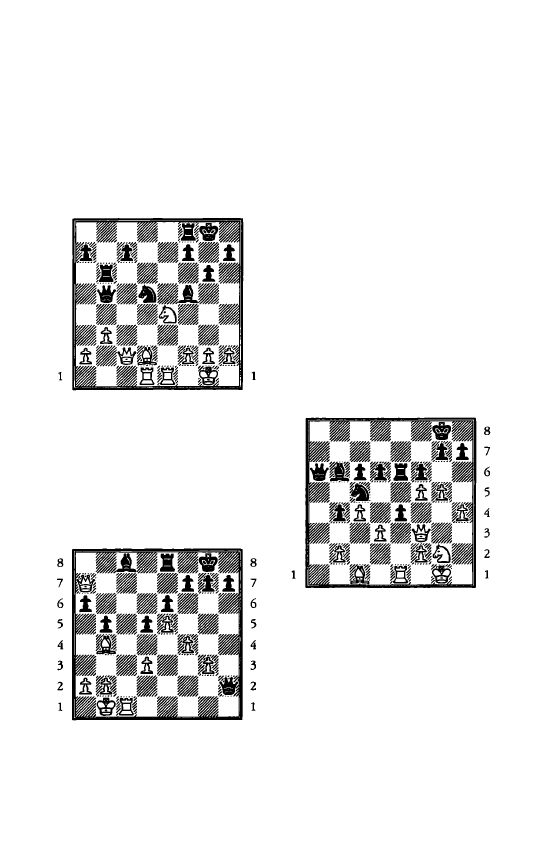
Solutions to Puzzles
1
a b c d e f g h
8
8
7
7
6
6
5
5
4
4
3
2
a b c d e f g h
3
2
If 1 .i.b6 l:le8 3 l:lxdS! 'il'xdS 4
ltlf6+ 'itth8 5 l:lxe8 mate.
2
Rudolf - Moritz
Rostock 2002
a b . c d e f g h
a b c d e f g h
The game finished 23 1i'e7! 1-0
The black rook has no escape
squares and if 23 ... l:lxe7 24 .llxc8
mates next move. If from the
diagram Black had played 22 ... 1i'd8
then 23 l:lc7 with the twin threats of
24 .i.e7 and 24 l:lxf7 is decisive.
After losing control of the dark
squares there was no hiding place
for the black pieces on the light
squares.
8
7
6
5
4
3
2
3
Movsesian - Godena
Elista 1998
a b c d e f g h
a
b c d e
f g h
No, as 29 fxe6! exf3 30 e7 won at
once: in view of the threatened mate
on e8 Black has no time to take the
knight on g2. Godena tried
30
••
.'ii'c8
but resigned after 3 1
eS='iV+ '1Vxe8 32 :XeS+ 'iftf7 33
l:lb8 1-0 as if 33 ... �7 34 .l:r.b7
keeps the extra rook.
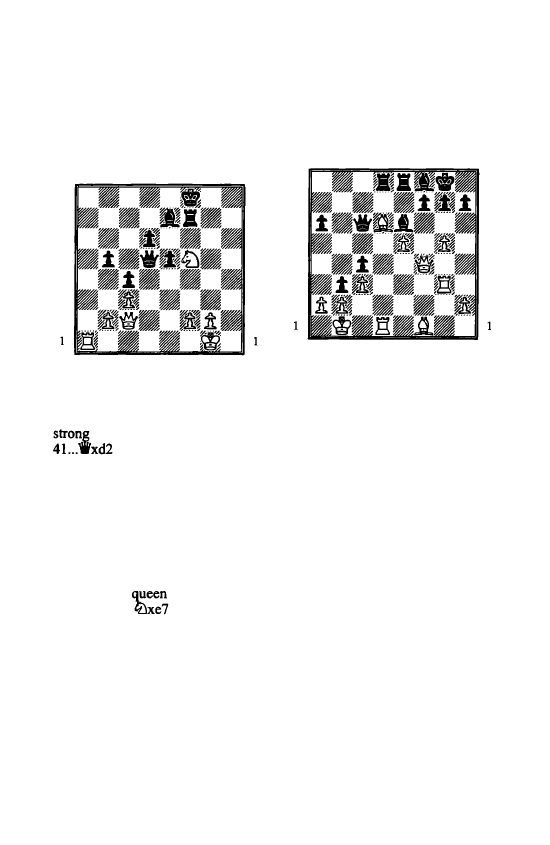
4
Adams - Giorgadze
Groningen 1997
a
b
c
d
e
f
g
h
8
8
7
7
6
6
5
5
4
4
3
3
2
2
a
b
c
d
e
f
g
h
Adams uncorked 41 'ifd2!!
winning time to get his queen to a
attacking post on h6 as if
42 .Ua8+ .td8 43 .Uxd8
is mate.
After 41
••.
'ifc6 42 'ii'b6+ �e8 43
'ife6 Black resigned.
The threat is
44 �xd6+ 'ifxd6 45 .Ua8+ 'ifd8 46
l:lxd8+ �xd8 4 7 'ifxf7, and if
43 ... Wf8 White has the choice
between 44 �xe7 .l:.xe7 45 'iff6+
l:.f7 46 l:la8+! 'ifxa8 47 'ifb8+
winning the
for rook or 44
l:la7 'ife8 45
l:txe7 46 'iff6+
when 46 ... .Uf7 47 'ifb8 is mate
while 46 ... 'iff7 47 'ifh8+ wins a
rook.
Solutions to Puzzles 133
s
Ljubojevic - Kasparov
Belfort 1988
a
b
c
d
e
f
g
h
8
8
7
7
6
6
5
5
4
4
3
3
2
2
a
b
c
d
e
f
g
h
If 28 ... bxa2+ White has to avoid
29 �xa2? 'ifa4+, but 29 �a l looks
safe for him. Kasparov kept the
pawn on b3 to create mating threats:
he only wants to take on a2 when
White can't stop the pawn from
queening!
The game went 28 ... .txd6 29
exd6 .l:.xd6!
which exploits the
weak white back rank to win the
crucial passed pawn. Neither recap
ture is any good for White:
30 'ifxd6 .tf5+ 3 1 'itc 1 (it will be
mate after 3 1 �a1 'ifxd6 32 .Uxd6
.Ue1+) 3 1 ...bxa2! when 32 'ifxc6
al='if+ 33 �d2 'ifxb2 or 32 'ifa3
'ii'e4! 33 .i.d3 (if 33 'ifxa2 'ifc2
mate) 33 ... 'iff4+ 34 Wc2 lle2+ 35 .
.Ud2 'ifxd2 are both mate. Alterna
tively 30 .Uxd6 .tf.5+ 3 1 1ixf.5 lte1
mates or here 3 1 �c1 bxa2 32 ltxc6
a1='if+ 33 �d2 'ife1 mate.
In the game White played the
forlorn 30 llcl, but having lost his
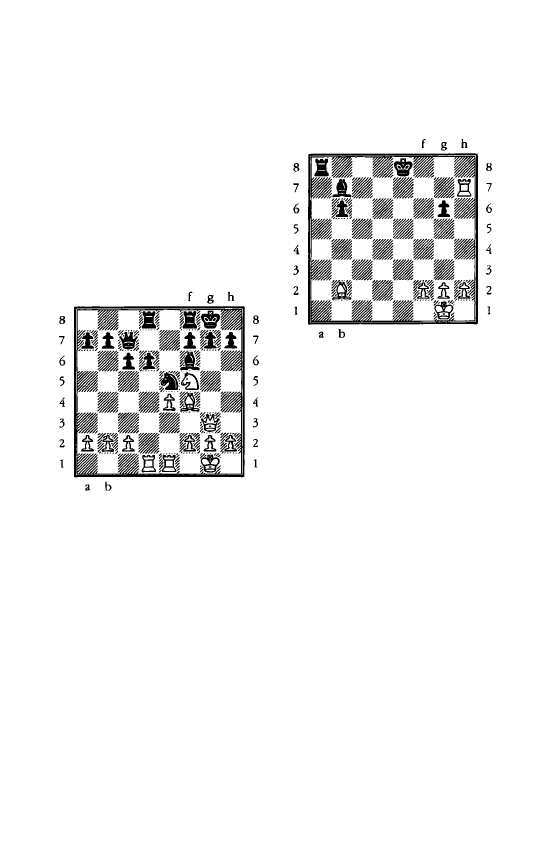
/34 Solutions to Puzzles
passed pawn and still not removed
the cramping pawn on b3 there was
little hope against K.asparov:
30 ... 'ifcS 31 Wa1 l:led8 32 l:le3
l:ld1 33 l:lel l:lxe1 34 l::r.xe1 'ifaS 35
a3 'iVdS 36 i.e2 g6 37 h4 'ifd2 38
'ifn i.h3! 39 'ii'g1 l:le8 0-1
The pin costs the bishop.
6
a
b
c
d
e
c
d
e
f
g
h
An old game but one of my
favourites: 17 l:lxd6! J:.xd6 18
i.xeS J:.d1
the only try as if
18 .. :i.xe5 19 'ifxe5 hits both d6 and
g7, and 19 .. Jlg6 drops the queen. It
seems that the back rank trick will
save Black, but... 19 J:.xd1 i.xeS 20
�h6+! 'ith8 21 'ifxeS! 'ifxeS 22
�xti+! 1-0
White has the last laugh
as Black's own weak back rank
means that he cannot capture the
knight. Therefore 22
..
.'�g8 23
�e5 leaves him a piece and two
pawns up. (Capablanca-Fonaroff,
New York 1918)
7
a
b
c
d
e
c
d
e
f
g
h
White to play
It looks like White can win at
once with 1 fl.xb7, for if
l
... l:la2 2
l:lxb6 but 1 ... 0-0-0!! turns the
tables: the white rook is attacked
and mate is threatened on d I ! As he
can't deal with both threats White
loses the rook and eventually the
game after 2 h4 'itxb7 etc. Instead
White should play something like 1
i.f6 l:lc8 2 h4 with good winning
chances. (OK, I guess I should have
told you that queenside castling was
legal for Black, but that would have
given the trick away. At least you
won't ever forget this idea!)
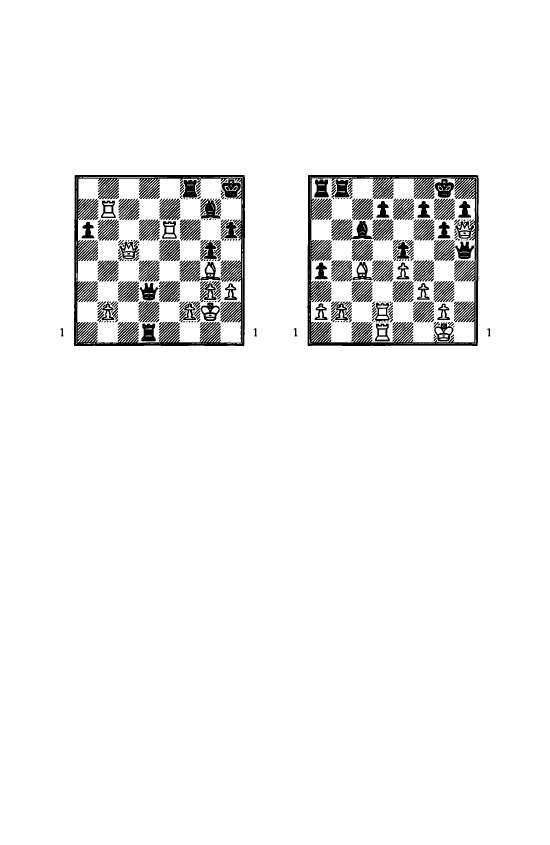
8
Lputian - Spraggett
Olympiad, Bled 2002
a
b
c
d
e
f g h
8
8
7
7
6
6
5
s
4
4
3
3
2
2
a
b
c
d
e
f g h
The butcher's approach would be
36 .i.xd1, winning the exchange,
though the game would still take
some finishing after 36 ... 'iVxdl.
Black found something speedier
and more entertaining, though don't
make it too subtle as Black himself
is threatening mate in two with
36 ... 'iVfl+
.
36 .l:[xh6+!
and Black resigned.
The fianchetto defence breaks down
after 36
.•.
.txb6 37 'iVeS+ �g8 38
'iVe6+
(even more precise than 38
.te6+) 38 ... l:.f7 39 •xf7+ �b8 40
1ff6+ �g8 41 .te6 mate.
Solutions to Puzzles 135
9
Short - Rogers
Manila 1992
a
b
c
d
e
f g h
8
8
7
7
6
6
s
s
4
4
3
3
2
2
a
b
c
d
e
f g h
White was prepared to sacrifice
heavily to get control of the seventh
rank:
29 .txf7+!
If now 29 ..
.
�f7
30 :xd7+
.txd7 3 1 :xd7+ and in reply to
both 3 1 ... �e6 and 3 1 ... �e8 White
has 32 'ikg7 when mate will follow
on e7 or
f7.
So in the game Rogers
played 29
...
�b8,
but after 30 WxhS
gxhS 3l .i.xhS
he was a pawn down
with a hopeless position.
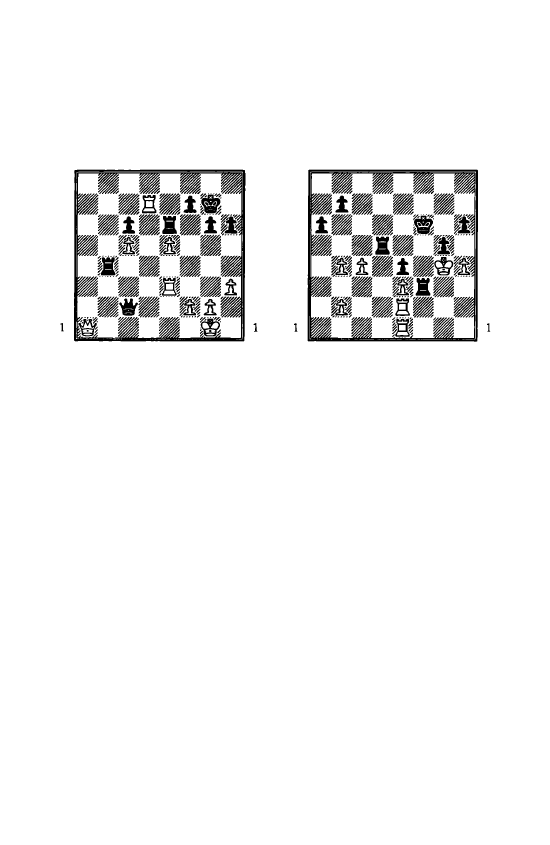
136 Solutions to Puzzles
10
Korchnoi - Kraidman
Beersheba 1978
a
b
c
d
e
f
g h
8
8
7
7
6
6
5
5
4
4
3
3
2
2
a
b
c
d
e
f
g h
After the plausible 35 'ifa7 Black
can defend f7 with 35 ... l:tbl+ 36
�h2 'ifxf2, with at least a draw
after 37 l:tf3 'Wgl+. So Korchnoi
ignored the threat to his queen with
35 l:tf3!! l:tbl+ 36 �hl It turns out
that Black is mated after 36 ... l:.xal
37 l:.dxfl+ �h8 38 llffi+ �g7 39
l:.3f7. So Kraidman tried the
desperate 36
•.•
g5. Here White had a
quick mate with 37 lldxfl+ <t>g6
(or 37 ... �g8 38 'ifa8+ and mates)
38 . l:t3f6+ lhf6 (or 38 ... �h5 39
l:txe6!) 39 llxf6+ �h5 40 g4+ �h4
41 l:txh6 mate. Korchnoi played the
less precise 37 'ifa8 but also won
quickly: 37
•..
'ife4 38 lldxf7+ �g6
39 'ii'g8+ �h5 40 ll7f5 'ifel 41
l:txg5+! 1-0 for if 4l...hxg5 42
1i'h7+ l:.h6 43 g4+ �h4 44 'ii'xh6
mate.
I I
Sahovic - Korchnoi
Biel 1979
a
b
c
d
e
f
g h
8
8
7
7
6
6
5
5
4
4
3
3
2
2
a
b
c
d
e
f
g
h
Another game from the old
maestro. There are no rooks on the
seventh rank-at least not yet! Let
us see how Korchnoi managed to
shut in and mate the white king.
l
.•.
hS+! 2
�xh5 lld8!
with threat of 3 ... l:.h8+ 4 �g4
llxh4 mate.
3 bxg5+
There is no escape with 3 �g4 as
3 ... gxh4 4 �xh4 �f5 and mate next
move, or similarly 4 b5 llg8+ 5
�h4 �f5 and 6 ... .l:h8 mate.
3 ... �f5
with a double threat of mate on
h3 or bS.
4 �h6
l:.h3+ 5 �g7 l:td7+ 6 �g8
Or
6 �ffi l:.h8 mate.
6
•..
�g6! 7 llf2
To stop mate on d8, but now
Korchnoi ended the game with
7
.••
llg7+ 8
�f8 llh8 mate.
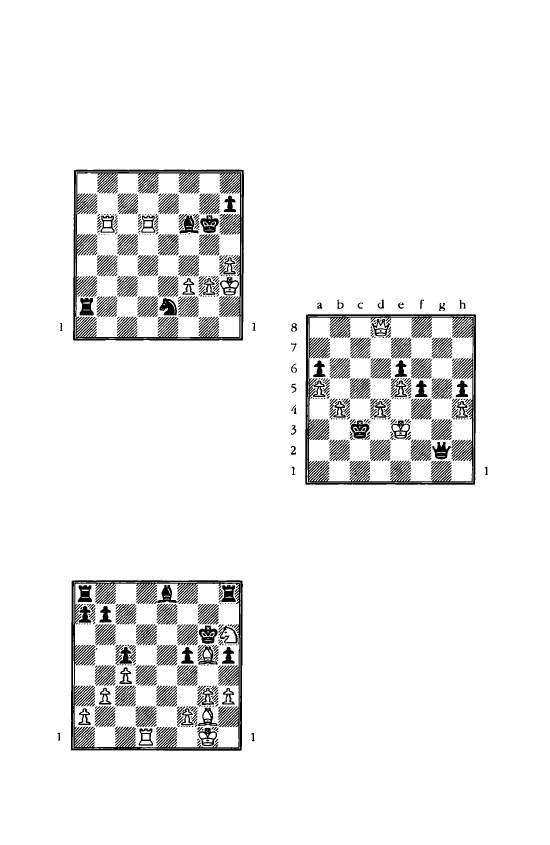
12
Kotronias - Hausrath
Germany
1 996
a
b
c
d
e
f
g h
8
8
7
7
6
5
4
3
2
a
b
c
d
e
f g h
6
5
4
3
2
No, as he is mated after
44 ... tt:\g1 + 45 �g4 .!:la4+! 46 f4 hS
mate!
In the game Kotronias played
it safe with 43 l:rd5 i.d4 44 h5+
�f6 45 �g4 which destroyed all
the potential mating nets and
eventually won.
8
7
6
5
4
3
2
13
Kalinin - Skotorenko
Correspondence
1 99 1
a
b
c
d
e
f
g h
a
b
c
d
e
f
g
h
8
7
6
5
4
3
2
Solutions to Puzzles 137
If 26 ... �xg5 27 l:rd6! i.g6 28
tt::\17+!
i.xf7 when White has a
choice of pawn mates with 29 f4 or
29 h4.
It is no surprise that Black
resigned in the diagram position as
in a correspondence game there is
time to work out such a variation.
14
Topalov - Kasparov
Linares
1 999
a
b
c
d
e
f
g
h
8
7
6
5
4
3
2
White resigned
on 61. .. f4+! as it
is mate after 62 �xf4 �d3 ! 63
'ii'g5-the only way to prevent
63 ... 'ii'g4 mate-63 ... 'ii'f2 mate.
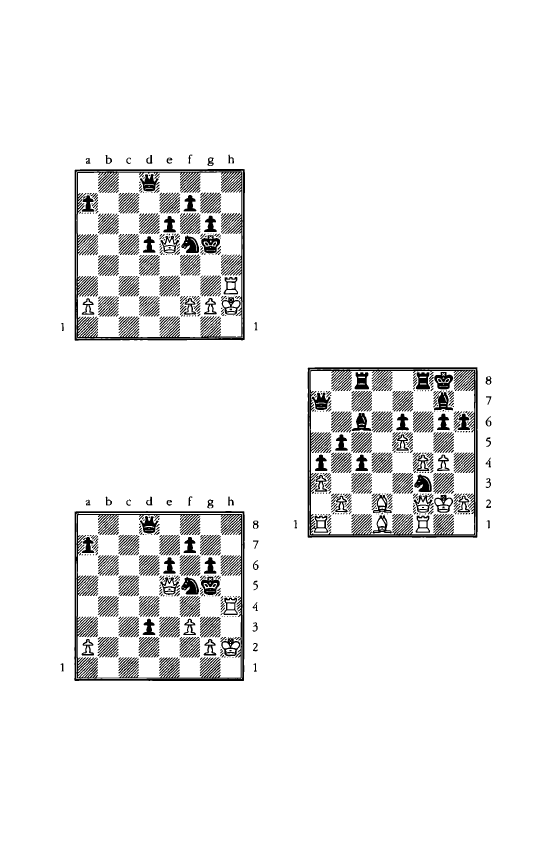
138 Solutions to Puzzles
8
7
6
5
4
3
2
15
Schaefer - Novik
Sofia 1994
a
b
c
d
e f g h
8
7
6
5
4
3
2
After 45 ... 'ii'd6 White can mate
with 46 f4+ 'it>g4 47 lth4+!! 'it>xh4
(or 47 ... tDxh4 48 �g5 mate-better
than taking the queen!) 48 'ii'f6+
'it>g4 49 �g5 mate.
8
7
6
5
4
3
2
After 45 ... d4 46 f3 d3 47 lth4!
a
b
c
d
e
f
g
h
Black is mated after both
47 ... 'it>xh4 48 'ii'f4+ 'ifr>h5 49 g4+
�h4 50 g5+ �h5 51 'ii'g4 mate
and
47 ... d2 48 �h3!
(threat 49 f4 mate)
48 ... 'ii'd3 49 ltg4+ 'it>h5 50 'ii'h8+
tiJh6 51 'ii'f6 lDxg4 52 'ir'h4 mate.
These variations were given by
Novik and Nesis in lnformator.
The game itself actually finished
46 ... f6 47 f4+ 'it>g4 48 'ii'e2+ 'it>xf4
49 ltf3+ 'it>g5 50 'ii'd2+ 'it>h5 51
g4+ 'it>h4 52 'ii'f4 1-0
8
7
6
5
4
3
2
16
a
b
c
d
e
f
g h
a
b
c
d
e
f
g
h
Answer: no, after 28 'ii'xa7
lDxd2+ 29 �f2 ltxf4+ 30 'it>e3
White is mated with 30 ... lDxf1+ 31
�xf4 g5 mate.
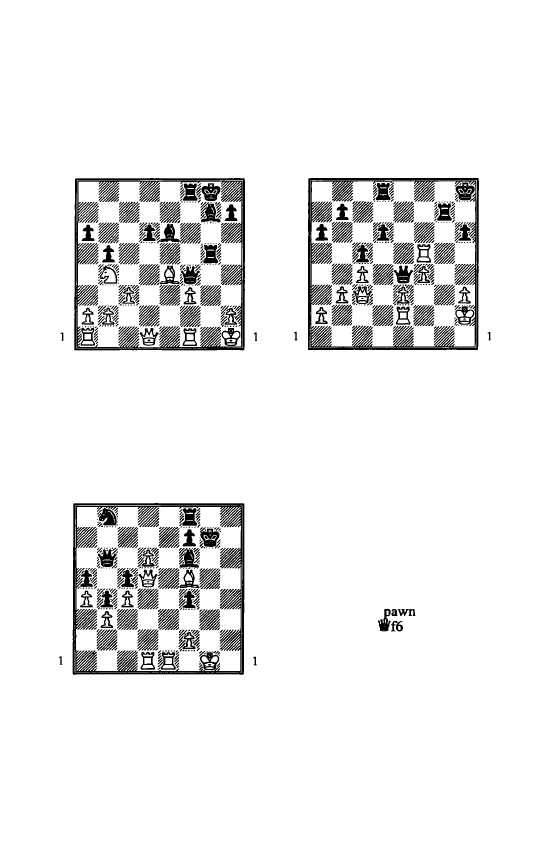
17
Prokopp - Scholz
Correspondence, 1996
a b c d e f g h
8
8
7
7
6
6
5
5
4
4
3
3
2
2
a b c d e f g h
Yes, as 25
•.
.'ifxh2+!! 26 �xh2
l:.f6 forces mate!
8
7
6
5
4
3
2
18
Kasparov - Grischuk
Cannes 2001
a b c d e f g
h
a b c d e f g
h
8
7
6
5
4
3
2
There was no escape for the black
king after 40 'ifg2+ �h6 41 'ifh3+
-.i?g5
(if 4 l...�g7 42 'ifh7 mate) 42
'ifg4+ �h6 43 l:ld3 1-0
Solutions to Puzzles 139
19
Malaniuk - Tseitlin
Hastings 1995
a b c d e f g h
8
8
7
7
6
6
5
5
4
4
3
3
2
2
a
b c d e
f g h
After 40 'iff6?? 'iffJ!! White saw
to his horror that he is mated down
the g file after 41 'ifxd8+ ..t>h7, for
example 42 l:ld2 'ifg3+ 43 �hl
'ii'gl mate. So he tried 41 'ifxh6+
�g8,
but once again he was help
less against the double threat of
42 ... 'ifxe2+ and 42 ... 'ifg3+. He
resigned after the futile moves 42
l:lg5 'ifxe2+ 43 �h1 'iffJ+ 44 �h2
l:ldd7 45 'ife6+ l:ldf7 46 h4 'ifc6
0-1
Instead of his terrible blunder in
the game White could have forced
an endgame a
up with 40
:m
l:.dgs 41
..th7 42 'iff5+
'ifxf5 43 J:lxf5 etc.
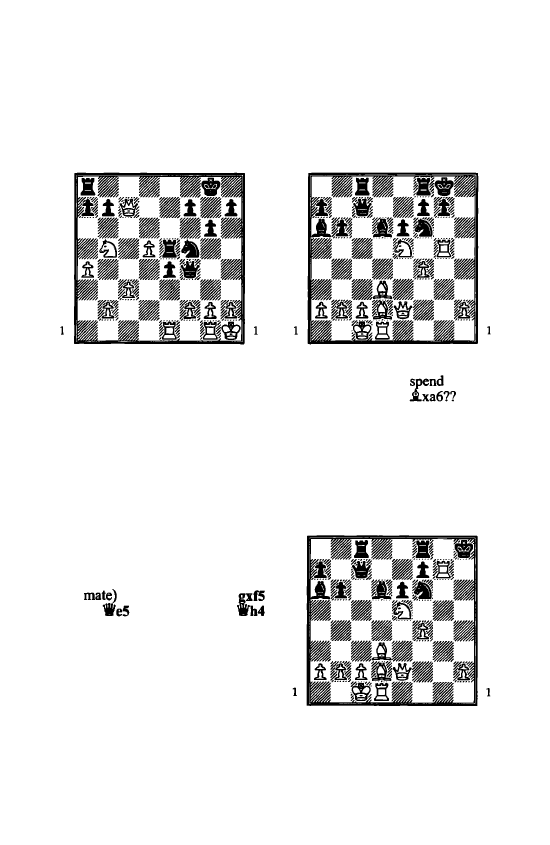
140 Solutions to Puzzles
20
Yudasin - Kramnik
Wijk aan Zee 1994
a b c d e f
g
h
8
8
7
7
6
6
5
5
4
4
3
3
2
2
a b c d e f
g
h
Here 23 ... e3! softened up the
defence of the g3 square, so that
both 24 fxe3 and 24 f3 could be
answered by 24 ... ll'lg3+ 25 hxg3
:lh5 mate. If instead 24 lbd4 there
is a variation on the same theme
with 24 ... exf2 25 'ifxe5 ll'lg3+ 26
hxg3 'ifb6+-this time the queen
finds a mating square on the h file.
As Black is also threatening
24 ... exf2, there is nothing White
can do. Yudasin tried 24 l:txeJ but
resigned after 24 ... 'ifxe3 25 ll'ld6
(or again 25 fxe3 ll'lg3+ 26 hxg3
l:th5
25
..•
:le7 26 ll'lxf5
27 'ii'd6
28 'ifb4 :r.ae8 29
f6 30 h3 'ii'xd5 0-1
2l
Baklan - Matzat
Bad Zwesten 1999
a b c d e f
g
h
8
8
7
7
6
6
5
5
4
4
3
3
2
2
a b c d e f g h
I hope you didn't
too long
thinking about 21
'ii'xc2
mate. Instead 2l :lxg7+! ¢>xg7 22
'ii'g2+
and Black resigned as
22 ... Wh8 23 'ifh3+ ¢>g7 24 l:gl+
ll'lg4 25 'it'xg4+ ¢>f6 26 'ifg5 is
mate. Black could have made it a
little harder for White with
21
•••
¢>h8
8
7
6
5
4
3
2
,a b c d e
f g h
a b c d e f
g
h
8
7
6
5
4
3
2
but he has a pretty win with 22
'ifh5+! ll'lxh5 23 :lh7+ ¢>g8 24
:lgl + ll'lg7 25 :lgxg7 mate.
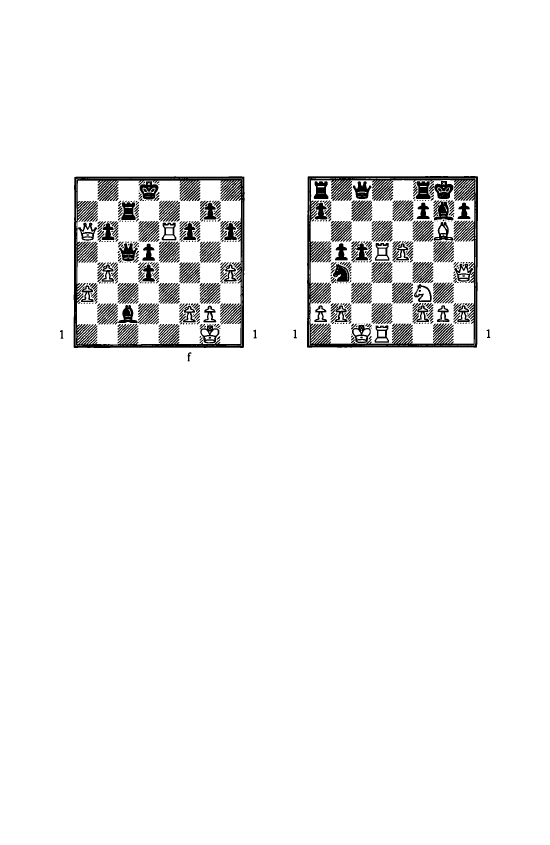
22
Haba - Khenkin
Koszalin 1999
a
b
c
d
e
f g h
8
8
7
7
6
6
5
5
4
4
3
3
2
2
a
b
c
d
e
g
h
The black queen is attacked, and
if 36 ... 'Wc4 37 WaS+! wins for
White: 37 ... l:tcS (or 37 .. .'itd7 3S
'ikeS mate) 3S Wb7 l:tc7 (Black
must deal with the threat of 39 We7
mate, and 3S ... 'Wc7 39 'ii'xd5+ 'ii'd7
40 l:td6 drops the queen) 39 WbS+
l:tcS 40 'ii'd6 with a form of the
epaulette mate described earlier in
the chapter.
So it seems that White was right
to avoid the draw by repetition.
However, in the game Khenkin
didn't move his queen. Instead he
turned the tables with 36
•••
�d3!!
when 37 'WaS+ l:tcS is just bad for
White so he had to take the bishop:
37 Wxd3 'Wct + 3s 'Wn
The only way to resist was with
3S �h2, but 3S ... 'Wf4+ is then very
good for Black.
38
.••
d3! 39 'ii'e1 d2 40 'ii'd1
W:x:dl+ 0-1
Solutions to Puzzles 141
23
BeUavsky - Kasparov
World Cup, Belfort 19SS
a
b
c
d
e
f g h
8
8
7
7
6
6
5
5
4
4
3
3
2
2
a
b
c
d
e
f g h
No-19
•••
h:x:g6? 20 l2Jg5 l:te8 21
l:td7! is fatal. The threat is 22 'ikh7+
<ifilfB 23 l:t:x:f7, and if 21...l:tf8 then
22 'ilfh7 mate. Black can only delay
things with the useless check
21...lLlxa2+ 22 q;.bl , or the bluff
21
.•.
.:e7 22 lt:x:e7 Wrs, when his
roof caves in after 23 'ii'h7+ q;.fB 24
.::x:f7+ W:x:f7 25 lD:x:f7 �:x:f7 26
l:td7+.
The
situation
after
Kasparov's correct 19 ... fxg6! is
discussed in the chapter on back
rank
mate.
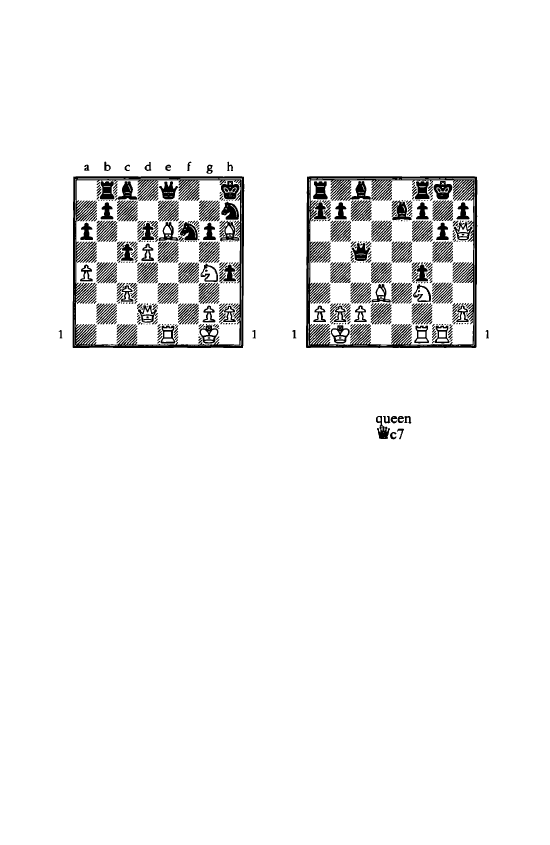
142 Solutions to Puzzles
24
Mecking - Pace
Olympiad, Bled 2002
8
8
7
7
6
6
5
5
4
4
3
3
2
2
a
b
c
d
e
f
g
h
27 .tg7+! !
This really rubs in the fact that
Black should never have parted
with the dark squared bishop that
was once sitting on g7.
27
•.
/�xg7 28 'ifh6+ �h8 29
ltlxf6 'ii'e7 30 ltlxh7 1-0
As soon as the white queen enters
it all crumbles for Black. He cannot
recapture on h7 without allowing
mate with 3 1 'it'f8+.
25
Khalifman - Bareev
Wijk aan Zee 2002
a
b
c
d
e
f
g
h
8
8
7
7
6
6
5
5
4
4
3
3
2
2
a
b
c
d
e
f
g
h
After 20 l:lg5! Black resigned. If
20 ... .ixg5 21 ltlxg5 and Black has
to give up his
to avert mate
on h7. Or 20 ...
21 :h5! gxh5
22 'it'xh7 mate. The only other
move allows a breakthrough on g6:
20 ... f5 21 :txg6+ hxg6 22 _.xg6+
�h8 23 'ii'h6+ 'iPg8 24 .ic4+!
'ii'!(c4 (if 24 ... :f7 25 'ii'g6+) 25
:tg1 + �f7 26 'ii'g6 mate.
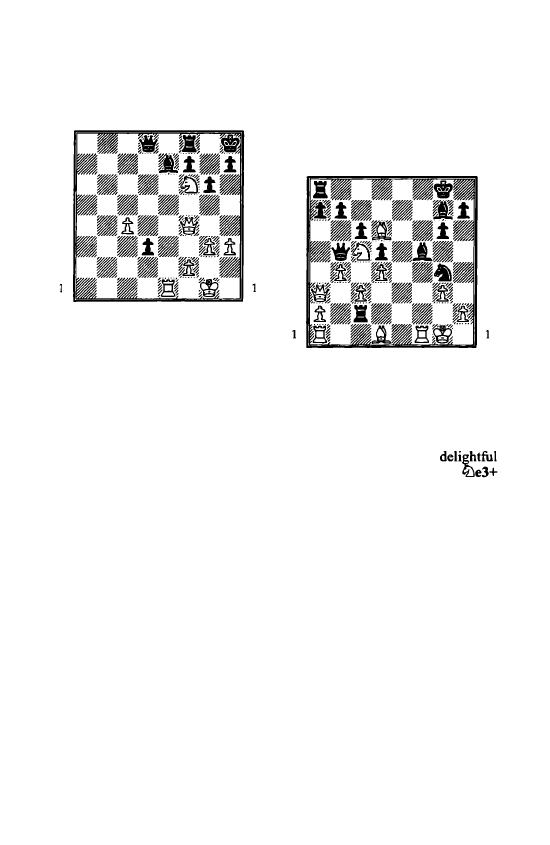
26
a
b
c
d
e
f
g
h
8
8
7
7
6
6
5
5
4
4
3
3
2
2
a
b
c
d
e
f
g
h
1 :.xe7! 'fixe7 2 'fih6! •xr6
(also
useless is 2 ...• el+ 3 �g2 'fie4+ 4
�h2 etc.) 3 'Wxf8 mate: the black
queen was unable to keep f8
defended and eliminate the black
knight. A tougher defence is l.
. .
d2
but White still wins easily after 2
'ii'h6 d1=1i'+ 3 �h2 'ifhS
(an awful
move to have to make) 4 lLlxhS
gxhS S lld7!
(still using the poten
tial mate on f8) S
..•
'fie8 6 'ii'f6+
�g8 7 lidS h6 8 'ii'xh6
and things
get gradually more gruesome for
Black as he tries to fend off a fatal
check on g5, e.g. 8
.•.
fS 9 1i'gS+
�h8 10 lld6.
Solutions to Puzzles 143
27
Szabolcsi - Legky
Val Thorens 1990
a
b
c
d
c
f
g
h
8
8
7
7
6
6
5
5
4
4
3
3
2
2
a
b
c
d
e
f
g
h
After (a) 27 ..ixc2 'ife2 wins very
quickly as there is no good answer
to 28 ... 'ifxh2 mate. For example if
28
J:lf4 there is, amongst other
winning lines, the
variation 28
.•.
'ifxh2+ 29 �n
30 �el lLlxc2+
picking up the
white queen.
In the game White chose (b) 27
:c1,
but he resigned immediately
after 27
.••
J:Ig2+!
which gains time to
co-ordinate the queen and knight in
a king hunt. There could follow 28
�xg2 ltJe3+ 29 �1'2 'ii'xn + 30
�xe3 l:.e8+ 31 ..teS ..th6 mate!
(or
less elegantly 3 1 ltJe4 J:lxe4+ 32
�d2 'ii't2+ 33 �d3 :.xd4 mate.)
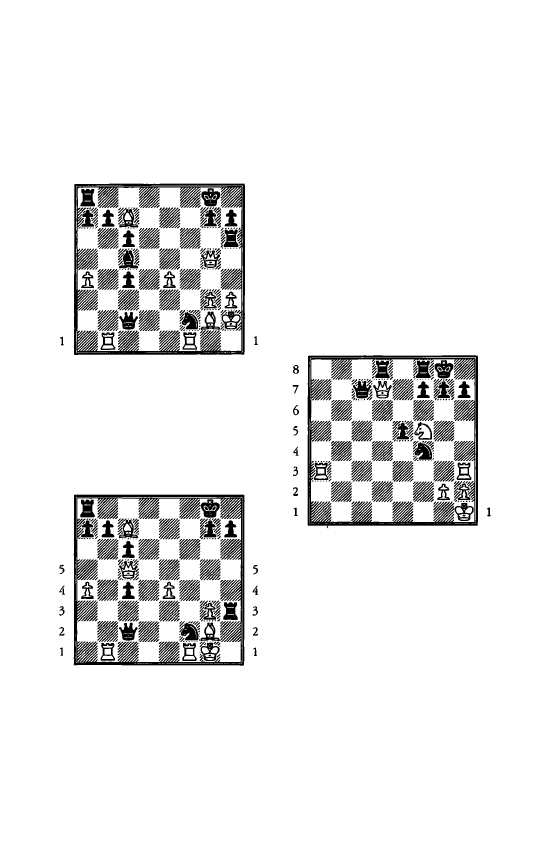
144 Solutions to Puzzles
28
Topalov - Kramnik
Linares 1997
a
b
c
d
e
f
g
h
8
8
7
7
6
6
5
5
4
3
2
a
b
c
d
e
f
g
h
4
3
2
White is mated after 27 WxcS?
Axh3+!
when 28 .txh3 lDg4+ 29
�g 1
'ii'h2
is mate or more cleverly
after 28 �gl
8
7
6
a
b
c
d
e
f
g
h
a
b
c
d
e
f
g
h
8
7
6
28
..•
Ahl +! 29 .txhl lDh3 mate.
After the game Topalov admitted
that he had missed 28 .
.
.l:lh1+ in his
earlier calculations when he went in
for the puzzle position. It is indeed
difficult to see this move, which
clears the way for the fatal knight
check on h3. In the game Topalov
declined to take the bishop but was
losing all the same after 27 llxfl
'ihfl 28 llfl Wd4
etc.
29
a
b
c
d
e
f
g
h
a
b
c
d
e
f
g
h
8
7
6
5
4
3
2
Taking the black queen is a bad
idea as it is mate on d 1. As well as
this White is two pawns down and
he has both his queen and rook
attacked. But one of the mates came
to the rescue: 1 lDe7+ �h8 2
l:xh7+! �xh7 3 l:b3+ lDxh3 4
'iVxh3 mate.
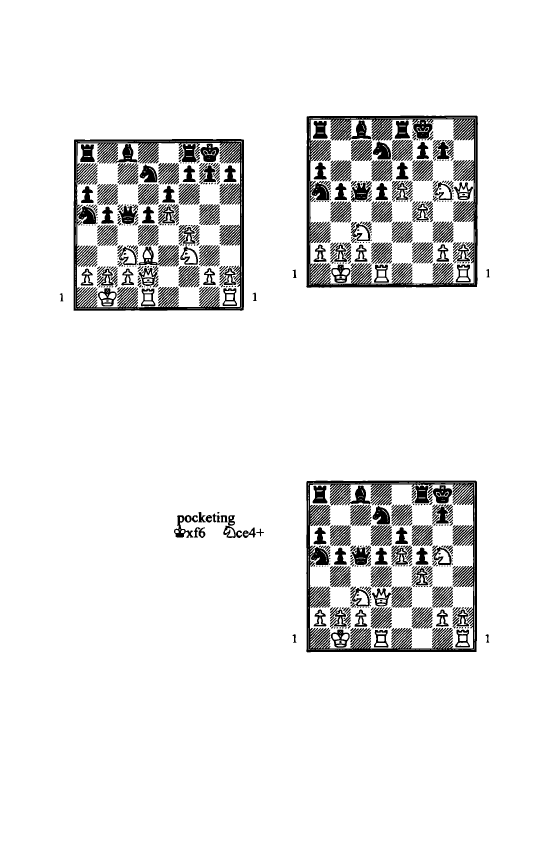
30
a
b
c
d
e
f g h
8
8
7
7
6
6
5
5
4
4
3
3
2
2
a
b
c
d
e
f g h
After 1 .txh7+ �xh7 2 li:)gS+
Black has three alternatives:
Firstly, if 2 ... �h6 3 'ii'd3! and
there is no answer to the double
threat of 4 'ii'h7 mate or a similarly
fatal check on h3, e.g. 3 ... g6 4
'ii'h3+ �g7 S 'ii'h7 mate.
Secondly, 2 ... �g6 3 'ii'd3+! is
lethal after 3 ... f5 (or 3 ... �h5 4
'ii'h3+ �g6 5 'ii'h7 mate) 4 'ii'h3!
(even better than
the
queen with 4 exf6+
5
dxe4 6 li:)xe4+ etc.). Again Black
has no good way to prevent a
killing check on h7 for if 4 ... li:)xeS
S 'ii'h7+ �f6 6 fxeS+ �xgS 7 li:)e2!
(the simplest move, taking away the
f4 flight square from the black
king) 7
.
.
.
:n
8 h4+ �g4 9 'ii'g6
mate.
Finally, 2 ... �g8 is the best way to
fight on. Then after 3 'ii'd3 l:r.e8 4
'ii'h7+ �f8
White has the clever
move S 'iVhS! when Black has no
good way to defend f7 as moving
the queen or rook to e7 allows mate
on h8.
Solutions to Puzzles 145
a
b
c
d
e
f g h
8
8
7
7
6
6
5
5
4
4
3
3
2
2
a
b
c
d
e
f g h
After S ... �e7 (or 5 ... g6 6 'ii'h7) 6
'ii'xf7+ �d8 7 li:)xe6+ l:r.xe6 8 'ii'xe6
Black has avoided mate but his
position has been wrecked.
And if 3 .
.
. f5
in this sequence then
White has an instructive win.
a
b
c
d
e
f g h
8
8
7
7
6
6
5
5
4
4
3
3
2
2
a
b
c
d
e
f g h
4 'ii'h3 l:e8
(or 4 ... l:d8 5 'ii'h7+
�f8
6 'ii'h8+ �e7 7 'ii'xg7+ �e8 8
'ii'f7 mate) S 'iVhS! winning time to
check on f7 by attacking the rook.
s
...
.tb7 6 'ii'f7+ �h8 7 l:d3
and
mate follows with l:h3.
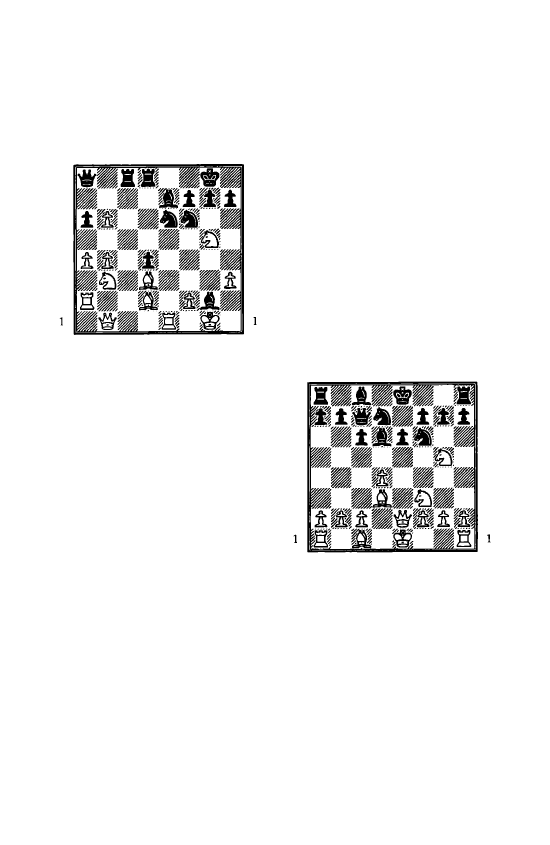
/46 Solutions to Puzzles
31
Korchnoi - Kotsur
Olympiad, Bled 2002
a
b
c
d
e
f g h
8
8
7
7
6
6
5
5
4
4
3
3
2
2
a
b
c
d
e
f g h
2
7 .i.xh7+
!
A forcing move as if now
27 .. .'�'h8 28 t£:Jxfl mate or
27 ... t£:Jxh7 28 'ii'xh7+ <it:ffl 29 'ii'h8
mate. It is possible that the immedi
ate 27 llxe6 amounts to the same
thing as Black probably has nothing
better
than
the
transposing
27 ... .i.xh3 28 .i.xh7+, but you
should always
try
to give your
opponent the fewest options.
27 ... <itf8 28 l:txe6!
The killer move as after 28 ... fxe6
29 1i'g6! Black has no way to guard
the f7 square. As I remark
elsewhere, it is a peculiarity due to
the checkmate rule that a whole
position can be ruined by the
inability to control a single square,
when otherwise, speaking of
development and material, every
thing else is looking fine.
Black battled on with 28
••.
J.xh3,
but he was losing on 'points'.
29 J.e4!
Dealing with the mate threat on
g2. The potential fork with b6-b7
now proves handy in tidying up the
win for Korchnoi.
29
...
t£:Jxe4 30 'ifxe4 J.xg5
If 30 ... fxe6 31 b7 wins, but not 3 1
'iVg6?? 'iVg2 mate.
31
b7 'ifb8 32 bxc8=1i' l:txc8 33
:es f5 34 l:lxf5+ 1-0
White emerges a piece up.
32
a
b
c
d
e
f g h
8
8
7
7
6
6
5
5
4
4
3
3
2
2
a
b
c
d
e
f g h
Yes, you can play 9 t£:Jxfl! when
Black is already dead lost as
9
•.•
�xti 10 t£:Jg5+ <ite7 (or 10 ... �:ffl
1 1 t£:Jxe6+ winning the queen) 11
'Wxe6+ �d8
(or 1 1 ...�:ffl 12 'iffl
mate) 12 t£:Jti is a smothered mate.
Therefore 8 ... 'iVc7 is a terrible
blunder-usual is 8 ... h6 to get
control of the g5 square and prevent
the second white knight from ever
landing there.
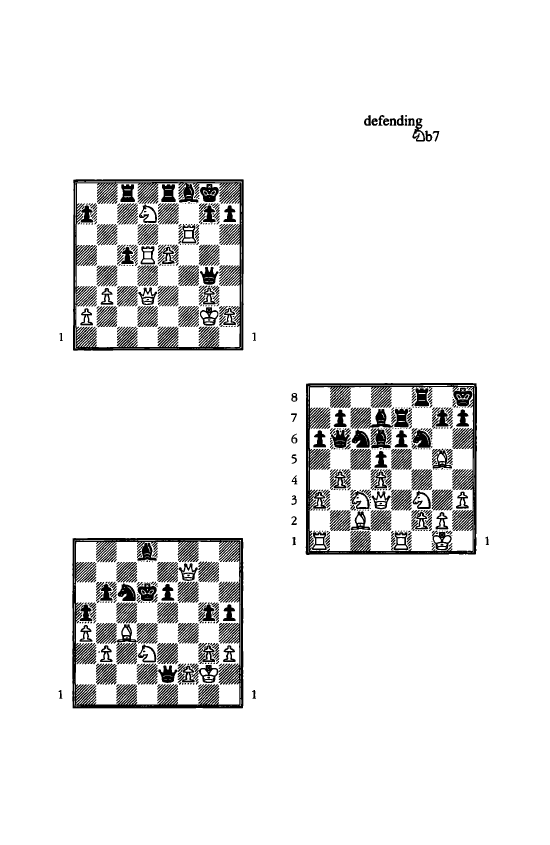
33
Beliavsky - Wu Sbaobin
Olympiad, Bled 2002
a b c d e f g h
8
8
7
7
6
6
5
5
4
3
2
a b c d e f g h
4
3
2
White won with 29 l:h6! l-0 The
h7 pawn has become indefensible
because of 29 ... gxh6 30 lllf6+
winning the queen. Therefore
'it'xh7+ will be crushing.
8
7
6
5
4
3
2
34
Christiansen - Mosquera
Olympiad, Bled 2002
a b c d e f g h
a b c d e
f g h
8
7
6
5
4
3
2
Solutions to Puzzles 147
After SO lilcS! the black queen
can't remain
the
e6
pawn
for if 50 ... 'it'e5 51
is mate,
while 50 ... llle5 51 'it'xe6+ followed
by 52 .i.xe2 costs him the queen.
Black tried SO
.•.
Wc2
but it was mate
in three: Sl lllb7+ �eS 52 'it'xe6+
�d4 53
'it'e3 mate. I hope you
noticed that the f2 pawn wasn't just
there to shield the white king!
35
V.Karpov - Rudykh
Novosibirsk 2002
a b c d e f g h
a b c d e f g h
8
7
6
5
4
3
2
White won with 20 .i.xf6 gxf6
(he has to defend h7 with the rook
as if 20 ... l:xf6 2 1 'it'xh7 mate) 21
lllxdS!
and Black resigned as he
loses the exchange and a pawn or
else is mated after 2 l...exd5 22
l:xe7 lllxe7 23 'it'xh7.
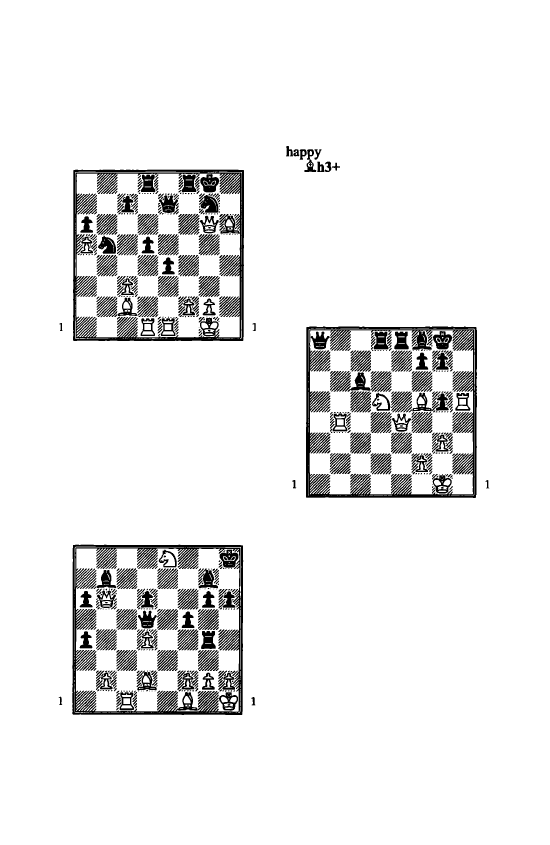
148 Solutions to Puzzles
36
Ramesh - D.Ledger
Torquay 2002
a
b
c
d
e
f
g
h
8
8
7
7
6
6
5
5
4
3
2
a
b
c
d
e
f
g
h
4
3
2
White forced open the diagonal
with 29 l:bd5! llxd5 30 .i.xe4
when the queen and bishop formed
a lethal battery against the h7
square. The game ended 30
•••
l:le5
31 'ifh7+
t:/;f1
32 .i.xg7 llh5
(or
32
. .
.'iti>e6 33 i.d5+! followed by
taking on e5) 33 i.g6 mate.
37
a
b
c
d
e
f
g
h
8
8
7
7
6
6
5
5
4
4
3
2
a
b
c
d
e
f
g
h
3
2
The only good and winning move
is c): l f3. All the other alternatives
allow the combination l ... 'ifxg2+!!
2 i.xg2 i.xg2+ 3 �gl
Now you
might think that Black would be
with a perpetual check after
3
. • .
4 �hl i.g2+
etc. but he
can do even better: 4
•.•
i.e4+! 4 �fl
i.d3+ 5 �el llgl mate!
Here the
villain is the white bishop on d2
which cuts off the flight of the
white king.
38
a
b
c
d
e
f
g
h
8
8
7
7
6
6
5
5
4
4
3
3
2
2
a
b
c
d
e
f
g
h
If White can get his queen to h7 it
will be mate. There are two ways of
doing it:
l Ah8+ �xh8 2 'ifhl+ 'itg8 3
'ifh7 mate
and l i.h7+ �h8 2
i.g8+ �xg8 3 'ifh7 mate.
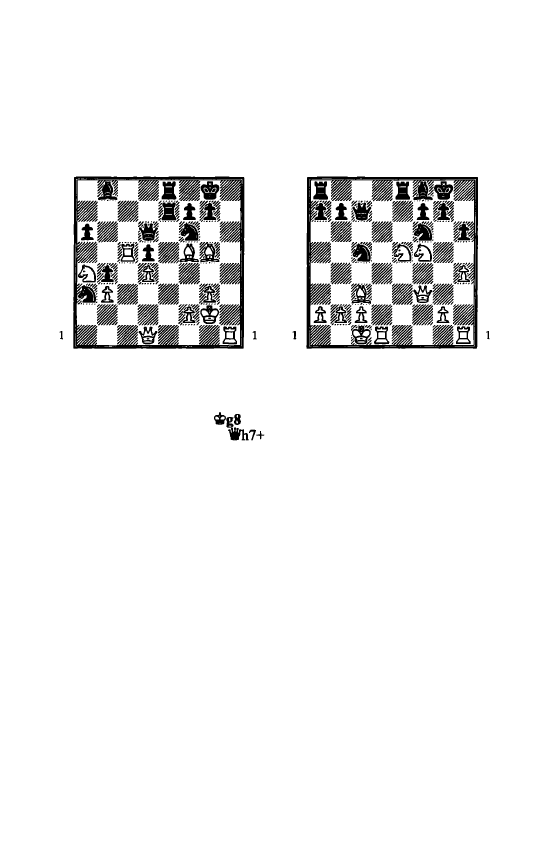
39
Karpov
-
Morovic Fernandez
Las Palmas 1994
a
b
c
d
e
f
g
h
8
8
7
7
6
6
5
5
4
4
3
3
2
2
a
b
c
d
e
f g
h
Karpov won time for a decisive
breakthrough on the h file with 32
llb8+!! �xb8 33 ftl +
34
.ixf6
If now 34
. .
. 'ifxf6 35
ct>:ffi
36 Wh8 is mate, while 34 ... g6
35 'ii'h8 mate doesn't help either.
Black
tried
the
desperate
34 ... 'ifxg3+
but resigned after 35
fxg3 l:[e2+ 36 �h3 gxf6 37 �g4
1-0
Solutions to Puzzles 149
40
Adams - Leko
Linares 1999
a
b
c
d
e
f
g
h
8
8
7
7
6
6
5
5
4
4
3
3
2
2
a
b
c
d
e
r g
h
After 20 �xb6+ gxb6 White
didn't take the knight on f6. Instead
he prevented Black from finding
time for .ig7 with 21 �g4! �xg4
22 'ii'xg4+ �h7 23 'iff5+ �g8 24
'iff6!
when the queen and bishop
were the usual deadly duo. The
game ended 24
•••
�h7 25 'ifh8+
�g6 26 h5+
and Black resigned.
The last word goes to the white
bishop after 26
. . .
'it>f5
27 'iff6+ 'it>g4
(or 27 .
.
. �e4 28 'ii'O mate) 28 'iVO+
�g5 29 .if6 mate!
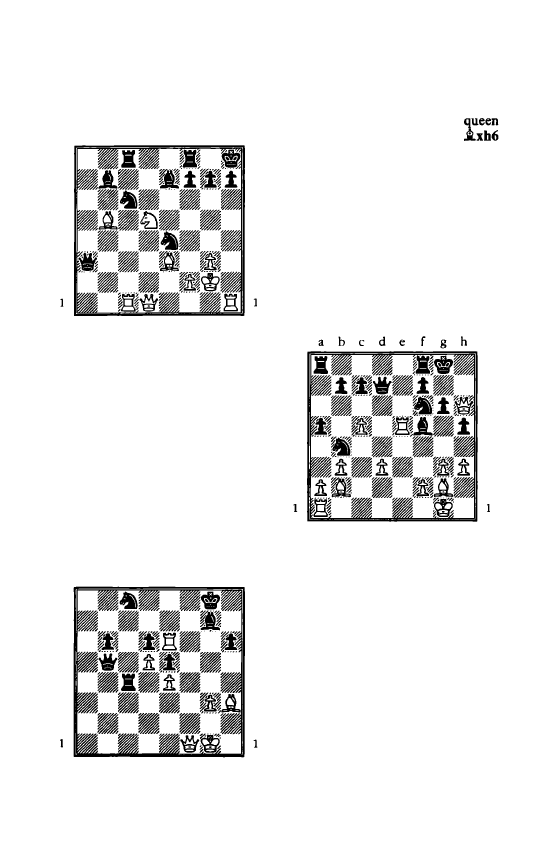
150 Solutions to Puzzles
41
a
b
c
d
e
f
g h
8
8
7
7
6
6
5
5
4
3
2
a
b
c
d
e
f
g h
4
3
2
I
l:lxh7+ 'it'xh7 2 ii'h5+ 'iti>g8 3
lthl f5 4
i.c4! Black has no answer
to the threat of discovered check,
for example 4
...
l:tfe8 5 ltlxe7+
(another way to do it is 5 ltlf6+,
when there are four mates on the
next move!) 5
. . .
'iti>f8
when you can
choose between 6 'ikf7 mate and 6
ltlg6 mate.
42
Kasparov - Smirin
Moscow 1988
a
b
c
d
e
f
g h
8
8
7
7
6
6
5
5
4
4
3
3
2
2
a
b
c
d
e
f
g
h
Kasparov wanted to clear the way
for a decisive attack by his
and bishop with 39 l:lxh6!!
40 i.e6+ �h8 41 ii'f6+ 1-0
It is
mate after both 4I...i.g7 42 ii'h4+
i.h6 43 'ikxh6 and 4l...�h7 42
'ii'f7+ i.g7 43 i.f5+ 'it>h8 44 'ikh5+
'it>g8 45 i.e6+ <iti>f8 46 ii'fl.
8
7
6
5
4
3
2
43
Speelman - Koneru
Torquay 2002
a b
c
d
e f g h
Speelman played 23 i.e4! l:ta6
8
7
6
5
4
3
2
If 23 ... i.xe4 24 l:r.xh5! ! when
24 ... ltlxh5 25 ii'h8 is mate, or
similarly 24 ... gxh5 25 i.xf6 and
mate is unstoppable.
24 l:.xf5! gxf5 25 'iVg5+ 'iPh8 26
i.xf5
and Black resigned. A
possible finish is 26 ... 'ikd8 27 'ikh6+
�g8 28 i.xf6 'ii'xf6 29 'ikh7 mate.
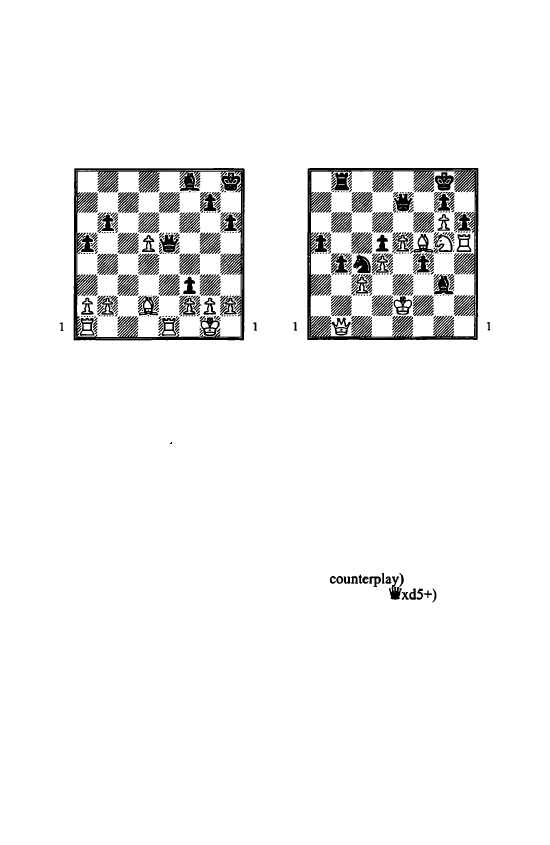
44
Adams - Seirawan
Bermuda 1999
a b c
d
e
f
g
h
8
8
7
7
6
6
5
5
4
4
3
3
2
2
a b c
d
e
f
g
h
If 27 .. .'ihd5 28 .i.f4 is unclear,
but Adams had forgotten about
27 .. .'ifd4!
which both attacks the
bishop and threatens our standard
mate with 28 ... 'ifg4 29 g3 'ii'h3. He
resisted with 28 g3 'ifxd2 29 lladl
'ifb4 30 a3 but couldn't hold the
game. Instead of 27 life 1 ?? White
should have tried something like 27
:fd1 .i.d6 28
gx:O !
'ifxh2+
29 �n
when his king is safe in the centre
as it is no longer menaced by the
killer pawn.
Solutions to Puzzles 151
45
Ganguly - Barua
Nagpur 2002
a b
c
d
e
f
g
h
8
8
7
7
6
6
5
5
4
4
3
3
2
2
a b c
d
e
f
g
h
Black found himself being mated
after 40
••.
hxg5?? 41 'ifhl .i.h4
(or
else 42 llh8 mate) 42 'ifxd5+ and
here Barua resigned before 42 ... �f8
43 :hs. He had quite forgotten that
after 41 'ii'h1 the power of the white
queen extends to the d5 square as
well
as
supporting the rook on the h
file. Instead Black should have
declined the piece offer, for
example with 40 ... llb6 (preventing
4 1 .i.e6+ and 42 .i.xd5) when 41
'ii'h1 lbe3 42
c4
(he has to
try
to get
some
42 ... b3 (not
42 ... lbxc4?? 43
43 cxd5
lbxfS and Black should win despite
the messy nature of the position.
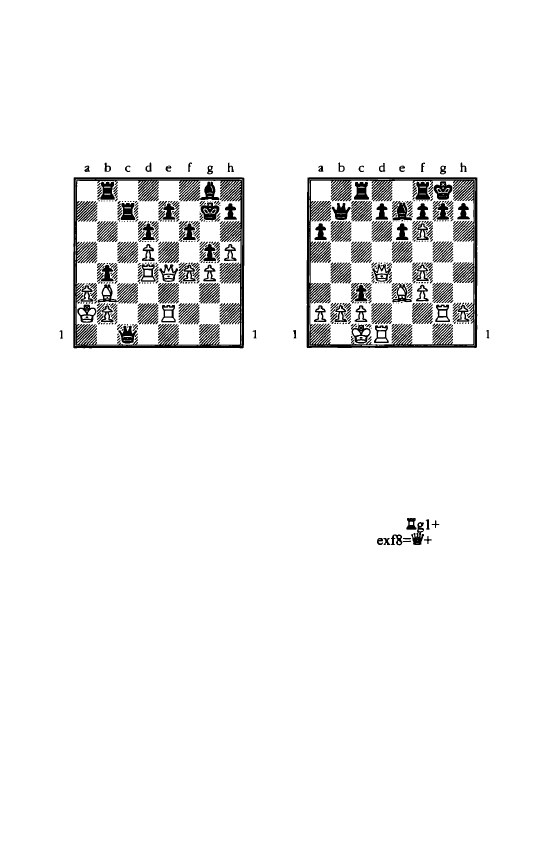
152 Solutions to Puzzles
46
Bruzon - Felgaer
Olympiad, Bled 2002
8
8
7
7
6
6
5
5
4
4
3
3
2
2
a
b
c
d
e
f
g h
30 l:[c4!
This deflects the rook from the
defence of e7 with gain of time by
attacking the black queen.
30 ... lbc4
Black has absolutely no choice as
all other moves will leave him at
least a rook down.
31 1fxe7+
i.fT
If the king moves he is mated
with 32 1fxf6.
32 h6+
and Black resigned.
If 32 ... �g6 33 f5+ Cit>xh6 34
_.xf6+ i.g6 35 .l:.h2 mate or
similarly 32 .. .'�xh6 33 _.xf6+
�
g6
34 .l:.h2 mate. That leaves 32 ... �g8,
but after 33 •xf6 mate is inevitable
on g7. The killer pawn has the last
laugh.
47
Ehlvest - Andersson
Belfort 1988
8
8
7
7
6
6
5
5
4
4
3
3
2
2
a
b
c
d
e
f
g h
The game ended 18 .l:.xg7+ �h8
19 .l:.g8+!! 1-0.
White gives up the
rook to force a win with checks, in
order to prevent Black carrying out
his own threat of mate on b2.
Here's what might have happened if
Black had carried on:
19 ... ltxg8
If 19 ... Cit>xg8 20
Cit>h8 21
fxe7+ f6 22
ltxf8 23
_.xc3 and with an extra piece White
wins easily.
20 fxe7+ .l:.g7 21 Z:g1 !
The pin on the g file and the
passed pawn on e7 are such a lethal
combination that White allows
Black to carry out a queen check on
b2. Instead 21 1fxc3 would lead to
mate after 2 l . .. .l:.xc3? 22 e8='iV+
.l:.g8 23 i.d4+ etc. but Black could
instead break the pin with 21...Cit>g8!
21.
••
1fxb2+ 22 �d1 �I+ 23
i.ct llcg8
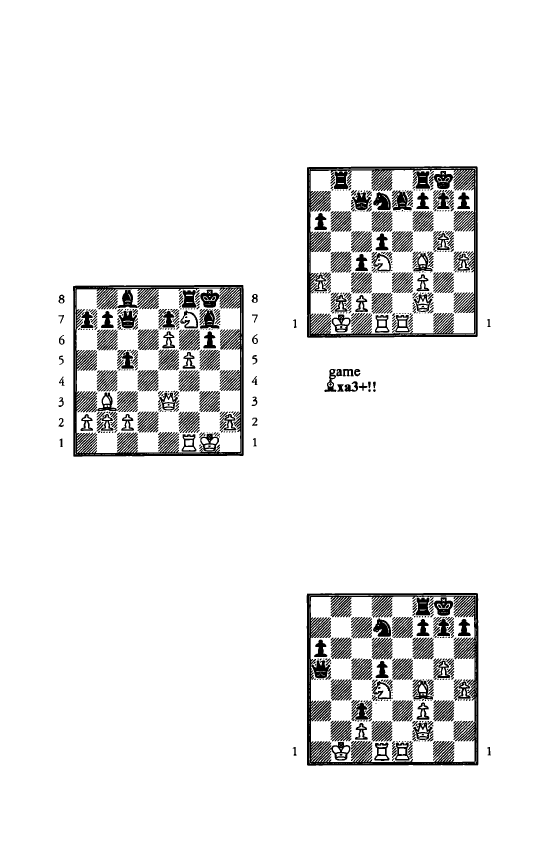
The only move.
24 'ifxg7+ :xg7 25 e8='if+
Promoting to a rook also wins.
25
•.•
:gs 26 'ii'xg8 mate.
48
Kislov - Zoltek
Polanica Zdroj 1995
a
b
c
d
e
f
g
h
a
b
c
d
e
f
g
h
White found another way to
exploit the killer pawn:
25 f6! i.xf6
If 25 ... exf6 the quiet bishop on b3
comes to life: 26 e7 l:.e8 27 ll:ld6+
�h8 28 ltlxe8 and wins.
26 1:.xf6! exf6 27 'ifh6 1-0
Black has been deprived of the
defender of the dark squares around
his king. There is no answer to 28
'ii'h8 mate
as
27 ... :xt7 28 exf7+
costs him the queen.
Solutions to Puzzles 153
49
Kasimdzhanov - Ye Jiangchuan
Olympiad, Bled 2002
a
b
c
d
e
f g
h
8
8
7
7
6
6
5
5
4
4
3
3
2
2
a
b
c
d
e
f
g
h
The
went 23
•••
l:.xb2+! 24
�xb2
If you didn't see this follow up to
the sacrifice then the verdict has to
be (b)-a complete waste of a rook.
25 'itxa3
If 25 �a2 'ifa5 leaves White
defenceless, e.g. 26 i.d2 'ii'a4 and
then a discovered check with the
bishop in conjunction with l:.b8 etc.
is decisive.
25 .. .'.a5+ 26 �b2 c3+ 27 �bl
a
b
c
d
e
f
g
h
8
8
7
7
6
6
5
5
4
4
3
3
2
2
a
b
c
d
e
f
g
h
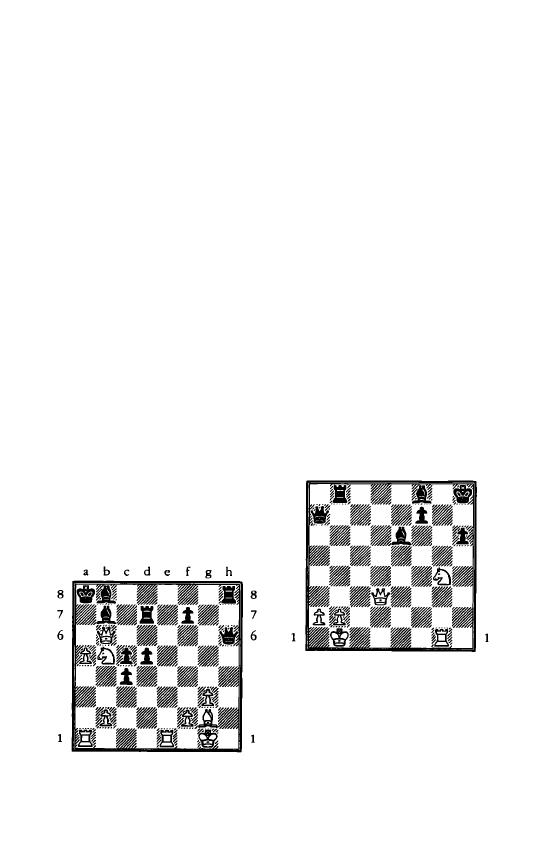
154 Solutions to Puzzles
Ready to answer 27 ... 'ifb4+ with
28 li:)b3 or 27 ... 1Va3 with 28 .tel
when Black's attack runs out of
steam, e.g. 28 ... l:tb8+ 29 li:)b3
:xb3+ 30 cxb3 'ii'xb3+ 3 1 'iPa 1 c2
and White mates with 32 l:te8+ ll)ffi
33 l:txffi+ 'iPxffi 34 'ii'c5+ 'iPe8 35
_.c8+ 'iPe7 36 l:[el
In that case the verdict is (c)-the
combination is interesting but
ultimately fails.
27 ... 'ifb6+!
The point of Black's combina
tion. The white knight has to retreat
to b3 to stave off 28 ... 'ifb2 mate,
but this will leave the queen en
prise on f2! So we are well into the
territory of (a)-the sacrifice is
winning!
After 28 li:)b3 'ii'xf2 White battled
on grimly, but with only a rook and
bishop for queen and two pawns he
was unable to save the game.
5
4
3
2
so
Kasparov - lvanchuk
Linares 1994
a
b
c
d
e
f
g
h
5
4
3
2
30 l:te8!! 'ii'h2+
The threat was 3 1 'iVa? mate, and
if 30 .. .llxe8 he drops the queen.
Also hopeless was 30 ... 'ii'xb6 31
axb6+ .ta6 32 l:lxa6+ etc.
31
'iPfl
If now 31 ... l:lxe8 32 a6! and
despite Black's extra rook the killer
pawn triumphs: 32 ... .tc8 33 'ii'c6+
.tb7 34 axb7 mate.
So Ivanchuk gave up his queen
with 31 .. .'.,xg2+ 32 'iPxg2 d4+ but
lost after 33 'ii'xb7+! l:[xb7 34
l:lxh8 l:lxbS 35 a6 rj;a? 36 l:lf8
l:lxb2 37 l:lxti+ 'ifila8 38 a7 c3 39
llf8 1-0
The final triumph of the killer
pawn!
8
7
6
5
4
3
2
51
a
b
c
d
e
f
g
h
a
b
c
d
e
f
g
h
8
7
6
5
4
3
2
1 'ii'h7+! 'iPxh7 2 li:)f6+ 'iPh8 3
l:lg8 mate

52
Leko - Adams
Dortmund 1996
a b c d e f g h
8
8
7
7
6
6
5
5
4
4
3
2
a b c d e f g h
3
2
After 29 ... h5?? Leko could have
won with 30 l:txe5+! fxeS (or
30
.
.
.
�f8
31 l:txd8+) 31 .txg5+ c;ttB
32 l::.xd8+.
53
Wells - Berry
Torquay 2002
a b c d e f g h
8
8
7
7
6
6
5
5
4
4
3
3
2
2
a b c d e
f g h
Solutions to Puzzles 155
White would be worse
if
he just
moved the queen and if 45 l:tg8
.i.d8 blocks off the mate on c8. But
45 Axf6!
looked great as the game
ended 45
.•.
l:.xe2 46 l:tf8 l:a2+ 47
�bJ 'iffl
(what else?) 48 l:tc8
mate:
apparently there was no way
for Black to escape from the
knight/rook mate. In fact, Black
missed a fantastic way to save
himself. In this sequence after 46
l:f8
8
8
7
7
6
6
5
5
4
4
3
3
2
2
a b c d e f g h
he could have played 46 ... l:ta8!!
the rook is less useless off the board
than on it, as 47 l:xa8 (if 47 l£Jxa8+
�d7 and the king escapes from the
mating pattern) 47 .. Jla2+ 48 c;tbJ
l:b2+! 49 �xb2 'iffl+ 50 �bJ
(or
50 .tc2 'ifxc2+) so
. .
. 'ifb2+ 51
c;txb2
draws by stalemate!
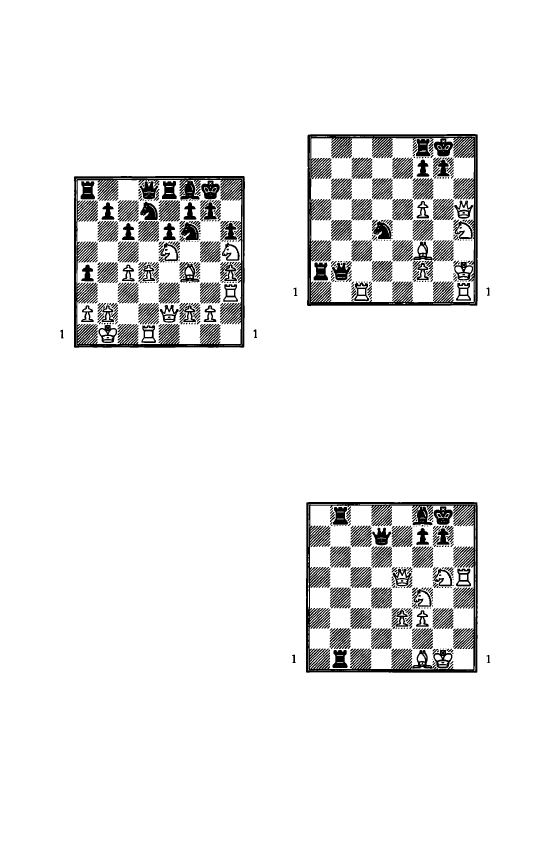
156 Solutions to Puzzles
8
7
6
5
4
3
2
54
Kasimdzhanov - Rausis
Olympiad, Bled 2002
a
b
c
d
e
f
g
h
a
b
c
d
e
f
g
h
8
7
6
5
4
3
2
If 18 l:[g3 g6 the black king
position looks flimsy, but there is
no obvious win, for example if 19
lLlxg6 fxg6 20 :xg6+ �f7 holds
on. Instead in the game 18 i..xh6!
just won a pawn as Black would be
mated after either 18
•..
gxh6 19
l:[g3+ �h7 20 'ii'c2+! �h8 21 lLlxt7
mate
or 18 ... lLlxh5 19 'ii'xh5 gxh6
20 'ii'xt7+ �h8 21 lLlg6 mate.
In the game Black followed the
second of these lines as far as 19
'ii'xh5, then grovelled on with
20 ... lLlxe5 20 dxe5 'ii'c7 21 l:[g3
when White had both an extra pawn
and the initiative.
55
a
b
c
d
e
f
g
h
8
8
7
7
6
6
5
5
4
4
3
3
2
2
a
b
c
d
e f g
h
After 1 'ii'h8+! �xh8 2 lLlg6+
Black can choose how he is mated:
If 2 ... �g8 3 lLle7+ �h7 4 �g2
mate
or 2 ... �h7 3 �g2+ �g8 4
:bs
mate
(or 4 lLle7 mate) or
2 ... fxg6 3 �g2+ �g8 4 i..d5+
:n
5 :cs mate.
8
7
6
5
4
3
2
56
a
b
c
d
e
f
g
h
a
b
c
d
e
f
g
h
8
7
6
5
4
3
2
First White breaks the pin on his
bishop: 1 'ii'xb8! ltxb8 (if t...:xfl +
2 'ifixfl 'ii'dl+ 3 �f2 'ii'd2+ 4 lLle2
etc.). Then he mates: 2 iLlg6! fxg6 3
i..c4+ 'ii't7 4 i..xf7 mate.
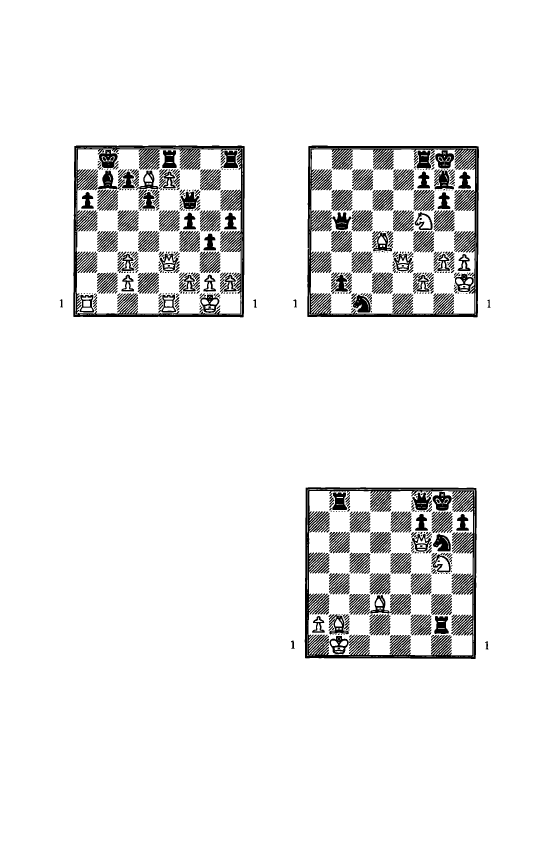
57
a
b
c
d
e
f
g
h
8
8
7
7
6
6
5
5
4
4
3
3
2
2
a
b
c
d
e
f
g
h
Not bad is
I
lleb l , when if
l .
.
.
l:xe7 White has a mate in three:
2 llxb7+! �xb7
3
l:bl + 'it.'a8 4
.tc6 mate. Capablanca chose the
more forceful 1 l:xa6! (threat mate
on a7) t.. . .txa6 2 l:bl+ .tb7 3
.tc6 l:.xe7 (if
3
.
.
. �c8 4 l:xb7 l:.xe7
would transpose) 4 l:xb7+ �c8 5
l:a7!
and Black resigned
whatever Black does it will be 6
l:a8. Spotting this combination is
child's play for a World Champion.
(Capablanca-Pulvermacher,
New
York 1907)
Solutions to Puzzles 157
58
a
b
c
d
e
f
g
h
8
8
7
7
6
6
5
5
4
4
3
3
2
2
a
b
c
d
e
f
g
h
White mates with I 'ii'h6! If now
I
..
.
.txh6 2 lDxh6 mate, or equally 2
lDe7 mate.
The fact that g7 is attacked three
times paralyses any possible
defence .
8
7
6
5
4
3
2
59
a
b
c
d
e
f
g
h
a
b
c
d
e
f
g
h
8
7
6
5
4
3
2
It is mate in two: 1 'ii'h8+ lDxh8 2
.txh7 mate.
Incidentally, in some
books it says that a pinned piece
loses its power, but the bishop on
b2 is doing a pretty good job in
preventing l...�xh8!
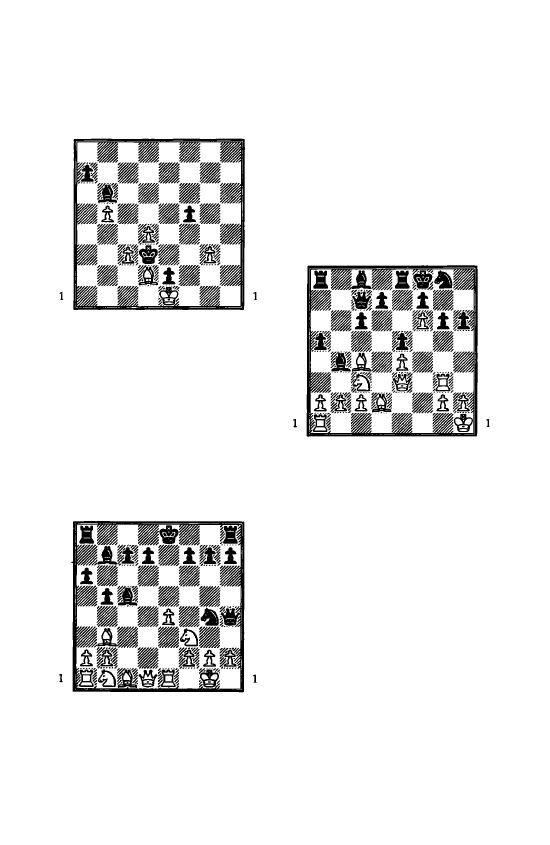
/58 Solutions to Puzzles
60
a
b
c
d
e
f
g
h
8
8
7
7
6
6
5
5
4
4
3
3
2
2
a
b
c
d
e
f
g
h
A
fine effort by Capablanca. He
exploited the superior mobility of
his bishop by opening a fatal diag
onal against the trapped white king:
l. .. .i.e7! 2 .i.f4 .i.aS 3 .i.d2 f4! 4
gxf4 .i.d8!
and White resigned as
there is no good answer to
5
.
.. .i.h4
mate. (Ettlinger-Capablanca, New
York, 1907)
8
7
6
5
4
3
2
61
a
b
c
d
e
f
g
h
a
b
c
d
e
f
g
h
8
7
6
5
4
3
2
No, as 12
•••
'ii'xfl+ 13 �h1
'ii'gl+! 14 l:bg1
(or 14 il)xgl)
14
••.
il)fl
is mate. Incidentally,
White should have played 10 h3 in
the opening sequence, when after
the knight retreats
I I
cxd4 is
excellent for him. In playing 10
cxd4 immediately he fell for an
opening trap.
8
7
6
5
4
3
2
62
a
b
c
d
e
f
g
h
a
b
c
d
e
f
g
h
8
7
6
5
4
3
2
19
llxg6!
with mate by the two
bishops after 19
.•.
fxg6 20 'ii'xh6+
il)xb6 21 .i.xh6
or with bishop and
rook after 19
...
dS 20 'ii'xh6+ il)xh6
21 .i.xh6.
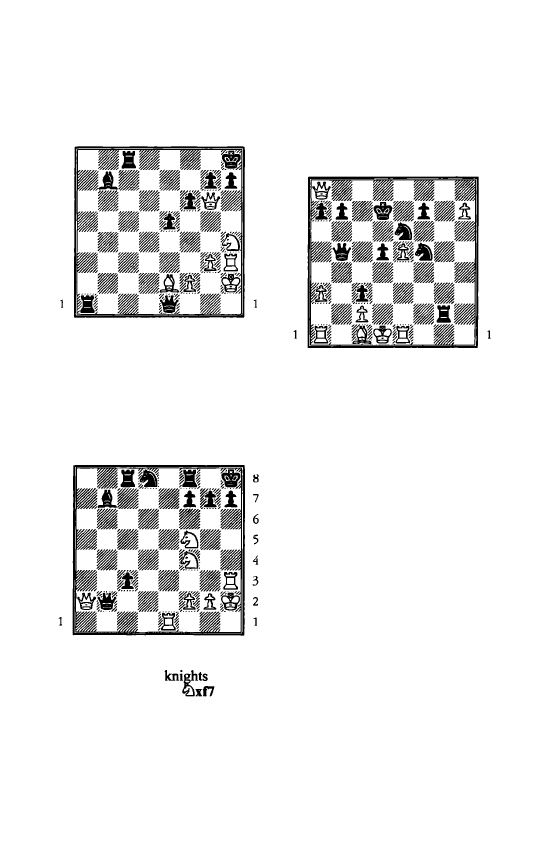
63
a b c d
c
f g h
8
8
7
7
6
6
5
5
4
4
3
3
2
2
a b c d e f g
h
It is mate in four moves: 1 'ife8+!
.l:l.xe8 2 �g6+ 'iPg8 3 ..tc4+ .l:l.e6 4
�xe6 mate.
8
7
6
5
4
3
2
64
a b c d e f g h
a
b c d e
f g h
Here the two
are the
heroes after 1 WVxt7!
(or else
it is a back
rank
mate after 1 ... .l:l.xf7
2 lieS+) 2 �g6+ Wg8 3 �fe7
mate.
Solutions to Puzzles !59
65
Short - Neelotpal
Dhaka 1999
a b c d e f g h
8
8
7
7
6
6
5
5
4
4
3
3
2
2
a b
c
d
c
f g h
If
24 h8='ii'
White is unexpected
ly mated by 24
. . •
'ifd3+!! 25 cxd3
c2.
Therefore Short tried to shore
up the c2 square with 24 lla2 but
this allowed an alternative mate:
24 ... �e3+! 25 ..txe3 'ifh1 + 26 .tel
.:.d2 mate!
The diagram position is in fact
winning for Black in view of his
irresistible attack.
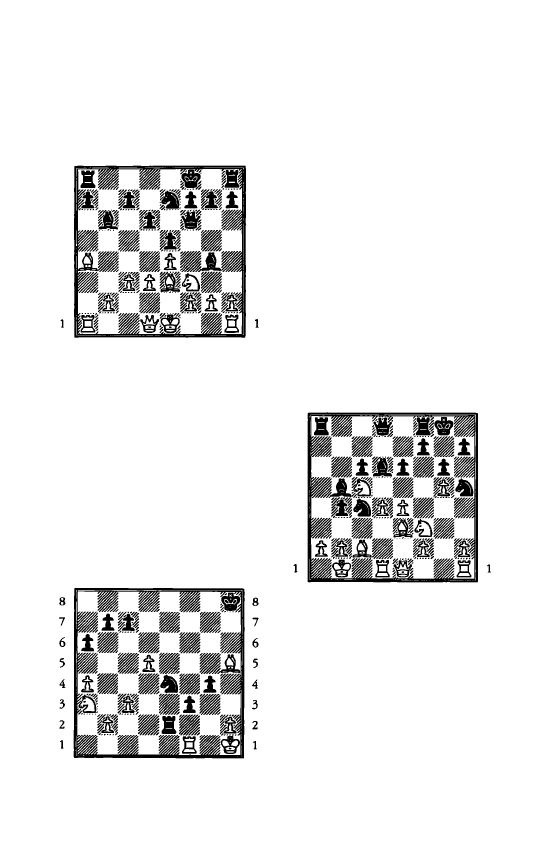
160 Solutions to Puzzles
8
7
6
5
4
3
2
66
Short - Kupreiehik
Hastings I98I
a
b
c
d
e
f g
h
a
b c
d
e
f g
h
8
7
6
5
4
3
2
Further evidence that Legall's
mate has evolved into a strong
tactical device. Here Short played
14 lbxe5!
Black now loses a piece
after I4 ... .i.xdi IS lbd7+ c;i{g8 I6
lbxf6+ gxf6 I7 �xdl. If instead
14 ... .i.xe3 I S lbd7+ wins just the
same. So he had to make do with
14 ... dxe5
but eventually lost after
15 'ihg4.
67
a
b
c
d
e
f g
h
a
b
c
d
e
f g
h
This position is from another
game by Capablanea, who forced
mate as follows:
l. .. lbtl+ 2 ¢'gl
If 2 :X£2 l:e 1+ 3 l:fl llxfl mate.
2
..•
lbh3+ 3 ¢'hi
It seems as though the game will
end in repetition after 3 ... lbf2+ 4
�gi but...
3
.••
llg2! 4 .i.xg4 llgl+! 5 l:xgl
ibn
mate.
68
Dao Thien Hai - McDonald
Budapest I996
a
b
c
d
e
f
g
h
8
8
7
7
6
6
5
5
4
4
3
2
a
b
c
d
e
f
g
h
3
2
2l ... llxa2! 22 �xa2 'iVa5+ 23
�b3 .i.xe5
Now 24 dxcS 'iVa4 is mate, but
my opponent confidently played 24
llal
attacking the queen. Evidently
he thought this refuted the attack,
but after 24 ... lbb6! he resigned. It
is mate in one with 25 llxa5 .i.c4 or
in two with 2S .i.d3 .i.a4+ 26 �a2
.i.c2.
Wyszukiwarka
Podobne podstrony:
Mastering Checkmates
dane mastertig2300mls
01 Certyfikat 650 1 2015 Mine Master RM 1 8 AKW M
MasterPlanRekrutacjaGrupowa2010
2 3 Unit 1 Lesson 2 – Master of Your Domain
Mastercam creating 2 dimensio Nieznany
master
Master Vet
07 Aneks 1 Certyfikat 650 1 2015 Mine Master RM 1 8 AKW M (AWK) (nr f 870 MM)
Mutants & Masterminds Archetypes Energy Being
Mastercook 3400 3455 3469 instrukcja
instrukcja mastercook 3400
Mutants & Masterminds Master Splinter
Dungeons and Dragons 3 5 Dungeon Master's Sheet
Prezentacja Master Of Hypnotic Learning 1 edycja
więcej podobnych podstron