
www.elementkjournals.com
In This Issue
Freeze Frame:
Capture the rocket’s
red glare with your
digital camera
Get up close and
personal with your
digital photographs
Make quick color
changes using
brushes in Photoshop
Exposure bracketing
helps get the right
shot every time
Get the most from
your digital camera’s
movie mode
The Contact Sheet:
Digital versus film:
The great debate
Capture the rocket’s red glare
with your digital camera
by Stephen Dow
From pixels to print: Your guide to better digital image capturing and editing
Freeze Frame
D
igital cameras aren’t known for their low-light exposure ability. In fact,
they can be quite troublesome when trying to take nighttime shots, let
alone shots of a fireworks show. The mixture of a dark sky and bright
streaks of color can wreak havoc on your camera’s image sensor. Tradi-
tional photographers have devised some reliable techniques for shooting fire-
works, but these practices only partially apply in the digital world. To get great
shots of your next fireworks show, there are some special steps you can take to
make sure your fireworks images get the oohs and aahs you deserve.

Exploring Digital Photography
2
Get on with the show
In this article, we’ll tell you how to get some
great shots from your digital camera at your next
fireworks show. First, we’ll discuss the chal-
lenges involved when a digital camera comes
across such brief flashes of light against a dark
background. Next, we’ll walk you through the
complete process of shooting the fireworks show,
from setup and location selection to exposure
settings and framing. Finally, we’ll look at what
you can do in your image-editing application to
give your fireworks images some more punch.
Figuring out fireworks
Fireworks are unpredictable, short-lived, volatile,
erratic, etc. Capturing a good photograph of a
firework burst takes as much luck as it does
planning. However, understanding the chal-
lenges when shooting a fireworks show is the
key to getting quality images.
The biggest problem when shooting at night
with a digital camera is the buildup of noise
when the sensor is exposed to light for a long
period of time. This isn’t a problem with film
cameras, where the traditional method is to
open the shutter, cover the lens with something
dark, and wait for the fireworks burst to remove
the dark object and expose the film. But this
process doesn’t work so well with a digital cam-
era, as the image sensor can produce noise even
if no light is reaching it. So, getting good shots at
a fireworks show is largely a matter of using
your camera’s settings to properly expose the
image without developing any nasty noise.
Setting the scene
The process of capturing a spectacular fireworks
display begins well before the show starts. One
of the most important steps in this process is
selecting your shooting location. Fireworks
shots look best when they fill the frame but
don’t extend beyond it. While you could always
crop out extra image space in post-processing,
attempt to use as much of your image sensor as
possible to get the best resolution and detail. To
do this, try to get as close to the action as possi-
ble without putting yourself in harm’s way.
Anticipate where the fireworks will explode, but
know that you’ll probably have to make adjust-
ments once the show starts. Position yourself
upwind from where the fireworks are being
launched and detonated, as shooting through a
thick wall of smoke will do nothing good for
your image.
A steady footing
For the best results, place your camera on a tri-
pod or other firm foundation. We can’t stress
this enough—your shutter is going to be open
longer than usual to capture enough light for the
exposure. This long shutter time also exposes
any camera movement, turning your bursts of
light into squiggles! If your digital camera came
with a remote control, consider using it to elimi-
nate any camera shake that can occur when you
press the shutter button.
Adding more than the sky
While shooting fireworks against the dark night
sky is dramatic enough, you may want to con-
sider adding other objects
into your scene, as shown in
Figure A
. If you’re shooting
a show in a downtown area,
consider adding a landmark
to help set the scene and
encourage some interesting
reflective possibilities. Water
creates beautiful reflections
of the show and can create
some captivating mirror
images. Also, keep in mind
that the audience may be as
interesting as the show. Sil-
houette the crowd against
the explosions, or turn your
camera around and capture
the glow of a burst on their
faces. We’ve even seen some
stunning overhead shots of
fireworks shows from air-
Figure A:
By taking the time to set the scene, you can create some memorable shots.

www.elementkjournals.com
3
July 2002
planes. While we don’t think you have to go to
this extreme, selecting your shooting position
thoughtfully can yield some effective shots.
Getting your camera ready
First things first—you’re going to need memory,
and lots of it. Since your fireworks images will
probably contain as many misses as hits, shoot
as many images as possible. Use the largest
memory card you have and shoot until you’re
out of memory. Also, make sure you have a fully
charged battery in the camera—nothing is worse
than running out of juice before the finale!
Next, we’re going to go over some other set-
tings to be aware of when shooting fireworks.
While every digital camera is different, use these
guidelines to make smart choices for what’s the
best combination of settings to get the most from
your camera.
Selecting your image size
When shooting fireworks, shoot at the highest
resolution possible. If your camera has an
uncompressed RAW format option, go with that.
Otherwise, select the image setting that will
compress your image the least. Compression can
skew colors and reduce saturation as well as add
unwanted noise to your image, particularly in
nighttime skies. Using the image sensor to its
fullest potential also allows you extra image size
in case you need to crop your image later.
Note:
The trade-off of using a less compressed
image format (such as RAW or TIFF) is the
time it takes to write the file to your storage
media. If you find your shots taking too long
to save, go a step down to speed things up.
Focus on what?
It’s basically impossible to predict the focal range
of a fireworks burst. For that reason, it’s best to
give your camera the maximum range of latitude
Figure B:
Noise can
build up fast at night, so
be aware of your exposure
settings to keep noise at a
minimum.
when it comes to focal distance. The best selec-
tion is to set the focusing scale to infinity, but
many digital cameras don’t offer this option. Try
to avoid using the autofocus option, as your shot
will be gone by the time your camera focuses on
the burst. If you can set your camera for a spe-
cific focal range, estimate your distance from the
fireworks and hope for the best!
Getting the right exposure
If your camera offers manual exposure controls,
you’re going to want to use them to your advan-
tage. Smaller apertures, such as f/5.6, f/8 and
f/11, work best with fireworks as they produce
thin streaks of color rather than the thicker
bands produced when a larger aperture lets too
much light in.
As for the shutter speed, you need to open
the shutter long enough to get sufficient light
without allowing noise to develop on the sensor.
Some digital cameras offer a Bulb mode (B),
which allows the shutter to remain open as long
as the shutter button is pressed. This option is
best for traditional film setups, but use it with
caution in a digital camera. Noise can build up
quickly, decreasing the quality of your image, as
ahown in
Figure B
. Use a shutter speed range
from
1
⁄
4
to 2 seconds. Longer shutter speeds are
desirable, so experiment with your camera to
find out what your limitations are.
Quick Clicks
Lost your lens cap?
Lens caps have a nasty habit of walking away from you. But before you rush to the manufac-
turer’s Web site and buy a pricey piece of plastic, first check your camera’s manual to see if
your lens cap has a standard configuration such as 24, 37 or 43 mm. Since these are standard
lens cap sizes, a cheap replacement might be waiting for you at your local camera shop.

Exploring Digital Photography
4
Color concerns
The vivid colors of a fireworks show are what
it’s all about. For that reason, you want to set
your camera up to take the best color possible.
Ironically, good nighttime color comes from an
unlikely source. By setting your camera’s white
balance setting to “Daylight” (or a similar set-
ting such as “Sunny”), you give the camera the
best chance to get an accurate range of colors.
Other settings, even a “Night” setting, overem-
phasize portions of the spectrum that increase
noise visibility. By exposing with a Daylight set-
ting, you can capture the vibrant explosions
without getting unwanted color details.
Note:
If your digital camera has in-camera
sharpening, it’s a good idea to turn this option
off and do your sharpening in your image-ed-
iting application. The fine details of an explo-
sion can be lost with in-camera sharpening.
On with the show!
Once your camera is set up, shooting fireworks
is largely a matter of reacting to the show. It’s a
good idea to start the show with your lens
zoomed out—zoom in on the action once you
have a good idea of the range of the explosions.
Shoot as many images as possible—you can pick
the winners later. Consider using your camera’s
continuous or burst mode, if available. This
option takes a series of shots in quick succession,
allowing you to shoot the burst from initial
explosion to fade away. If you’re shooting in a
normal, single-shot mode, keep your camera’s
lag time in mind and adjust your reaction time
accordingly. Since the explosions can be unpre-
dictable, the best technique is to shoot first and
ask questions later.
What to do after the show
What can you do to improve your fireworks
images? Consider boosting saturation levels to
make the streaks of light more vibrant, as we did
in
Figure C
. You’ll also want to eliminate as
much noise in your image as possible, a topic
explored in detail in “Remove unwanted noise
from your digital images” in the June 2002 issue.
You may also find that some of your bursts
have hotspots from the explosion—try using
your image-editing application’s Levels adjust-
ment to decrease the intensity of the highlights
and increase the midtones. Your image will be
heavy in the shadows, but you’ll want a nice
dark sky as the background to isolate your
explosions.
Figure C:
We took this shot into an image-editing program and boosted
the saturation levels to create a much more attractive image.
Note:
When photographing fireworks, turn
off your flash. If you set up your camera cor-
rectly, the fireworks will give off all the light
you need.
Keeping the noise down
The ISO setting on your digital camera deter-
mines how sensitive your image sensor is to
light. While you might think that setting a higher
ISO for a nighttime shot would give a better
exposure in low-light conditions, it isn’t a good
idea to shoot above ISO 200 during a fireworks
show. Again, we shoot at this setting because of
noise, as higher ISO settings tend to create nois-
ier images. ISO 100 or 200 does a good job while
reducing the possibility of noise buildup.
What do heat and humidity have to do with
image quality? Well, digital cameras are more
susceptible to noise buildup in hot and wet con-
ditions, which is likely at an Independence Day
celebration. This is the infamous “hot pixel”
issue, where pixels on the image sensor overheat
and give false readings. Higher ISO settings are
prone to display this noise, especially when
you’re shooting a larger area of dark color such
as the bluish-black night sky.
What can you do about the heat and humidity?
Unfortunately, there’s no magic technique to over-
come the elements. If you find a lot of dark noise in
your images, set the ISO to the lowest possible set-
ting and slightly reduce your exposure compensa-
tion to “desensitize” the image sensor and minimize
the appearance of noise in your image.

www.elementkjournals.com
5
July 2002
The post-processing stage is also the best
time to add any sharpening to your images, as
you have the maximum level of control. Since
we aren’t using a specific focal point, you might
need to sharpen all images to some level. The
trick is to keep your sharpening to a minimum
so the fine details of the firework streaks don’t
become pixilated.
Grand finale
Shooting fireworks with a traditional film setup is
hard, but shooting with a digital camera can be
even more challenging. However, the results are
worth the extra effort when you take the time to
set up your shot and your camera to expose the
perfect fireworks burst. Shoot often, be flexible
and enjoy the show!
Get up close and personal
with your digital photographs
by G.H. Cloutier
Application:
Adobe Photoshop 5.5/6.x
Operating Systems:
Microsoft Windows, Macintosh
T
hese days, quite a few digital cameras
offer Close Up or Macro modes that
allow you to take detailed images of
small objects. The world of small things
offers great creative potential for looking at
things in a completely new way. The world of
small details can translate into something inter-
esting and fresh when seen at a larger size like
our water droplet in
Figure A
. In many cases,
you’ll find that close-up images are more strik-
ing than vast landscapes. Close-up photography
also has many practical applications for docu-
mentation, research and archiving purposes.
At close range
Whether you need to create images for a specific
purpose or if you’re just looking for a new
avenue to explore, these steps will help you on
your way. First, we’ll give you an overview of
some of the principles behind close-up photogra-
phy, followed by basic shooting tips and other
considerations you’ll need to keep in mind to get
optimum results. And, should you ever need to
display an image at a specific magnification, we’ll
show you how to use Adobe Photoshop to deter-
mine the magnification of an image for print.
Is it close-up or macro?
Many people refer to close-up photography and
photomacrography as the same thing, but they
are actually different in terms of range. Close-up
photography covers the realm of imaging from
1:10 (1/10
th
of life size) to 1:1 (life size). Pho-
Figure A:
Shooting small
things can be
as interesting
as shooting a
grand vista.
tomacrography is 1:1 to 80:1 (eighty times life
size). While many cameras refer to their close-up
mode as a macro mode, the cameras aren’t actu-
ally capable of shooting 1:1 or greater. That abil-
ity really depends on the lens on your camera.
Determining your camera’s capabilities
Many digital cameras come with macro zoom
lenses. By reworking the lens positioning, a cam-
era is capable of both telephoto and close-up
photography. While this doesn’t give you opti-
mal close-up quality, it’s good enough for most
Exploring Digital Photography
6
uses. If your camera has a macro zoom lens, you’ll
probably have a setting for Close-up or Macro
mode that prepares the camera for closer shots.
Analyze your lens
If you find the setting, check your manual for
minimum focus distances. Even if your camera
is able to focus quite closely on an image, you
may not want to due to distortions. You can test
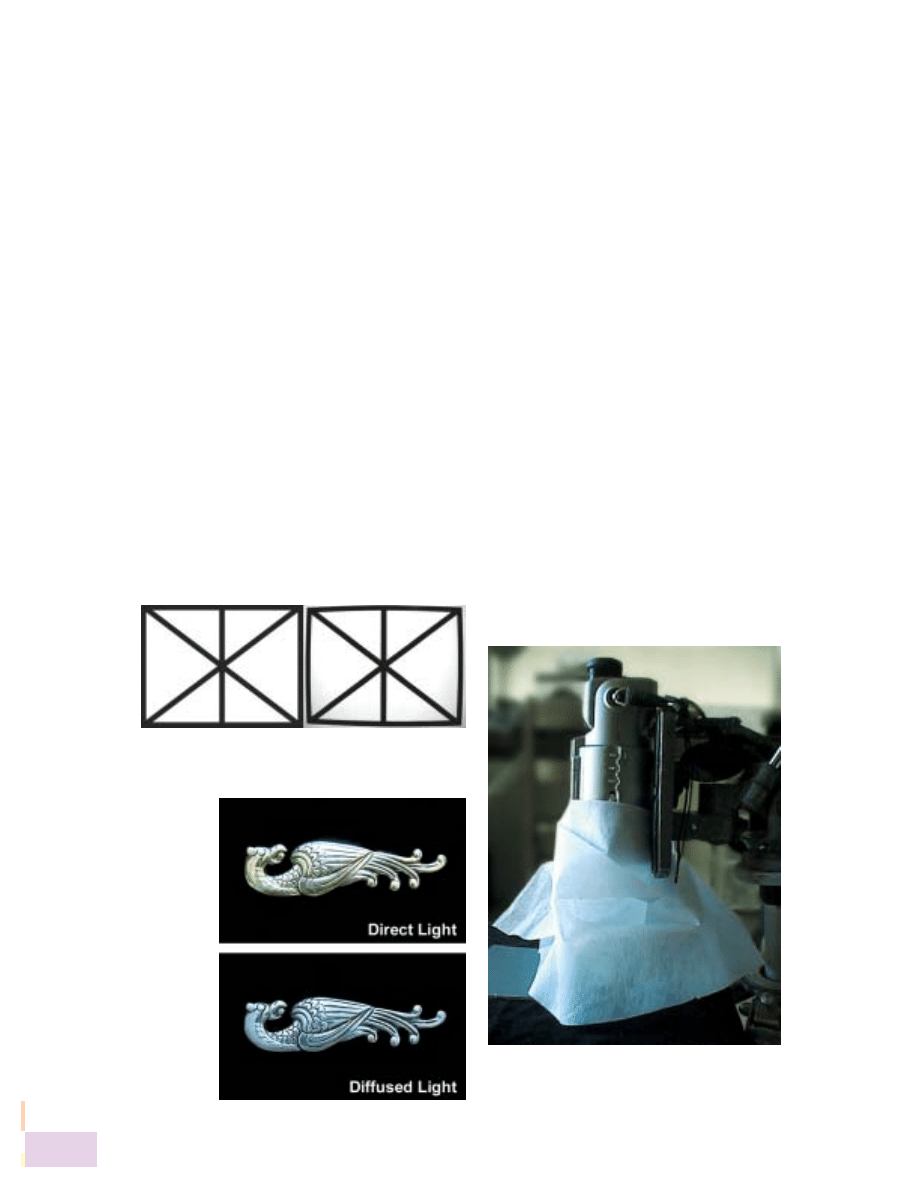
your camera’s propensity for image distortion
by printing a test target like ours on the left in
Figure B
. We then shot the target with a Sony F-
707 at full Wide Angle on the right. As you can
see, it has some issues with barrel distortion in
the corners of the frame as well as some fall off,
while the center of the image is still straight.
This is common with macro zoom lenses. This
distortion means that you’ll experience some
edge distortions if you shoot close-up at the full
Wide Angle setting. You may find it more effec-
tive to move away from the object and shoot far-
ther away to minimize distortions that might be
introduced by your camera lens.
Things you’ll need
The type of materials you’ll need for close-up
photography will depend on what you’re shoot-
ing, but there are some basic things that are nice
to have around. Other than a tripod, most are
cheap and easy to come by.
For example, it’s useful to have paper clips
and modeling clay on hand to create small
stands for your objects. White index cards or
small mirrors make great reflectors. Backgrounds
are typically simple and contain relatively neu-
tral colors. It’s useful to have black velvet or
other matte surfaces that don’t reflect a lot of
light and show reflections. Glass plates are also
useful to hold flat objects like stamps or paper.
Lighting small things
Your lighting for close-up photography is just as
important as standard photography. Because
you typically need to use small apertures for the
greatest depth of field, you’re likely to need a lot
of light for your images. Adequate lighting con-
ditions also reduce the possibility of noise devel-
oping during longer exposures.
You can shoot close-up images indoors or
outdoors. When indoors, the best light to use is
either flash or tungsten lighting. Using a flash
can be tricky because of how close your camera
is to the subject, but slave flashes set away from
your subject can work effectively. Small tensor
lamps are cost-effective and are excellent lights
for close-up work because they’re flexible and
easy to position.
Figure D:
For shiny metal, you usually get the best
results with a diffuser, which you can make from a
variety of objects.
Figure C:
Your
choice of lighting
techniques affects
the appearance of
your image.
Figure B:
Test your camera to see if it has any distortions
when shooting close up.

www.elementkjournals.com
7
July 2002
Quality of light
Your lighting choices will largely depend on
what details you want to capture about your
subject. If your subject has a lot of texture, you
may want to skim light directly across the sur-
face to enhance the appearance of that texture. If
you’re working with shiny objects like jewelry
or coins, you’ll probably want to consider dif-
fused lighting with a light tent, as reflective
objects usually look terrible if light shines
directly on them, as seen at the top of
Figure C
.
Diffusing light with a light tent is low tech,
but effective. As you can see in
Figure D
, to cap-
ture the silver brooch, we simply draped some
interfacing material around the camera lens and
then clipped it to hold it in place. Pieces of plas-
tic milk jugs and Styrofoam cups can also work
well as diffusers around small objects. And you
can use Styrofoam cups over the tensor lamps as
diffusers.
Diffused light is very important for shiny
objects as they have a tendency to flare and pick
up unwanted tone and reflections from surround-
ing objects. If you compare the two images in
Figure C
, you can see a tremendous difference in
appearance caused by diffusing the light. The bot-
tom image looks better as it accurately portrays
the brooch. The soft light also fills in scratches and
reduces their appearance rather than enhancing
them the way direct lighting does. For some
objects, you may find that a combination of both
direct and diffused light works well.
The DOF challenge
Getting as much of your object in focus as possi-
ble is always a challenge with close-up work. The
closer your camera is to the subject, the smaller
your potential depth of field (DOF). There are
some basic things you can do to give yourself the
best chances possible. First, to have the optimum
depth of field, use the smallest aperture that’s
available to you. Many digital cameras don’t
have very small apertures simply because they
don’t perform well at longer shutter speeds. On
our example camera, the smallest aperture is f/8.
You can see the beetle we photographed at that
setting in
Figure E
. When we used f/3.5, we
couldn’t get our entire insect into focus because
our depth of field was so shallow. Using a smaller
aperture gives you more focus flexibility.
However, a smaller aperture is also likely to
pick up your background detail. To alleviate
this problem, move your background away
from your subject. For example, place the speci-
men on a plate of glass and position the back-
ground a foot below it to make sure it stays out
of focus.
The DOF in all close-up work is always
small, so choose your point of focus carefully.
Focus stretches half in front and half behind
your point of focus. Therefore, you don’t neces-
sarily want to focus on the part of the subject
that’s closest to you, because half your available
focus above that point is being wasted on air.
There may also be areas in the subject that are
important to show accurately—if that’s the case,
that needs to be your critical area of focus.
Finally, keep your camera and subject as
parallel as possible. When you’re working with
a narrow DOF, a small amount of tilt in an object
or camera can create a lot of blur. You can avoid
tilt with the help of a level.
A fringe benefit of the DOF issue is the abil-
ity to isolate a subject easily. With a shallow
DOF, the background is usually thrown out of
focus, resulting in an image of striking simplic-
ity with an almost graphical quality.
Printing to size, accurately
Once you’ve captured your images, you’ll need
to print them. If you’re printing your images for
display, it can be useful to give the magnification
of the object. When you do so, someone looking
at your insect pictures will know the subject is
life size (1:1) or 5X life size (5:1). We’ll show you
how to use Photoshop’s Measure tool to deter-
mine the size of your object before you print it
Figure E:
Your
aperture setting has
a dramatic effect on
how much of your
subject is in focus.
/
/

Exploring Digital Photography
8
out. You can easily determine the size of an
object with the following calculation:
Magnification = Image size/Object size
Photoshop’s Measure tool
The Measure tool is useful to those who need
precision. It’s imperative for measuring size on
the computer because it’s difficult to determine
the size of an object onscreen versus how it will
appear in print. We want to print a 5:1 copy of
our brooch. In real life, the tail on our bird
brooch is 1.75 inches long. If we want to print a
detail of the image at twice life size, how do we
go about it?
Because our image is digital and composed
of thousands of pixels, an adjustment in resolu-
tion changes the physical image size. To get the
size you need, in this case 2:1, determine the
physical size you want your image to be. To
show the tail of the brooch at 2:1, we need it to
measure 3.55 inches when printed.
To start out, place guides at the start and
end points you wish to measure. Next, select
the Measure tool
(
)
and click positions to
measure the tail onscreen at its default resolu-
tion. Look at the Info palette to get the specific
length. If the tail is larger than 3.55 inches, then
choose Image
> Image Size to bring up the
Image Size dialog box. Make sure the Resample
Image option is not selected. You want to link
the physical dimensions of your image and the
resolution. Increase your resolution to shrink
the physical dimensions of the image and then
click OK. Use the Measure tool to check the
exact distance again and adjust resolution as
necessary until you have the physical dimen-
sions you desire.
Then, open the Image Size dialog box once
again and select the Resample Image option.
Now, specify the resolution at which you want
your image to appear and then click OK. In this
case, we wanted our image to be 200 ppi for the
journal. You can see our results in
Figure F
. This
process may seem like a hassle at first, but if you
work with the same camera system frequently,
you’ll find that you’ll be able to guesstimate
appropriate resolution settings quickly.
Up close and personal
We’ve given you a quick overview of the theory
and techniques behind close-up photography.
Digital photography is a great way to do close-
up work. Your results are instant, which allows
you to modify lighting and focus quickly and
get the best results possible.
Figure F:
It’s easy
to determine specific
magnifications for
your images if you
use Photoshop’s
Measure tool.
Quick Clicks
Rainy days got you down?
Looking to use your digital camera on a rainy day? Watch out—moisture is any digital camera’s
worst enemy. If you don’t want to buy a special waterproof case, try a simple resealable plastic
bag. Place the camera in the bag with the sealing end at the bottom. Cut a hole for the lens and
place a rubber band around the opening to hold it in place. Your lens is slightly exposed to the
elements, but the electronics should be kept reasonably dry. Although this may not be foolproof,
it’s definitely better than facing the elements with no protection at all!

www.elementkjournals.com
9
July 2002
Make quick color changes using
brushes in Photoshop
by Stephen Dow
Application:
Adobe Photoshop 5.5/6.x
Operating Systems:
Microsoft Windows, Macintosh
H
ave you ever wanted to have a red
car? Or blue hair? Or maybe turn the
sky bright green? Color changes like
this can be done in any image-editing
program, but deciding which method is the
fastest can be confusing. If you’re looking for the
quick and dirty technique to change a color in
Photoshop, you can’t beat using a brush set for
the Color Painting Mode. With a few stokes of
your virtual brush, you can turn your color
world upside-down—and we’re going to show
you how.
Paint by numbers
To demonstrate this technique, we’ll be turning
a red tulip into a yellow tulip, as shown in
Figure A
. To accomplish this feat, we’ll first iso-
late our red tulip using the Selection tool and
make a few adjustments to make sure we don’t
change the color anywhere else. Then, we’ll
sample a color from the yellow tulip and use our
Color brush to “paint” in our sample color.
Finally, we’ll use this brush with other Painting
Modes and colors to make our adjusted tulip
look just right.
Natural selection
The first step in this technique is to select the
portion of the image you’re targeting with one
of the selection tools. If you have a steady hand,
you could skip this step, but we don’t recom-
mend it. Selections are reusable, editable and
create a better template to make adjustments. In
this example, having a solid selected area will
allow us to feather the edges, helping blend in
our new color with its surroundings.
To start, open your file in Photoshop. Next,
choose the Pen Tool
(
)
and draw a path
around your object. The Pen Tool works great
for this type of work as you can draw precise
paths that can be easily edited. We usually draw
a rough outline around our object and then
adjust the path at a higher magnification using
the Direct Selection Tool
(
)
and Convert Point
Tool
(
)
. It’s important to draw a good path—
Figure A:
By using a brush and a few of Photoshop’s Painting Modes, we can
quickly turn this tulip from red to yellow.
any image area outside of your target object that
gets colorized is going to stick out like a sore
thumb. The path we drew around our tulip is
shown in
Figure B
on the next page.
Now that we have a path, let’s activate the
selection. Open the Paths panel by selecting Win-
dow
> Paths and click on the Work Path layer
while holding down the [Ctrl] key ([control] on
the Mac). Your path turns into “marching ants,”
Photoshop’s indicator of a selected area.
Next, we want to slightly feather our selec-
tion to make sure our edges aren’t too sharp and
the new color blends in with the surrounding
pixels. Open the Feather dialog box by selecting
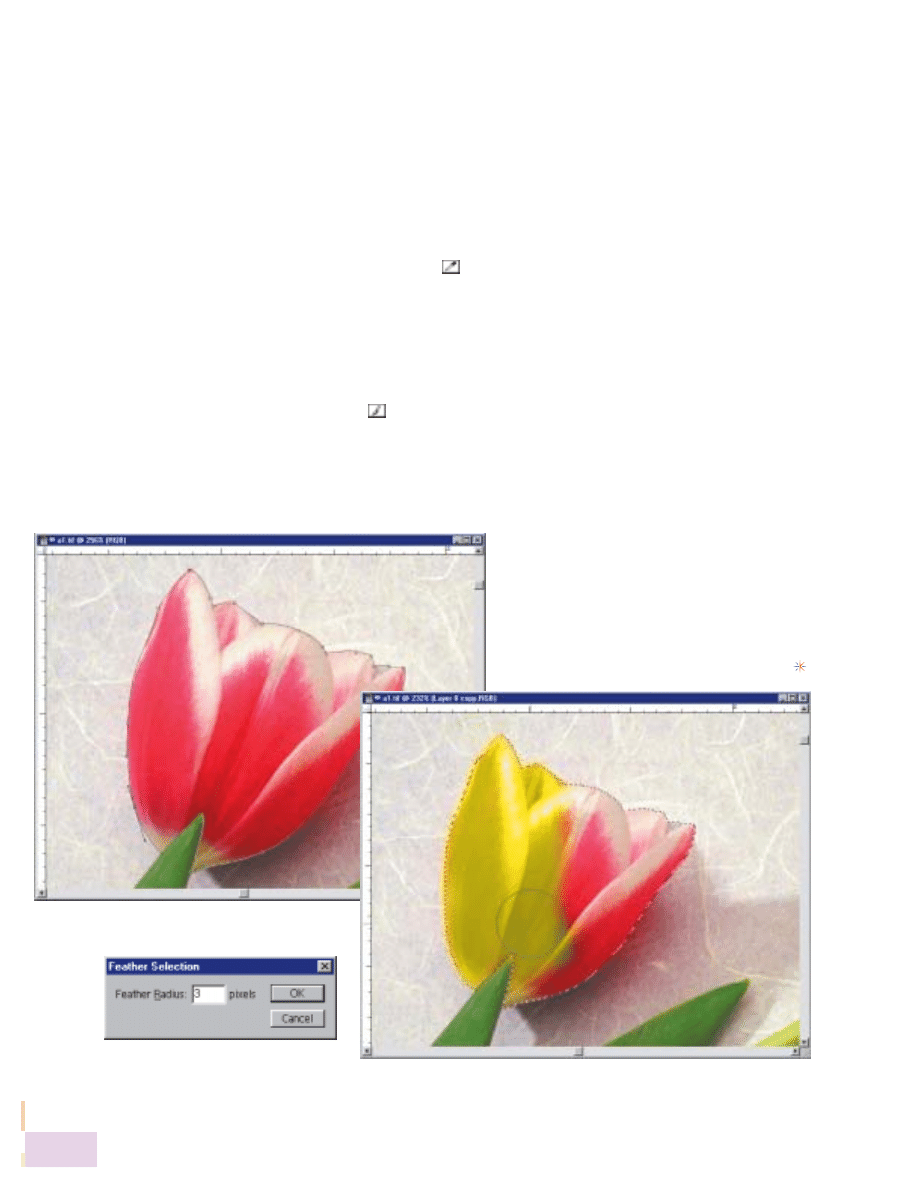
the luminance of the foreground color while pre-
serving the hue and saturation of the image.
This means that our tulip’s color will change,
but its details will remain the same. If we just
painted yellow over our image, we’d end up
with one flat-looking tulip shape.
Choose a brush size that fits your selection
(bigger for a big area, smaller for a smaller area)
and start painting. Make sure you cover the
whole area as you paint—as we said earlier,
omissions are obvious.
Figure D
shows our tulip
making the switch to the yellow side.
Tweaking the image
Now, we only painted with one color, but you can
paint with as many or as few as you want. Our
tulip is certainly yellow, but needs a few more
shades of yellow to make it look just right. We
selected another shade of yellow from the tulip,
this time from the upper petals, to get a darker hue.
Then, we selected a smaller brush and painted in
this color in the appropriate areas of our selection.
We repeated the process until we thought we had a
good match from tulip to tulip.
Recolor your world
As we showed in
Figure A
, our new yellow
tulip is pretty close to its naturally yellow
companions. It really only takes three things—
a selection, a color sample and a brush set for
the color mode—to make a quick color change
in Photoshop. Once you get the hang of it,
you’ll be changing the color of everything.
Exploring Digital Photography
10
Selection
> Feather. As shown in
Figure C
, enter
3 pixels in the Feather Radius text box and click
OK. This will give us softer edges and make our
color change look more realistic.
Coloring book time
With our selection made, the next step is to sam-
ple the color we’ll be using to make our change.
In this case, we have a target color available
from the image itself, but you can use any color
you want. We selected the Eyedropper Tool
(
)
and sampled the yellow color from one of the
tulips. Granted, this single color doesn’t repre-
sent the tonal range of the entire tulip, but we’ll
show you a way to fix this in a minute. The color
we sampled appears as the current Foreground
Color in the Toolbar, ready to be used with one
of the brushes.
Click on the Paintbrush Tool
(
)
and take a
look at the Options toolbar. While most people
just paint with the straightforward Normal
mode, we aren’t normal or straightforward.
Click on the Mode dropdown menu and select
Color. This Painting Mode allows you to paint
Figure C:
By feathering our selection by 3
pixels, we’ll get a softer edge that will blend
better with the surrounding pixels.
Figure B:
We used the Pen Tool to draw a tight path
around our red tulip.
Figure D:
Once your brush and selection are set, it only takes a few swipes to get rid
of the red.
www.elementkjournals.com
11
July 2002
Exposure bracketing helps gets the
right shot every time
by Stephen Dow
I
t’s a once-in-a-lifetime shot—a colorful sun-
set fading away across the slow-moving
waves of the ocean, perfectly silhouetting a
lonely sailboat. You don’t want to miss cap-
turing this moment, but the tricky light levels
are making the decision on the correct exposure
settings a nerve-wracking endeavor. What do
you do? You can rely on a technique known as
bracketing, where you take several shots of the
same scene at different exposures. While tradi-
tional photographers usually have to manually
change the exposure settings to bracket their
shots, most digital cameras have automated this
process to make it very easy to use. With brack-
eting, you can reduce the chance that you’ll miss
that unique shot by increasing the range of
exposures you capture.
Filling out your bracket
In this article, we’ll discuss exposure bracketing
and how you can use it to improve your digital
images. First, we’ll explain just why exposure
bracketing will benefit the digital photographer.
Next, we’ll go over some shooting and lighting
situations that lend themselves to using this
technique. Then, we’ll work through an exam-
ple, explaining how different digital cameras
handle the bracketing process. Finally, we’ll
show you how to manually perform exposure
bracketing if your digital camera doesn’t have
an automated process.
Note:
While you can bracket by adjusting
shutter speed, aperture or ISO settings, most
digital cameras use positive or negative expo-
sure compensation to vary the exposure.
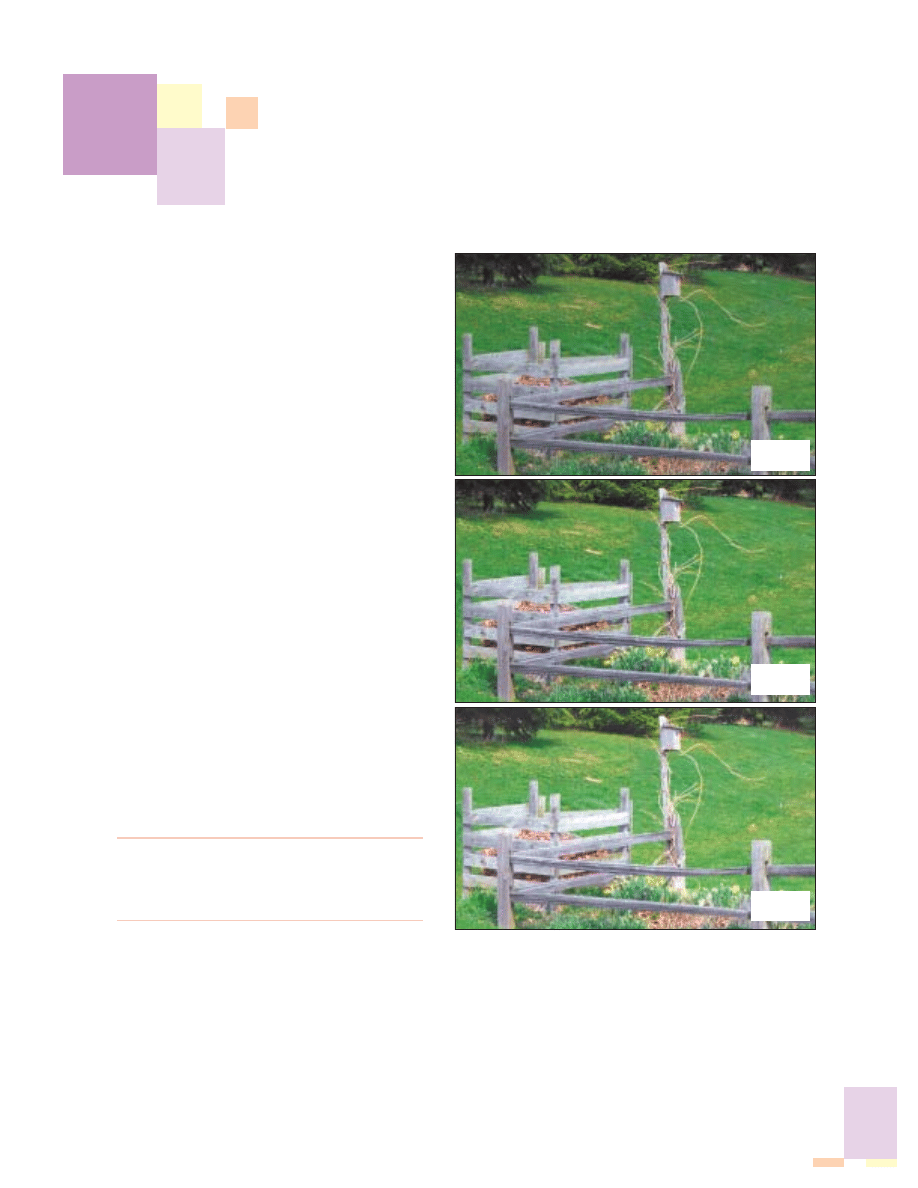
Shooting smart
When shooting a typical bracketed sequence,
one shot is taken at the metered setting, one shot
is underexposed, and one shot is overexposed,
as shown in
Figure A
. One of the impediments
of using exposure bracketing with traditional
film cameras is that it “wastes” film. While you
might think that getting the perfect shot out-
weighs the burning of a few frames of film, the
fact remains that for every shot you select from a
bracketed sequence, there will be three or more
shots that are useless. However, digital cameras
Figure A:
In this three-shot bracket, the exposure values are -0.3, 0.0
and +0.3. You can have a broader range, but a narrow bracket gives you
a better chance of getting it right.
-0.3 EV
0.0 EV
+0.3 EV

Exploring Digital Photography
12
are limited only by the amount of storage—you
can erase unnecessary images without any
wasted resources.
When should you bracket?
Any shooting situation when you’re second-
guessing your metering ability is a good time to
bring out the bracketing. These situations usu-
ally involve a scene that contains a wide range
of lighting levels or a dramatic contrast between
subject and background. Consider a scene where
the background is a bright snow-covered field.
For the subject to be properly exposed, your
camera might decide to blow out the details in
the background. Conversely, if you’re shooting a
particularly bright foreground subject, any nega-
tive exposure compensation applied to even out
the exposure could reduce the amount of detail
in your shadows.
For example, consider our ocean sunset
example from the beginning of the article. The
rapidly changing light of a sunset, as well as the
reflections from the water, can make selecting an
appropriate exposure difficult. By shooting at a
variety of exposures, you have a better chance of
capturing a correctly exposed shot.
Bracketing concerns
Before you bracket a series of shots, there are a
few things to consider. First, since you’ll be
varying the exposure levels of the shots, it’s a
good idea to avoid your flash. You want to use
the available light and make adjustments from
there—using the flash will skew your results.
Next, be aware of your mode setting. Exposure
variations are different depending on whether
you’re using an aperture priority, a shutter pri-
ority or a custom camera mode. Experiment first
so you know what to expect from each mode.
Finally, since you want each shot to vary only in
exposure, use a tripod to keep the camera steady
and the scene consistent, as focus and white bal-
ance are typically measured on the first shot,
and not changed until the bracket sequence is
complete.
Setting up an exposure bracket
Every digital camera, while technically perform-
ing the same procedure, seemingly has a differ-
ent exposure bracketing procedure. The big
differences from camera to camera are in the
number of shots taken, the range of exposure
values, and whether the bracketed shots are
taken automatically or if they require you to
manually push the shutter button. Consult your
camera’s manual to find out the capabilities of
your camera.
For our example, we’re going to use an
Olympus C-3000, which allows us to shoot three
or five bracketed shots at +/- 0.3, +/- 0.6 or +/-
1.0 increments. We selected five shots at +/- 0.3
as it gives us a good range of shots without get-
ting too dramatic from shot to shot. This is an
important point—you aren’t looking to have
radically different bracketed shots, as the
extreme exposures are almost sure to go too far.
The Olympus requires you to hold the shut-
ter button down while it takes the series of

July 2002
13
www.elementkjournals.com
Figure B:
By shooting with
a five-shot bracket, we were
able to see the exposure
extremes for this scene.
shots. Once the five shots are taken, the shutter
stops opening and you can release the shutter
button. Some cameras automatically shoot all
bracketed shots with one click of the shutter but-
ton, while others require you to click it for each
shot. The bracketed sequence we captured is
shown in
Figure B
.
Bracketing your shots manually
If your camera doesn’t have automatic exposure
bracketing but has adjustable exposure compen-
sation, you can manually set up your own
bracket. The technique here is to take one shot,
allowing the camera to meter the scene. Then,
take one shot at positive exposure compensation
and one shot at negative exposure compensa-
tion. You get the same results—the automatic
exposure bracketing just speeds the process
along. While having your camera do all the
work is certainly easier, the benefit of manually
bracketing your shot is that you aren’t limited to
the range of exposure you can shoot with.
Bracketed shots in post-process
Bracketing shots can also be helpful if you want
to combine two images to get the best composite
image. Let’s go back to the person standing in
the snow—by taking a series of shots at different
exposures, you can select a foreground subject
that has the correct exposure from one shot with
the background that contains good detail from
another shot. Then, by combining these two ele-
ments, you can build a better composite shot.
Often, this is the only way to make certain shots
work, so keep it in mind when you shoot.
Get it right!
Exposure bracketing won’t ensure that you get
the perfect shot every time, but it will give you a
better chance of capturing a scene when select-
ing an exposure is tricky. With digital cameras,
shooting an extra frame or two is a small price to
pay for a great shot, so take the time to get used
to bracketing and find ways to incorporate this
practice into your shooting technique.
Quick Clicks
Make your skies stand out
If you like dramatic skies, consider putting a polarizing filter on your digital camera. A polariz-
ing filter emphasizes blues by rejecting scattered blue light that causes the sky to appear overly
bright. It also has the added benefit of reducing glare from reflective objects such as water.

Exploring Digital Photography
14
Get the most from your digital
camera’s movie mode
by Stephen Dow
L
et’s face it—no one buys a digital camera
primarily for its video capabilities. How-
ever, taking short video clips with your
camera can be a lot of fun and extends
your range of shooting possibilities. While you
might have conquered taking still shots, getting
quality clips from your video mode can be
tricky. In this article, we’re going to give you
some tips for using the video mode that will
help you use this feature to its fullest potential.
Know your camera’s capabilities
The first step in using the video mode success-
fully is to understand the capabilities of your
camera. The most important thing to know is the
maximum length your camera will allow you to
record. Most cameras limit you to a specific
length, dependent on the camera’s internal
buffer size or the capacity of the storage media.
This time can be anywhere from 15 seconds to
several minutes, so knowing how long you have
to shoot will ensure that you capture the action
you’re after. You may also be able to sacrifice
quality for a longer recording time, so check out
your manual to know exactly what to expect.
Most digital cameras record images at 320 x
240 pixels, but some allow you to cut this size in
half (160 x 120) to allow you to take longer shots.
While this is a nice option, the quality and size
of the smaller movie size leave a lot to be
desired. Stick with 320 x 240 and sacrifice the
longer record time for better image quality.
However, if you’re looking for a really long
record time, check out the Fuji FinePix S602,
which can record VGA movies (640 x 480) at 30
frames per second for the capacity of the storage
card. Now that’s some video muscle!
Table A
shows specifications for some of the more popu-
lar digital cameras.
Plan your shot beforehand
Editing digital video is time-consuming and
tricky. Why not get the shot right the first time?
By setting your scene before you start recording,
you can capture video clips without going into a
video-editing application to rework all the clips.
Another reason to prepare your shot beforehand
is that you may have some lag time when your
camera writes the video file to your storage
media. By planning out your shot, you reduce
the risk that you’ll miss out on the moment you
were trying to capture.
Don’t go toward the light
Obviously, your image sensor is very sensitive to
light, but when it records frame after frame of
video, this sensitivity is even more pronounced.
Avoid backlighting your subjects or panning
across bright lights and reflection as they can
cause ugly hotspots in your video. Actually, hav-
ing less light in the room usually produces bet-
ter exposures, as the camera can control the
amount of light and compensate to an appropri-
ate level. Also watch out for color casts caused
by influential light sources such as fluorescent or
halogen bulbs—you might want to adjust your
camera’s white balance to make sure your sub-
jects don’t look like they’re from another planet.
Table A:
Video capabilities of various digital cameras
Camera type
Recording
Frames
Sound
Maximum
format
per second
movie length
Minolta Dimage 7i
AVI
12
No
60 sec.
Nikon Coolpix 995
QuickTime
15
No
40 sec.
Olympus C-3040Z
QuickTime
15
Yes
32 sec.
Canon G2
AVI
15
Yes
30 sec.
Sony F707
MPEG
8 or 16
Yes
Storage capacity
Fuji FinePix S602
QuickTime
30
Yes
Storage capacity

www.elementkjournals.com
Digital Photo Pro (ISSN 1535-4377) is published monthly by Element K
Journals, a division of Element K Press, 2165 Bri-Hen TL Rd. Ste. 3,
Rochester, N.Y., 14623.
U.S. toll-free................................................................................(800) 223-8720
Outside of the U.S. ....................................................................(716) 240-7301
Customer Relations fax ..............................................................(716) 292-4392
For subscriptions, fulfillment questions, and requests for group subscriptions,
address your letters to
Element K Journals Customer Relations
2165 Bri-Hen TL Rd. Ste. 3
Rochester, NY 14623
Or contact Customer Relations via Internet email at journals@element-k.com.
Editorial
Editor ..........................................................................Stephen Dow
Editorial Director ..........................................................................Michelle Rogers
Managing Editor ..............................................................................Craig Watkins
Copy Editors ................................................................................Nathan Adamus
Evan Gelder
Contributing Editor............................................................................G. H. Cloutier
Graphic Designer ..............................................................................Alicia Natale
Cover and Content Design ................................................................Alicia Natale
You may address tips, special requests, and other correspondence to
The Editor, Digital Photo Pro
Element K Journals
2165 Bri-Hen TL Rd. Ste. 3
Rochester, NY 14623
Editorial Department fax................................................................(716) 292-4391
Or contact us via Internet email at digitalphoto@elementkjournals.com.
Sorry, but due to the volume of mail we receive, we can’t always promise a
reply, although we do read every letter.
Element K Journals
General Manager ...................................................................... Doreen Bieryla
Manager of Customer Relations ...................................................... Nicole Pate
Manager of Operations .................................................... Elizabeth Sherwood
Sr. Design Manager ................................................................ Ian Caspersson
Director of Marketing .................................................................... Torry Burdick
Product Marketing Manager ..................................................Carolyn Reynolds
Postmaster
Postmaster: Send address changes to
Digital Photo Pro
P.O. Box 92880
Rochester, NY 14692
Copyright
© 2002 Element K Journals, a division of Element K Press LLC ("Element K").
Element K and the Element K logo are trademarks of Element K LLC. This work
is an independently produced publication of Element K Journals, the content of
which is the property of Element K or its affiliates or third-party licensors and
which is protected by copyright law in the U.S. and elsewhere. The right to copy
and publish the Content is reserved, even for Content made available for free
such as sample articles, tips and graphics, none of which may be copied in
whole or in part or further distributed in any form or medium without the express
written permission of Element K. Questions or requests for permission to copy or
republish any content may be directed to contentreuse@elementk.com.
All product names or services identified throughout this journal are trademarks or
registered trademarks of their respective companies.
Printed in the U.S.A.
Price
Domestic ....................................................................................................$107/yr.
Outside U.S. ..............................................................................................$127/yr.
Our Canadian GST # is R140496720. CPM # is 40031405.
The QST # is 1018491237.
Element K Journals publishes a full range of journals designed to help
you work more efficiently with your software.To see a list of our prod-
ucts, visit our Web site at www.elementkjournals.com.
Figure A:
We created this index sheet from a video shot with an Olympus digital camera.
Find your focal point
Most digital cameras won’t auto focus while you’re shooting a video
clip. It’s a good idea to pre-focus your camera before you start shooting
and maintain your distance from your subjects. You can usually do this
by half-pressing the shutter button to give the camera a chance to lock
the focus to a specific range.
Resist the urge to zoom
When shooting video clips, most digital cameras disable the optical
zoom. This means that any zooming you can do, if you can do any at all,
will be digital. This process simply makes a smaller portion of the image
sensor bigger, increasing the size of your pixels and decreasing the qual-
ity of your images. When possible, just avoid zooming altogether when
shooting video clips.
Would you like audio with your video?
Many digital cameras include microphones to record sound. While this
feature is primarily intended to allow the photographer to add audio
annotations to their still images, you can also use it to gather sound
along with your video. Be aware that these microphones are basic; don’t
expect CD quality from them. Keep your subjects in front of the camera
and at a reasonable distance from the microphone to get the best possi-
ble quality. Also, be aware that if your camera can auto focus while
shooting video, your microphone is probably going to pick that sound
up as well!
To view or not to view
Whether you use the LCD screen or the optical viewfinder to frame
your videos is a personal preference, but we found that using the LCD
gave us a better idea of what we were shooting. The image displayed
will be choppy, but you’ll get a better preview of the action than if
you’re looking through the viewfinder. Also, know that the quality of

Please include account number from label with any correspondence.
2018
16
Exploring Digital Photography
Please include account number from label with any correspondence.
the LCD preview is usually just for compositional pur-
poses only and not necessarily representative of the
quality of your video file.
Would you just sit still?
As always, placing your camera on a tripod will give
you the best video clips. If this isn’t an option, keep the
camera as still as possible to emphasize the movement
of your subjects while the background remains static.
The natural shakiness of human hands can add a dis-
tracting blurriness to your video—so stay still!
Check out those special features
There are tons of video features loaded on digital cam-
eras these days, from night vision to on-board editing to
360-degree panoramic image stitching. Check out your
camera’s manual and educate yourself on the options—
you may find a cool feature to play with. One quick look
in our Olympus digital camera’s manual revealed a
video index feature, giving us the ability to turn our dig-
ital video into a frame-by-frame index sheet. This feature
turned our little movie into an interesting series of stills,
as shown in
Figure A
on the previous page.
Coming up…
•
Avoid reflections when
shooting through glass
•
Create better images by
understanding color depth
Digital versus film:The great debate
by Stephen Dow
I
’ve been shooting film for years, but I’m ready to make the
move to digital. However, I want to make sure that I can
get the same amount of detail I’m used to with film. How
close are digital cameras to reaching the detail available with
35 mm film?
This is certainly a controversial issue between digital
and traditional photographers, and one that doesn’t
have an easy answer. However, the general consensus is
that a 35 mm frame contains approximately the same
amount of information as an image taken with a six-
megapixel (MP) CCD. This figure was derived using a
top-quality SLR with an excellent lens and low-speed,
perfectly exposed film. For that reason, many digital
supporters claim the resolution calculation should be
much smaller accounting for lesser cameras, films and
lenses. Conversely, many film enthusiasts think it
should be much higher, accounting for the larger nega-
tive of medium format cameras and the detail possible
with highly sensitive film.
Professional digital cameras, such as the Kodak
DCS760, sport 6.3 MP CCDs, but that level of resolution
comes at a high price. Currently, there are plenty of
four-MP cameras and even a few five-MP models that
have broken the magical $1000 price point. With the
rate of innovation in the digital camera industry, it
seems possible that a six-MP camera will be within the
reach of the consumer soon.
But there’s more to the story than just the resolu-
tion. Larger CCDs need more power, more processing
time and a faster transfer to the storage media. Plus,
even with advances in lens technology, most digital
cameras are still offering a built-in lens with a short
focal length. This offers a compact size, but takes away
the flexibility of an interchangeable lens system. So,
while camera manufacturers are certainly working to
offer the largest CCD possible, they have to weigh how
it will work within the big picture of camera perform-
ance and flexibility (no pun intended).
The important thing to remember is that the tech-
nology is getting better and better every day. Today’s
cameras and inkjet printers give consumers unprece-
dented abilities to capture and print their own images.
Think ahead a few years and you can only imagine
where digital photography will be. For now, digital still
has a way to go, but it’s catching up fast.
The Contact Sheet
Wyszukiwarka
Podobne podstrony:
[Photography Ebook] digital photography hacks
Digital Photography Course
Butler, Kris; Canning, Stephen & Cooper, Robert Photography Going Digital A Guide To Digital Phot
The Digital Photography Book Scott Kelby Volume 2
The Digital Photography Book Scott Kelby Volume 1
Digital Photography The Digital Darkroom
Digital Photography School Wedding Photography 21 Tips For For Amateur Wedding Photographers
The Digital Photography Book Scott Kelby Volume 3
A Z Of Digital Photography
Digital SLR photography Guide
Overview of Exploration and Production
exploring the world of lucid dreaming
Principles of Sigma Delta Conversion for Analog to Digital Converters
Page153 Model 2491 2492 2493 Digital Switchboard meter c
DIGITAL OUTPUT ANGULAR ACCELEROMETER 8556
Digital ECU Tuner III Manual
więcej podobnych podstron