
Installation Supplement for Audi
Subject:
i-
-R DICE iPod Integration Kit for
, Radio Interface Kit.
Audi
Audi
Models Supported:
MENU
AUX Audio Source:
MP3, DVD, TV...
DICE Module
iPod
Vehicle
(CD changer/SAT Port)
Audi
Basic Wiring Diagram:
Docking Cable
Vehicle Specific Cable
Auxiliary
Cable
(not included)
Recommended Installation Time:
All models - Approximately 45 mins
1
Parts Information:
Kit Contents:
1. DICE Module
2.
3. Docking Cable
Audi radio interface cable (vehicle specific cable)
Please verify all parts before installation!
1
2
3
A3
06+
1, 2
Symphony I, II Radio
A4
98-06
A6
98-04
A8
98-01
S4
98-05
S6/R6
98-04
S8
98-01
Allroad
00-05
i-Audi-R
TT
00-06
i-Audi-R
1, 2
1
1
1
1
1
1
1
Symphony I, II Radio
Symphony I, II Radio
Symphony I, II Radio
Symphony I, II Radio
Symphony I, II Radio
Symphony I, II Radio
Symphony I, II Radio
Chorus and Concert Radios
i-Audi-R
i-Audi-R
i-Audi-R
i-Audi-R
i-Audi-R
i-Audi-R
i-Audi-R
Model
Year
Part Number
Known Limitations*
Compatible Radio Systems
* 1 - If vehicle has factory XM/Sirius a special harness is required
2 - Not for NAV Plus in 2006 models
Installation Instructions:
1. Pull vehicle into service bay and access trunk area.
2. Disconnect both battery terminals. These cables must
be disconnected during installation to insure proper
initialization of the DICE module when the DICE when it
is connected.
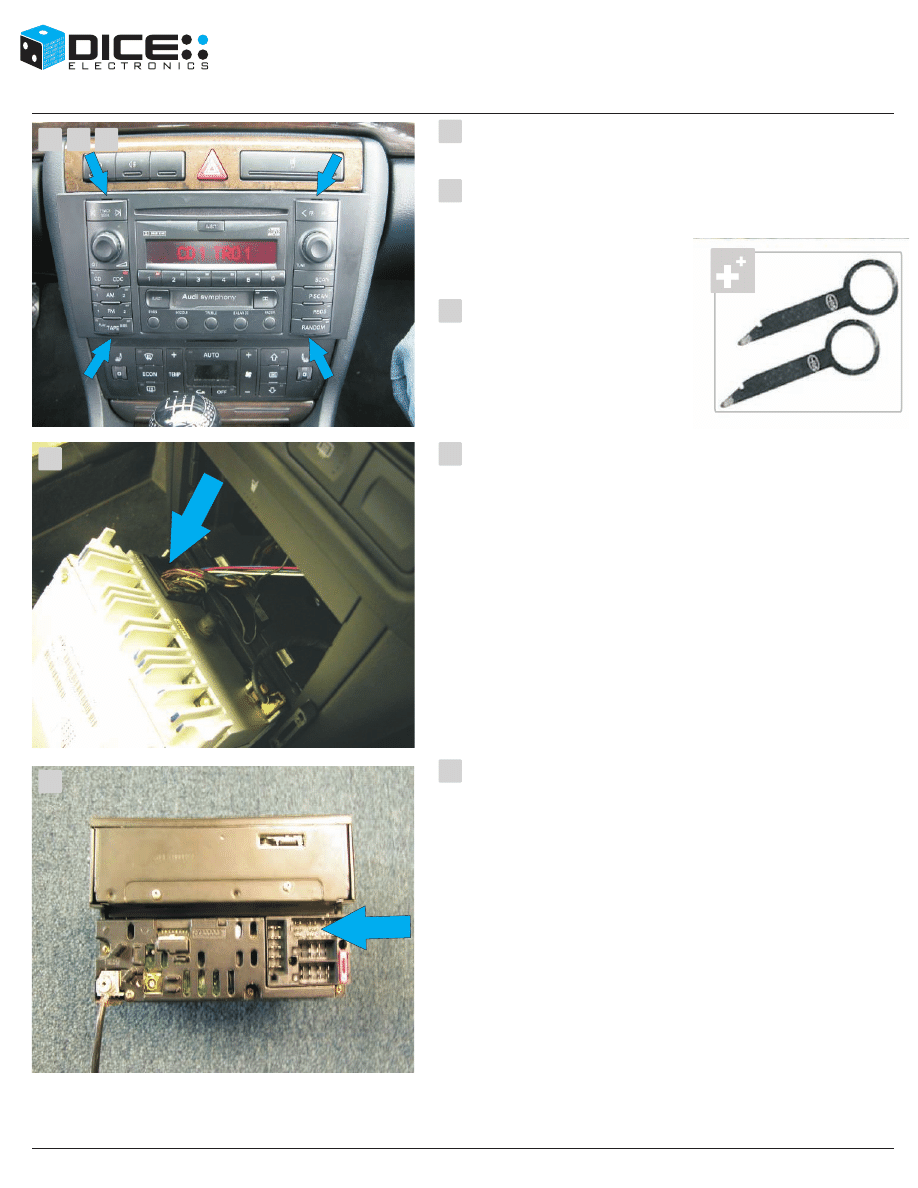
3. Remove radio by inserting the
(4) factory keys (not included)
into the slots on each corner of
the radio.
Radio removal keys (not included)
4. CD changer interface will be on left hand side of
radio, it is the smaller left-hand connector on the bottom
of the harnesses.
Remove all wiring from the radio unit and remove from
vehicle.
5. Shown is the CD Changer harness through the back
of the radio. The vehicle specific cable will be interfacing
from this point.
2
1
2
3
4
5
3
6. Insert the vehicle specific cable into the specified
connector. Make sure the connector is fully inserted and
that it snaps in place.
7. Connect the vehicle specific cable's 8-pin molex
and iPod Docking Cable to the DICE module.
The correct plugs
on the DICE
module can be
identified by
matching it up with
the connector or
by looking for
the label on the
bottom of the
module.
connector
8. Connect the remaining adapters and antenna leads
back into the radio and prepare for re-installation.
Verify all leads are firmly locked into place.
Its recommended to install your DICE module in a easily
accessable location or to extend the AUX connector for
future connections of auxiliary devices.
1/8"
AUX
Dock
Cable
Vehicle
Specific
Cable
6
7
8
This will be a good time to test your installation. Before
reinstalling your radio, connect your iPod and test for
audio, and controls from the radio. If everything is ok,
proceed to the next step.
This screw is the factory grounding point to
which the vehicle specific cable MUST be
grounded. Do not overlook this step as the DICE
module will not function correctly without proper
grounding.
4
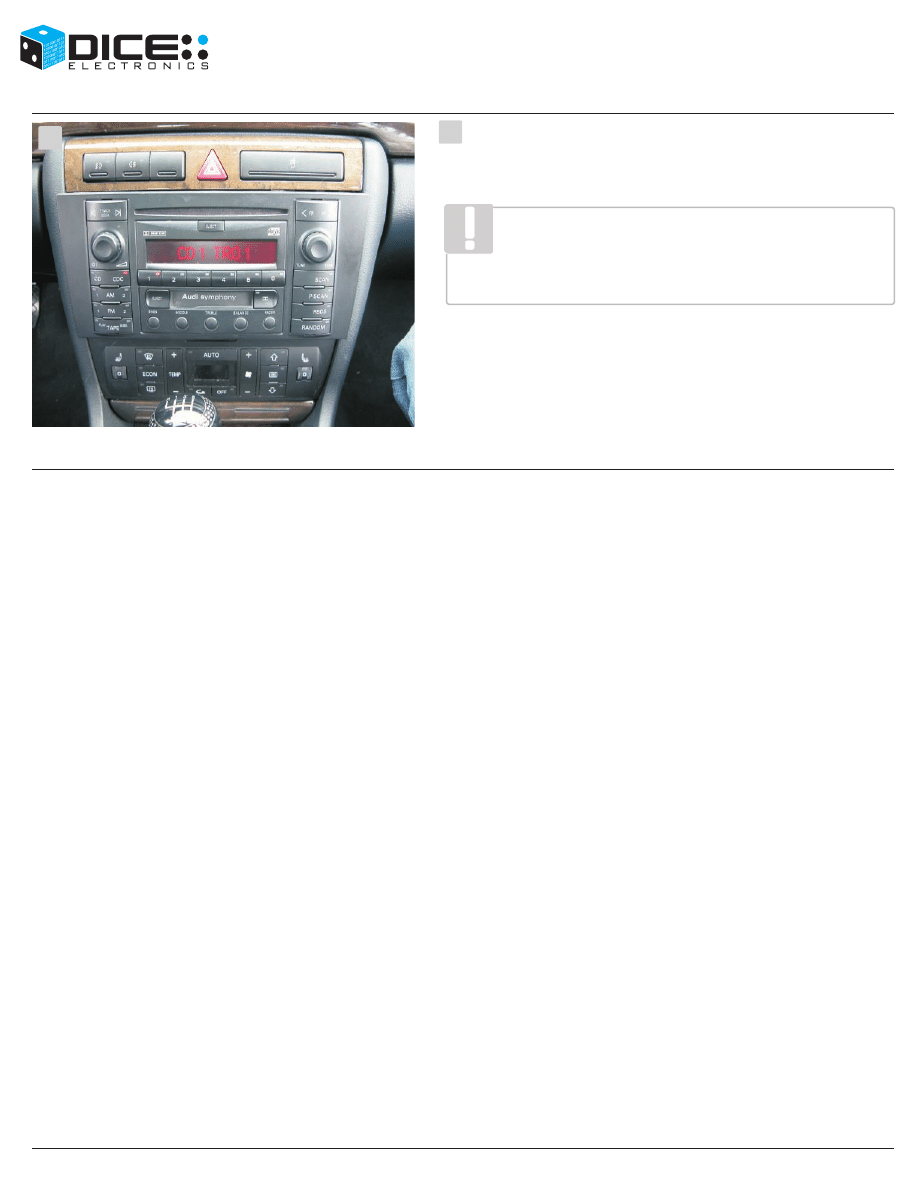
9. Verify all connections and re-install the radio back into
the vehicle by sliding it into the tray until it locks into
place. Route the docking cable as desired.
The DICE iPod Integration installation is now complete.
Use caution around the factory wiring while reinstalling
your radio. If the radio will not slide into place, do not try to
force it in place. Pull the radio back out and check for any
cables or other obstructions that may be in the path of the
radio.
9
This documentation
Keep away from children !
Proof of purchase is required.
is provided as an educational guide only and all included content, including written
information and images, is as is. No warranty explicit or implied is stated and neither DICE Electronics
LLC., nor any of its distributors, dealers or vendors shall be liable for any damages.
Driving is dangerous and requires concentration. Do not allow the DICE iPod Integration Kit to distract you
from prevailing traffic conditions. If in doubt, only operate the unit when stationary or ask a passenger to
operate it for you.
Do not submerge or expose to water or other fluids. DICE components are NOT water resistant and will be
damaged by water. You must properly insulate its casing if your installation environment may subject the
unit to water, such as a convertible vehicle.
DICE components may contain small parts, can be broken or disassembled
and components may become loose from vibration and heat. Small components and packaging materials
may be a choking hazard when handled by children.
Unauthorized reproduction or reverse engineering is strictly prohibited ! Intellectual property included is
distributed under specific license agreement with respective vendor(s). No warranty, explicit or implied, is
stated and neither DICE Electronics, LLC., nor any of its distributors, dealers or vendors shall be liable for
damages. IN NO EVENT SHALL DICE ELECTRONICS' LIABILITY EXCEED THE PRICE PAID FOR THE
PRODUCT FROM DIRECT, INDIRECT, SPECIAL, INCIDENTAL, OR CONSEQUENTIAL DAMAGES
RESULTING FROM THE USE OF THE PRODUCT, ITS ACCOMPANYING SOFTWARE, OR ITS
DOCUMENTATION.DICE Electronics, LLC. is a trademark. All other products are registered and
copyrighted by their respective owners.
Warranty and Support.
DICE Electronics products carry a one year limited warranty that protects you from defects in material and
workmanship of products sold by DICE Electronics or its authorized agents, distributors and dealers. We
do not warrant any installation. If you experience any problems or need help, please contact your DICE
Electonics retailer.
Warranty does not cover normal tear and wear, damages due to negligence, improper installation or
operation.
Disclaimer:
Wyszukiwarka
Podobne podstrony:
AudiForums com Audi A6 C5 IceLink iPod Install
AudiWorld com Audi S4 B7 Snub Mount Install DIY
AudiWorld com Audi A6 C5 Boor Blade Installation DIY
Audi BarryStuff com Audi RS6 C5 Sirius XM Satellite Radio DIY Install
AllRoadFAQ com Audi C5 2 7T 402 AirLoweringMod[1]
AllRoadFAQ com Audi C5 2 7T PressureLeakTesting
BentleyPublishers com Audi C5 OBD Diagnostics
Fourtitude com Audi A6 C5 Brake Information PartNumbers
Interfejs instalacji gazowych
BentleyPublishers com Audi A6 C5 Service Reset
BentleyPublishers com Audi A6 C5 4 2L Secondary Air Injection Maintenance
AllRoadFAQ com Audi C5 2 7T 402 AirLoweringMod[1]
BentleyPublishers com Audi A6 C5 Sunroof drain cleaning
VAG COM 512 4 USB Driver Installation Instructions
Bentley com Audi TB 01 03 07
więcej podobnych podstron