60
Issue 192 July 2006
CIRCUIT CELLAR
®
www.circuitcellar.com
does it perform much of the processing
required to construct a spectrum ana-
lyzer, it’s also highly integrated, simple
to lay out, and easy to control. When I
found this part, I knew I had to try to
design yet another spectrum analyzer.
The result of my effort is the single
4
″
× 4
″
PCB shown in Photo 1a.
You can use my spectrum analyzer
board as a stand-alone system with its
own keypad and display, or you can con-
nect it to a PC. If you do the latter, the
output will be displayed on the PC’s
screen and all of the keypad’s functional-
ity will be available with a mouse. You
can also connect the spectrum analyzer
I
t is funny how simple beginnings can
lead you down convoluted paths of learn-
ing and discovery. About a year and a half
ago, I was playing around with my auto-
matic garage door remote control unit. I
was experimenting with signal encoding
at the time, and I wanted to look at the
scheme used in my remote. One thing
led to another, and before I knew it, I was
trying to determine the RF frequency at
which the transmitter was operating.
I then built RF filters to look at sig-
nal levels and RF generators to aid in
prototyping and testing. Next came RF
mixing, frequency doubling, and so on.
You can see where I’m going here. I
became hooked on RF and all of the
art that goes along with getting RF cir-
cuits working properly. Currently, all
of my design-related pursuits are
focused on circuits and test equipment
at radio frequencies.
When it comes to RF test equipment,
the spectrum analyzer is the Holy Grail.
Unfortunately, both new and used RF
spectrum analyzers are extremely expen-
sive. There are a variety of home-brew
spectrum analyzers available on the ’Net.
Some are more sophisticated than others
because all of the circuit elements are
built from scratch. They feature complex
filter constructions, have precise PCB lay-
outs that turn PCB traces into inductors,
and include a lot of discrete components.
Other somewhat simpler designs fea-
ture integrated modules borrowed
from the TV/VCR tuner world.
These are easier to build, but they
lack sophistication and functionality.
As I was browsing the ’Net for an
alternative to a home-brew spec-
trum analyzer, I stumbled across the
Maxim MAX3550, which seemed
almost too good to be true. Not only
board directly to an oscilloscope to dis-
play the output spectrum. All of these
combinations are possibilities. The circuit
is relatively easy to build, and construc-
tion is pretty forgiving when it comes to
the layout and part selection processes.
Read on if you want a low-cost spectrum
analyzer for your future RF endeavors.
ANALYZER FUNDAMENTALS
A spectrum analyzer is used to display
the power distribution of a signal as a
function of frequency. This type of display
is said to be in the frequency domain as
opposed to being in the time domain as
displayed on the screen of an oscilloscope.
To illustrate the value of a spectrum
analyzer, let’s look at some typical
signals being analyzed with spec-
tral analysis.
If the input to a spectrum ana-
lyzer is a pure sine wave, the out-
put spectrum might look like
what you see in Figure 1a. The
arrowed line at F
1
indicates that
the frequency of the sine wave is
FEATURE ARTICLE
by Neal Martini
Compact Spectrum Analyzer
If RF testing is in your future, you’ll need a spectrum analyzer. But they don’t come cheap.
Your best bet is to follow Neal’s lead by building your own 4
″
× 4
″
system.
Po
w
e
r
P
1
F
1
Frequency
F
1
F
2
Po
w
e
r
Frequency
Po
w
e
r
Frequency
P
1
P
2
P
1
F
1
2F
1
3F
1
4F
1
Figure 1
—Compare the spectrum of a pure sine wave (a) to the
spectrum of two equal power pure sine waves (b) and the spec-
trum of a slightly distorted sine wave (c).
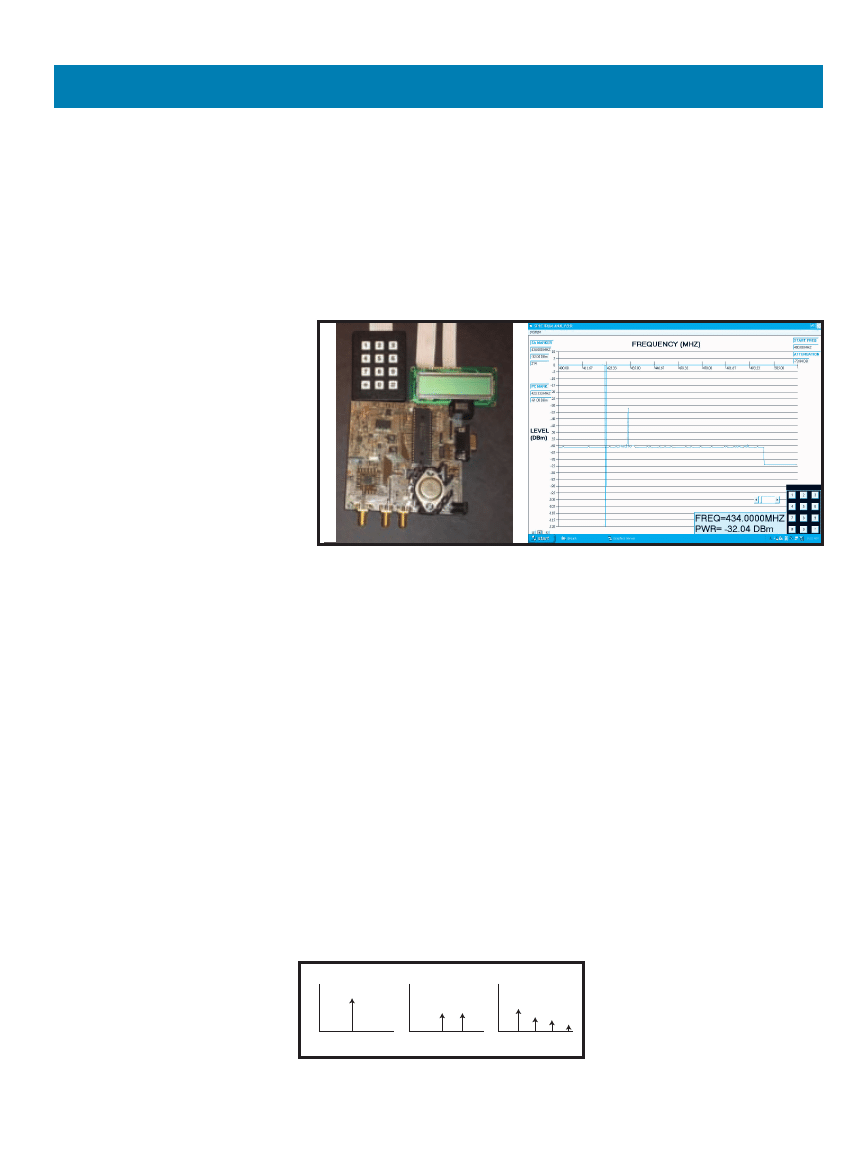
Photo 1a
—My spectrum analyzer’s PCB is shown here with an optional keyboard and LCD, which I unplugged for
clarity. The 4
″
× 4
″
PCB includes the complete spectrum analyzer with a 5-V power supply. b—The spectrum ana-
lyzer can be controlled as a stand-alone device from the keypad or from a virtual keypad using a mouse. The output
spectrum can be a cursored trace on an oscilloscope or a more elaborate PC screen display with a few extra whis-
tles and bells. Alternatively, the power level at a single frequency can be displayed on the LCD.
a)
b)
c)
b)
a)
www.circuitcellar.com
CIRCUIT CELLAR
®
Issue 192 July 2006
61
F
1
and the power level is P
1
. If
you have an oscilloscope that
operates at RF frequencies, you
can get the same information
from its screen. But oscillo-
scopes that operate at up to
1 GHz are extremely expensive.
Figure 1b illustrates the spec-
trum analyzer output that occurs
if your input signal is the sum of
two sine waves of different fre-
quencies and equal amplitude.
There are two components to
the signal, and the frequencies
and power levels of each compo-
nent are displayed. Even if you
were to use a high-frequency
oscilloscope, this information
would be difficult to discern from the
oscilloscope’s display.
Yet another example of spectrum
analyzer output is shown in Figure 1c.
This is the output that results when a
distorted sine wave is the input signal.
The components at the various fre-
quencies show the amount of harmon-
ic distortion contained in the signal.
A spectrum analyzer facilitates other
operations too. You can use one to deter-
mine filter responses, measure field
strength, tune antennas, locate noise
sources, and debug RF circuits. As
soon as you have a working spectrum
analyzer, you’ll wonder how you ever
accomplished anything without one.
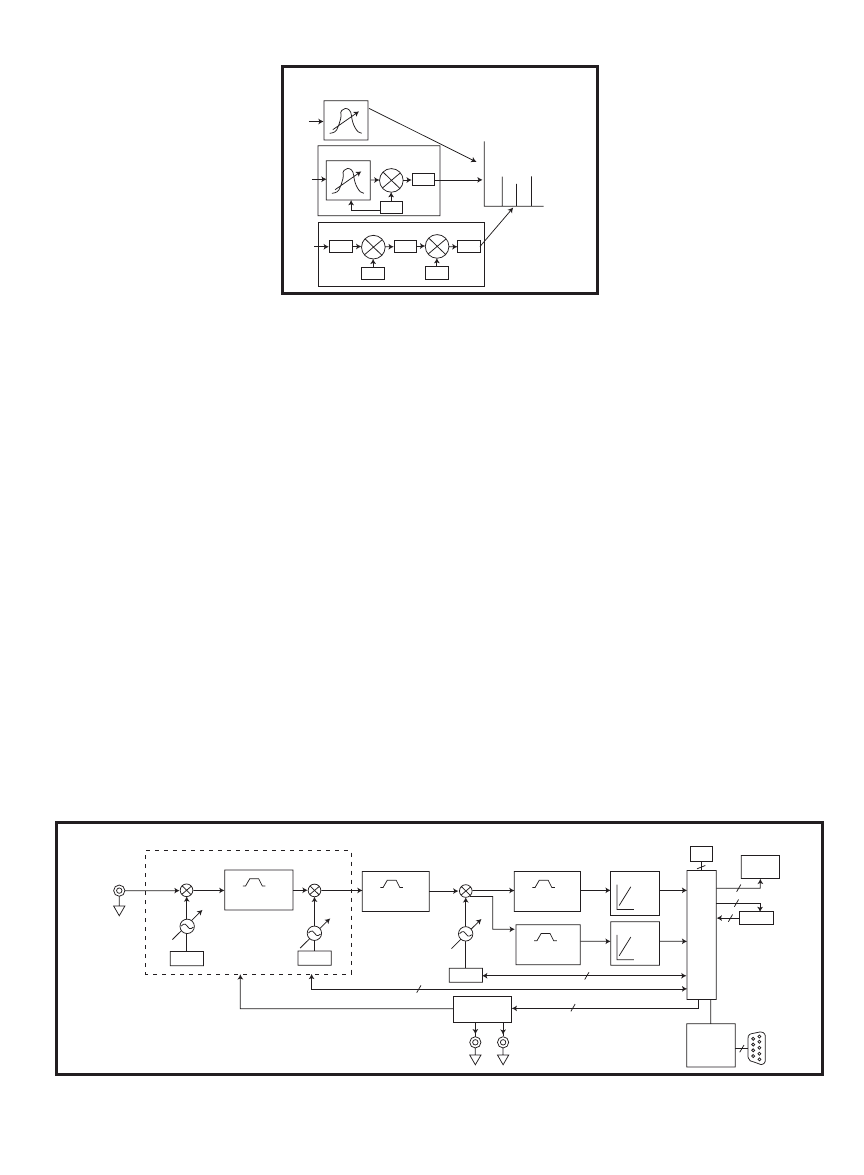
ARCHITECTURE CHOICES
Let’s look at some spectrum analyzer
architectures so you can better under-
stand my design. Figure 2 illustrates
three different spectrum analyzer archi-
tectures: swept filter, heterodyne with
tracking filter, and double conversion.
The swept filter analyzer varies the
passband of a band-pass filter (BPF)
over the frequencies to be covered (see
Figure 2a). It produces an output voltage
that’s proportional to the amplitude
levels of the various frequency compo-
nents. Although it appears simple, the
direct implementation of narrowband fil-
ters variable across 1 GHz is difficult.
The heterodyne with a tracking filter
approach is much easier to implement
(see Figure 2b). It has been the basic
approach used in radio receivers for years.
Basically, a voltage-controlled oscillator
(VCO) shifts the frequency of interest into
the passband of the fixed-frequency nar-
rowband BPF located at the output. The
purpose of the tracking filter is to elimi-
nate any signals located at the image fre-
quency before the signal enters the mix-
ing process. This is necessary because the
mixing process produces both the
sum and difference frequencies,
which would result in unwanted
signals being shifted into the BPF’s
passband without the tracking
filter. Because this tracking filter
doesn’t have to be too narrow to
reject the image frequency compo-
nent, it lends itself to an easier
implementation than the tracking
filter in the swept filter approach.
Modern high-frequency receivers
use a double-conversion architec-
ture (see Figure 2c). The beauty of
this approach is that there are no
tracking filters to deal with. The
added complexity is a second mix-
ing stage. The front end fixed LPF
removes components outside the highest
frequency range of interest. The first
mixing stage moves the signal frequency
component of interest up in frequency
into the fixed passband of the first BPF.
The shift up in frequency causes the
image frequency to be above the fixed
passband of the input low-pass filter
(LPF), so there is no image frequency
content in the passband of the first BPF.
The second mixing stage brings the
frequency of interest back down. This
allows extremely narrowband final filters
to be used for maximum selectivity.
I used the double conversion architec-
ture for my spectrum analyzer design.
Why? Because it is relatively easy to
implement fixed filters and variable-
frequency VCOs.
SIGNAL PROCESSING
My spectrum analyzer is fairly sim-
ple (see Figure 3). Diagrams showing
Tracking
filter
Input
Tracking filter
BPF
VCO
Mixer
BPF
LPF
Mixer
VCO
BPF
Mixer
VCO
Input
Input
Power
Frequency
Figure 2a
—The center frequency of a narrowband filter is swept across
the frequencies of interest. b—The VCO shifts the frequency of interest
into the passband of the BPF. c—The two mixers shift the frequency
into the passband of the BPF without needing a tracking filter.
Input
1,274–2,111 MHz
PLL
F
C
= 1,226 MHz
BW = 65 MHz
IF 1
BPF1
VCO 1
0–1,000
MHz
IF 2
VCO 2
1,180.25 MHz
Mixer 1
F
C
= 45.75 MHz
BW = 5 MHz
BPF2
PLL
VCO 3
33–37 MHz
Mixer 3
F
C
= 110.7 MHz
BW = 330 kHz
BPF3
F
C
= 10.7 MHz
BW = 7.5 kHz
BPF4
PLL
Mixer 2
V
PWR
V
PWR
MCU
ICD
Programming
connector
LCD
Keypad
Control
Four-channel
DAC
Control
Control
RF Gain control
To oscilloscope
vertical
To oscilloscope
external trigger
MAX232A
RS-232
Connector
to PC
Figure 3
—Three frequency conversion stages translate the frequency of interest into the passband of the final narrowband filters and log amplifiers. The PIC18F4520 micro-
controller constructs the spectrum and drives the various output devices. The PIC18F4520 microcontroller also controls all of the conversions and gains.
a)
b)
c)
62
Issue 192 July 2006
CIRCUIT CELLAR
®
www.circuitcellar.com
what the frequency spectrum looks
like at various stages of signal process-
ing (assuming the analyzer is locked
on an 800-MHz input sine wave) are
posted on the Circuit Cellar FTP site.
The front end of the process is basically
the double conversion architecture.
The first mixer/VCO moves the fre-
quency of interest up to 1,226 MHz,
the passband of the BPF1. For the
800-MHz hypothetical input signal,
VCO1 is set to 2,026 MHz.
Notice that there is no LPF at the
front end of the spectrum analyzer
like that in the double conversion
approach. The LPF needs to be only
2 GHz to reject the image frequency
components. I didn’t include an LPF
because my applications typically
don’t have content higher than 2 GHz.
If your application is different, you
can add an external BNC-connected
LPF. Also note that the VCOs are
phase-locked-loop (PLL) controlled for
high stability and ease of control. More
on PLLs later.
The second mixing stage shifts
the frequency of interest down to
45.75 MHz, the center of the BPF2’s
passband. The BPF2’s output is a 6-MHz
wide region of the spectrum centered
at 45.75 MHz. As you’ll learn when I
describe the hardware, many of the
center frequency and filter bandwidth
choices were dictated by the parts I
selected.
I chose two resolutions for the spec-
trum analyzer: one for broad frequency
looks and one for close frequency
examination. The coarse spectrum res-
olution bandwidth is 330 kHz. The
finer resolution bandwidth is 7.5 kHz.
These resolutions are readily available
in band-pass filters with center fre-
quencies of 10.7 MHz. The problem is
that the signal of interest is 45.75 MHz,
so another conversion stage is required
to bring the frequency of interest
down to 10.7 MHz. Mixer 3 provides
the required down conversion.
The 10.7 MHz centered content is
now delivered to BPF3 and BPF4, each
with their respective bandwidths. The
final task is to convert the output
voltages of the two filters to power
levels. Log amplifiers provide this
functionality by producing an output
voltage proportional to the log of the
input voltage. The log amplifier out-
puts are delivered to the microcon-
troller for display. I used a Microchip
Technology PIC18F4520 microcon-
troller for this project.
The PIC18F4520 microcontroller
controls the frequency scanning of the
RF portion of the spectrum analyzer. A
coarse frequency stepping of 330 kHz
is accomplished by varying the VCO1’s
frequency. The finer-resolution 7.5-kHz
stepping operation is accomplished by
varying VCO3. There are high- and
low-sensitivity operating modes.
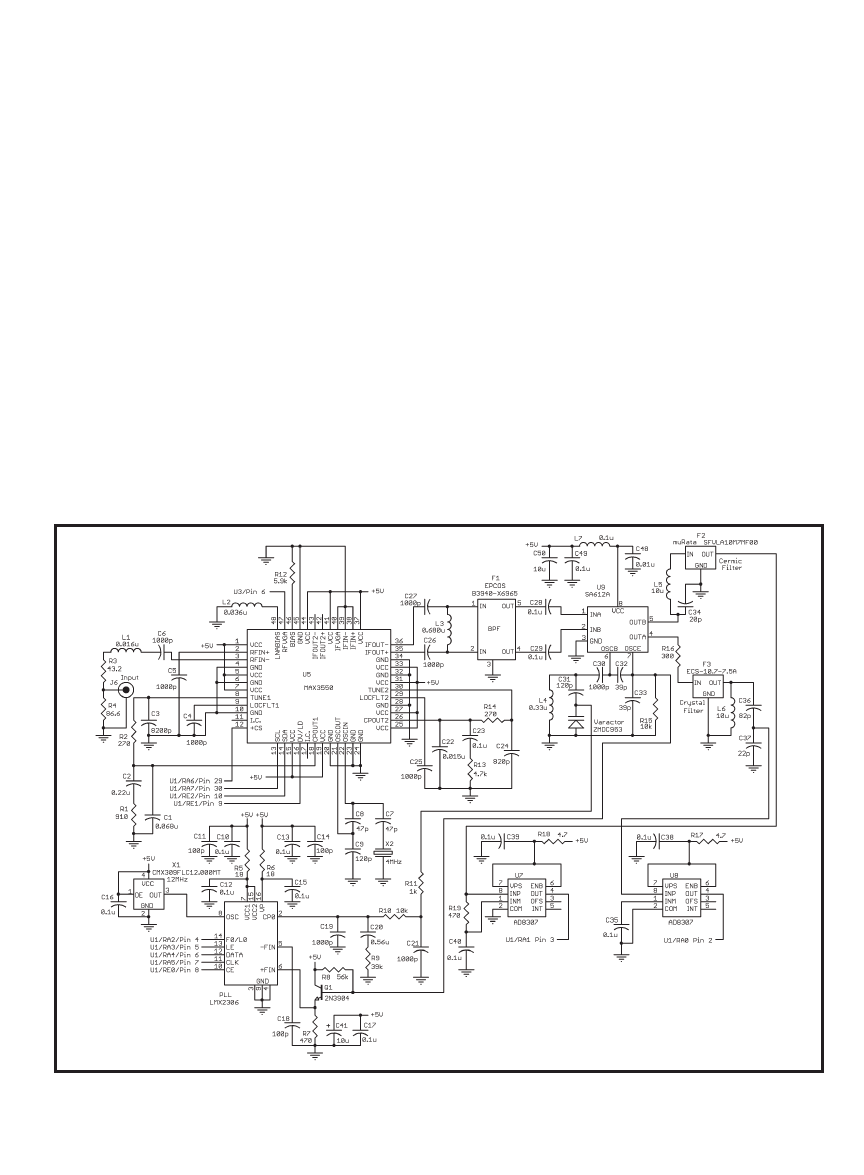
Figure 4
—The MAX3550 integrates many of the spectrum analyzer’s front-end functions. The Philips Semiconductors SA612A mixer shifts the signal of interest to 10.7 MHz for
filtering. The Analog Devices AD8307 amplifier performs the conversion to decibels relative to 1 milliwatt (dBm).
64
Issue 192 July 2006
CIRCUIT CELLAR
®
www.circuitcellar.com
is the IC that got me interested in tak-
ing a crack at a home-brew spectrum
analyzer.
There are several ICs on the market
that are said to have single-chip TV
functionality, but I haven’t found any
with the level of integration and ease
of use of the MAX3550. The chip con-
tains all of the components necessary
to perform double conversion tuning.
It has the necessary variable gain RF
amplifiers, double-balanced mixers, a
band-pass filter, and PLL frequency
synthesizers.
Other one-chip solutions for TV
tuning require external VCO tuning
inductors and external varactors. The
MAX3550 has eight digitally selec-
table tank circuits and the necessary
varactors on the chip. Maxim has
somehow found a way to integrate the
required inductors and capacitors on
the chip, which isn’t an easy task over
the wide frequency operating range.
The operating frequency range extends
from 50 to 878 MHz, the standard TV
frequency space, while providing 60-dB
RF gain control. The response across
These two modes of operation are
controlled by varying the RF gain in
the first mixing stage (also under the
control of the PIC18F4520 microcon-
troller).
My spectrum analyzer can display
its output spectrum on an LCD, an
attached PC, or directly on an oscillo-
scope. The PIC18F4520 microcon-
troller uses a DAC to generate the sig-
nals to drive the oscilloscope. An RS-
232 interface is included to communi-
cate with a PC. The PIC18F4520
microcontroller also responds to com-
mands from the optional keypad and
drives the LCD to display the power
level of a user-selected frequency. The
system includes a connector so you
can use a firmware development sys-
tem to in-circuit program the micro-
controller.
HARDWARE FRONT END
Figure 4 (p. 62) shows the RF por-
tion of the spectrum analyzer. The
front end centers on the MAX3550
broadband TV tuner IC, which is a
48-pin QFN, 7 mm × 7 mm IC. This
this frequency range is flat, typically
0.3 dB. The high-quality local oscilla-
tors have superior phase noise per-
formance of –86 dBc/Hz at 10 kHz.
The integrated filter achieves 68 dBc
of image rejection. Device program-
ming and configuration are easily
accomplished with a standard three-
wire interface to the microcontroller.
I am actually using the chip from
10 to 956 MHz, sacrificing some accu-
racy at the very high and very low fre-
quencies. All that’s needed to support
this part are a handful of SMD resis-
tors and capacitors to form the PLL
loop filters and to do normal bypass-
ing. A 4-MHz crystal is also needed.
The MAX3550 requires a single 5-V
supply.
Another thing that attracted me to
the MAX3550 is that Maxim offers an
evaluation kit for testing it. The beauty
of this was that I could copy the cir-
cuit design in the kit, which ensured
that the part would perform as speci-
fied. The evaluation kit also came
with a piece of software to exercise
the part using a PC. This enabled me
66
Issue 192 July 2006
CIRCUIT CELLAR
®
www.circuitcellar.com
to copy the values that were used for
setting up the various PLL divider reg-
isters and to ensure specified perform-
ance once again.
The BPF in the chip actually has a
movable center frequency that’s used
to avoid a problem that can occur in
the double-conversion process. It turns
out that in the process, unwanted beat
frequencies are generated from har-
monics of the two local oscillators.
The MAX3550 allows the center fre-
quency of its internal BPF to be shift-
ed slightly when these beat frequen-
cies come into play. This moves the
beat frequencies outside the output
BPF’s passband. I used the software
that came with the evaluation kit to
decide how to control the inter-
nal BPF’s center frequency.
The MAX3550’s output is fed
into a 6-MHz wide EPCOS
band-pass SAW filter centered
at 45 MHz. This filter, which is
contained in a five-pin SIP
package, has an out-of-band
rejection of higher than 50 dB,
which is excellent. I used it
because it’s the same filter used in the
evaluation kit. I wanted to ensure
there weren’t any impedance-matching
issues. The filter has a steep response
and is designed for use with standard
TV channel spacing.
CONVERSION DOWN
The conversion of the 45.75-MHz cen-
tered signal down to 10.7 MHz is accom-
plished with a Philips Semiconductor
SA612A double-balanced mixer/oscil-
lator and a National Semiconductor
LMX2306 PLL frequency synthesizer.
The SA612A contains a differential
input mixer with an input impedance
that closely matches that of the EPCOS
filter output, so no impedance-matching
components are required. The SA612A,
which can receive inputs at –119 dBm,
has a reasonable third-order intercept
that’s typically –13 dBm. It also contains
a high-frequency common collector
transistor that can be configured as a
local oscillator for the mixing process.
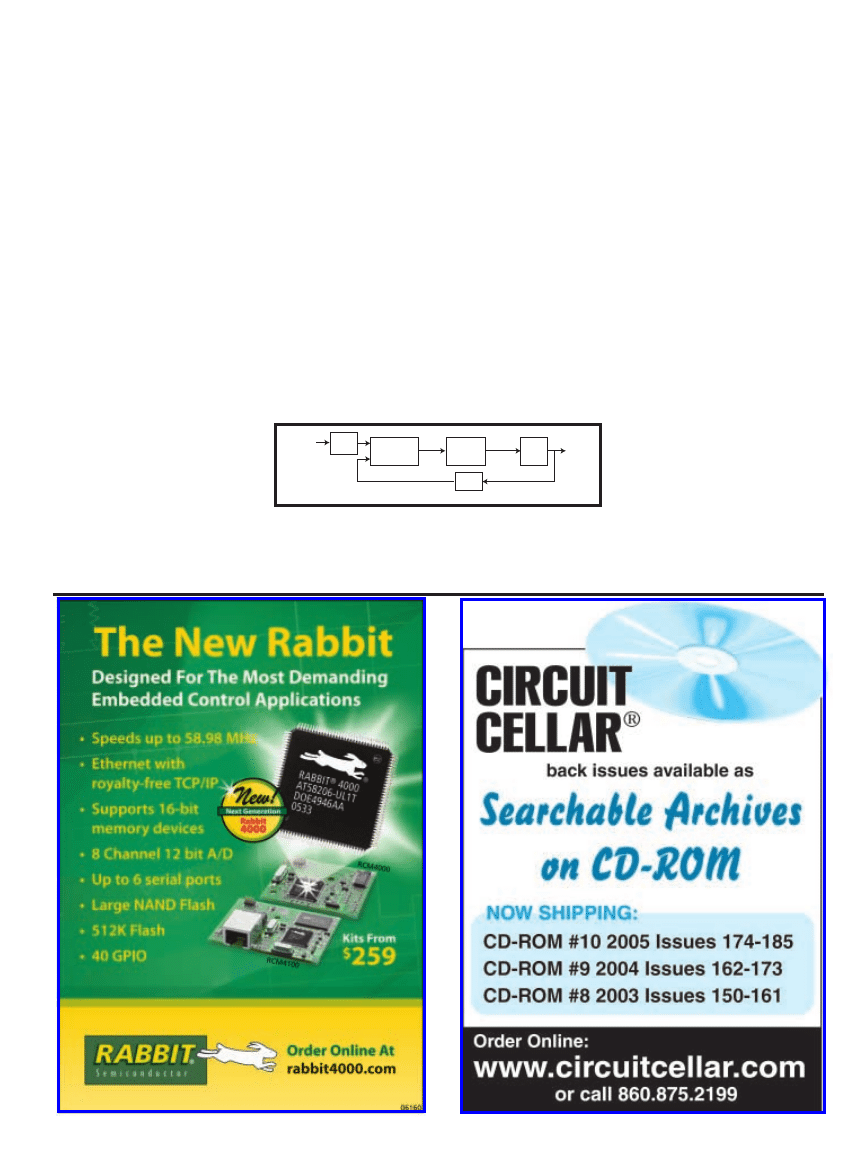
Before I describe the actual circuit,
let’s look at what makes up a PLL.
Figure 5 shows a PLL-controlled VCO.
As you can see, the voltage V
TUNE
con-
trols an oscillator’s frequency of opera-
tion. The VCO output is divided by
factor N. A fixed frequency reference
is divided down by factor R. These
two divided-down signals are fed into
the phase comparison box whose out-
put is an error signal proportional to
the difference in frequencies of
the two divided-down signals.
The error signal is passed
through a loop filter. V
TUNE
is
changed until the divided-down
VCO frequency matches the
divided-down reference frequen-
cy. At this point, the loop is
said to be in lock, and the VCO
output remains stable locked to
Refence
input
÷ R
Phase
compare
Loop
filter
Error
VCO
÷ N
V
TUNE
Output
Figure 5
—An error signal is generated in the comparison of divided-down
versions of the VCO output and a reference input. The loop filter conditions
the error signal. It corrects the VCO tuning voltage until the output gets to
the desired frequency.
www.circuitcellar.com
CIRCUIT CELLAR
®
Issue 192 July 2006
67
the frequency dictated by the values
set in N and R.
In the spectrum analyzer implemen-
tation of a PLL, the frequency dividing
and phase comparison is accomplished
by the LMX2306. The fixed reference is
provided by a 12-MHz oscillator clock
source. A 2N3904-based buffer delivers
the VCO output signal to the LMX2306.
This buffer is necessary because the
LMX2306’s +FIN input contains a
prescaler that may produce some tran-
sients. The buffer keeps these transients
away from the SA612A mixer. The
LMX2306 contains several internal
registers that control how it operates,
all of which are easily interfaced to
the PIC18F4520 microcontroller. For
example, three registers (A, B, and R)
control the PLL frequency. The fre-
quency of operation is set as follows:
The phase error measured by the
LMX2306 produces current pulses at
its CP0 output that have a duty cycle
proportional to the amount of frequen-
cy error. This CP0 output is fed into
the loop filter made up of three capaci-
tors and two resistors that are con-
nected as shown to the CP0 output.
This loop filter’s design is critical. It
can make or break the quality of your
PLL system. It influences the speed at
which the loop responds to requests to
change frequency (loop bandwidth). It
also minimizes the effects of spurs
generated by things like component
leakage and current pulsing (spur
gain). Lastly, it influences the output
sine wave’s stability after it’s
locked (phase margin/phase
noise). There are books on the
market that describe how to opti-
mize the loop filter design.
Fortunately, there is a much
easier way to come up with a
design for this loop filter.
National Semiconductor’s
WEBENCH online electrical sim-
ulation tool will do all of the
heavy lifting for you. Simply
enter a few key parameters like
the frequency range, the frequen-
cy step size, the reference fre-
quency, and the power supply
that you want to use, and
Frequency
MHz
=
B + A
R
8
12
(
)
×
WEBENCH will essentially create the
design. It will generate a schematic
and a detailed parts list that includes
vendor part numbers. WEBENCH will
even tell you which VCO and PLL
chips to order.
After the tool completes the design,
it allows you to change part values
and examine the effects on perform-
ance. All critical response, gain, and
stability values for your design are cal-
culated and graphed. As a final offering,
you can even order a National PCB
that contains the design in hardware
form. This is one of the best online
tools for a complex task that I have ever
seen. National, give the hard-working
engineer who put this thing together a
big raise!
Unfortunately, the WEBENCH pro-
gram didn’t have a standard VCO to
recommend that satisfied the frequen-
cy requirements for my spectrum ana-
lyzer. This required me to design a
custom VCO that operated from 34 to
36 MHz. This tool enabled me to input
the parameters describing my custom
VCO. I then proceeded to design the
loop filter as before.
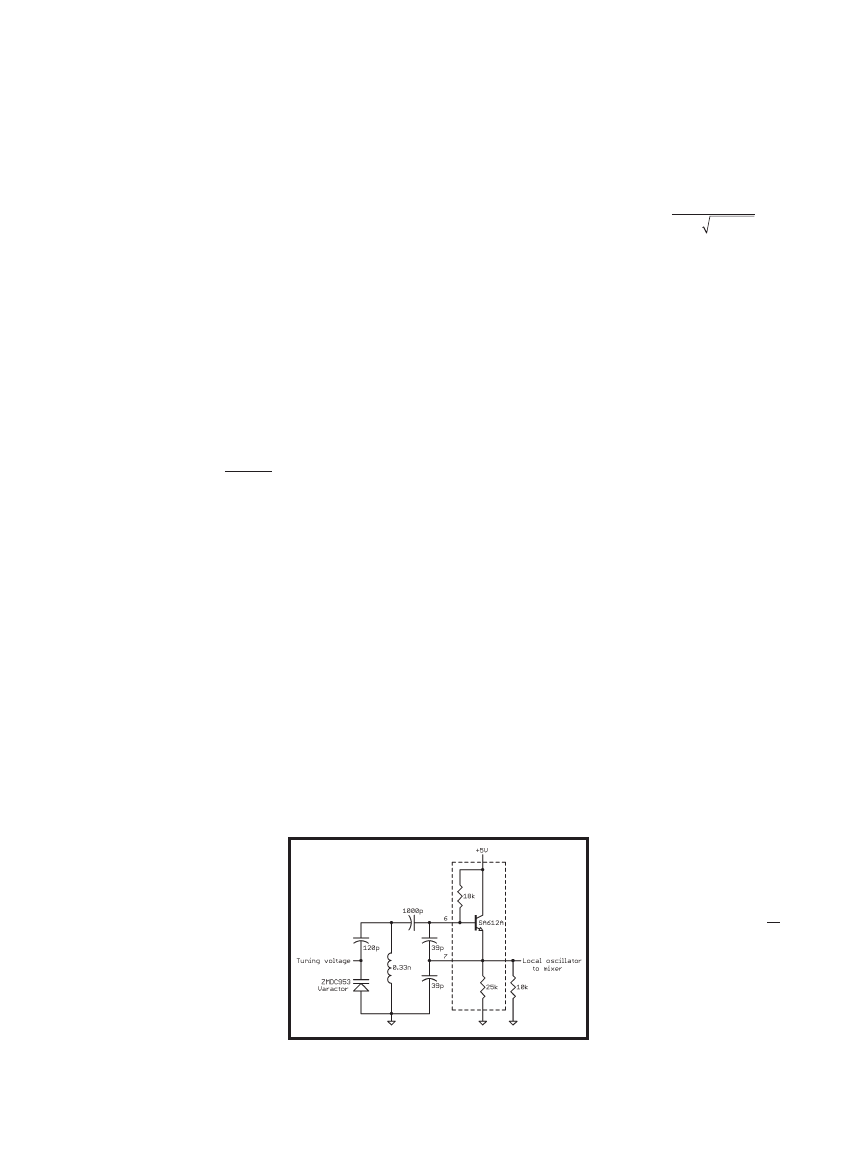
The oscillator is a classic common
collector Colpitts design that uses the
biased high-frequency transistor inter-
nal to the SA612A as the active ele-
ment (see Figure 6). It employs a Zetex
Semiconductors ZMDC953 varactor
to provide variable capacitance to tune
the overall LC tank that sets the oper-
ating frequency. The capacitance of
the varactor varies from approximately
26 to 84 pF as the tuning voltage varies
from 4 to 1 V.
The overall equivalent capacitance
C
EQ
resulting from the 120-pF capaci-
tor in series with the varactor and the
paralleling of the two 39-pF series
capacitors (in conjunction with the
inductor) determines the circuit’s
oscillating frequency:
When the C
EQ
is around 62 pF, the cir-
cuit oscillates at the nominal 35 MHz.
Rather than adding more rigorous
loop gain and start-up criteria to the
design process, I went with the first-
order look and used parts I saw in a sim-
ilar design. The oscillator worked fine
when I made the prototype, although
the output amplitude was lower than
the 200 mV
PP
needed to drive the
SA612A mixer and PLL inputs. I just
used brute force and added the 10-k
Ω
resistor from the emitter to ground. As
a result, the output amplitude increased
as needed. This resistor increases the
circuit’s transconductance (g
M
), thus
increasing amplitude and ensuring
start-up.
There’s an important gotcha to con-
sider when you’re dealing with fre-
quency synthesizers. So far, you’ve
been under the assumption that the
reference input (12 MHz in this case)
is exact. In fact, if you use a standard
reference source like the one used
here, the frequency is typically off by
several parts per million. The clock
source I used was actually 12,000,080 Hz.
Because a divided-down version of this
is what’s compared to a divided-down
version of the VCO output, the VCO
output frequency will be slightly
off. If the reference signal is
divided by R and the VCO output
is divided by N:
This is relatively easy to
account for in the firmware, so
don’t panic. Incidentally, this
same analysis applies to the PLLs
internal to the MAX3550. Any
error in the 4-MHZ clock driving
the MAX3550 must be accounted
for when coming up with the
final frequency spectrum.
Frequency error
=
Reference
Reference
N
R
IDEAL
ACTUAL
−
(
×
)
F =
L
C
EQ
1
2
π
×
×
Figure 6
—The spectrum analyzer uses a high-frequency transistor
internal to the SA612A mixer to implement a VCO. The total C
EQ
and
the 330-nH inductor determine the oscillating frequency. Changing
the voltage driving the varactor varies C
EQ
.
68
Issue 192 July 2006
CIRCUIT CELLAR
®
www.circuitcellar.com
also wanted to minimize the number
of support parts around the microcon-
troller, so the 40-pin version provided
the necessary I/O pins needed to
directly control the spectrum analyzer
without the use of external bus-shar-
ing hardware. All of the I/O pins are
used except one.
The spectrum analyzer does a lot of
arithmetic, so the 8 × 8 hardware multi-
plier in the PIC18F4520 is highly attrac-
tive. The PIC18F4520 has 1,536 bytes
of RAM onboard, which is needed to
hold a single pass of the spectrum ana-
lyzer without any external storage. The
PIC18F4520 has 32 KB of internal flash
memory, relatively fast ADCs, and a
wide word architecture that makes for
fast execution speeds.
The parts around the PIC18F4520
are fairly standard. There is hardware
for an RS-232 interface for running the
spectrum analyzer in PC Connected
mode. A standard 2 × 16 LCD and a
standard 4 × 3 keyboard are included for
FINAL SIGNAL PROCESSING
The 10.7-MHz centered signal at the
output of the SA612A is simultane-
ously fed to the high- and low-resolu-
tion paths of the spectrum analyzer.
An inexpensive ceramic filter accom-
plishes the lower-resolution 330-kHz
bandwidth filtering. The more difficult
higher-resolution 7.5-kHz bandwidth
filtering is done with a more expen-
sive crystal filter.
The passive components connected
to the inputs and outputs of these fil-
ters are there for impedance matching.
In the case of the crystal filter, this is
critical because the response of a crys-
tal filter can change dramatically if
there are mismatches. (To learn more
about the online tool I used to design
the matching networks, refer to the
web sites listed in the Resources sec-
tion of this article.)
The output levels of the two filters
now need to be converted to logarith-
mic power levels for the final step of
spectrum generation. In RF, the com-
mon unit for power is decibels relative
to 1 milliwatt (dBm):
The Analog Devices AD8037 loga-
rithmic amplifier is perfectly suited to
perform this required conversion. Its
output varies 25 mV/dBm over a 90-dB
dynamic range. It responds to signals
as low –75 dBm. In addition, it’s high-
ly stable and runs off a single power
supply.
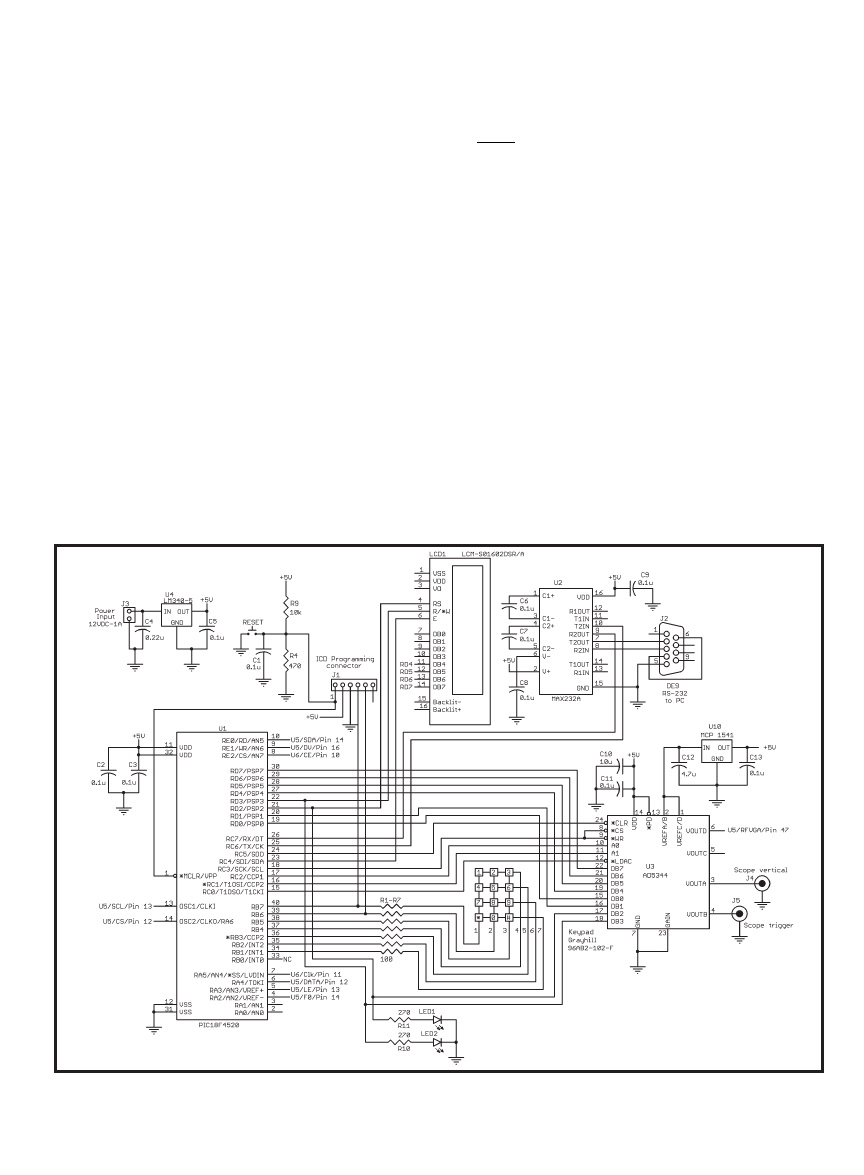
CONTROLLER HARDWARE
Figure 7 shows the controller portion
my spectrum analyzer. A PIC18F4520
serves as the controlling microprocessor.
I used the PIC18F4520 because it has an
internal clock source. Using the inter-
nal PLL and no external parts, the
chip runs at 32 MHz. Crosstalk to the
RF section is minimized because this
is all internal to the microcontroller. I
Power dBm
Power
mW
=
10
1
log
Figure 7
—The PIC18F4520 microcontroller is the heart of the controller. A minimum amount of support hardware is necessary. Multiple display and control options are inter-
faced to the microcontroller. A single 5-V supply is required.

www.circuitcellar.com
CIRCUIT CELLAR
®
Issue 192 July 2006
69
just have to replace the components
connected to the SA612A oscillator
pins with a fixed 35-MHz X’tal. You
could also leave out the oscilloscope
and keypad interface hardware. If you
do, you’d use the spectrum analyzer
in only its PC mode. This would still
be a useful tool that would serve you
well in many of your RF pursuits.
Good Luck!
I
Neal Martini (nealmartini@cableone
.net) holds an M.S.E.E. degree from
the University of Missouri, Rolla. He
is retired after working 24 years for
Hewlett-Packard in the LaserJet and
InkJet printing businesses. In addition
to being involved with a variety of
boards, Neal works independently in
product development in several appli-
cation areas. In his spare time, he
enjoys spending time with family,
woodworking, racquetball, golf, and
playing the piano.
PROJECT FILES
SOURCES
AD5334 DAC and AD8307 amplifier
Analog Devices, Inc.
www.analog.com
MCP1541 Voltage reference and
PIC18F4520 microcontroller
Microchip Technology, Inc.
www.microchip.com
LMX2306 Synthesizer and WEBENCH
electrical simulator
National Semiconductor Corp.
www.national.com
SA612A Mixer
Philips Semiconductors
www.semiconductors.philips.com
ZMDC953 Diode
Zetex Semiconductors
www.zetex.com
RESOURCES
Impedance Matching, www.hoflink.
com/~mkozma/match19c.html.
Loop Filter Design, http://webench.
national.com/appinfo/webench.
running the system in Stand-Alone mode.
The PCB also has a place to mount a
six-pin modular connector that you can
use to interface with the Microchip
ICD2 code development system.
Three analog signals are generated
in the spectrum analyzer and con-
trolled by the PIC18F4520. Two of
these are for driving an oscilloscope
when it’s chosen for output display.
The third signal gives the PIC18F4520
precision control of the MAX3550’s RF
gain. I chose a four-channel Analog
Devices AD5334 DAC to accomplish
these tasks because it’s a fast, easy-to-
interface, low-noise part. I added a
Microchip MCP1541 to provide a sta-
ble 4.096-V reference voltage for the
digital-to-analog process.
A final nice feature is that every-
thing runs from a single 5-V power
supply. Normally, RF circuits contain-
ing amplifiers and PLL require other
than 5 V to operate. But because of the
MAX3550’s high integration level, and
because the SA612A conversion step
was designed assuming only a 5-V sup-
ply, the power supply requirements
remain basic. Every RF component is
also meticulously bypassed to keep
the supply line clean. This allows the
5-V supply to be implemented with an
LM3405 voltage regulator and a few
local bypass capacitors. A heatsink is
required to supply the spectrum ana-
lyzer’s 375-mA load.
SOFTWARE & FIRMWARE
My spectrum analyzer has a lot of
functionality, and I will continue to
evolve some of the things that it can
do. The code for the PIC18F4520 is
written almost entirely in PBASIC,
making it easy to follow and readily
modifiable. The program for operating
in PC mode is written entirely in
Visual Basic (again, making it easy to
read and evolve). Although there is a
lot of code to perform all the functions
required by the PIC18F4520 and the
PC, there’s nothing too unusual that’s
worth noting. You may download the
code and Visual Basic files from the
Circuit Cellar
FTP site.
There are several key operating
specifications for the spectrum analyz-
er. There is about 1 GHz of frequency
covered at two resolution bandwidths.
The spectrum analyzer is capable of
seeing signals at –93 dBm with good
power level and frequency accuracies.
The spectrum analyzer’s frequency
range is from 10 to 956 MHz. The res-
olution bandwidth is 330 kHz at low
resolution; it’s 7.5 kHz at high resolu-
tion. The system’s sensitivity is –93 dBm
at low and high resolution, and its
maximum input level is 0 dBm.
The spectrum analyzer’s power
accuracy at low and high resolution is
less than 1 dB, and the internal attenu-
ation is 0 and 40 dB. The frequency
accuracy at low resolution is less than
166,666 Hz; it’s less than 2,500 Hz at
high resolution.
The spectrum analyzer’s interfaces
include RS-232, an LCD, a keypad, and
an oscilloscope vertical/trigger. The
spectrum analyzer requires 5 V and
375 mA at low and high resolutions.
The unit is extremely sensitive to low-
level signals, and it has good frequency
accuracy and resolution. Also, as I
explained earlier, there are several ways
to display the analyzer’s output and
command its operations (see Photo 1b).
It can be controlled as a stand-alone
device from the keypad or from a virtual
keypad on a PC screen using a mouse.
The output spectrum can be a cursored
trace on an oscilloscope or a more
elaborate PC screen display with a few
extra whistles and bells. Alternatively,
the power level at a single frequency
can be displayed on the LCD.
GREAT RF TOOL
I love working on a project that
requires me to learn new things. I like
it even better when I end up with a
product that’s useful and fun to use.
My spectrum analyzer exceeded my
expectations in terms of performance
and usefulness, and it has become a
part of my everyday set of RF proto-
typing tools.
If you’re a little nervous about tak-
ing on a project of this complexity,
you might want to consider imple-
menting only the 330-kHZ low-resolu-
tion bandwidth portion of the spectrum
analyzer. This will enable you to elim-
inate the LMX2306 PLL, the 10.7-MHz
crystal filter (and the AD8307 con-
nected to it), and the varactor-tuned
circuit attached to the SA612A. You’d
Wyszukiwarka
Podobne podstrony:
circuit cellar1995 06
circuit cellar1996 11
circuit cellar1995 12
circuit cellar1996 04
circuit cellar1991 04,05
circuit cellar1993 11
circuit cellar2001 04
circuit cellar2001 05
circuit cellar2000 02
circuit cellar1996 09
circuit cellar1996 08
circuit cellar1990 10,11
circuit cellar1994 08
circuit cellar1994 01
circuit cellar1996 12
circuit cellar2002 04
circuit cellar2004 01
Apress Java 6 Platform Revealed Jul 2006 1000th Release
więcej podobnych podstron