38
September 2002
www.linux-magazine.com
P
OV-Ray, the “Persistence Of Vision
Raytracer” [1], is a unique ray
tracing program. But its command
line interface has caused users occasional
headaches as the number of parameters
are quite confusing. The following article
introduces a couple of tools that help you
optimize the power of POV-Ray by
prompting you for critical parameters and
launching the rendering process at the
press of a button. Two of the candidates
offer far more than just simple front-end
functionality and provide you with a
WYSIWYG display for creating complex
scenes on screen.
The other programs will unfortunately
mean you tackling the POV-Ray scene
description language. Box 1 describes
how to install the raytracer. We tested all
our candidates with POV-Ray 3.1 and the
brand new POV-Ray 3.5.
The Candidates
Our test candidates are Peflp and tclPov,
which were programmed in Tcl/Tk, and
their GTK counterparts gPov, PovFront,
and Truevision. The KPovmodeler tool
rounds off the field. Some of these front-
ends are no spring chickens. Only
KPovmodeler and Povfront are still being
regularly updated, but bugfixes for all the
programs mentioned here are published
at irregular intervals.
These tools aim to save you typing in
the POV-Ray commands – either by
prompting you for them in a dialog or by
means of sliders, however, the offered
functionality by the individual programs
is varied: Peflp, gPov and tclPov only
offer common options. If you intend to
delve deeper into POV-Ray's treasure
trove, you might like to consider PovFront
instead. KPovmodeler and Truevision
stand up to comparison with Windows
front-ends for the ray tracer. The decisive
factor is their ability to help the user to
compile scenes without prior knowledge
of the POV-Ray scripting language.
Peflp
Peflp, the “POV-Ray Front-End For Lazy
People” requires both a pre-installed
POV-Ray
K N O W H O W
Front-Ends for POV-Ray
Well rendered
POV-Ray gives you the power to create beautiful virtual worlds and the right
front-end makes the tool easy to use, at the same time reducing development
time and increasing the fun factor.
BY FRANK WIEDUWILT
Tcl/Tk environment and the ImageMagick
tool collection to convert pre-rendered
scenes. Installation is simple, just expand
the peflp074.tgz archive and su to root to
copy the program file peflp to a directory
in your path, for example /usr/local/bin.
If after typing peflp & the program
complains about not being able to find
the defaultstamp.gif file, simply copy this
file from the peflp
archive to the
~/.peflp/stamps directory (you may need
to create the directory prior to this step).
When you first launch the program, you
are also prompted to enter the path to
POV-Ray.
The POV-Ray file you want to render is
one of the most important parameters, of
course. Additionally, you can choose the
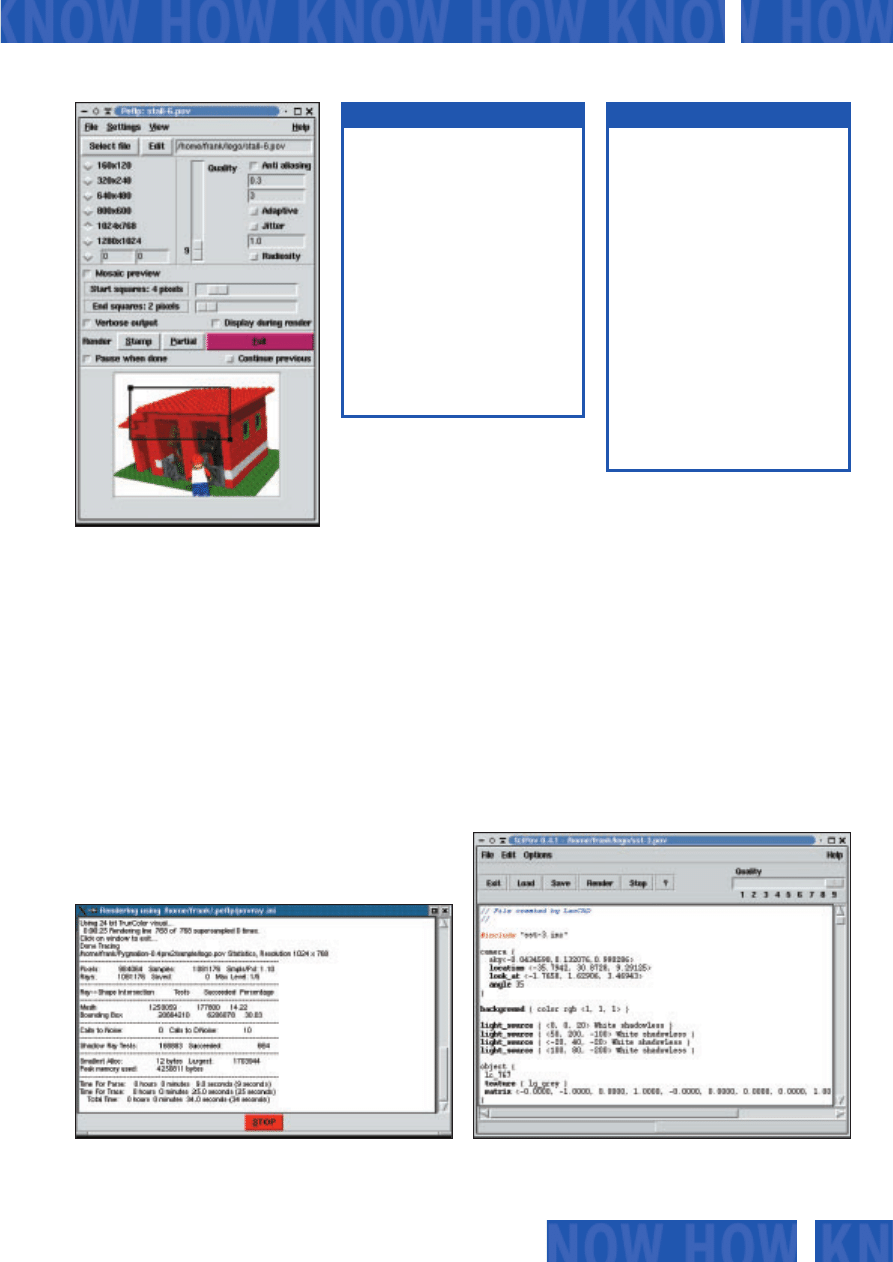
resolution (Figure 1) and opt to use Anti
Aliasing or define quality features for the
image you are creating. The option
Mosaic Preview allows you to view a low
resolution image of the result that will be
gradually enhanced.
You can choose Settings / General
Options to define the editor that you want
to use to edit your POV-Ray files when
you click Edit. You can also specify the
program you want to use for converting
the rendered images and the directory
where you will be saving your work.
It is also useful to render a small
thumbprint, or Stamp. Peflp offers this
option in the lower part of the screen.
This allows you to gain a first impression
of the lighting and composition without
having to wait while a full-scale image is
rendered. You can use the preview to
select a part of the image that you want to
render in a higher
resolution – just
click on Partial to
do so.
Peflt is a program without a lot of bells
and whistles that does exactly what it
promises: that is, it simplifies the POV-
Ray interface. However, this is not the
program to choose if you want to fine
tune a rendered scene; the feature set is
far too small.
tclPov
The archive file, tclPov-0.4.1.tar.gz, is
only a few kilobytes in size. It contains an
installation script install.sh, that you can
run (as root) in the directory where you
expanded the archive. You will be
prompted for an installation directory
(/usr/local/bin/tclpov makes). The files
you need to run the program are then
copied to the directory you specified.
39
www.linux-magazine.com
September 2002
K N O W H O W
POV-Ray
Figure 1: Peflp
Figure 2: Peflp rendering a file
Figure 3: Tclpov
The archive containing the current Povray
version 3.5, povlinux.tgz, is available on the
project website [1] . Use the following
syntax to expand the archive tar -xzvf
povlinux.tgz or alternatively a program such
as ark or guitar. After changing to the
directory created by this process, povray-3.5,
call the install script by typing ./install – you
need to be root to run the script. This copies
the required libraries to /usr/local/lib and
the executables s-povray and x-povray to
/usr/local/bin. s-povray uses the svga library
and does not need an X Window system;
x-povray was design for use with X.
Finally, working with user privelges, copy
the file povray.ini from /usr/local/lib to
.povray.rc in your home directory:
cp /usr/local/lib/povray.ini
~/.povray.rc
Box 1: Installing Povray
WYSIWYG: The “What You See Is What You
Get”model requires that the on-screen
display closely resembles the final (printed)
output.
Home directory: A directory used for storing
files and configurations for a user.The shell
can abbreviate the home directory to ~.
Tcl/Tk: Tcl is a scripting language that (in
combination with the TK GUI toolkit) can be
used for developing GUI programs.
GTK: A C program library containing the GUI
elements that was originally written for the
image processing tool, Gimp.
Path: The PATH environment variable
contains the directories in which the OS will
look for programs or scripts allowing the user
to omit the path.
GLOSSARY
POV-Ray
K N O W H O W
A short online help describes how to
use the program and explains all of the
settings you need for POV-Ray.
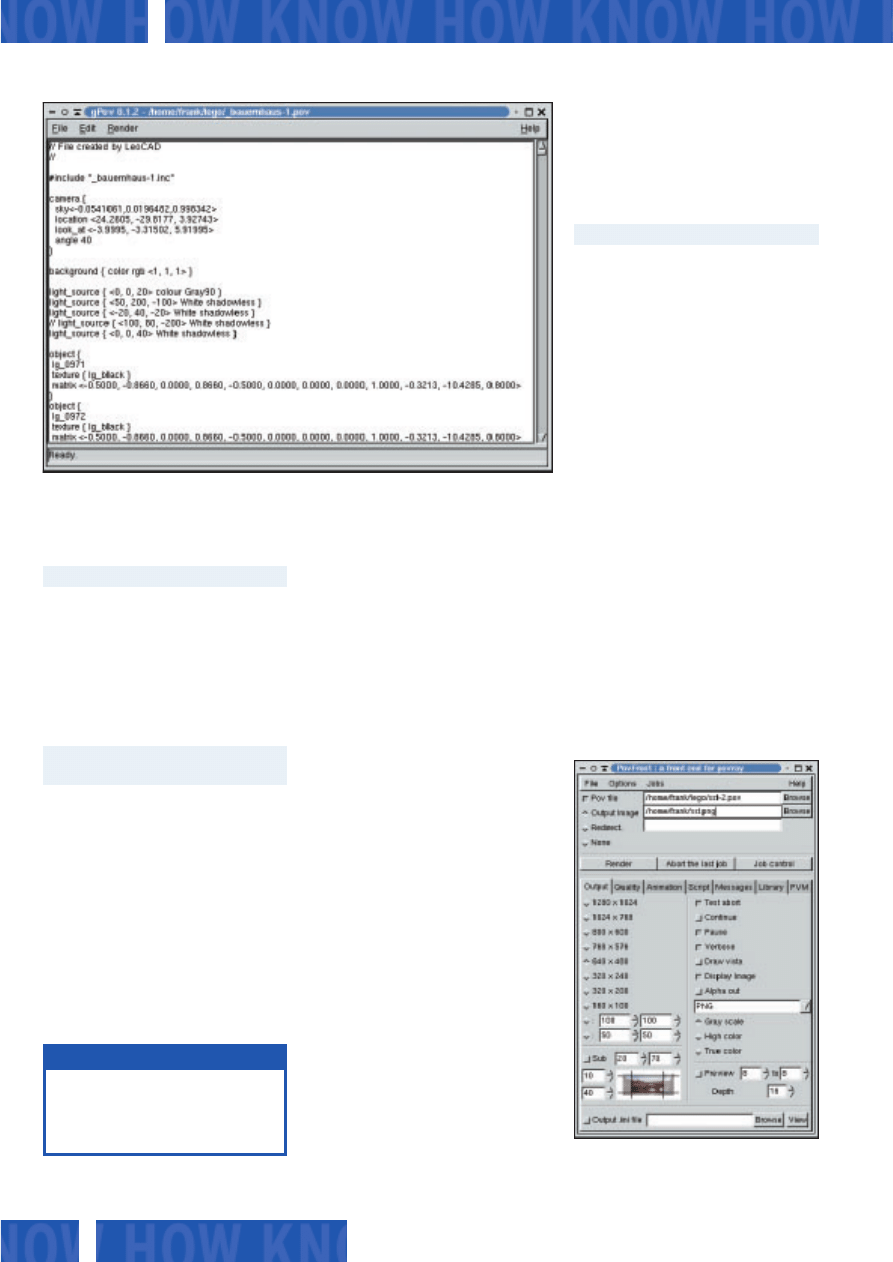
gPov
gPov from the gPov-0.1.2.tar.gz archive is
also by the developer of tclPov. The
installation of this C program keeps closer
to home ground: after pre-installing both
the GTK library and the accompanying
header files, run the make command in
the gPov-0.1.2 directory to create the new
program. While logged on as root, simply
call make install. You can then launch the
program by typing gPov & (Figure 4).
Again an integrated editor is available,
but in this case do not expect too many
features, not even syntax highlighting.
You are prompted for the rendering
parameters, but only for critical values
such as the quality, anti-aliasing and
image size. You can save any files you
create in jpeg, bmp, png, or gif format.
The program dropped to the bottom of
the division due to its instability, and
occasionally crashing with a memory
access error after clicking on a button.
PovFront
Following this disappointment, it is time
for a far more fully featured program:
PovFront. In addition to the Gimp toolkit
PovFront requires the libgtkglarea library.
After expanding the source archive
povfront-1.3.5.tar.gz), use the ./configure
syntax in the newly created povfront-1.3.5
directory and then type make in a shell to
compile the program. In our tests we
demonstrated that the program was far
more stable when compiled without
GNOME support. To do this you need to
set the --disable-gnome:
./configure --disable-gnome
flag when launching the configuration
script. You can use the third program in
this group make install to finally install
the program – you need to be root to do
so. The povfront & syntax calls the GUI
shown in Figure 5.
PovFront provides far more settings
than any other program we have looked
at so far. The options are available via
tabs in the lower part of the main screen.
The Output tab allows you to select the
image size, the output format and the
section that you want to render. Use the
Quality option to select the quality and
color depth for the image and to select or
deselect anti-aliasing. Use Library to
define the paths to the libraries which
contain the elements that POV-Ray will
need to access.
Click on the Render button to start the
ray tracer. A separate window allows you
to view the current state of the image.
You can then click on Abort the last job to
cancel the last rendering job or the Job
control will open a window with a list of
the jobs POV-Ray is currently performing.
What is missing is an integrated editor
40
September 2002
www.linux-magazine.com
You can launch the program using the
following syntax:
/usr/local/bin/tclpov/tclpov &
If the bad interpreter message is shown,
this means that the program could not
find the Tcl interpreter wish8.3: it should
be in /usr/local/bin. Just type which
wish8.3 to quickly discover where the
wish8.3 is hiding. Then working as root
create a suitable link, such as
ln -s /usr/bin/wish8.3 U
/usr/local/bin/wish8.3
Some users might find the tclPov GUI
slightly over the top (see Figure 3), but
the (albeit simplistic) editor that you
can use for scene “programing”, fills
most of the screen. And the Syntax
Highlighting feature should make your
job easier.
Use the Options menu to select settings
(such as the resolution and anti-aliasing)
for the rendering process. This menu also
lets you convert the rendered image into
a variety of graphic formats.
Figure 4: gPov
Figure 5: PovFront
Syntax Highlighting: This refers to an editor
highlighting commands, comments and any
variables in a program language by using
various colors.
GLOSSARY
that would allow the user to open POV-
Ray files for easy editing. Povfront was
not exactly stable during all our tests and
it often issued memory access errors just
before crashing the program when we
clicked on certain buttons.
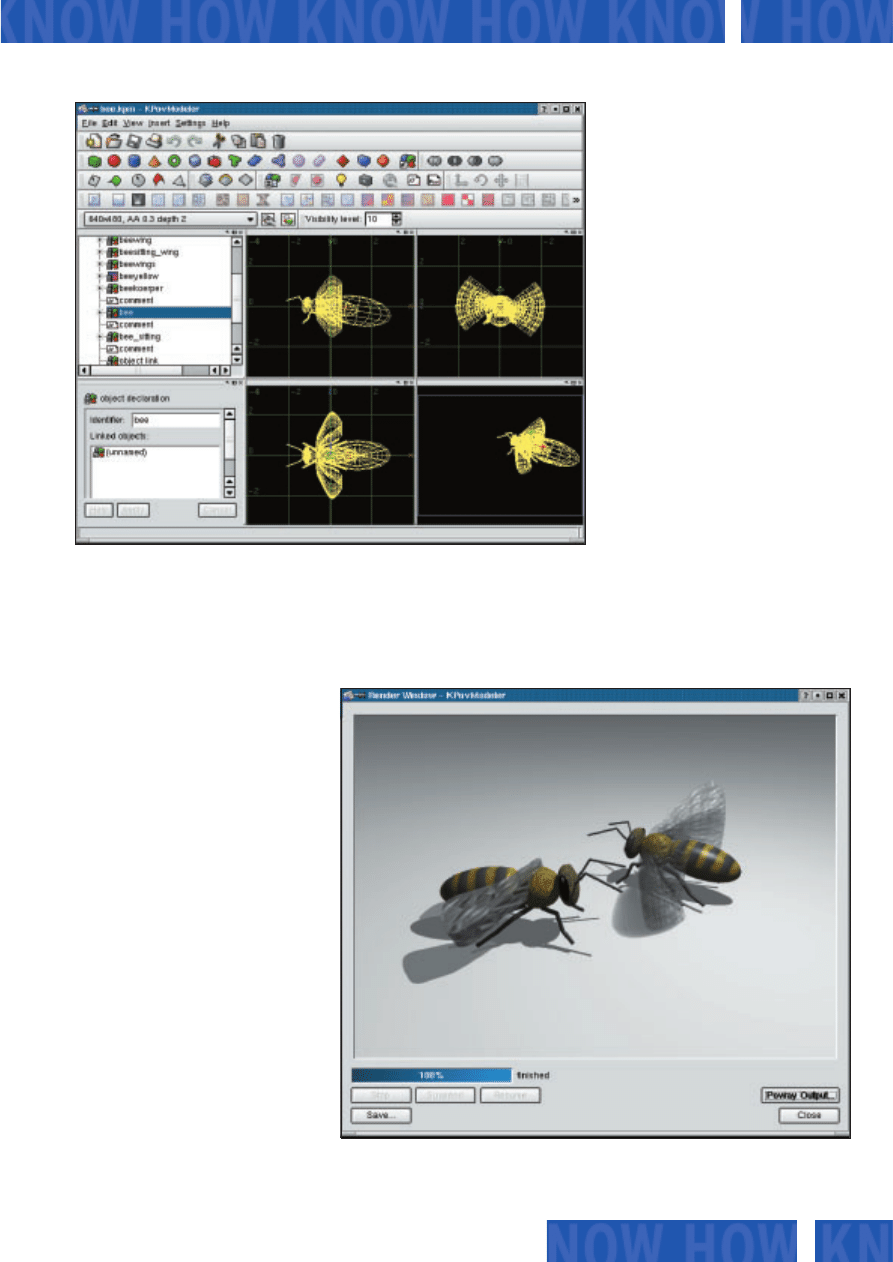
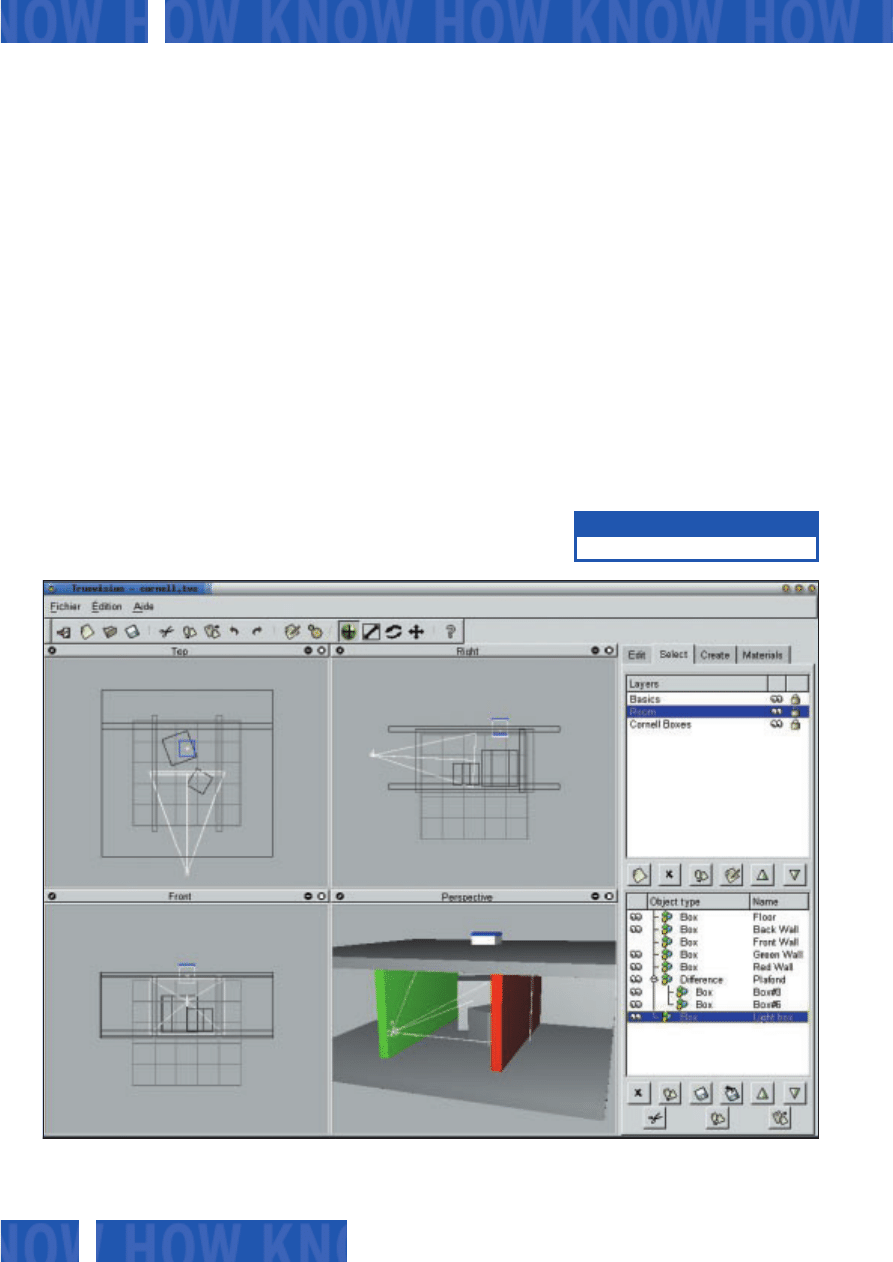
KPovmodeler
The tools we have covered so far were
useless without POV-Ray scene files being
created elsewhere. KPovmodeler goes a
few steps further, providing both a front-
end for the POV-Ray command and
allowing you to compile scenes.
The program website only offers the
sources at present – you will need to
compile the KDE software yourself. You
will need a current version of Qt 3.0.x
and the kde3-kdelibs package as well as
additionally the OpenGL, glut, glx, and
glu libraries plus headers.
Before compiling, you need to expand
the source file archive. Type tar -xzvf
kpovmodeler-0.2.tar.gz to do so and then
change to the directory, kpovmodeler-0.2,
and type the folowing commands in this
order: ./configure, make, and (again as
root) make install. After completing these
steps you can run the program by typing
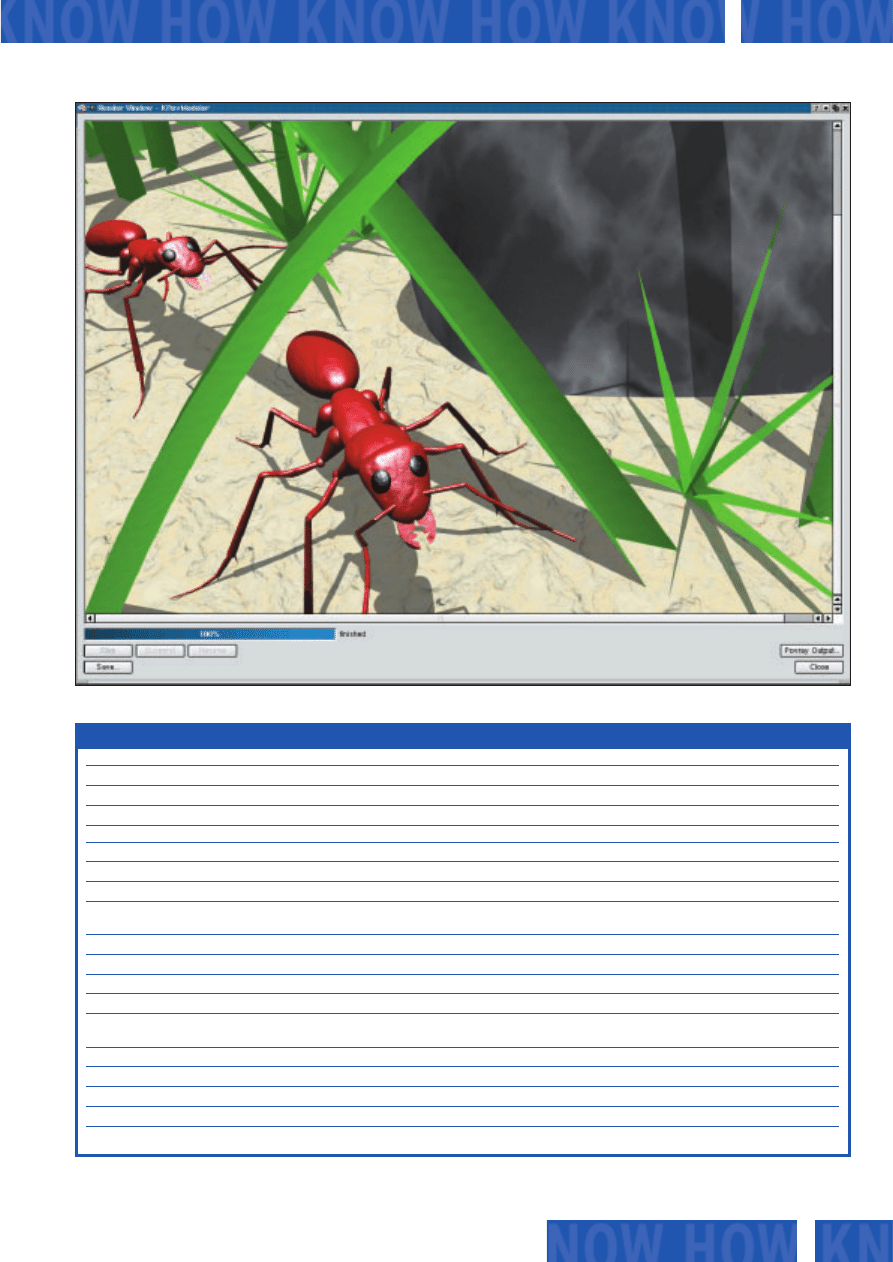
kpovmodeler in a shell (Figure 6).
The upper screen area of the program
contains some toolbars that provide
access to functions for the scene creation
and rendering. Below the toolbars and on
the left you will see a tree view showing
the objects that belong to the current
scene. The area on the lower left allows
you to edit the selected element. The
lower right area provides four different
views of the current scene.
KPovmodeler is not just for editing
existing POV-Ray files, it also helps you
be creative while defining new scenes. All
of the major geometric elements are
available. Various surfaces and structures
can be applied to them. A selection of
backgrounds is also available. After you
define a scene you can click on View /
Render in the menu to start rendering the
image with POV-Ray. The results will be
shown in a separate window (Figure 7).
The KDE Modeler provides you with a
useful menu item, Settings / Configure
KPovModeler, where you can define the
individual settings, this is where you will
want to define screen colors and starting
sizes for the objects you will be inserting.
The program is suitable for creating
complex scenes and provides you with a
useful interface for inputing objects –
even going through the list of features is
beyond the scope of this article. You can
create and modify scenes without writing
a single line of POV-Ray code. Although
the version we tested was only 0.2, the
program was extremely stable and did not
crash once during our test series.
The authors are looking for help with
the program documentation. As soon as
41
www.linux-magazine.com
September 2002
K N O W H O W
POV-Ray
Figure 7: KPovmodeler has completed the rendering process – the output window shows the results
Figure 6: Main working screen of KPovmodeler
POV-Ray
K N O W H O W
available objects. Here you can click on
Create to insert the selected object.
Materials provides you with a list of the
pre-used materials, where you can opt to
create your own surfaces or select an
available patina. The Edit page shows
you the characteristics of the selected
object and provides ample opportunity
for fine tuning.
There are fewer textures available than
in KPovmodeler, but you can still create
interesting models. Editing individual
objects means toggling back and forth
between various tabs, and that can be
extremely time consuming if you are
working on a complex scene.
Again, Truevision turned out to be
somewhat unstable and crashed when
we tried to save a scene. And that meant
that all our work had been to no avail
with the program being unable to load
the files we had saved up to that point.
Unfortunately, the program also lacks an
online help or a manual. Although you
can create and edit scenes, this program
is so complicated that the initial learning
curve will be very steep without external
assistance.
Summary
For producing the occasional POV-Ray
scene, Peflp is definitely a good choice, as
it is stable, clear and easy to use.
PovFront offers all the settings that a
POV-Ray user could possibly wish for.
The program tends to crash at irregular
intervals, which makes productive use
impossible. GPov and tclPov both have an
integrated source editor that you can
use for scene creation, however, our
impression was that both programs need
some polishing.
KPovmodeler and Truevision are
equally suited to scene compilation. Your
learning curve will be fairly steep, as they
both lack a manual. KPovmodeler was
just a nose in front on the stability stakes
and is thus highly recommended.
■
42
September 2002
www.linux-magazine.com
this becomes available KPovmodeler may
be the solution for visual rendering tasks
on Linux.
Truevision
Truevision, which requires GTK and
GNOME, is already firmly established in
this niche. The program website contains
a source archive ( truevision-0.3.10.tar.gz)
that you can expand using the following
syntax: tar -xzvf truevision-0.3.10.tar.gz.
As usual follow the installation trinity,
./configure, make and make install in the
expanded source directory to compile and
install the program – you will need the
header files, of course. After following
these steps, you can type truevision & to
launch the program.
The graphic user interface contains no
unpleasant surprises, providing a menu
and toolbar in the upper area, various
views of the model on the lower left. The
dialog boxes for inserting and editing
individual objects are available via the
tabs on the lower right (Figure 8). The
Create tab leads to a tree view of the
Figure 8: Main Window in Truevision
[1] Povray: http://www.povray.org/
INFO
43
www.linux-magazine.com
September 2002
K N O W H O W
POV-Ray
Program
Peflp
tclPov
gPov
PovFront
KPovmodeler
Truevision
Author
Xavier Bourvellec
Chris Hammer
Chris Hammer
Philipe P. E. David
Andreas Zehender
Vincent le Prince
License
GPL
GPL
GPL
GPL
GPL
GPL
Website
mogzay.multimania.com
www.nasland.nu/tclpov.php
www.nasland.nu/gpov.php
perso.club-internet.fr/clovis1 www.kpovmodeler.org
truevision.sourceforge.net
Installation
Source tgz
x
x
x
x
x
x
rpm
-
-
-
-
-
-
deb
-
-
-
-
-
-
Additional Libraries
Tcl/Tk
Tcl/Tk
GTK
GTK, optionally GNOME 1.4 Qt, KDE 3.0.x (1)
GTK, libgtkglarea,
GNOME 1.4
Interface language
English
English
English
English
English
English/Other
Functionality
Integrated Text Editor
-
x
x
-
-
-
Integrated Preview
x
-
-
-
-
-
Store and Convert
Finished Image
x
x
-
x
x
x
Graphics Editor
-
-
-
-
x
x
Help
Online Help
-
x
-
-
-
-
Manual
-
-
-
-
-
-
(1) KDE Version 3.1 will include KPovmodeler as part of the kdegraphics package.
Table 1: Overview of Povray Front-Ends
Figure 9: Complex scenes comprising a large number of elements can be created in KPovmodeler and rendered in POV-Ray
Wyszukiwarka
Podobne podstrony:
All the Way with Gauss Bonnet and the Sociology of Mathematics
2002 09 42
2002 09 14
2002 09 18
2002 09 07
2002 09 Osla laczka Nieznany (2)
Lekka atletyka, La-doskonalenie startu niskiego (II) 2002.09.11, Konspekt lekcji gimnastyki
Siatkówka- doskonalenie odbić oburącz górnych w tył 2002.09, Konspekty, Siatkówka
La-atletyka terenowa 2002.09.20, lekkoatletyka
The Language of Internet 6 The language of virtual worlds
2002 09 23
ei 01 2002 s 09 12
2002 09 04
2002 09 36
2002 09 32
2002 09 18 Prezentacja LPP 2002q2
2002 09 12
2002 09 Szkoła konstruktorów klasa II
więcej podobnych podstron