
Template Creation
Wednesday, 13 October 2004
Introduction
This tutorial will aid you in the creation of simple
Joomla!
templates without the use of web page creation
software such as Dreamweaver and FrontPage. All templates will be created in xhtml transitional format. If you
do not have any prior html or css knowledge you may have some difficulty with this tutorial. I recommend
for help with any questions as this is not a html or css tutorial. Also this tutorial is for
templates to be used with
Joomla!
4.5.1a Stable and above only.
One thing to note about this tutorial is that I use images to show you the code. I do this so you will have to type
it out. In having you do it this way you learn faster by typing the code yourself rather than just simply copying
and pasting.
Examples
There are two example templates included in the zip file that you can download
here
. The first example
(default_template.zip) is an empty template for you to start with. The second example (finished_template.zip) is
a very simple template with both the index.php file and the template_css.css file commented heavily so that you
can refer to them both for help. This will be the end result of this tutorial.
PSPAD
You can use text pad as your editor of choice. I would recommend, however, that for the purpose of this
tutorial you should download
PSPad
. This is what I will be using throughout this tutorial.
Getting Started
Before we can get started you need to have PSPad installed. If not, do so from the link above.
If you already have it installed open the tutorial_index.php and the tutorial_css.css file that was included with
this document. Once opened proceed to Understanding a Template.
Understanding a Template
First thing that needs to be understood is how a basic template is layed out. The following is basically how
every template starts.
Template Overview Template Dissection
There are a few things in this empty template that need to be brought to your attention. These are
Mambo
specific.
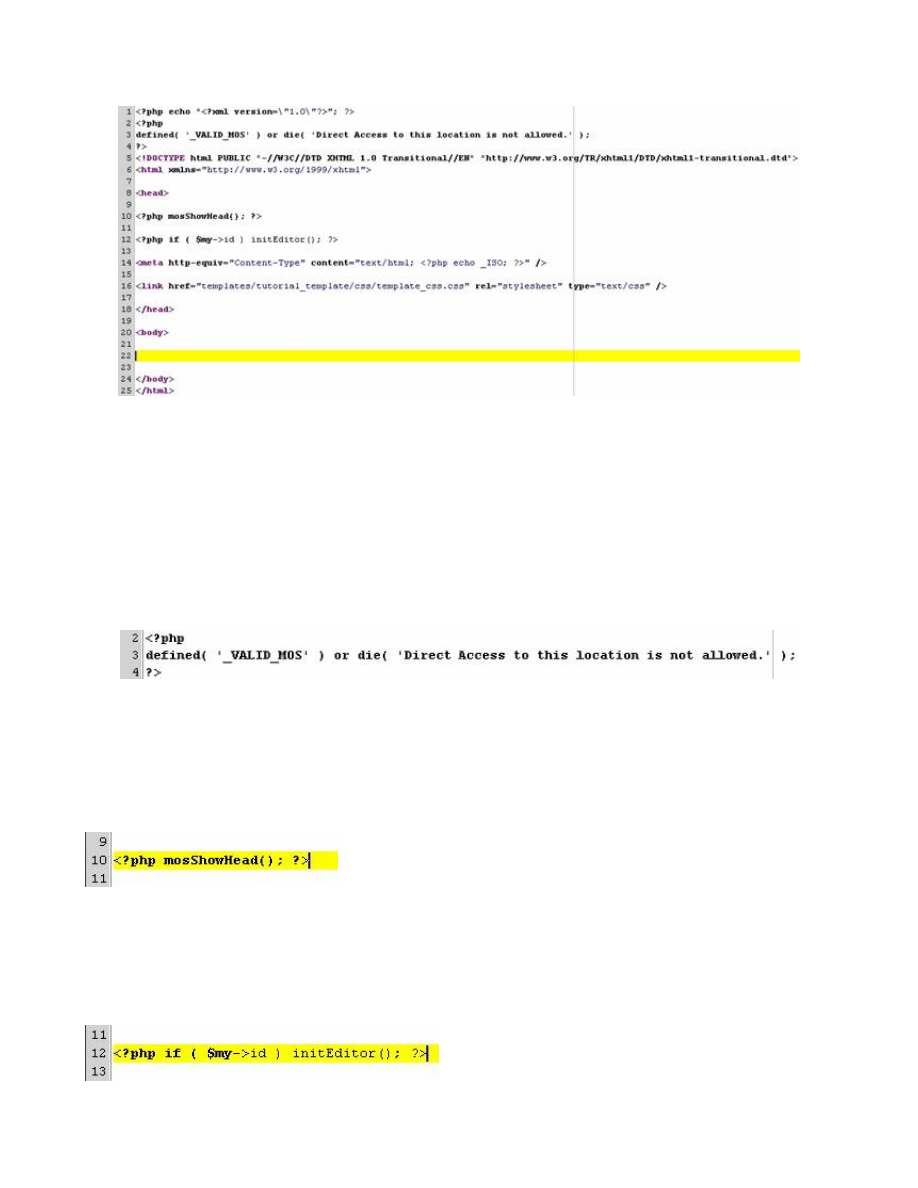
1. Security
The piece of code on lines 2 -4 are there for your protection. This keeps people from directly accessing your
template files for whatever reason. Very important for this to be in your templates.
2. Meta Information
On line 10 of the template you will see some code that is specific to
Joomla!
4.5.1 and above only. It calls the
Joomla!
copyright notice as well as your meta tag information that you set in your admin panel. This also allows
for dynamic page titles according to your pages content.
3. Editor Information
Now looking at line 12 you will see some code that calls your WYSIWYG editor when you are logged in. This is
needed and no changes need to be made. You just need to be aware that it is important in the template.
4. CSS File Link
On line 17 you will see a link to call up your css file. Without this link your styles that we will be assigning later
will not load and your page will have no formatting.
Template Creation
Install template: Optional
Inside the zip file referenced earlier is one php file, one css file and two zip files. If possible I recommend that
you install default_template.zip (if you are running at least 4.5.1a). That way you can copy and paste the code as
you go so that you can see the results in real time. We will be using the php and css files in this tutorial. When
you are finished you can look at the finished_template.zip file which is the completed template heavily
commented for reference purposes.
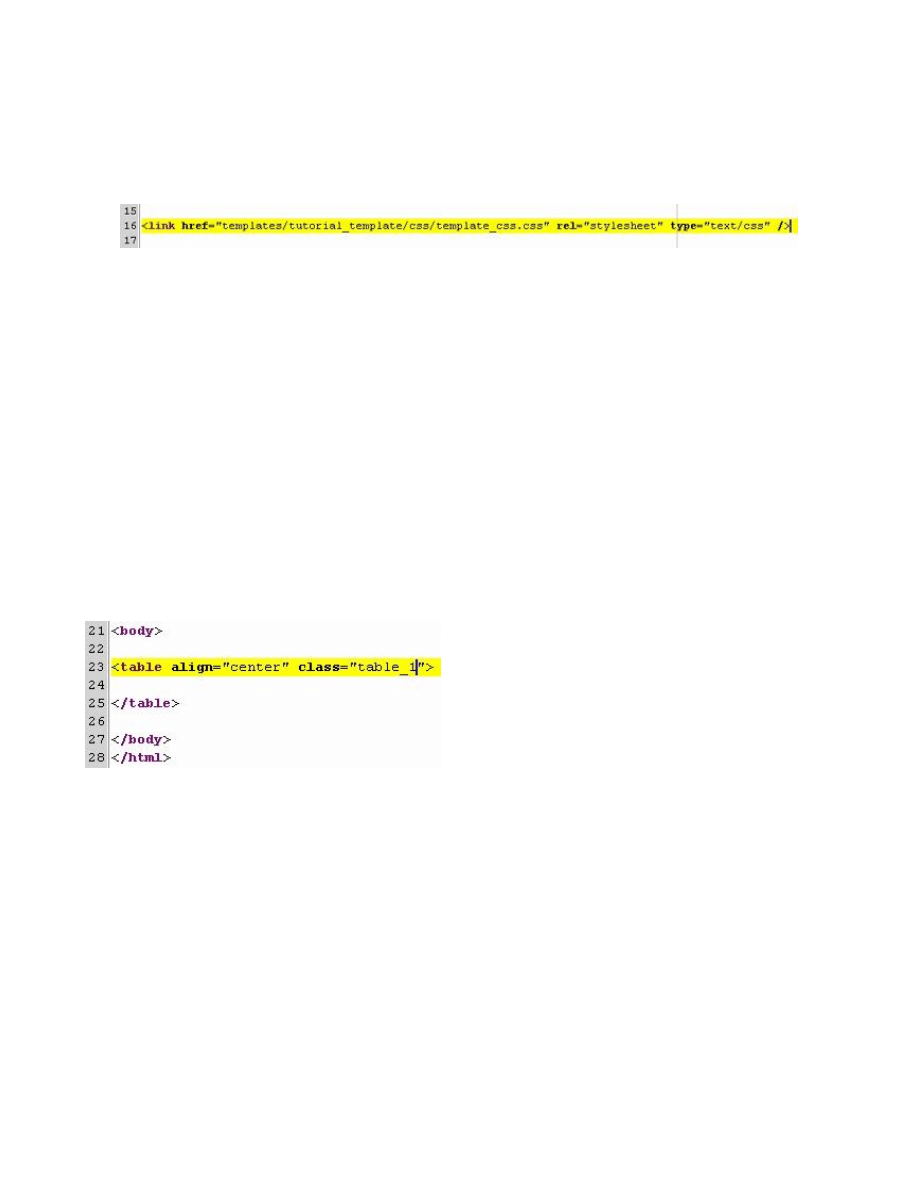
TABLE 1 -SITE NAME
We are about to create our first table which will hold the name of the website. I always create my tags in pairs
to cut down on errors. So on line 23 type what you see in the image below then hit enter twice and enter the
ending table tag on line 25 just as it is shown below.
Table Row and Table Cell
Now that the table is created lets create the table row () and the table cell (). Click on line 24 and hit tab once.
Then create the starting () tag. Hit enter twice and create the ending () tag. Now click on line 25 and create the
starting () tag as shown below then hit enter twice and create the ending () tag. Once this is done it should look
like the image below.
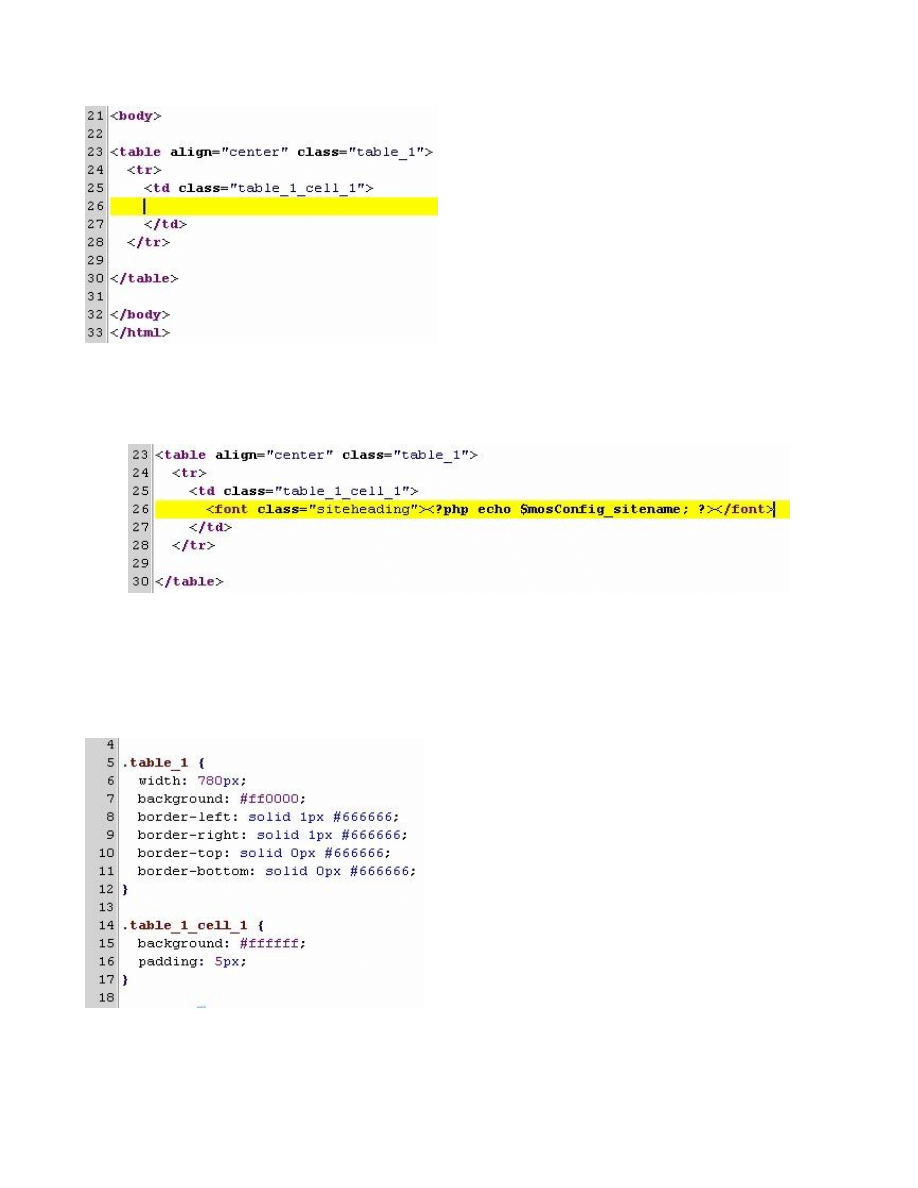
Site Name
Now click on line 26 and hit tab once. Then type the code you see in the image below on line 26.
Table 1 CSS
Now the html part of this table is complete. If you do not have the tutorial_css.css file open yet, do so now. Once
opened we are going to add the classes that define how the table is rendered in our layout.
Type the following css styling in the tutorial_css.css file so that it resembles the image below.
Preview Table 1
Now the first table we created was aligned in the center of the page and had a style class called 'table_1' and the
cell had a style called table_1_cell_1. In the css file we create the style class and tell it how we want it to look.
This defines exactly how the table will be layed out when you view it. If you have opted to install the default
template then you can copy and paste both the index and css file to see what it looks like so far. If you choose to
do so it should look like the following image:
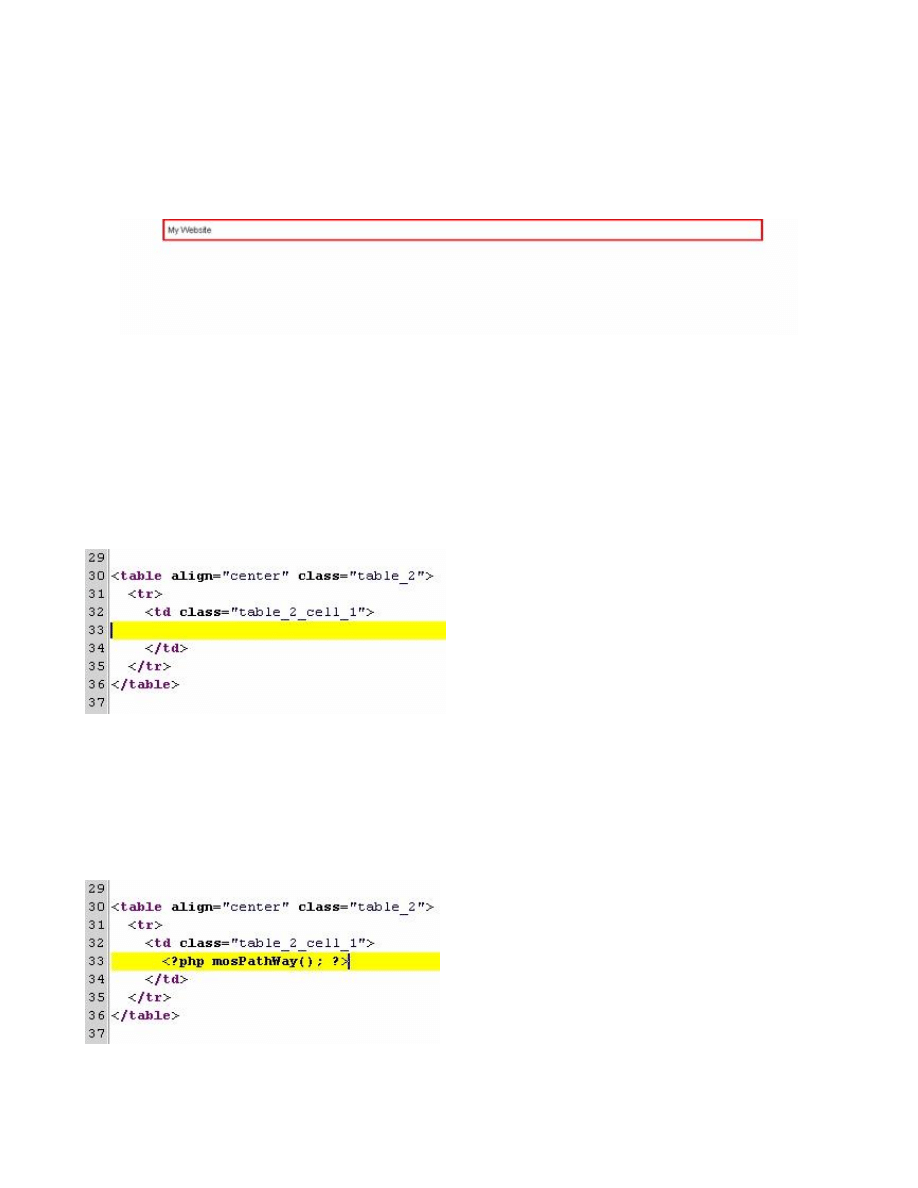
The text may differ according to the name of your website.
Now that we have the first table in place with the styles assigned, lets move on to the next one.
TABLE 2 – PATHWAY
Once again we will begin by creating the table with the table rows and the table cells. So go ahead and type in
the code that is in the image below:
Pathway
Now we will insert the
Joomla!
specific code that calls the pathway into your template. One thing to note is that
this is only specific to version 4.5.1a and above.
Type the code as shown on line 33 in the image below:
Table 2 CSS

Now lets create the styles for the second table and it's cell and then the pathway itself. Again this goes in the
tutorial_css.css file. Type it so that it matches the image below:
This created the styles for the table and the table cells. This next image shows the code for the pathway itself.
Enter the code just as the image shows:
Preview Table 2
Now that the second table is done, lets take a look at what it looks like live. Just copy and paste the index.php
content to the index file through your admin panel and the tutorial_css.css content in the css file through your
admin panel. Once you have done that it should look like the image below:
As you can see there is no text in the second box. That is ok. Once we get the menu's and the content in the next
table, you will start seeing the pathway working. Line numbers are not relevant here. You can place this code at
the end of the template if you wish.
TABLE 3 -LEFT AND RIGHT MODULES AND MAIN CONTENT
Now its time for the table that is going to hold 99% of your website. This will hold the left and right

modules and the main content area.
Up until now we created a table with one table row and one table cell. Now we are going to create a table with
one table row and three table cells. Below is an image with the code you are going to type out. Type as shown.
With the code for the table in place we will now place the
Joomla!
specific code. Enter it in as follows:
Left Modules:
On line 41 enter the code as shown in the image. This will call any module you assign to the left module
position.
Left Modules: A
If you wanted to add another module position such as user1 to the left, you would enter the code as shown in the
following image:
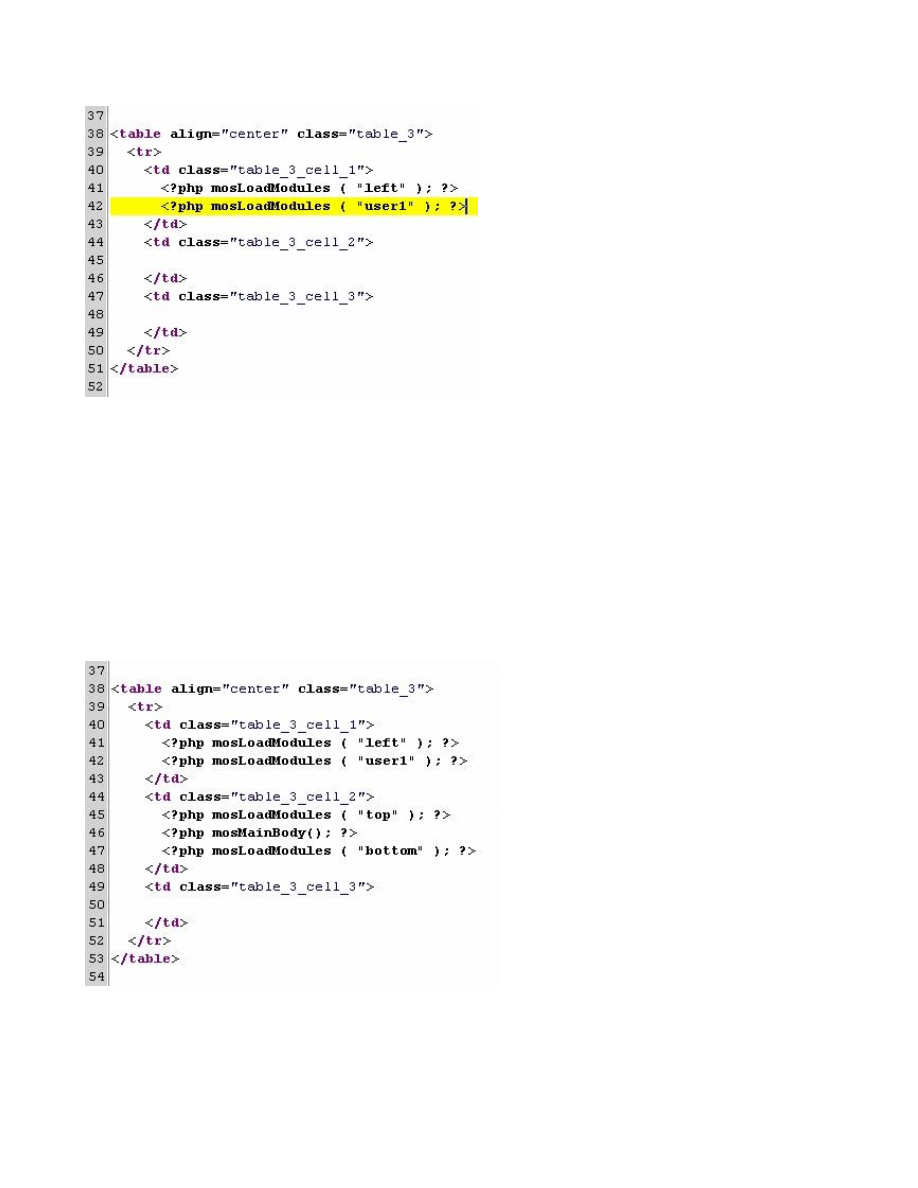
Notice that the user1 module position is under the left module position and in the same table cell. This means
that when viewed anything assigned to the user1 module position will always be under any modules in the left
position.
Main Body:
This is where we will call all of you content and information that you type in your website for others to view.
Not only that but we will also add the top and bottom module positions for things such as the newsflash.
You will need to add the code on lines 45 -47. One thing to note is that on line 46 which calls the main body
of your site is specific to
Joomla!
4.5.1a and up.
Right Modules:
The right modules are really an optional thing as some use them and some don't. So that being said we will add a
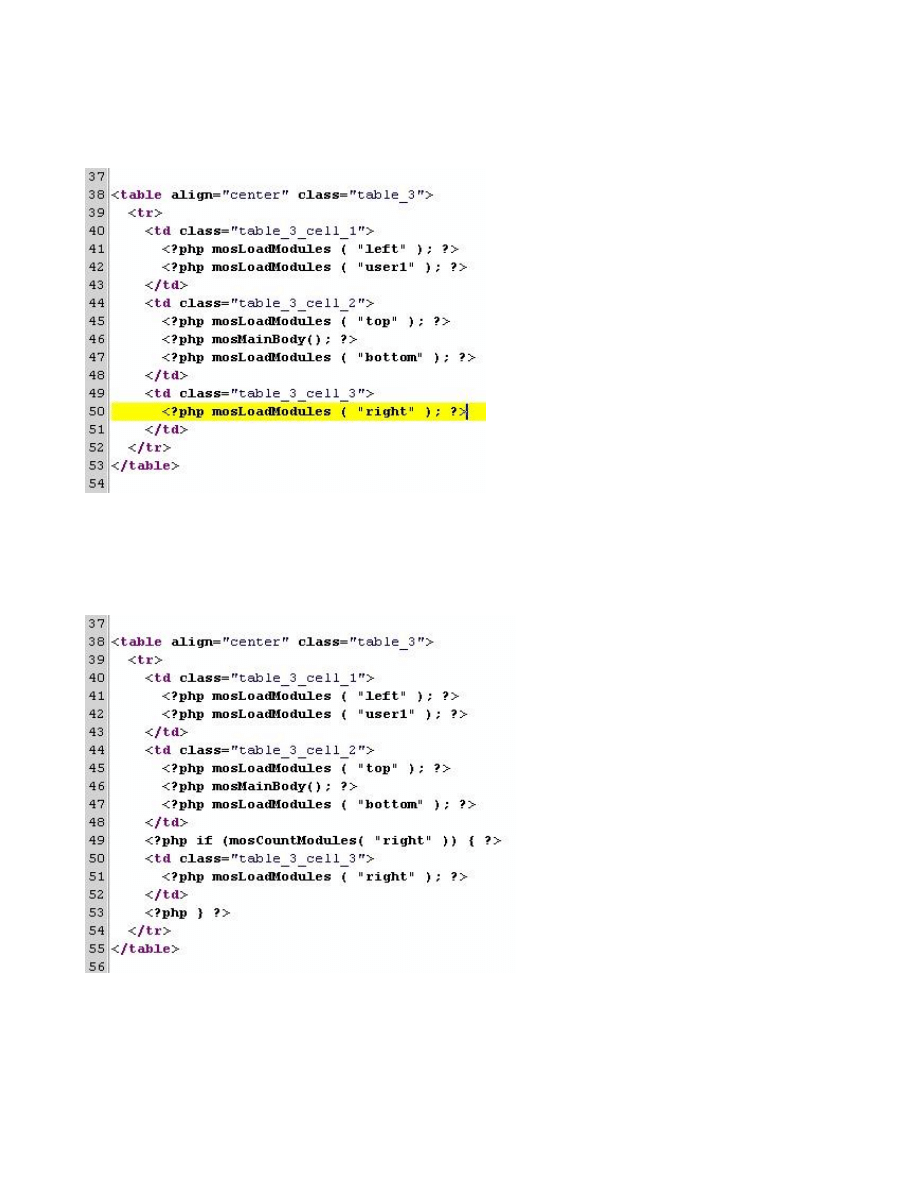
little something that will allow you to hide them it they are not wanted.
The image below represents the typical code for a right side module. You may enter it as shown.
Right Modules: A
Now we are going to add the option to hide the right table cell if there are no right side modules. Add the code
shown on lines 49 and 53 of the image below:
Now that table 3 is complete its time to write the styles for the table and the table cells.
Table 3 CSS
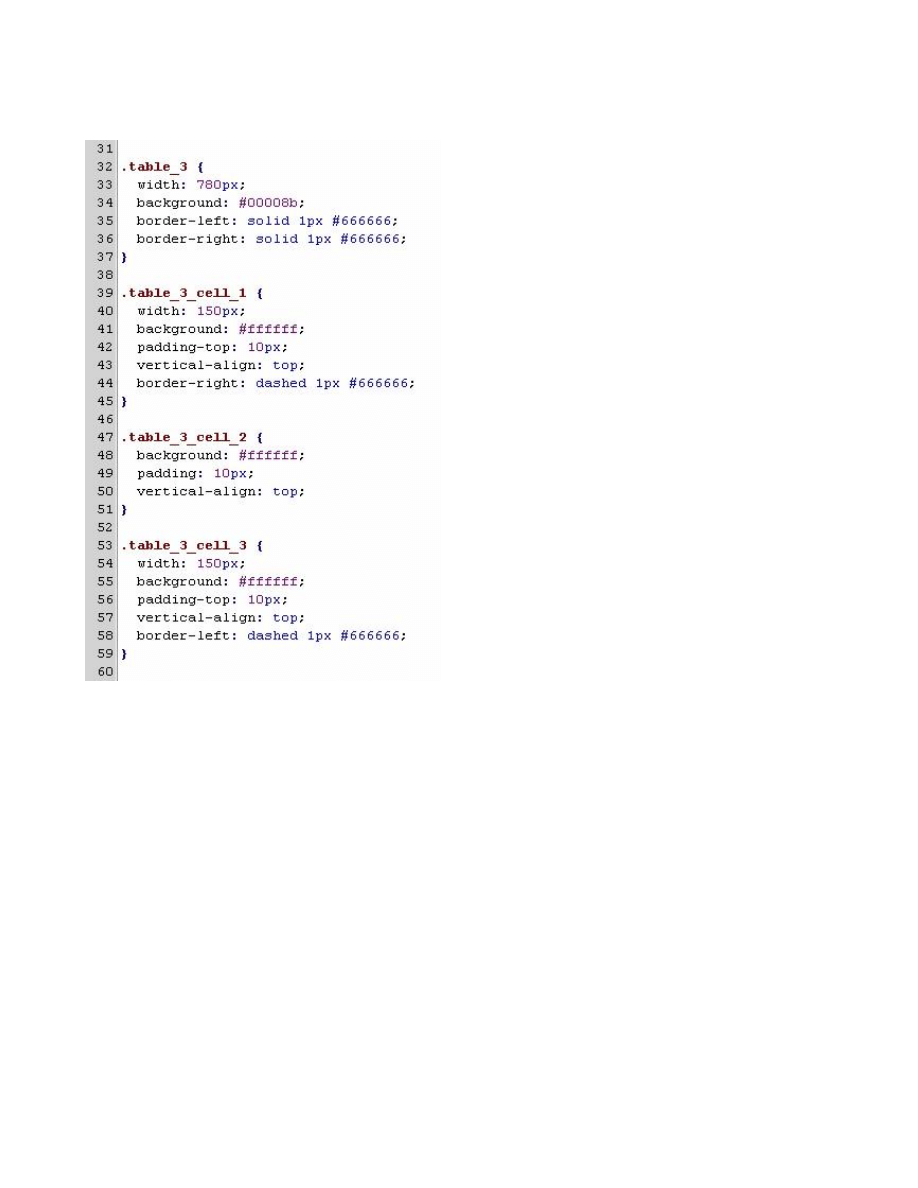
Type the following code as shown in the image below:
Preview Table 3
Once you have again copied everything over to where you can preview it live it should resemble the following
image:
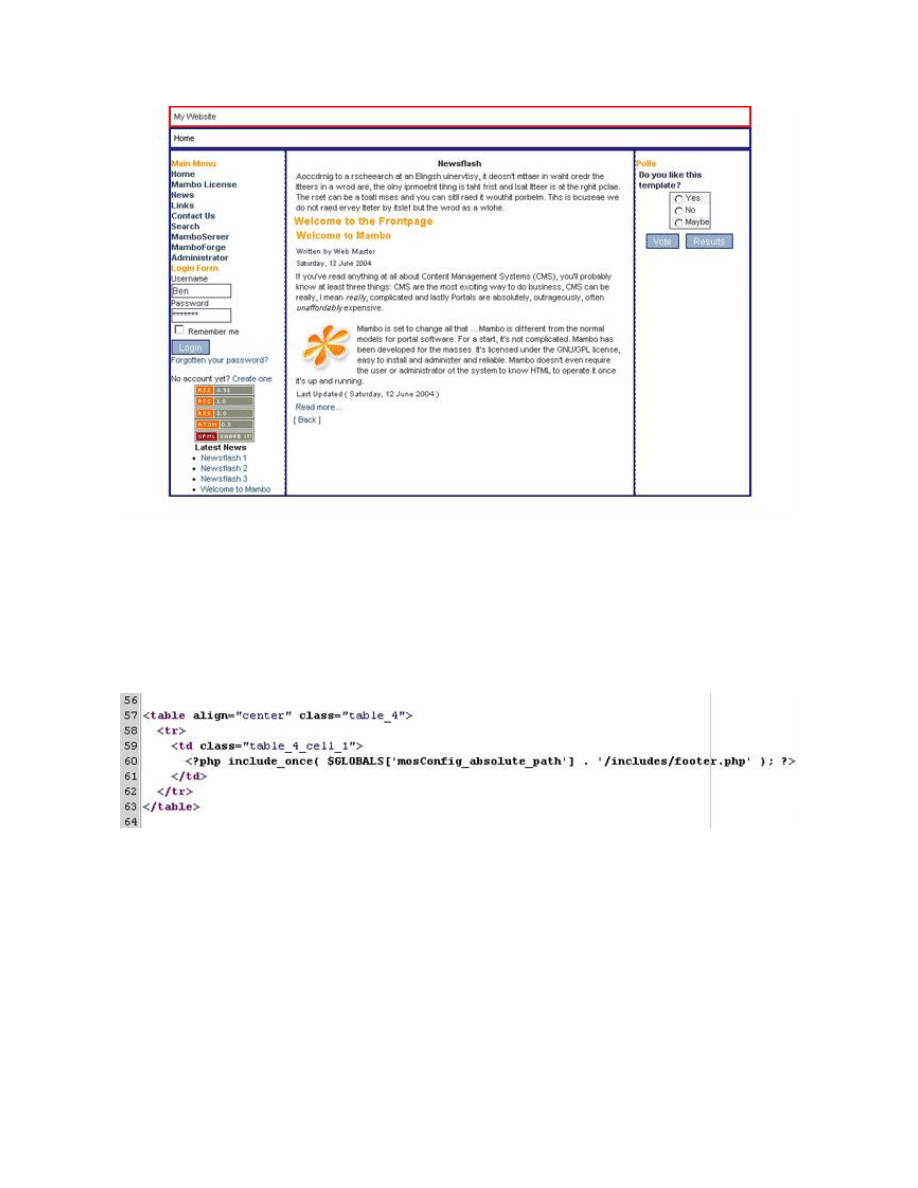
That is basically a template. If needed we can add one more thing such as the footer. All that consist of is
creating another table and creating the css to define it.
TABLE 4 – FOOTER
The Table Code:
The CSS code:
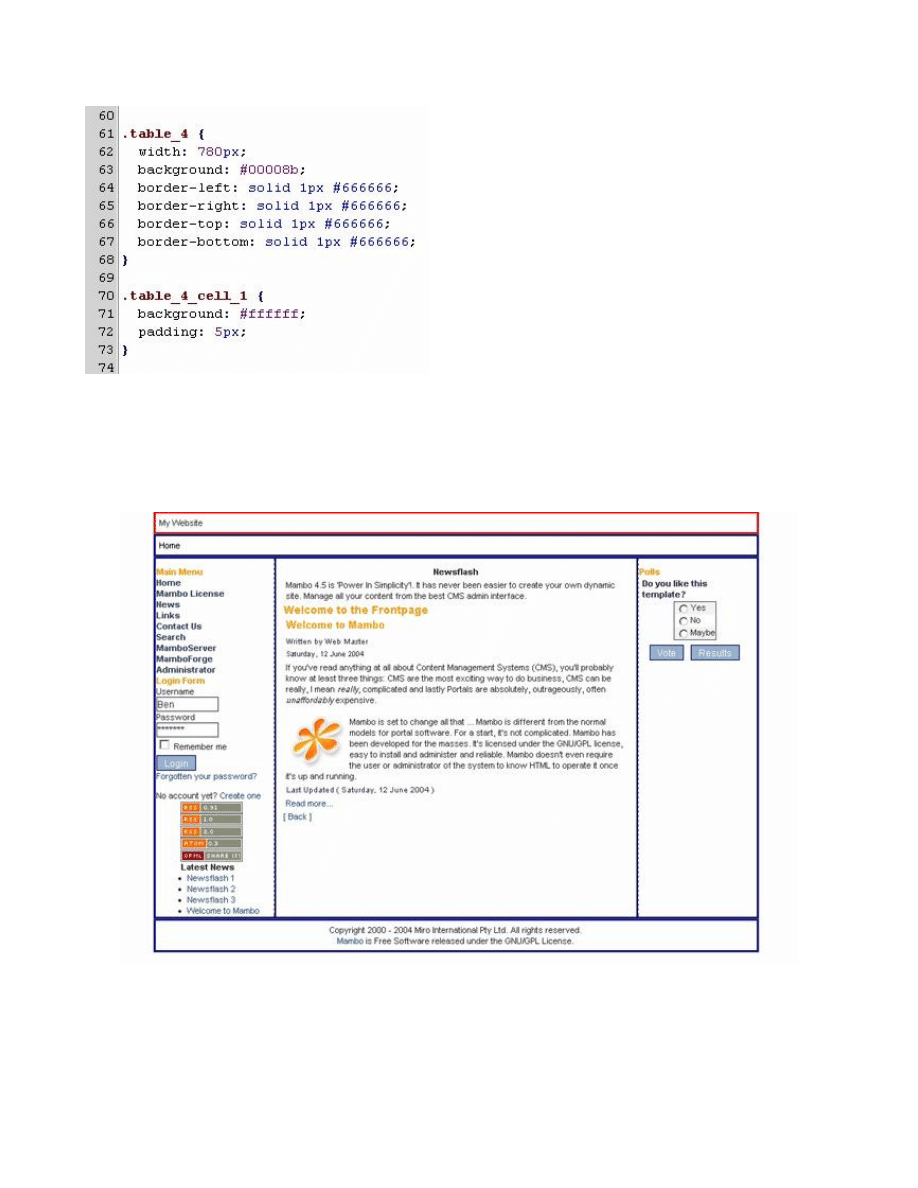
Preview Table 4
The complete site from header to footer. This encompasses all of the code (both HTML and CSS) we have gone
over so far.
ADVANCED TEMPLATING
Some more advanced options will help to overall better your template and make it look more professional and
clean. These include adding graphics, changing widths, changing colors, etc. We are only going to go over a few
since this is meant as a basic tutorial.
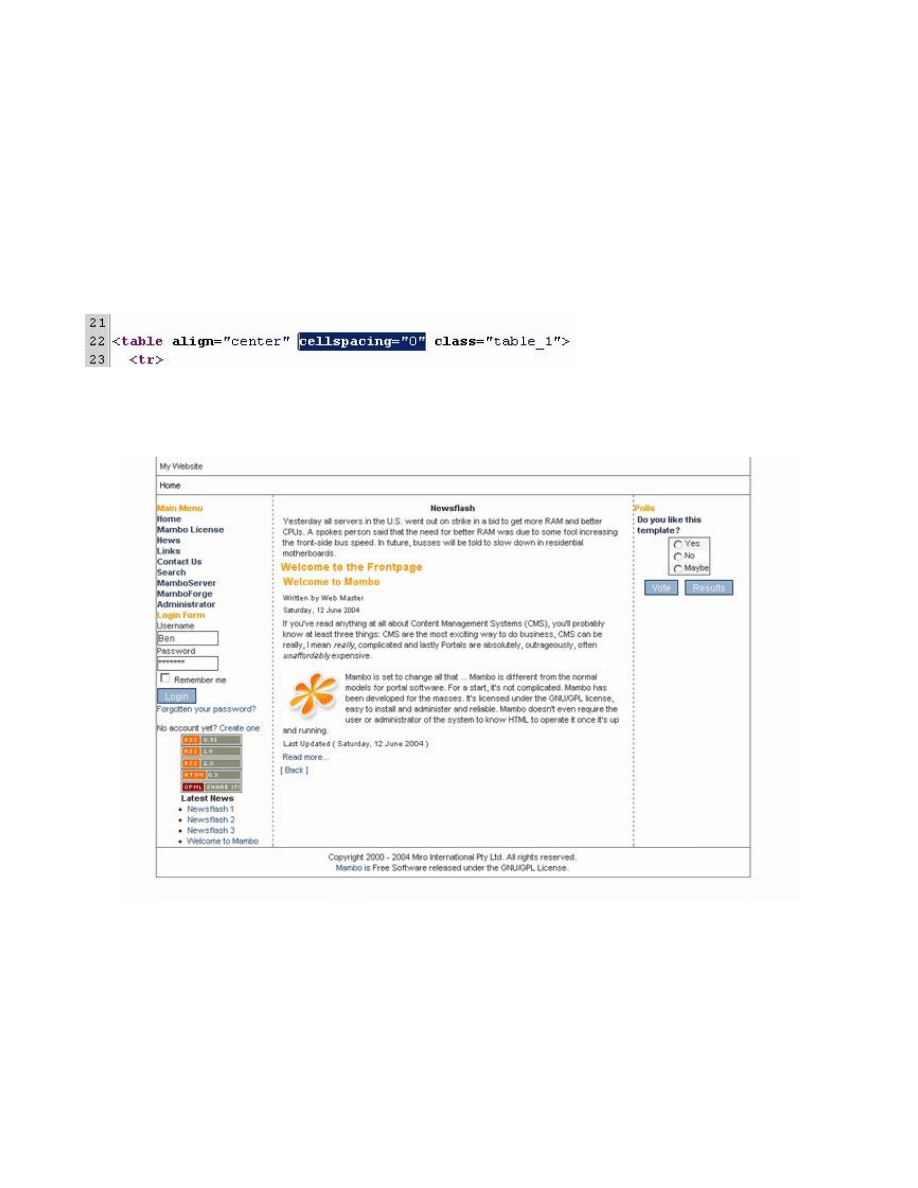
CLEAN LINES
One thing you probably already noticed is that there is a thick colored border around the table cells. That is
because of cell spacing in the tables. removing that not only adds a cleaner look but also makes it so much easier
to add graphics to your template and have them line up properly. See the following example to see how they are
removed:
In each beginning table tag we just had the highlighted code and this removes all cell spacing. Once you do this
to all of the tables in your template it should look similar to the image below:
You see that it has a much cleaner look.
GRAPHICS
One thing that adds so much to templates are simple graphics. I have included a very simple header graphic in
the tutorial template and now it is time to add it.
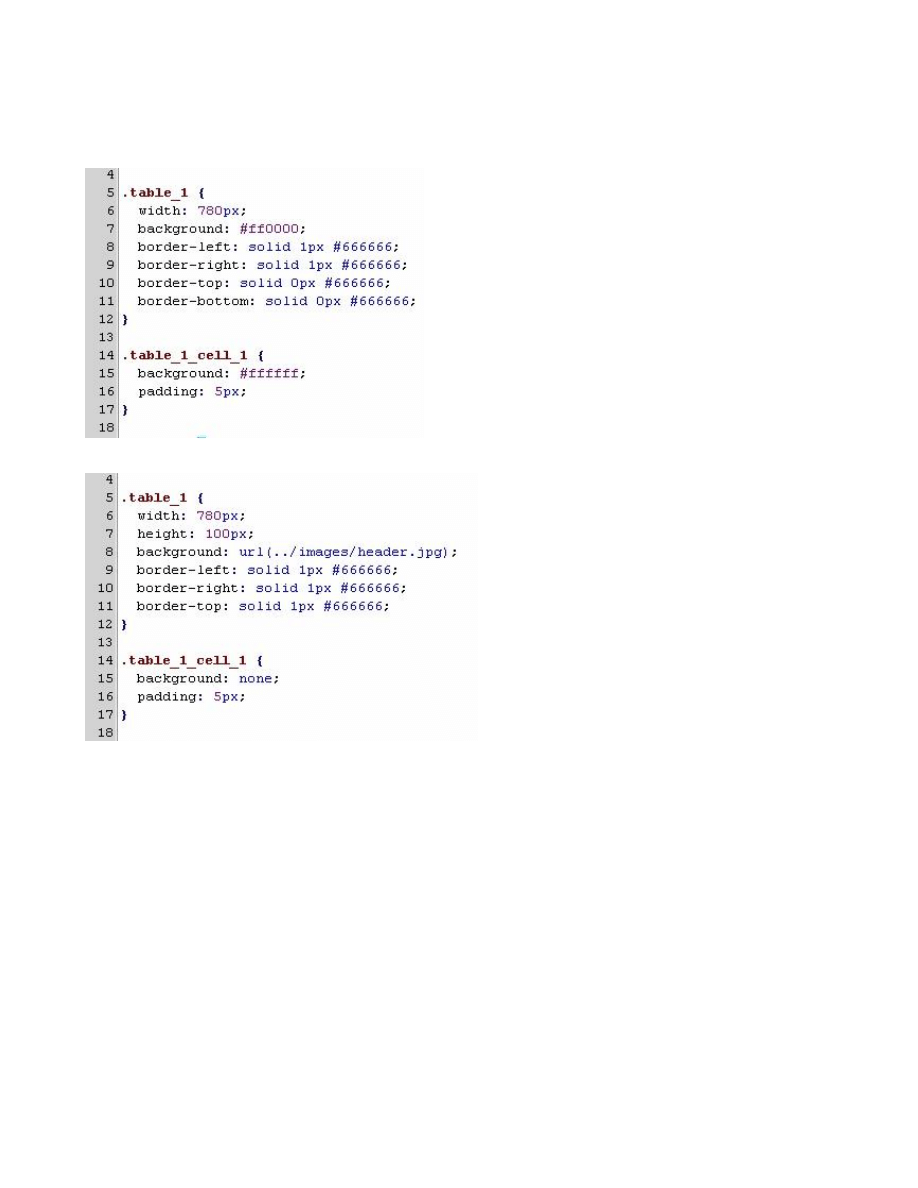
In your css file you will need to edit the code in the following image:
Before After
We added a height to the table on line 7, then changed the background from a color to an image on line 8. We
then eliminated the background color for the table cell on line 14 (before image) and line 15 (after image). We
added it to the table because we wanted the whole table to have the image. You can add images to cells or tables
depending on how you want them to display.
COLORS
Something as simple as changing colors in a cell can make a big difference in appearance. Here we will
change the colors in just the footer table cell. See the image below for reference.
Before
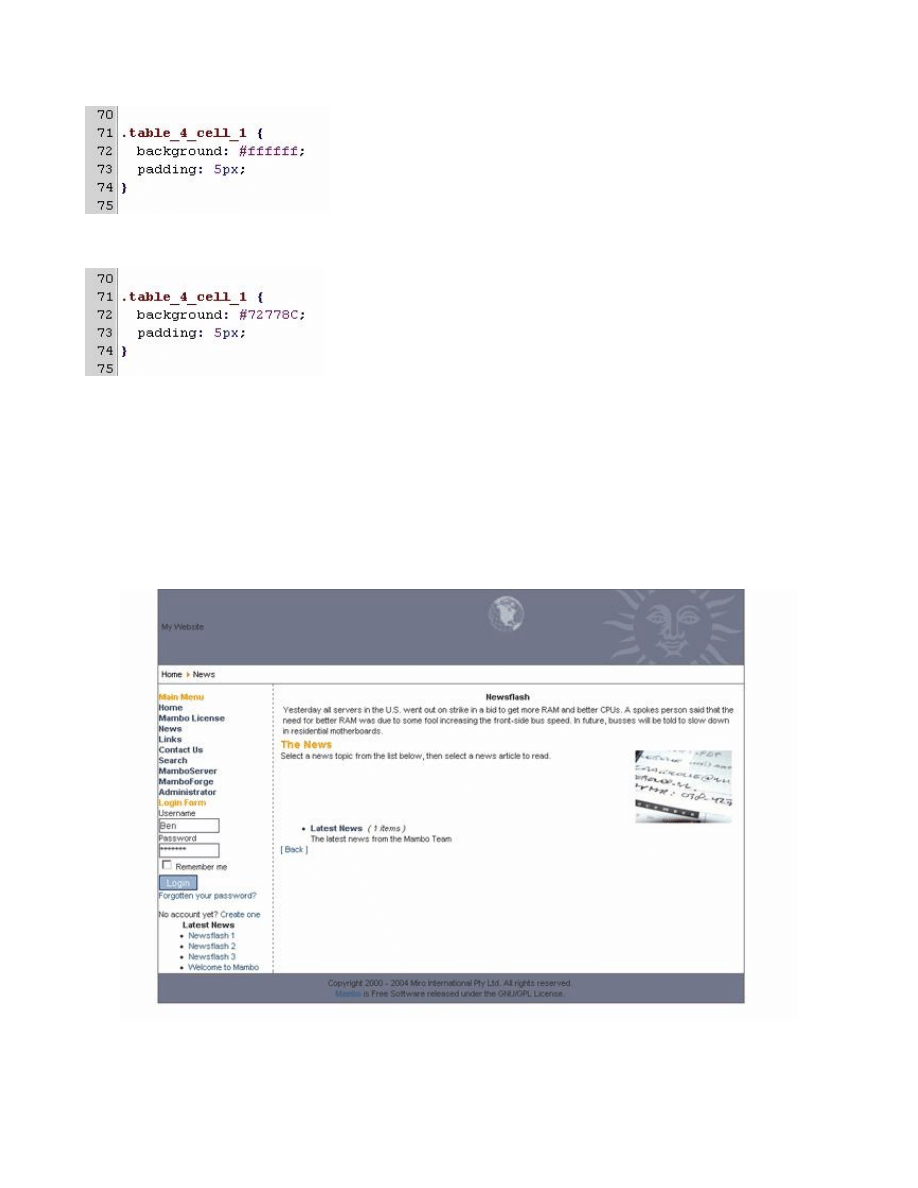
After
As you can see a very simple change for the background color. It was changed to match the header image color.
Final Preview
This is the final preview of everything we have done to create a template that is very simple and useable. There
are a few other things that really should be done to fine tune the template, but this is again a very simple and
basic tutorial to create a template from scratch.
That is pretty much it. I hope I made it simple enough for everyone to understand and learn from. If not please
let me know and I will try to refine it a little more. Also if there is anyone who would like to add to this, by all
means
contact me
.

<td class="left">
<div class="sidepad">
<?php defined( "_VALID_MOS" ) or die( "Direct Access to this location is not allowed." );?>
<!DOCTYPE html PUBLIC "-//W3C//DTD XHTML 1.0 Transitional//EN"
"http://www.w3.org/TR/xhtml1/DTD/xhtml1-transitional.dtd">
<html xmlns="http://www.w3.org/1999/xhtml">
<head>
<title><?php echo $mosConfig_sitename; ?></title>
<?php if ( $my->id ) { initEditor(); } ?>
<meta http-equiv="Content-Type" content="text/html;><?php echo _ISO; ?>" />
<?php mosShowHead(); ?>
<?php echo "<link rel=\"stylesheet\"
href=\"$GLOBALS[mosConfig_live_site]/templates/$GLOBALS[cur_template]/css/template_css.css\"
type=\"text/css\"/>" ; ?><?php echo "<link rel=\"shortcut icon\"
href=\"$GLOBALS[mosConfig_live_site]/images/favicon.ico\" />" ; ?>
</head>
<body bgcolor="#FFFFFF" leftmargin="0" topmargin="0" marginwidth="0" marginheight="0">
<!-- ImageReady Slices (hsk2b.psd) -->
<table id="Table_01" width="1005" border="0" cellpadding="0" cellspacing="0">
<?php if (mosCountModules('inset')) { ?>
<tr>
<td
width="1005"
height="111"
colspan="3" valign="top" class="header"></td>
</tr>
<tr>
<td width="761" height="40" colspan="2" valign="top" class="menu"><?php
mosLoadModules ( 'top' ); ?></td>
<td width="244" height="310" rowspan="2" valign="top" class="rightsidebox"><?php
mosLoadModules ( 'right' ); ?></td>
</tr>
<tr>
<td rowspan="3" width="181" height="499" valign="top"><?php mosLoadModules (
'left' ); ?></td>
<td
width="580"
height="270" valign="top">
<?php mosMainBody(); ?>
</td>
</tr>
<tr>
<td width="580" height="32" valign="top" class="hskdivider"></td>
<td width="244" height="229" rowspan="2" valign="top" class="hskfrontimg"></td>
</tr>
<tr>

<td
width="580"
height="197" valign="top"></td>
</tr>
<?php } elseif (mosCountModules('left')) { ?>
<tr>
<td
width="1005"
height="111"
colspan="3" valign="top" class="header"></td>
</tr>
<tr>
<td width="761" height="40" colspan="2" valign="top" class="menu"><?php
mosLoadModules ( 'top' ); ?></td>
<td width="244" height="310" rowspan="2" valign="top" class="rightsidebox"><?php
mosLoadModules ( 'right' ); ?>
</tr>
<tr>
<td width="181" height="499" valign="top"><?php mosLoadModules ( 'left' ); ?></td>
<td width="580" height="270" valign="top"><?php mosMainBody(); ?></td>
</tr>
<?php } else { ?>
<tr>
<td
width="1005"
height="111"
colspan="2" valign="top" class="header"></td>
</tr>
<tr>
<td width="761" height="40" valign="top" class="menu"><?php mosLoadModules (
'top' ); ?></td>
<td width="244" height="310" rowspan="2" valign="top" class="rightsidebox"><?php
mosLoadModules ( 'right' ); ?></td>
</tr>
<tr>
<td width="761" height="270" valign="top"><?php mosMainBody(); ?></td>
</tr>
<?php
}
?>
</table>
<!-- End ImageReady Slices -->
</body>
</html>
Wyszukiwarka
Podobne podstrony:
Joomla Templates Creating a Pure CSS Template webreference com
Creating a Joomla Template
Joomla Template Tutorial
Manual joomla template ser
Joomla Template Tutorial
Template Creation
Joomla and Mambo template tutorial The Complete Guide to Joomla Templates a
Content Creation Request Template
Joomla Mambo Professional Templates Club Mambo Layout
Tutorial Templates 1 5 Joomla
creativemanagement
CMS Lab 01 Podstawy Joomla
Mastercam creating 2 dimensio Nieznany
Templariusze a katarzy, Templariusze
więcej podobnych podstron