Getting Started with
Backbone Marionette
Build large-scale JavaScript applications with
Backbone Marionette quickly and efficiently
Raymundo Armendariz
Arturo Soto
BIRMINGHAM - MUMBAI

Getting Started with Backbone Marionette
Copyright © 2013 Packt Publishing
All rights reserved. No part of this book may be reproduced, stored in a retrieval
system, or transmitted in any form or by any means, without the prior written
permission of the publisher, except in the case of brief quotations embedded in
critical articles or reviews.
Every effort has been made in the preparation of this book to ensure the accuracy
of the information presented. However, the information contained in this book is
sold without warranty, either express or implied. Neither the authors, nor Packt
Publishing, and its dealers and distributors will be held liable for any damages
caused or alleged to be caused directly or indirectly by this book.
Packt Publishing has endeavored to provide trademark information about all of the
companies and products mentioned in this book by the appropriate use of capitals.
However, Packt Publishing cannot guarantee the accuracy of this information.
First published: January 2014
Production Reference: 1030114
Published by Packt Publishing Ltd.
Livery Place
35 Livery Street
Birmingham B3 2PB, UK.
ISBN 978-1-78328-425-2
www.packtpub.com
Cover Image by Artie Ng (
artherng@yahoo.com.au
)

Credits
Authors
Raymundo Armendariz
Arturo Soto
Reviewers
Andrea Puddu
Michel Richard
Sam Saccone
Acquisition Editors
Martin Bell
Meeta Rajani
Llewellyn Rozario
Lead Technical Editor
Vaibhav Pawar
Technical Editors
Pooja Nair
Humera Shaikh
Copy Editors
Alisha Aranha
Gladson Monteiro
Project Coordinator
Michelle Quadros
Proofreader
Lucy Rowland
Indexers
Monica Ajmera Mehta
Tejal Soni
Graphics
Abhinash Sahu
Production Coordinators
Adonia Jones
Komal Ramchandani
Cover Work
Adonia Jones

About the Authors
Raymundo Armendariz
is a web developer with over nine years of experience
in developing applications for the government and different industries such as
automotive and manufacturing.
In the past two years, he has spent most of his time on frontend development with
Backbone and Marionette, and building single-page applications.
Arturo Soto
is a technical architect and developer. His work focuses on developing
enterprise-level applications, especially web applications. His professional interests
include software design patterns, agile practices, and multiple technologies, such as
WCF, ASP.NET MVC, OData, Web API, HTML5, and JavaScript.
To our wives and families for their love and motivation and to our
friends for their help and support.
About the Reviewers
Andrea Puddu
(Twitter:
@nuragic
) is a web engineer from Sardinia, Italy.
After a few years of working in his country, he moved to Madrid, Spain, where
he worked in marketing and advertising companies, IT consulting firms, and tech
startups. He has studied and worked with server languages and databases. He
has now become a frontend expert because that’s what he loves to do. In his spare
time, he likes to contribute to open source software; in fact, he is a committer of
the MarionetteJS project. He is also a drummer in a rock band that he started: The
Ancient Secrets of Levitation.
I’d like to wholeheartedly thank my parents who have supported me
in my professional career. I also want to thank Carol, my girlfriend,
who always helps me to make the best decisions. And last but not
least, many thanks to my mate Tony, who always helps me out with
English!
Michel Richard
is a full-stack web developer born and raised in Kamloops, BC,
Canada and is now residing in New York city. He earned his degree from McGill
University and has a double major in Computer Science and Psychology. He is
a huge fan of open source projects and contributes to them whenever possible.
Michel has been working with Backbone and Marionette for the past two years
and maintains a Yeoman Marionette generator project on GitHub. Michel currently
works at Saks Inc., where he is the Director of Frontend Development. He can be
found on GitHub as
mrichard
and on Twitter as
MicheLeeRichard
.
Sam Saccone
is a creator and a problem solver. He spends his time working on
open source projects and building applications at MojoTech. MojoTech builds web
and mobile apps for big and soon to-be-big companies.
www.PacktPub.com
Support files, eBooks, discount offers and more
You might want to visit
www.PacktPub.com
for support files and downloads related
to your book.
Did you know that Packt offers eBook versions of every book published, with PDF
and ePub files available? You can upgrade to the eBook version at
www.PacktPub.
com
and as a print book customer, you are entitled to a discount on the eBook copy.
Get in touch with us at
service@packtpub.com
for more details.
At
www.PacktPub.com
, you can also read a collection of free technical articles, sign
up for a range of free newsletters and receive exclusive discounts and offers on Packt
books and eBooks.
TM
http://PacktLib.PacktPub.com
Do you need instant solutions to your IT questions? PacktLib is Packt’s online digital
book library. Here, you can access, read and search across Packt’s entire library of
books.
Why Subscribe?
• Fully searchable across every book published by Packt
• Copy and paste, print and bookmark content
• On demand and accessible via web browser
Free Access for Packt account holders
If you have an account with Packt at
www.PacktPub.com
, you can use this to access
PacktLib today and view nine entirely free books. Simply use your login credentials
for immediate access.

Table of Contents
Preface 1
Chapter 1: Starting with Backbone Marionette
Chapter 2: Our First Application
Introduction to what we are building
Setting up our development environment
The Backbone.Marionette.Application object
Backbone already has a router!
Chapter 3: Marionette View Types and Their Use

Table of Contents
[
ii
]
Building the layout of our application with Marionette.Layout
Understanding the Marionette.Region object
Using the Marionette.RegionManager object
Using the Backbone.BabySitter object
Taking advantage of the Marionette.Renderer object
Improving the performance of the application with TemplateCache
Chapter 5: Divide and Conquer – Modularizing Everything
Applying the divide and conquer principle
Modularizing single-page applications
Splitting modules into multiple files
Implementing initializers and finalizers
Understanding the event aggregator
Using the event aggregator of Marionette.js
Making applications more extensive with an event aggregator
Setting up the RequestResponse object
Chapter 7: Changing and Growing
Defining our application module
Writing the subapplications using Require.js
Modularizing all your components

Preface
Backbone Marionette is a composite application library for
Backbone.js
, which aims
to simplify the construction of large-scale JavaScript applications. It is a collection of
common design and implementation patterns found in the applications that we build
with Backbone, and includes pieces inspired by composite application, event-driven,
and messaging architectures.
What this book covers
Chapter 1, Starting with Backbone Marionette, is an introduction to what Marionette
is and the problems it aims to solve. In this chapter, we also learn about its
prerequisites, download sources, and documentation.
Chapter 2, Our First Application, introduces three main concepts of Marionette—the
application, controller, and router objects— and details the process of building a
small application.
Chapter 3, Marionette View Types and Their Use, digs deep into the view types that
Marionette has and how to use them.
Chapter 4, Managing Views, reviews the view management that goes from firing a
view, closing it, and re-opening it. We will also introduce some useful objects, such
as the
Renderer
object and the
TemplateCache
object, that are very valuable in order
to build an application.
Chapter 5, Divide and Conquer – Modularizing Everything, talks about how to
modularize an application and break it into small subapplications. Being able
to do this will increase its productivity as the modules allow the adding of new
functionality without affecting the existing code.
Preface
[
2
]
Chapter 6, Messaging, explains that in order to build a loosely coupled application, the
components need to know very little about each other; however, these components
still need to work together. In this chapter, we also learn how to archive this through
messages and events.
Chapter 7, Changing and Growing, helps us to learn how to manage a problem
that comes with large-scale applications: the file explosions, and how to keep a
clean structure.
What you need for this book
A modern browser and a text editor are all you need to follow the examples of
this book. You will find detailed instructions of how to set up your development
environment and also where to get the Marionette and its dependencies in the book.
Who this book is for
If you are a web application developer interested in using Backbone Marionette
for a real-life project, this book is for you. Knowledge of JavaScript and working
knowledge of
Backbone.js
are prerequisites.
Conventions
In this book, you will find a number of styles of text that distinguish between
different kinds of information. Here are some examples of these styles, and an
explanation of their meaning.
Code words in text are shown as follows: "The
Marionette.ItemView
is "
A block of code is set as follows:
var CategoryView = Backbone.Marionette.ItemView.extend({
tagName : 'li',
template: "#categoryTemplate",
});
Warnings or important notes appear in a box like this.
Tips and tricks appear like this.

Preface
[
3
]
Reader feedback
Feedback from our readers is always welcome. Let us know what you think about
this book—what you liked or may have disliked. Reader feedback is important for us
to develop titles that you really get the most out of.
To send us general feedback, simply send an e-mail to
feedback@packtpub.com
,
and mention the book title via the subject of your message.
If there is a topic that you have expertise in and you are interested in either writing
or contributing to a book, see our author guide on
www.packtpub.com/authors
.
Customer support
Now that you are the proud owner of a Packt book, we have a number of things to
help you to get the most from your purchase.
Downloading the example code
You can download the example code files for all Packt books you have purchased
from your account at
http://www.packtpub.com
. If you purchased this book
elsewhere, you can visit
http://www.packtpub.com/support
and register to have
the files e-mailed directly to you.
Errata
Although we have taken every care to ensure the accuracy of our content, mistakes
do happen. If you find a mistake in one of our books—maybe a mistake in the text or
the code—we would be grateful if you would report this to us. By doing so, you can
save other readers from frustration and help us improve subsequent versions of this
book. If you find any errata, please report them by visiting
http://www.packtpub.
com/submit-errata
, selecting your book, clicking on the errata submission form link,
and entering the details of your errata. Once your errata are verified, your submission
will be accepted and the errata will be uploaded on our website, or added to any list of
existing errata, under the Errata section of that title. Any existing errata can be viewed
by selecting your title from
http://www.packtpub.com/support
.

Preface
[
4
]
Piracy
Piracy of copyright material on the Internet is an ongoing problem across all media.
At Packt, we take the protection of our copyright and licenses very seriously. If you
come across any illegal copies of our works, in any form, on the Internet, please
provide us with the location address or website name immediately so that we can
pursue a remedy.
Please contact us at
copyright@packtpub.com
with a link to the suspected
pirated material.
We appreciate your help in protecting our authors, and our ability to bring you
valuable content.
Questions
You can contact us at
questions@packtpub.com
if you are having a problem with
any aspect of the book, and we will do our best to address it.

Starting with Backbone
Marionette
This practical guide provides clear steps to the basics of writing scalable applications
using
Marionette.js
. As you progress through the initial examples, you will
develop an understanding of how the framework components work together to
create a composite application. But before we go through in-depth examples, here
are some things that you will find in this introductory chapter:
• Description and characteristics
of
Marionette.js
• The role of
Marionette.js
in the Backbone applications
• Benefits of the framework
• An overview of architecture and scalability
• Instructions for installation and documentation
Introducing Marionette.js
A composite application library for
Backbone.js
is
Backbone.marionette
, also
known as
Marionette.js
. It gives us the core constructs and simplifies many of the
patterns and practices that your JavaScript applications need to be scalable.

Starting with Backbone Marionette
[
6
]
Backbone needs Marionette.js
An increasingly popular framework for building single-page and small- to mid-sized
applications is
Backbone.js
. It provides a great set of building blocks to organize
your frontend development and build applications that support mobile devices.
However, it leaves much of the application design, architecture, and scalability to
developers. Nevertheless,
Marionette.js
fills in some blanks that
Backbone.js
doesn't provide by itself and gives us conventions that you can take advantage of to
build your own custom objects. Simply put,
Marionette.js
makes your life easier
when you are developing the Backbone applications.
Key benefits of Marionette.js
Adding a lot of key patterns and tools used to create real-world applications,
Marionette.js
found its place in Backbone. The following are some of the
benefits that you can find within this framework:
• Structure, organization, and patterns
• Composite application architecture
• Event-driven architecture with the event aggregator
• Boilerplate for views can be reduced
• Enterprise messaging pattern influence
• Modularization options
• Incremental use; because it's not an all or nothing framework, which
means that you can use just the components you need
• Support for nested views and layouts within visual regions
• Built-in memory management and zombie killing in views, regions,
and layouts
A lot of application infrastructural components needed to build an application of any
module size is provided by
Marionette.js
.
A wide set of objects are provided by
Marionette.js
that facilitate the creation of
well-structured applications of virtually any size and complexity. It achieves this
goal by providing a collection of common design and implementation patterns
found in the applications that the creator, Derick Bailey, used to develop the
modular Backbone applications.

Chapter 1
[
7
]
Building large applications
When planning the architecture for your application, you normally try to think
ahead as much as possible, attempting to achieve a decoupled architecture with
functionality broken down into independent modules, and to avoid making direct
calls between these modules. Therefore, you can add and remove modules without
affecting its behavior.
"The secret to building large apps is never build large apps. Break your applications
into small pieces. Then, assemble those testable, bite-sized pieces into your big
application"
– Justin Meyer, author of JavaScriptMVC.
Consider that components tied to each other are difficult to change and scale without
affecting each other. A very incremental and modular approach is provided by
Marionette.js
, using the module definition. It relies on the event aggregator to
send messages between the modules to coordinate functionality from other parts of
the system, without adding direct references to them among many more object types
that facilitate the application's design.
Incremental use
This is one of the basic concepts that the creator of
Marionette.js
used to create the
framework. An incremental and modular approach is facilitated by
Marionette.
js
, providing the application object and the module architecture to scale applications
across subapplications, features, and files. All of them are built to stand alone and to
work with the core pieces of Backbone to accomplish the application's specific needs.
"The key is to acknowledge from the start that you have no idea how this will grow.
When you accept that you don't know everything, you begin to design the system
defensively ... You should spend most of your time thinking about interfaces rather
than implementations."
– Nicholas Zakas, author "High-performance JavaScript websites"
One of the main benefits of
Marionette.js
is that you don't need to use all of its
components. A jQuery-jQuery UI comparison can also be applied here. The fact that
you use the jQuery calendar by any means forces you to use the entire UI library.
The same can be applied to Marionette because the fact that you use just one of its
components that makes sense for your application does not obligate you to use the
other components of Marionette.

Starting with Backbone Marionette
[
8
]
Installing Marionette.js
We will go over how to download and set up a development environment so that
you can get started with
Marionette.js
in some easy steps. If you're already
comfortable with installing
Marionette.js
, you may want to skip the remaining
parts of this chapter. Feel free to jump to Chapter 2, Our First Application.
Text editor
While building large and scalable applications, you will spend most of your time on
a code editor. We recommend that you use an editor that works for you. Notepad++
or Sublime Text are definitely good options. Sublime Text already has a lot of
snippets and packages that will help you in your development.
Web browser
Working with complex client-side applications requires a good set of developer
tools. For the purpose of this guide, we will use mostly Google Chrome and Mozilla
Firefox, but all the code and examples should work in all modern browsers (IE9+,
Opera, and Safari).
We will use
jsfiddle.net
in order to show you the running examples. The use of
this site is pretty simple and most of the time, you will only need to run the code to
see it in action.
Prerequisites
At the time of this writing, the current stable version of
Marionette.js
is v1.3.0 and
it relies on the following libraries:
•
JSON2.js
•
jQuery
(v1.7, v1.8, and v1.9)
•
Underscore.js
(v1.4.4)
•
Backbone.js
(v1.0.0)
•
backbone.wreqr.js
•
backbone.babysitter.js
We would like to point that having basic knowledge on Backbone and Underscore
will help you to get the best out of this book and to understand the benefits of
Marionette over plain Backbone development.

Chapter 1
[
9
]
Getting Marionette.js
The best way to get the latest build of
Marionette.js
is by going to the project
website,
http://marionettejs.com/
.
They have a Pre-packaged option. The
.zip
contains all of the files that you
need to get started with
Marionette.js
, including Backbone, jQuery, and other
prerequisites. You can also download the
Marionette.js
file without all the
dependencies and just use the CDN versions of these libraries if they are available.
Documentation
You can download the documentation for each piece of
Marionette.js
from
https://github.com/Marionette.jsjs/Marionette.js/tree/master/docs
.
The documentation is split into multiple files. The annotated source code can be
found at
http://marionettejs.com/docs/backbone.marionette.html
. You can
find articles, blog posts, presentations, FAQs, and more on its wiki page,
https://
github.com/marionettejs/backbone.marionette/wiki
.
Derick Bailey, the creator of Marionette, has created a sample application that can
be used as a reference for building the Backbone applications with
Marionette.js
.
The name of the application is
BBCloneMail
and it is a great example to demonstrate
a composite application. You can find
BBCloneMail
online at
http://bbclonemail.
heroku.com
and the source code at
http://github.com/derickbailey/
bbclonemail
.
Summary
In this chapter, we looked at some of the core concepts and benefits that
Marionette.js
offers for building scalable applications. We also provided links to
find, download, and install the basic tools needed to perform your development. In
the next chapter, you will be introduced to the components or building blocks that
make up the
Marionette.js
applications.

Our First Application
In the previous chapter, we learned what Marionette is, where to find the source
code and documentation, and other useful resources that will help us to learn more
about Marionette. But we believe the best way to learn something is by putting it into
practice. So in this book, we will build an application with moderate complexity, that
is, it is complex enough to break the Hello World! barrier, allowing us to discover the
benefits that Marionette has to offer, but simple enough to complete it with in this
book. We will show some standalone code snippets to introduce you to each new
concept; however most of the time we will stick to the application code.
In this chapter, we will review how to set up your development environment in order
to build our first application. We will also learn three important parts of
Marionette.
js
: the marionette router, marionette controller, and marionette application.
Introduction to what we are building
The application that we will be building in this book is a website for a book store. We
should be able to perform the following actions on the website:
• Display a list of book categories
• Select a category and display the related books
• Present a description, price, and other important details of the book
• Add books to the shopping cart
• Display the shopping cart items
The website that we are going to build is just an example application. It's mandatory
to follow the structure proposed in this book, as every application has different needs.
Nevertheless, it's a good starting point and our idea is to show how each component of
Marionette solves a problem and how to make its components work together.
Our First Application
[
12
]
Also, keep in mind that we will give attention to the Marionette components of
the code, explaining in detail their benefits, and to adding them to the application.
However, we will not dive deep into Backbone details such as
Backbone.Model
and
Backbone.Collection
, which are the core components of Backbone, as knowledge
of this is already assumed.
One of the concepts that Marionette adds to Backbone is that of an application
object—
Backbone.Marionette.Application
. We will start this book with this topic
because the object will be the container of all of your Backbone views and models.
One of its responsibilities is, before the user starts interacting with the website, it
must initialize some of the components, such as the
Backbone.Router
component,
that will be listening to the route (URL) changes of our application. This object
provides some handy methods to perform this initialization. But, before we dig
deeper into details, let's first take a look at what we are building.
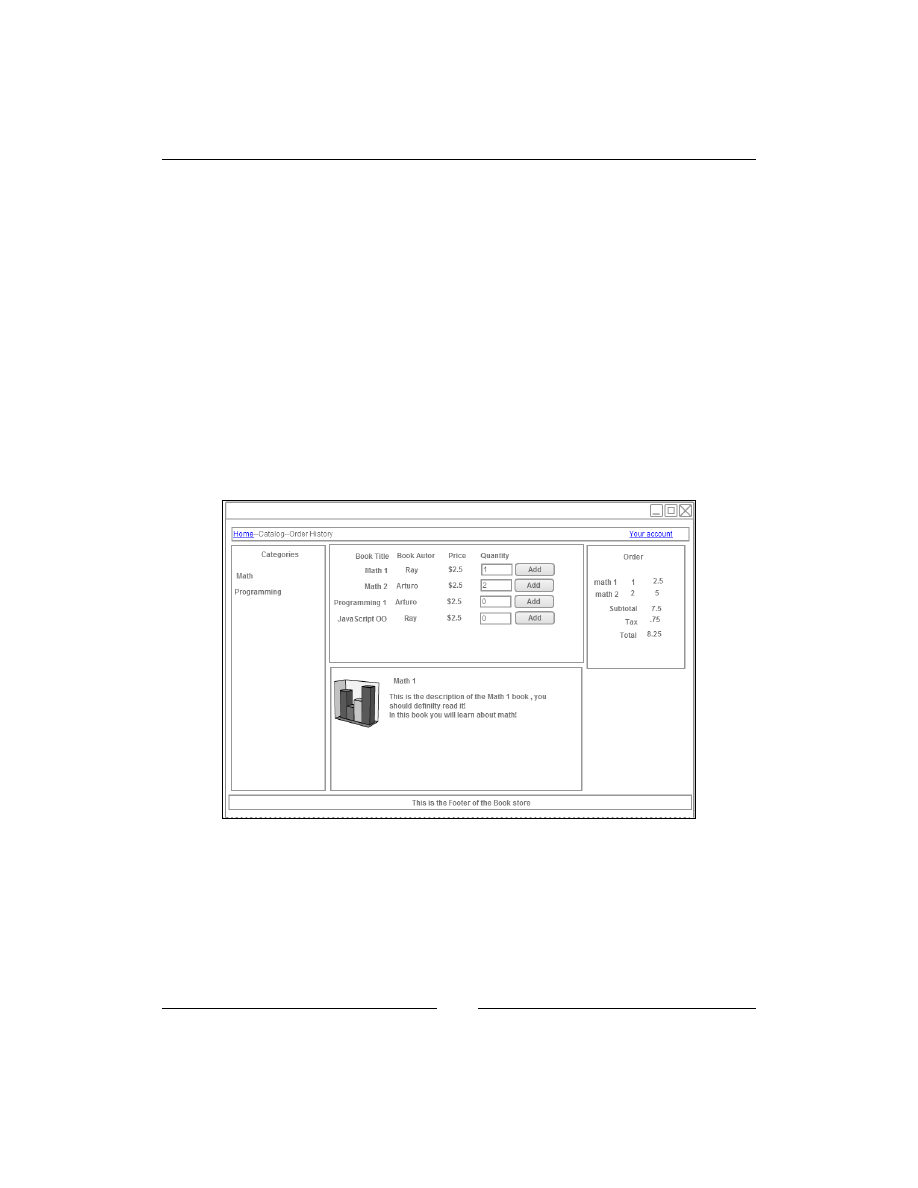
The following screenshot helps us to illustrate the structure of the book store
application that we are going to build:
We have a navigation section that provides the categories of the books. Then in the
middle, we have two sections. The one on top is the list of books by name, author,
and price. This section also allows users to order books.
The second section, in the center of the screen, will show a description of each book
as the user selects from the list on top. Finally, to the right of the screen, we have the
Order section that will contain the details about our order.
Chapter 2
[
13
]
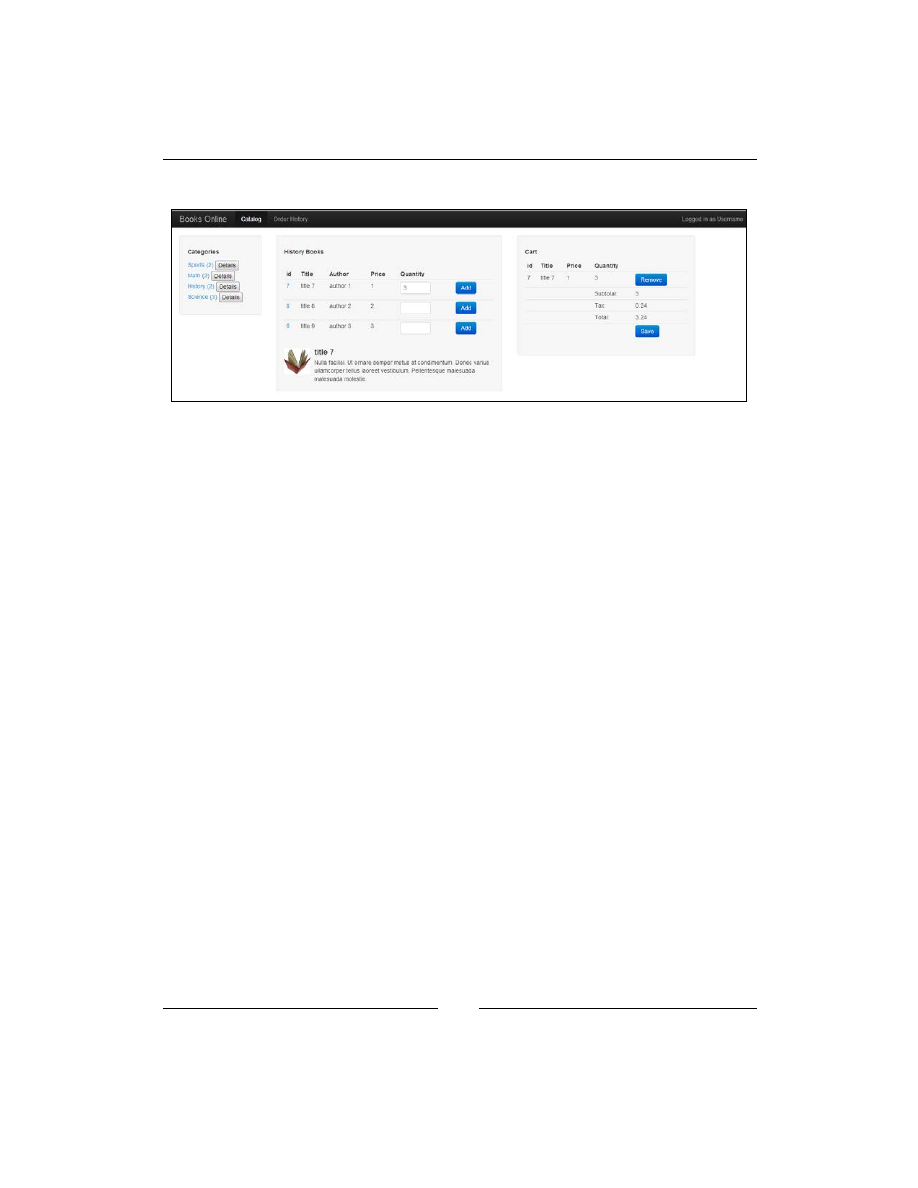
At the end of the book, the application should look like the following screenshot:
The goal of this chapter is to build the foundation of the book store website and
a part of that foundation is to have the
Backbone.Marionette.Application
object working with enough functionality so that we can call it an application. Our
philosophy is to take small steps at a time and then check where we stand. So let's
get started!
Setting up our development environment
As we will be building an application together, we need to set up our development
environment. The following are the steps to do it:
1. Create a folder and name it
Bookstore
.
2. Inside this folder, create two new folders—one named
Source Code
and the
other
Libraries
.
3. In the
Libraries
folder, place the following four libraries:
°
Underscore.js
°
jQuery.js
°
Backbone.js
°
Backbone.Marionette.js
For styling purposes, we will use Twitter bootstrap v2. Download the default
package, unzip it, and place the entire unzipped bootstrap folder beside the
.js
files inside the
Libraries
folder.
4. In the
Source Code
folder, create a new folder with the name
js
as it will be
the location where we will save all our JavaScript files.

Our First Application
[
14
]
5. Under the
Source Code
folder, create an HTML file and name it
Index.
html
. It should be placed at the same level as the
js
folder.
6. Make sure that your folder structure looks like the following screenshot and
that you have the right library files inside the
Libraries
folder.
Your
Source Code
folder should look like the following screenshot:
We are building a single-page application and in this section, we are about
to build the initial HTML page structure for our application. It is the HTML
file that will be rendered by the server the first time a user types the URL of
the site.
7. Open the
Index.html
file in your preferred code editor.
8. To avoid the tedious task of writing the HTML file manually for this chapter,
we have made it available for you at
http://jsfiddle.net/
. The code is
available at
http://jsfiddle.net/rayweb_on/hsrv7/11/
.
jsfiddle.net
—if you don't know it already, this is an excellent
tool to test the small parts of your JavaScript code and share your
snippets with ease.
I'm sure that if you are reading a Marionette book, it is because you have
enough experience to put the CSS and JS tags in the right place. So feel free to
skip the following steps.
Chapter 2
[
15
]
9. Copy the CSS section and paste it into the
<head>
section of the HTML file.
10. Copy the HTML section and paste it into the
<body>
section of the
HTML file.
11. At
http://jsfiddle.net/
, the scripts are already included for you. But in
our local environment, we have to add them. We will do it just at the bottom
of the
<html>
tag, but still inside the
<body>
tag.
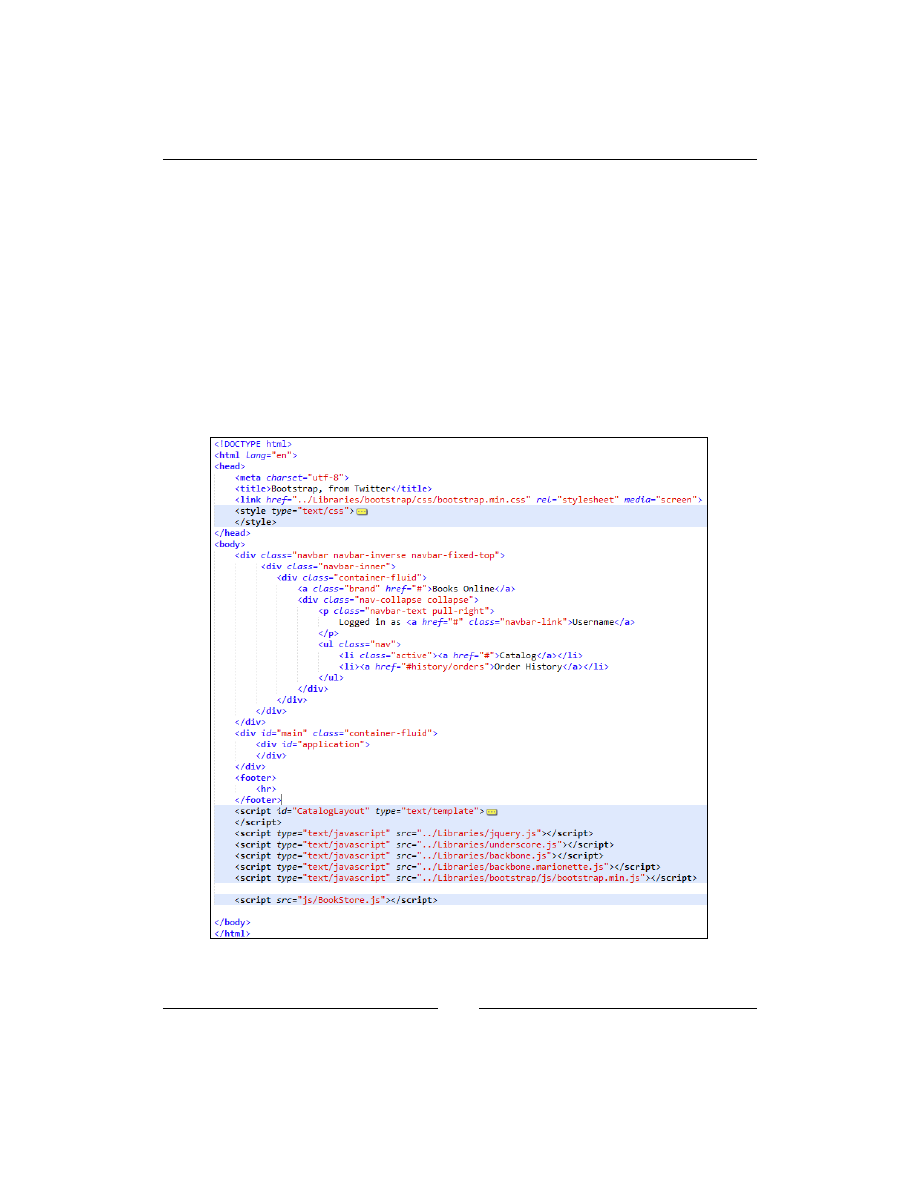
12. When you are done with copying the initial structure, your HTML file should
look like the following screenshot (the style script and the template script are
collapsed in the screenshot). In this chapter, we will be using the console of
your browser and we won't be interacting with the HTML file for now, but
it's important that your
Index.html
file follows the structure shown in the
following screenshot:
Our First Application
[
16
]
Bootstrap and styling your page is outside the scope of this book.
But it's a pretty convenient library that allows us to set up a
decent looking HTML file for this demo application.
But wait a minute…what does the last script
js/BookStore.js
refer to?
Well, that's the JavaScript code that we will be creating in the next step.
The Backbone.Marionette.Application
object
Create a new file inside the
js
folder and name it
BookStore.js
. To create a new
application, we just need to type the following line in
Bookstore.js
:
var bookStoreApp = new Backbone.Marionette.Application();
We will name the application
BookStoreApp
and will start attaching our Backbone
pieces to this application. But, we already mentioned that Marionette brings the
concept of an application object and, from the documentation, we also know that
it is an object that will help us to coordinate the pieces of our application. You may
ask, what pieces; for example, a
Marionette.Router
object and a
Marionette.
Controller
object.
Backbone already has a router!
Yes, Backbone already has a router object. Then what does the
Marionette.Router
object do differently? Well, the new router adds the ability of reducing your router
to just a small file that will contain only the routes of your application and not the
methods that will respond and take action once a route is matched. These methods
belong to a controller—another new concept that Marionette adds to Backbone.
Let's build a
Marionette.Router
object and a
Marionette.Controller
object to get
a better understanding of them:
var BookStoreController = Backbone.Marionette.Controller.extend({
displayBooks : function (){
console.log("I will display books...");
}
});
var BookStoreRouter = Backbone.Marionette.AppRouter.extend({
controller : BookStoreController,
appRoutes: {
"": "displayBooks"
}
});

Chapter 2
[
17
]
In the preceding code snippet, we created the
BookStoreController
object,
which is just a JavaScript object containing the functions that will match the name
of the methods defined in the router. In this case, the empty router will call the
displayBooks
method or the controller. This separation of concerns will allow us to
have a cleaner code base as the router will only know about the routes. We declare
which controller will handle the routes by setting the controller property of the
router to
BookStoreController
. The rest of the code snippet is just the declaration
of the routes.
It is not mandatory to have a router in order to use a controller. The Marionette
controllers can be instantiated without the need of a router. You may not handle
the interaction of your site by changes in the URL but by events. In this case, the
controller still adds value as it can be the container of your views.
It's recommended to have small routers and controllers divided as per the purpose
of your application instead of a giant single-router file that will contain all the routes
and the functions.
While these two pieces are part of the application's foundation, we still need to
make them work within it. But, we also need to do a little more in order to achieve a
functional application. Let's take small steps for this. Let's first check out whether we
can see a message log in the console of our browser.
To do that, we need to put all the code together and add the missing pieces in order
to make it work.
So far, we have only defined the application, controller, and router. But where
should we instantiate them? The
Backbone.Marionette.Application
object offers
the possibility to add initializer methods that will run when we start our application.
Yes, you read correctly! You can add as many methods as you need in case you want
to keep the logic of this initializers separated.
Inside this initializer method, we will instantiate the router and the controller, and
just for fun, add another log message to see the order of execution.
Use the following code to do this:
BookStoreApp.addInitializer(function () {
var bookStoreController = new BookStoreController({
var bookStoreRouter = new
BookStoreRouter({controller:controller});
console.log('Message from the addInitializer Method');
..});
})

Our First Application
[
18
]
Another useful function of the applications is the events that fire the
initialize:before
,
initialize:after
, and
start
functions. The names of these
functions are quite descriptive. As the name suggests, the
initialize:before
function will be executed before the initializers, the
initialize:after
function will
be executed after the initializers, and the
start
function is responsible for starting the
application and thereafter starting the initializers.
In our application, we will use
initialize:after
. This function will be
helpful for us, as the last thing we want to do once we instantiate the router is
start
Backbone.history
.
BookStoreApp.on('initialize:after', function () {
if (Backbone.history) {
Backbone.history.start();
}
console.log('Mesagge from initialize:after method');
});
The last step to complete the infrastructure or foundation of our application is call
the following function:
BookStoreApp.start();
Now, let's put all the code snippets together as follows:
var BookStoreApp = new Backbone.Marionette.Application();
var BookStoreController = Backbone.Marionette.Controller.extend({
displayBooks : function (){
console.log("I will display books...");
}
});
var BookStoreRouter = Backbone.Marionette.AppRouter.extend({
controller : BookStoreController,
appRoutes: {
"": "displayBooks"
}
});
BookStoreApp.addInitializer(function () {
var controller = new BookStoreController();
var router = new BookStoreRouter({controller:controller});
console.log("hello from the addInitializer.");
});
BookStoreApp.on('initialize:after', function () {
if (Backbone.history) {
Chapter 2
[
19
]
Backbone.history.start();}
console.log("hello from the initialize:after.");
});
BookStoreApp.start();
Downloading the example code
You can download the example code files for all Packt books you have
purchased from your account at http://www.packtpub.com. If you
purchased this book elsewhere, you can visit http://www.packtpub.
com/support
and register to have the files e-mailed directly to you.
Now, you can go ahead and open the
Index.html
file in your browser and see the
results on the console.
Summary
In this chapter, we learned about the application, controller, and router functionality,
and how to get them working together to get a simple application skeleton which
will be the base for our book store application.
In the next chapter, we will familiarize ourselves with the different views that
Marionette adds to the Backbone development.


Marionette View Types and
Their Use
In the previous chapter, we learned about components that help us provide a
structure to our application; however, none of these components interacted with the
DOM. This responsibility belongs to the views in Backbone development; however,
the interaction and manipulation of the DOM can quickly become complicated
inside our views. With the intention of having cleaner and meaningful objects to
manipulate, the DOM Marionette introduces a powerful set of views. The following
is a description of each one of those views provided in the official documentation at
https://github.com/marionettejs/backbone.marionette
:
•
Marionette.ItemView
: This is the view that renders a single model
•
Marionette.CollectionView
: This is the view that iterates over a collection
and renders the individual
ItemView
instances for each model
•
Marionette.CompositeView
: This is the collection view and item view for
rendering leaf-branch/composite model hierarchies
•
Marionette.Layout
: This is the view that renders a layout and creates
region managers to manage areas within it
•
Marionette.View
: This is the base view type that other Marionette views
extend from (not intended to be used directly)
In this chapter, we will learn the intention behind each one of them and how to start
using them.

Marionette View Types and Their Use
[
22
]
Marionette.View and Marionette.ItemView
The
Marionette.View
extends the
Backbone.View
, and it's important to remember
this, because all the knowledge that we already have on creating a view will be
useful while working with these new set of views of Marionette.
Each of them aims to provide a specific out of the box functionality so that you spend
less time focusing on the glue code needed to make things work, and more time on
things that are related to the needs of your application. This allows you to focus all
your attention on the specific logic of your application.
We will start by describing the
Marionette.View
part of Marionette, as all of the
other views extend from it; the reason we do this is because this view provides a
very useful functionality. But it's important to notice that this view is not intended to
be used directly. As it is the base view from which all the other views inherit from, it
is an excellent place to contain some of the glue code that we just talked about.
A good example of that functionality is the
close
method, which will be responsible
for removing
.el
from DOM. This method will also take care of calling unbind to
all your events, thus avoiding the problem called Zombie views. This an issue that
you can have if you don't do this carefully in a regular Backbone view, where new
instantiations of previously closed fire events are present. These events remain
bound to the HTML elements used in the view. These are now present again in the
DOM now that the view has been re-rendered, and during the recreation of the view,
new event listeners are attached to these HTML elements.
From the documentation of the
Marionette.View
, we exactly know what the
close
method does.
• It calls an
onBeforeClose
event on the view, if one is provided
• It calls an
onClose
event on the view, if one is provided
• It unbinds all custom view events
• It unbinds all DOM events
• It removes
this.el
from the DOM
• It unbinds all
listenTo
events
The link to the official documentation of the
Marionette.View
object is
https://
github.com/marionettejs/backbone.marionette/blob/master/docs/
marionette.view.md
.
It's important to mention that the third point, unbind all custom view events, will
unbind events created using the
modelEvents
hash, those created on the events
hash, and events created via
this.listenTo.

Chapter 3
[
23
]
As the
close
method is already provided and implemented, you don't need to
perform the unbind and remove previously listed tasks. While most of the time this
would be enough, at times, one of your views will need you to perform extra work
in order to properly close it; in this case, two events will be fired at the same time to
close a view.
The event
onBeforeClose
, as the name indicates, will be fired just before the
close
method. It will call a function of the same name,
onBeforeClose
, where we can add
the code that needs to be executed at this point.
function : onBeforeClose () {
// code to be run before closing the view
}
The second event will be
onClose
, which will be fired after the
close
method so
that the
.el
of the view won't be present anymore and all the unbind tasks will have
been performed.
function : onClose () {
// code to be run after closing the view
}
One of the core ideas behind Marionette is to reduce the boilerplate code that you have
to write when building apps with Backbone. A perfect example of which is the
render
method that you have to implement in every Backbone view, and the code there is
pretty much the same in each of your views. Load the template with the underscore
_.template
function and then pass the model converted to JSON to the template.
The following is an example of repetitive code needed to render a view in Backbone:
render : function () {
var template = $( '#mytemplate' ).html();
var templateFunction = _.template( template );
var modelToJSON = this.model.toJSON();
var result = templateFunction(modelToJSON);
var myElement = $( '#MyElement' );
myElement.html( result );
}
As Marionette defining a
render
function is no longer required, just like the
close
method, the preceding code will be called for you behind the scenes. In order to
render a view, we just need to declare it with a template property set.
var SampleView = Backbone.Marionette.ItemView.extend({
template : '#sample-template'
});
Marionette View Types and Their Use
[
24
]
Next, we just create a Backbone model, and we pass it to the
ItemView
constructor.
var SampleModel = Backbone.Model.extend({
defaults : {
value1 : "A random Value",
value2 : "Another Random Value"
}
})
var sampleModel = new SampleModel();
var sampleView = new SampleView({model:sampleModel);
And then the only thing left is to call the
render
function.
sampleView.render();
If you want to see it running, please go through this JSFiddle that
illustrates the previous code:
http://jsfiddle.net/rayweb_on/VS9hA/
One thing to note is that we just needed one line to specify the template, and
Marionette did the rest by rendering our view with the specified template. Notice
that in this example, we used the
ItemView
constructor; we should not use
Marionette.View
directly, as it does not have many functionalities of its own. It just
serves as the base for other views.
So some of the following examples of the functionalities provided by
Marionette.
View
will be demonstrated using
ItemView
, as this view inherits all of these
functionalities through extension.
As we saw in the previous example,
ItemView
works perfectly for rendering a single
model using a template, but what about rendering a collection of models?
If you just need to render, for example, a list of books or categories, you still can use
ItemView
. To accomplish this, the template that you would assign to
ItemView
must
know how to handle the creation of the DOM to properly display that list of items.
Let's render a list of books.
The Backbone model will have two properties: the book name and the book ID. We
just want to create a list of links using the book name as the value to be displayed;
the ID of the book will be used to create a link to see the specific book.
First, let's create the book Backbone model for this example and its collection:
var BookModel = Backbone.Model.extend({
defaults : {
id : "1",
Chapter 3
[
25
]
name : "First",
}
});
var BookCollection = Backbone.Collection.extend({
model : BookModel
});
Now let's instantiate the collection and add three models to it:
var bookModel = new BookModel();
var bookModel2 = new BookModel({id:"2",name:"second"});
var bookModel3 = new BookModel({id:"3",name:"third"});
var bookCollection = new BookCollection();
bookCollection.add(bookModel);
bookCollection.add(bookModel2);
bookCollection.add(bookModel3);
In our HTML, let's create the template to be used in this view; the template should
look like the following:
<script id="books-template" type="text/html">
<ul>
<% _.each(items, function(item){ %>
<li><a href="book/'+<%= item.id %> +"><%= item.name %> </li>
<% }); %>
</ul>
</script>
Now we could render the book list using the following code snippet:
var BookListView = Marionette.ItemView.extend({
template: "#books-template"
});
var view = new BookListView ({
collection: bookCollection
});
view.Render();
If you want to see it in action, go to the working code in JSFiddle
at http://jsfiddle.net/rayweb_on/8QAgQ/.

Marionette View Types and Their Use
[
26
]
The previous code would produce an unordered list of books with links to the
specific book. Again, we gained the benefit of writing very little code once again, as
we didn't need to specify the
Render
function, which could be misleading, because
the
ItemView
is perfectly capable of rendering a model or a collection. Whether to
use
CollectionView
or
ItemView
will depend on what we are trying to accomplish.
If we need a set of individual views with its own functionality,
CollectionView
is
the right choice, as we will see when we get to the point of reviewing it. But if we just
need to render the values of a collection,
ItemView
would be the perfect choice.
Handling events in the views
To keep track of model events or collection events, we must write the following code
snippet on a regular Backbone view:
this.listenTo(this.model, "change:title", this.titleChanged);
this.listenTo(this.collection, "add", this.collectionChanged);
To start these events, we use the following handler functions:
titleChanged: function(model, value){alert("changed");},
collectionChanged: function(model, value){alert("added");},
This still works fine in Marionette, but we can accomplish the same thing by
declaring these events using the following configuration hash:
modelEvents: {
"change:title": "titleChanged"
},
collectionEvents: {
"add": "collectionChanged"
},
This will give us exactly the same result, but the configuration hash is very
convenient as we can keep adding events to our model or collection, and the code is
cleaner and very easy to follow.
The
modelEvents
and
collectionEvents
are not the only configuration hash sets
that we have available in each one of the Marionette views; the UI configuration hash
is also available. It may be the case that one of the DOM elements on your view will
be used many times to read its value, and doing this using jQuery can not be optimal
in terms of performance. Also, we would have the jQuery reference in several places,
repeating ourselves and making our code less DRY.

Chapter 3
[
27
]
Inside a Backbone view, we can define a set of events that will be fired once an action
is taken in the DOM; for instance, we pass the function that we want to handle in this
event at the click of a button.
events : {
"click #button2" : "updateValue"
},
This will invoke the
updateValue
function once we click on
button2
. This works
fine, but what about calling a method that is not inside the view?
To accomplish this, Marionette provides the
triggers
functionality that will fire
events which can be listened to outside of your view. To declare a
trigger
, we can
use the same syntax used in the
events
object as follows:
triggers : { "click #button1": "trigger:alert"},
And then, we can listen to that event somewhere else using the following code:
sampleView.on("trigger:alert", function(args){
alert(args.model.get("value2"));
});
In the previous code, we used the model to alert and display the value of the
property,
value2
.
The
args
parameter received by the function will contain objects that you can use:
• The view that fired the trigger
• The Backbone model or collection of that view
UI and templates
While working with a view, you will need a reference to a particular HTML element
through jQuery in more than one place in your view. This means you will make a
reference to a button during initialization and in few other methods of the view. To
avoid having the jQuery selector duplicated on each of these methods, you can map
that UI element in a hash so that the selector is preserved. If you need to change it,
the change will be done in a single place.
To create this mapping of UI elements, we need to add the following declaration:
ui: {
quantity: "#quantity"
saveButton : "#Save"
},

Marionette View Types and Their Use
[
28
]
And to make use of these mapper UI elements, we just need to refer them inside any
function by the name given in the configuration.
validateQuantity: function() {
if (this.ui.quantity.val() > 0 {
this.ui.saveButton.addClass('active');
}
}
There will be times when you need to pass a different template to your view. To do
this in Marionette, we remove the template declaration and instead add a function
called
getTemplate
.
The following code snippet would illustrate the use of this function:
getTemplate: function(){
if (this.model.get("foo"){
return "#sample-template";
}else {
return "#a-different-template";
}
},
In this case, we check the existence of the property
foo
; if it's not present, we use a
different template and that will be it. You don't need to specify the
render
function
because it will work the same way as declaring a template variable as seen in one of
the previous examples.
If you want to learn more about all the concepts that we have discussed so far, please
refer to the JSFiddle link
http://jsfiddle.net/rayweb_on/NaHQS/
.
If you find yourself needing to make calculations involving a complicated process
while rendering a value, you can make use of
templeteHelpers
that are functions
contained in an object called
templateHelpers
. Let's look at an example that will
illustrate its use better.
Suppose we need to show the value of a book but are offering a discount that we
need to calculate, use the following code:
var PriceView = Backbone.Marionette.ItemView.extend({
template: "#price-template",
templateHelpers: {
calculatePrice: function(){
// logic to calculate the price goes here

Chapter 3
[
29
]
return price;
}
}
});
As you can see the in the previous code, we declared an object
literal
that will
contain functions that can be called from the templates.
<script id="my-template" type="text/html">
Take this book with you for just : <%= calculatePrice () %>
</script>
Marionette.CollectionView
Rendering a list of things like books inside one view is possible, but we want to be
able to interact with each item. The solution for this will be to create a view one-
by-one with the help of a loop. But Marionette solves this in a very elegant way by
introducing the concept of
CollectionView
that will render a child view for each of
the elements that we have in the collection we want to display.
A good example to put into practice could be to list the books by category and create
a Collection view. This is incredible easy.
First, you need to define how each of your items should be displayed; this means
how each item will be transformed in a view.
For our categories example, we want each item to be a list
<li>
element and part of
our collection; the
<ul>
list will contain each category view.
We first declare
ItemView
as follows:
var CategoryView = Backbone.Marionette.ItemView.extend({
tagName : 'li',
template: "#categoryTemplate",
});
Then we declare
CollectionView
, which specifies the view item to use.
var CategoriesView = Backbone.Marionette.CollectionView.extend({
tagName : 'ul',
className : 'unstyled',
itemView: CategoryView
});
A good thing to notice is that even when we are using Marionette views, we are still
able to use the standard properties that Backbone views offer, such as
tagName
and
ClassName
.

Marionette View Types and Their Use
[
30
]
Finally, we create a collection and we instantiate
CollectionView
by passing the
collection as a parameter.
var categoriesView = new CategoriesView({collection:categories);
categoriesView.render();
And that's it. Simple huh?
The advantage of using this view is that it will render a view for each item, and it can
have a lot of functionality; we can control all those views in the
CollectionView
that
serves as a container.
You can see it in action at
http://jsfiddle.net/rayweb_on/7usdJ/
.
Marionette.CompositeView
The
Marionette.Composite
view offers the possibility of not only rendering a
model or collection models, but also the possibility of rendering both a model and a
collection. That's why this view fits perfectly in our BookStore website. We will be
adding single items to the shopping cart, books in this case, and we will be storing
these books in a collection. But we need to calculate the subtotal of the order, show
the calculated tax, and an order total; all of these properties will be part of our
totals
model that we will be displaying along with the ordered books.
But there is a problem. What should we display in the order region when there are
no items added? Well, in the
CompositeView
and the
CollectionView
, we can set an
emptyView
property, which will be a view to show in case there are no models in the
collection. Once we add a model, we can then render the item and the
totals
model.
Perhaps at this point, you may think that you lost control over your render
functionality, and there will be cases where you need to do things to modify your
HTML. Well, in that scenario, you should use the
onRender()
function, which is
a very helpful method that will allow you to manipulate the DOM just after your
render
method was called.
Finally, we would like to set a template with some headers. These headers are not
part of an
ItemView
, so how can we display it?
Let's have a look at part of the code snippet that explains how each part solves
our needs.
var OrderListView = Backbone.Marionette.CompositeView.extend({
tagName: "table",
template: "#orderGrid",

Chapter 3
[
31
]
itemView: CartApp.OrderItemView,
emptyView: CartApp.EmptyOrderView,
className: "table table-hover table-condensed",
appendHtml: function (collectionView, itemView) {
collectionView.$("tbody").append(itemView.el);
},
So far we defined the view and set the template; the
Itemview
and
EmptyView
properties will be used to render our view.
The
onBeforeRender
is a function that will be called, as the name indicates, before
the
render
method; this function will allow us to calculate the totals that will be
displayed in the
total
model.
onBeforeRender: function () {
var subtotal = this.collection.getTotal();
var tax = subtotal * .08;
var total = subtotal + tax;
this.model.set({ subtotal: subtotal });
this.model.set({ tax: tax });
this.model.set({ total: total });
},
The
onRender
method is used here to check whether there are no models in the
collection (that is, the user hasn't added a book to the shopping cart). If not, we
should not display the header and footer regions of the view.
onRender: function () {
if (this.collection.length > 0) {
this.$('thead').removeClass('hide');
this.$('tfoot').removeClass('hide');
}
},
As we can see, Marionette does a great job offering functions that can remove a lot of
boilerplate code and also give us full control over what is being rendered.

Marionette View Types and Their Use
[
32
]
Building the layout of our application
with Marionette.Layout
The final view that we need to review is the
Marionette.Layout
view. This view
is the combination of
Itemview
and
Region
; we haven't reviewed the
Marionette.
Region
component, but for now, it's enough to say that it's a component that will be
in charge of rendering a view on its
el
.
So the layout works as an
ItemView
because it requires a template to render itself.
This template can be your initial HTML divided by logical regions, such as the
navigation region that will contain a view which will display the navigation section
of your site, the footer view that should be displayed at the footer region, and so on.
You can start by rendering your layout and then rendering the view properly on
each of the regions.
Let's create the
Marionette.Layout
view.
varCatalogLayout = Backbone.Marionette.Layout.extend({
template: "#CatalogLayout",
regions: {
categories : '#categories',
products : '#products',
order : '#order',
book: '#book'
}
});
In the HTML that you copied in Chapter 2, Our First Application, you will find the
corresponding
<div>
tags with the IDs of the regions.
In this view, we specified the script/template that the view will use to render. This
specified template was added to the initial HTML, and inside it were
<div>
tags that
will serve as regions. Each of the regions is given a name that makes sense with the
view that it will be displaying, and we used an object
literal
to define the regions.
The
Layout
view inherits the same functionality as for all the other views, so in case
you want to listen to events, you can do it just like in any other view.
To render this initial layout, we just need to instantiate it and render it as any
other view.
var catalogLayout = new CatalogLayout();
catalogLaout.render();

Chapter 3
[
33
]
You can still add and remove regions to your layout at runtime by calling the
addRegion
and
removeRegion
methods.
layout.addRegion("footer", "#footer");
layout.removeRegion("footer ");
To add multiple regions, the
Layout
view provides an
addRegions
method that
receives an object
literal
with the regions to be added.
layout.addRegions({
favoriteBooks: "#favoritebooks",
bestRated: "#best"
});
The behavior of the
Close
function on this view will be a little different as it will call
close
on all of the regions. These regions will then call close on the views that they
contain, making sure all of the views contained are closed properly.
A good way to start your application is to define a
Body
region; this region will
then contain the application
Layout
that will contain all of the logical regions of
the application. Maybe you need to display a sublayout in one of these regions,
which is perfectly fine. There is no limit of nested layouts; use them as your
application requires.
Extending Marionette views
A common need while working with Backbone and Marionette and in pretty much
every language is to re-use code as much as possible. If you want all your views to
behave in a certain way, you can achieve it by extending your Marionette views. In
the following example, we will add a
log
method to all the item views by extending
the
Marionette.ItemView
.
var HandyView = Backbone.Marionette.ItemView.extend({
initialize:function(){
Backbone.Marionette.ItemView.prototype.initialize.apply
(this,arguments);
},
logMessage : function (message){
console.log(message);
}
});

Marionette View Types and Their Use
[
34
]
Now you just need to start using your
HandyView
in order to get the benefit of the
logMessage
function.
var BookView = HandyView.extend({
alertMessage : function () {
alert(message);
}
});
var bookView = new BookView();
bookView.logMessage("Hi");
bookView.alertMessage("Bye");
The idea here is to let you know that you can extend Marionette views just like you
can extend Backbone views, and take advantage of the benefits of inheritance.
Summary
In this chapter, we got to learn about all the kinds of views that Marionette offers,
when to use them, how to advantageously make use of its handy methods that will
allow us to manage the DOM creation and interaction better, and finally how to
extend them.
In the next chapter, we will learn about how to manage a set of views with the help
of the
Regions
,
RegionManager
, and
BabySitter
objects of Marionette.

Managing Views
As we learned in Chapter 3, Marionette View Types and Their Use,
Marionette.js
views provide us with a lot of functionality to render data with the benefit of having
to write very little code in exchange. In this chapter, we are going to discover what a
Region
in Marionette is and what
RegionManager
and
BabySitter
objects are. All of
them are intended to help us manage views in an easier way.
We will also get to know a handy object while rendering templates in your
application: the
Renderer
object. After that, we will have a short summary of what
we have learned through the first four chapters.
We will cover the following topics in this chapter:
•
Marionette.Region
•
Marionette.RegionManager
•
Marionette.BabySitter
•
Marionette.Renderer
• Improving the application's performance with
Marionette.TemplateCache
All of these are very helpful objects that will help us to manage our Marionette views
with ease, keeping in mind performance and reuse.

Managing Views
[
36
]
Understanding the Marionette.Region
object
While building an application, we need to separate the screen into small, logical
pieces such as header, footer, navigation, and content area. These are common parts
that are present in most applications. Usually your navigation options can change
depending on the user. The header may also be different based on your user profile,
and of course, your content area is going to be busy showing different views—views
that need to be rendered to perform an action and closed in order to show a new
view with perhaps some results or the next logical steps in your application. That's
why we should think of the footer or content parts of your application as regions
within your application, where we will be swapping different views.
The following code exemplifies one of the ways to create a
Marionette.Region
object:
var FooterRegion = new Backbone.Marionette.Region({
el: "#footer"
});
To define a region, we just need to specify an element in DOM that will serve as a
container of the views on your logical section of the application. In this case, the
#footer
is a DIV element, but it can be any HTML element as long as appending a
view inside of it generates a valid HTML.
The idea behind a region is to use it as a container of views in your application one at
a time. It will be in charge of calling the
render
function of the specified view when
we call the method
.show
of the region. It will call the close method of the current
view and remove it from the DOM when we call the method
.close
of the region.
The following is the code needed to use a region in order to render a view:
// definition of a view to be shown in the region
var footerView = new FooterView();
//the Region will show the footerview in its DOM element
//in this case it will render the footer view inside the #footer
element in the DOM
FooterRegion.show(footerView);
// the footerView is now rendered
//Finally we can call close on the region and the footer view
will be removed from the #footer element
FooterRegion.close();

Chapter 4
[
37
]
As we can see in the preceding code snippet, the
show
method of the region will take
the instance of the view to be rendered as a parameter.
Rendering the views and then swapping them for new ones seems trivial at the
beginning. We can just call
close
and
render
, right? Then why do we need a region
object to do it for us? This is because the region does these things for us and much
more, without us having to worry about which view is the current view displayed
inside of it. Think of it in this way: you have the content region and you will display
a view inside of it. We can replace this view with a new one just by calling the
.show
method and the region will take care of the removal of the first view. So we don't
have to call its
close
method, as this is part of the functionality of the
show
method
of the region. This means that if there is a view already being displayed in the region,
the
close
method of the exiting view will be called by calling
show
and passing a
new view, thereby ensuring there is proper removal of its
.el
event bindings.
Let's use a wizard as an example. We have four steps and on each step, we show a
view where we will fill some data. On each one of these views, we have links that
will guide us to the next step or to the previous step in case we want to modify the
data. The links will modify the URL, and it will be the router's responsibility to call
the proper step.
For this example, the code that is inside the controller is given as follows:
// each view step syncs with the server at the time to
initialize and close in order to preserve the data
stepOne : function () {
var stepOneView = new StepOneView();
content.region.show(stepOneView);
},
stepTwo : function () {
var stepTwoView = new StepTwoView();
content.region.show(stepTwoView);
}
stepThree : function () {
ar stepThreeView = new StepThreeView();
content.region.show(stepThreeView);
}
finalStep : function () {
var finalStepView = new FinalStepView();
content.region.show(finalStepView);
}

Managing Views
[
38
]
From the preceding code, we can see the benefits of using a region to render views.
If the user clicks on the second step and decides to go back, we don't need to check
whether the instance of the
stepTwoView
method is in memory and close it in order
to render the
stepOneView
method, as this will be handled by the region.
There will be occasions where it will be impossible to track which view is present
in a region, and in most of those cases, we don't care. We just need to render a new
view on this area without having to worry about whether the previous view is being
removed in a proper way.
Another way to declare a region is by attaching it directly to a Marionette
application, as follows:
BookStoreApp = new Backbone.Marionette.Application();
BookStoreApp.addRegions({
contentRegion: "#mainContent",
});
In this case, we used the
.addRegions
method of the application object that is
expecting an object literal with the names of the regions and the DOM element to
be used.
To use these new regions, we just need to call them by the name given in the object
literal, which is used for this configuration as follows:
BookStoreApp.contentRegion.show(stepOneView);
In Chapter 3, Marionette View Types and Their Use, we defined a layout. The layout
view of Marionette serves as a container of regions or as a container of containers.
The layout will render a template with the skeleton of your HTML. Inside this
skeleton, we will put the DIV element or elements that will serve as regions, and
once this layout is rendered, we can use its region to display views.
So lets review the code as follows:
CatalogLayout = Backbone.Marionette.Layout.extend({
template: "#CatalogLayout",
regions: {
categoriesRegion : '#categories',
productsRegion : '#products',
orderRegion : '#order',
bookRegion: '#book'
}
});

Chapter 4
[
39
]
In the layout declaration, we defined a template and the regions object literal, giving
names to the regions and matching those with the DOM elements.
For this
BookStoreApp
, we will create
mainRegion
. The responsibility of this region
is to render the layout view of the application. The layout view will contain the
initial HTML file and the logical regions of the application, regions that will show the
proper views. The following code exemplifies the creation of the application object,
the layout view, and the rendering of views inside the regions of the layout:
BookStoreApp = new Backbone.Marionette.Application();
BookStoreApp.addRegions({
mainRegion: "#mainContent",
});
CatalogLayout = Backbone.Marionette.Layout.extend({
template: "#CatalogLayout",
regions: {
categoriesRegion : '#categories',
productsRegion : '#products',
orderRegion : '#order',
bookRegion: '#book'
}
});
var catalogLayput = new CatalogLayout();
BookStoreApp.mainRegion.show(catalogLayput );
catalogLayput.categoriesRegion.show(new CategoriesView());
catalogLayput.productsRegion.show(new ProductsView());
With the help of the layout and the regions, we can create a logical segmentation
of the screen that will allow us to render views on each region. Using meaningful
names for these regions will definitely help, as we just need to pass the right view to
the region and stop worrying about the glue code needed for rendering and cleanup.
A region will raise the following two events while rendering a view that will help us
to perform an extra manipulation to the DOM:
•
"show"/onShow
: This event is called on the view instance when the view has
been rendered and displayed
•
"show"/onShow
: This event is called on the region instance when the view
has been rendered and displayed

Managing Views
[
40
]
Finally, while closing a view, the following method will be raised that can be used to
perform one of the final tasks such as notifying the user with a friendly message:
•
"close"/onClose
: This method is called when the view has been closed
You can subscribe to these events as usual with the
.on
method declaration as
follows:
BookStoreApp.mainRegion.on("show", function(view){
// extra functionality needed to be added once the view is
rendered
});
The following code exemplifies how to subscribe to the
close
method:
BookStoreApp.mainRegion.on("close", function(view){
// code to notify that the view as been removed
});
Using the Marionette.RegionManager
object
Using regions helps to manage views in a very elegant way. But that may not be
enough for some applications, which can have dozens of regions that need to be
added and removed during the lifetime of the application. To accomplish this
management, we can take advantage of the
RegionManager
object of Marionette,
which will serve as a container for regions.
Having your regions in this container can help us to accomplish almost the same
actions, which we could accomplish with a
Backbone.Collection
object, with the
help of underscore methods such as
each
,
map
,
invoke
,
contains
, and
toArray
.
The following syntax can help us to declare
Marionette.RegionManager
:
var regionManager = new Marionette.RegionManager();
The following syntax demonstrates how to add a region to
regionManager
. The
addRegion
method takes two parameters. The first one will be the ID or alias of the
region, and the second one will be the DOM element to be used.
regionManager.addRegion("math", "#math");

Chapter 4
[
41
]
If we want to add multiple regions, we need to use the
addRegions
method and pass
an object literal to this method with names and IDs as parameters.
regionManager.addRegions({
art: "#art",
music: "#music",
science: "#science"
});
We can make use of the
removeRegion
method to remove the region from
regionManager
and also to close the region, which will call
close
on the contained
view, thereby removing this view from the application.
regionManager.removeRegion("math");
To remove all the regions, we can use the
removeRegions
method as shown in the
following code:
regionManager.removeRegions();
We can continue adding more regions to this container. But let's now create a
RegionManager
object for a category that will contain regions for subcategories; each
region will show a
CollectionView
object with books of the same subcategory. So
we display a
CollectionView
object inside a region with the same name.
The idea is that the user wants to view books of his favorite category and also
wants to add more subcategories to the screen to be rendered. For instance, in the
History category, we can have an option to view books from modern history, Rome,
universal history, World War II, and many more subcategories.
var historyManager = new Marionette.RegionManager();
historyManager.addRegions({
wwIIRegion: "#wwII",
romeRegion: "#rome",
modernRegion: "#modern",
unitedStatesHistoryRegion : "#us"
});
And then just render the proper view on each region as follows:
historyManager.modernRegion.show(new BooksView({collection :
modern}));
historyManager.wwIIRegion.show(new BooksView({collection
:wwIIBooks}));

Managing Views
[
42
]
If at some point, the user switches to another category and no longer wants to see
the History category, calling
removeRegions
will cascade to the view level, thereby
removing all the views in a safe way for us.
Using the Backbone.BabySitter object
With the value that they provide, two objects made its way out of the Marionette
library and can be used individually by including them in your scripts or using the
blended version of Marionette. One is the
Backbone.Wreqr.EventAggregator
object
and the other is the
Backbone.BabySitter
object, which is the one that we are about
to discuss.
This object helps us to keep track of views and to manage them. These views
can be contained within another view or another object that needs to keep track
of these views.
The
BabySitter
object can be used to contain views instead of regions. The
responsibility of
RegionManager
is to contain and perform actions on regions within
your application. The
BabySitter
object has the same responsibility, but in this case,
it helps us to manage related views.
The following code is an example of an instantiation of a BabySitter object:
container = new Backbone.ChildViewContainer();
You can start adding and removing views to this container as it is a regular
Backbone.Collection
object; you can do this by using the add and remove
functions.
container.add(someView);
container.add(anotherView);
container.remove(someView);
The container offers a lot of useful methods such as length, which will return the
number of views that the container is keeping track of.
var numberofViews =container.length
As we have mentioned earlier, the container exposes several functions of the
underscore collection functions, such as
each
,
map
,
find
,
select
,
filter
,
all
,
some
,
and
toArray
.
Chapter 4
[
43
]
To demonstrate that we can call a method of each one of the views inside the
container, we just need to write the following code:
container.each(function(view){
view.changeColor();
});
The responsibility of the preceding function is to iterate all the views in the container
and call a function inside this view,in this case, the
changeColor
function of each view.
We have created a JSFiddle that demonstrates the use of the
BabySitter
object. You
can find it at
http://jsfiddle.net/rayweb_on/fxzAs/
.
jsfiddle.net
is a very useful website for sharing small snippets of
code, facilitating collaboration between developers.
Taking advantage of the Marionette.
Renderer object
As we saw in Chapter 3, Marionette View Types and Their Use, Marionette does the
great job of removing the repetitive code needed in order to render views. But
behind the scenes, what Marionette does is it delegates this task to the
Renderer
object. Its responsibility is to load and compile the template into the
.template
function and to pass the data to be used in order to properly render the model of the
view. This means that every view object in Marionette uses the
Renderer
object. This
object can also help to render HTML into DOM by just passing a template with the
data to be used for this purpose.
Let's say that for some reason we need to append HTML into our view, but we don't
want to call the render of the view that we are working with. In such a case, we can
use the
Marionette.Renderer
object.
callRenderer : function () {
var template = "#sample-template2";
var data = {foo: "I was appended with Marionette Renderer"};
var html = Backbone.Marionette.Renderer.render(template, data);
this.$el.append(html);
}
In the preceding function, we declared a template that is in DOM, then we created
an object literal with dummy data, and then we passed these two to the
Renderer
object, which returned an HTML, that we finally appended to the
$el
of our view.

Managing Views
[
44
]
To see this example working, you can go to the
http://jsfiddle.net/rayweb_on/
BeMfz/
JSFiddle link.
But perhaps a better use could be to render DOM elements that will serve as
containers for the regions.
If we need to render the subcategories, we need the DIVs
(<div id="rome"><div>
)
to be available in order to attach the regions and then call
show
to render the views
inside these containers (DIV elements).
Improving the performance of the
application with TemplateCache
In every application, performance matters. That's why having our templates
available in the cache will definitely improve the speed of the rendering process in
future calls.
Marionette has an object called
TemplateCache
that is used by the
Renderer
object.
This means that all of our templates are stored in this
TemplateCache
object and to
start making use of it, we just need to call the
get
method. Internally, this method
will confirm whether it already has the template and then return it; alternatively, it
will load the template from DOM and will return the template so that we can use it,
but it will also keep a reference of it. Hence in the subsequent call, we will get the
cached version of our template by using the following code:
var template = Backbone.Marionette.TemplateCache.get("#my-
template");
To remove one or more templates from our cache, we need to call the
clear
function
as follows:
Backbone.Marionette.TemplateCache.clear("#my-template")
If we need to delete more than one template, we can pass a list of templates to be
deleted or simply call the
clear()
function without parameters to delete all the
cached templates as follows:
Backbone.Marionette.TemplateCache.clear("#my-template", "#this0-
template")
Alternatively, we can use the following code to do this:
Backbone.Marionette.TemplateCache.clear()
Chapter 4
[
45
]
By default, the Marionette
TemplateCache
works with underscore templates,
but to override this, we need to provide our own definition of the
compileTemplate
function.
To be consistent, we will override this function to return handlebars templates.
Backbone.Marionette.TemplateCache.prototype.compileTemplate =
function(rawTemplate) {
return Handlebars.compile(rawTemplate);
}
Handlebars is a very popular template engine and is commonly used
as an alternative to underscore templates. You can find out more
about it on its website, http://handlebarsjs.com/.
As we saw, making use of
TemplateCache
is very easy and the benefits that it
provides are definitely its biggest selling point.
Summary
In this chapter, we learned about different objects that Marionette provides to manage
views, such as the
Region
and
BabySitter
objects. This management is definitely
needed, but it takes a lot of glue code to achieve it. So having it out of the way at the
time of building an application is a very good reason to start using these objects.
In the next chapter, we will learn how to modularize our applications into small
modules of subapplications in order to keep different functionalities of our website
separated from each other, but still working together.


Divide and Conquer –
Modularizing Everything
After explaining in detail in Chapter 4, Managing Views, how to implement regions
in
Marionette.js
to manage your views, it is time to understand how to deal with
complex JavaScript projects and learn how to create a framework that would be
extensible in subapplications and should require minimal effort to scale.
The following list contains the main topics that we will cover in this chapter and that
we should consider while building modular and scalable single-page apps using
Marionette.js
:
• Divide and conquer
• Modules
• Subapplications
• Memory management
Applying the divide and conquer
principle
Complexity is the enemy of software, and building complex JavaScript applications
can easily get out of hand. There are multiple ways to deal with complexity, but the
most effective method is by using the principle of divide and conquer.
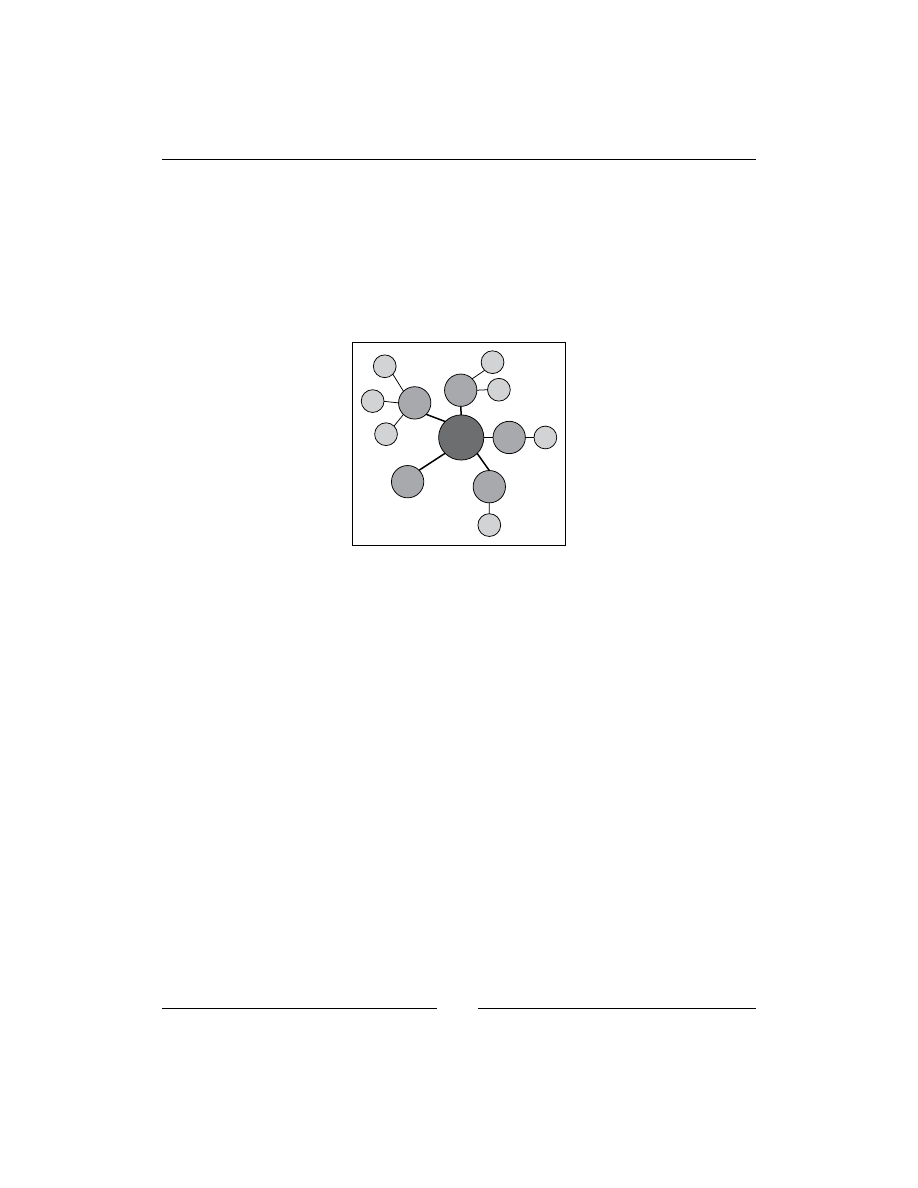
Divide and Conquer – Modularizing Everything
[
48
]
Directly through its module definition,
Marionette.js
allows us to split our code
into smaller and more single responsibility blocks. If we do not break our code into
smaller pieces, we will slow down development and make our application difficult
to maintain. The easiest starting point to structure the code is the
Marionette.
Application
. The application's primary responsibility is to start and stop
subapplications and, if necessary, mediate cross subapplication communication. The
following image shows how we can start from the application object to modularize
our solution in subapplications and modules:
For the Single-page application (SPA) example that we are building, we probably
will not need a lot of subapplications right from the beginning. But it is really
important to know how to use this powerful feature that helps to break up an
app into smaller and single responsibility units. The subapplication modules are
independent parts of our app and they can consist of routers, controllers, models,
layouts, and views.
All modules can be loaded on demand, so they do not need to be created from the
beginning. For example, we can start them when the subapplication route matches
specific patterns.
Modularizing single-page applications
Designing a base architecture for single-page apps is not trivial. SPAs are opposite
to traditional web apps that often have full-page reloads. They are dynamic page
applications running in one page and usually, require spending some time on
designing foundations. They are designed more like desktop apps since we store the
application state in the client, but managing it quickly becomes a problem. As we
have learned from the divide and conquer principle, a problem can be divided in
several parts, so that each part can be handled independently. Having said that, let's
explore how we can implement an application that will load single responsibility
subapplications on demand, each of them has the ability to stop and start modules.

Chapter 5
[
49
]
Getting started with modules
"Beauty of style and harmony and grace and good rhythm depends on simplicity."
— Plato
By understanding the concept of divide and conquer, we should agree that the
modularization of code is tremendously important. Modules are small, simple, and
well-encapsulated packages that have a singular focus with well-defined functions;
they can be used in conjunction with other modules to create an entire system. In
Marionette.js
, a module provides a high-level piece of functionality and manages
objects that really provide implementation details.
Let's define a module with no functionality to continue with the examples from the
book store, where we will create the module that will contain the cart and order
history subapplications:
var MyApp = new Backbone.Marionette.Application();
var myModule = MyApp.module("MyModule");
The modules of
Marionette.js
are loaded and defined after the
app.start()
call
and they are fully instantiated objects. As you can see, Marionette's modules hang
from our application. Let's now define a real-world module definition:
Books.module('HistoryApp', {
startWithParent: false,
define:
function (HistoryApp, App, Backbone, Marionette,$, _) {
}
});
The following is an explanation of the previous code snippet:
•
Books
: This is the main application object.
•
HistoryApp
: This is the name module.
•
startWithParent
: This should be false if we wish to manually start a
module instead of having the application start it. We have to tell the module
definition not to start with the parent, and that is exactly our scenario
since we do not want to start all the subapplications from the beginning.
This concept will be explained in detail when we get into the Working with
subapplications section of this chapter.

Divide and Conquer – Modularizing Everything
[
50
]
An explanation of the function arguments is as follows:
•
App
: This is the application central object that manage the module life cycle
•
Backbone
: This is the reference to the
Backbone
library
•
Marionette
: This is the reference to the
Backbone.Marionette
library
•
$
: This is the reference to the DOM library, jQuery in this case
•
_
: This is a reference to underscore
In addition to the arguments explained, you can pass custom arguments to this
function definition. Now we have a very simple module ready to encapsulate some
of the functionality required.
Splitting modules into multiple files
Sometimes a module is so long for a single file that we want to split the definition
across multiple files. But it is pretty common for the subapplication modules to
contain controllers, routers, and views, among others, so we do not want to put them
all together in a file. This is made really simple by
Marionette.js
modules, so let's
take a look.
The following is an example code from a controller file:
Books.module('HistoryApp', function (HistoryApp, App) {
HistoryApp.Controller = Marionette.Controller.extend({
});
});
An example code from a router file is as follows:
Books.module('HistoryApp', {
startWithParent: false,
define:
function (HistoryApp, App, Backbone, Marionette, $, _) {
var Router = Backbone.Router.extend({
});
}
});
We have created two files, one for the controller and other for the router, both of
them are contained in the same module HistoryApp but located in separated files.
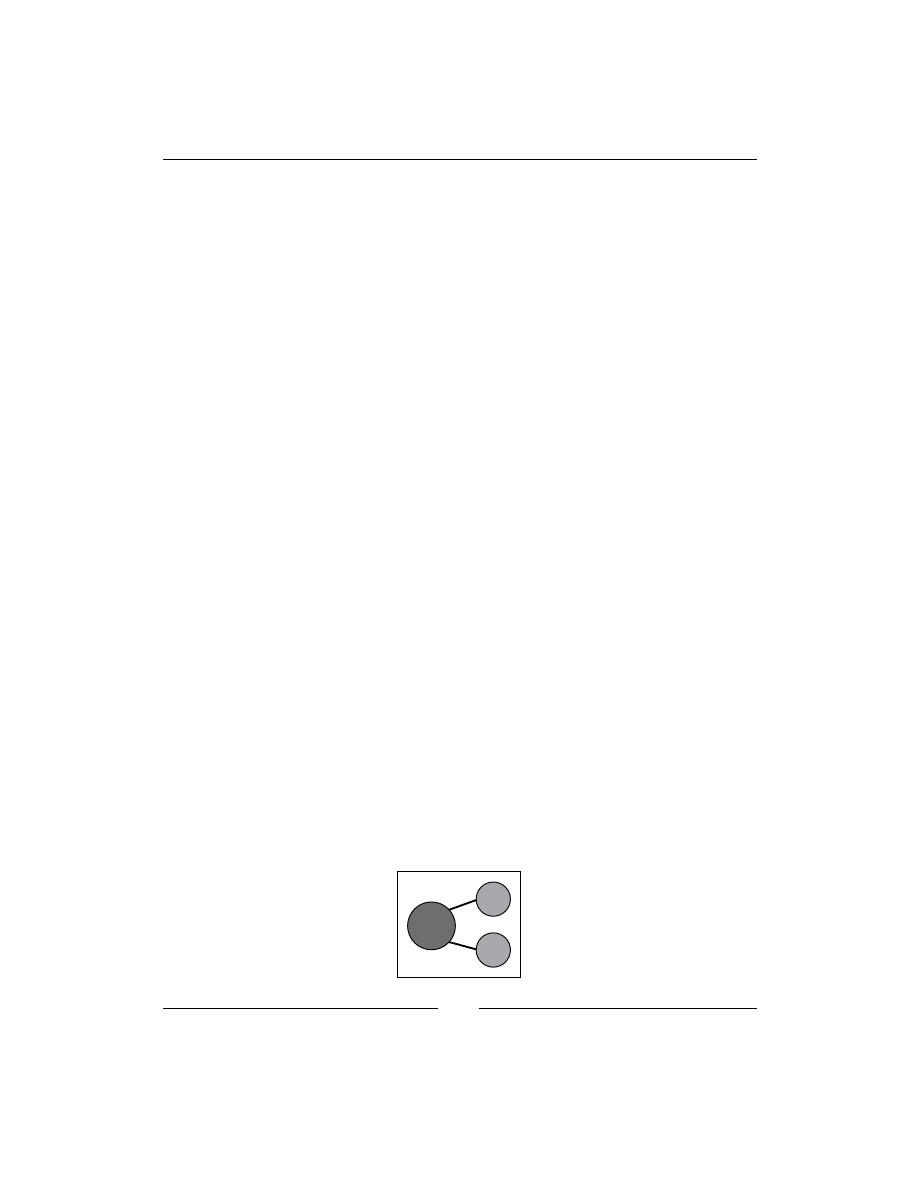
Chapter 5
[
51
]
Implementing initializers and finalizers
Modules have initializers and finalizers similar to application objects. Initializers are
run when the module is started and finalizers are run when a module is stopped.
Let's add an initializer and a finalizer to our existing module:
Books.module('HistoryApp', function (HistoryApp, App) {
'use strict';
HistoryApp.Controller = Marionette.Controller.extend({
});
HistoryApp.addInitializer(function (args) {
HistoryApp.controller = new HistoryApp.Controller();
});
HistoryApp.addFinalizer(function () {
if (HistoryApp.controller) {
HistoryApp.controller.close();
delete HistoryApp.controller;
}
});
});
This example shows how we can create definitions inside a module. We added a
controller in this case, without actually creating any objects—just the definition—and
then we let the initializer start creating the objects and set them up when the module
is loaded.
Working with subapplications
Our book's sample app is a single application that can contains several smaller
applications, for example, shopping cart and order history. Each of them are
independent but managed by the same application and are able to interact with other
modules if necessary. The next diagram describes the concept of two subapplications
being managed by a central application.

Divide and Conquer – Modularizing Everything
[
52
]
Each subapplication is usually related with a screen from the SPA. They are
responsible for doing what is required for screen changes using a controller that
starts and stops modules and deals with their communication. They also manage the
layout manipulating regions to display or hide views. Take a look at the code related
to the diagram.
Let's now explore how to define two subapplications, each of them is also located in
different file as we just learned in the previous section.
The following is our first application:
Books.module('HistoryApp', function (HistoryApp, App) {
'use strict';
HistoryApp.Controller = Marionette.Controller.extend({
});
});
Our second application is as follows:
Books.module('CartApp', function (CartApp, App) {
'use strict';
CartApp.Controller = Marionette.Controller.extend({
});
});
These applications are managed by the central application (
App
) that is passed as a
parameter. Both the modules contain a controller definition as an example.
The next code snippet demonstrates how the main application is capable of starting
and stopping subapplications:
Books = (function (Backbone, Marionette) {
'use strict';
var App = new Marionette.Application();
App.on('initialize:after', function () {
if (Backbone.history) {
Backbone.history.start();
}
});
App.startSubApp = function (appName, args) {

Chapter 5
[
53
]
var currentApp = App.module(appName);
if (App.currentApp === currentApp) { return; }
if (App.currentApp) {
App.currentApp.stop();
}
App.currentApp = currentApp;
currentApp.start(args);
};
return App;
})(Backbone, Backbone.Marionette);
As we can see, the main application is defined in a self-invoking function. It runs
automatically/immediately when we create it, and note that calling the function
returns the main
App
object.
The function
startSubApp
is what provides the ability to start and stop a module.
This function will be called probably when the user clicks on the button to open the
history or when a user navigates directly to this specific route. The next step is to
understand how to call this function.
Using the route filter
We have understood how to divide the application into subapplications; however,
we still need to decide when and how we will tell the main application that we
need to start a specific subapplication. To accomplish that, each module should be
associated with a specific router that needs to be active from the beginning. This is
different from modules that can be lazy loaded when a route matches. The creator
of
Marionette.js
solves this scenario perfectly with his
BBCloneMail
example
app that we mentioned before. For that purpose, he included a library called
routefilter.js
. As with any other library, this library is installed by adding the
path reference in our project.
Route filter can be found at
https://github.com/boazsender/backbone.
routefilter
.
Usually, when we use SPA composed by subapplications, just one subapp is active
at the same time, and our example application is not the exception. It is important to
mention this in order to understand the next code.

Divide and Conquer – Modularizing Everything
[
54
]
The following code is for the
cart
router:
Books.module('CartApp', {
startWithParent: false,
define: function (CartApp, App, Backbone, Marionette, $, _) {
'use strict';
var Router = Backbone.Router.extend({
routes: {
"(:category)(/:id)": "init"
},
before: function () {
App.startSubApp('CartApp');
},
init: function (category,id) {
//call cart app controller function
}
});
App.addInitializer(function () {
var router = new Router();
});
}
});
As we mentioned before, each subapplication generally has a router associated
with it. This router will be the point of entrance for that application and will be
responsible to lazy load it.
Let's explain what the pieces of the code means. Here,
before
is a function that is
defined with the magic of
routefilter.js
. This function is executed before any
function that maps the particular route. What it means is that the router will know
when we are trying to access the specific subapplication and will start it by calling
the function that we visited before, which is located at the main application (
App.
startSubApp('CartApp')
). Other pieces that we are already familiar with are the
module initializer and the route definition.
So, what if we want to start the history application now? Easy, just create a router
associated with that subapplication, define that router, and we are done.
The following code puts this concept into practice:
Books.module('HistoryApp', {
startWithParent: false,

Chapter 5
[
55
]
define:
function (HistoryApp, App, Backbone, Marionette, $, _) {
'use strict';
var Router = Backbone.Router.extend({
routes: {
"history/orders": "showHistory",
},
before: function () {
App.startSubApp('HistoryApp');
},
showHistory: function () {
// call history app controller
}
});
App.addInitializer(function () {
var router = new Router();
});
}
});
Memory considerations
One of the major challenges in single-page applications is to eliminate the memory
leaks. The main problem is that we never do full-page reloads to flush the memory. So,
applications need to handle closing subapplications when a new one is put in place to
simulate a page load, thus unbinding all the events and objects associated with it.
But, we can still mess up the memory with zombies if we do not clean up references
correctly. So like the main application, all subapplications should close old views
and this is where Marionette's Region comes in to play. This especially ensures
the unbinding of all the events when an object is disposed or when we switch views
in a region.
In the case of subapplications, there are multiple ways to clean up the memory. To
illustrate this, let's revisit some lines of code from the Working with subapplications
section. This function is designed to stop and start subapplications as needed. We are
using this technique to have just one subapplication running at the same time; once a
subapplication is stopped, all its objects and events are disposed.
App.startSubApp = function (appName, args) {
var currentApp = App.module(appName);

Divide and Conquer – Modularizing Everything
[
56
]
if (App.currentApp === currentApp) { return; }
if (App.currentApp) {
App.currentApp.stop();
}
App.currentApp = currentApp;
currentApp.start(args);
};
In our example, if the application was stopped, the router provides the functionality
to call this function to start the subapplication again, if required. The next code is
from the Using the route filter section of this chapter.
before: function () {
App.startSubApp('HistoryApp')
},
As an important note, we need to develop discipline to remember that every time we
create objects, we should be writing the proper code to remove them, always taking
advantage of the
Marionette.js
capabilities.
Summary
By far, the main problem that we have in creating a software is complexity. An
easy starting point for a model view structure is provided by
Backbone.js
, but it
offers mainly low-level patterns. In the case of a more complex application, we can
take advantage of some other frameworks to provide the missing parts on top of
Backbone.js
. For each part of your system, find a way to solve it and combine the
solutions of the parts to obtain the solution of the original problem. Always strive
for readability and maintainability when you implement your modules, and try to
encapsulate behavior and not just state code with no reason.
Modules address the larger scale needs for encapsulation, while controllers, views,
routers, and regions address the more detailed aspects of the matter.
Divide and conquer is a principle that has been used for years and is one of the most
useful concepts when dealing with large and complex system structures. Keep up
with all the best practices that we have learned and try to make them an integral part
of your applications. The next step is to learn about messaging with
Marionette.js
.

Messaging
The previous chapter suggested an architecture that allows your entire application to
be divided into subapplications and modules. Subapplications are just separate parts
of your application with functionality that is entirely separate from each other.
The goal when designing your modules and subapplications is to produce an entire
system that is integrated but also loosely coupled, and this is where a very well-known
technique enters the scene: messaging. The concept of messaging, like the divide and
conquer method, has been around for a long time and developers use these types of
tools and patterns every day. This pattern tries to provide a way for the components to
talk to each other through messages, thus allowing modules to subscribe and publish
events on a common message bus.
The topics that will be covered in this chapter are as follows:
• Understanding the event aggregator
• Using the event aggregator of
Marionette.js
• Making applications more extensive with the event aggregator
• Getting started with
Commands
• Setting up the
RequestResponse
object
Understanding the event aggregator
According to Martin Fowler, an Event Aggregator does the following:
"Channels events from multiple objects into a single object to simplify registration
for clients."
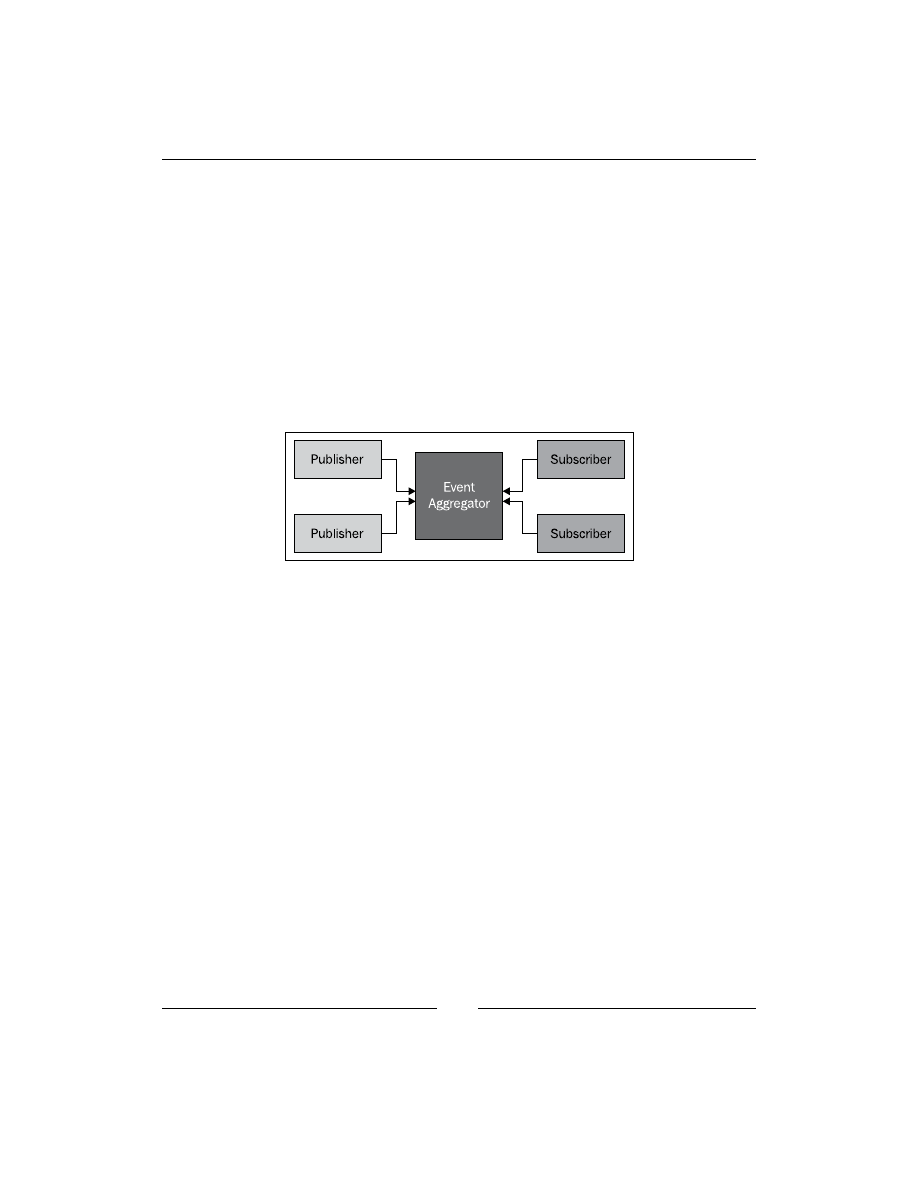
Messaging
[
58
]
One of the most useful patterns of modular, scalable, and complex JavaScript
applications is the event aggregation. The event aggregator functionality is in a
container for events that allow publishers and subscribers of these events to have
a channel of communication; however, at the same time, it allows them to work
independently without the need for code references between them, so they can
be updated or removed without affecting the others. Having said that, note how
this decoupling is useful in your modularized applications because new subapps
and modules can be added to just make use of your current architecture. In our
composite application design, the event aggregator is a powerful way to implement
communication among
Marionette.js
objects and we will see how we can integrate
that in our current code.
The following is a graphical explanation of the event aggregator:
Using the event aggregator of
Marionette.js
The Marionette implementation of the event aggregator pattern made its way out of
the Marionette core build as it can be found now in a separate distributable file called
backbone.wreqr.js
. This implementation extends from the
backbone.events
object. The following is an example of how to instantiate an event aggregator:
var vent = new Backbone.Wreqr.EventAggregator();
You can start adding listeners that will react to the events triggered:
vent.on("do something", function(){
console.log("im logging a message");
});
Now, you have a listener that will be expecting an event to be triggered.
Let's trigger the
do something
method:
vent.trigger("do something");

Chapter 6
[
59
]
And that's all you need to log the message. Ok, but how can we do this at the
application level, the
Marionette. An application
object comes with an instance
of the
Backbone.Wreqr.EventAggregator
. So by instantiating a Marionette
application object, you can start registering listeners to events without the need of
instantiating the
EventAggregator
object.
var myApp = new Backbone.Marionette.Application();
The following is an example of how to register a listener to an event at the
application level:
myApp.vent.on("helloWorld", function(){
alert("Hello World");
});
The event publisher can now raise the event anywhere inside the application with
the following code:
myApp.vent.trigger("helloWorld");
As you can see, we don't have to ask the application to do some work. In this case,
to show an alert, we should tell the application object that we need to be notified
when work will execute
MyApp.vent.trigger("helloWorld ")
, which will
display the message.
Making applications more extensive with an
event aggregator
To make this pattern easy to understand, we can use the metaphor of the shopping
cart app. The user selects an item to be purchased from the book view. The order
view needs to be notified when a new product is added in order to display it and
calculate the total.
For example, we have multiple ways to complete this functionality and the obvious
one is to have the order view reference in the book view, so we can either call
methods or raise events. But then, we will have, for example, a much coupled design
where you cannot delete the order view without affecting the book view. So now, it
is time to bring the event aggregator to our application and solve this problem.
We need a central object that manages the events and the subscribers for those
events. For this example, we will use a controller. With this controller and the event
aggregator in place, the views will be decoupled from each other. This means that
the book view will not contain a reference to the order's view and can be changed
without design problems.

Messaging
[
60
]
The following is the code for adding the controller:
var cartApp.Controller = App.Controller.extend({
initialize: function (options) {
var self = this;
App.vent.on("itemAdded", function (model) {
self.addProduct(model);
});
},
addProduct: function (model) {
//call orders view
}
});
When the controller is initialized, we register the listener for the item added. It's
expecting to receive parameters from the publisher event and then call the local
function. The next step is to create the view that is raising the event.
The following is the code for adding the view:
CartApp.BookItemView = Backbone.Marionette.ItemView.extend({
template: "#catalogRow",
tagName: "tr",
events: {
'click .btn-primary': 'addItem',
},
addItem: function () {
if (this.$('input').val() > 0) {
this.model.set({ qty: this.$('input').).).val() });
App.vent.trigger("itemAdded", this.model);
}
},
});
This contains a view with a declared event ; this event is to be called from a button
located in the view when the
addItem
function is executed. It also raised the
App.
vent.trigger("itemAdded", this.model)
event; this event is going to be handled
by the central object, that is, the controller, and call the order view. Pretty easy right?
In this way, we do not have the order view reference here that allows both the views
to evolve independently.
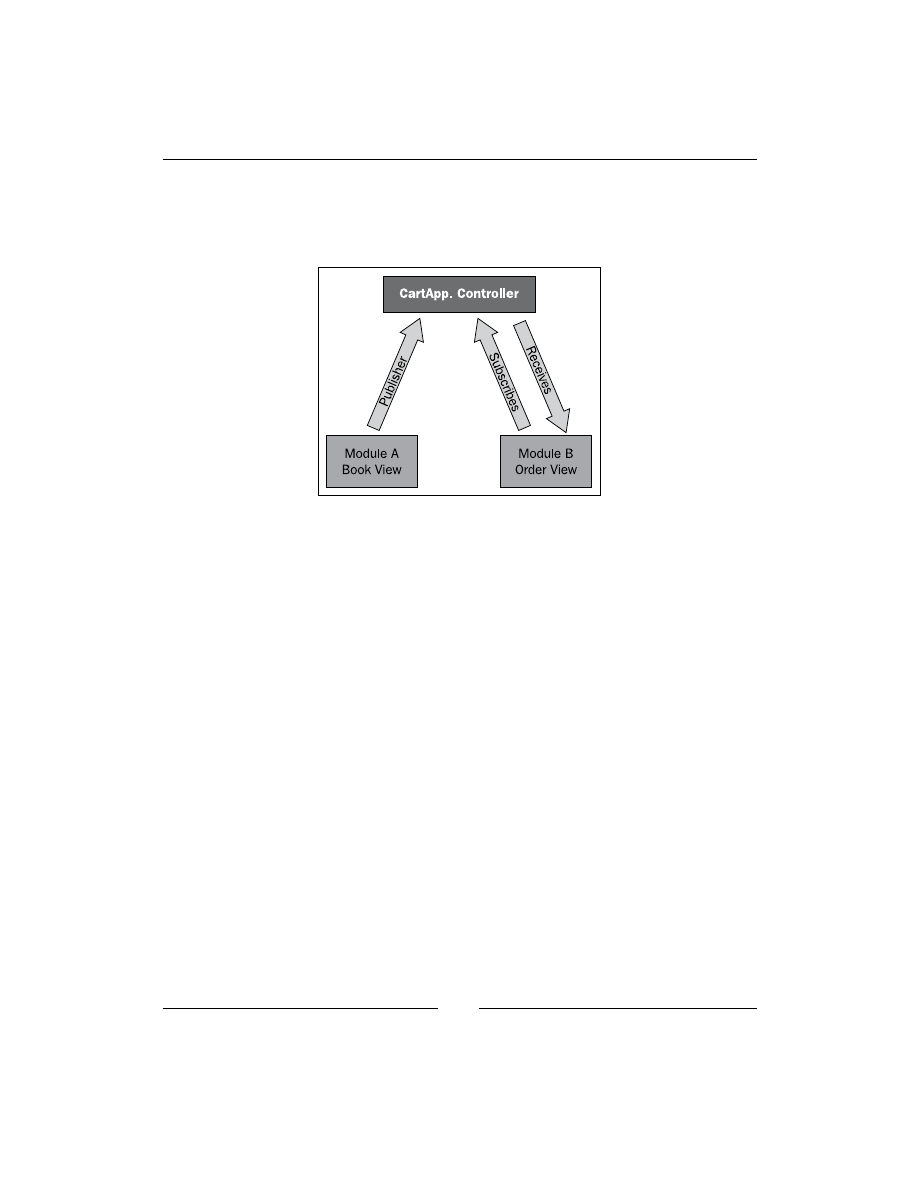
Chapter 6
[
61
]
The following is a graphical explanation of the code that we just explained. As you
can see, we have the central object, that is, the controller; it contains listeners that will
raise the event to refresh the order view after the button is clicked in the book view.
You can also update multiple modules according to your business flow.
This design also allows the controller to have multiple views or modules that listens
to the event and responds accordingly. The event aggregator is a powerful pattern
with the ability to send messages between modules, allowing applications to be
much more decoupled from each other.
Getting started with Commands
While building an application using the plain Backbone, you will just have four
components: the model, collection, view, and router. By now, we have reviewed
some of the objects that Marionette adds, such as the controller and the application,
and of course the different kinds of views. Each of these objects aim to reduce the
boilerplate and facilitate the process of structuring your application to accomplish
the concerned separation in the code, as not everything belongs to the views or the
router. We now know that the controller is a perfect place to orchestrate our views,
but what about the code snippets that does not belong to a view? It definitely does
not make sense to put that code in the router or in the model as it is meant to be used
across all applications; for those scenarios, Marionette has the
Commands
component.
In order to instantiate it, we just need the following line:
var commands = new Backbone.Wreqr.Commands();

Messaging
[
62
]
As you can see, it is also part of the
Wreqr
object, so you can use it by itself. Now,
we need to set handlers that will perform the actions once you call them through the
execute keyword.
commands.setHandler("logMessage", function(){
console.log("Im logging an important message");
});
The
setHandler
function takes the name of the command and the function that it
will execute.
The following line of code exemplifies the execution of a command using the name
of the command as the parameter for the
execute
function:
commands.execute("logMessage");
And that's all you need to do in order to set a command and execute it. It's good to
know that you can pass parameters to these commands in the same way as in the
event aggregator.
In the following example, we will pass the message to be logged:
var commands = new Backbone.Wreqr.Commands();
commands.setHandler("logMessage", function(message){
console.log(message);
});
commands.execute("logMessage","I am the message to be logged ");
As you can see, the functions receive the message passed on the execute call. This
parameter, of course, can be whatever object you need to pass to the handler.
Let's now use a command in the BookStore application that we are building, but we
are not going to instantiate the
Wrerq
component because the Marionette application
object already has an instance of it. So, you can set the handlers of the commands to
the application object.
The following code demonstrates how to set a handler to the application object:
var App = new Marionette.Application();
App.commands.setHandler("deleteLocalStorage", function(){
// code todelete the local storage of the application
});
App.execute("deleteLocalStorage");
Note that you can call
App.command.execute
or just
App.execute
plus the name of
the command and the result will be the same.

Chapter 6
[
63
]
The handler created in the previous code is to delete the stored values in the local
storage of the browser to remove old entries from previous visits to the site. This
code does not belong to any view or controller because the responsibility of those
objects differs from what this code is doing. We consider cleaning the local storage
of the browser to prevent old and invalid entries in the code that belong to the
application level, and having a command for that is very handy.
We can execute it from any part of the application, but the code is well placed in
order to keep your concerns separate. We are sure you will find scenarios in which it
makes sense to use commands while using Backbone and Marionette.
Finally, if you want to remove a handler, you can do it using the following code line:
App.commands.removeHandler("deleteLocalStorage");
For removing all the registered handlers at once, use the instruction
App.commands.
removeAllHandlers()
.
Setting up the RequestResponse object
Finally, the last part of the
Wreqr
object is the
RequestResponse
, which in our
opinion is definitely a nice addition to the Backbone development. We just saw
how we can make different components work together with the help of events in
order to communicate each other. We also learned that not all the code belongs to a
view or router of the controller, and for those cases, the Marionette commands are
definitely a good option in order to keep our concerns separate. Similar to
Commands
,
the
RequestResponse
object can help us split more responsibilities of the code in an
application.
The
RequestResponse
object conceptually works in the same way as events and
Commands
, where an object fires a call and the other object responds to it. The
difference with
Commands
is that, in this case, a response is returned to the caller.
To set up a
RequestResponse
object, we need the following line of code:
var reqres = new Backbone.Wreqr.RequestResponse();
The setup of a handler is also similar to the commands handler as we can see in the
following code snippet:
reqres.setHandler("getUserName", function(userId){
//code to get the user name goes here
return Username; ///this will be the response
});

Messaging
[
64
]
In order to get that response value, we need to put in a request as follows:
var username = reqres.request("getUserName", userId);
In the previous example, we requested a username and the handler, with the name
getUserName
, is just a function that will return that value for us. Also, note that you
can pass parameters to this request.
We consider the
RequestResponse
object very useful to separate concerns, get the
value from the server, filter those values, and perform a data manipulation task
again; these are not responsibilities of the other components of Backbone or of
Marionette reviewed so far. Think of
RequestRepsonse
as a service layer that will
call the server and return a collection or models in a single place. Instead of doing
this at the view level, your views should display the data passed to them. But they
will be doing too much by also being in charge of retrieving this data from the server,
and what if your API changes? You would need to change that server call in all the
views or controllers where you made the calls.
Using the
RequestResponse
object will give you the ability to perform this
synchronization with the server in one place and call it from different places, always
getting the same return. But above everything, it allows you to decouple your
application and keep the responsibility and duties of the other components short and
meaningful.
Let's see an example of this, but again, we will use the default instance of
Wreqr
,
which is in the application object of Marionette:
App.reqres.setHandler("GetBooksByCategory", function(category){
//code to fetch the books by category goes here.
return collection;
});
Inside the method of a controller, we can call the handler by performing a request and
passing the collection to the view, as demonstrated in the following code snippet:
var BooksController = Marionette.Controller.extend({
initialize: function(options){
this.region = options.region;
},
showBooksinCategory: function(category){
var books = App.request("GetBooksByCategory ", category);
this.region.show(new CategoryView({collection:books}));
}
});

Chapter 6
[
65
]
The benefit of this is that the controller acted as a mediator between the view and the
RequestResponse
object, while the view is responsible for getting the data removed
because the controller passes the collection to it.
Summary
In this chapter, we learned how to decouple our application with the help of the
Wreqr
object while splitting the responsibilities between the different subcomponents
such as the
event aggregator
,
Commands
, and
RequestRespone
.
In the next chapter, we will learn how to make these components work in single
files and keep our file structure organized with the help of
Require.js
.

Changing and Growing
In the previous chapter, we explored various functions that could be combined to
produce a system that is fully integrated, but loosely coupled. In this chapter, we will
cover some external pieces of Marionette that are very valuable, and as we progress,
you will discover how to change some default features of the framework and
combine
Marionette.js
with external libraries to make your application perform
better. Here is a list of the topics that we will cover:
• Using Asynchronous Module Definitions (AMD)
• Using the
Require.js
library
• Configuring
Require.js
• Using the text plugin to load the templates
Using AMD
Using the AMD, API will help us to load scripts on demand, specify the module
dependencies, and reduce the script definition order problem. In Chapter 5, Divide
and Conquer – Modularizing Everything, we discussed why building large applications
can easily get out of hand. There are multiple aspects to consider, but managing the
script modules is a common scenario. We need to make sure that all the scripts are
loaded in the right order, combine them, and reduce the number of requests to the
servers. This seems to be simple but as the application grows, it is really complex
to keep track.
To illustrate the scenario, we will use a part of the script section from the
Index.
html
file before we implement an AMD solution as follows:
<script src="../libs/jquery.js"></script>
<script src="../libs/underscore.js"></script>
<script src="../libs/backbone.js"></script>
<script src="../libs/backbone.marionette.js"></script>

Changing and Growing
[
68
]
<script src="../libs/backbone.routefilter.js"></script>
<script src="../libs/backbone.localStorage.js"></script>
<script src="../libs/bootstrap/js/bootstrap.min.js"></script>
<script src="app/Books.js"></script>
<script src="app/BaseController.js"></script>
<!-- Cart -->
<script src="app/modules/cart/CartApp.js"></script>
<script src="app/modules/cart/CartRouter.js"></script>
<script src="app/modules/cart/views/Catalog.js"></script>
<script src="app/models/BookModels.js"></script>
<script src="app/Books.Data.js"></script>
<script src="app/main.js"></script>
This list contains files for just a small proof of the concept and we have already
started to accumulate a lot of scripts. As we add more modules, services, models,
views, and so on, it will start to get less comprehensive and really hard to maintain.
For example, at some point, we may lose track of the files that are not being used
anymore. In the preceding code, all the scripts are downloaded when the page is
loaded, even if the current view is not using them. Our code is modular, but still
it is not easy to write encapsulated code that can be loaded on the fly, injected as
dependency, and shared with other modules. Let's review how we can fix this.
Using the Require.js library
James Burke introduced the
Require.js
library and it has a great community. The
author is an expert in script loading and a contributor to the AMD specification.
This book assumes that you know the basics of AMD and so before jumping to
the implementation of our application, it will provide you with some basics of the
configuration and boilerplate required while using
Require.js
. To get the latest
build of
Require.js
, please go to the project website,
http://requirejs.org/
docs/download.html
.
Configuring Require.js
To get started with
Require.js
, we will create a file named
main.js
. Of course, you
can give this file a more appropriate name that follows your naming conventions and
business domain. We will write the following code inside the
main.js
file:
require.config({
baseUrl: 'src',
paths: {
jquery: 'libs/jquery',
underscore: 'libs/underscore',
backbone: 'libs/backbone',

Chapter 7
[
69
]
marionette: 'libs/backbone.marionette',
},
shim: {
underscore: {
exports: '_'
},
backbone: {
deps: ['underscore', 'jquery'],
exports: 'Backbone'
},
marionette : {
deps : ['jquery', 'underscore', 'backbone'],
exports : 'Marionette'
}
}
});
require(['jquery','underscore','backbone','marionette'],
function($,_,Backbone,Marionette) {
console.log('Hello world from the main file! ');
});
Let's replace all the script references from our
Index.html
file for the next script
reference as follows:
<script data-main="main" src="libs/require.js"></script>
In this script reference, we pass the name of the file (in our example, the
main.js
file)
that has all the required configuration to the
data-main
attribute. Please note that
it's just the name of the file (
main
) and not its extension (
.js
) that is passed, because
Require.js
assumes that it will be working only with JavaScript files; therefore,
the extension is not needed. The source (
src
) should point to the path where the
Require.js
file is located.
Now, we are ready to complete a small test to see if we are on the right path. Open
the browser and in the console, you should see the log message when you load the
Index.html
file.
Now, let's review each section of the content of the
main.js
file to get a better
understanding of what's going on.
In the preceding code snippet, we put all the libraries that we will use under the
paths
section of the
require.config
function. On the left-hand side, we assigned the alias of
the library and on the right-hand side, we indicated the path of the file—the path that
will be relative to the
baseUrl
value assigned, in this case, the
src
folder.

Changing and Growing
[
70
]
The second property of this function is called shim. The primary use of
shim
is for
libraries that do not support AMD, but you still need to manage their dependencies.
A perfect example for this is
Underscore.js
. In this case,
Underscore.js
is
exported as
_
and it does not depend on another library to be loaded. We have a
different scenario with
Backbone.js
that requires Underscore to work correctly.
We have to specify
Underscore.js
as a dependency because it is possible that
Backbone.js
would try to do something with it before it is loaded.
The
require
function is placed at the end of the file as follows:
require(['jquery','underscore','backbone','marionette'],
function($,_,Backbone,Marionette) {
console.log('Hello world from the main file!);
});
The preceding code will be the starting point of our application. It is a function
definition that gets the exported values as parameters. At this point, we are just
logging a message, but now let's do something more useful.
Defining our application module
Now that the core dependencies are configured using
Require.js
, and once those
are loaded and ready, we can define our Marionette application and set up the
region initializers, commands, and request/response handlers. This is because we
need the inside of a single file that we will name
app.js
with the idea of keeping all
the login details related to the Marionette application object inside of this file. In the
following code, our application is defined and ready to work as an AMD module.
The following is the content of our
app.js
file:
define(['marionette'], function(Marionette){
var Books = new Marionette.Application();
Books.addRegions({
main: '#main',
modal: ModalRegion
});
Books.on('initialize:after', function () {
if (Backbone.history) {
Backbone.history.start();
}
});
Books.startSubApp = function (appName, args) {
var currentApp = App.module(appName);
if (App.currentApp === currentApp) { return; }
if (App.currentApp) {

Chapter 7
[
71
]
App.currentApp.stop();
}
App.currentApp = currentApp;
currentApp.start(args);
};
return Books;
});
The book's application that we just defined will be used in the
main.js
file when we
start the application.
When we add a new file we need to know where it is located and also its alias name.
We specify this by going to the
paths
section of the
main.js
file definition. After this
change your
paths
section should look like the following:
paths: {
jquery: 'libs/jquery',
underscore: 'libs/underscore',
backbone: 'libs/backbone',
marionette: 'libs/backbone.marionette',
app: 'app'
},
Now, we are ready to use this file to start our Marionette application in the
require
function of the
main.js
file as follows:
require(['app'], function(Books) {
Books.start();
});
Note how we injected the book's dependency to start the Marionette application and
used the
start()
method of the Marionette application object to fire the initializers.
Writing the subapplications using Require.js
The module that we defined is our root app that takes care of starting up the
subapplications. The next example shows how we can define the subapplications
using
Require.js
. As you can see, we can easily adapt our preceding code to use
the
require
function by sending our script definitions to a configuration file and
injecting the necessary object into our module definition. The following code is from
the
CartApp
subapplication:
define(['app'], function(Books){
Books.module('CartApp', function (CartApp, Books, Backbone,
Marionette, $, _) {
CartApp.Controller = Marionette.Controller.extend({

Changing and Growing
[
72
]
initialize: function (options) { },
addProduct: function (model) { },
removeProduct: function(model){ },
});
CartApp.addInitializer(function (args) {
CartApp.controller = new CartApp.Controller({
mainRegion: args.mainRegion,
});
CartApp.controller.show();
});
CartApp.addFinalizer(function () {
if (CartApp.controller) {
CartApp.controller.close();
delete CartApp.controller;
}
});
return Books.CartApp;
});
});
Modularizing all your components
In the following example, we will show how to write a module for a view to
be loaded with
Require.js
, but the same concept applies for all the objects/
components.
In the following code, we define a view called
CategoryView.js
and gave it the alias
name of
categoryView
in the
main.js
file so that other files can use it.
define(['app'], function(Books){
Books.module('CartApp.CategoryView', function(View, Books,
Backbone, Marionette, $, _){
View.CategoryView = Backbone.Marionette.ItemView.extend({
tagName : 'li',
template: '#categoryTemplate',
events : {
'mouseenter .info' : 'showDetails',
'mouseleave .info' : 'hideDetails'
},
showDetails : function() {
this.$( '.info').popover({
title:this.model.get('name'),
content:this.model.get('booksOnCategory')
});

Chapter 7
[
73
]
this.$( '.info').popover('show');
},
hideDetails : function() {
this.$( '.info').popover('hide');
},
});
return Books.CartApp.CategoryView;
});
});
The preceding example defined a well-scoped object. When a module does not have
any dependencies and it is just a collection, we pass an object literal to
define()
.
In our scenario, our module has dependencies, so the first argument should be an
array of dependency names—in this case,
app
is the alias of our application—and the
second argument should be a definition function.
Adding the text plugin
So far, we have defined the template property of our views using the ID of the
template. This template is inside a script tag and has always been present in the
DOM. But putting all the templates in the HTML file of a SPA won't scale and will
give us the same maintenance problem that we had with all the script references in
the
Index.html
file. A solution to this problem is to use the text plugin.
You can download the text plugin from the
Require.js
page. The following is the
link for the download:
http://requirejs.org/docs/download.html#text
.
As with any other script file, we need to give it an alias in the
main.js
file and its
path in order to start using it.
The responsibility of the text plugin is to get the template from the server and pass it
to our view so that we don't need it in the HTML file.
In the following code, we passed the relative path to the template using the
!text/
path
syntax and the function that creates the view receives the exported name of the
template as a parameter; in this case,
CategoryTemplate
.
define(['app', '!text/templates/CategoryTemplate.html'],
function(Books, CategoryTemplate){
Books.module('CartApp.CategoryView', function(View, Books,
Backbone, Marionette, $, _){
View.CategoryView = Backbone.Marionette.ItemView.extend({
tagName : 'li',
template: CategoryTemplate,

Changing and Growing
[
74
]
events : {'
'mouseenter .info' : 'showDetails',
'mouseleave .info' : 'hideDetails'
},
showDetails : function() {
this.$( '.info').popover({
title:this.model.get('name'),
content:this.model.get('booksOnCategory')
});
this.$( '.info').popover('show');
},
hideDetails : function() {
this.$( '.info').popover('hide');
},
});
return Books.CartApp.CategoryView;
});
});
This approach is more maintainable when building a large-scale application, but
perhaps you want to keep the initial templates in your HTML file for performance
benefits and the rest of your templates inside the right file structure.
Structuring your files
There are many different options to define the layout of your files and probably this
will be defined depending on the size and type of your project. At the end of the day,
the goal should be to create a folder structure that is easy to understand, implement,
and maintain.
In the following example, we categorize the source into common folders, such as
models and collections, and specific folders for the application pieces (views and
controllers).
The static dependencies such as CSS, images, and JavaScript libraries required
by our code should go under a different directory. It could prevent unintentional
modifications to the library code and give us a better understanding of the real
business domain.
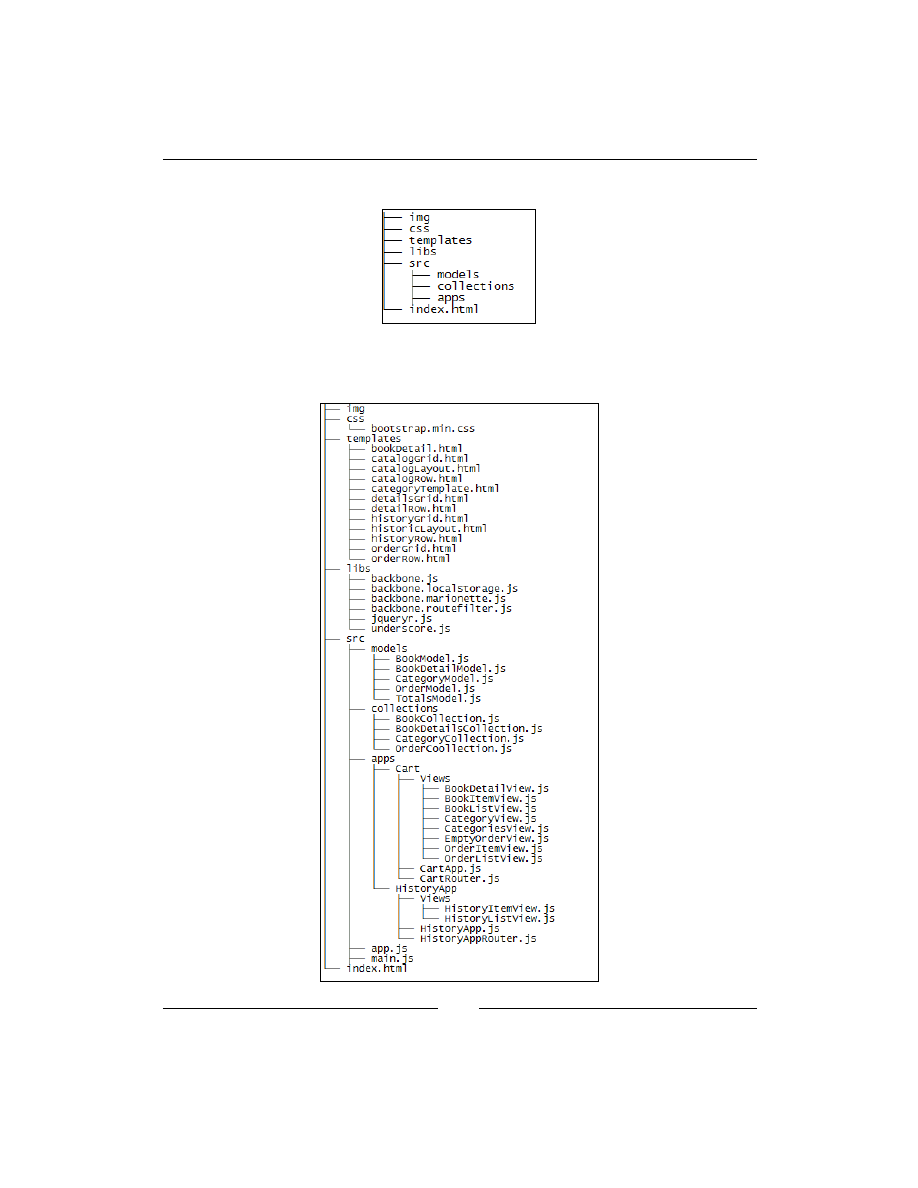
Chapter 7
[
75
]
The following image shows the base structure where we will fit our files:
Having said that, let's dive into some of the details of our application. The following
image shows how you might layout your application structure:

Changing and Growing
[
76
]
In the preceding image, we showed the structure of our book store application. This
structure makes sense in this particular case. But the good thing is that we created
small meaningful files that can interact with each other in an easier and elegant way,
instead of having big files with the logic of different components contained.
Using handlebars as a template engine
in Marionette
One of the selling points of Backbone is that it plays well with the other libraries and
this also holds true for Marionette . If we want to use a different template engine, we
can do it with ease.
For this specific example, we will use handlebars, which we can be downloaded from
http://handlebarsjs.com/
.
Once we have downloaded the
Handlebars.js
file, we can add it to our
Index.html
file by using the following line:
<script type="text/javascript" src="libs/handlebars.js">
Or, we can do so by specifying an alias and path for it in the
main.js
file.
The syntax difference from the underscore templates is that a handlebars expression
is
{{
, followed by some content, and then by
}}
instead of
<%= expression %>
of
the
require
function. So, a template in handlebars looks like the following:
<script type="text/html" id="sample-template">
<p>This is an ItemView template using handlebars<p>
{{ value1 }} </br>
{{ value2 }} </br>
</script>
In order to use this template in a Marionette view, we must call the following syntax:
template : Handlebars.compile($('#sample-template').html());
The preceding line will grab the template from the DOM and compile it into a
function that will later be used by Marionette to render the view . The following will
be the full code for
ItemView
:
var SampleView = Backbone.Marionette.ItemView.extend({
template : Handlebars.compile($('#sample-template').html())
});

Chapter 7
[
77
]
To see this working please go to the JSFiddle example at
http://jsfiddle.net/
rayweb_on/gXemX/
.
And that's it! There is no global change needed to start using a different template
engine. We can also use both the engines if we want because the definition of the
template is at the view level.
Summary
In this chapter, we learned that in order to manage the increasing complexity of
our application, we must break it down into separate files. This increasing number
of files leads to another problem that
Require.js
solves in an elegant way. The
Backbone.js
development clearly benefits from the use of
Marionette.js
, along
with other libraries, such as
Require.js
and
Handlebars.js
, among others. This
will definitely make our development environment more solid and at the same time,
flexible to changes.


Index
Symbols
A
AMD
app
layout building, Marionette.Layout used
application module
components, modularizing 72, 73
handlebars, using as template engine 76
subapplications writing, Require.js used 71
Asynchronous Module Definitions.
See
AMD
B
Backbone
Backbone.BabySitter object
Backbone.Marionette.Application object 16
Backbone model
Backbone.Wreqr.EventAggregator 59
BBCloneMail online
C
D
development environment
divide and conquer principle
E
event aggregator
used, for making extensive applications
events
F
finalizers

[
80
]
H
handlebars
I
initializers
installation
Marionette.js, prerequisites 8
J
JSFiddle
L
M
Marionette
handlebars, using as template engine 76, 77
Marionette.CollectionView 21, 29, 30
Marionette.CompositeView 21, 30, 31
Marionette.Controller object
Marionette.js
documentation, URL for downloading 9
large applications, building 7
Marionette.Layout
used, for building app layout 32, 33
Marionette.RegionManager object
Marionette.Region object
Marionette.Renderer object
Marionette.Router object
Marionette views
memory considerations, single-page appli-
modules
splitting, into multiple files 50
multiple files
O
P
performance application

[
81
]
R
RequestResponse object
about 64
Require.js library
route filter
S
single-page application (SPA)
subapplications
T
TemplateCache object
used, for improving application
templates
text plugin
U
UI
V
views
W
Z

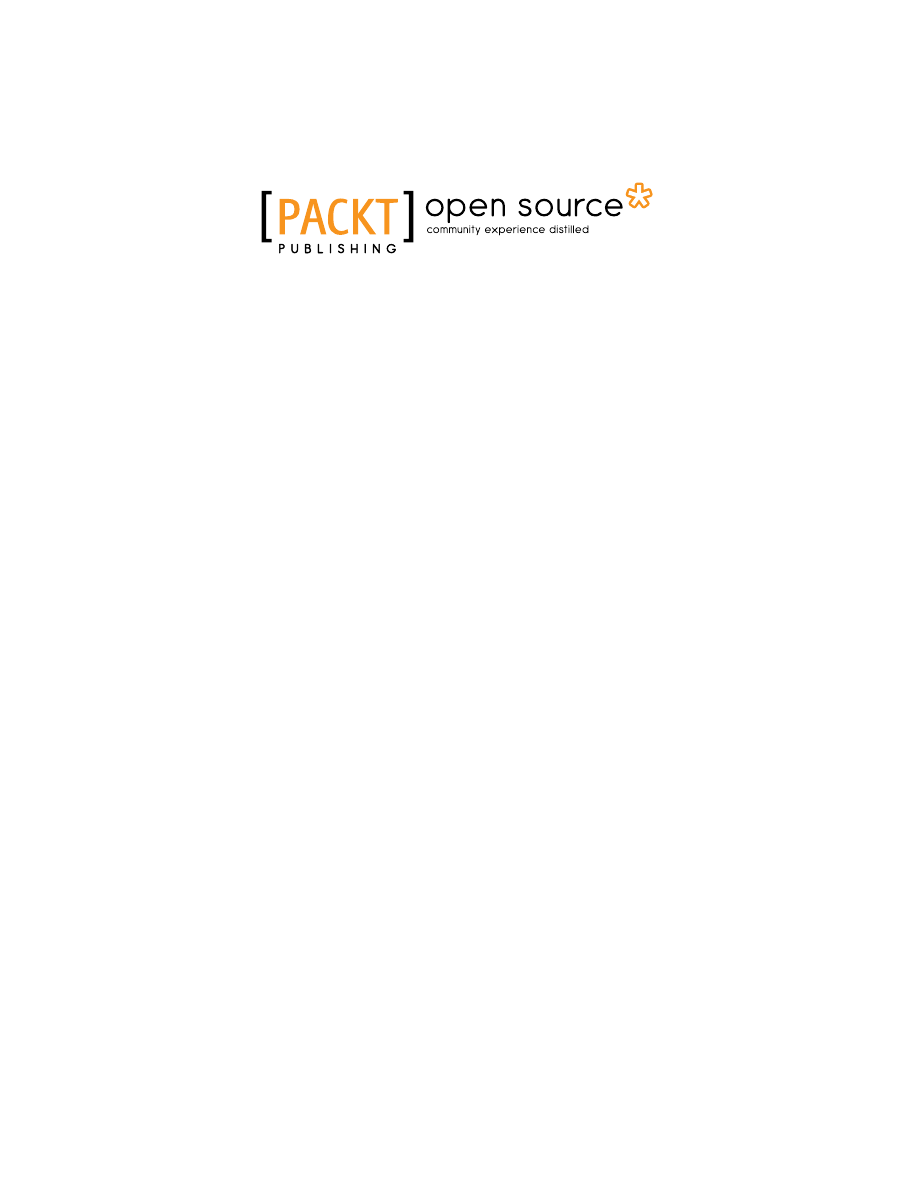
Thank you for buying
Getting Started with Backbone Marionette
About Packt Publishing
Packt, pronounced 'packed', published its first book "Mastering phpMyAdmin for Effective
MySQL Management" in April 2004 and subsequently continued to specialize in publishing
highly focused books on specific technologies and solutions.
Our books and publications share the experiences of your fellow IT professionals in adapting
and customizing today's systems, applications, and frameworks. Our solution based books
give you the knowledge and power to customize the software and technologies you're using
to get the job done. Packt books are more specific and less general than the IT books you have
seen in the past. Our unique business model allows us to bring you more focused information,
giving you more of what you need to know, and less of what you don't.
Packt is a modern, yet unique publishing company, which focuses on producing quality,
cutting-edge books for communities of developers, administrators, and newbies alike.
For more information, please visit our website:
www.packtpub.com
.
About Packt Open Source
In 2010, Packt launched two new brands, Packt Open Source and Packt Enterprise, in order
to continue its focus on specialization. This book is part of the Packt Open Source brand,
home to books published on software built around Open Source licences, and offering
information to anybody from advanced developers to budding web designers. The Open
Source brand also runs Packt's Open Source Royalty Scheme, by which Packt gives a royalty
to each Open Source project about whose software a book is sold.
Writing for Packt
We welcome all inquiries from people who are interested in authoring. Book proposals
should be sent to author@packtpub.com. If your book idea is still at an early stage and
you would like to discuss it first before writing a formal book proposal, contact us;
one of our commissioning editors will get in touch with you.
We're not just looking for published authors; if you have strong technical skills but no
writing experience, our experienced editors can help you develop a writing career,
or simply get some additional reward for your expertise.
Instant Backbone.js Application
Development
ISBN: 978-1-78216-566-8 Paperback: 64 pages
Build your very first Backbone.js application covering
all the essentials with this easy-to-follow introductory
guide
1. Learn something new in an Instant! A short,
fast, focused guide delivering immediate
results
2. Structure your web applications by providing
models with key-value binding and custom
events
3. Keep multiple clients and the server
synchronized
4. Persist data in an intuitive and consistent
manner
Backbone.js Testing
ISBN: 978-1-78216-524-8 Paperback: 168 pages
Plan, architect, and develop tests for Backbone.js
applications using modern testing principles and
practices
1. Create comprehensive test infrastructures
2. Understand and utilize modern frontend
testing techniques and libraries
3. Use mocks, spies, and fakes to effortlessly test
and observe complex Backbone.js application
behavior
4. Automate tests to run from the command line,
shell, or practically anywhere
Please check
www.PacktPub.com for information on our titles
Backbone.js Cookbook
ISBN: 978-1-78216-272-8 Paperback: 282 pages
Over 80 recipes for creating outstanding web
applications with Backbone.js, leveraging MVC, and
REST architecture principles
1. Easy-to-follow recipes to build dynamic web
applications
2. Learn how to integrate with various frontend
and mobile frameworks
3. Synchronize data with a RESTful backend and
HTML5 local storage
4. Learn how to optimize and test Backbone
applications
Jasmine JavaScript Testing
ISBN: 978-1-78216-720-4 Paperback: 146 pages
Leverage the power of unit testing to create bigger
and better JavaScript applications
1. Learn the power of test-driven development
while creating a fully-featured web application
2. Understand the best practices for
modularization and code organization while
putting your application to scale
3. Leverage the power of frameworks such as
BackboneJS and jQuery while maintaining the
code quality
4. Automate everything from spec execution to
build; leave repetition to the monkeys
Please check
www.PacktPub.com for information on our titles
Document Outline
- Cover
- Copyright
- Credits
- About the Authors
- About the Reviewers
- www.PacktPub.com
- Table of Contents
- Preface
- Chapter 1: Starting with Backbone Marionette
- Chapter 2: Our First Application
- Chapter 3: Marionette View Types and Their Use
- Chapter 4: Managing Views
- Chapter 5: Divide and Conquer – Modularizing Everything
- Chapter 6: Messaging
- Chapter 7: Changing and Growing
- Index
Wyszukiwarka
Podobne podstrony:
Packt Publishing Getting Started with Backbone Marionette (2014)
1 3 Getting started with Data Studio Lab
Getting Started with PostHASTE
Getting Started with Arduino
GETTING STARTED WITH MAT000
Getting Started with MediaFire
Getting Started with Data Warehouse and Business Intelligence
Getting Started with Arduino Table of Contents
1 3 Getting started with Data Studio Lab
Borland Delphi Magazine Getting Started With Sql Part 2
Getting Started With Asterisk
Getting Started with QuadriSpace
Getting Started with PECS
6624 Getting started with the Power BI for Android app WSG 2
6623 Getting started with the Power BI mobile app for Windows 10 WSG 2
getting started with pyparsing
6628 Getting started with Power BI PG 2
więcej podobnych podstron