Shuttle Tatting Without A Teacher (11)

The smali motif on which we will be working is for practice purposes only, but be surę to work through it as you are reading- it will make your understanding of the tech-niques a whole lot easier. If you occasionally forget and make a mistake - it’s not the end of the world - as long as you are aware of it!
This motif will require two different colors of thread so get out your shuttles and let’s get started.
As we continue, this would be a good time to review (again!) the abbreviation list given at the beginning of this book. Because of the diversity mentioned earlier, it's most advisable to preview the abbreviations which are usually given at the front of a book or pattern. In some of the older books, the directions take up a lot of room and the morę modern “short” method is much to be preferred.
KNOTLESS BEGINNINGS!
After you have wound your two shuttles with different colors (preferably with size 20 thread for learning), you find that most patterns then direct you to tie threads together. WHOA! ! ! ! ! ! Do you really want to see a bunch of thread-ends all over your lovely work? Up until now l’ve been ambivalent about ‘right and wrong side’ but l’m really adamant about KNOTS!
1’m not saying I haven’t used them but it’s so unsightly trying to stop them from coming apart with glue or what-ever - who says you can’t teach an old dog! (ME -1 only fairly recently learned this myself!) In fact, l’m going to teach you that knots aren’t necessary even in the middle when joining after correcting an unintentional design variation or at the end of the thread.
The following method is a little morę time consuming but once learned it’s well worth the extra time and effort.
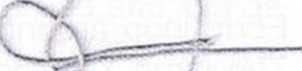
Form a loop around your hand with the thread of shuttle 1
(illus. A) The large X is the position where threads are held together with the thumb.

Illus. A >
Start tatting a ring with the first half of a DS in the normal manner. Transfer the stitch - Oh, that stitch that was so difficult to learn!
Illus. B >
but before tightening it up, lift the thumb and slip the short end through the transferred stitch, following the direction of the shuttle thread.
illus. C >
Puli on the short end until you have a smali loop.

illus. D >
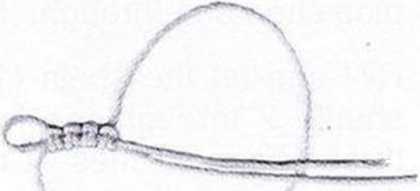
Tat the second half of the stitch and slip the same short end through (again following the shuttle thread) the transferred stitch - be careful not to lose the smali loop. Work another three DS, each time slipping the short end through.
Illus. E >
THEN complete the ring (8-4-8)
WITHOUT slipping the short - ^__
end through the stitches - DO
NOT CUT OFF THAT END YET! Close ring.
To tat the chain, slip the thread end of shuttle 2 (or
Wyszukiwarka
Podobne podstrony:
Shuttle Tatting Without A Teacher (7) Once the whole shuttle is beyond the top thread, bri
Shuttle Tatting Without A Teacher (12) bali end) through the smali loop. Puli on the short end comin
Shuttle Tatting Without A Teacher (8) to make light colored stitches (sińce the loop around the left
Shuttle Tatting Without A Teacher (4) or points. If a shuttle without a hook or point is to be used,
Shuttle Tatting Without A Teacher (6) the loop which was formed over the fingers of your right hand.
Shuttle Tatting Without A Teacher (9) the ‘loop’ loose enough to raise the middle finger and also le
więcej podobnych podstron