Shuttle Tatting Without A Teacher (6)

the loop which was formed over the fingers of your right hand.
You will now see a loose stitch madę with the light thread around the dark thread. However much you feel tempted, do not tighten this stitch.
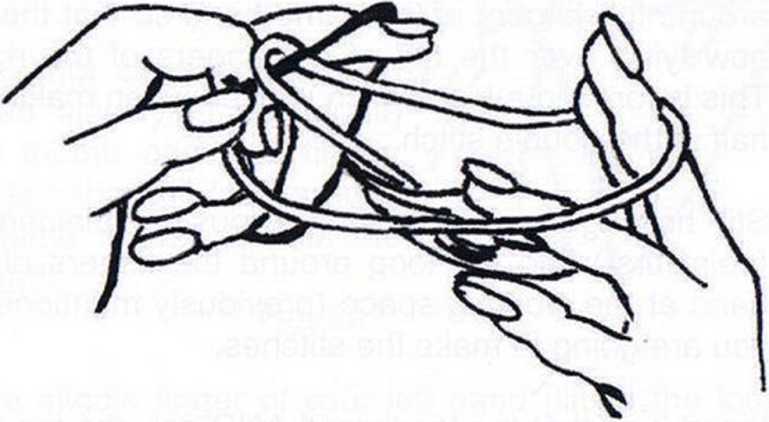
Fig. 5
The reason we are using two colors of thread is so that you will morę easily see what is supposed to happen when you make a stitch.
At this point, relax the middle finger which is holding the loop up on your left hand so that the colored loop col-lapses. Ąt the same time. take the shuttle to the right so that the shuttle thread is taut - KEEP IT TAUT!
Use the fingers of your right hand to assist in keeping the shuttle thread taut. You will notice that the stitch jumped from being formed with the light thread to being formed with the dark thread. (if it did NOT jump, give the shuttle a little jerk and the stitch will “transfer”).
Once the transfer happens, KEEPING THE SHUTTLE THREAD TAUT (this is very important), slowly start to raise the middle finger of your left hand - lifting the loop with it - so that the transferred stitch slides towards where the knot is being held. ONLY when it is there, (and keeping your left hand middle finger raised) should you let the shuttle thread relax. You have just completed the first half of a double stitch!

Fig. 7
Hołd that first half of the double stitch right at or between your left thumb and first finger and then work the second half of the double stitch, as fol-lows:
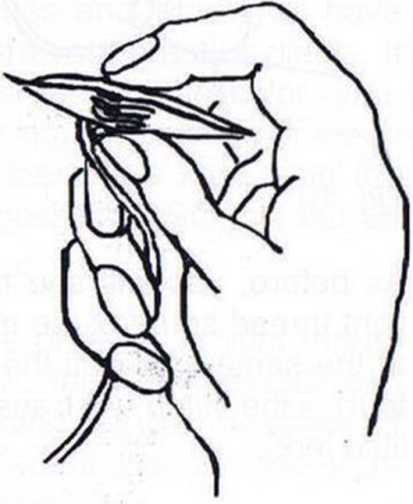
As with the first half, hołd the shuttle in the right hand but this time do not position the thread over the right hand in a loop. Instead, allow a loop of thread to hang down from the shuttle (thread can be held against the palm of the right hand with the other three fingers, as shown) and this time slide the shuttle OVER the top thread of the left hand loop, allowing the top thread to slide between thumb and shuttle.
Fig. 8
9
Wyszukiwarka
Podobne podstrony:
Shuttle Tatting Without A Teacher (9) the ‘loop’ loose enough to raise the middle finger and also le
Shuttle Tatting Without A Teacher (9) the ‘loop’ loose enough to raise the middle finger and also le
Shuttle Tatting Without A Teacher (8) to make light colored stitches (sińce the loop around the left
Shuttle Tatting Without A Teacher (11) The smali motif on which we will be working is for practice p
Shuttle Tatting Without A Teacher (12) bali end) through the smali loop. Puli on the short end comin
Shuttle Tatting Without A Teacher (13) and chain you have just tatted) when the front side of the ri
Shuttle Tatting Without A Teacher (14) WE have discussed and demonstrated what is consid-ered to be
więcej podobnych podstron