Instr 4

Step 6:
Examine piece A13 carefully. Enigmatic, no? Now examine the assembly illustration (fig. 6). Still confused? Read on, but be forewarned: Words alone do not suffice here. Nevertheless, this entire step should be read through before attempting to proceed. The piece folds into a sort of upside-down (or inside-out) tentlike shape; the two score lines running parallel to the longer sides are unmarked, so score them appropriately. Then, cut where indicated. Apply glue to the two smali tabs on the ends and attach them to the sides. Next, fold pieces A14 and A15, noting that the tabs fold in opposite directions. Glue the “odd” tab (the one with the reverse score) on A14 to the bottom of A13, then the other tab to the top so it is flush with the edge. Repeat with A15. The completed assembly will fit into the open rectangle on A3. When the glue has set on the A13-15 assembly, test the fit. Apply glue to the long tab on A3 and position the corre-sponding edge of A13 in place. Make surę the edges are flush. Press in place and hołd until the glue is well set. Using a toothpick or the edge of a card, apply glue to the end tabs on A3. Check the alignment and press in place. Hołd until set. Then glue the rear tabs on A14 and A15; check the alignment and press in place. Hołd in position until dry. Finally, glue the tab on the bottom of A8 to the facing surface on piece A13. Allow to dry.
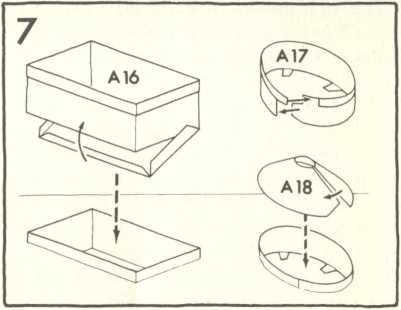
Step 7:
Such a crazy world we live in. For example, take the pieces you’re going to construct here in Step 7: Everything gets built inside out; all the detail is on the inside, while the outside is as white as the driven snów. Begin by taking the two pieces marked A16 and the six marked A17 and folding over the railings. Apply glue to the inside of the rail-ings, fold them over and press in place; lodge the pieces under a book and set them aside to dry. Next, glue the A16 pieces into boxlike shapes and let dry. Remember the detail goes on the inside. Next, curl the strips on the Al 7 pieces around a broomstick or a highway flarę. Glue the ends together to form an oval—the railings attach on the outside. Allow to dry thoroughly, then test the fit of the A17 pieces in the oval-shaped openings in A3. The fit should be snug. If it seems okay, apply glue to the tabs inside the oval openings on A3 and press the A17 pieces inside until the bottom edge of the railings are flush with the roof. Press the tabs against the wali formed by the Al 7 pieces. Next, form an oval cone with the six A18 pieces and let dry. Apply glue to the bottom tabs of the A17 pieces and glue them inside the A18 pieces (see fig. 7) and hołd in position until dry. The tabs on the A17 pieces should fold up against the inside of each A18 piece. Repeat with the other A18 pieces. Now, remember those A16 pieces that were set aside to dry? Find them and test fit them into the openings in Al-2. Apply glue to the longer tabs in the openings on Al-2 and, noting the direction of the joiner marks, push the A16 pieces into place so that the bottom of the railing is flush with the roof. Glue the remaining tabs in place.
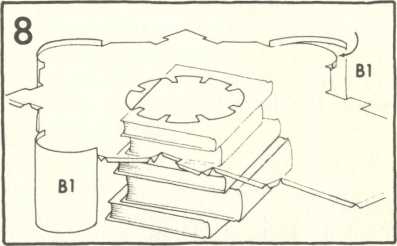
Step 8:
Spread in front of you, like so much litter on the vast Asian steppes, is the “A” assembly. What’s next? Yes, it’s the “B” assembly. Fold over the railings on the three pieces marked BI, glue them back against themselves and place them under a book to dry. Remember how your math teacher always told you how important and useful algebra would be in your later years? She’s right. Find all your old algebra books (or four or five Reader’s Digest Condensed Books), stack them higher than the walls represented by the BI pieces and place the “A” assembly on top of the stack of books. This will enable you to work on the “A” and “B” assemblies without doing damage to your spinał column. When the rails on the BI pieces have dried, curl each BI piece around a broomstick and fold back the tabs on the base of the piece. Start at the joiner mark and apply glue to the first one or two tabs of Al and attach BI to Al so that the bottom of the railing on BI is flush with the top of the roof (Al). Hołd until the glue has set well. Proceed slowly—no morę than two tabs at a time—until BI is securely attached to Al. The railing should fit snugly against the roof. Repeat with the other two BI pieces, noting the position numbers on Al-2. Let dry.

Wyszukiwarka
Podobne podstrony:
64006 Instr 3 Step 1: Carefully cut and remove the interior parts on roof pieces Al, A2 and A3 (look
Instr 6 Step 14: If the glue has dried completely, turn the model upside down and install support pi
11377 Instr 8 Step 23: There are five smali roof pieces marked FI; fold them as indicated and attach
81696 Instr 5 Step 9: Fold over the railings on pieces B2 and B3; place therii under a weight until
53874 Instr 7 Step 19: St. Peter’s, apparently, has morę rings than Wagner ever dreamed of, and to p
f27 d c- orange pink NOTĘ: If there is no letter, leave the space white.T-[biue
00169 ?8fdc7697ba8e0e2234fcfe61c09204 170 McWilliams satisfy ^3 = r/0 = T] + T2. In addition to exa
więcej podobnych podstron