DSP/BIOS 6 Getting Started Guide
March 13, 2008

ii
IMPORTANT NOTICE
Texas Instruments Incorporated and its subsidiaries (TI) reserve the right to make corrections, modifications, enhancements, improvements, and other
changes to its products and services at any time and to discontinue any product or service without notice. Customers should obtain the latest relevant
information before placing orders and should verify that such information is current and complete. All products are sold subject to TI’s terms and
conditions of sale supplied at the time of order acknowledgment.
TI warrants performance of its hardware products to the specifications applicable at the time of sale in accordance with TI’s standard warranty. Testing
and other quality control techniques are used to the extent TI deems necessary to support this warranty. Except where mandated by government
requirements, testing of all parameters of each product is not necessarily performed.
TI assumes no liability for applications assistance or customer product design. Customers are responsible for their products and applications using TI
components. To minimize the risks associated with customer products and applications, customers should provide adequate design and operating
safeguards.
TI does not warrant or represent that any license, either express or implied, is granted under any TI patent right, copyright, mask work right, or other TI
intellectual property right relating to any combination, machine, or process in which TI products or services are used. Information published by TI
regarding third-party products or services does not constitute a license from TI to use such products or services or a warranty or endorsement thereof.
Use of such information may require a license from a third party under the patents or other intellectual property of the third party, or a license from TI
under the patents or other intellectual property of TI.
Reproduction of TI information in TI data books or data sheets is permissible only if reproduction is without alteration and is accompanied by all
associated warranties, conditions, limitations, and notices. Reproduction of this information with alteration is an unfair and deceptive business practice.
TI is not responsible or liable for such altered documentation. Information of third parties may be subject to additional restrictions.
Resale of TI products or services with statements different from or beyond the parameters stated by TI for that product or service voids all express and
any implied warranties for the associated TI product or service and is an unfair and deceptive business practice. TI is not responsible or liable for any
such statements.
TI products are not authorized for use in safety-critical applications (such as life support) where a failure of the TI product would reasonably be expected
to cause severe personal injury or death, unless officers of the parties have executed an agreement specifically governing such use. Buyers represent
that they have all necessary expertise in the safety and regulatory ramifications of their applications, and acknowledge and agree that they are solely
responsible for all legal, regulatory and safety-related requirements concerning their products and any use of TI products in such safety-critical
applications, notwithstanding any applications-related information or support that may be provided by TI. Further, Buyers must fully indemnify TI and its
representatives against any damages arising out of the use of TI products in such safety-critical applications.
TI products are neither designed nor intended for use in military/aerospace applications or environments unless the TI products are specifically
designated by TI as military-grade or "enhanced plastic." Only products designated by TI as military-grade meet military specifications. Buyers
acknowledge and agree that any such use of TI products which TI has not designated as military-grade is solely at the Buyer's risk, and that they are
solely responsible for compliance with all legal and regulatory requirements in connection with such use.
TI products are neither designed nor intended for use in automotive applications or environments unless the specific TI products are designated by TI
as compliant with ISO/TS 16949 requirements. Buyers acknowledge and agree that, if they use any non-designated products in automotive
applications, TI will not be responsible for any failure to meet such requirements.
Following are URLs where you can obtain information on other Texas Instruments products and application solutions:
Products
Applications
Amplifiers
Audio
Data Converters
Automotive
DSP
Broadband
Interface
Digital Control
Logic
Military
Power Mgmt
Optical Networking
Microcontrollers
Security
RFID
Telephony
Low Power Wireless
Video & Imaging
Wireless
Mailing Address: Texas Instruments, Post Office Box 655303, Dallas, Texas 75265
Copyright © 2008, Texas Instruments Incorporated

Read This First
iii
Preface
Read This First
About This Manual
This document describes the process of installing and using DSP/BIOS 6 in a Windows
environment.
How to Use This Manual
This document provides an overview of program generation steps in Chapter 1,
installation instructions in Chapter 2, and step-by-step instructions for starting to use
DSP/BIOS in Chapter 3.
After you install DSP/BIOS, you might want to review the release notes in the installation
before reading further.
After you have read this document, you should see the DSP/BIOS 6 User’s Guide
(SPRUEX3) and the online CDOC reference for more information.
Notational Conventions
This document uses the following conventions:
•
Program listings, program examples, and interactive displays are shown in a special
typeface. Examples use a bold version of the special typeface for emphasis.
Here is a sample program listing:
#include <xdc/runtime/System.h>
int main(){
System_printf("Hello World!\n");
return (0);
}
•
Square brackets ( [ and ] ) identify an optional parameter. If you use an optional
parameter, you specify the information within the brackets. Unless the square
brackets are in a bold typeface, do not enter the brackets themselves.
Related Documentation from Texas Instruments
DSP/BIOS 6 User’s Guide (SPRUEX3)
XDC Consumer User’s Guide (SPRUEX4)
CDOC API Reference online help system

iv
Trademarks
The Texas Instruments logo and Texas Instruments are registered trademarks of Texas
Instruments. Trademarks of Texas Instruments include: TI, Code Composer, Code
Composer Studio, DSP/BIOS, SPOX, TMS320, TMS320C54x, TMS320C55x,
TMS320C62x, TMS320C64x, TMS320C67x, TMS320C28x, TMS320C5000,
TMS320C6000 and TMS320C2000.
Windows is a registered trademark of Microsoft Corporation.
Linux is a registered trademark of Linus Torvalds.
All other brand or product names are trademarks or registered trademarks of their
respective companies or organizations.

v
Contents
Read This First .......................................................................................................................................iii
About This Manual ........................................................................................................................... iii
How to Use This Manual .................................................................................................................. iii
Notational Conventions .................................................................................................................... iii
Related Documentation from Texas Instruments............................................................................. iii
Trademarks ...................................................................................................................................... iv
Contents ..................................................................................................................................................v
DSP/BIOS Program Generation ..........................................................................................................1-1
1.1
Overview ................................................................................................................................1-2
Installation ............................................................................................................................................2-3
2.1
Installing XDC Tools...............................................................................................................2-3
2.2
Installing DSP/BIOS 6 ............................................................................................................2-3
2.3
Setting Up the XDCPATH Environment Variable ...................................................................2-3
2.4
Managing the config.bld File ..................................................................................................2-4
2.5
Microsoft Visual Studio C++ 2005 Installation Notes .............................................................2-4
Building and Configuring ....................................................................................................................3-7
3.1
Generating and Building DSP/BIOS Examples ......................................................................3-7
3.2
Configuring DSP/BIOS ...........................................................................................................3-9
3.2.1
DSP/BIOS Configuration Script ................................................................................................3-9
3.2.2
Create and Build a DSP/BIOS Configuration Package.............................................................3-9
3.3
Build the Executable.............................................................................................................3-10
3.3.1
Executable Build Flow Changes .............................................................................................3-10
3.3.2
C Source File Changes ...........................................................................................................3-10

vi
1
Chapter 1
DSP/BIOS Program Generation
This chapter provides an overview of the program generation steps for using DSP/BIOS 6.
Topic Page
1.1 Overview ....................................................................................................................................2
DSP/BIOS Program Generation
2
1.1 Overview
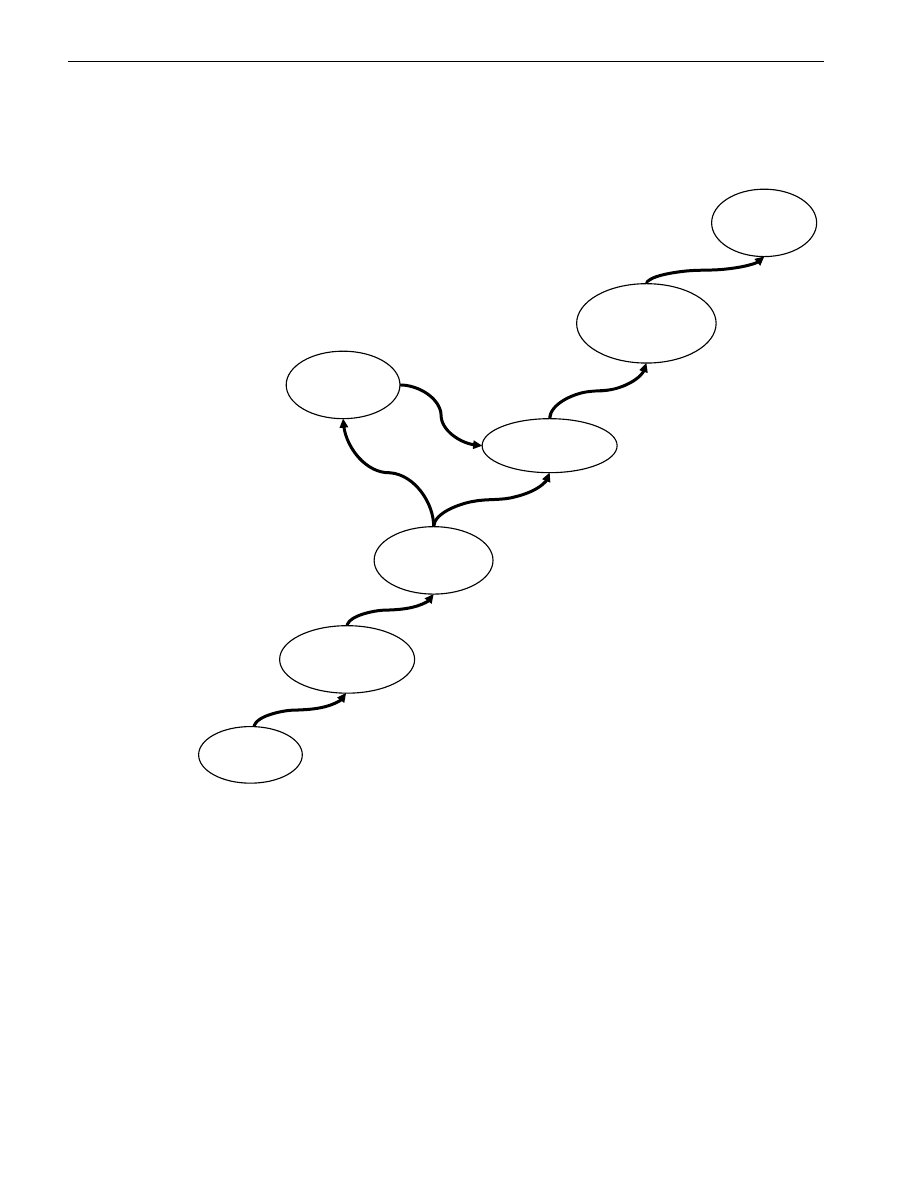
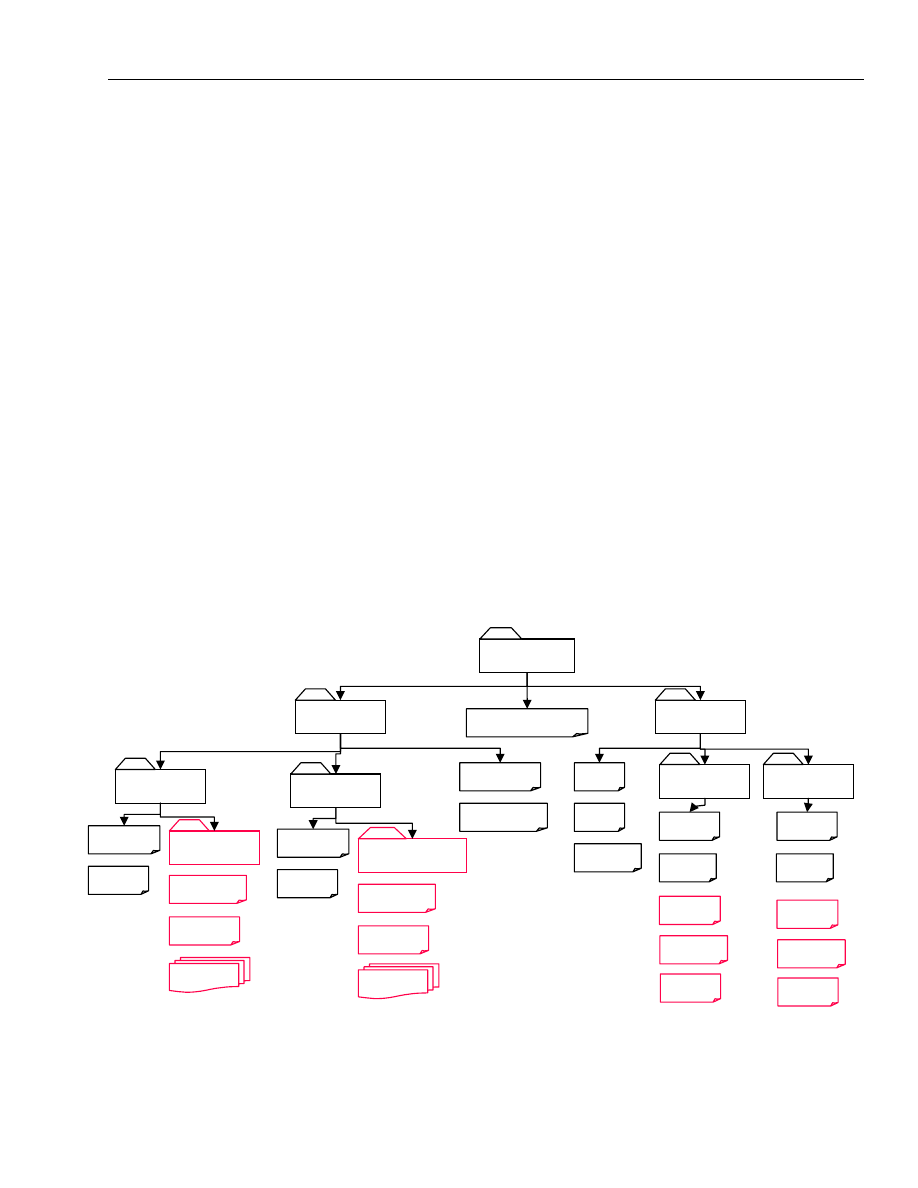
This flowchart shows all the steps required to install DSP/BIOS 6, generate examples and
build an application. Subsequent chapters describe each of these steps.
Configure
DSP/BIOS
Build
Executable
Setup
XDCPATH
Install
Generate
and Build
Examples
Manage
config.bld
Build DSP/BIOS
configuration
package

3
Chapter 2
Installation
This chapter describes how to install DSP/BIOS and prepare to use it.
Topic Page
2.1 Installing XDC Tools .................................................................................................................3
2.2 Installing DSP/BIOS 6 ...............................................................................................................3
2.3 Setting Up the XDCPATH Environment Variable....................................................................3
2.4 Managing the config.bld File....................................................................................................4
2.5 Microsoft Visual Studio C++ 2005 Installation Notes.............................................................4
2.1 Installing
XDC
Tools
You must install the XDC Tools in order to use DSP/BIOS 6. Please refer to the XDC
Getting Started Guide for details.
2.2 Installing
DSP/BIOS
6
To install DSP/BIOS, follow these steps:
1) Place the distribution file into a temporary location.
2) Double-click on the distribution file to start the installation process. The installation
directory, <bios_install_dir>, can be anywhere on your system, but make sure there
are no spaces in the full path to <bios_install_dir>.
3) View documentation for the DSP/BIOS 6 packages at <bios_install_dir>/docs. See the
XDC Getting Started Guide for information on using the xdc.tools.cdoc.sg tool to
generate and view documentation for repositories.
2.3 Setting Up the XDCPATH Environment Variable
XDCPATH is a required environment variable. It is the path where the XDC tools look to
locate all packages. All DSP/BIOS configuration scripts only mention packages by name,
not by their location, and therefore the scripts are physically portable. If you copy a
package to a different location or a different system, only the XDCPATH environment
variable needs to be changed. XDC tools provide a tool, xdc.tools.path.sg, to view and
manage XDCPATH. See XDC Getting Started Guide for details.
Using XDCPATH, we can select repositories (e.g. select among different DSP/BIOS
installs) and select a config.bld script.

Installation
4
Add the DSP/BIOS repository <bios_install_dir>/packages to the XDCPATH environment
variable. In the Windows System Properties in the Control Panel, select Environment
Variables under the Advanced tab. Add a new system variable named XDCPATH, with
the value <bios_install_dir>/packages.
Other operating systems require a slightly different command to set environment
variables. See the documentation for your operating system for details.
2.4 Managing the config.bld File
The build configuration script, config.bld, is a master setup script that completely defines
the XDC targets and the environment in which individual XDC packages will build. For
practical purposes, however, this script is usually just a list of targets and paths to their
codegen tools.
The intention behind the build configuration script is the following: it is a small, non-
portable piece of the build flow, because it defines the location of the various codegen
tools on your system. Another use for the build configuration script is to provide a
common build setup for multiple packages.
DSP/BIOS 6 ships a default config.bld script at
<bios_install_dir>/etc/config.bld.default
1) View this script. This default script names all the targets and platforms that DSP/BIOS
6 supports. It also points to the codegen tools used by the default CCStudio_v3.3
installation. Please refer to the release notes on supported versions of codegen tools.
2) Create a directory <localRepository> anywhere on your system. Copy
config.bld.default into <localRepository>/config.bld. All targets are disabled by default.
Please uncomment the target of interest in the Build.targets array in config.bld. You
will also need to edit this script for the following reasons.
•
Location of your codegen tools is different.
•
You are interested in a particular platform.
3) Add <localRepository> to the XDCPATH environment variable.
2.5 Microsoft
Visual
Studio C++ 2005 Installation Notes
Skip this section if you are not going to build your application on Windows using the
windows emulation support in DSP/BIOS 6.
Building on Microsoft Windows requires Microsoft Visual Studio C++ 2005 Express Edition
to be installed on your computer. Download and install the following components
(available for free) from the Microsoft Web Site
http://msdn.microsoft.com/vstudio/express/
•
Microsoft Visual C++ 2005 Express Edition
•
Microsoft Visual C++ 2005 Express Service Pack 1
•
Microsoft Platform SDK for Visual C++ 2005 Express
(Microsoft Windows Server 2003 R2 Platform SDK)
Make sure to set the environment variables required for Visual Studio C++. Run the
following batch script at the DOS prompt before building the examples:

Installation
5
C:\Program Files\Microsoft Visual Studio 8\Common7\Tools\vsvars32.bat
Update the Win32.rootDir in your config.bld script to point to your Visual C++ installation
folder. The rootDir must not contain spaces or backslash characters. You must use the
short pathname to the Visual C++ installation folder. Use the following command in a DOS
Shell to display the short pathname of the Visual C++ installation folder. (Enter the
command all on one line.) Then replace all backslash characters with forward slashes.
for /f "delims=" %i in ("C:\Program Files\Microsoft Visual Studio 8")
do @echo %~fsi
For example, here is how Win32.rootDir would be set on a typical system:
Win32.rootDir = "C:/PROGRA~1/MID05A~1";
Update the Win32.vcPath["VC8"].sdkPath in your config.bld script to point to your Platform
SDK installation folder. As with the Win32.rootDir, the sdkPath must not contain spaces or
backslash characters, and you must use the short pathname to the installation folder.
For example, here is how the sdkPath would be set on a typical system:
Win32.vcPath["VC8"].sdkPath = " C:/PROGRA~1/MI9547~1";

6
7
Chapter 3
Building and Configuring
This chapter describes how to build DSP/BIOS examples and applications.
Topic Page
3.1 Generating and Building DSP/BIOS Examples.......................................................................7
3.2 Configuring DSP/BIOS..............................................................................................................9
3.3 Build the Executable ...............................................................................................................10
3.1 Generating and Building DSP/BIOS Examples
DSP/BIOS does not ship any pre-built examples. Instead it ships a package
ti.sysbios.genx which will generate the examples in a directory of your choice.
ti.sysbios.genx allows the examples to be customized for your config.bld script. It
also allows re-generation of the examples in case of corruption.
View options for ti.sysbios.genx by typing the following:
xs ti.sysbios.genx --help
Generate DSP/BIOS 6 examples as follows:
xs ti.sysbios.genx <myExamples>
The examples are generated in <myExamples> for all targets and platforms
listed in the config.bld referred to in your XDCPATH environment variable.
You can optionally specify a single target and a platform listed in the config.bld
on the command line.
xs ti.sysbios.genx -t ti.targets.C64
–p ti.platforms.dsk6416 <myExamples>
If you are using CCStudio project files to build examples, open the CCStudio
project file for any example. Ignore all warnings about files not being found. The
files referenced will be generated as part of the build. Many examples use the
same DSP/BIOS configuration. The CCStudio project file for the example may
contain a dependency on another CCStudio project file that builds the DSP/BIOS
configuration. For example <platform_dir>/hello.pjt depends on
common/<platform_dir>/depend.pjt. Use the incremental build button to build the
examples. This prevents unnecessary builds of the configuration package.
Building and Configuring
8
To use makefiles to build the examples, use commands like the following:
•
Use the top-level makefile to build all examples.
cd <myExamples>
gmake
•
To build one example, build <myExamples>/common/<platform_dir> first.
Many examples depend on <myExamples>/common/<platform_dir>.
cd <myExamples>\common\<platform_dir>
gmake
•
Use gmake to build the individual examples:
cd <myExamples>/hello/<platform_dir>
gmake
NOTE: During the installation, the XDCROOT environment variable is set by the
installer. In addition, %XDCROOT% is added to the beginning of the system and
user path(s). However, the <examples>/common/common.mak file references
the specific version of XDC it was installed with. If you update your XDC
installation and want to rebuild the examples with the new version, you need to
update the XDCROOT definition in the <examples>/common/common.mak file.
See the README for individual examples for more details on how to build them.
You can use <myExamples>/common/common.mak to pass additional linker
(e.g. --xml_link_info) and compiler options (e.g –pdr) to the makefiles used by all
examples.
<myExamples> has the following structure when built. The expected output is in
testcase.k files.
<myExamples
>
common
hello
sim6xxxCfg
evmDM6446Cfg
sim6xxx
evmDM6446
Top level makefile
makefile
common.mak
common.cfg
hello.c
makefile
makefile
hello.pjt
hello.pjt
compile.opt
linker.cmd
compile.opt
linker.cmd
Other stuff
Other stuff
hello.out
hello.map
hello.obj
hello.out
hello.map
hello.obj
depend.pjt
sim6xxx
evmDM6446
makefile
depend.pjt
hello.k
README

Building and Configuring
9
3.2 Configuring
DSP/BIOS
DSP/BIOS configuration allows clients to specify modules to be used in an
application, create static objects, and modify their properties as part of the
application build process. DSP/BIOS configuration also allows clients to modify
program-level configuration parameters such as stack size and the section map.
3.2.1 DSP/BIOS
Configuration
Script
DSP/BIOS configuration is done through a script. The script is a file with “.cfg”
extension that uses XDC script. XDC script is an extension of JavaScript. Please
see <xdc_install_dir>/packages/xdc/cdk/langref/xdcScript.pdf for details.
The DSP/BIOS configuration script by itself is not sufficient to create a DSP/BIOS
configuration; you must also specify the target and platform that DSP/BIOS will
be running on. The script is the client’s portable input into a DSP/BIOS
configuration package.
In the simple case, this script can list all the modules used. See
<myExamples>/common/common.cfg. Creating static objects and manipulating
them is an optimization and is the focus of the static example.
1) Create a <cfgScript>. This file can be located along with the application code
(static example has its own static.cfg script) or maintained separately (hello
example uses common/common.cfg). For example client.cfg may be located
at C:\CCStudio_v3.3\MyProjects\client\client.cfg.
2) Edit this file using any text editor. Refer to the DSP/BIOS 6 documentation
for details on configuration parameters.
3.2.2 Create and Build a DSP/BIOS Configuration Package
A DSP/BIOS configuration package is created using xdc.tools.configuro.
The configuration package is specific to a DSP/BIOS configuration script,
platform/target pair and development environment.
View options supported by xdc.tools.configuro as follows:
xs xdc.tools.configuro --help
Use xdc.tools.configuro to create and build a DSP/BIOS configuration package.
The configuration package <myCfgPkg> can be located anywhere on your
system.
xs xdc.tools.configuro -–cb -t<target> -p<platform>
-o <myCfgPkg> -r whole_program <cfgScript>
For example:
xs xdc.tools.configuro -–cb –t ti.targets.C64
–p ti.platforms.sim6xxx
–o C:\CCStudio_v3.3\MyProjects\client\configPkg
-r whole_program C:\CCStudio_v3.3\MyProjects\client\client.cfg

Building and Configuring
10
This step of running xdc.tools.configuro can be integrated into a makefile or
CCStudio project file. See XDC Getting Started Guide for details on running
xdc.tools.configuro in a makefile or CCStudio project. Also see the makefiles and
project files used by the examples.
The configuration package needs to be rebuilt for any change in the <cfgScript>.
3.3 Build
the
Executable
3.3.1 Executable Build Flow Changes
A compiler.opt file located in the DSP/BIOS configuration package needs to be
added to the compiler options using -@ for ti targets. In a CCStudio project this
file can be added by selecting the Project->Build Options. Name this file in the
Compiler->Files->Options File box. This compiler.opt file contains all the
include paths and some defines.
The linker.cmd file located in the DSP/BIOS configuration package needs to be
added to linker options. In a CCStudio project right-click on the project and select
“Add Files to Project” to add this file. This file specifies the obj files and
command file.
Add the RTS library to linker options from codegen tools specified in your
config.bld. In a CCStudio project, right-click on the project and select “Add Files
to Project” to add the RTS library. NOTE: The RTS library must come after the
linker.cmd file in the link order. Ensure this is the case in your makefile or
CCStudio project.
3.3.2 C Source File Changes
•
#include <xdc/std.h> to get XDC types
•
#include <xdc/cfg/global.h> to get access to Program.globals generated by
the DSP/BIOS configuration.
•
Include module header files.
Document Outline
- DSP/BIOS 6 Getting Started Guide
Wyszukiwarka
Podobne podstrony:
Microsoft Assessment and Planning Toolkit 4 0 Getting Started Guide en
Red Hat Enterprise Linux 6 Beta Virtualization Getting Started Guide en US
Red Hat Enterprise Linux 6 Virtualization Getting Started Guide en US
Raspberry Pi Getting Started Guide
mrtg getting started guide
Getting Started on Acoustic Guitar User Guide SNE77
Getting Started
getting started IAOTAGZXANHHC6G Nieznany
(ebook pdf) Matlab Getting started
Part I Getting Started
1 3 Getting started with Data Studio Lab
Getting Started with PostHASTE
Packt Publishing Getting Started with Backbone Marionette (2014)
Getting Started
ANSYS Getting Started Tutorial Workbench
chinas southwest 3 getting started
1 2 Getting started (2)
więcej podobnych podstron