
INFLUENCE OF SURFACE HEAT TREATMENT
ON THERMAL FATIGUE BEHAVIORS
OF HOT WORK STEEL
Yongan Min, Luoping Xu and Xiaochun Wu
School of Material Science and Engineering, Shanghai University
Postal address: 149 Yanchang Road, Shanghai University, 200072,Shanghai, China
Abstract
Self-restricted thermal fatigue tests were carried out on different surface
treated specimens according to Uddeholm Method with temperature range
between room temperature and 700
◦
C, in which H13 type hot work steel
was used. Developments of heat checking cracks on different specimens
were detected during thermal cycles. Static residual stresses on specimens
in the first hundreds cycles were also measured to evaluate the changes of
cyclic dynamic stresses, and to get a better understanding of thermal fatigue
mechanisms. It showed that the thermally induced cyclic stress played an
important role in the generation and propagation of heat checking cracks.
The residual compressive stresses on H13 specimens without high hardness
layer decreased gradually, and it was apt to form evenly distributed cracks.
While the higher compressive stresses on H13 specimens with high hardness
layer dropped quickly. The uneven distributed stresses, usually induced by
a few cracks in compound layers, were the important factor for quick devel-
oped main cracks. Heat checking was an unavoidable result of the thermally
induced expansion and contraction of the hot work steel. Thermal fatigue
resistance was generally decreased by worsened stress distribution due to the
amplified expansion and contraction between iron matrix and diffused layer
or compound layer, except when higher strength and better stress condition
were acquired in surface layer.
Keywords:
Thermal fatigue, die, hot work steel, surface treatment, stress.
63

64
6TH INTERNATIONAL TOOLING CONFERENCE
INTRODUCTION
Today thermal fatigue shown as heat checking is generally the most dom-
inating failure in hot work dies [1]. Many kinds of surface treatment or
modifications have been used on hot work dies to get longer service lives
and better performance. Surface processes such as gas nitriding sometimes
have a negative effect on thermal fatigue, especially those which lead to a
continuous compound layer in the die surface. On the other hand, those lay-
ers are always beneficial to enhance the resistance to erosion and corrosion.
Therefore, selected surface treatments have been carried out on hot work
dies, especially on bigger and more complicated dies. In practice, lots of die
casting dies are not surface treated, except special oxidation. A more clear
understanding is expected on thermal fatigue mechanism in different surface
conditions, which is complicated and multiform in certain dies due to various
factors collectively acting on. Thermal fatigue specimens were respectively
treated by some typical surface treating process, including plasma nitriding,
plasma sulfur-carbon-nitriding, boronizing and oxidizing. The surface ap-
pearances of those specimens were observed after different cycles in order
to study the nucleation and propagation behavior of heat checking under
thermal fatigue test. Stress on specimens after some certain cycles were also
determined by X-ray to acquire more information on the changes of heat
checking.
EXPERIMENTAL
Cylindrical thermal fatigue specimens were made with size ∅ 10 ×
20 mm according to the test method [2] of Uddeholm Company from high
quality H13 steel. After quenching and tempering, they had a hardness of
47 HRC. Observed planes were finished finely on specimens. Then these
specimens were treated respectively with plasma nitriding (H13-N stand
for specimens without nitride layer, H13-N+ with nitride layer), plasma
sulfur-carbon-nitriding (H13-SCN), and oxidizing (H13-O). The boroniz-
ing thermal fatigue specimens (H13-B) were boronized before hardening.
A group of original quenched and tempered specimens (H13) were also
tested for comparison. All the thermal fatigue specimens were tempered at
200
◦
Cbefore test. In the first heat checking experiment, different groups
of specimens of H13-N,H13-SCN,H13-B and H13 were compared. Their
surface features are given in Table 1.

Influence of Surface Heat Treatmenton Thermal Fatigue Behaviorsof Hot Work Steel
65
Table 1.
Features in surface layers of different group specimens
Specimen
Compound
Diffused
Surface Hardness
Exp. 1
Exp. 2
layer ( µm)
layer ( µm)
(HV0.3)
H13-N
0
80
846
O
O
H-13N+
iron nitride 4
100
1100
O
H13-SCN
complicated nitride 3
118
1005
O
H13-B
iron boride 5
0
1800
O
O
H13-O
iron oxide 3
0
460
O
H13
0
0
464
O
O
Thermal fatigue experiments were carried out with a self-restricted ther-
mal fatigue equipment, in which induction heater with 200 kHz frequency
and 2.5 kW power was used. The total system could control the thermal fa-
tigue procedure and record the cycle number automatically. The parameters
of the test were as follows, temperatures range: room temperature ↔ 700
◦
C;
heating time: 3.6 sec; holding at high temperature:1 sec; cooling time: 8
sec; holding at room temperature:1 sec.; cooling medium: water; total cycle
number: 3000. Thermal fatigue test was halted at different number of cycles,
i.e. 100, 200, 400, 600, 1000, 2000, 3000. Then the specimen was immersed
in dilute hydrochloric acid solution for several minutes to eliminate the oxide
skin for observation. The changes on surface center areas of the observed
planes of different specimens were monitored carefully after those cycles
with Nikon stereomicroscope, to judge the effects of surface treatments on
the thermal fatigue behavior. After 3000 cycles, the specimens were cut at
center cross sections and cracks developed in depth direction were observed.
The specimens used in second experiment are showed in Table 1. The test
method and parameters of this experiment was just the same as the above
one. In the above test dilute hydrochloric acid etchant solution was used
for observation, but it influenced the surface structures and cracks without
doubt. So in the second experiment it was canceled. After different cycles,
residual stresses in specimens surface was directly measured, by REGAKU
PSP/MSF X-ray stress instrument, in the transverse and longitudinal direc-
tions. The detection parameters were as follows, characteristic X-ray: Cr
Kα; diffraction plane: αFe 211; ψ angle: 0, 15, 30, 45; stress constant,

66
6TH INTERNATIONAL TOOLING CONFERENCE
K: -297 MPa/deg. It has been pointed out that a remarkable change of the
residual stress on hot work tools happens mainly in the first hundreds shots,
therefore the selected cycle numbers for stress test were as follows: 0, 50,
150, 300, 600.
RESULTS
DEVELOPMENT OF HEAT CHECKING CRACKS
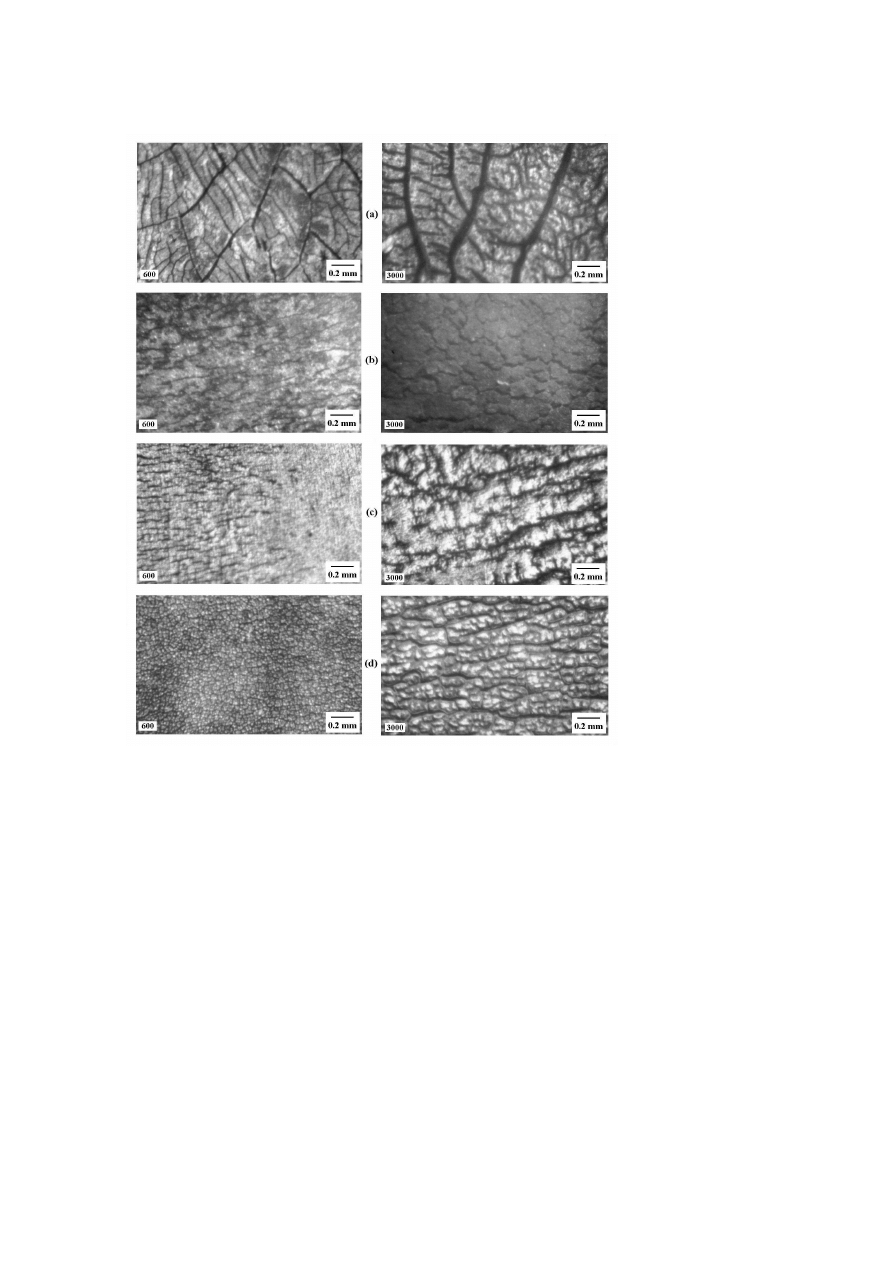
After 100 thermal cycles, very fine wrinkles appeared on H13 specimens,
no change on specimens could be detected in the other groups. After 200
cycles, H13-N specimens showed fine wrinkles like the H13 specimens,
but more fine and even. H13-SCN and H13-B specimens both showed a
few wrinkles in some certain places. After 400 cycles, mini-cracks could
be seen in every group. Uniform degree of mini-cracks distribution was
in the H13-N, H13, H13-B and H13-SCN specimens orderly. After 600
cycles, H13-SCN specimens showed remarkable heat checking networks,
in which thinner cracks were surrounded by main cracks. It seemed as the
heat checking cracks nucleated after 200 cycles, and then developed quickly
after 400 cycles. From 600 to 3000 cycles, the developing feature of heat
checking was that chiefly main crack grew and thinner cracks had no obvious
progress (Fig. 1a).
Compared to the crack development in the H13-SCN specimens, H13-B
specimens showed more main cracks and had no thinner cracks after 600
cycles. These main cracks developed evenly up to the end of the test (Fig.
1b). After 600 cycles, no main cracks could be seen on H13, and H13-N
specimens, especially on H13-N specimens. All of the cracks had different
extent, and some main cracks formed from 600 to 3000 cycles (Fig. 1c and
Fig. 1d).
After the experiment, surface hardness of the different group specimens
were measured and compared to the original values as showed in Table 2.
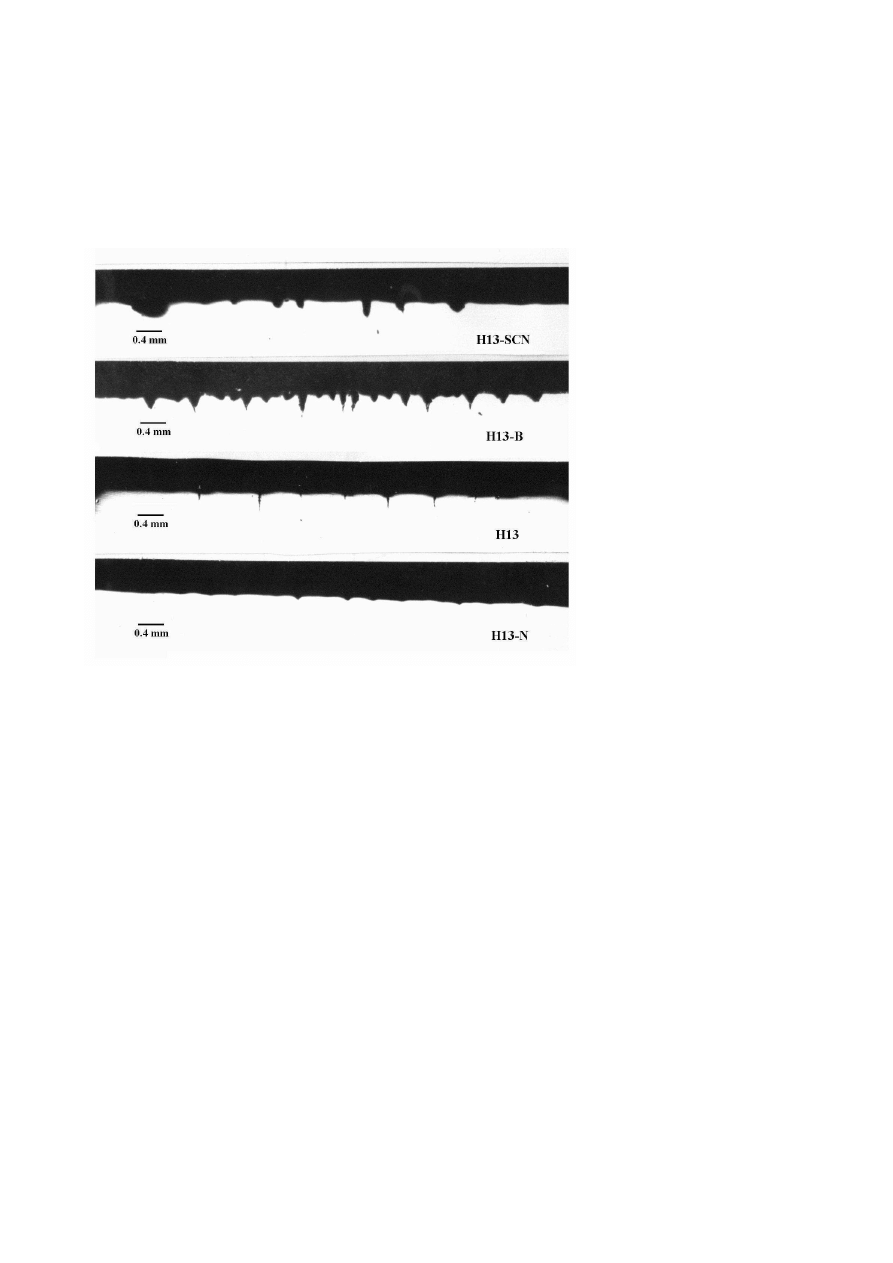
The cracks developed in depth were observed on cross-sections after 3000
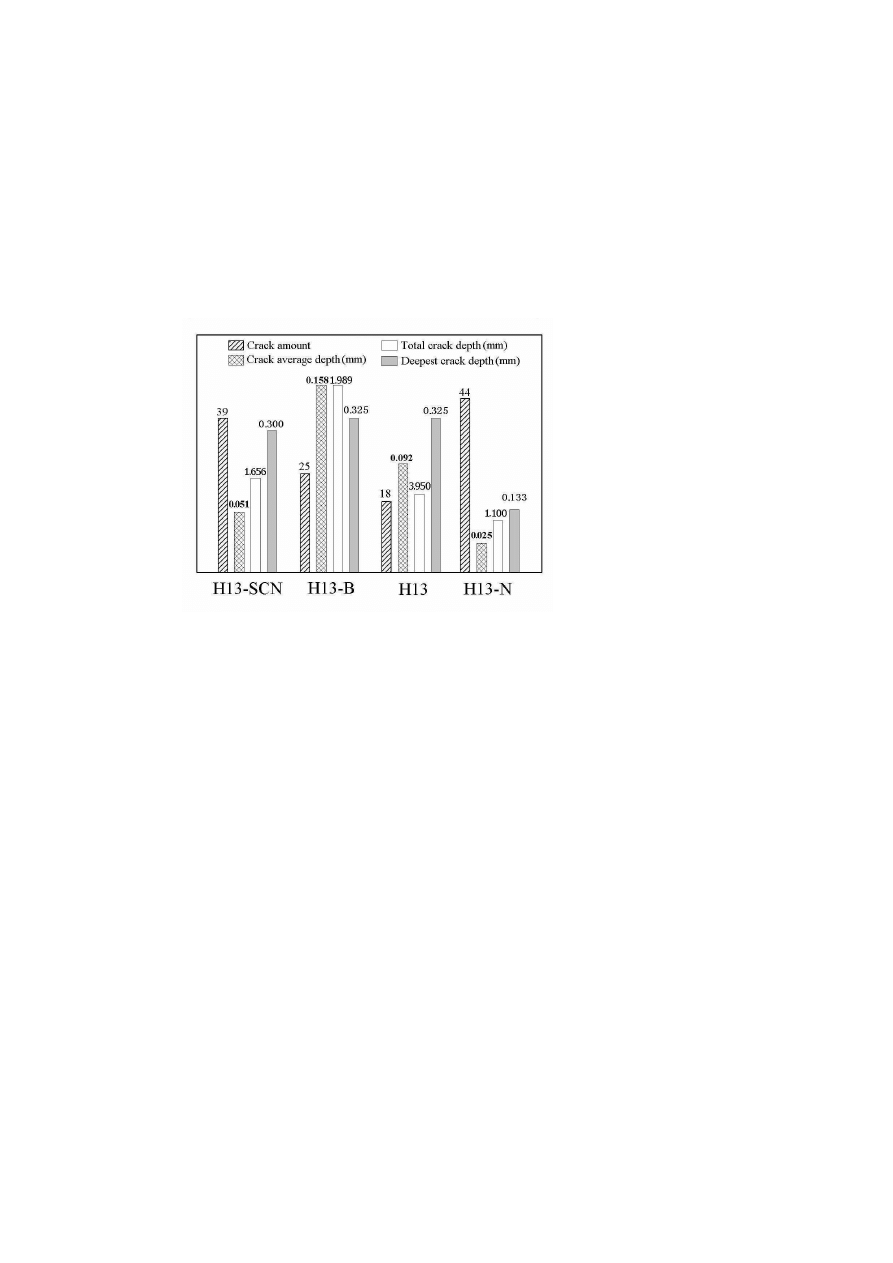
cycles and shown in Fig. 2. Relative statistical diagram of the cracks on
different specimens, shown in Fig. 3, were used to evaluate the destructive
degree. It was regarded as a crack when deeper than 0.013 mm, as observed
by optical microscope with magnification 100×.

Influence of Surface Heat Treatmenton Thermal Fatigue Behaviorsof Hot Work Steel
67
Table 2.
Surface hardness before and after thermal fatigue test
Specimen type
Original hardness (HV0.3)
Final hardness (HV0.3)
H13-SCN
1005
862
H13-B
1800
1546
H13
464
303
H13-N
846
425
RESIDUAL STRESSES IN THERMAL CYCLES
COURSE
It is well-known that stresses play an important role in the development of
heat checking cracks in hot-work application. It was possible to halt the ther-
mal fatigue test and measure the static residual stresses by X-ray diffraction,
although the dynamic stresses are more important in order to understand
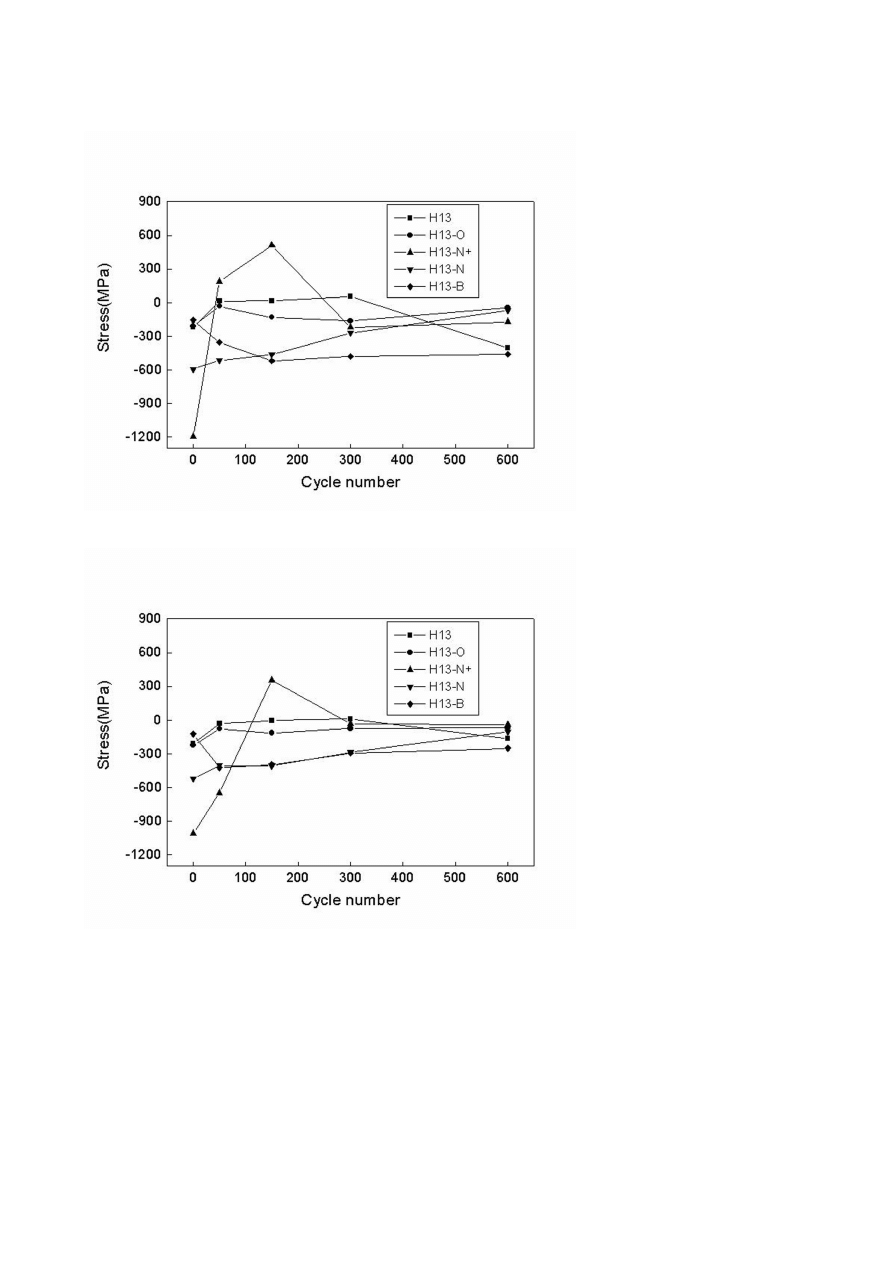
the mechanism of thermal fatigue. The measured residual stresses on the
surface of different specimens after some certain thermal cycles are showen
in Fig. 4.
The residual stresses in subsurface below the compound layers were mea-
sured on H13-N+, H13-B and H13-O specimens, using the αFe 211 diffrac-
tion peak. The surface compound layer disturbed the diffraction peak ob-
viously, especially on the H13-B specimens with a thick and high hardness
layer. Before testing, high compressive stresses were measured on H13-N+,
H13-N specimens and lower compressive stresses on H13-O and H13 speci-
mens. Unexpectedly low compressive stress found on H13-B specimens was
likely caused by the special heat treatment processes. The change of surface
stresses on H13-O specimens was most similar to that on H13 specimens.
On these specimens, the residual compressive stresses decreased and waved
a little with increasing cycle number. The compressive stresses on H13-N+
specimens and H13-N specimens clearly decreased with increasing cycle
number. On H13-N+ specimens the compressive stresses dropped rapidly
and changed to a tensile condition almost between 50 to 150 cycles, while
on H13-N specimens the compressive stresses decreased gradually and kept
a compressive condition till the end of 600 cycles. The compressive stresses
on H13-B specimens increased to some extent with increasing cycle number.

68
6TH INTERNATIONAL TOOLING CONFERENCE
It seemed as the surface compound layer had a remarkable influence on that
change.
DISCUSSIONS
CYCLIC DYNAMIC STRESS DURING THERMAL
CYCLES
Although the dynamic stresses could not be measured during thermal
cycles, the change of stress was one of the most important factors which
controlled the thermal fatigue progress. The static residual stresses on spec-
imens, measured at room temperature, may help us to evaluate the dynamic
stresses and obtain a better understanding on the thermally induced stress-
strain behavior of the specimens. Normally there was a residual compres-
sive stress field distributed in the surface layer of a quenched and tempered
cylindrical H13 specimen, owing to the martensite transformation and tem-
perature change. In the thermal fatigue test, an approximate steady cyclic
stress condition is reached in the specimens after a certain amount cycling
[4]. The original residual stresses in the specimens had an important effect
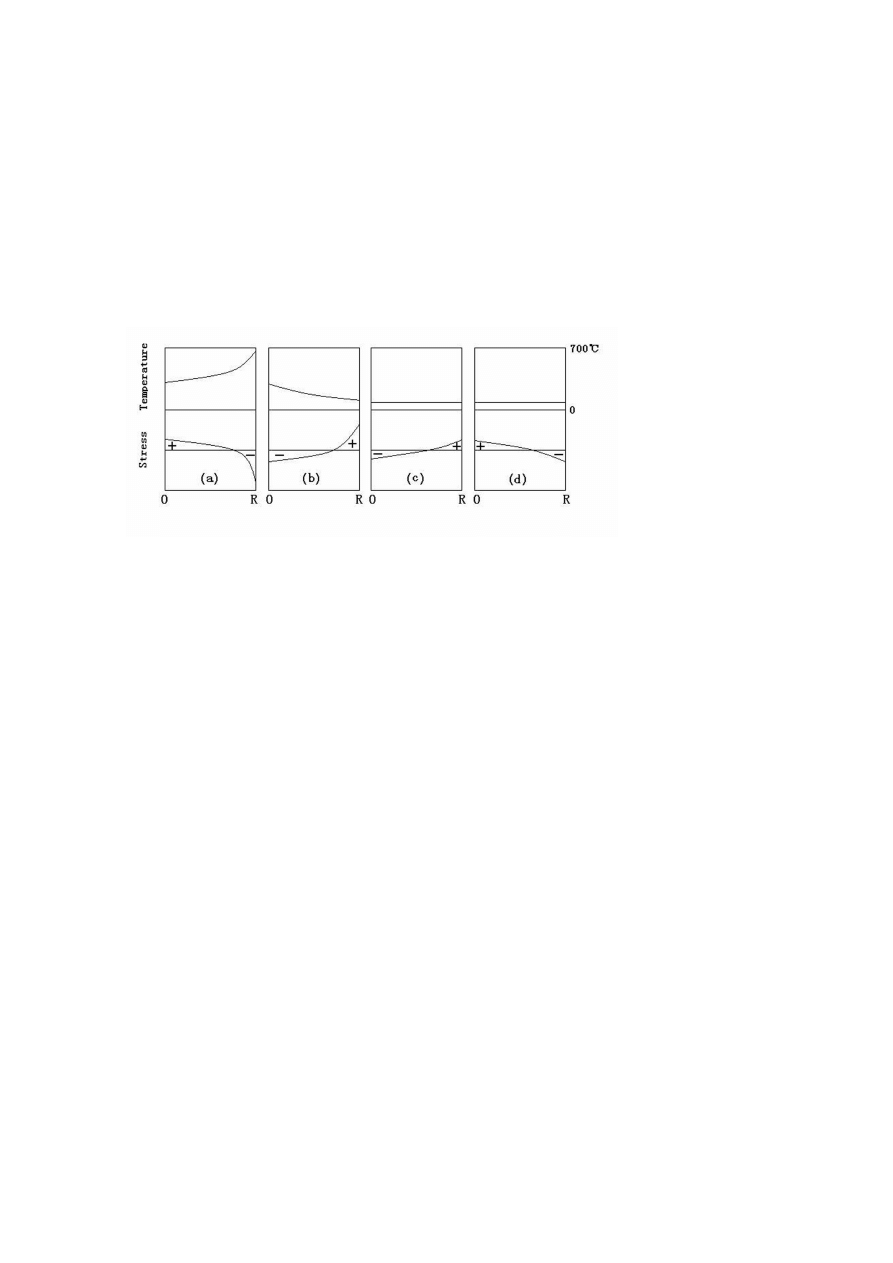
on this change. Figure 5 shows a sketch of the cyclic stress change in the
section of a cylindrical H13 specimen. During the heating period the surface
compressive stress increased quickly, and reached a peak at the position of
the highest temperature gradient (Fig. 5a), which usually happened at the
end of a heating period. During this period, the plastic strain induced by the
compressive stress is regarded as the original force for heat checking [5].
During the cooling period, the surface layer contracts faster than the core
and obtained a tensile state along with the change of temperature gradient
(Fig. 5b). The tensile stress in this period was the direct force for nucleation
and propagation of the heat checking cracks. When the surface stress was
measured at room temperature, the temperature gradient vanished and the
surface residual stress would keep a tensile state (Fig. 5c), or return to a com-
pressive state (Fig. 5d). This is due to various factors including the original
stress, and structural changes in the specimen and experimental conditions.
The original compressive stresses on the surfaces of H13 specimens would
increase plastic strains mainly caused by the temperature gradients. These
contracting plastic strains then decreased the compressive stresses and even
led to tensile stresses on the surfaces at room temperature. H13-O specimens
had a similar change of stresses as the H13 specimens. At room temperature,

Influence of Surface Heat Treatmenton Thermal Fatigue Behaviorsof Hot Work Steel
69
surfaces with compressive stresses indicates that a longer compressive state
could be kept during the cooling period. Consequently, the development
of cracks might be delayed. It seemed as if iron oxide had no remarkable
influence on the original stress and cyclic stress change, while the other com-
pound layers had a notable effect. The original H13-N+ specimens had the
highest compressive stresses. During thermal cycling, the dropping stresses
implied a more remarkable change of structures and strains. The nitride
layer with high hardness and low thermal expansion coefficient promoted
the plastic deformation as well as the temperature gradient did. Without
nitride layer, the H13-N specimens showed a slow decreasing of the residual
compressive stresses. In the surface diffused layer of the H13-N specimens,
the increased expansion coefficient amplified contractive strains while the
increased strength reduced the deformation. The crack development was re-
strained mainly due to the increased strength and the enhanced compressive
stresses. On H13-B specimens the abnormally increased compressive resid-
ual stresses maybe meant that higher tensile plastic deformation occurred
during the thermal cycles due to the effect of the borides layers.
NUCLEATION AND PROPAGATION OF HEAT
CHECKING CRACKS ON DIFFERENT SPECIMENS
Besides external thermally induced cyclic stresses, nucleation and propa-
gation of cracks were also controlled by internal structures and mechanical
properties of the specimens. The structures and properties of the surface lay-
ers were strongly influenced by cyclic temperature and cyclic stresses. The
different surface treatments led to different thermal fatigue characteristics.
At the beginning of the thermal fatigue test, fine and even mini-cracks ap-
peared on H13 and H13-N specimens because of the evenly distributed plas-
tic deformations and stresses, while less mini-cracks appeared on H13-SCN
and H13-B specimens due to the high hardness compound layers. After that,
the failure of compound layers caused a concentration of strain and stress.
Main cracks then propagated faster and minor cracks almost stopped, as in
H13-SCN and H13-B specimens. Only main cracks particularly formed in
H13-B specimens. On H13 specimens main cracks formed later, and other
cracks developed with the main cracks to some extent. On H13-N specimens
almost no main cracks developed with priority, but all the cracks propagated
equally during the test. The width of the cracks in the cross-section of

70
6TH INTERNATIONAL TOOLING CONFERENCE
different specimens can be seen in Fig. 2. H13 specimens showed sharp
main cracks while other specimens showed wider main cracks. The width
actually reflects the level of expansion and constriction during the test. Sur-
face treatment enhanced the level and widened the surface cracks due to the
difference of expansion between iron matrix and the diffused layer or com-
pound layer. This fact implied the conclusion that the expansion difference
between the surface and the core caused by surface treatment, decreases the
thermal fatigue resistance except when long time compressive stresses is
kept in the surface layer. A few remarkable cracks were more detrimental
than numerous mini-cracks appearing in a hot work application. Therefore,
optimized nitriding without compound layer is regarded as the best choice
in this test. The oxidation treatment had less effect on change of stress, but
a special iron oxide has showed good erosion and corrosion resistance [6].
Nitriding combined with oxidation process perhaps would be a better choice
for hot-work dies.
CONCLUSIONS
Static residual stresses measured in thermal fatigue test reflected the
change of dynamic cyclic stress. Plasma nitriding specimens without com-
pound layer kept a residual compressive stress for longer time. A com-
pound layer seemed to weaken the compressive stress during thermal cy-
cling. Plasma nitriding without compound layer increased thermal fatigue
resistance mainly due to the effective compressive stress on the surface of
the specimen. Plasma sulfur-carbon-nitriding and boronizing decreased the
resistance owing to a difference of expansion coefficients between the sur-
face and the core and the worsening of the stress condition. Continuous
compound layers were apt to form unevenly remarkable cracks.
ACKNOWLEDGMENTS
The authors would express their thanks to the help of Uddeholm Tooling
AB, the Shanghai Fifth Steel Co, and the China Spring Co.
REFERENCES
[1] B. KLARENFJORD and L. A. NORSTROM, in Proceeding of the 5th Pacific Rim
International Conference on Tool Steels for Dies and Molds, Shanghai, April, 1998,
edited by Luoping Xu, L-A. Norstrom ( Shanghai University, Shanghai,1998) p.225.

Influence of Surface Heat Treatmenton Thermal Fatigue Behaviorsof Hot Work Steel
71
[2] L-A. NORSTORM, Met. Technology 8 (1981) p.376.
[3] M. NAGASAWA and K. KUBOTA, in Proceeding of the 5th International Conference
on Tooling, Leoben, Sept., 1999, edited by F. Jeglisch (Institut fur Metallkunde und
Werkstoffprufung, Leoben, 1999 ) p.225.
[4] S. JEAN and B. MIQUEL, in Proceeding of the 5th International Conference on Tooling,
Leoben, Sept., 1999, edited by F. Jeglisch (Institut fur Metallkunde und Werkstoffpru-
fung, Leoben, 1999 ) p.185.
[5] J. H. LIU and J. ANHUI, Inst. Techno. 7(1988) p.58.
[6] A. MOLINARI and M. PELLIZZARI, Surface and Coatings technology126 (2000) p31.
72
6TH INTERNATIONAL TOOLING CONFERENCE
Figure 1.
Heat checking cracks after 600 and 3000 cycles on different surface treating
specimens.
(a) H13-SCN specimens. (b) H13-B specimens. (c) H13 specimens. (d) H13-N specimens.
Influence of Surface Heat Treatmenton Thermal Fatigue Behaviorsof Hot Work Steel
73
Figure 2.
Features of heat checking cracks on cross section of different specimens.
74
6TH INTERNATIONAL TOOLING CONFERENCE
Figure 3.
Statistical diagram of heat checking cracks on different specimens.
Influence of Surface Heat Treatmenton Thermal Fatigue Behaviorsof Hot Work Steel
75
(a) Stresses in transverse direction.
(b) Stresses in longitudinal direction.
Figure 4.
Static residual stresses of different surface treated specimens after some certain
thermal cycles.
76
6TH INTERNATIONAL TOOLING CONFERENCE
Figure 5.
Sketch of cyclic stress change during the experiment.
(a) Stress distribution during heating period. (b) Stress distribution during heating period.
(c) One type stress distribution at room temperature. (d) Other type stress distribution at room
temperature.
Wyszukiwarka
Podobne podstrony:
Effect of heat treatment on microstructure and mechanical properties of cold rolled C Mn Si TRIP
70 1003 1019 Influence of Surface Engineering on the Performance of Tool Steels for Die Casting
71 1021 1029 Effect of Electron Beam Treatment on the Structure and the Properties of Hard
Conrad Hjalmar Nordby The Influence Of Old Norse Literature On English Literature
Adsorption of active ingredients of surface disinfectants depends on the type
Influence of surface modifications
Influence of the starter culture on the microbiological and sensory characteristics of ewe s cheese
The Influence of Black Slave Culture on Early America
Barwiński, Marek The Influence of Contemporary Geopolitical Changes on the Military Potential of th
43 597 609 Comparison of Thermal Fatique Behaviour of Plasma Nitriding
Influence of titanium surfaces on attachment of osteoblast
07 Kolar K i inni Influence of separation agents on quality of concrete surface
20 255 268 Influence of Nitrogen Alloying on Galling Properties of PM Tool Steels
więcej podobnych podstron