EasyCoder
™
7421 Printer
P/N 066386-002
User’s Manual
EasyCoder
7421

Intermec Technologies Corporation
6001 36th Avenue West
P.O. Box 4280
Everett, WA 98203-9280
U.S. technical and service support: 1.800.755.5505
U.S. media supplies ordering information: 1.800.227.9947
Canadian technical and service support: 1.800.687.7043
Canadian media supplies ordering information: 1.800.267.6936
Outside U.S. and Canada: Contact your local Intermec service
supplier.
The information contained herein is proprietary and is provided solely
for the purpose of allowing customers to operate and/or service
Intermec manufactured equipment and is not to be released,
reproduced, or used for any other purpose without written permission
of Intermec.
Information and specifications in this manual are subject to change
without notice.
1998 by Intermec Technologies Corporation
All Rights Reserved
The word Intermec, the Intermec logo, JANUS, IRL, TRAKKER,
Antares, Adara, Duratherm, EZBuilder, EasyCoder, Precision Print,
PrintSet, Virtual Wedge, and CrossBar are trademarks of Intermec
Corporation.
Throughout this manual, trademarked names may be used. Rather
than put a trademark (
or
) symbol in every occurrence of a
trademarked name, we state that we are using the names only in an
editorial fashion, and to the benefit of the trademark owner, with no
intention of infringement.
The software contained in the 7421 Printer and the accompanying
materials are copyrighted. Unauthorized copying of the software,
including software that has been modified, merged, or included with
other software, or the written materials is expressly forbidden without
the prior written consent of Intermec. All right, title, and interest in all
copies of this software are and shall at all times remain the sole and
exclusive property of Intermec. Customer may be held legally
responsible for any copyright infringement that is caused or
encouraged by its failure to abide by these terms.

iii
Contents
Before You Begin vii
Warranty Information vii
Safety Summary vii
Warnings, Cautions, and Notes viii
About This Manual ix
Operating the Printer
Getting to Know Your Printer 1-3
Learning How to Operate the Printer 1-5
Understanding the Power Light 1-5
Using the Feed/Pause Button 1-6
Loading Media Into the Printer 1-7
Using the Peel-Off Option 1-7
Loading Fanfold Media 1-16
Inserting the Optional Memory Card 1-20
Configuring the Printer
Configuring the Printer 2-3
Setting the Media Sensitivity Number 2-3
Setting the MSN for Intermec Media and
Ribbon 2-5
Setting the MSN for Other Media and Ribbon
2-6
Adjusting the Print Darkness 2-8
Adjusting the Label Gap Sensor 2-9
Communicating With the Printer 2-10
1
2

iv
Printing a Test Label 2-11
Using the Printhead Loading Modes 2-12
Maintaining the Printer
Maintenance Schedule 3-3
Tools for Cleaning the Printer 3-5
Cleaning the Printhead 3-6
Cleaning the Printer Covers 3-7
Cleaning the Drive Roller and Peel-Off Bar 3-8
Cleaning the Label Sensors 3-10
Troubleshooting
Troubleshooting Checklist 4-3
Printer Operation Problems 4-4
Print Quality Problems 4-5
Communication Problems 4-6
Using Data Line Print Mode 4-6
Preventing Data Loss 4-7
Resetting the Printer to Factory Defaults 4-8
Printer Specifications
Printer Specifications A-3
Printer Options A-5
Bar Code Symbologies Supported A-6
3
4
A

v
Communications Reference
About Communications B-3
Serial Communication Protocols B-3
RS-232 Serial Interface B-8
Character Sets
International Character Sets C-3
Extended Character Sets C-7
Index
B
C
I


vii
Before You Begin
This section introduces you to standard warranty provisions,
safety precautions, warnings and cautions, terms, and sources of
additional product information. A documentation roadmap is
also provided to help you find information.
Warranty Information
To receive a copy of the standard warranty provision for this
product, contact your local Intermec sales organization. In the
U.S. call 1.800.755.5505, and in Canada call 1.800.688.7043.
Otherwise, refer to the Worldwide Sales & Service list that was
shipped with this manual for the address and telephone number
of your Intermec sales organization.
Safety Summary
Your safety is extremely important. Read and follow all
warnings and cautions in this book before handling and
operating Intermec equipment. You can be seriously injured, and
equipment and data can be damaged if you do not follow the
safety warnings and cautions.
Do not repair or adjust alone Do not repair or adjust energized
equipment alone under any circumstances. Someone capable of
providing first aid must always be present for your safety.
First aid Always obtain first aid or medical attention
immediately after an injury. Never neglect an injury, no matter
how slight it seems.
Resuscitation Begin resuscitation immediately if someone is
injured and stops breathing. Any delay could result in death. To
work on or near high voltage, you should be familiar with
approved industrial first aid methods.
Energized equipment Never work on energized equipment
unless authorized by a responsible authority. Energized
electrical equipment is dangerous. Electrical shock from
energized equipment can cause death. If you must perform
authorized emergency work on energized equipment, be sure
that you comply strictly with approved safety regulations.
viii
Warnings, Cautions, and Notes
The warnings, cautions, and notes in this manual use these
formats.
Warning
A warning warns you of an operating
procedure, practice, condition, or statement
that must be strictly observed to avoid
death or serious injury to the persons
working on the equipment.
Avertissement
Un avertissement vous alerte d’une
procédure de fonctionnement, d’une méthode,
d’un état ou d’un rapport qui doit être
strictement respecté pour éviter l’occurrence
de mort ou de blessures graves aux personnes
manupulant l’équipement.
Caution
A caution alerts you to an operating
procedure, practice, condition, or statement
that must be strictly observed to prevent
equipment damage or destruction, or
corruption, or loss of data.
Conseil
Une précaution vous avertit d’une procédure
de fonctionnement, d’une méthode, d’un état
ou d’un rapport qui doit être strictement
respecté pour empêcher l’endommagement ou
la destruction de l’équipement, ou
l’altération ou la perte de données.
Notes:
Notes are statements that either provide extra information
about a topic or contain special instructions for handling a particular
condition or set of circumstances.

ix
About This Manual
This manual contains all of the information necessary to operate,
configure, maintain, and troubleshoot the 7421 bar code label
printer. This manual was written for all users who need to know
how to use the printer to print labels.
What You Will Find in This Manual
This table summarizes the information in each chapter of this
manual:
For Information On
Refer To
Operating the printer
Chapter 1, “Operating the Printer.”
Explains the printer front panel, tells
you how to load media for self-strip,
load fanfold media, and insert the
optional memory card.
Configuring the printer
Chapter 2, “Configuring the Printer.”
Explains how to configure the printer for
optimal performance. You will learn
how to set the media sensitivity number,
the print darkness, adjust the label
sensors, and print a test label.
Routine maintenance
Chapter 3, “Maintaining the Printer.”
Shows how to maintain the printer.
Troubleshooting
Chapter 4, “Troubleshooting.” Instructs
how to clear error messages and
troubleshoot programming or
configuration problems.
Printer specifications and
options
Appendix A, “Printer Specifications.”
Lists the specifications for the printer,
the available options, and the supported
symbologies.
Communications, printer
protocols, and printer
interfaces
Appendix B, “Communications
Reference.” Defines the communications
protocol and the interfaces that the
printer uses to communicate.
Character sets
Appendix C, “Character Sets.” Contains
tables for the character sets that your
printer supports.

x
Terms
Listed below are special terms used throughout the manual.
“Printer” refers to the 7421 bar code label printer.
“Media” is the general term used to describe the label stock (roll,
fanfold, or tag) on which the printer prints labels.
“Label” refers to the individual labels of your media.
“Host” refers to a personal computer or other computer that
communicates with the printer.
A “symbol” or “bar code symbol” consists of alphanumeric
characters encoded in a bar code format.
Other Intermec Manuals
The following manuals provide additional information about
printing labels with your bar code printer.
Manual
Intermec Part
Number
EasyCoder 7421 Printer Setup Guide
066387
IPL Programming Reference Manual
066396
9161B Installation Manual
049572
9180 Network Controller User’s Manual
054292
Data Communications Reference Manual
044737
RF System User’s Manual
053574
The Bar Code Book
051241

Operating the Printer
1

1-3
This chapter introduces the 7421 printer and explains features and
options that are not covered in the
EasyCoder 7421 Printer Setup
Guide
.
Getting to Know Your Printer
Features of your printer include:
•
Support for either direct thermal or thermal transfer printing
applications.
•
High resolution 203 dots per inch (dpi) printhead.
•
Ability to store downloaded formats, fonts, or graphics in
removable memory cartridges.
•
An easy to use software application called PrintSet. PrintSet
makes configuring your printer and printing a test label
effortless. See the PrintSet online help for more information
on how to use the application.
Use the following illustrations to familiarize yourself with your
printer.
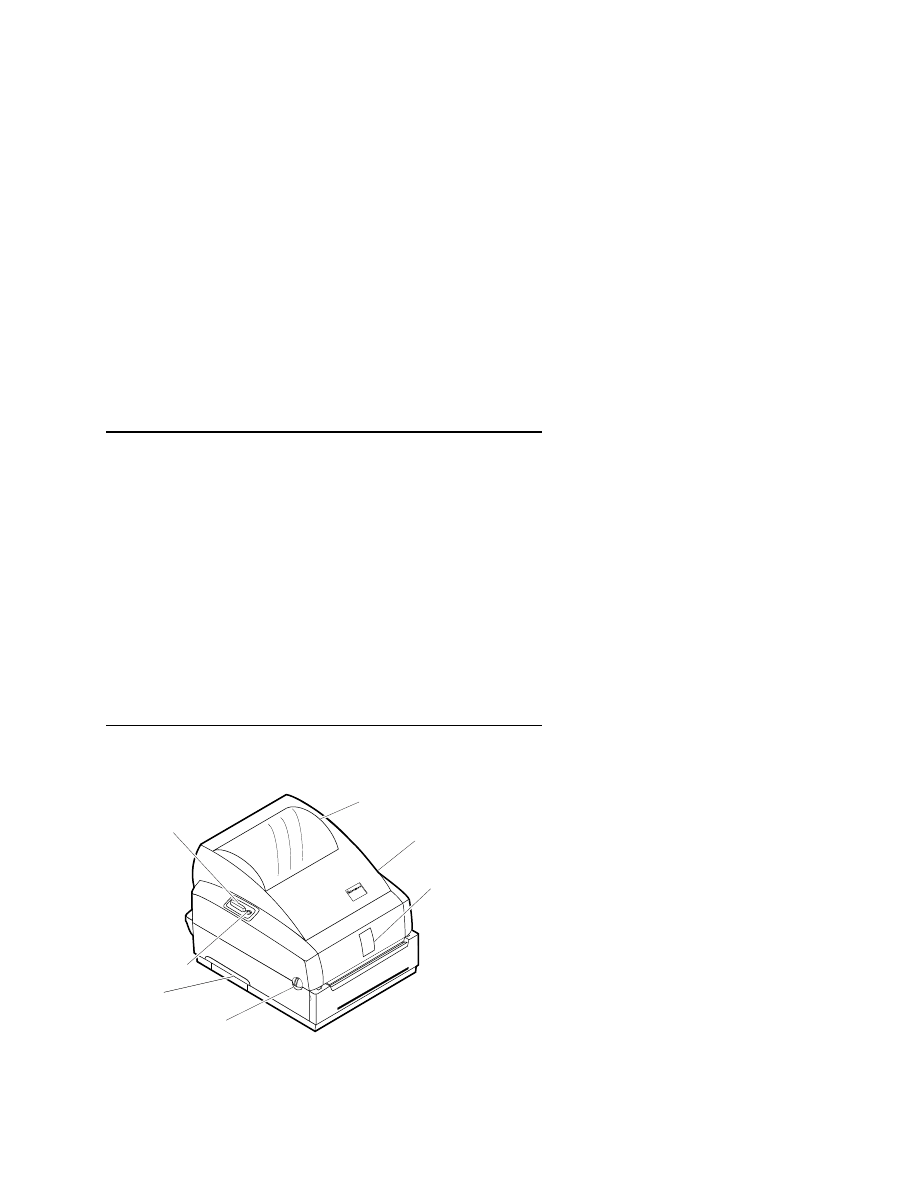
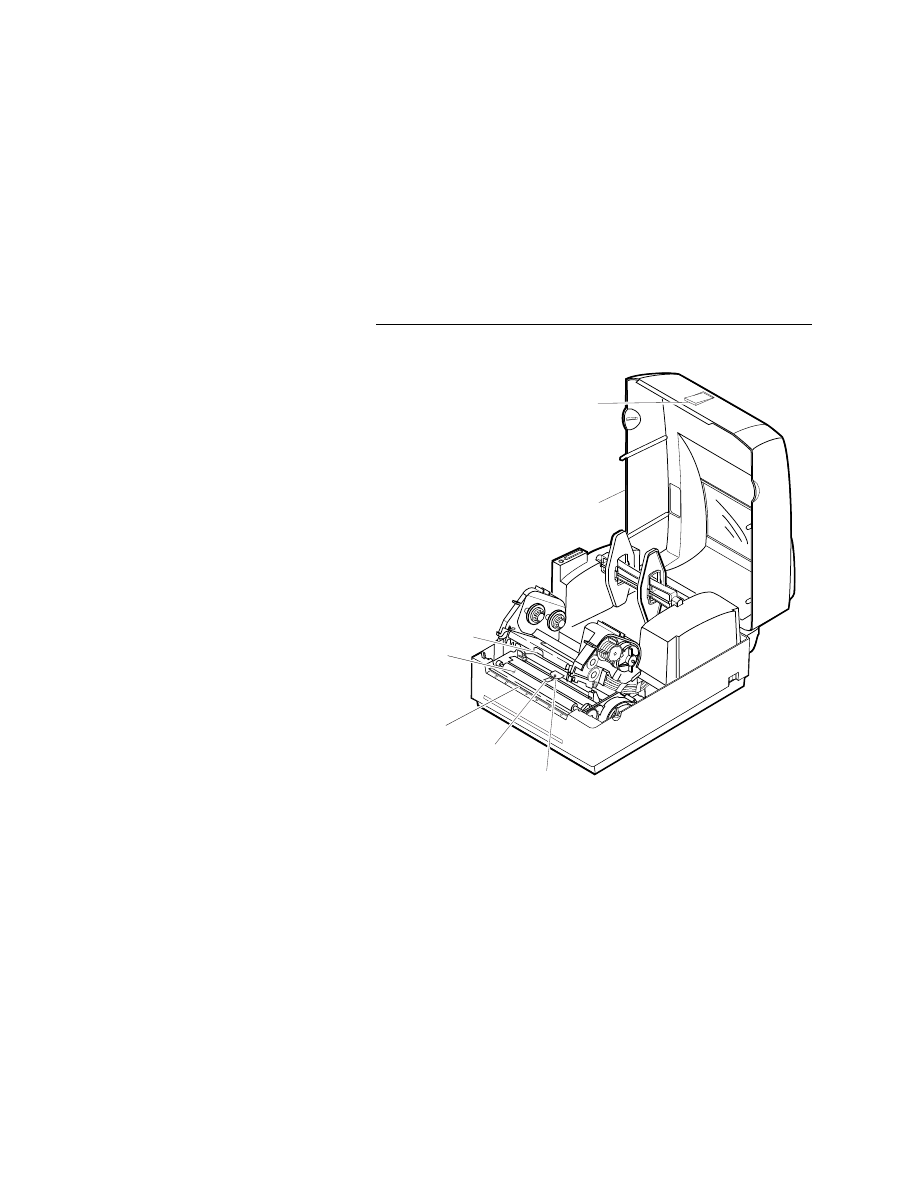
Front View
7421U.001
7422
EasyCoder
Power
light
Feed/Pause
button
Media
window
Cover
release
Media
cover
Label
taken
sensor
Memory
card slot
cover
1-4
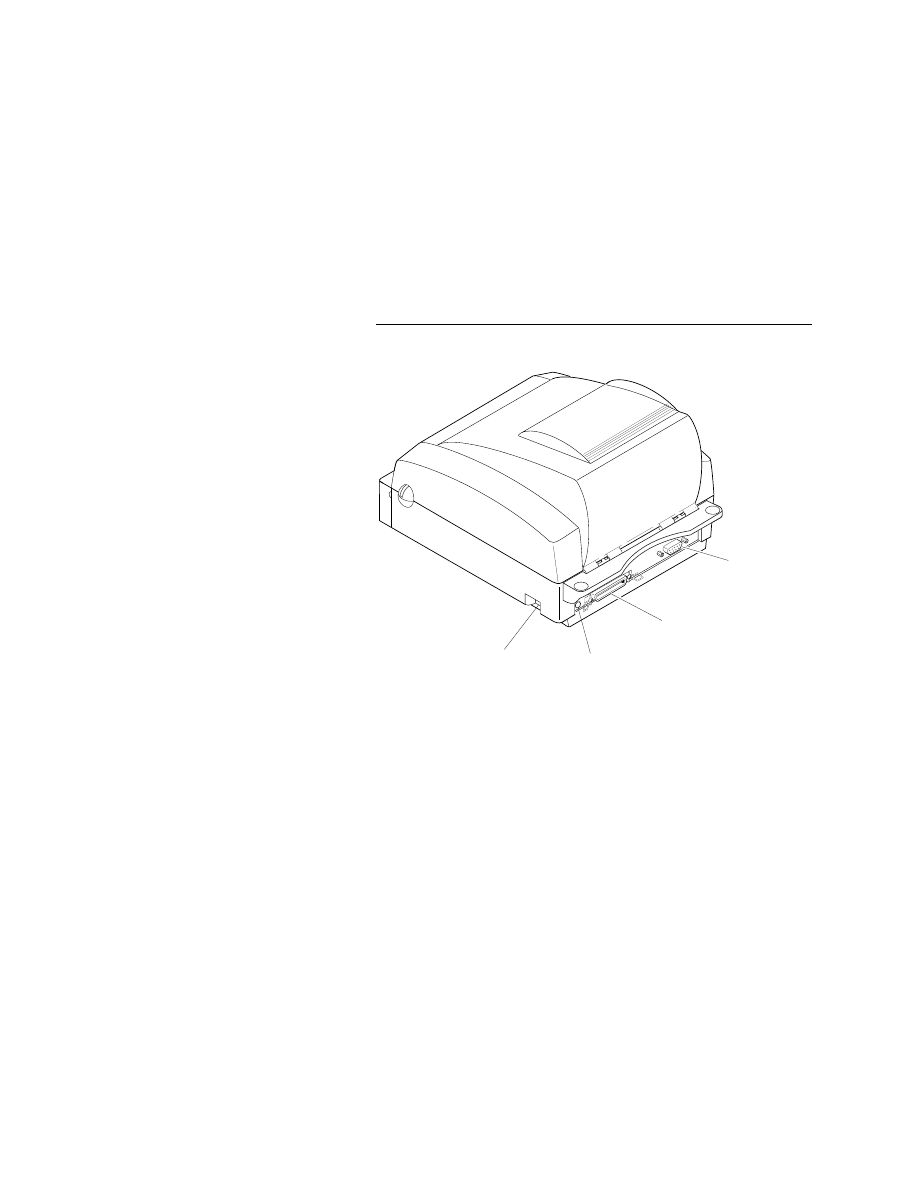
Back View
7421U.002
On/Off
switch
Power
cord
connector
Parallel
communications
port
Serial
communications
port
Several options are available for use with your printer. See
Appendix A for complete descriptions of these options.

1-5
Learning How to Operate the Printer
To operate the printer, you need to understand:
Power light The Power light helps you determine when the
printer is on or off, or if there is a problem with the printer.
Feed/Pause button The Feed/Pause button allows you to feed
out media, pause the printer, and print a hardware configuration
label.
Understanding the Power Light
Use the Power light to monitor the status of the printer:
Light
State
Indication
Green
Off
On
Flashing
Power off
Power on
Receiving data
Red
On
Flashing
System fault
Over-temperature
Orange
On
Flashing
Media fault
Paused
Over-Temperature If the printer overheats, the Power light
flashes red and the printer stops. Do not try to troubleshoot or
adjust the printer—just allow it enough time to cool down and it
will resume operation on its own.
Media or System Faults If the Power light turns red or orange
and remains on, your printer is experiencing a media or system
fault. For help, see Chapter 4, “Troubleshooting.”
1-6
Using the Feed/Pause Button
The Feed/Pause button, located on the left side of the printer,
performs these functions depending on the printer mode:
Printer
Mode
You Want To
What to Do
Idle
Feed out one label
or a minimum
specified amount of
media.
Press and release the Feed/Pause
button.
Continuously feed
media.
Press and hold the Feed/Pause
button. When you release the
button, the media stops feeding.
Take the printer
offline.
Press the Feed/Pause button
twice. Press the button again to
bring the printer online.
Printing
Pause the printer.
Press and release the Feed/Pause
button. Press and release the
button again to resume printing.
Cancel the current
print job.
Press and hold the Feed/Pause
button until the printer stops
printing.
Powered on
for the first
time
Print the hardware
configuration label.
Press and hold the Feed/Pause
button while you turn on the
printer.
Print the software
configuration label
Press the Feed/Pause button after
the hardware configuration label
stops printing.
Print the pitch
label.
Press the Feed/Pause button after
the software configuration label
stops printing.

1-7
Loading Media Into the Printer
In addition to loading roll media in the printer, you can:
•
Use the peel-off option.
•
Load fanfold media.
You can load media with the printer power turned on or off. The
following procedures for loading media assume that you have
turned on the printer. Refer to the EasyCoder 7421 Printer Setup
Guide for instructions on loading rolls of media.
Using the Peel-Off Option
Use the peel-off option in printing applications where you want
to apply labels to a surface immediately. After printing a label,
the printer presents the label with the backing removed.
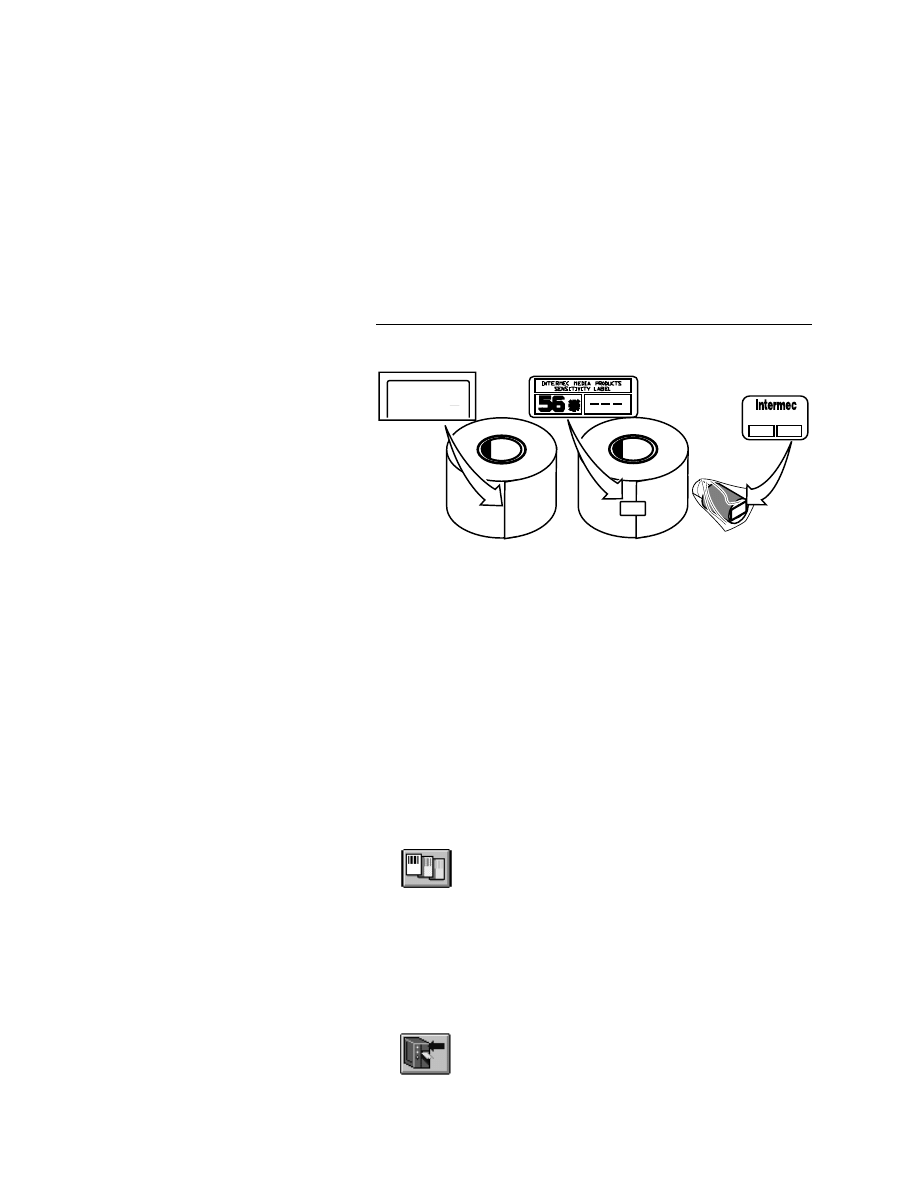
Note:
You should find a small label with a three-digit sensitivity
number printed on it attached to your roll of media or a 15-digit
number stamped on the side of the media roll. Save this information.
You will need it to set the correct media sensitivity number. For help,
see “Setting the Media Sensitivity Number” in Chapter 2.
Note:
Intermec does not recommend using fanfold media with the
peel-off option.
1-8
To load labels using the peel-off option
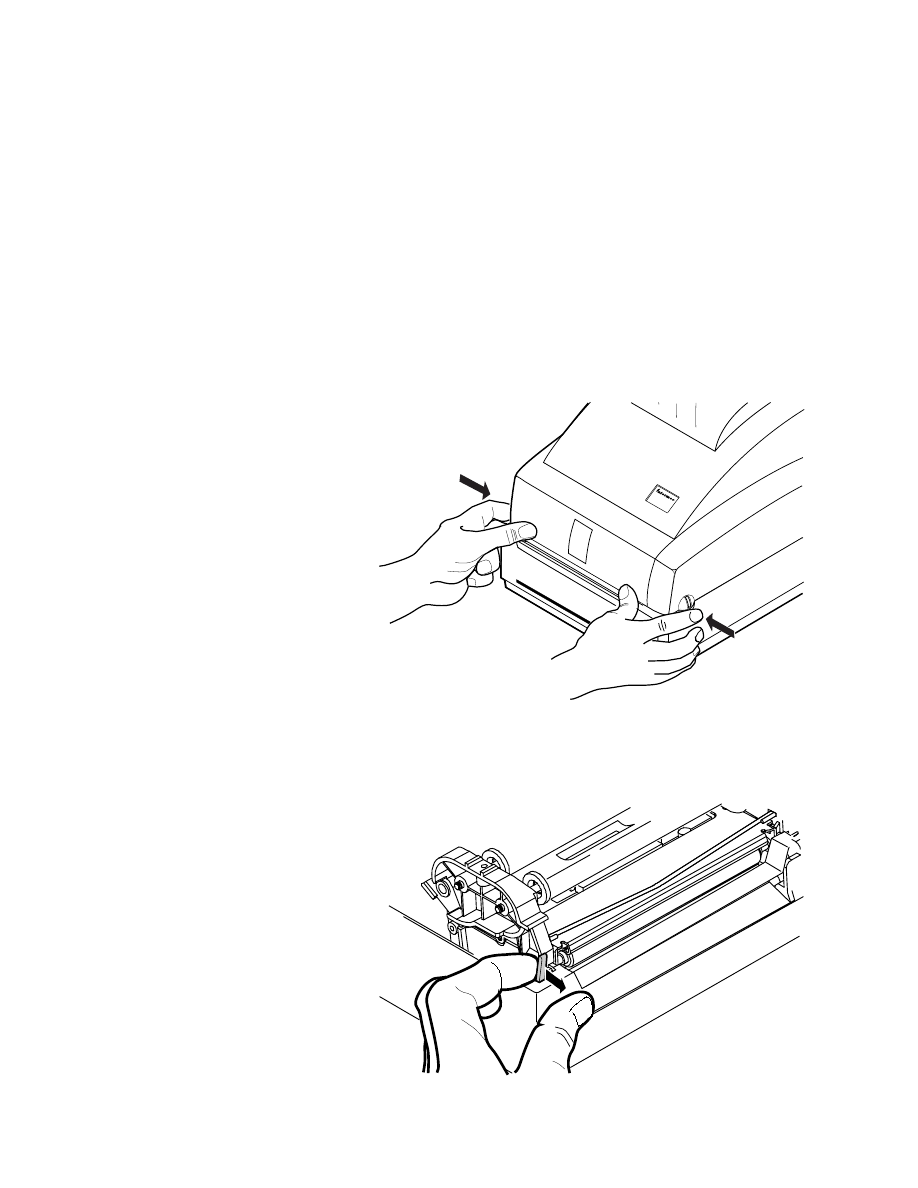
1. Open the top cover of the printer.
7421
EasyCoder
7421U.003
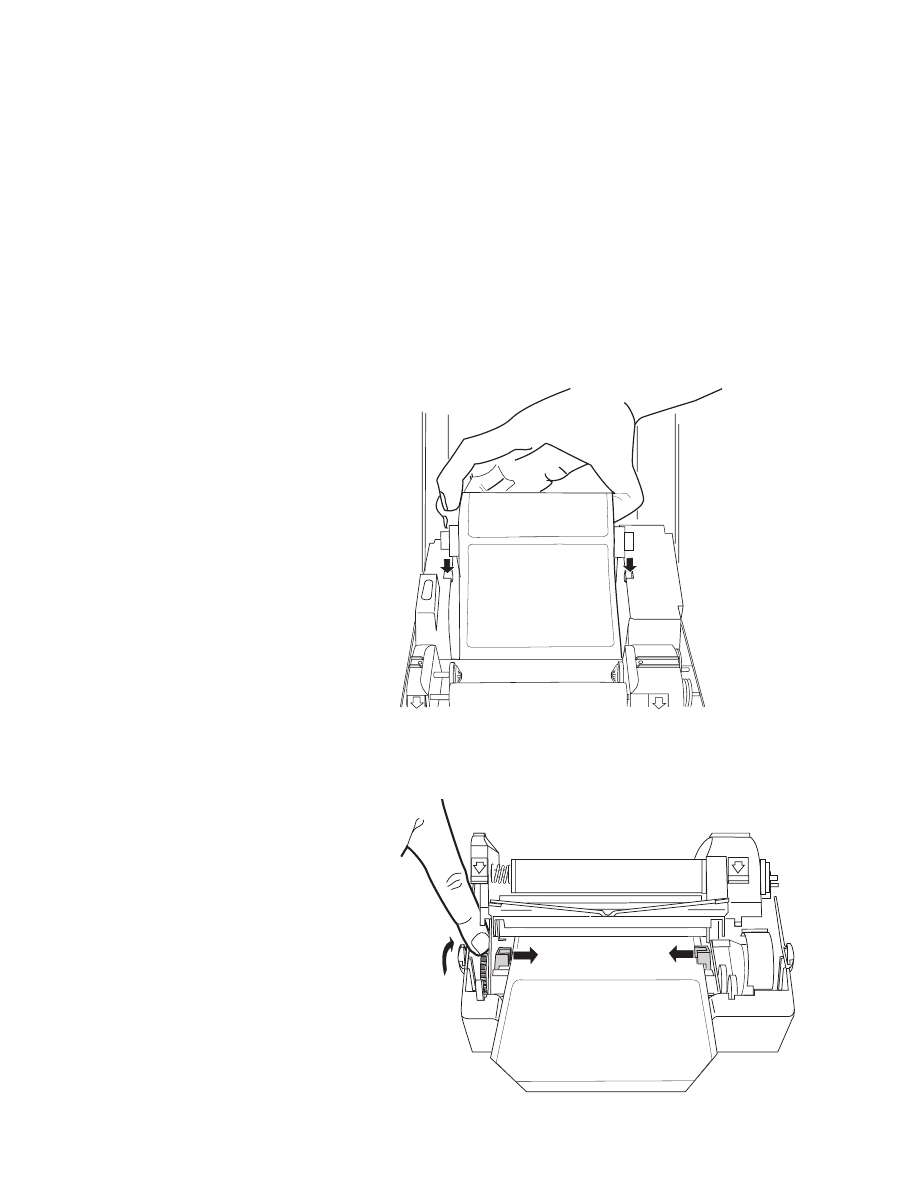
2. Open the printhead assembly by pulling the yellow release
lever toward the front of the printer.
7421U.005
1-9
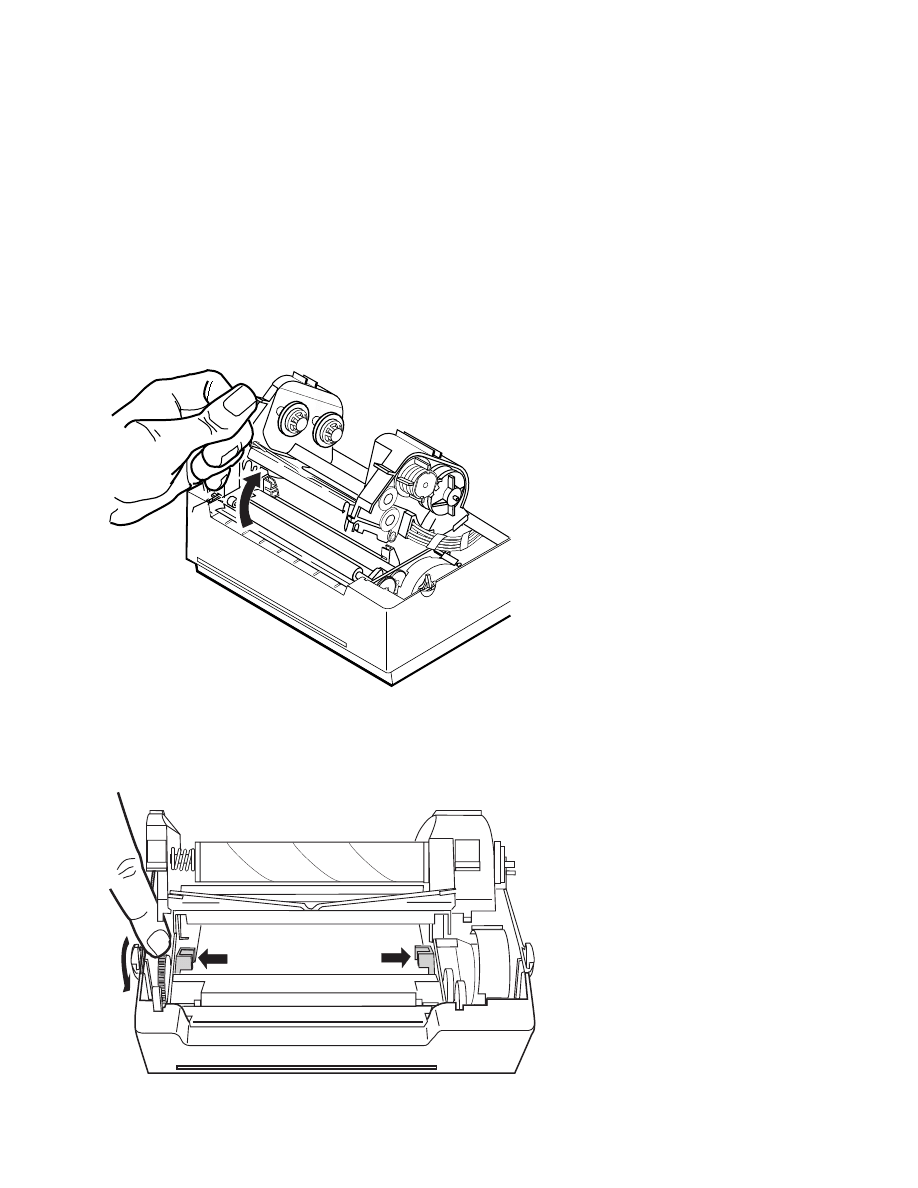
3. Lift the printhead up into the full open position.
7421U.006
4. Adjust the guide tabs to their widest position by winding the
yellow adjustment roller toward the front of the printer.
7 4 2 1 U . 0 0 9

1-10
5. Insert the spindle into the roll of media.
7421U.011
<3.9"
(99mm)
4"
(102mm)
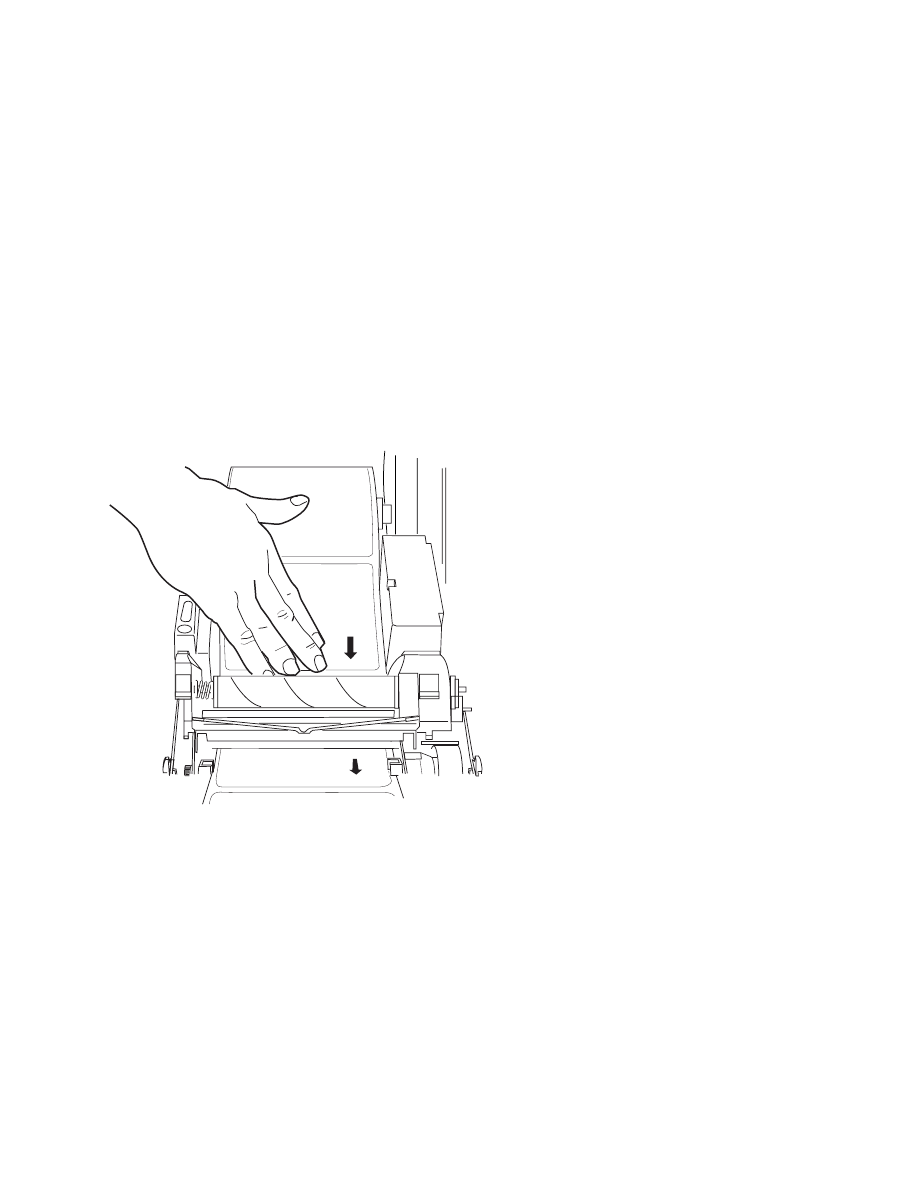
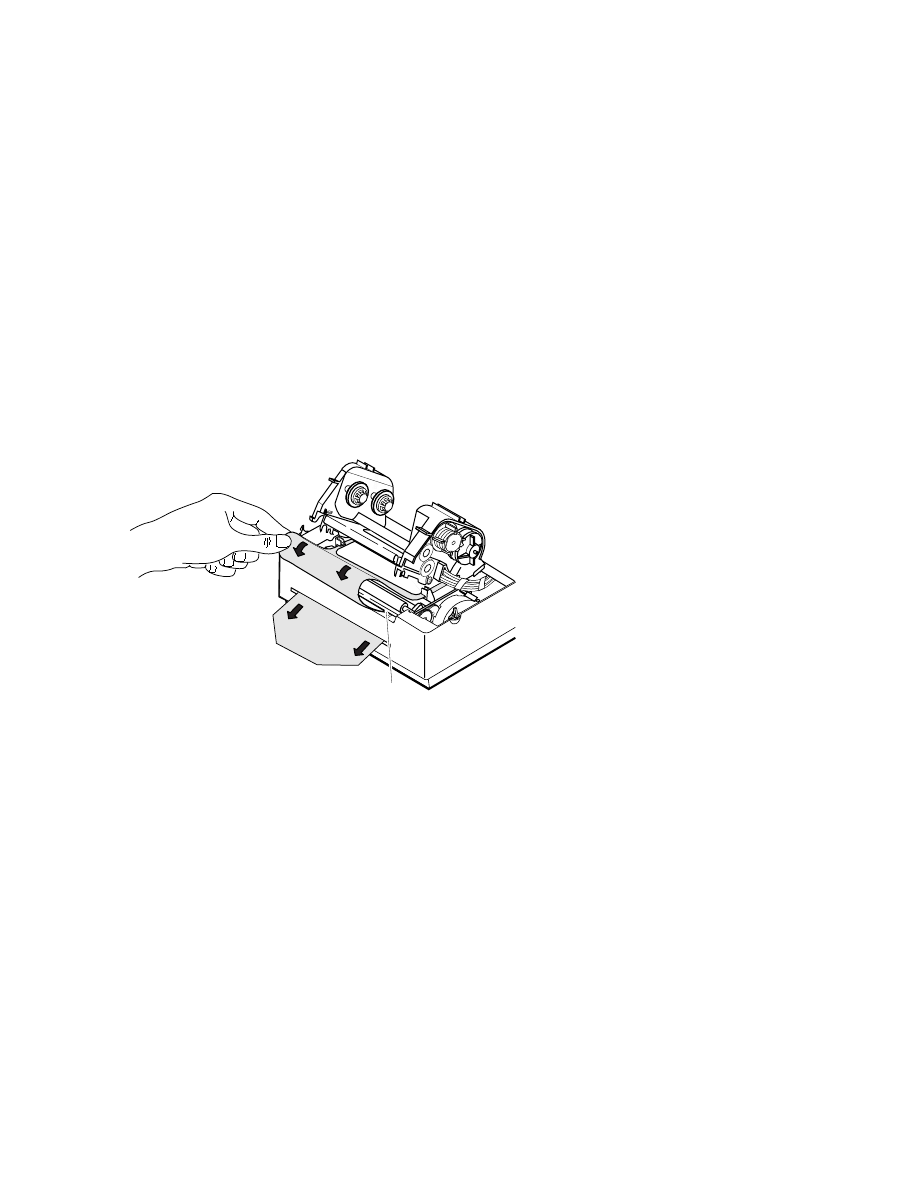
6. Place the roll inside the top cover so that the end feeds from
the top.
7421U.012
1-11
7. Insert the end of the roll into the printer and out the front of
the printer.
Note:
It is easier to insert the media through the printer mechanism
if you cut the corners off the end of the first label.
7421U.013
1-12
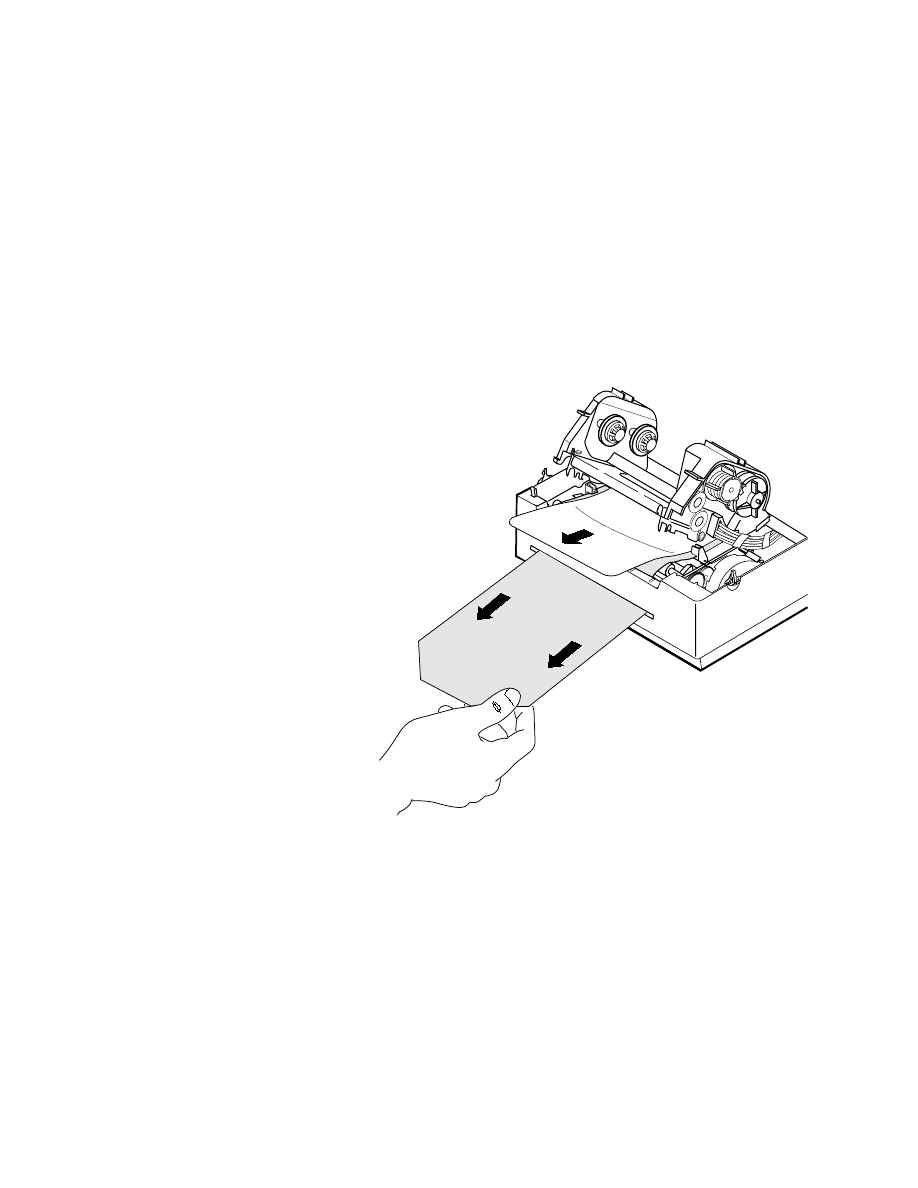
8. Rewind the excess paper onto the media roll while placing
the spindle into the holder slots on the printer.
7421U.014
9. Center the labels in the printer path and adjust the label
guides so that they just touch the edges of the label liner.
7421U.015
1-13
10. Pull the labels through the printer until at least two full labels
(approximately 6 inches or 15 cm) are sticking out the front of
the printer. Peel the first two labels from the label liner.
11. Insert the label liner between the front of the printer and the
peel-off bar until the liner appears out the bottom slot.
7421U.016
Peel-off
bar
1-14
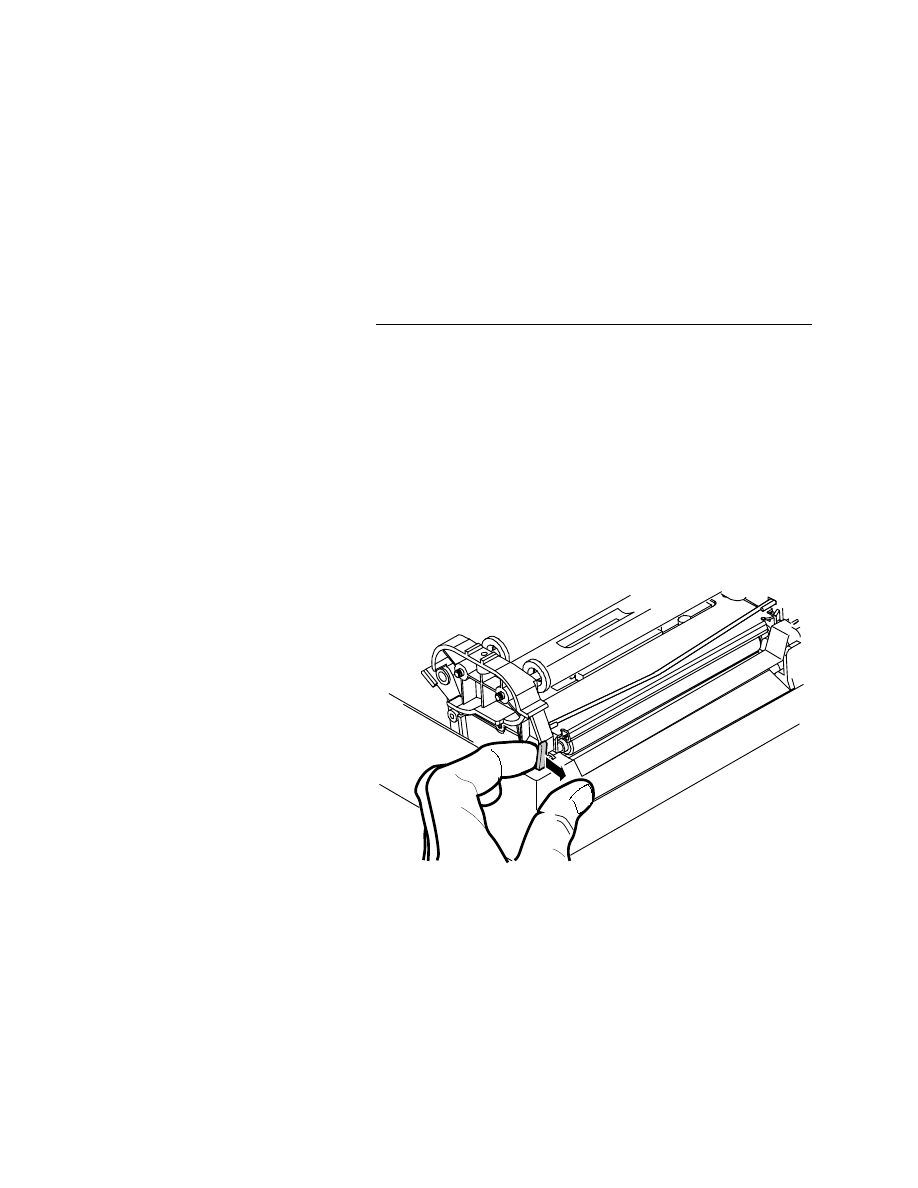
12. Pull the label liner out of the bottom slot until the liner is tight
across the peel-off bar.
7421U.017
1-15
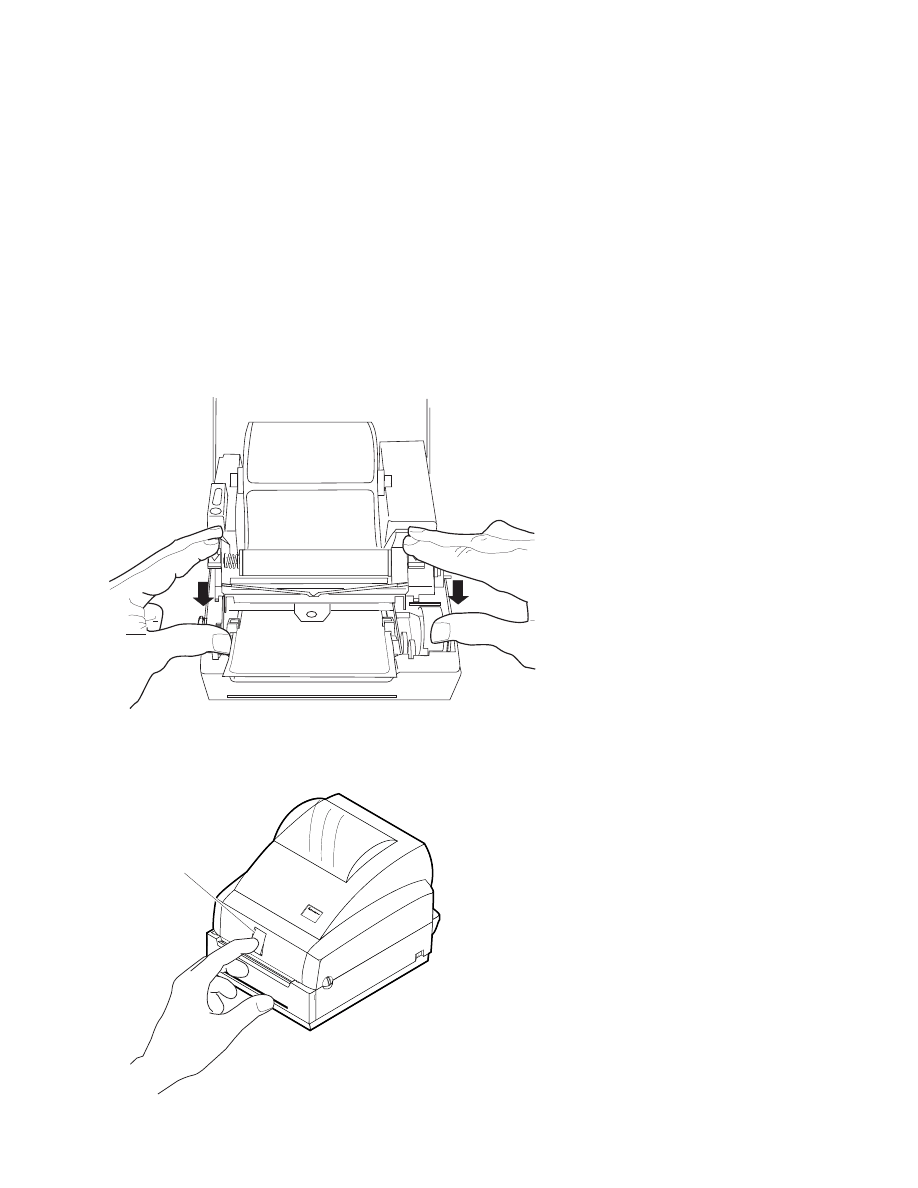
13. Lower the printhead assembly and lock it into the operating
position by pressing down firmly on both sides of the
printhead. Lower the printer cover.
7421U.010
14. Activate the label taken sensor by pressing in on the top of
the sensor. The printer is now ready for printing.
EasyCoder
7422
7421U.018
Label taken
sensor
1-16
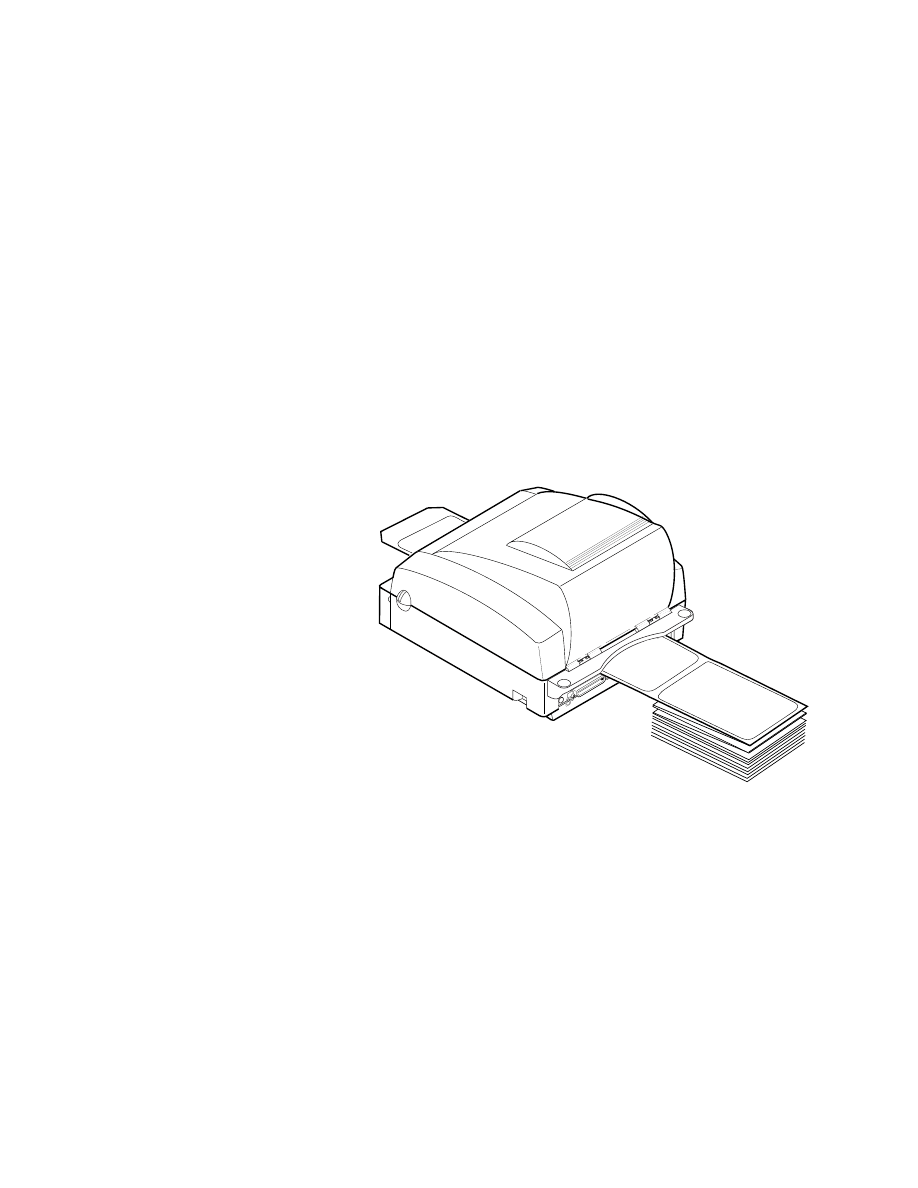
Loading Fanfold Media
In fanfold printing, you place a stack of fanfold media at the rear
of the printer and feed it into the printer through a slot in the
rear cover.
To load media for fanfold printing
1. Open the top cover and remove the spindle from the printer.
Save the spindle for use with roll media.
2. Open the printhead assembly by pulling the yellow release
lever (on the left side of the printer) toward the front of the
printer.
7421U.019

1-17
3. Lift the printhead up into the full open position.
7421U.020
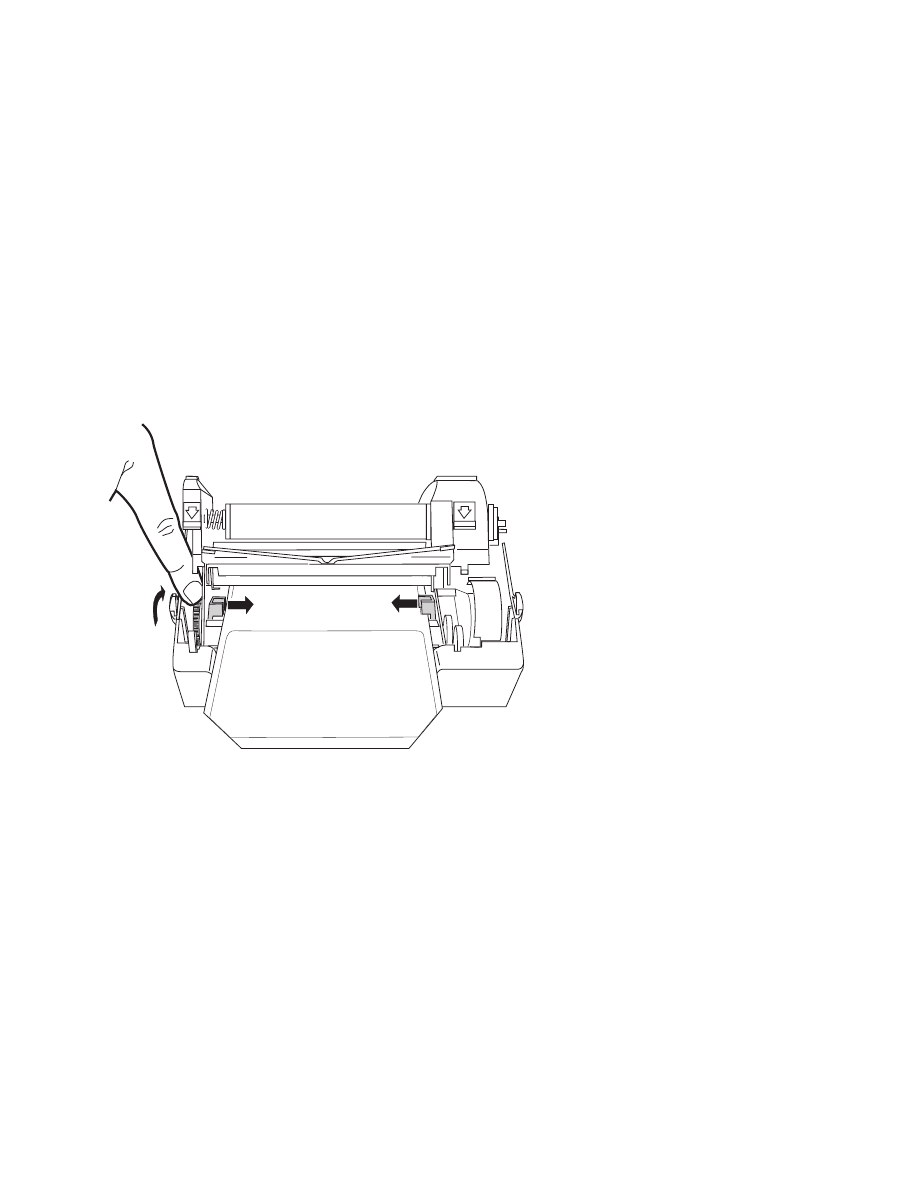
4. Adjust the guide tabs to their widest position by winding the
yellow adjustment roller toward the front of the printer.
7 4 2 1 U . 0 2 2
1-18
5. Place the fanfold media slightly lower than the slot in the
printer back cover and insert the media through the slot, into
the printer mechanism, and out the front of the printer.
Note:
It is easier to insert the media through the printer mechanism
if you cut the corners off the end of the first label of the media. Note
how the corners of the media have been cut in the illustration below.
7421U.023
1-19
6. Center the labels in the printer path and adjust the label
guides so that they just touch the edges of the label liner.
Wind the yellow adjustment roller toward the rear of the
printer.
7421U.015
7. Lower the printhead assembly and lock it into the operating
position by pressing down firmly on both sides of the
printhead. Lower the printer cover.
1-20
Inserting the Optional Memory Card
Use the optional memory card to store label formats, fonts, and
graphics in permanent memory. To order a memory card,
contact your Intermec representative.
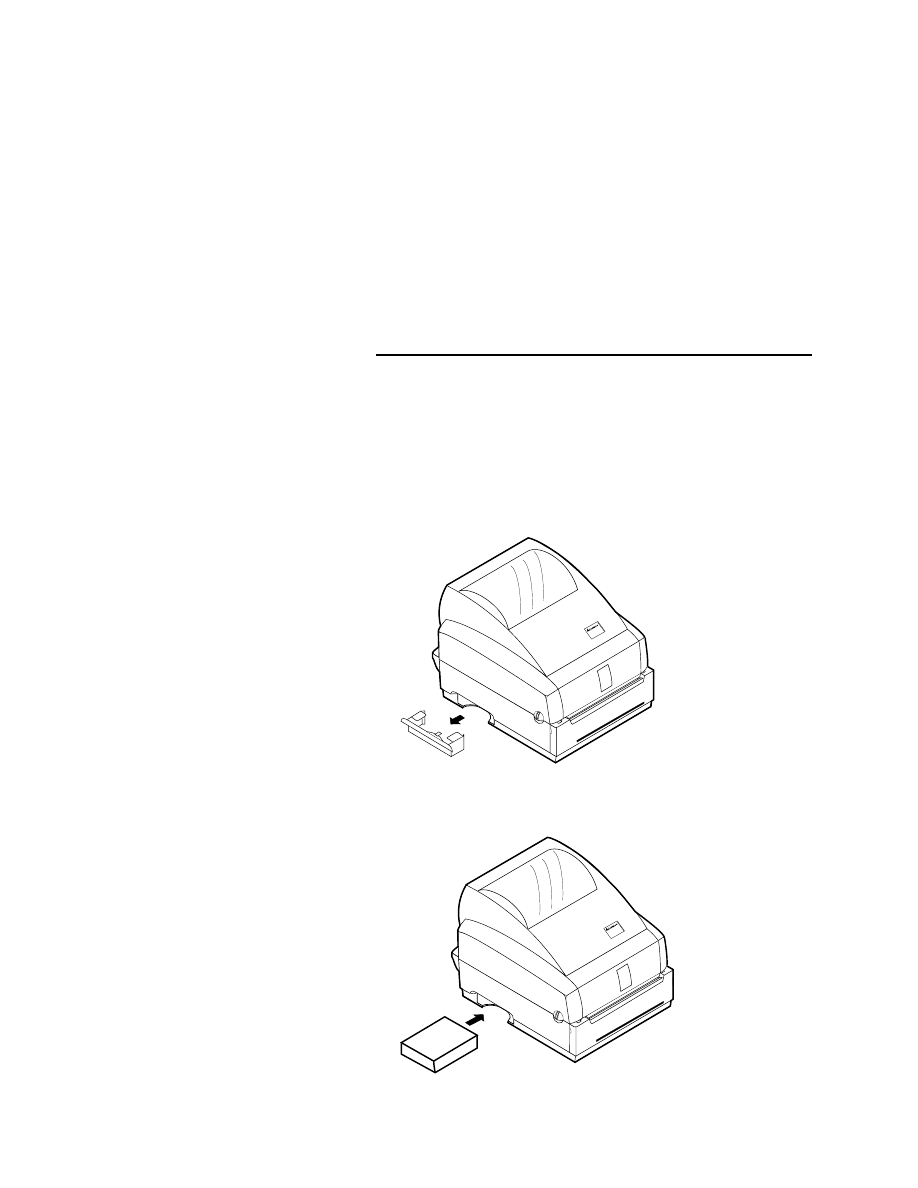
To insert the optional memory card
1. Turn the printer power off.
2. Remove the memory card slot cover.
7421U.028
EasyCoder
7422
3. Insert the memory card, label side up, into the memory card
slot. Push firmly to engage the memory card.
EasyCoder
7422
7421U.027

Configuring the Printer
2


HelvC
NugFont
Co de 39
2-3
Use this chapter to learn how to configure your 7421 printer,
communicate with a PC, and print a test label with PrintSet.
Configuring the Printer
You are now ready to configure the printer by downloading data
from the host to the printer. For your printer to operate most
effectively, you need to configure:
•
the media sensitivity number
•
the print darkness
•
the label gap sensors
Setting the Media Sensitivity Number
Media sensitivity is important because you use it to optimize
print quality. The three digit media sensitivity number (MSN)
specifies the amount of heat required by the printhead to image a
label. The amount of heat that each roll of media or ribbon
requires is unique due to different chemistries and
manufacturing processes.
Intermec has developed heating schedules (the amount of heat
required to image a label) to produce the highest possible print
quality for Intermec media and ribbon combinations on Intermec
printers. Look for the three digit media sensitivity number on:
•
the side of the media roll. Use the last three digits (140 in the
example) of the 15 digit number stamped on the roll for the
media sensitivity number.
•
a small label attached to the roll of media.
•
a small label attached to the plastic bag of your ribbon roll.
Your label may be different from this example, but it will
contain the media sensitivity number.
HelvC
NugFont
Co de 39
2-4
Finding Your Media Sensitivity Number
SENSITIVITY NUMBER
5
✩
7
120066102605140
120066102605140
7421U.030
Note:
Some ribbon rolls have the media sensitivity number printed on
the inside core.
Use this three-digit number to optimize print quality and print
speed on your printer. You can achieve the best print quality on
the printer by using only Intermec ribbon and media products.
The default sensitivity setting for thermal transfer media is 567.
For direct thermal media, the default sensitivity setting is 180.
To change the media sensitivity number with PrintSet
1. Start the PrintSet application software.
2. Click the Paper type button.
3. In the Print Quality Setup dialog box, enter your three-digit
number in the Media Sensitivity Number field.
4. Click OK.
5. Download your change to the printer by pressing the button
to send command updates to the attached printer.

HelvC
NugFont
Co de 39
2-5
Setting the MSN for Intermec Media and Ribbon
For direct thermal media, use the three-digit media sensitivity
number located on the roll of media to set the media sensitivity
number. You can also use the values from the tables in the next
section.
For thermal transfer media, you need to look in two places to
determine the sensitivity number. The media sensitivity number
on each roll of thermal transfer media or ribbon has an asterisk
(*) in place of one of the digits. On thermal transfer media, the
number contains the first and second digits, with an asterisk in
place of the third digit. One the thermal transfer ribbon, the
number contains the first and third digits, with an asterisk in
place of the second digit.
To optimize the sensitivity number for thermal transfer media,
you combine the digits like this:
Media or Ribbon
Sensitivity Number
Description
Thermal transfer
media
56*
The asterisk reserves the
third digit to identify the
ribbon’s sensitivity
number.
Thermal transfer
ribbon
5*7
The asterisk reserves the
second digit to identify
the media’s sensitivity
number.
567
Optimal media
sensitivity number

HelvC
NugFont
Co de 39
2-6
Setting the MSN for Other Media and Ribbon
If you are not using Intermec media and ribbon, or if you
misplaced your packaging with the three digit-sensitivity
number label on it, you can set an approximate sensitivity
number. The first column of the Direct Thermal and Thermal
Transfer Media Sensitivity Settings tables list the approximate
sensitivity settings. To achieve acceptable print quality, enter the
three-digit media sensitivity number (for example, 600).
If you are unsure of how to set the media sensitivity number,
start with the highest setting, which provides the lowest energy
(600 for thermal transfer and 400 for direct thermal), and work
your way down until you achieve the best print quality.
Direct Thermal Media Sensitivity Settings
Approximate
Sensitivity
Settings
Sensitivity
Setting
Direct Thermal Media
400 Medium
470
Duratherm Lightning-2
460
European IR
440
European Thermal
100 Low
180
Duratherm II-1
170
European Tag
160
Duratherm II Tag
140
European Top

HelvC
NugFont
Co de 39
2-7
Thermal Transfer Media and Ribbon Sensitivity Settings
Approximate
Sensitivity
Settings
Sensitivity
Setting
Thermal Transfer Media
(Media/Ribbon Stock)
600 Medium
687
Duratran TTR Polyester/Premium-3
(Plastic)
683
Duratran TTR Polyester/Premium-2
677
Duratran Syntran/Premium-3/6
673
Duratran Syntran/Premium-2
637
European Polyethelene/Prem.-3/6
633
European Polyester/Premium-2
627
Duratran Kimdura/Premium-3/6
623
Duratran Kimdura/Premium-2
500 Medium
567
Duratran II-1/Premium-3/6
(Paper)
563
Duratran II-1/Premium-2
557
Duratran 5 mil Tag/Premium-3/6
553
Duratran II Tag-5 mil/Premium-2
537
European Tag/Premium-3/6
533
European Tag/Premium-2
527
Duratran II Tag-7 mil/Prem.-3/6
523
Duratran II Tag-7 mil/Premium-2
517
European Coated/Premium-3/6
513
European Coated/Premium-2
300 Low
(Plastic)
366
Super Premium Polyester/Super
Premium-1
HelvC
NugFont
Co de 39
2-8
Adjusting the Print Darkness
Use the print darkness adjust to fine-tune the darkness of print
on your labels. The fine adjustments compensate for variations in
the media (“lot to lot”), the printhead, or the printer. The
darkness adjustment is similar to the dark adjust available on a
copier. An increase in print darkness increases the energy to the
printhead and results in darker print. A decrease in print
darkness decreases the energy to the printhead and results in
lighter print.
Set the darkness after you enter the media sensitivity number.
You can adjust the print darkness from + 10 to -10.
To adjust the print darkness with PrintSet
1. Start the PrintSet application software.
2. Click the Paper type button.
3. In the Print Quality Setup dialog box, adjust the Print
Darkness slider bar until the setting that you want appears
underneath it.
4. Click OK.
5. Download your change to the printer by pressing the button
to send command updates to the attached printer.

HelvC
NugFont
Co de 39
2-9
Adjusting the Label Gap Sensor
The label gap sensor detects the gap between labels while they
are being printed. The gap sensor automatically calibrates itself
when you first turn on power to the printer. This adjustment
compensates for manufacturing differences in label stock that
may make it difficult for the gap sensor to detect the gap
between labels.
To adjust the label gap sensor
1. Turn the printer power off.
2. Turn the printer power on.
The printer Power light flashes yellow and the printer advances
to the next label. When the label gap sensor adjustment is
complete, the Power light stops flashing and turns green.

HelvC
NugFont
Co de 39
2-10
Communicating With the Printer
Downloading is the universal term used to describe the transfer of
information from the host to any connected peripheral device,
such as your printer. When you transfer data from your printer
to the PC or host, you are performing a process called uploading.
You can use several methods to download information to your
printer. Use these products to communicate with your printer:
PrintSet Application Software Use the PrintSet application
software to easily configure your printer from your PC. You can
upload the current configuration settings, modify them, and then
download them to your printer. PrintSet also lets you:
•
download graphics and fonts.
•
print test labels using resident fonts, user-defined bitmap
graphics, or resident bar code symbologies.
•
allocate printer memory.
•
download configuration files to multiple printers.
For help using PrintSet, refer to the online help portion of the
application software.
Intermec Printer Language (IPL) Commands You can create labels
by downloading formats (designs) and data with IPL commands.
You can use the printer IPL commands to perform functions and
activate features of the printer. See the IPL Programming Reference
Manual for more information.
Third-Party Software You can use third-party software to set
many of the printer parameters. You can use PrintSet or the IPL
command set to configure the parameters that your software
does not set.
Use your third-party software to create label formats and convert
graphics into a user-defined character (UDC) format that the
printer can interpret.
Printing a Test Label
If you would like to test your communications by downloading a
label, follow the example below. Use the PrintSet application
software to send a test label to the printer.

HelvC
NugFont
Co de 39
2-11
To print the test label
1. Start the PrintSet application software.
2. Click the Test Print button:
3. Select the Test Label option button.
4. Select either the Text or the Bar Code option button.
If you select text, you can choose any font in the Select Printer
Font list box.
If you select bar code, you can choose any symbology in the
Select Symbology list box.
5. Click the Print button. Your 7421 printer prints out a test
label.
HelvC
NugFont
Co de 39
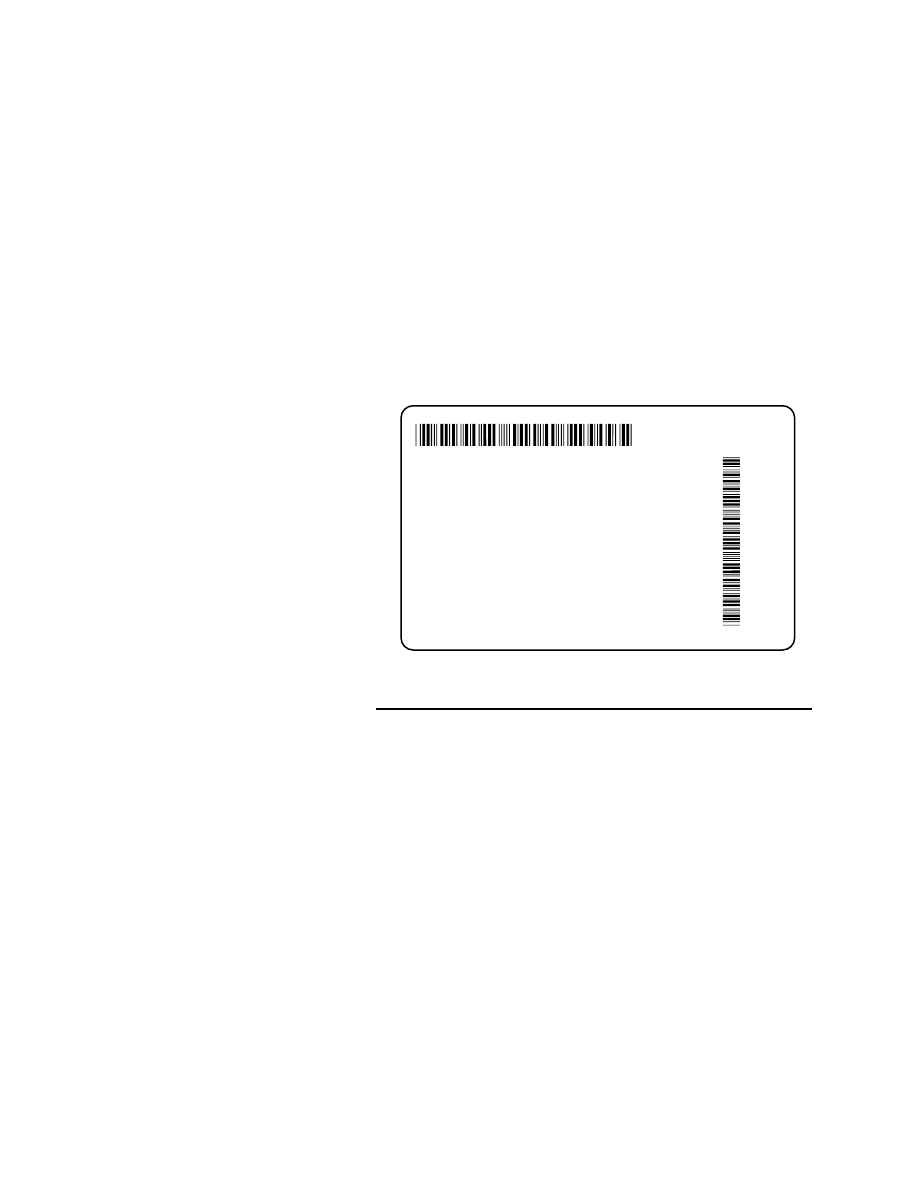
2-12
For example, if you choose to print a bar code with the Code
39 symbology, your printer prints out a label similar to this
one:
*0123456789*
*0123456789*
7421U.031
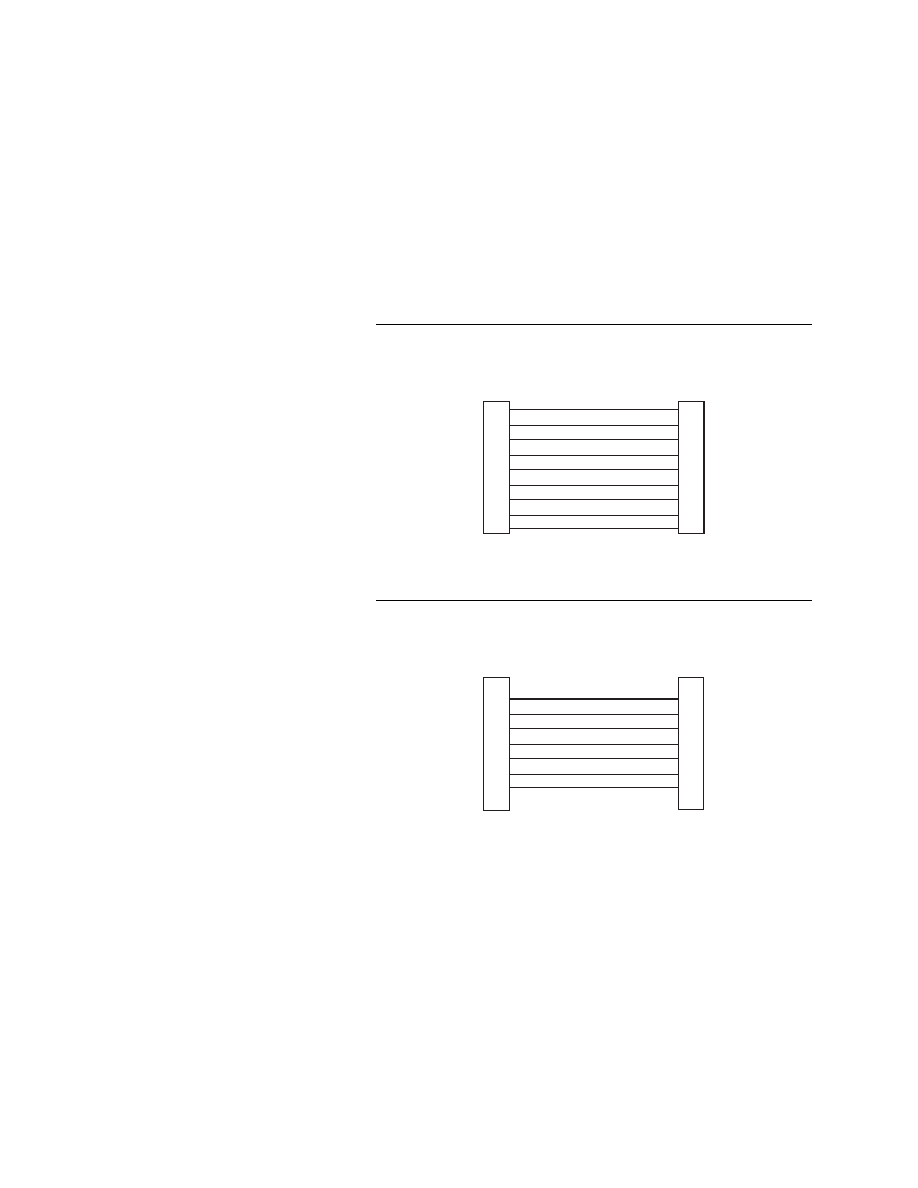
Using the Printhead Loading Modes
You can use two different printhead loading modes with the
7421 printer: Mirror Printing mode or Inverse Printing mode.
If you select Mirror Printing mode, the printer reverses the order
of the data that is loaded into the printhead.
If you select Inverse Printing mode, the printer inverts all pixels
in an image before it sends the data to the printhead. Only use
Inverse Printing mode to print a small area of a label.
Note:
Intermec does not recommend using Inverse Printing mode for
printing multiple labels. The printhead is not covered under warranty
if you use Inverse Printing mode for printing multiple labels.
HelvC
NugFont
Co de 39
2-13
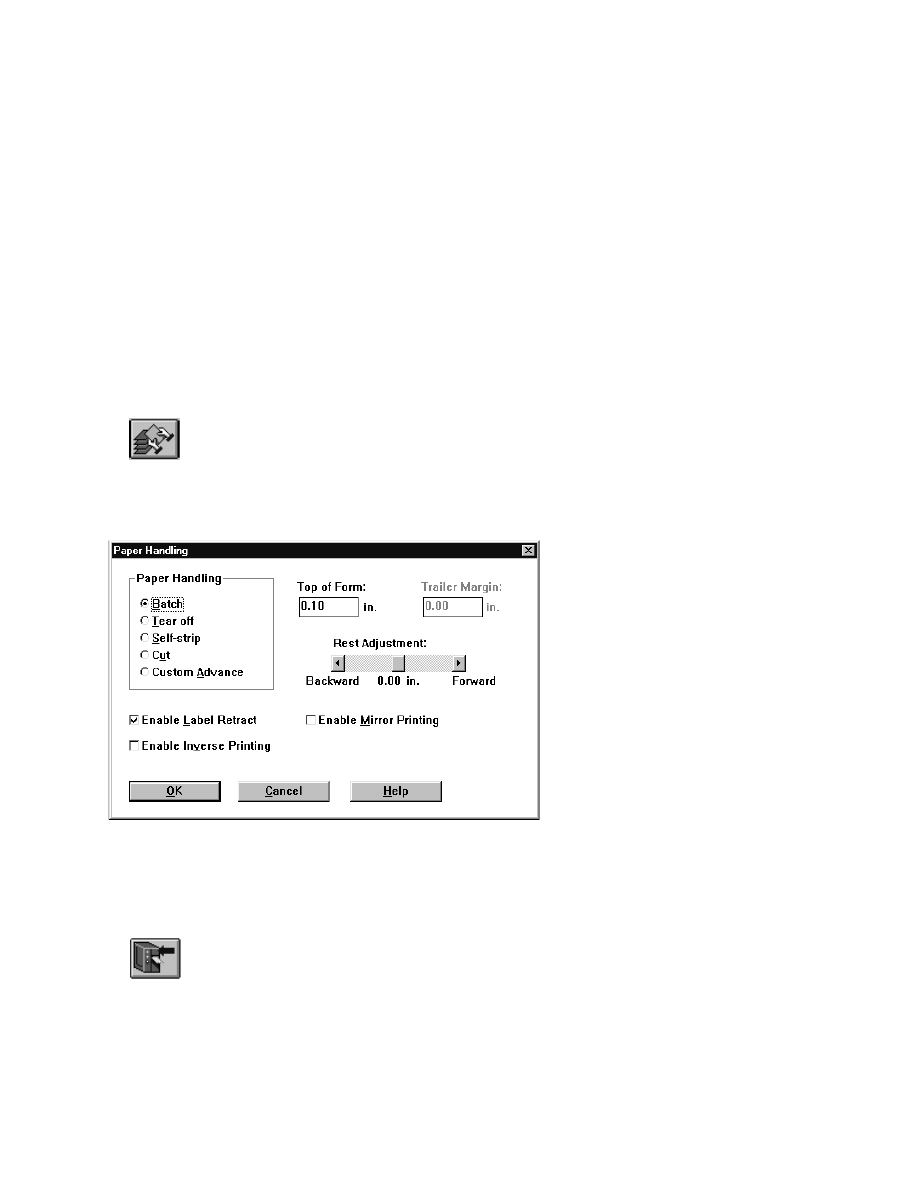
To select Inverse or Mirror Printing mode
1. Start the PrintSet application software.
2. Click the Paper Handling button.
3. Select either the Enable Inverse Printing or the Enable Mirror
Printing check box.
4. Click OK.
5. Download your change to the printer by pressing the button
to send command updates to the attached printer.

HelvC
NugFont
Co de 39

Maintaining the Printer
3


3-3
This chapter contains cleaning procedures and a schedule detailing
how often to perform maintenance procedures. You must clean the
7421 printer on a regular basis to keep it running at its highest
performance level.
It is very important to perform the maintenance procedures if you
expose the printer to dirt or debris.
Maintenance Schedule
Clean your printer regularly to maintain the print quality of your
labels and extend the life of your printer. This table contains
suggestions for cleaning the printer. Use the following
illustration to locate the parts you need to clean.
Printer Component
Maintenance Period
Printhead
Inspect after every roll of media or ribbon.
Clean after every roll (1,800 inches or 46
m) of media or more often if necessary.
Printer Cover
Clean as necessary.
Drive roller and peel-off
bar
Label gap sensor
Label mark sensor
Label taken sensor
Clean after every five rolls of media. If
you are using hi-tack adhesive, you must
clean these parts after every roll of media.
If you are using tag stock or continuous
media, you may want to clean the parts
after every five rolls of media or as
necessary. Clean these parts more often in
environments that are harsh or dusty.
3-4
Locating the Printer Parts You Need to Maintain
Printhead
Peel-off
bar
Drive roller
7421U.033
Printer cover
Label
taken
sensor
Label
mark sensor
Label
gap sensor

3-5
Tools for Cleaning the Printer
To clean the printer safely and effectively, use the following
items:
•
Isopropyl alcohol
•
Cotton swabs
•
Clean lint-free cloth
•
Soapy water/mild detergent
The following procedures explain how to access the printer parts
and clean them without causing any harm to the printer or
yourself.
Warning
Switch off the printer power and remove the
power cord before cleaning any part of the
printer.
Avertissement
Mettez l’imprimante hors tension et débranchez
le câble d’alimentation avant de nettoyer une
parte de l’imprimante.
3-6
Cleaning the Printhead
In order for the printhead to provide good print quality, it must
maintain close contact with the media. Therefore, cleaning media
debris from the printhead is very important. Clean the printhead
after every roll (1,800 inches or 46 m) of media or when
necessary.
Caution
Do not use sharp objects such as knives or
screwdrivers to scrape the printhead clean.
Cleaning with sharp objects will damage the
printhead. Clean with only a cotton swab, or a
clean, lint-free cloth or tissue damp with
isopropyl alcohol.
Conseil
N’utilisez pas d’objets pointus tels que couteaux
ou tournevis pour nettoyer la tête d’imprimante.
Nettoyer avec des objets pointus endommagera
la tête d’imprimante. Nettoyez-la seulement
avec de la ouate ou avec un linge propre et libre
de peluches, humecté avec de l’alcool
d’isopropyl.
To clean the printhead
1. Turn the printer power off and remove the power cord.
2. Open the printer cover.
3. Open the printhead assembly by pulling the yellow release
lever (on the left side of the printer) toward the front of the
printer. Lift the printhead up into the full open position.
4. Remove the media and ribbon (if necessary).
5. Use a cotton swab moistened with alcohol to remove any dirt,
adhesive, or debris from the print surface on the bottom of
the printhead.
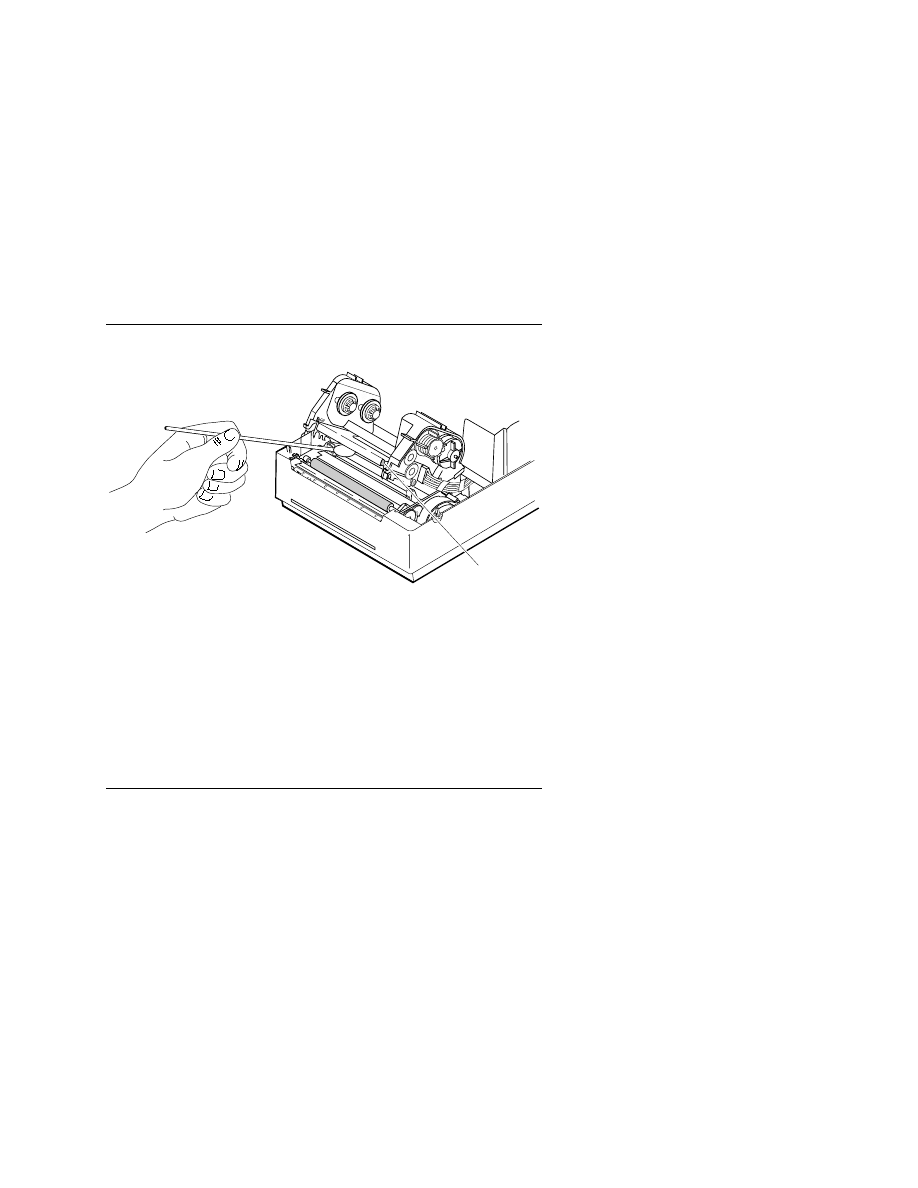
3-7
Cleaning the Printhead
7421U.035
Printhead
6. Wait 5 to 10 seconds for the print surface to dry. Replace the
media and ribbon.
7. Lower the printhead assembly and lock it into the operating
position by pressing down firmly on both sides of the
printhead.
8. If you are finished cleaning, close the printer cover.
Cleaning the Printer Covers
Use a general purpose cleaner (soapy water/mild detergent) to
clean the printer cover. Do not use abrasive cleansers or solvents
and make sure that the cleaning solution does not get inside of
the printer. Be sure to clean the transparent panel on the printer
cover so that the media supply inside the printer is visible when
you close the cover.

3-8
Cleaning the Drive Roller and Peel-Off Bar
Cleaning the drive roller and peel-off bar preserves print quality
by maintaining close contact between the media and the
printhead.
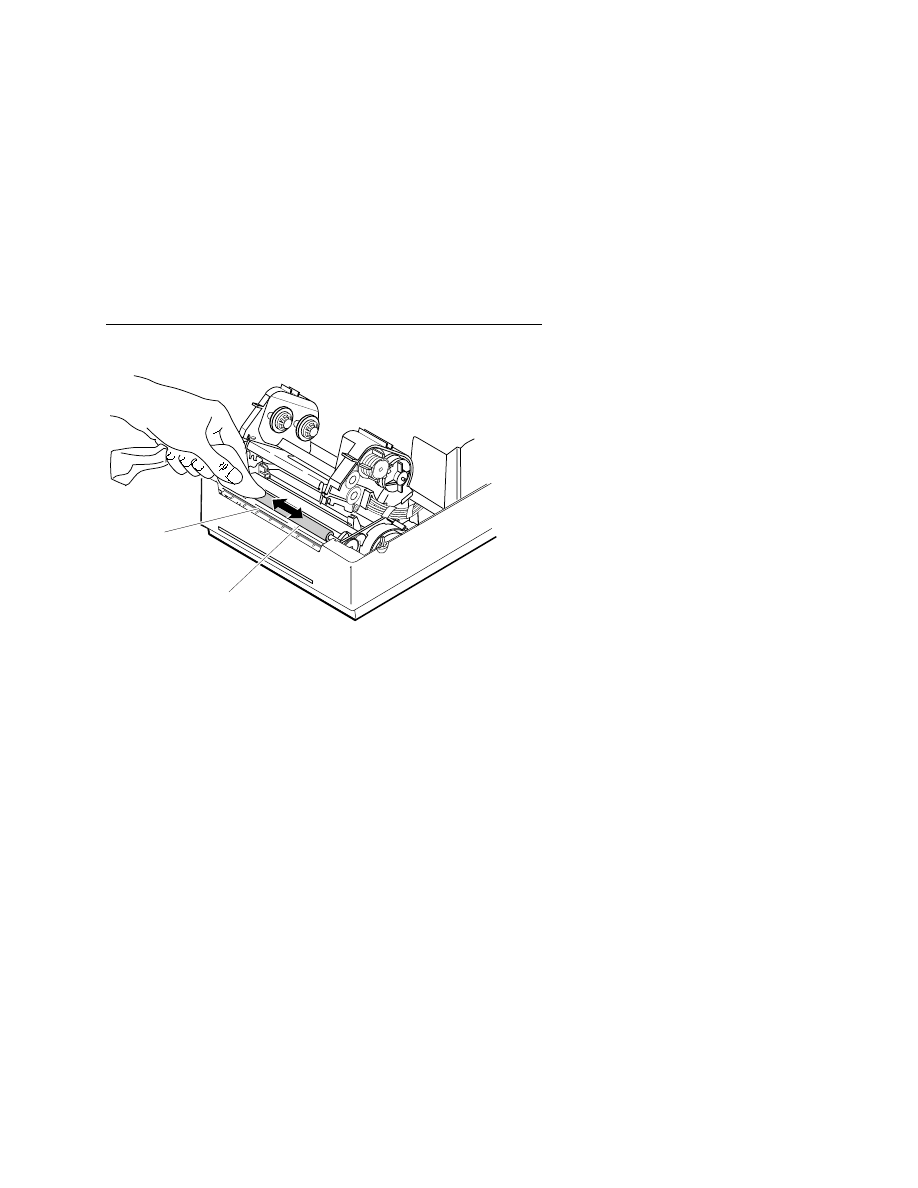
To clean the drive roller and peel-off bar
1. Turn the printer power off and remove the power cord.
2. Open the printer cover.
3. Open the printhead assembly by pulling the yellow release
lever (on the left side of the printer) toward the front of the
printer. Lift the printhead up into the full open position.
4. Remove the media and ribbon (if necessary).
5. Clean the drive roller by using a cloth dampened with
isopropyl alcohol. Move the cloth over the drive roller in a
side-to-side motion as shown.
6. Clean both sides of the peel-off bar with a cloth dampened
with isopropyl alcohol. Remove all traces of dust, paper, and
adhesive.
7. Replace the media and ribbon.
8. Lower the printhead assembly and lock it into the operating
position by pressing down firmly on both sides of the
printhead.
9. If you are finished cleaning, close the printer cover.
3-9
Cleaning the Drive Roller and Peel-Off Bar
7421U.037
Drive roller
Peel-off
bar

3-10
Cleaning the Label Sensors
Three label sensors on the printer require regular cleaning:
•
Label taken sensor
•
Label mark sensor
•
Label gap sensor
To clean the label sensors
1. Turn the printer power off and remove the power cord.
2. Open the printer cover.
3. Open the printhead assembly by pulling the yellow release
lever (on the left side of the printer) toward the front of the
printer. Lift the printhead up into the full open position.
4. Clean the label taken sensor, the label mark sensor, and the
label gap sensor with a cotton swab moistened with isopropyl
alcohol.
5. Lower the printhead assembly and lock it into the operating
position by pressing down firmly on both sides of the
printhead.
6. If you are finished cleaning, lower the printer cover.
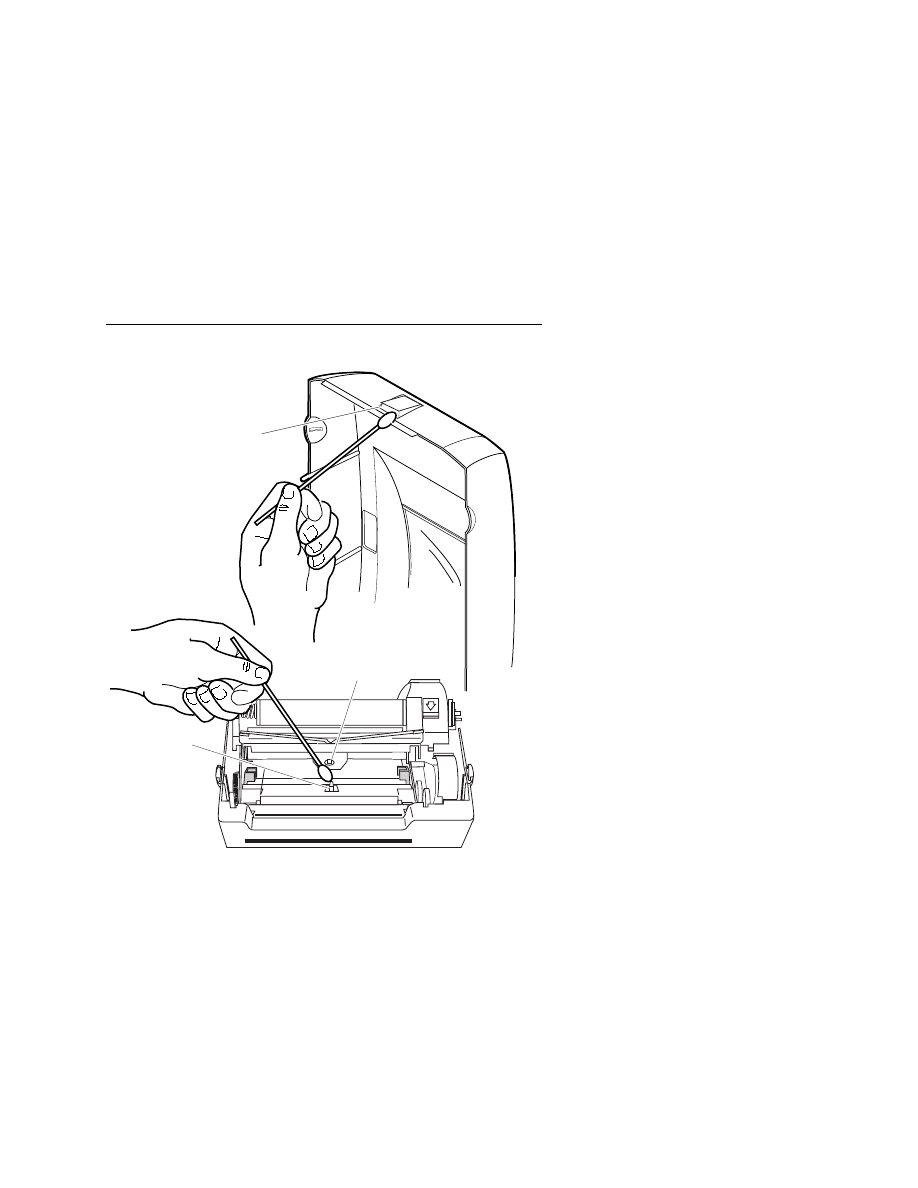
3-11
Cleaning the Label Sensors
7421U.038
Label gap
sensor
Label
mark
sensor
Label
taken
sensor


Troubleshooting
4


4-3
This chapter provides some hints for troubleshooting error messages
that the printer sends to the host and problems you may experience
with the printer.
Troubleshooting Checklist
You may have printer operation, print quality, or printer
communications problems at some time during the life of your
printer. It is easy to fix most of the errors and consequently not
delay operation of the printer for very long.
To troubleshoot your printer
1. First try cleaning the printer components and checking all of
the connections. See Chapter 3, “Maintaining the Printer,” for
details.
2. If cleaning the printer and checking the connections does not
solve the problem, use the following tables to locate the
symptom. Follow the solution in the table to fix your
problem.
If you receive an error message on your PC, refer to your IPL
Programming Reference Manual for a complete list of error
messages and their solutions.
If the problem persists, contact your Intermec Customer Service
Representative:
In the U.S.
1.800.755.5505
In Canada
1.800.688.7043
If you are an international customer, contact your local Intermec
representative.

4-4
Printer Operation Problems
If your printer is not operating correctly, try locating the problem
in the table below.
Symptom
Possible Causes
Solution
No power or loss
of power.
You have
damaged or
disconnected the
power cable.
Make sure you have plugged
the power cable into both the
printer and a power source.
Replace the cable if damaged.
The Power light
flashes red and
printing stops.
Printhead has
overheated.
Let the printer cool down. It
will resume printing on its
own.
Test
configuration
label does not
print.
You have
incorrectly loaded
media.
Try reloading the media. For
help, see “Loading Media” in
the Printer Setup Guide.
Printing stops
and the Power
light glows
orange.
Media fault.
Possible problem with the
label gap sensor. Adjust the
label sensor. For help, see
“Adjusting the Label Gap
Sensor” in Chapter 2.
Label jam.
Remove any jammed labels
from the printer and clean the
printhead. For help, see
“Cleaning the Printhead” in
Chapter 3.
The printhead is
up.
Make sure the printhead is
down. Cycle printer power
and press the Feed/Pause
button to resume printing.
You have
incorrectly loaded
the media.
Try reloading the media. For
help, see “Loading Media” in
the Printer Setup Guide.
Printer appears to
be working but
nothing prints.
Media loaded
incorrectly.
If you are using direct
thermal media, make sure the
roll is loaded with the
thermal side facing up.
If you are using thermal
transfer media, you must use
a thermal transfer ribbon.

4-5
Print Quality Problems
If your labels are not being printed properly, check the following
table to locate the symptom and correct the problem.
Symptom
Possible Causes
Solution
Blotches printing
on labels.
Dirty printhead.
Clean the printhead. For
help, see “Cleaning the
Printhead” in Chapter 3.
Printing is too light
or too dark.
Poor quality label
or ribbon stock.
Use only Intermec label and
ribbon stock to ensure
superior print quality and
product performance.
Incorrect media
sensitivity
setting.
Change sensitivity setting to
match the type of media you
are using. If you set the
sensitivity setting correctly,
try changing the dark adjust.
For help, see your PrintSet
online help or the IPL
Programming Reference
Manual.
Labels are not
stopping at the
right point for
removal.
You have not set
the label rest
point command
correctly.
Adjust the label rest point.
For help, see your PrintSet
online help or the IPL
Programming Reference
Manual.
Print quality is
poor.
Printhead is
dirty.
Clean the printhead. For
help, see “Cleaning the
Printhead” in Chapter 3.
Poor quality label
or ribbon stock.
Use only Intermec label and
ribbon stock to ensure
superior print quality and
product performance.
Ribbon
wrinkling.
Check to make sure that you
installed the ribbon
correctly. For help, see
“Loading Thermal Transfer
Media and Ribbon” in the
Printer Setup Guide.

4-6
Communication Problems
If your printer is not receiving downloaded data, try the
solutions in this table.
Symptom
Possible Causes
Solution
Printer does not
communicate
with the host.
Incorrect
communications
parameters.
Use PrintSet to make sure
that you have the correct
communications
parameters set (such as
baud rate).
Damaged or incorrect
I/O cable.
Check the connections at
both ends or replace the
cable. See Appendix B for
cable information.
Using Data Line Print Mode
Use Data Line Print mode to troubleshoot communications
between the printer and the host, and to test the operation of the
printer. When the printer is in Data Line Print mode, it prints out
all downloaded data with the hexadecimal equivalent directly
underneath it.
To enter Data Line Print mode
1. Turn the On/Off switch to the off position.
2. Press down and hold the Feed/Pause button while turning on
the printer.
The hardware configuration test label prints out and the
firmware program and version number are sent to the host.
You are now in Data Line Print mode.
3. Send a few characters down from the host. The printer prints
out your data with the hexadecimal equivalent directly
underneath it.

4-7
4. Hold the Feed/Pause button down to momentarily suspend
the test. The printer prints a software configuration test label.
5. If you press the Feed/Pause button again, the pitch label
prints.
To exit Data Line Print mode
1. Turn the printer power off.
2. Turn the printer power back on.
Preventing Data Loss
Several problems can cause data loss or communications
problems on the printer. Data loss can result in printing errors or
missing field data.
Hardware handshaking involves the use of a hardware wire.
Software handshaking involves a two-way datalink between the
devices. The two devices communicate with each other without
losing data through the use of handshaking. The printer sends
both forms of handshaking simultaneously when the printer’s
input buffer is full. Any loss of data can cause printing errors or
missing data.
Hardware handshaking uses pin 6 or pin 9 of the RS-232
interface to control data flow. When the printer is using Intermec
Standard protocol, it holds pins 6 and 9 high when the printer is
ready to receive data. For help on understanding printer
protocol, see Appendix B, “Communications Reference.”
The printer holds pins 6 and 9 low when the printer is in one of
these conditions:
•
Buffer full
•
Ribbon fault
•
No label stock
•
Label at peel-off bar

4-8
Your printer uses XON/XOFF protocol for software
handshaking. When the input buffer is full, the printer transmits
an XOFF character. This action alerts the host to the fact that the
printer buffer is full and cannot receive any more data. When the
printer is ready to receive more data, it sends the XON character.
To check for communications problems
1. Check the cabling from the printer to the host system.
2. Check the interfacing of the devices that are communicating
with the printer.
3. Check the printer for proper electrical operation of the I/O
port.
4. Test to see that the host system is not overrunning the
printer’s input buffer.
5. Check to see that the data string being sent to the printer
contains the correct information.
Resetting the Printer to Factory Defaults
Use memory reset if you want to return the printer to its default
configuration.
To reset the printer to factory defaults
1. Turn off the printer.
2. Lift the printhead and remove all label stock from the paper
path.
3. Turn the printer on while holding down the Feed/Pause
button.
4. When the print mechanism starts to move, release the
Feed/Pause button and press it again. The Power light
should now be flashing red.
5. Press and hold the Feed/Pause button down for 8 seconds or
until the Power light stops flashing. The printer resets all
parameters to their factory default settings.

Printer Specifications
A


A-3
Printer Specifications
This section describes the specifications for the 7421 printer.
Character Sets
•
US ASCII
•
Norwegian/Danish
•
French
•
UK ASCII
•
Swedish/Finnish
•
Swiss
•
German
•
Italian
•
Spanish
•
8-bit ASCII
•
Code Page 850
Communications
•
Asynchronous RS-232C, IEEE 1284 Bi-directional Parallel
•
Serial ASCII code
•
Hardware (Ready/Busy) Flow Control
•
XON/XOFF Protocol
•
Intermec Standard Block Protocol
•
Baud Rates: 1200, 2400, 4800, 9600, 19200
Dimensions (no options installed)
Height
7 inches (17.8 cm)
Width
8 inches (20.3 cm)
Length
10 inches (25.4 cm)
Weight
4.5 pounds (2.0 kg)
Electrical Requirements, External Power Supply
Input Voltage
~100 to 240V
Frequency
50-60 Hz
Current
2A maximum
Electrical Requirements, Printer
Input Voltage
x w19-21V
Current
2,5A
Environment
Operating
40°F to 104°F (5°C to 40°C)
Humidity
10% to 90% noncondensing

A-4
Fonts and Graphics
The printer contains 21 resident bitmap fonts and three outline
fonts. You can use font ID 3 through 6 and 8 through 19 to
download user-defined fonts. See Appendix C, “Character Sets,”
for complete tables of all available fonts and their character sets.
Media Specifications
Roll
1,800 inches (46 m)
Label Length
0.38 inch (10 mm) to 8.0 inches (203mm)
Web Width
1.12 inches minimum (28 mm)
4.65 inches maximum (118 mm)
Thickness
0.0059 inch minimum (0.15 mm)
0.010 inch maximum (0.25 mm)
Roll Inner Diameter
1.0 inch (25 mm)
Roll Outer Diameter
5 inches maximum (127 mm)
Memory
Base
512K of DRAM
Optional
1 or 4MB flash RAM modules
Printhead
Printed dot size
0.005 inch square (0.13 mm)
Width
4.1 inches maximum (104 mm)
Resolution
203 dots per inch (8 dots per mm)
Number of elements
832 per printhead
“X” dimensions
10 mil to 50 mil (0.25 mm to 1.27 mm); 5
mil (0.13 mm) in drag printing (specified
media only)
Printing Method
The 7421 printer is capable of direct thermal (DT) printing or
optional thermal transfer (TTR) printing using thermal transfer
ribbon.

A-5
Printing Speed
2 inches per second (50.8 mm per second)
Ribbon Specifications
Roll
3,582 linear inches (91 m)
Widths
1.33 inches (34 mm)
2.5 inches (64 mm)
3.29 inches (84 mm)
4.33 inches (110 mm)
Diameter
1.39 inches maximum (35 mm)
Printer Options
This section contains a list of the options you can use with the
printer along with a brief description. Consult your Intermec
representative to order any option.
Battery Pack The battery pack allows you to take your printer
anywhere without the need to attach it to a power supply. When
the battery pack is fully charged, you can run the printer for
approximately 8 hours and print up to 500 labels.
Cutter Use the cutter option to cut continuous media into
individual labels ready for use. This option works best for
individual random lengths or short batches of different label
lengths.
Memory Expansion The memory expansion card is available in 1
or 4 MB flash modules. You can use the flash memory cards for
the storage of label formats, single- or double-byte fonts, and
bitmap graphics.

A-6
Bar Code Symbologies Supported
The 7421 printer supports these bar code symbologies:
•
Codabar
•
Data Matrix
•
Code 2 of 5
•
EAN
•
Code 11
•
HIBC
•
Code 16K
•
Interleaved 2 of 5
•
Code 39
•
Maxicode
•
Code 49
•
PDF417
•
Code 93
•
POSTNET
•
Code 128
•
UPC
•
Code One

Communications Reference
B


B-3
About Communications
The 7421 printer supports both serial and parallel
communications. Using the parallel interface with an IEEE 1284
parallel interface cable (Part No. 590124) provides the best
performance.
Your printer has the following hardware and software
requirements:
•
The host computer must use the American Standard Code for
Information Exchange (ASCII) for data communications.
•
A serial port or a parallel port must be available on the host if
you are connecting directly to the printer.
•
The host must support the RS-232 or data communications
interface.
For information on configuring the host computer, port
concentrator, or network controller, see the reference manual for
the controlling device.
Serial Communication Protocols
Communication protocols are important because they determine
the transmission standards for communications between the
printer and the host. The printer and the host must use the same
protocol and parameters to communicate properly. The printer
supports the flow control and block transfer protocols described
in the next sections. All of these protocols are point-to-point.
Application programs and/or ROM BIOS determine which
protocols your computer can support. For more detailed
information, refer to the Intermec Data Communications Reference
Manual (Part No. 044737).
Intermec Printer Standard Protocol
Intermec Printer Standard Protocol is a half-duplex protocol. All
data transmission to the printer consists of status enquiry (ENQ),
status dump (VT), or message blocks. Each message block starts
with the Start of Text (STX) characters and ends with the End of
Text (ETX) characters. Each message block must be 255
characters or less, including the STX and ETX characters.

B-4
The printer returns its highest priority status when it receives a
valid block (<STX> data <ETX>) or when it receives the status
request command <ENQ>. When the printer receives the status
dump command (<VT>), the printer returns all active status. The
printer status response time ranges from 30 ms to 100 ms
depending on the complexity of the received message block. In
the case of a transmission error, the printer responds with a
<NAK> and discards the entire message block.
The table below shows printer status conditions in descending
order of priority:
Printer Status
Character
Buffer already full
GS
Ribbon fault
US
No label stock
EM
Buffer now full
DC3
Printhead hot
SI
Label at strip pin
FS
Skipping
DC1
Printing
DC1
Ready/Online
DC1
Note:
Do not confuse the Buffer now full <DC3> status with the
XON/XOFF characters <DC1> and <DC3>.
When the printer returns Buffer Now Full (<DC3>) status, it
accepts the currently received message block. At this time, the
printer can accept short messages to allow parsing of immediate
commands such as Reset (<DLE>) or Cancel Batch Printing
(<EM>). However, if the printer responds with a <GS> to any
message block, the buffer is already full and the printer discards
the entire message block. In case of a transmission error, the
printer discards the whole message block and responds with a
Negative Acknowledgment (NAK). You should retransmit the
message block from the host.

B-5
XON/XOFF Protocol
XON/XOFF protocol uses the ASCII characters <DC1> (XON)
and <DC3> (XOFF) to start and stop the flow of data from the
host to the printer. The printer does not restrict the message
length for XON/XOFF protocol. That is, the printer processes
information as it is being downloaded and stops when there is
no more information.
<STX> and <ETX> are optional characters. However, if you send
an STX, the printer ignores all other characters until you send an
ETX.
Intermec provides two versions of the XON/XOFF protocol. The
Intermec version of XON/XOFF has the printer respond to each
message with its current status. The other version conforms to
generally accepted industry standards that include no end-of-
message response being sent to the host other than XOFF. In
addition, a DC3 is sent to the host if the printer is offline or if
media fault occurs. An XON is sent on power up.
Since the printer uses DC1 and DC3 for data flow control, the
printer status characters are different from those of the Standard
Protocol.
Printer Status
Character
Buffer already full
GS
Ribbon fault
US
No label stock
EM
Printhead hot
SI
Buffer now full
DC4
Label at strip pin
FS
Label skipping
DC2
Printing
DC2
Ready
DC2
If the host ignores the printer sending an XOFF, the printer
resends an XOFF after receiving every 15 characters from the
host. In the case of transmission error, the printer discards the
characters with the error and keeps the rest of the message block.

B-6
Hardware Protocol
The printer uses Ready/Busy and DTR (data terminal ready) of
the RS-232C interface to indicate the printer’s status. You can
configure Ready/Busy and DTR independent of each other and
independent of the software protocol you select for the serial
port. You can set each pin to one of these four settings: default,
high, flow control, and Ready/Busy.
When you set the pin to high, it stays high as long as the printer
is powered up.
When you set the pin to flow control, the pin is high when the
printer status is ready. The pin is held low when the printer is
offline or if the buffer is full.
When you set the pin to Ready/Busy, the pin is high when the
printer status is ready. The pin is held low when the printer is in
one of these conditions:
•
Offline
•
Buffer full
•
No label stock
•
Ribbon fault
•
Label at strip pin
When you set the pin to default, it uses flow control if the serial
port is set for XON/XOFF protocol. If you are using Intermec
Standard protocol, the printer uses Ready/Busy.
User-Defined Protocol
The printer provides the capability to change protocol characters.
However, users may not define their own protocol. You can
substitute characters you want to use as protocol characters, but
the rules for the chosen protocol do not change. The printer does
not use any protocol characters that you replace with the NUL
character. One table of protocol characters exists. You may
redefine these characters to create a table that all of the protocols
can use. One possibility for the user to redefine protocol
characters might be the replacement of control characters with
printable characters.

B-7
Note:
Please use caution when replacing control characters with
printable characters. You cannot replace one control character with
more than one printable character.
The following table lists the protocol characters that you can
redefine and the protocols they affect:
Character
Protocol Affected
SOM IN
STD, XON/XOFF
EOM IN
STD, XON/XOFF
DLE IN
STD, XON/XOFF
XON IN
XON/XOFF
XOFF IN
XON/XOFF
NEG OUT
STD
DLE OUT
STD
XON OUT
XON/XOFF
XOFF OUT
XON/XOFF
PROTO-CMD 1
STD, XON/XOFF
PROTO-CMD 2
STD, XON/XOFF

B-8
Communications Boundaries
The information below applies to all protocols that the printer
supports.
Parameter
Maximum Capacity
Message delay
9999 milliseconds
Character delay
9999 milliseconds
Message block size
255 characters (including STX and ETX
characters) Unlimited block size for
XON/XOFF
RS-232 Serial Interface
The printer supports serial communications with the RS-232
interface. Use the RS-232 serial interface in all asynchronous
point-to-point full- or half-duplex direct data communications.
The printer cable must have the pin assignments for an RS-232
serial interface shown in the following table.

B-9
Pin
Name
Operation
3
Receive Data
Input: Connect to transmit data pin of
connected device.
2
Transmit Data
Output: Connect to receive data pin of
connected device.
6
Data Terminal
Ready (DTR)
Output: When you use a modem, connect
to modem DTR pin.
When using Intermec Standard Protocol,
this pin indicates that the printer is
switched on.
When using XON/XOFF or hardware
flow control, this pin indicates the printer
mechanical status and the status of the
printer input buffer.
5
Ground
To enable communications, connect to
signal ground of connected device.
Completes circuit for all RS-232 signals.
7
Clear to Send (CTS)
Input: When you use a modem, connect to
modem CTS pin. The modem must set
CTS true before the printer transmits data.
If not connected, CTS sets itself true.
8
Request to Send
(RTS)
Output: When you use a modem, connect
to modem RTS pin. The modem sets RTS
to true before transmission. The printer
sets RTS to false after transmission.
9
Printer Status
Output: When not using software flow
control (XON/XOFF), connect to input of
connected device (for example, CTS).
Indicates printer mechanical status and
status of printer input buffer.
B-10
RS-232 Cable for 9-pin to 9-pin (Part No. 590123)
1
2
3
4
5
6
7
8
9
+5V
Transmit Data
Receive Data
AUX
Ground
Data Terminal Ready
Clear to Send
Request to Send
Inactive
Receive Data
Transmit Data
Data Terminal Ready
Ground
Data Set Ready
Request to Send
Clear to Send
Ring Indicator
1
2
3
4
5
6
7
8
9
DB9 SOCKET
DB9 PLUG
AT
PRINTER
7421U.39
RS-232 Null Modem Cable for PC for 25-pin to 9-pin
1
2
3
4
5
6
7
8
9
+5V
Transmit Data
Receive Data
AUX
Ground
Data Terminal Ready
Clear to Send
Request to Send
Inactive
Receive Data
Transmit Data
Data Terminal Ready
Ground
Data Set Ready
Request to Send
Clear to Send
3
2
20
7
6
4
8
DB25 SOCKET
DB9 PLUG
HOST
PRINTER
7421U.040

Character Sets
C

C-3
This chapter contains tables for the character sets that the 7421
supports. To select a character set, use PrintSet, your
third-party software application, or the IPL command set.
International Character Sets
The following tables show which hex codes to download for
international characters not available in the U.S. character set. To
use the tables, find the hex code for the U.S. character that
corresponds with the character in your language.
Advanced Character Table
If you are running your printer in Advanced mode (you are not
using 86XX Emulation), use this table to find the right hex codes
for the international character sets.
23 24 40 5E 5C 5D 5E 60 7E 7C 7D 7E
U.S. ASCII
#
$
@
[
\
]
^
`
{
¦
}
~
U.K. ASCII
£
$
@
[
\
]
^
`
{
¦
}
-
Germany
#
$
§
Ä
Ö
Ü
^
`
ä
ö
ü
ß
France
£
$
à
°
ç
§
^
`
é
ù
è
_
Norway/Denmark
#
$
@
Æ
Ø
Å
^
`
æ
ø
å
¨
Sweden/Finland
#
É
Ä
Ö
Å
Ü
é
ä
ö
å
ü
Spain
£
$
§
¡
Ñ
¿
^
`
°
ñ
ç
~
Switzerland
#
$
à
°
ç
é
^
ù
ä
ö
ü
è
Italy
£
$
§
°
ç
é
^
ù
à
ò
è
ì
Code Page 850
#
$
@
[
\
]
^
`
{
|
}
~
C-4
86XX Character Table
This table shows the hex codes for the character sets that print if
your printer is running under Emulation mode.
23 24 40 5B 5C 5D 5E 60 7B 7C 7D 7E
U.S. ASCII
#
$
@
[
\
]
^
`
{
¦
}
~
U.K. ASCII
£
$
@
[
\
]
^
`
{
¦
}
~
Germany
#
$
§
Ä
Ö
Ü
^
`
ä
ö
ü
ß
France
£
$
à
°
ç
§
^
`
é
ù
è
¨
Norway/Denmark
#
$
@
Æ
Ø
Å
^
`
æ
ø
å
~
Sweden/Finland
#
¤
É
Ä
Ö
Å
Ü
é
ä
ö
å
ü
Spain
P
t
$
@
¡
Ñ
¿
^
`
¨
ñ
ç
~
Switzerland
#
$
à
°
ç
é
^
ù
ä
ö
ü
è
Italy
#
$
§
°
ç
é
^
ù
à
ò
è
ì
Code Page 850
#
$
@
[
\
]
^
`
{
|
}
~
C-5
IBM Translation Character Table
If you are running your printer with IBM Translation enabled,
use this table to find the right hex codes for the international
character sets.
4F 7B 5B 7C 4A E0 5A 5F 79 C0 6A D0 A1
U.S. ASCII
¦
#
$
@
¢
\
!
¬
`
{
¦
}
~
U.K. ASCII
¦
#
£
@
$
\
!
¬
`
{
¦
}
_
Germany
!
#
$
§
Ä
Ö
Ü
^
`
ä
ö
ü
ß
France
!
£
$
à
°
ç
§
^
`
é
ù
è
¨
Norway/
Denmark
!
Æ
Å
Ø
#
\
¤
^
`
æ
ø
å
ü
Sweden/
Finland
!
Ä
Å
Ö
§
É
¤
^
é
ä
ö
å
ü
Spain
¦
Ñ
P
t
@
[
\
]
¬
`
{
ñ
}
¨
Switzerland
!
#
$
à
°
ç
é
^
ù
ä
ö
ü
è
Italy
!
£
$
§
°
ç
é
^
ù
à
ò
è
ì
Code Page 850
!
#
$
@
[
\
]
^
`
{
|
}
~

C-6
Code Page 850 Character Table
00
10
20
30
40
50
60
70
80
90
A0
B0
C0
D0
E0
F0
01
11
21
31
41
51
61
71
81
91
A1
B1
C1
D1
E1
F1
02
12
22
32
42
52
62
72
82
92
A2
B2
C2
D2
E2
F2
03
13
23
33
43
53
63
73
83
93
A3
B3
C3
D3
E3
F3
04
14
24
34
44
54
64
74
84
94
A4
B4
C4
D4
E4
F4
05
15
25
35
45
55
65
75
85
95
A5
B5
C5
D5
E5
F5
06
16
26
36
46
56
66
D6
E6
F6
A6
B6
C6
D6
E6
F6
07
17
27
37
47
57
67
77
87
97
A7
B7
C7
D7
E7
F7
08
18
28
38
48
58
68
78
88
98
A8
B8
C8
D8
E8
F8
09
19
29
39
49
59
69
79
89
99
A9
B9
C9
D9
E9
F9
0A
1A
2A
3A
4A
5A
6A
7A
8A
9A
AA
BA
CA
DA
EA
FA
0B
1B
2B
3B
4B
5B
6B
7B
8B
9B
AB
BB
CB
DB
EB
FB
0C
1C
2C
3C
4C
5C
6C
7C
8C
9C
AC
BC
CC
DC
EC
FC
0D
1D
2D
3D
4D
5D
6D
7D
8D
9D
AD
BD
CD
DD
ED
FD
0E
1E
2E
3E
4E
5E
6E
7E
8E
9E
AE
BE
CE
DE
EE
FE
0F
1F
2F
3F
4F
5F
6F
7F
8F
9F
AF
BF
CF
DF
EF
FF
▲
▲
!
♥
♦
♣
♥
"
§
➝
➝
➝
➝
➝
➝
➝
➝
▲
▼
➝
➝
#
$
% &
'
(
)
∗
+
,
-
.
0
1
2
3
4
5
6 7 8
9
:
;
<
=
>
?
@ A B C D E F G H I
J
K
L M N
O
P Q R S T U V W X Y
Z
[
\
]
-
a b
c d e f
g h i j k l m n o
p q r s t u v w x y z { }
˜
Ç ü é
â
ä à
å
ê
ë
è
ï
î
ì
Ä Å
É æ Æ ô
ö
ò û
ù
ÿ Ö Ü ø £ Ø X ƒ
á í
ó
ú ñ Ñ a o ¿ ® ¬
1
2
/
1
4
/
i
¢ ¥ ¬
Á Â
©
ã Ã
∂
D Ê Ë È
1
Í Î Ï
Ì
Ó ß Ô Ò õ Õ
µ ρ ρ
Ú Û Ù y Y -
´
´
-
3
4
¶ §
÷
1 3 2
7421U.042
¶
`
ç
´
Á
C-7
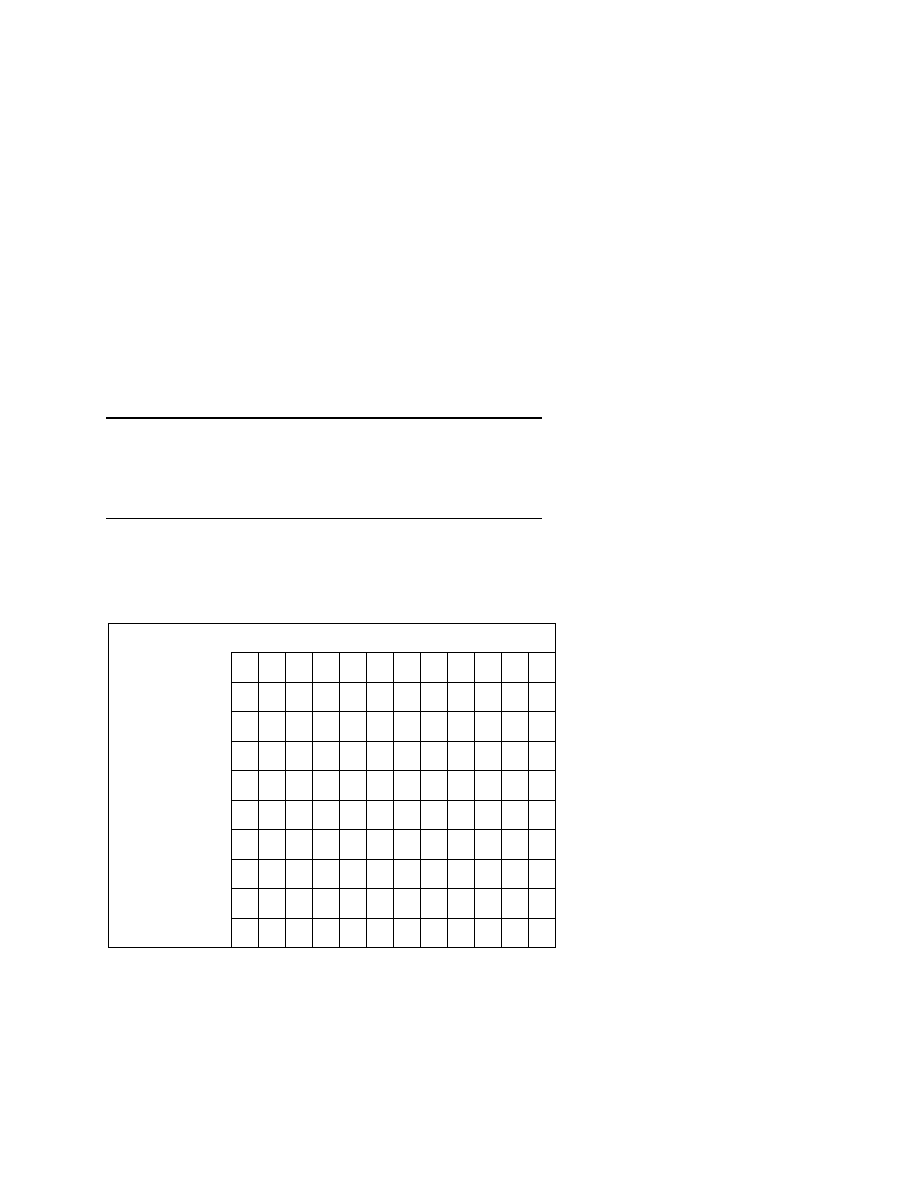
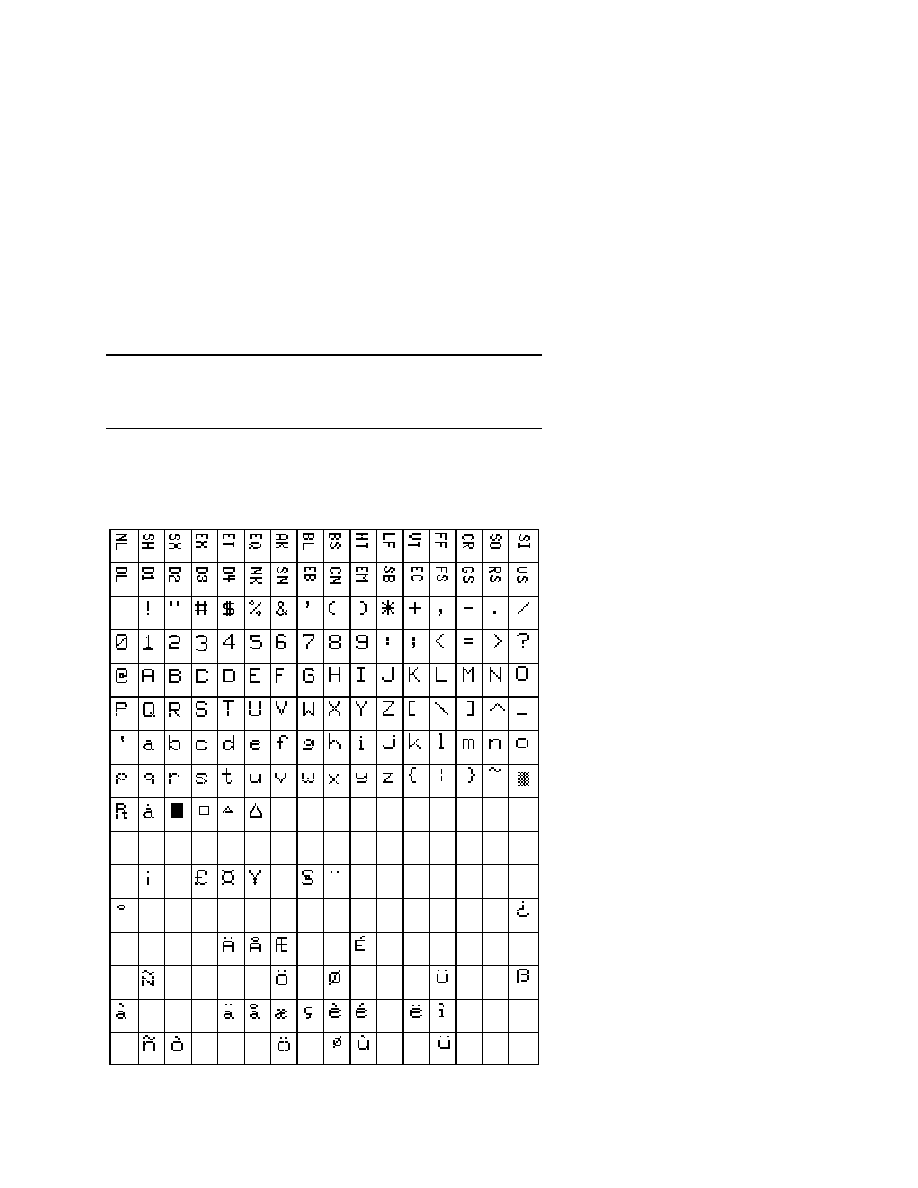
Extended Character Sets
Each internal font in the 7421 has a different character set
associated with it as shown in the following tables. The hex
codes accompany each character.
Characters in Fonts
c0
7 x 9 Standard
c1
7 x 11 OCR
c2
10 x 14 Standard
c7
5 x 7 Standard
7421U.044
ØØ
Ø1
Ø2
Ø3
Ø4
Ø5
Ø6
Ø7
Ø8
Ø9
ØA
ØB
ØC
ØD
ØE
ØF
1Ø
11
12
13
14
15
16
17
18
19
1A
1B
1C
1D
1E
1F
2Ø
21
22
23
24
25
26
27
28
29
2A
2B
2C
2D
2E
2F
3Ø
31
32
33
34
35
36
37
38
39
3A
3B
3C
3D
3E
3F
4Ø
41
42
43
44
45
46
47
48
49
4A
4B
4C
4D
4E
4F
5Ø
51
52
53
54
55
56
57
58
59
5A
5B
5C
5D
5E
5F
6Ø
61
62
63
64
65
66
67
68
69
6A
6B
6C
6D
6E
6F
7Ø
71
72
73
74
75
76
77
78
79
7A
7B
7C
7D
7E
7F
8Ø
81
82
83
84
85
86
87
88
89
8A
8B
8C
8D
8E
8F
9Ø
91
92
93
94
95
96
97
98
99
9A
9B
9C
9D
9E
9F
AØ
A1
A2
A3
A4
A5
A6
A7
A8
A9
AA
AB
AC
AD
AE
AF
BØ
B1
B2
B3
B4
B5
B6
B7
B8
B9
BA
BB
BC
BD
BE
BF
CØ
C1
C2
C3
C4
C5
C6
C7
C8
C9
CA
CB
CC
CD
CE
CF
DØ
D1
D2
D3
D4
D5
D6
D7
D8
D9
DA
DB
DC
DD
DE
DF
EØ
E1
E2
E3
E4
E5
E6
E7
E8
E9
EA
EB
EC
ED
EE
EF
FØ
F1
F2
F3
F4
F5
F6
F7
F8
F9
FA
FB
FC
FD
FE
FF
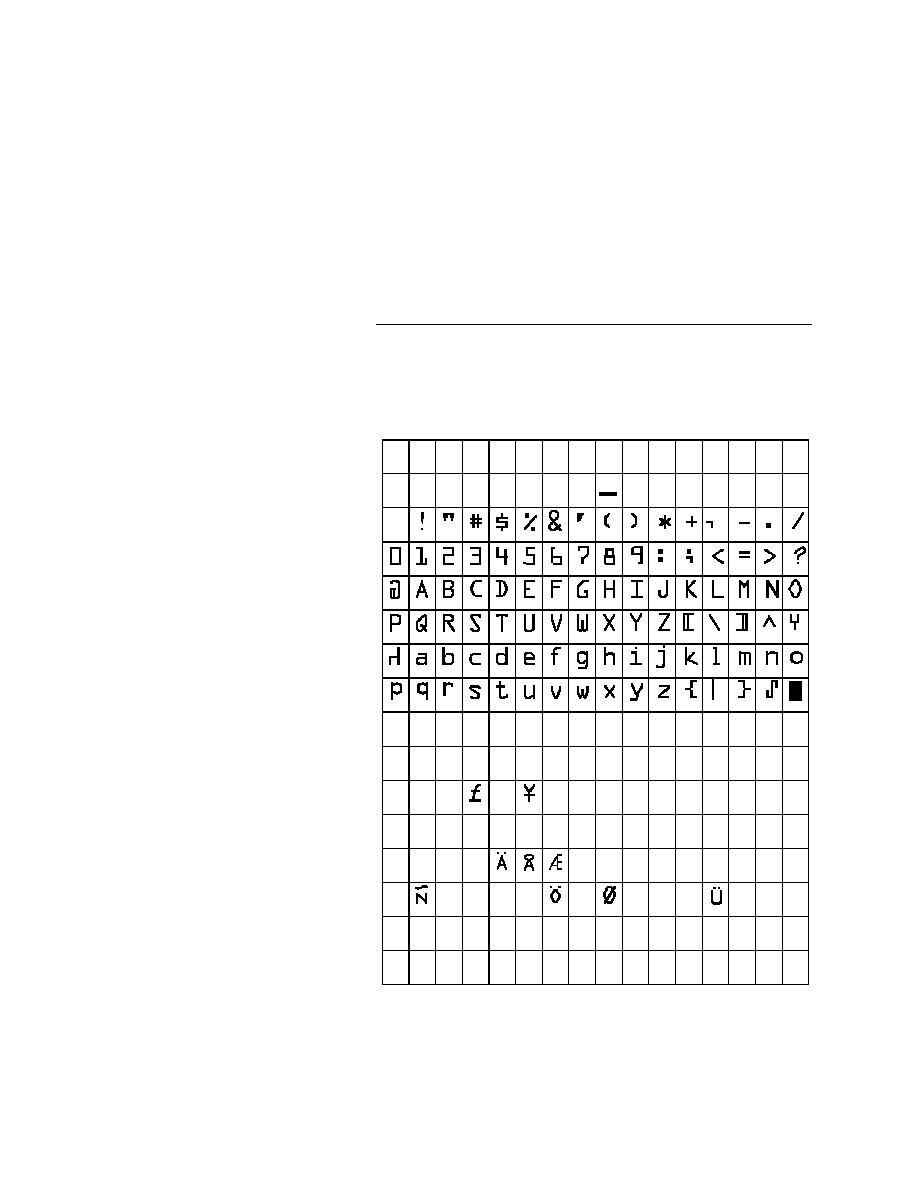
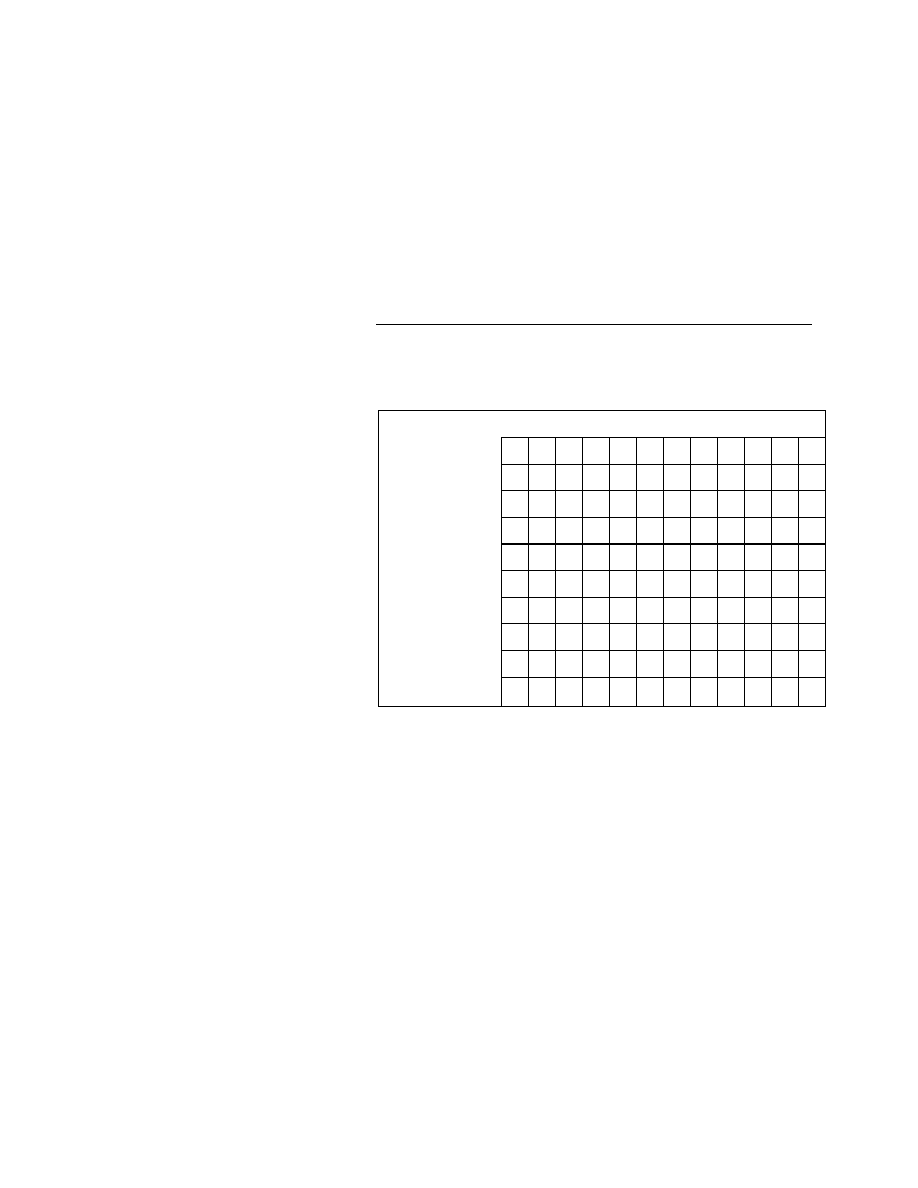
C-8
Characters in Fonts
c20
8 point
c21
12 point
c22
20 point
c25, c26, c28
outline fonts
c30-c41
monospace fonts
ØØ
1Ø
2Ø
3Ø
4Ø
5Ø
6Ø
7Ø
8Ø
9Ø
AØ
BØ
CØ
DØ
EØ
FØ
Ø1
11
21
31
41
51
61
71
81
91
A1
B1
C1
D1
E1
F1
Ø2
12
22
32
42
52
62
72
82
92
A2
B2
C2
D2
E2
F2
Ø3
13
23
33
43
53
63
73
83
93
A3
B3
C3
D3
E3
F3
Ø4
14
24
34
44
54
64
74
84
94
A4
B4
C4
D4
E4
F4
Ø5
15
25
35
45
55
65
75
85
95
A5
B5
C5
D5
E5
F5
Ø6
16
26
36
46
56
66
76
86
96
A6
B6
C6
D6
E6
F6
Ø7
17
27
37
47
57
67
77
87
97
A7
B7
C7
D7
E7
F7
Ø8
18
28
38
48
58
68
78
88
98
A8
B8
C8
D8
E8
F8
Ø9
19
29
39
49
59
69
79
89
99
A9
B9
C9
D8
E9
F9
ØA
1A
2A
3A
4A
5A
6A
7A
8A
9A
AA
BA
CA
DA
EA
FA
ØB
1B
2B
3B
4B
5B
6B
7B
8B
9B
AB
BB
CB
DB
EB
FB
ØC
1C
2C
3C
4C
5C
6C
7C
8C
9C
AC
BC
CC
DC
EC
FC
ØD
1D
2D
3D
4D
5D
6D
7D
8D
9D
AD
BD
CD
DD
ED
FD
ØE
1E
2E
3E
4E
5E
6E
7E
8E
9E
AE
BE
CE
DE
EE
FE
ØE
1F
2F
3F
4F
5F
6F
7F
8F
9F
AF
BF
CF
DF
EF
FF
7421U.047
Note:
You cannot print these characters as 4 x 4 inch graphics because
there is white space surrounding the characters that prevents the image
from reaching the maximum graphic size.
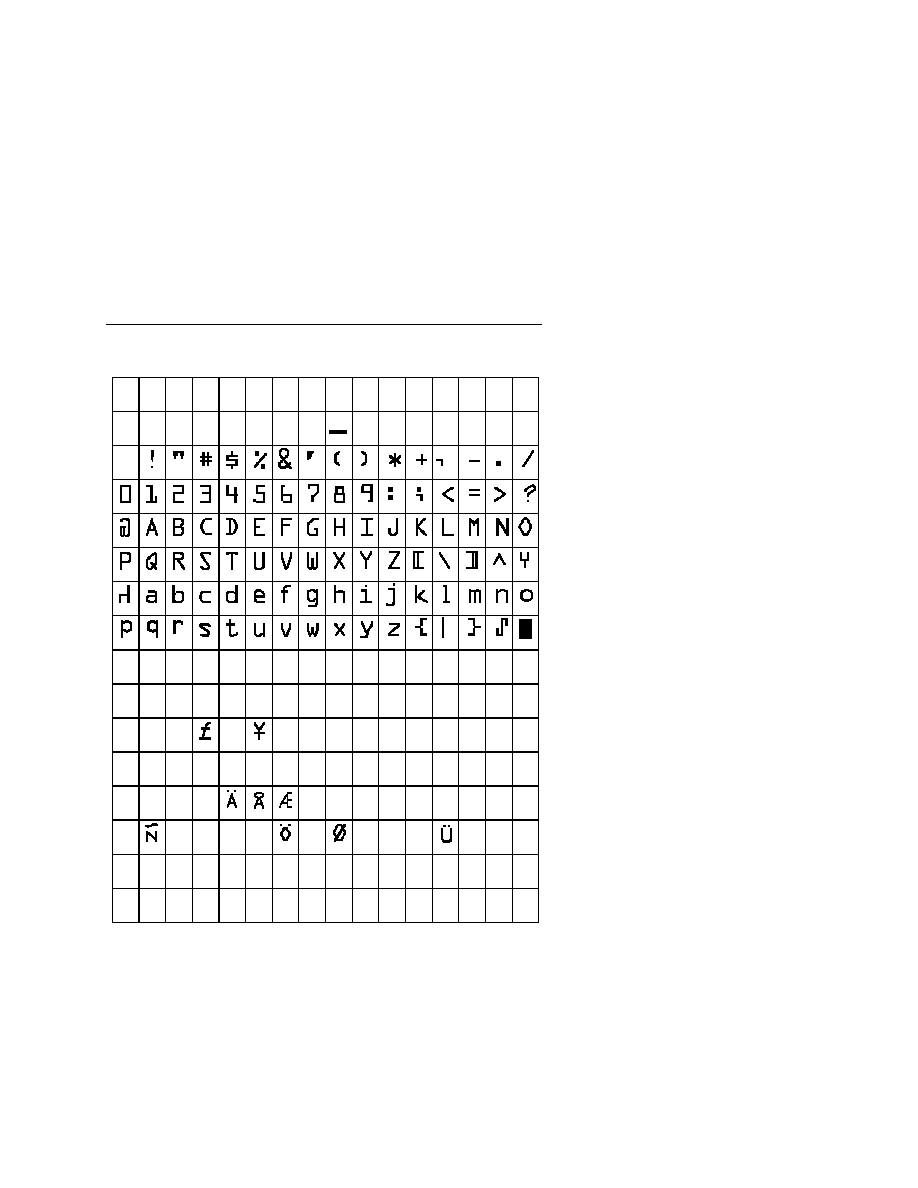
C-9
Characters in Font
c23
OCR A
ØØ
1Ø
2Ø
3Ø
4Ø
5Ø
6Ø
7Ø
8Ø
9Ø
AØ
BØ
CØ
DØ
EØ
FØ
Ø1
11
21
31
41
51
61
71
81
91
A1
B1
C1
D1
E1
F1
Ø2
12
22
32
42
52
62
72
82
92
A2
B2
C2
D2
E2
F2
Ø3
13
23
33
43
53
63
73
83
93
A3
B3
C3
D3
E3
F3
Ø4
14
24
34
44
54
64
74
84
94
A4
B4
C4
D4
E4
F4
Ø5
15
25
35
45
55
65
75
85
95
A5
B5
C5
D5
E5
F5
Ø6
16
26
36
46
56
66
76
86
96
A6
B6
C6
D6
E6
F6
Ø7
17
27
37
47
57
67
77
87
97
A7
B7
C7
D7
E7
F7
Ø8
18
28
38
48
58
68
78
88
98
A8
B8
C8
D8
E8
F8
Ø9
19
29
39
49
59
69
79
89
99
A9
B9
C9
D8
E9
F9
ØA
1A
2A
3A
4A
5A
6A
7A
8A
9A
AA
BA
CA
DA
EA
FA
ØB
1B
2B
3B
4B
5B
6B
7B
8B
9B
AB
BB
CB
DB
EB
FB
ØC
1C
2C
3C
4C
5C
6C
7C
8C
9C
AC
BC
CC
DC
EC
FC
ØD
1D
2D
3D
4D
5D
6D
7D
8D
9D
AD
BD
CD
DD
ED
FD
ØE
1E
2E
3E
4E
5E
6E
7E
8E
9E
AE
BE
CE
DE
EE
FE
ØE
1F
2F
3F
4F
5F
6F
7F
8F
9F
AF
BF
CF
DF
EF
FF
7421U.047
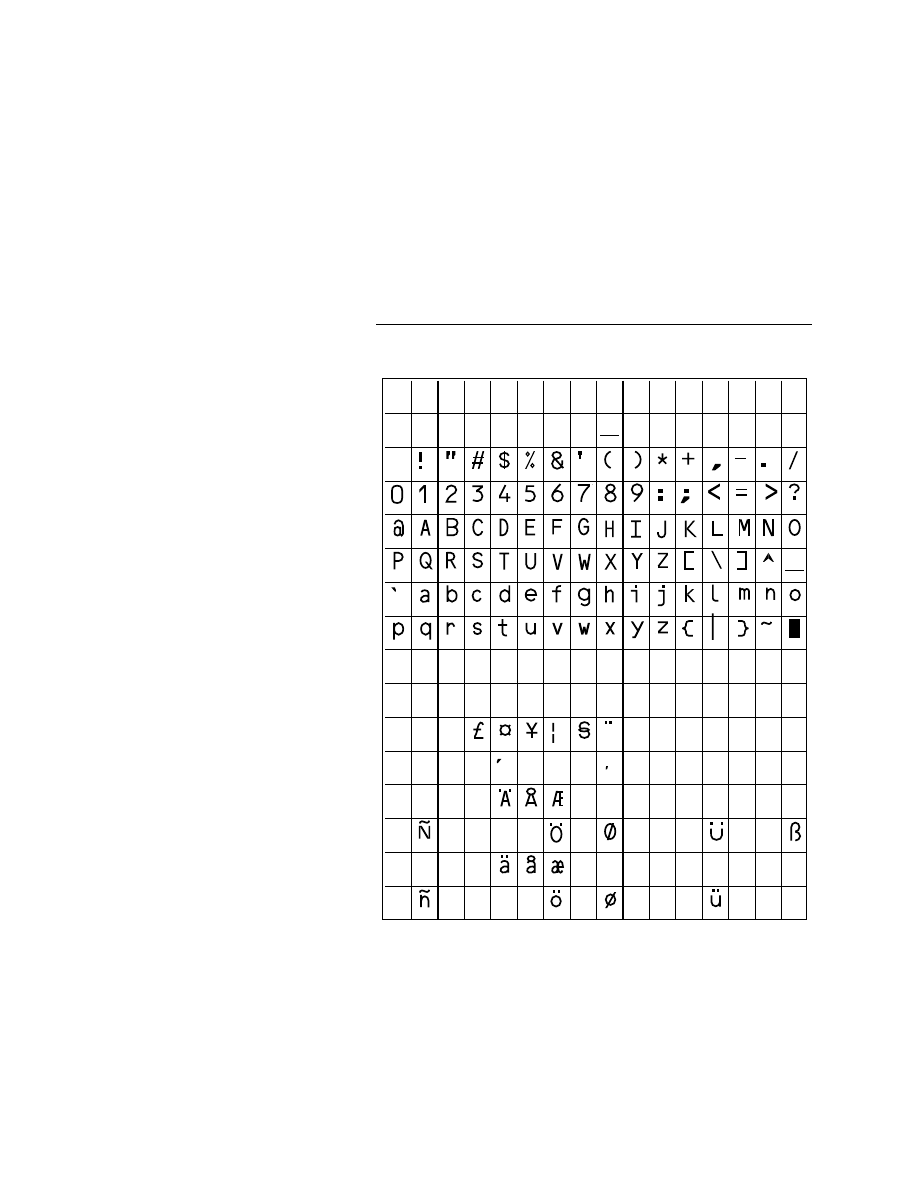
C-10
Characters in Font
c24
OCR B Size 2
ØØ
1Ø
2Ø
3Ø
4Ø
5Ø
6Ø
7Ø
8Ø
9Ø
AØ
BØ
CØ
DØ
EØ
FØ
Ø1
11
21
31
41
51
61
71
81
91
A1
B1
C1
D1
E1
F1
Ø2
12
22
32
42
52
62
72
82
92
A2
B2
C2
D2
E2
F2
Ø3
13
23
33
43
53
63
73
83
93
A3
B3
C3
D3
E3
F3
Ø4
14
24
34
44
54
64
74
84
94
A4
B4
C4
D4
E4
F4
Ø5
15
25
35
45
55
65
75
85
95
A5
B5
C5
D5
E5
F5
Ø6
16
26
36
46
56
66
76
86
96
A6
B6
C6
D6
E6
F6
Ø7
17
27
37
47
57
67
77
87
97
A7
B7
C7
D7
E7
F7
Ø8
18
28
38
48
58
68
78
88
98
A8
B8
C8
D8
E8
F8
Ø9
19
29
39
49
59
69
79
89
99
A9
B9
C9
D8
E9
F9
ØA
1A
2A
3A
4A
5A
6A
7A
8A
9A
AA
BA
CA
DA
EA
FA
ØB
1B
2B
3B
4B
5B
6B
7B
8B
9B
AB
BB
CB
DB
EB
FB
ØC
1C
2C
3C
4C
5C
6C
7C
8C
9C
AC
BC
CC
DC
EC
FC
ØD
1D
2D
3D
4D
5D
6D
7D
8D
9D
AD
BD
CD
DD
ED
FD
ØE
1E
2E
3E
4E
5E
6E
7E
8E
9E
AE
BE
CE
DE
EE
FE
ØE
1F
2F
3F
4F
5F
6F
7F
8F
9F
AF
BF
CF
DF
EF
FF
7421U.049

Index
I


I-3
A
adjustments
darkness adjust control, 2-8
label gap sensor, 2-9
Advanced mode, international
character sets, C-3
B
bar code
symbologies
Codabar, A-6
Code 11, A-6
Code 128, A-6
Code 16K, A-6
Code 2 of 5, A-6
Code 39, A-6
Code 49, A-6
Code 93, A-6
Code One, A-6
Data Matrix, A-6
EAN, A-6
HIBC, A-6
Interleaved 2 of 5, A-6
Maxicode, A-6
PDF417, A-6
POSTNET, A-6
supported, A-6
UPC, A-6
battery pack option, A-5
boundaries, communication,
B-8
C
cable, RS-232 serial schematics,
B-10
character sets
Advanced mode, C-3
Code Page 850, C-6
Emulation mode, C-4
extended, C-7
IBM translation, C-5
international, C-3
printer, A-3
checking for communications
problems, 4-8
cleaning
drive roller, 3-8
label sensors, 3-10
peel-off bar, 3-8
printer covers, 3-7
printhead, 3-6
tools, 3-5
cleaning the printer, 3-3
Codabar, A-6
Code 11, A-6
Code 128, A-6
Code 16K, A-6
Code 2 of 5, A-6
Code 39, A-6
Code 49, A-6
Code 93, A-6
Code One, A-6
Code Page 850, character table,
C-6
communicating with the
printer, 2-10
using PrintSet, 2-10
using the printer command
set, 2-10
using third-party software,
2-10
communications
boundaries, B-8
host requirements, B-3
interfaces, B-8
printer, B-3
problems, 4-6
problems, checking for, 4-8
protocol
user-defined, B-7
protocols
hardware, B-6
Intermec Standard, B-4
XON/XOFF, B-5
protocols, serial, B-3
reference
serial communication
protocols, See also
protocols
specifications, A-3
troubleshooting printer, 4-6

I-4
configuring
media sensitivity number,
2-3
printer, 2-3
covers, printer, cleaning, 3-7
cutter option, A-5
D
Data Line Print, 4-6
entering, 4-6
using to test the operation
of the printer, 4-6
using to troubleshoot
printer, 4-6
data loss, preventing, 4-7
Data Matrix, A-6
defaults, resetting factory, 4-8
dimensions
printer, A-3
drive roller, cleaning, 3-8
E
EAN, A-6
electrical requirements
external power supply, A-3
printer, A-3
Emulation mode,
international
character sets, C-4
environment, specifications,
A-3
extended character sets, C-7
F
factory defaults, resetting, 4-8
fanfold media, loading, 1-16
features, printer, 1-3
Feed/Pause button, 1-6
functions of, 1-6
using, 1-6
font
extended character sets,
C-7
tables, extended character
sets, C-7
fonts
described, A-4
printer, A-4
G
gap sensor, label, 2-9
graphics
defined, A-4
printer, A-4
H
hardware protocol, B-6
HIBC, A-6
host requirements,
communications, B-3
I
IBM translation, character
table, C-5
interfaces
communications, B-8
RS-232 serial, B-8
Interleaved 2 of 5, A-6
Intermec Standard protocol, B-
4
international character sets,
C-3
Inverse Printing mode, 2-12
selecting with PrintSet,
2-13
L
label
gap sensor, adjusting, 2-9
printing a test, 2-11
sensors, cleaning, 3-10
languages, international
character sets, C-3
light, Power, 1-5
loading
fanfold media, 1-16
media with the peel-off
option, 1-7
modes, printhead, 2-12

I-5
M
maintaining the printer, 3-3
maintenance
schedule, 3-3
tools, 3-5
Maxicode, A-6
media
faults, 1-5
loading fanfold, 1-16
loading for peel-off
printing, 1-7
media sensitivity number
changing with PrintSet, 2-4
description of, 2-3
finding, 2-3
optimizing with Intermec
media and ribbon,
2-5
setting for other media and
ribbon, 2-6
settings table
direct thermal media,
2-6, 2-7
memory
card, inserting, 1-20
expansion option, A-5
specifications
printer, A-4
Mirror Printing mode, 2-12
selecting with PrintSet,
2-13
modes, printhead loading,
2-12
O
operating the printer, 1-5
operation, printer problems, 4-
4
options
battery pack, A-5
cutter, A-5
memory expansion, A-5
printer, A-5
orange light, media or system
faults, 1-5
over-temperature condition, 1-
5
P
parallel interface,
communications, B-3
PDF417, A-6
peel-off
bar, cleaning, 3-8
printing, 1-7
POSTNET, A-6
Power light, understanding,
1-5
power supply, electrical
requirements, A-3
preventing data loss, 4-7
print darkness, adjusting with
PrintSet, 2-8
print quality, problems, 4-5
printer
character sets, A-3
cleaning, 3-3
cleaning tools, 3-5
commands, using to
communicate, 2-10
communication problems,
4-6
communications, 2-10, A-3
components
back view, 1-4
front view, 1-3
configuring, 2-3
cover, cleaning, 3-7
dimensions, A-3
electrical requirements, A-3
features, 1-3
fonts and graphics, A-4
maintenance, 3-3
memory specifications, A-4
operation, 1-5
problems, 4-4
testing, 4-6
troubleshooting, 4-6

I-6
printer (continued)
options, A-5
battery pack, A-5
cutter, A-5
memory expansion, A-5
printhead specifications,
A-4
printing speed, A-5
ribbon specifications, A-5
specifications, A-3
printhead
cleaning, 3-6
loading modes, using, 2-12
specifications, printer, A-4
printing
peel-off, 1-7
test label, 2-11
printing speed, A-5
PrintSet
using to adjust the print
darkness, 2-8
using to change the media
sensitivity number, 2-
4
using to communicate with
the printer, 2-10
using to select printhead
loading mode, 2-13
problems
communication, 4-6
communications, checking
for, 4-8
print quality, 4-5
printer operation, 4-4
protocol
hardware, B-6
Intermec Standard, B-4
user-defined, B-7
XON/XOFF, B-5
protocols, B-3
Q
quality, print problems, 4-5
R
red light, over-temperature
condition, 1-5
resetting factory defaults, 4-8
ribbon specifications, A-5
RS-232 serial interface, B-8
schematics, B-10
S
schedule of maintenance, 3-3
sensors, cleaning label, 3-10
serial interface, B-8
setting, media sensitivity
number, 2-3
specifications, printer, A-3
speed, printing, A-5
Standard protocol, B-4
symbologies
bar code, A-6
Codabar, A-6
Code 11, A-6
Code 128, A-6
Code 16K, A-6
Code 2 of 5, A-6
Code 39, A-6
Code 49, A-6
Code 93, A-6
Code One, A-6
Data Matrix, A-6
EAN, A-6
HIBC, A-6
Interleaved 2 of 5, A-6
Maxicode, A-6
PDF417, A-6
POSTNET, A-6
UPC, A-6
system, faults, 1-5
T
Test and Service mode, Data
Line Print, 4-6
test label, printing, 2-11
third-party software, using to
communicate with the
printer, 2-10
troubleshooting, 4-3
checklist, 4-3
communication problems,
4-6

I-7
print quality problems, 4-5
printer operation
problems, 4-4
U
UPC, A-6
user-defined protocol, B-7
X
XON/XOFF protocol, B-5

Wyszukiwarka
Podobne podstrony:
cas test platform user manual
CARPROG Opel ECU programmer user manual
elm327 interface viecar obd2 bluetooth scanner user manual
autel power scan ps100 user manual
Chartplanner user manual
INPA User manual
all100 user manual
CARPROG user manual
FX2N 485 BD User's Manual JY992 Nieznany
mb sbc tool user manual
07 Altistart48 user manual
iphone user manual pdf
PRDM 0010 Upgrade user manual UPG 0001
TK105 GPS Tracker User Manual
ATDSK1118 User Manual
FX2N 232 IF User's Manual JY992D66701
Protek 3502C USER MANUAL
Administrator User Manual
NMS KD 0017 en V01 03 N3000 IMC and ISC User Manual
więcej podobnych podstron