
Gebrauchsanweisung
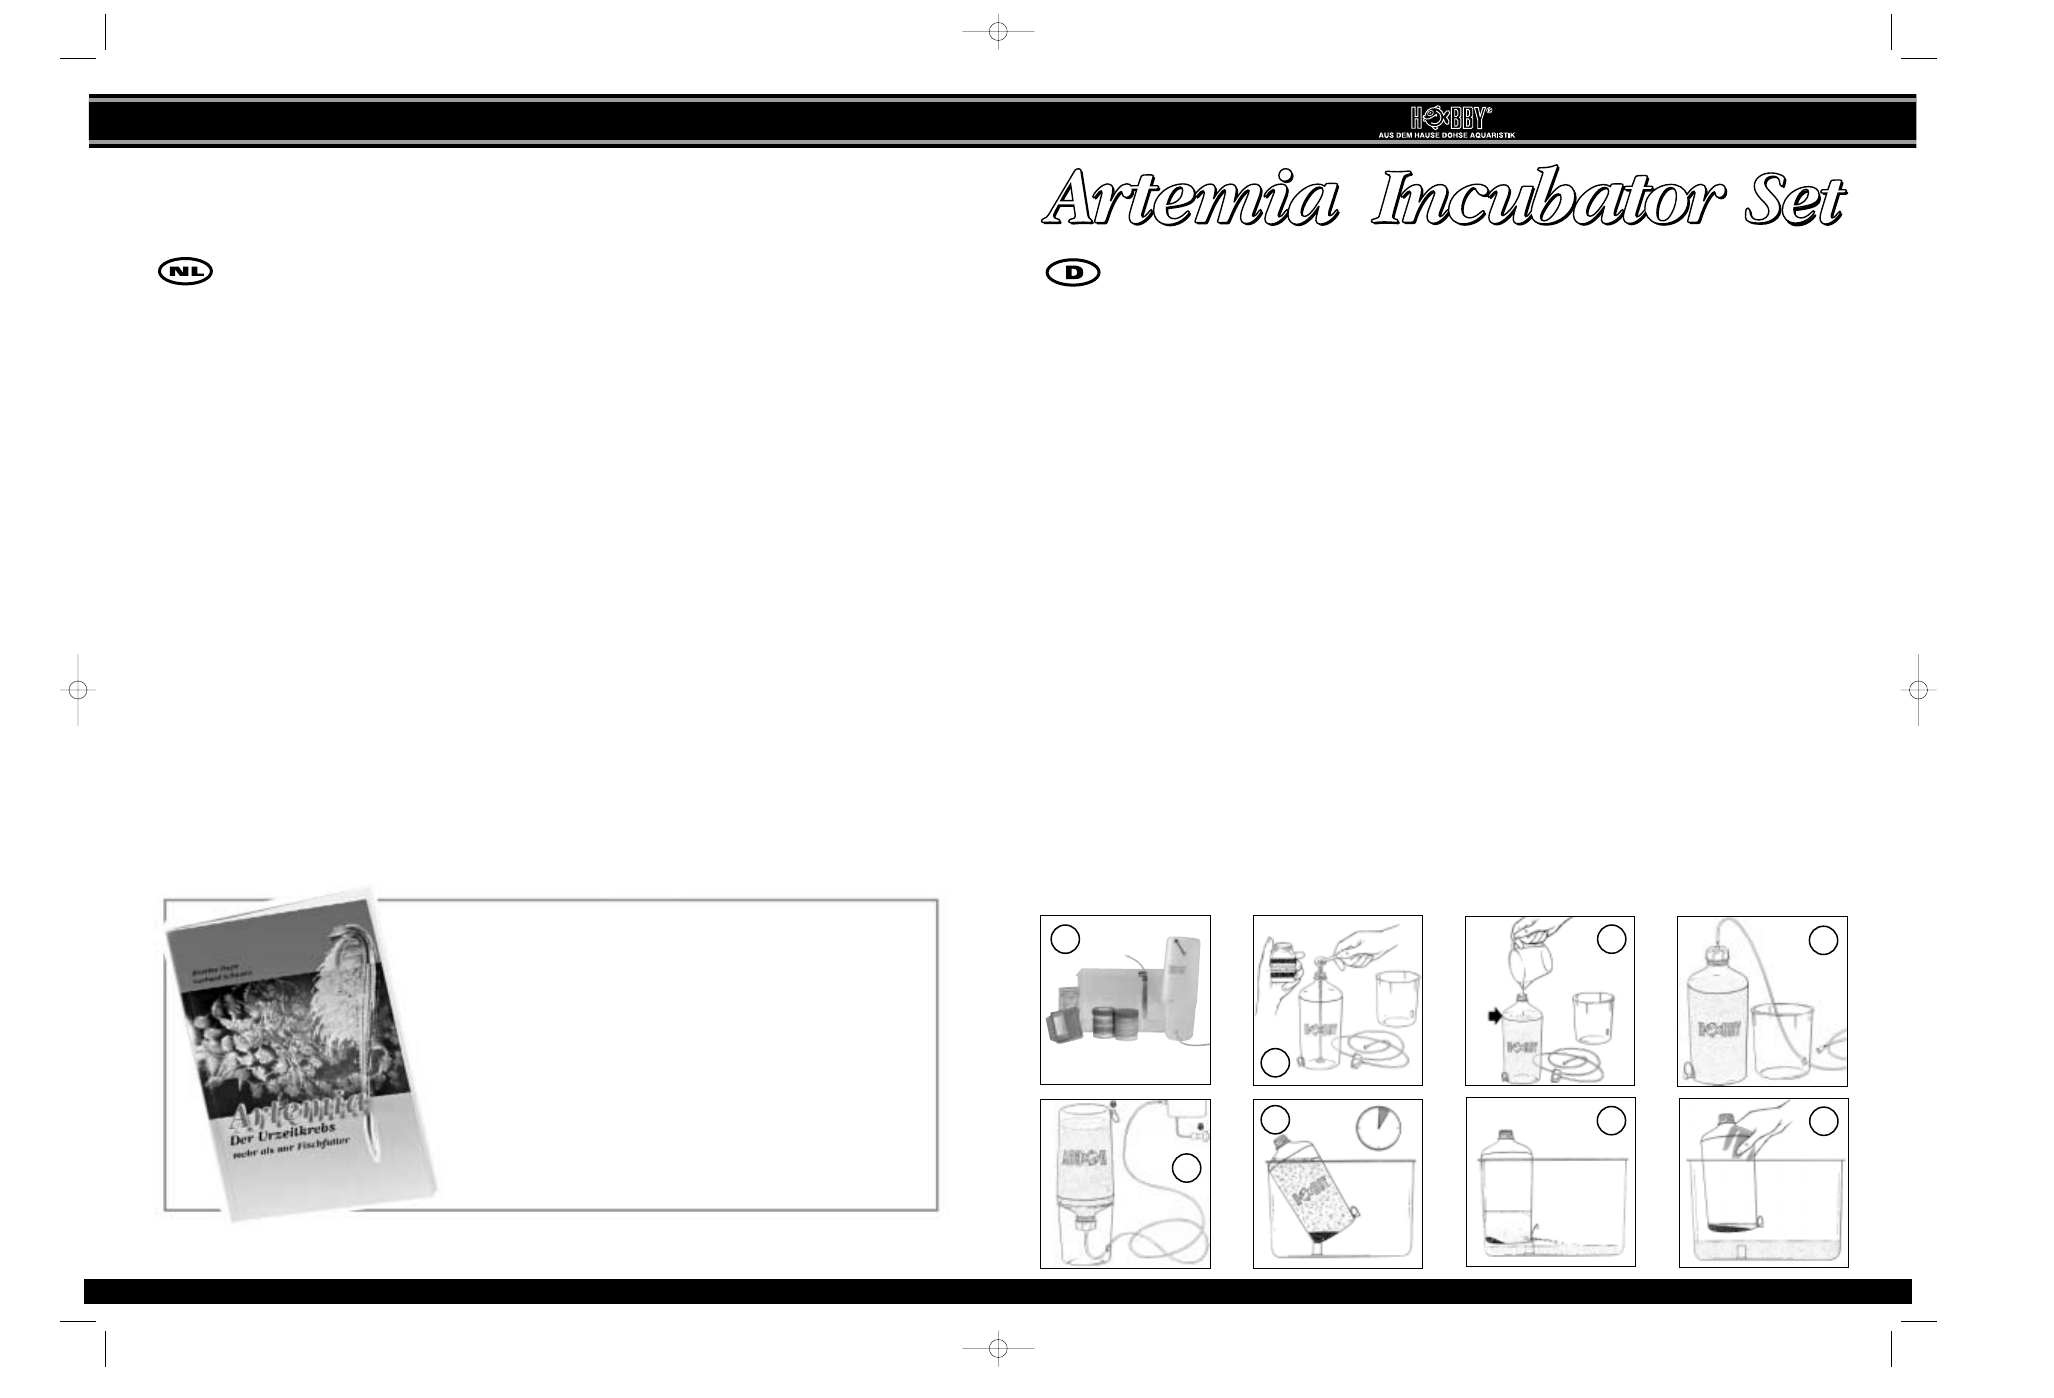
Das HOBBY Incubator Set (Abb. 1) besteht aus: 1 HOBBY Incubator, 1 Dose HOBBY Artemix, 1 Dose HOBBY Artemia Salz, 1 HOBBY
Aufzuchtbecken, 1 Artemia Aufzuchtfutter HOBBY Liquizell und 1 HOBBY Artemia Sieb. Der HOBBY Incubator und das HOBBY Incubator Set sind
für den Betrieb mit einer Luftpumpe vorgesehen, die nicht im Lieferumfang enthalten ist.
Mit dem HOBBY lncubator bringen Sie Artemia Eier erfolgreich zum Schlupf. Stellen Sie zunächst die Incubatorflasche auf den Flaschenboden und
achten darauf, dass der Stopfen unten auf dem Ablass sitzt. Nun füllen Sie - falls vorhanden unter Zuhilfenahme eines Trichters - zwei schwach
gehäufte Teelöffel vorgefertigte Mischung aus Salz und Eiern, HOBBY Artemix ein (Abb. 2). Anschließend geben Sie Leitungswasser bis zum roten
Strich hinzu (Abb. 3).
Schließen Sie die Flasche dann mit dem Schraubverschluß und führen den Luftschlauch durch die kleine Öffnung des mitgelieferten Bechers (Abb. 4).
Setzen Sie den Becher auf den Falschenhals. Drehen Sie anschließend die Flasche um und stellen diese auf den Boden des Bechers während Sie den
Luftschlauch anheben, damit kein Wasser entläuft (Abb. 5).
Öffnen Sie nun den Stopfen vom Ablass, damit die Luft später wieder austreten kann und schließen den Luftschlauch an eine Luftpumpe. Diese sollten
Sie nach Möglichkeit höher als den HOBBY lncubator positionieren, damit beim Abschalten kein Wasser in die Pumpe läuft.
Bei 24°C schlüpfen die Nauplien - wie man junge Artemien nennt - etwa nach 24-36 Stunden, bei 20°C nach 30-40 Stunden. Schalten Sie nach dem
Schlüpfen der Nauplien die Pumpe ab und verschließen den Ablass wieder mit dem Stopfen. Drehen Sie danach die Flasche um und schrauben den
Verschluss ab.
Stellen Sie die Incubatorflasche schräg im Aufzuchtbecken auf (Abb. 6 ) und lassen diese etwa 5 Minuten stehen, damit sich die ungeschlüpften Eier
absetzen können. Öffnen Sie danach den Stopfen am unteren Teil der Flasche und lassen die Nauplien in das Becken laufen (Abb. 7). Die Eischalen blei-
ben automatisch an den konisch geformten Flaschenwänden hängen. Danach können Sie die Flasche mit dem zurückgebliebenen Bodensatz entneh-
men (Abb. 8).
Setzen Sie nun die Föderpume auf den am Boden vorgesehenen Anschluß und verbinden das Schlauchende mit Ihrer noch nicht am Strom angeschlos-
senen Luftpumpe. Lösen Sie 4/5 der Dose HOBBY Artemia Salz (ca. 130 g) in 4 Liter Leitungswasser und füllen das Aufzuchtbecken damit auf. Danach
schließen Sie Ihre Luftpumpe an. So sorgen Sie für ausreichende Belüftung und halten später nach der Fütterung die feinen Futteralgen in der
Schwebe. Selbst kleinste Futterteilchen würden sonst durch Ihr Eigengewicht mit der Zeit zu Boden sinken und wären so nicht mehr so leicht von den
Nauplien aufzunehmen.
Mit dem HOBBY Incubator Set lassen sich Artemia leicht bei Zimmertemperatur aufziehen. Bei niedrigen Werten unter 15-20°C ist das Wachstum
langsamer. Artemien entwickeln sich bei Tages- wie auch Kunstlicht. Bei der Aufzucht ist kein Wechseln des Wassers erforderlich.
Füttern Sie erst nach dem 3. Tag des Umfüllens in das Aufzuchtbecken mit dem Startfutter HOBBY Liquizell und wirklich nur tröpfchenweise (siehe
Gebrauchsanweisung HOBBY Liquizell) da das Wasser sonst schnell umkippt. Nachdem die Nauplien weitere fünf Tage gewachsen sind, können Sie die
Ernährung auf HOBBY Mikrozell umstellen, da die Kauwerkzeuge nun besser ausgebildet sind.
4
5
Utilizzate solo dopo il 3° giorno il nutrimento iniziale HOBBY Liquizell e davvero solo a goccia a goccia (vedi istruzioni per l’uso HOBBY Liquizell) poiché
l’acqua altrimenti si rovescerebbe facilmente. Dopo che i nauplii sono cresciuti per altri cinque giorni, potete cambiare il nutrimento con HOBBY Mikrozell,
poiché gli strumenti per masticare sono ora formati meglio.
Gebruiksaanwijzing
De HOBBY incubatorset (afb. 1) bestaat uit: 1 HOBBY incubator, 1 doos HOBBY Artemix, 1 doos HOBBY Artemia zout, 1 kweekreservoir, 1 Artemia
kweekvoeder HOBBY Liquizell en 1 HOBBY Artemia zeef. De HOBBY incubator en de HOBBY Incubatorset zijn voorzien voor de werking met een
luchtpomp, die niet bij de levering inbegrepen is.
Met behulp van de HOBBY incubator kunt u de eieren van de Artemia met succes laten uitkomen. Zet allereerst de incubatorfles op de flesbodem en
let erop dat de afsluitstop op de afloop zit. Giet vervolgens - indien voorhanden met behulp van een trechter – twee kleine theelepels van HOBBY
Artemix, een geprefabriceerde mengeling van zout en eieren, in (afb. 2). Daarna voegt u hieraan leidingwater tot aan de rode streep toe (afb. 3).
Sluit de fles dan met de schroefdop af en leid de luchtslang door de kleine opening van de meegeleverde beker (afb. 4). Zet de beker op de flessenhals.
Draai aansluitend de fles om en zet deze op de bodem van de beker terwijl u de luchtslang optilt opdat er geen water zou weglopen (afb. 5).
Open vervolgens de afsluitdop van de afloop zodat de lucht later weer kan ontsnappen en verbind de luchtslang met een luchtpomp. Deze kunt u best
volgens mogelijkheid hoger dan de HOBBY incubator positioneren opdat er bij het uitschakelen geen water in de pomp loopt.
Ongeveer na 24-36 uren komt de nauplius– zoals de jonge artemia genoemd worden – bij 24°C uit en na 30-40 uren bij 20°C. Schakel na het uitko-
men van de nauplius de pomp uit en sluit de afloop opnieuw met de afsluitstop. Draai de fles daarna om en schroef de dop eraf.
Positioneer de incubatorfles schuin in het kweekreservoir (afb. 6) en laat deze ongeveer 5 minuten staan zodat de niet-uitgekomen eieren kunnen
bezinken. Open vervolgens de afsluitstop aan het onderste deel van de fles en laat de nauplius in het reservoir lopen (afb. 7). De eierschalen blijven
automatisch aan de conisch gevormde wanden van de fles hangen. Daarna kunt u de fles met het achtergebleven bezinksel wegnemen. (afb. 8)
Zet nu de voedingspomp op de aansluiting die op de bodem voorzien is en verbind het uiteinde van de slang met uw luchtpomp die nog niet aan de
elektriciteit aangesloten is. Los 4/5 van de doos HOBBY Artemia Zout (ca. 130 g) in 4 liter leidingwater op en vul het kweekreservoir hiermee op. Sluit
daarna uw luchtpomp aan. Zo zorgt u voor voldoende luchttoevoer en houdt u later na het voeren de kleine voederalgen omhoog. Zelfs de kleinste
voederdeeltjes zullen anders door hun eigen gewicht na verloop van tijd op de bodem zinken en kunnen zodoende niet meer gemakkelijk door de nau-
plius opgenomen worden.
Met behulp van de HOBBY incubatorset kunt u artemia gemakkelijk bij kamertemperatuur kweken. Bij lagere waarden onder 15-20°C is de groei
langzamer. Artemia ontwikkelen zich zowel bij daglicht als bij kunstlicht. Bij het kweken is het vervangen van het water niet nodig.
Voer pas na de 3de dag van het omvullen in het kweekreservoir met het startvoeder HOBBY Liquizell en dit ook maar druppelsgewijs (zie gebruiksaan-
wijzing HOBBY Liquizell) omdat het water anders snel omkipt. Nadat de nauplius nog vijf dagen gegroeid is, kunt u met de voeding op HOBBY
Mikrozell overgaan, daar de kauwwerktuigen nu beter ontwikkeld zijn.
Tipp:
Möchten Sie tiefer in die Welt der Artemia eindringen, empfehlen wir Ihnen das Buch
„Artemia. Der Urzeitkrebs“ von Gerhard Schwarz. Auch dieses bekommen Sie im
Fachhandel.
Conseil :
Si vous désirez en savoir plus sur les artémias nous vous recommandons le livre
„Artémia“ Le crustacé des temps primitifs“ de Gerhard Schwarz. Ce livre est égale-
ment disponible chez votre détaillant habituel.
Useful hint:
If you wish to discover more on the subject of artemia you should read the book
”Artemia - The shrimp from a prehistoric age” by Gerhard Schwarz available at
your specialist dealers.
DOHSE AQUARISTIK KG
www.hobby-dohse.com
DOHSE
AQUARISTIK KG
2
3
8
7
6
1
Geba Incubator-Set.neu 14.05.2001 16:43 Uhr Seite 1
Mode d’emploi
Le kit HOBBY Incubator Set (Fig. 1) se compose des éléments suivants : 1 HOBBY Incubator, 1 boîte HOBBY Artemix, 1 boîte de HOBBY sel pour arté-
mias, 1 bac d’élévage d’artémias, 1 bouteille de nourriture initial pour artémias HOBBY Liquizell et 1 tamis pour artémias HOBBY. L’HOBBY Incubator et
le kit HOBBY Incubator Set sont prévus pour fonctionner avec une pompe à air non fournie.
Avec l’ HOBBY Incubator Set, vous amenez les oeufs d’artémias à l’éclosion avec succès. Placez tout d’abord la bouteille incubatrice sur le fond du flacon
et veillez à ce que le bouchon repose sur l’évacuation. Puis ajoutez deux cuillères à café du mélange de HOBBY Artemix (Fig. 2). Remplissez d’eau du robi-
net jusqu’à la marque rouge (Fig. 3).
Fermez la bouteille avec le bouchon à visser et introduisez le tuyau à air par l’ouverture du gobelet fourni (Fig. 4). Placez le gobelet sur le col de la bouteil-
le. Retournez la bouteille et placez-la sur le fond du gobelet pendant que vous soulevez le tuyau d’air afin d’éviter que l’eau ne s’échappe pas.
Ouvrez le bouchon de l’évacuation afin que l’air puisse s’échapper ultérieurement et raccordez le tuyau d’air à une pompe à air. Il est recommandé de
l’accrocher ou de la positionner plus haut que l’ HOBBY Incubator Set afin d’éviter que de l’eau pénètre dans la pompe au moment de l’arrêter (Fig. 5).
A 24°C les nauplies éclosent – c’est ainsi qu’on appelle les larves d’artémias – au bout de 24 à 48 heures, à 20°C au bout de 30 à 40 heures. Débranchez la
pompe après l’éclosion des nauplies d’artémias et refermez l’évacuation avec le bouchon. Retournez ensuite la bouteille et fermez-la avec le bouchon vissé.
Placez la bouteille incubatrice tel que sur la figure 6 inclinée dans la bac d’élevage et laissez les coquilles se déposer dans le fond de la bouteille. Au bout
de 5 minutes retirez le bouchon dans la partie basse de la bouteille et laissez s’écouler les nauplies dans la bac (Fig. 7). La séparation des nauplies éclos
s’effectue automatiquement étant donné que les coquilles d’œufs s’accrochent aux parois coniques de la bouteille. Vous pouvez ensuite retirer la bouteille
avec le dépôt résiduel au fond de la bouteille. (Fig. 8)
Puis mettez l´exhauster sur le raccord prévu au sol et reliez l’extrémité du tuyau à la pompe à air qui n’a pas encore été connectée au secteur. Dissolvez 4/5
de la boîte de sel pour artémias HOBBY (ca. 130 g) dans 4 litres d’eau courante et remplissez la bac d’élevage de cette solution. Raccordez ensuite votre
pompe à air. Vous maintenez ainsi les fines algues nutritives en suspension, car avec le temps même les plus fines particules finissent par se déposer sous
leur propre poids au fond du récipient et ne sont plus très faciles à ingérer par les nauplies d’artémias comme nourriture.
Le kit HOBBY Incubator Set permet d’élever facilement les artémias à la température ambiante. A des températures inférieures à 15° et 20°C, la crois-
sance est cependant plus lente. Les artémias se développent aussi bien à la lumière naturelle qu’à la lumière artificielle.
Après le troisième jour, donnez comme nourriture initial HOBBY Liquizell au compte-gouttes (reportez-vous au mode d’emploi de HOBBY Liquizell) étant
donné que l’eau se pollue autrement rapidement. Au bout de cinq jours de croissance des nauplies, vous pouvez passer à la nourriture HOBBY Mikrozell
étant donné que les outils de mastication sont mieux développés.
Instructions for use
The HOBBY Incubator Set (Fig. 1) consists of: 1 HOBBY Incubator, 1 container of HOBBY Artemix, 1 container of HOBBY Artemia Salt, 1 breeding con-
tainer, 1 container of HOBBY Liquizell starting food and 1 HOBBY Artemia siev. Both the HOBBY Incubator and the HOBBY Incubator Set are designed
for use with an air pump (not supplied).
The HOBBY lncubator ensures the successful hatching of your brine-shrimp eggs. Start by placing the incubator bottle on the bottle base. When doing so,
ensure that the stopper is attached to the drain outlet. Now measure out two teaspoonfuls HOBBY Artemix mixture of salt and eggs (Fig. 2) and top up
the bottle to the red line with tap water (Fig. 3).
Seal the Incubator bottle with the screw-in plug and push the air hose through the hole in the Incubator cup supplied (Fig. 4). Attach the cup to the neck
of the bottle. Now turn the bottle over and place it on the base of the cup, while lifting the air hose to prevent any water escaping.
Open the drain outlet stopper to permit the subsequent escape of air, and connect the air hose to the air pump. This should be suspended, or in any case
kept higher than the HOBBY lncubator to prevent water running into the pump when it is switched off (Fig. 5)
The nauplii, as young brine shrimps are known, hatch out after being kept at 24°C after approx. 24-36 hours (or after 30-40 hours at 20°C). Switch the
pump off once the artemia nauplii have hatched and shut off the drain outlet once more with the stopper. Now turn the bottle over and unscrew the
adapter.
Set up the incubator bottle at an angle in the breeding container, as shown in Fig. 6, and let the remains of the artemia eggs sink to the bottom of the
bottle. After letting the bottle stand for five minutes, open the stopper at the base and drain the nauplii off into the container (Fig. 7). The hatched nauplii
separate out automatically as the remains of the eggs accumulate on the conically-shaped walls of the bottle. The bottle containing sediment can now be
removed. (Fig. 8)
Now connect the lifting pump at the point provided at the base and fit the end of the hose to the air pump (do not connect it to the power supply at this
stage). Dissolve 4/5 (ca. 130 g) of the container of HOBBY Artemia Salt in four litres of tap water and fill the breeding container with this solution. You
can now connect the air pump. This helps keep the minute particles of nutrient algae in suspension, as even the finest particles will eventually sink under
their own weight to the bottom of the tank, where the artemia nauplii would not be able to feed as easily.
The HOBBY Incubator Set permits easy breeding of artemia at room temperature (note however that they grow more slowly when kept at below 15-20°C).
Brine shrimps thrive successfully under either natural daylight or artificial light.
Wait three days before adding the artemia starter-food HOBBY Liquizell, adding it drop-by-drop only, as the water can otherwise easily tip over (see
instructions supplied with HOBBY Liquizell). Once the nauplii have been growing for a further five days – and their ability to masticate food is sufficiently
developed – you can change their feed for HOBBY Mikrozell.
Instrucciones de uso
El HOBBY Incubator Set (fig. 1) se compone de: 1 HOBBY Incubator, 1 bote de HOBBY Artemix, 1 bote de sal HOBBY Artemia Salz, 1 piscina de cría, 1
alimento primero para artemias HOBBY Liquizell y 1 tamizador HOBBY Artemia Sieb. La incubadora HOBBY Incubator y el HOBBY Incubator Set están
previstos para el funcionamiento con una bomba de aire, que no está contenida en el volumen de entrega.
Con la HOBBY lncubator Vd. conseguirá que los huevos de artemia eclosionen. En primer lugar, ponga la botella de incubación sobre el fondo de la botella
y asegúrese de que el tapón esté colocado en el desagüe. Ahora llene dos cucharillas de mezcla preparada de sal y huevos, HOBBY Artemix (fig. 2). A con-
tinuación, añada agua del grifo hasta la línea roja (fig. 3).
Entonces, cierre la botella con el cierre roscado y pase la manguera de aire por la apertura del vaso suministrado (fig. 4). Coloque el vaso sobre el cuello de
la botella. A continuación, gire la botella y colóquela sobre el fondo del vaso mientras levanta la manguera de aire, para que no se salga el agua.
Ahora abra el tapón del desagüe para que más adelante pueda salir el aire y conecte la conexión de aire a una bomba de aire. Sería recomendable que ésta
estuviera colgada, si es posible, o bien que esté posicionada más arriba que la incubadora HOBBY lncubator, para que, al desconectar, no entre agua en la
bomba (fig. 5).
A 24°C, los nauplius, como se conoce a las larvas de artemia, salen del huevo tras 24-36 horas, a 20º, tras 30-40 horas. Después de la eclosión de los nau-
plius, desconecte la bomba y vuelva a cerrar el desagüe con el tapón. Después, dé la vuelta a la botella y desenrosque el cierre.
Coloque la botella de incubación, tal como se indica en fig. 6, inclinada en la piscina de cría y deje que se asienten las cáscaras en el fondo de la botella.
Después de 5 minutos, abra el tapón y permita que los nauplius entren en la piscina (fig. 7). La separación de los nauplius eclosionados se produce de
forma automática, ya que las cáscaras se quedan adheridas a las paredes cónicas del cuello de la botella. Después puede Vd. retirar la botella con el poso
remanente (fig. 8).
Ahora conecte la bomba renovadora a la conexión prevista en el fondo y una el extremo de la manguera a su bomba de aire, que aún no está conectada a
la corriente. Disuelva 4/5 del bote de sal HOBBY Artemia Salz (ca. 130 g) en 4 litros de agua del grifo y llene con ello la piscina de cría. A continuación,
conecte su bomba de aire. De esta forma mantendrá las diminutas algas comestibles en flotación, ya que sino con el tiempo incluso partículas ínfimas
podrían hundirse por su propio peso hasta el fondo y los nauplius de artemia ya no las podrían atrapar fácilmente.
Con el HOBBY Incubator Set las artemias se pueden criar fácilmente a temperatura ambiente. Con temperaturas por debajo de 15-20°C , no obstante, el
crecimiento es más lento. Las artemias se desarrollan tanto con la luz del día como con la luz artificial.
No dé de comer hasta después del tercer día con el alimento primero HOBBY Liquizell y hágalo sólo a gotas (véase instrucciones de uso HOBBY Liquizell),
ya que sino el agua se vuelca rápidamente. Después de que los nauplius hayan crecido otros cinco días, puede Vd. cambiar la alimentación a HOBBY
Mikrozell, ya que los instrumentos de masticación están mejor formados.
Istruzioni d’uso
L’HOBBY Incubator Set (fig. 1) è composto di: 1 HOBBY Incubator, 1 scatola HOBBY Artemix, 1 scatola HOBBY Artemia Sale, 1 tanque de crecimento, 1
primo nutrimento d’artemia HOBBY Liquizell e 1 HOBBY setaccio artemia. L’HOBBY Incubator e l’HOBBY Incubator Set sono predisposti per il funzio-
namento con una camera d’aria, non contenuta nella fornitura.
Con l’HOBBY lncubator farete slittare con facilità le uova d’Artemia. Innanzi tutto mettete la bottiglia incubatoio sul fondo della bottiglia e prestate
attenzione che il tappo si trovi sullo scarico. Ora riempite due cucchiaini da tè di miscela preparata precedentemente di sale e uova, HOBBY Artemix
(fig. 2). Successivamente aggiungete acqua di rubinetto sino alla linea rossa (fig. 3).
Chiudete la bottiglia con il tappo a vite e introducete la camera d’aria dall’apertura del bicchiere allegato alla fornitura (fig. 4). Mettete il bicchiere sul
collo della bottiglia. Successivamente girate la bottiglia e mettetela sul fondo del bicchiere mentre sollevate la camera d’aria, in modo che non fuoriesca
acqua.
Ora aprite il tappo dallo scarico, in modo che in un secondo tempo l’aria possa di nuovo uscire e collegate il tubo flessibile ad una pompa pneumatica.
Dovreste appendere la stessa secondo le possibilità o posizionarla più in alto dell’HOBBY lncubator, in modo che con il disinnesto non vada acqunella
pompa (fig. 5)
A 24°C slittano i nauplii – detti giovani artemie – circa dopo 24-36 ore, a 20°C dopo 30-40 ore. Dopo lo slittamento dei nauplii d’artemia disinnestate la
pompa e chiudete di nuovo lo scarico con il tappo. Successivamente girate la bottiglia e svitate la chiusura.
Mettete la bottiglia incubatoio come nella figura 6 obliquamente nel tanque de crecimento e lasciate che i gusci si depongano nel fondo della bottiglia.
Dopo 5 minuti aprite il tappo nella parte inferiore della bottiglia e lasciate andare i nauplii nel bacino (fig. 7). La separazione dei nauplii slittati avviene in
modo automatico, mentre i gusci d’uova restano appesi nelle pareti della bottiglia a forma conica. Successivamente potete prelevare la bottiglia con il
deposito residuo. (fig. 8)
Mettete ora la pompa di alimentazione sul collegamento previsto nel fondo e collegate la fine della camera d’aria con la sua pompa pneumatica non
ancora allacciata alla corrente. Sciogliete 4/5 della scatola HOBBY Artemia Sale (ca. 130 g) in 4 litri d’acqua di rubinetto e con ciò riempite il bacino di
coltivazione. Successivamente collegate la Vostra pompa pneumatica. In questo modo mantenete l’equilibrio delle Vostre alghe fini da nutrimento, poiché
altrimenti le stesse particelle piccolissime con il loro peso proprio nel tempo si abbasserebbero sul fondo e non sarebbero più accettate così facilmente
come nutrimento dai nauplii di artemia.
Con l’HOBBY Incubator Set, le artemie possono essere facilmente coltivate a temperatura ambiente. Con valori più bassi sotto 15-20°C la crescita tuttavia
è più lenta. Le artemie si sviluppano sia con la luce diurna sia con quell’artificiale.
Otto-Hahn-Str. 9 • 53501 Grafschaft-Gelsdorf
Germany
DOHSE
AQUARISTIK KG
Geba Incubator-Set.neu 14.05.2001 16:43 Uhr Seite 2
Gebrauchsanweisung
Das HOBBY Incubator Set (Abb. 1) besteht aus: 1 HOBBY Incubator, 1 Dose HOBBY Artemix, 1 Dose HOBBY Artemia Salz, 1 HOBBY
Aufzuchtbecken, 1 Artemia Aufzuchtfutter HOBBY Liquizell und 1 HOBBY Artemia Sieb. Der HOBBY Incubator und das HOBBY Incubator Set sind
für den Betrieb mit einer Luftpumpe vorgesehen, die nicht im Lieferumfang enthalten ist.
Mit dem HOBBY lncubator bringen Sie Artemia Eier erfolgreich zum Schlupf. Stellen Sie zunächst die Incubatorflasche auf den Flaschenboden und
achten darauf, dass der Stopfen unten auf dem Ablass sitzt. Nun füllen Sie - falls vorhanden unter Zuhilfenahme eines Trichters - zwei schwach
gehäufte Teelöffel vorgefertigte Mischung aus Salz und Eiern, HOBBY Artemix ein (Abb. 2). Anschließend geben Sie Leitungswasser bis zum roten
Strich hinzu (Abb. 3).
Schließen Sie die Flasche dann mit dem Schraubverschluß und führen den Luftschlauch durch die kleine Öffnung des mitgelieferten Bechers (Abb. 4).
Setzen Sie den Becher auf den Falschenhals. Drehen Sie anschließend die Flasche um und stellen diese auf den Boden des Bechers während Sie den
Luftschlauch anheben, damit kein Wasser entläuft (Abb. 5).
Öffnen Sie nun den Stopfen vom Ablass, damit die Luft später wieder austreten kann und schließen den Luftschlauch an eine Luftpumpe. Diese sollten
Sie nach Möglichkeit höher als den HOBBY lncubator positionieren, damit beim Abschalten kein Wasser in die Pumpe läuft.
Bei 24°C schlüpfen die Nauplien - wie man junge Artemien nennt - etwa nach 24-36 Stunden, bei 20°C nach 30-40 Stunden. Schalten Sie nach dem
Schlüpfen der Nauplien die Pumpe ab und verschließen den Ablass wieder mit dem Stopfen. Drehen Sie danach die Flasche um und schrauben den
Verschluss ab.
Stellen Sie die Incubatorflasche schräg im Aufzuchtbecken auf (Abb. 6 ) und lassen diese etwa 5 Minuten stehen, damit sich die ungeschlüpften Eier
absetzen können. Öffnen Sie danach den Stopfen am unteren Teil der Flasche und lassen die Nauplien in das Becken laufen (Abb. 7). Die Eischalen blei-
ben automatisch an den konisch geformten Flaschenwänden hängen. Danach können Sie die Flasche mit dem zurückgebliebenen Bodensatz entneh-
men (Abb. 8).
Setzen Sie nun die Föderpume auf den am Boden vorgesehenen Anschluß und verbinden das Schlauchende mit Ihrer noch nicht am Strom angeschlos-
senen Luftpumpe. Lösen Sie 4/5 der Dose HOBBY Artemia Salz (ca. 130 g) in 4 Liter Leitungswasser und füllen das Aufzuchtbecken damit auf. Danach
schließen Sie Ihre Luftpumpe an. So sorgen Sie für ausreichende Belüftung und halten später nach der Fütterung die feinen Futteralgen in der
Schwebe. Selbst kleinste Futterteilchen würden sonst durch Ihr Eigengewicht mit der Zeit zu Boden sinken und wären so nicht mehr so leicht von den
Nauplien aufzunehmen.
Mit dem HOBBY Incubator Set lassen sich Artemia leicht bei Zimmertemperatur aufziehen. Bei niedrigen Werten unter 15-20°C ist das Wachstum
langsamer. Artemien entwickeln sich bei Tages- wie auch Kunstlicht. Bei der Aufzucht ist kein Wechseln des Wassers erforderlich.
Füttern Sie erst nach dem 3. Tag des Umfüllens in das Aufzuchtbecken mit dem Startfutter HOBBY Liquizell und wirklich nur tröpfchenweise (siehe
Gebrauchsanweisung HOBBY Liquizell) da das Wasser sonst schnell umkippt. Nachdem die Nauplien weitere fünf Tage gewachsen sind, können Sie die
Ernährung auf HOBBY Mikrozell umstellen, da die Kauwerkzeuge nun besser ausgebildet sind.
4
5
Utilizzate solo dopo il 3° giorno il nutrimento iniziale HOBBY Liquizell e davvero solo a goccia a goccia (vedi istruzioni per l’uso HOBBY Liquizell) poiché
l’acqua altrimenti si rovescerebbe facilmente. Dopo che i nauplii sono cresciuti per altri cinque giorni, potete cambiare il nutrimento con HOBBY Mikrozell,
poiché gli strumenti per masticare sono ora formati meglio.
Gebruiksaanwijzing
De HOBBY incubatorset (afb. 1) bestaat uit: 1 HOBBY incubator, 1 doos HOBBY Artemix, 1 doos HOBBY Artemia zout, 1 kweekreservoir, 1 Artemia
kweekvoeder HOBBY Liquizell en 1 HOBBY Artemia zeef. De HOBBY incubator en de HOBBY Incubatorset zijn voorzien voor de werking met een
luchtpomp, die niet bij de levering inbegrepen is.
Met behulp van de HOBBY incubator kunt u de eieren van de Artemia met succes laten uitkomen. Zet allereerst de incubatorfles op de flesbodem en
let erop dat de afsluitstop op de afloop zit. Giet vervolgens - indien voorhanden met behulp van een trechter – twee kleine theelepels van HOBBY
Artemix, een geprefabriceerde mengeling van zout en eieren, in (afb. 2). Daarna voegt u hieraan leidingwater tot aan de rode streep toe (afb. 3).
Sluit de fles dan met de schroefdop af en leid de luchtslang door de kleine opening van de meegeleverde beker (afb. 4). Zet de beker op de flessenhals.
Draai aansluitend de fles om en zet deze op de bodem van de beker terwijl u de luchtslang optilt opdat er geen water zou weglopen (afb. 5).
Open vervolgens de afsluitdop van de afloop zodat de lucht later weer kan ontsnappen en verbind de luchtslang met een luchtpomp. Deze kunt u best
volgens mogelijkheid hoger dan de HOBBY incubator positioneren opdat er bij het uitschakelen geen water in de pomp loopt.
Ongeveer na 24-36 uren komt de nauplius– zoals de jonge artemia genoemd worden – bij 24°C uit en na 30-40 uren bij 20°C. Schakel na het uitko-
men van de nauplius de pomp uit en sluit de afloop opnieuw met de afsluitstop. Draai de fles daarna om en schroef de dop eraf.
Positioneer de incubatorfles schuin in het kweekreservoir (afb. 6) en laat deze ongeveer 5 minuten staan zodat de niet-uitgekomen eieren kunnen
bezinken. Open vervolgens de afsluitstop aan het onderste deel van de fles en laat de nauplius in het reservoir lopen (afb. 7). De eierschalen blijven
automatisch aan de conisch gevormde wanden van de fles hangen. Daarna kunt u de fles met het achtergebleven bezinksel wegnemen. (afb. 8)
Zet nu de voedingspomp op de aansluiting die op de bodem voorzien is en verbind het uiteinde van de slang met uw luchtpomp die nog niet aan de
elektriciteit aangesloten is. Los 4/5 van de doos HOBBY Artemia Zout (ca. 130 g) in 4 liter leidingwater op en vul het kweekreservoir hiermee op. Sluit
daarna uw luchtpomp aan. Zo zorgt u voor voldoende luchttoevoer en houdt u later na het voeren de kleine voederalgen omhoog. Zelfs de kleinste
voederdeeltjes zullen anders door hun eigen gewicht na verloop van tijd op de bodem zinken en kunnen zodoende niet meer gemakkelijk door de nau-
plius opgenomen worden.
Met behulp van de HOBBY incubatorset kunt u artemia gemakkelijk bij kamertemperatuur kweken. Bij lagere waarden onder 15-20°C is de groei
langzamer. Artemia ontwikkelen zich zowel bij daglicht als bij kunstlicht. Bij het kweken is het vervangen van het water niet nodig.
Voer pas na de 3de dag van het omvullen in het kweekreservoir met het startvoeder HOBBY Liquizell en dit ook maar druppelsgewijs (zie gebruiksaan-
wijzing HOBBY Liquizell) omdat het water anders snel omkipt. Nadat de nauplius nog vijf dagen gegroeid is, kunt u met de voeding op HOBBY
Mikrozell overgaan, daar de kauwwerktuigen nu beter ontwikkeld zijn.
Tipp:
Möchten Sie tiefer in die Welt der Artemia eindringen, empfehlen wir Ihnen das Buch
„Artemia. Der Urzeitkrebs“ von Gerhard Schwarz. Auch dieses bekommen Sie im
Fachhandel.
Conseil :
Si vous désirez en savoir plus sur les artémias nous vous recommandons le livre
„Artémia“ Le crustacé des temps primitifs“ de Gerhard Schwarz. Ce livre est égale-
ment disponible chez votre détaillant habituel.
Useful hint:
If you wish to discover more on the subject of artemia you should read the book
”Artemia - The shrimp from a prehistoric age” by Gerhard Schwarz available at
your specialist dealers.
DOHSE AQUARISTIK KG
www.hobby-dohse.com
DOHSE
AQUARISTIK KG
2
3
8
7
6
1
Geba Incubator-Set.neu 14.05.2001 16:43 Uhr Seite 1
Wyszukiwarka
Podobne podstrony:
Aquaristik Aquarium 55 HOBBY DOHSE Manual UVC Deluxe
Hobby Dohse Manual Steward Rondo
Hobby Dohse Manual Aqua Thermo
Hobby Dohse Manual Algenkiller
Hobby Dohse Manual Sanoxon
Aquaristik Aquarium 55 HOBBY DOHSE Manual UVC Deluxe
Hobby Dohse Manual Vulcano
Hobby Dohse Manual Hygro Plus
PANsound manual
als manual RZ5IUSXZX237ENPGWFIN Nieznany
hplj 5p 6p service manual vhnlwmi5rxab6ao6bivsrdhllvztpnnomgxi2ma vhnlwmi5rxab6ao6bivsrdhllvztpnnomg
BSAVA Manual of Rabbit Surgery Dentistry and Imaging
więcej podobnych podstron