
2005 ELECTRICAL
Charging - RAV4
CHARGING SYSTEM
ON-VEHICLE INSPECTION
1. CHECK BATTERY ELECTROLYTE LEVEL
Check the electrolyte quantity of each cell.
Maintenance-free battery:
If under the lower level, replace the battery (or add distilled water if possible) and check the charging
system.
Except Maintenance-free battery:
If under the lower level, add distilled water.
2. Except Maintenance-free battery:
CHECK BATTERY SPECIFIC GRAVITY
Check the specific gravity of each cell.
Standard specific gravity: 1.25 to 1.29 at 20°C (68°F)
If the specific gravity is less than specification, charge the battery.
CAUTION:
Check that the battery cables are connected to the correct terminals.
Disconnect the battery cables when the battery is given a quick
charge.
Do not perform tests with a high voltage insulation resistance tester.
Never disconnect the battery while the engine is running.
Check that the charging cable is tightened on terminal B of the
generator and the fuse box.
Do not perform the inspection of the alternator in which terminal F is
connected to the other terminal.
2005 Toyota RAV4
2005 ELECTRICAL Charging - RAV4
2005 Toyota RAV4
2005 ELECTRICAL Charging - RAV4
Microsoft
Tuesday, July 21, 2009 10:23:45 AM
Page 1
© 2005 Mitchell Repair Information Company, LLC.
Microsoft
Tuesday, July 21, 2009 10:23:50 AM
Page 1
© 2005 Mitchell Repair Information Company, LLC.
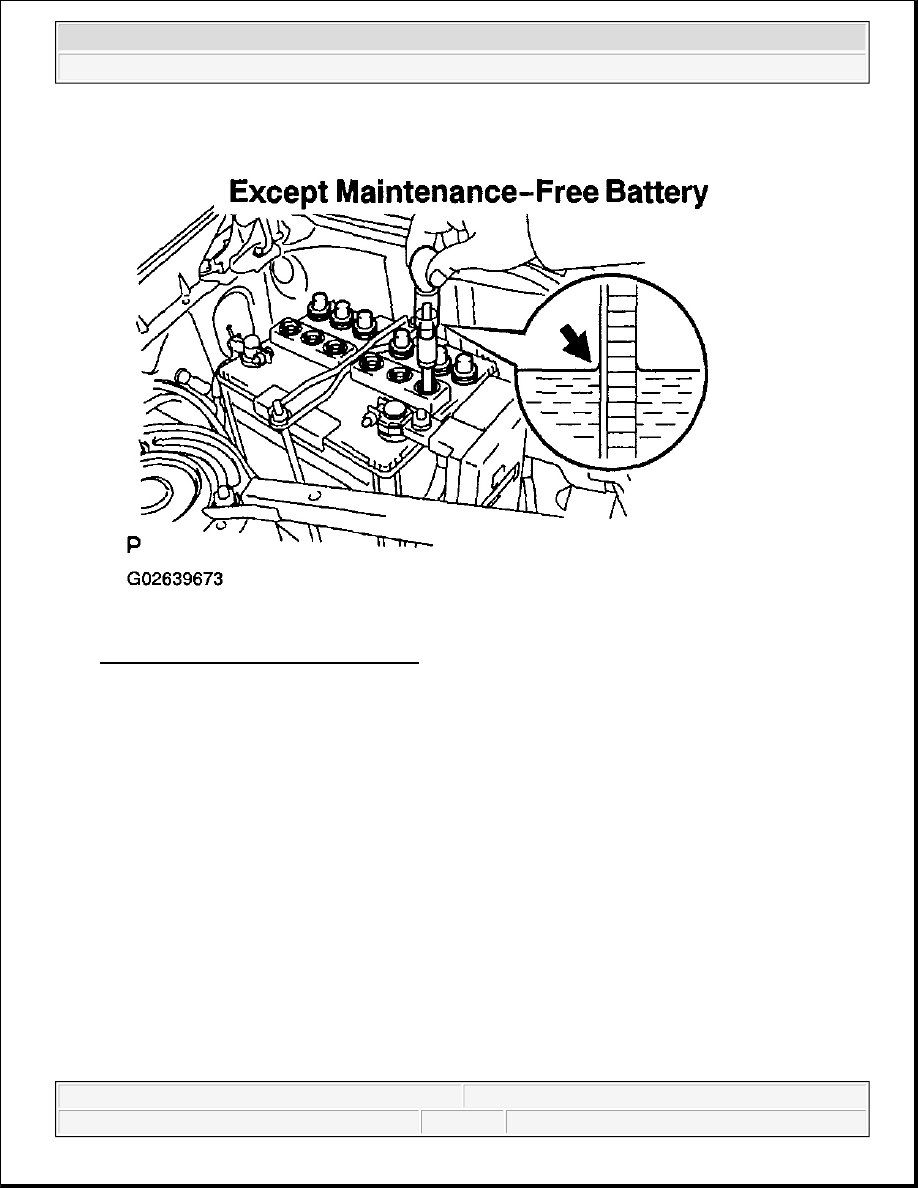
Fig. 1: Checking Battery Specific Gravity
Courtesy of TOYOTA MOTOR SALES, U.S.A., INC.
3. Maintenance-free battery:
CHECK BATTERY VOLTAGE
a. After having driven the vehicle and in the case that 20 minutes have not passed after having
stopped the engine, turn the ignition switch ON and turn on the electrical system (headlight, blower
motor, rear defogger etc.) for 60 seconds to remove the surface charge.
b. Turn the ignition switch OFF and turn off the electrical systems.
2005 Toyota RAV4
2005 ELECTRICAL Charging - RAV4
Microsoft
Tuesday, July 21, 2009 10:23:46 AM
Page 2
© 2005 Mitchell Repair Information Company, LLC.
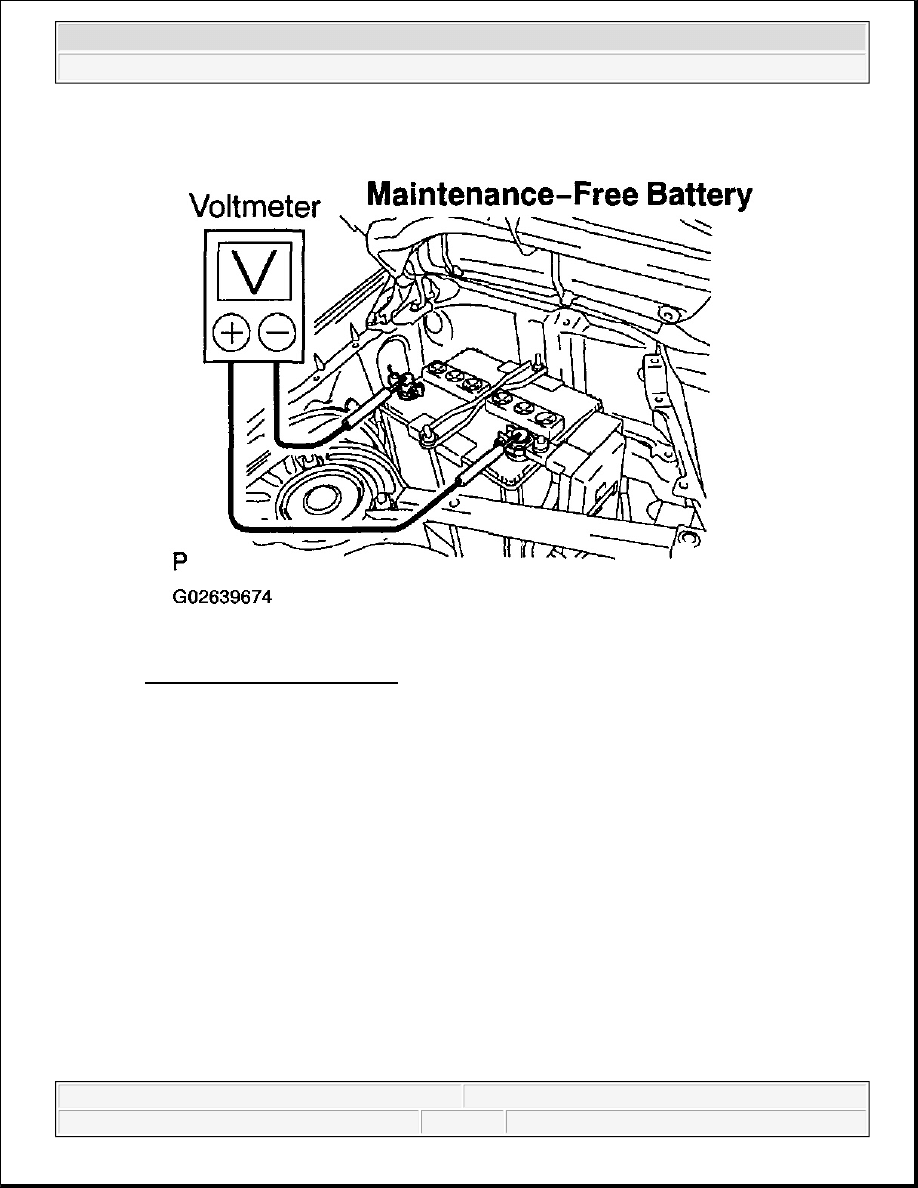
Fig. 2: Checking Battery Voltage
Courtesy of TOYOTA MOTOR SALES, U.S.A., INC.
c. Measure the battery voltage between the negative (-) and positive (+) terminals of the battery.
Standard voltage: 12.5 to 12.9 V at 20°C (68°F)
If the voltage is less than specification, charge the battery.
4. CHECK BATTERY TERMINALS, FUSIBLE LINK AND FUSES
a. Check that the battery terminals are not loosen or corroded.
b. Check the fuses and fusible link for continuity.
5. INSPECT DRIVE BELT
a. Visually check the belt for excessive wear, frayed cords etc.
If any defect has been found, replace the drive belt.
HINT:
2005 Toyota RAV4
2005 ELECTRICAL Charging - RAV4
Microsoft
Tuesday, July 21, 2009 10:23:46 AM
Page 3
© 2005 Mitchell Repair Information Company, LLC.
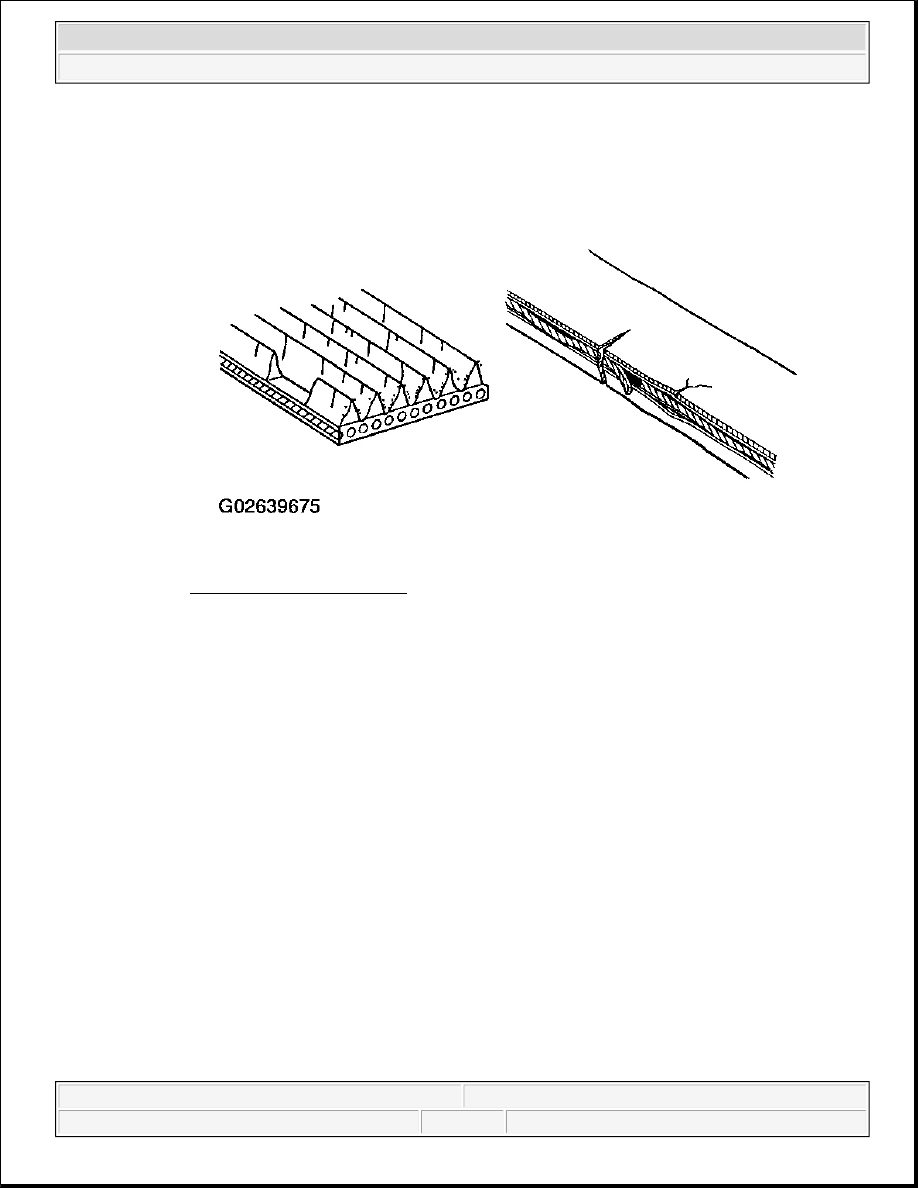
Cracks on the rib side of a belt are considered acceptable. If the belt has chunks missing from
the ribs, it should be replaced.
Fig. 3: Inspecting Drive Belt
Courtesy of TOYOTA MOTOR SALES, U.S.A., INC.
Hook SST on the hexagonal portion of the drive belt tensioner bracket, compress the drive
belt tension by turning the drive belt tensioner bracket clockwise and, take 3 seconds or more
for 1 stroke.
The drive belt tension can be released by turning the belt tensioner.
SST 09249-63010
2005 Toyota RAV4
2005 ELECTRICAL Charging - RAV4
Microsoft
Tuesday, July 21, 2009 10:23:46 AM
Page 4
© 2005 Mitchell Repair Information Company, LLC.
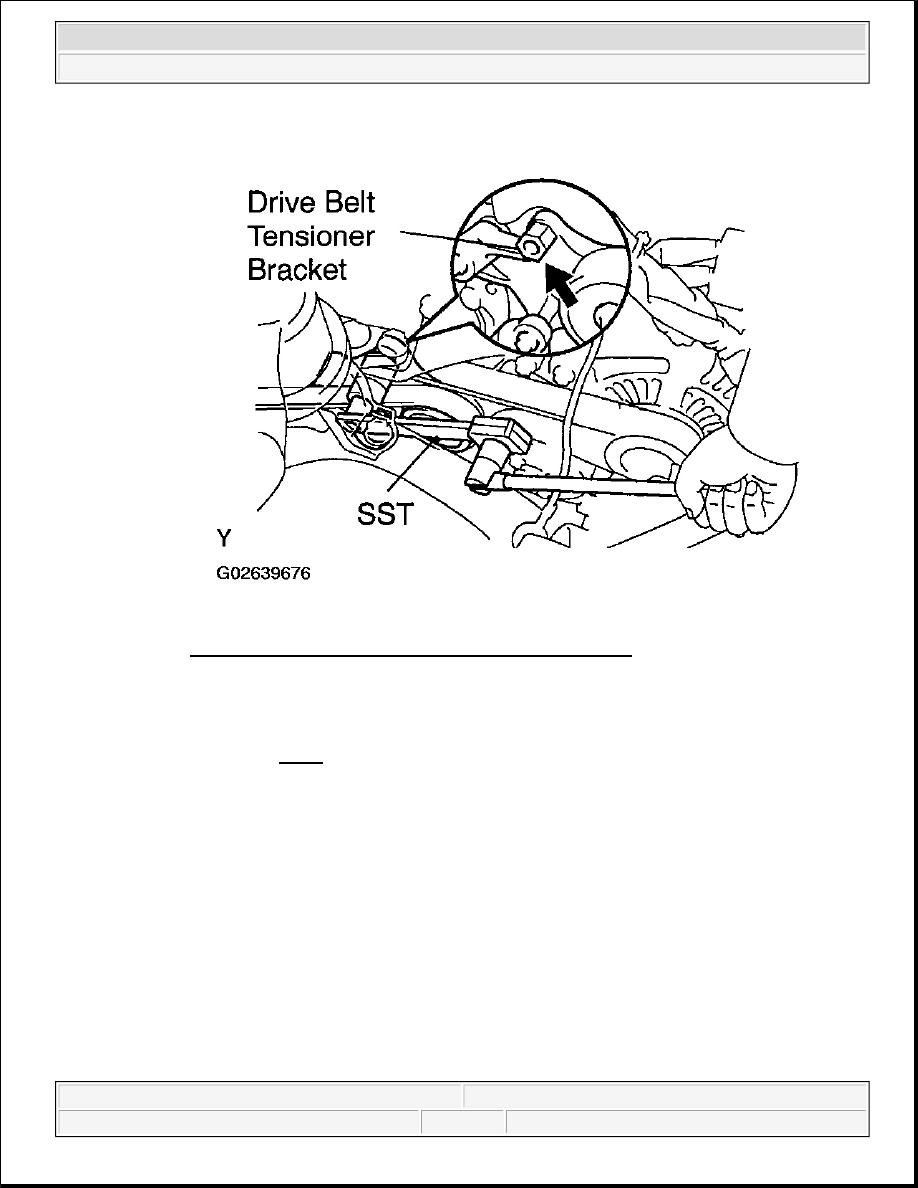
Fig. 4: Identifying Drive Belt Tensioner Bracket Hexagon
Courtesy of TOYOTA MOTOR SALES, U.S.A., INC.
b. Check the belt tensioner operation.
Check that belt tensioner moves downward when the drive belt is pressed down at the points
indicated in Fig. 5 with approx. 98 N (10kgf, 22.0 lbf) of force.
2005 Toyota RAV4
2005 ELECTRICAL Charging - RAV4
Microsoft
Tuesday, July 21, 2009 10:23:46 AM
Page 5
© 2005 Mitchell Repair Information Company, LLC.
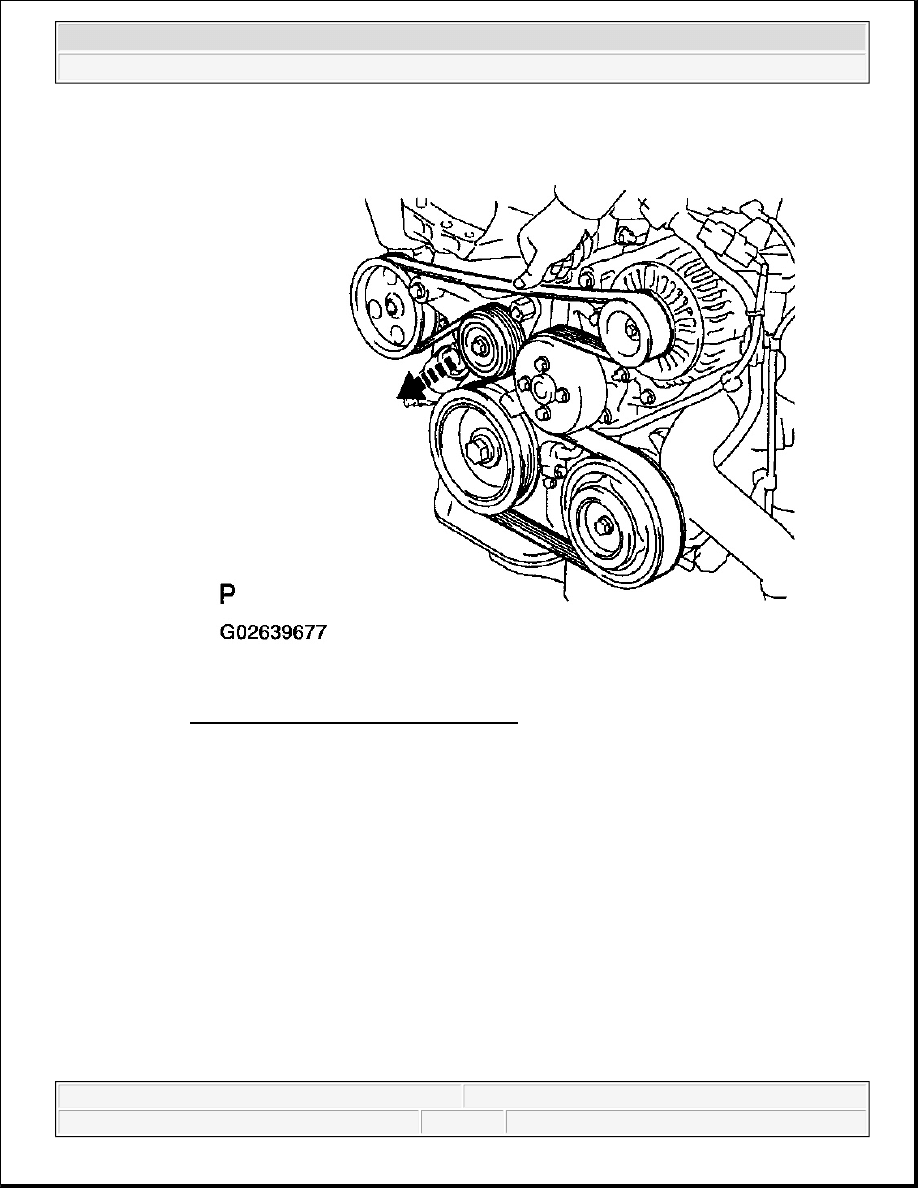
Fig. 5: Checking Belt Tensioner Operation
Courtesy of TOYOTA MOTOR SALES, U.S.A., INC.
Check the alignment of the belt tensioner pulley to make sure the drive belt will not slip off
the pulley.
2005 Toyota RAV4
2005 ELECTRICAL Charging - RAV4
Microsoft
Tuesday, July 21, 2009 10:23:46 AM
Page 6
© 2005 Mitchell Repair Information Company, LLC.
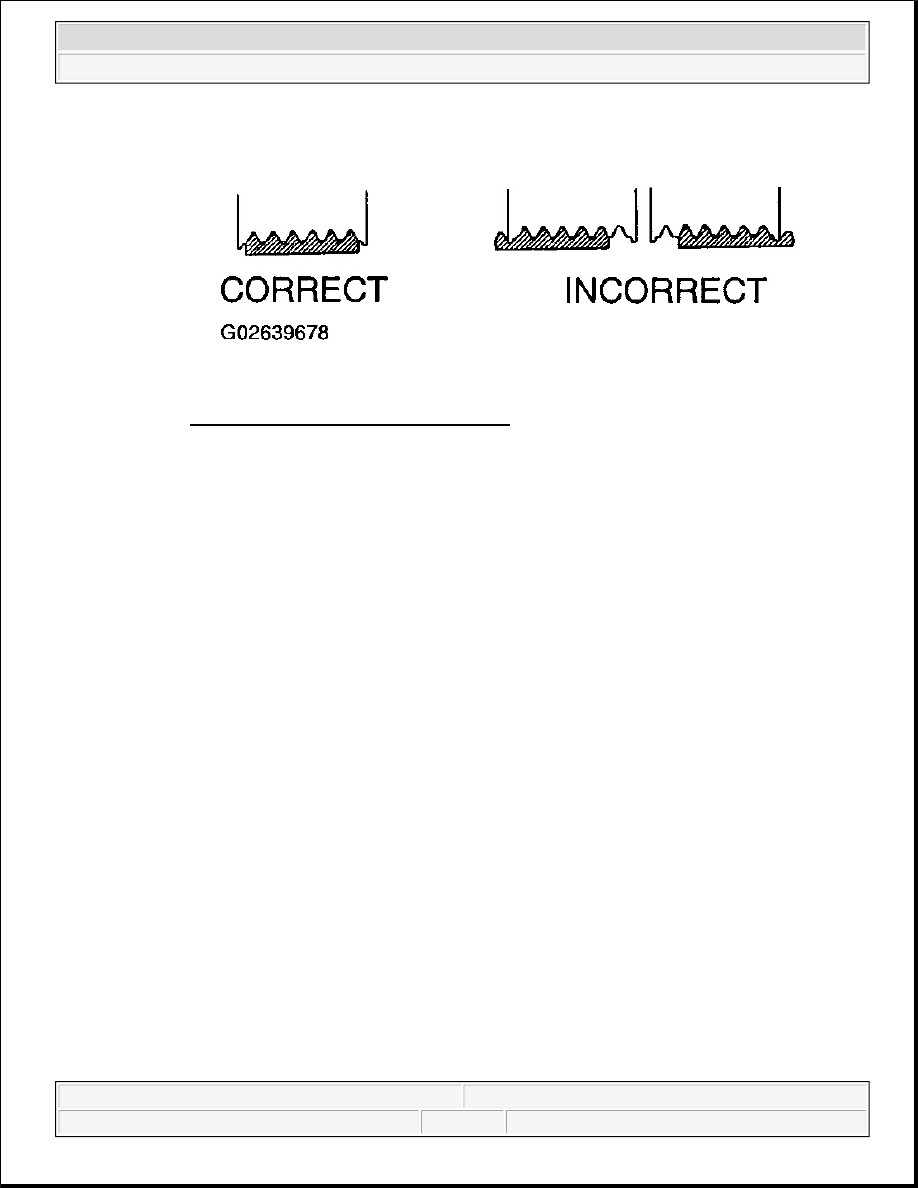
Fig. 6: Checking Belt & Pulley Alignment
Courtesy of TOYOTA MOTOR SALES, U.S.A., INC.
If necessary, replace the belt tensioner.
HINT:
After installing a belt, check that it fits properly in the ribbed grooves.
Check with your hand to confirm that the belt has not slipped out of the groove on the bottom of the
pulley.
After installing a new belt, run the engine for about 5 minutes and check the belt tension existing.
6. VISUALLY CHECK GENERATOR WIRING AND LISTEN FOR ABNORMAL NOISES
a. Check that the wiring is in good condition.
b. Check that there is no abnormal noise from the generator while the engine is running.
7. INSPECT CHARGE WARNING LIGHT CIRCUIT
a. Turn the ignition switch ON. Check that the charge warning light comes on.
b. Start the engine. Check that the light goes off.
If the light does not operate as specified, troubleshoot the charge warning light circuit.
8. INSPECT CHARGING CIRCUIT WITHOUT LOAD
HINT:
If a battery/generator tester is available, connect the tester to the charging circuit as per manufacturer's
instructions.
a. If a tester is not available, connect a voltmeter and ammeter to the charging circuit as follows:
1. Disconnect to the wire from terminal B of the alternator and connect it to the negative (-)
lead of the ammeter.
2005 Toyota RAV4
2005 ELECTRICAL Charging - RAV4
Microsoft
Tuesday, July 21, 2009 10:23:46 AM
Page 7
© 2005 Mitchell Repair Information Company, LLC.
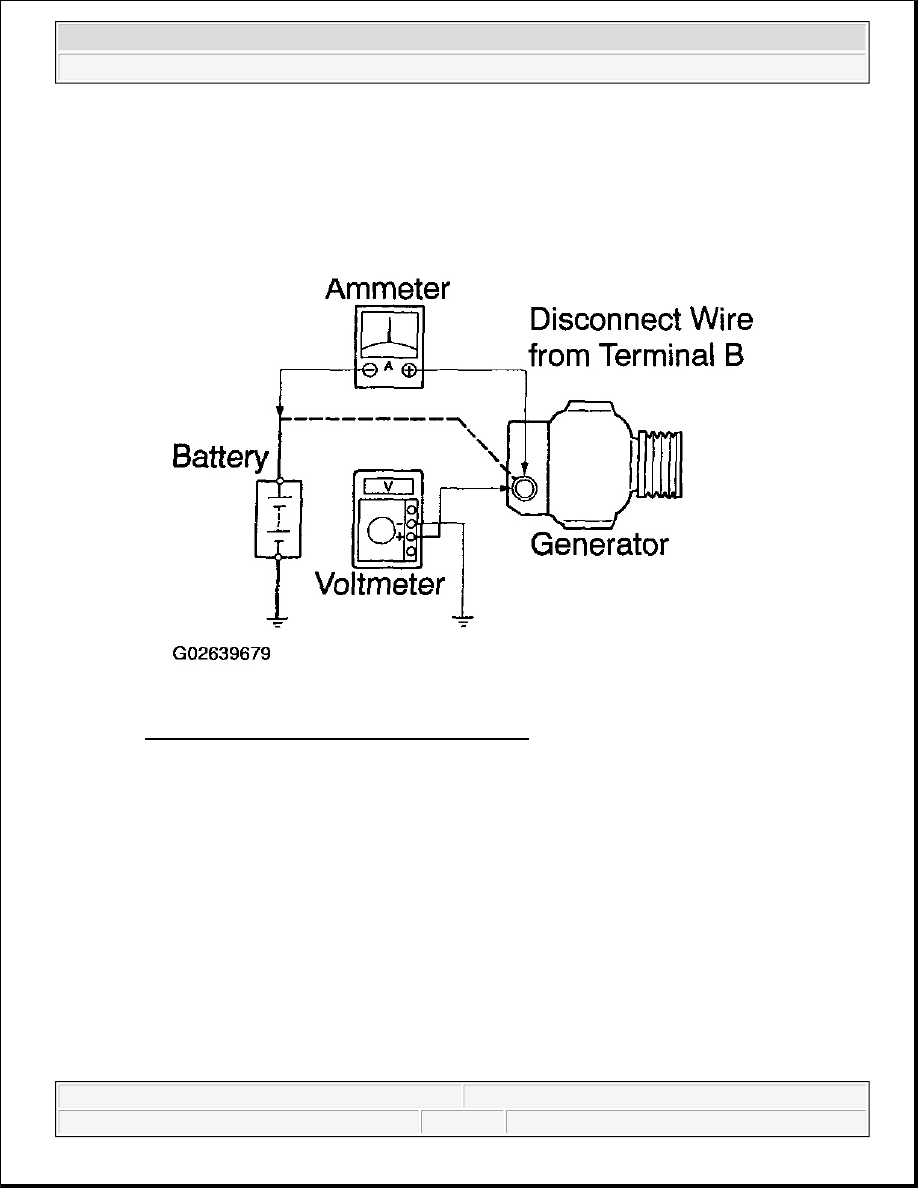
2. Connect the positive (+) lead of the ammeter to terminal B of the alternator.
3. Connect the positive (+) lead of the voltmeter to terminal B of the alternator.
4. Ground the negative (-) lead of the voltmeter.
Fig. 7: Inspecting Charging Circuit Without Load
Courtesy of TOYOTA MOTOR SALES, U.S.A., INC.
b. Check the charging circuit as follows:
With the engine running from idle to 2,000 RPM, check the reading on the ammeter and voltmeter.
Standard amperage: 10 A or less
Standard voltage: 13.2 to 14.8 V
If the voltmeter reading is more than standard voltage, replace the voltage regulator.
9. INSPECT CHARGING CIRCUIT WITH LOAD
a. With the engine running at 2,000 RPM, turn on the high beam headlights and place the heater
blower switch at H (High).
b. Check the reading on the ammeter.
2005 Toyota RAV4
2005 ELECTRICAL Charging - RAV4
Microsoft
Tuesday, July 21, 2009 10:23:46 AM
Page 8
© 2005 Mitchell Repair Information Company, LLC.

Standard amperage: 30 A or more
If the ammeter reading is less than standard amperage, repair the generator.
HINT:
If the battery is fully charged, the indication will sometimes be less than standard amperage.
GENERATOR
COMPONENTS
2005 Toyota RAV4
2005 ELECTRICAL Charging - RAV4
Microsoft
Tuesday, July 21, 2009 10:23:46 AM
Page 9
© 2005 Mitchell Repair Information Company, LLC.
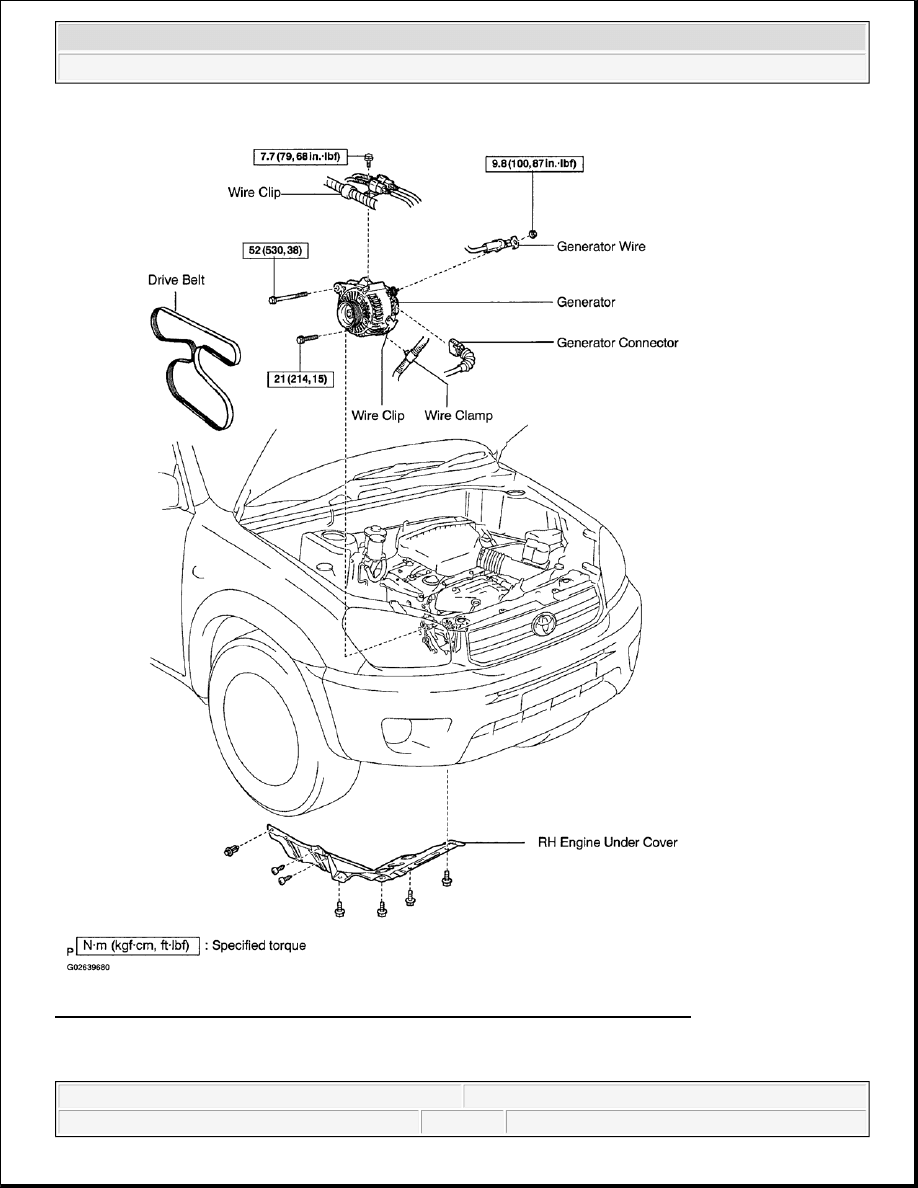
Fig. 8: Exploded View Of Generator Components & Torque Specifications (1 Of 3)
Courtesy of TOYOTA MOTOR SALES, U.S.A., INC.
2005 Toyota RAV4
2005 ELECTRICAL Charging - RAV4
Microsoft
Tuesday, July 21, 2009 10:23:46 AM
Page 10
© 2005 Mitchell Repair Information Company, LLC.
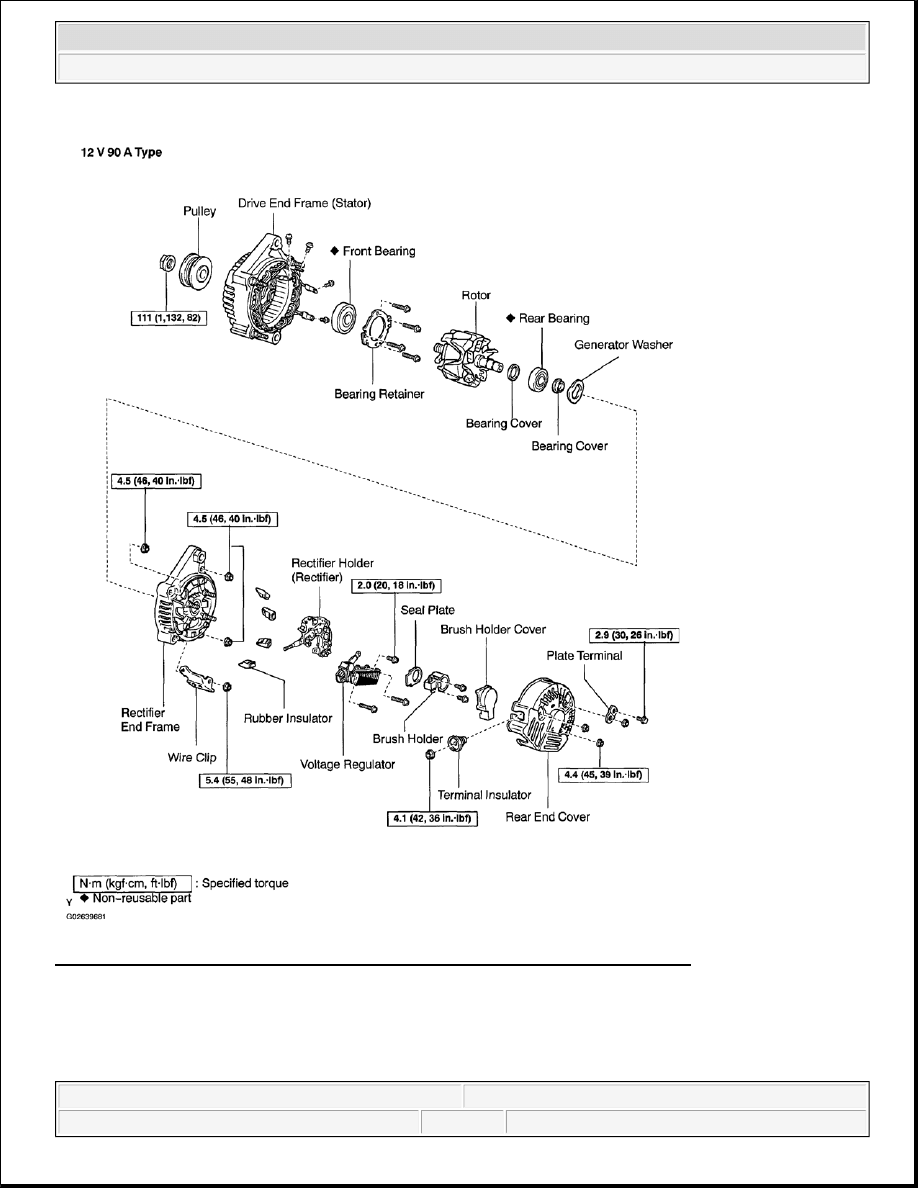
Fig. 9: Exploded View Of Generator Components & Torque Specifications (2 Of 3)
Courtesy of TOYOTA MOTOR SALES, U.S.A., INC.
2005 Toyota RAV4
2005 ELECTRICAL Charging - RAV4
Microsoft
Tuesday, July 21, 2009 10:23:46 AM
Page 11
© 2005 Mitchell Repair Information Company, LLC.

Fig. 10: Exploded View Of Generator Components & Torque Specifications (3 Of 3)
Courtesy of TOYOTA MOTOR SALES, U.S.A., INC.
2005 Toyota RAV4
2005 ELECTRICAL Charging - RAV4
Microsoft
Tuesday, July 21, 2009 10:23:46 AM
Page 12
© 2005 Mitchell Repair Information Company, LLC.

REMOVAL
1. REMOVE DRIVE BELT
Hook SST on the hexagonal portion of the drive belt tensioner bracket, compress the drive belt tension by
turning the drive belt tensioner bracket clockwise, and remove the drive belt.
SST 09249-63010
Fig. 11: Identifying Drive Belt Tensioner Bracket Hexagon
Courtesy of TOYOTA MOTOR SALES, U.S.A., INC.
2. REMOVE GENERATOR
a. Remove the bolt, and disconnect the wire clip on the wire connectors from the generator.
b. Disconnect the wire clamp from the wire clip.
c. Remove the cap and nut, and disconnect the generator wire.
d. Disconnect the generator connector.
NOTE:
Compress the drive belt tensioner by taking 3 seconds or more and
remove the drive belt.
2005 Toyota RAV4
2005 ELECTRICAL Charging - RAV4
Microsoft
Tuesday, July 21, 2009 10:23:46 AM
Page 13
© 2005 Mitchell Repair Information Company, LLC.

Fig. 12: Disconnecting Generator Harness Connectors
Courtesy of TOYOTA MOTOR SALES, U.S.A., INC.
e. Remove the 2 bolts and generator.
2005 Toyota RAV4
2005 ELECTRICAL Charging - RAV4
Microsoft
Tuesday, July 21, 2009 10:23:46 AM
Page 14
© 2005 Mitchell Repair Information Company, LLC.
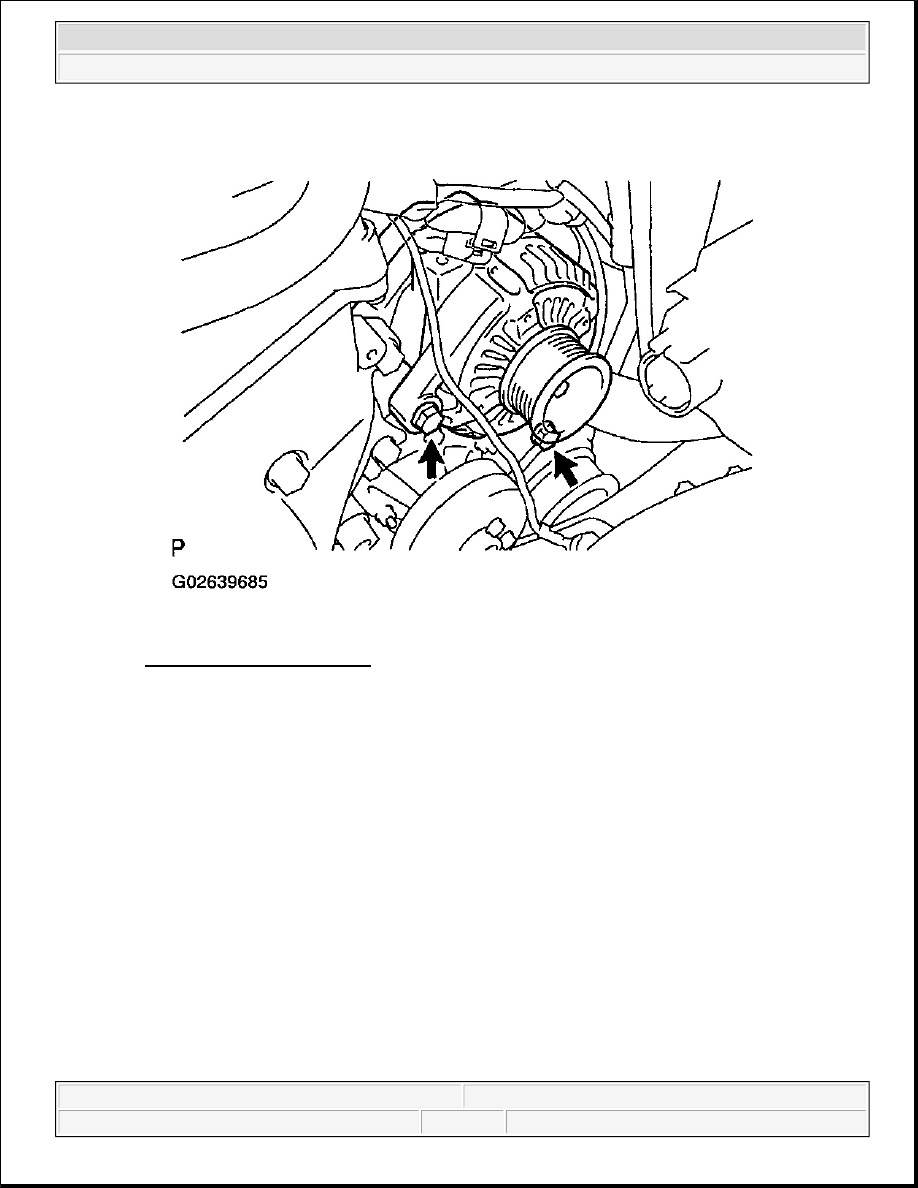
Fig. 13: Removing Generator
Courtesy of TOYOTA MOTOR SALES, U.S.A., INC.
DISASSEMBLY
1. 12 V 90 A type:
REMOVE REAR END COVER
a. Remove the nut and terminal insulator.
2005 Toyota RAV4
2005 ELECTRICAL Charging - RAV4
Microsoft
Tuesday, July 21, 2009 10:23:46 AM
Page 15
© 2005 Mitchell Repair Information Company, LLC.

Fig. 14: Removing Nut & Terminal Insulator
Courtesy of TOYOTA MOTOR SALES, U.S.A., INC.
b. Remove the bolt, 3 nuts, plate terminal, end cover and brush holder cover.
2005 Toyota RAV4
2005 ELECTRICAL Charging - RAV4
Microsoft
Tuesday, July 21, 2009 10:23:46 AM
Page 16
© 2005 Mitchell Repair Information Company, LLC.
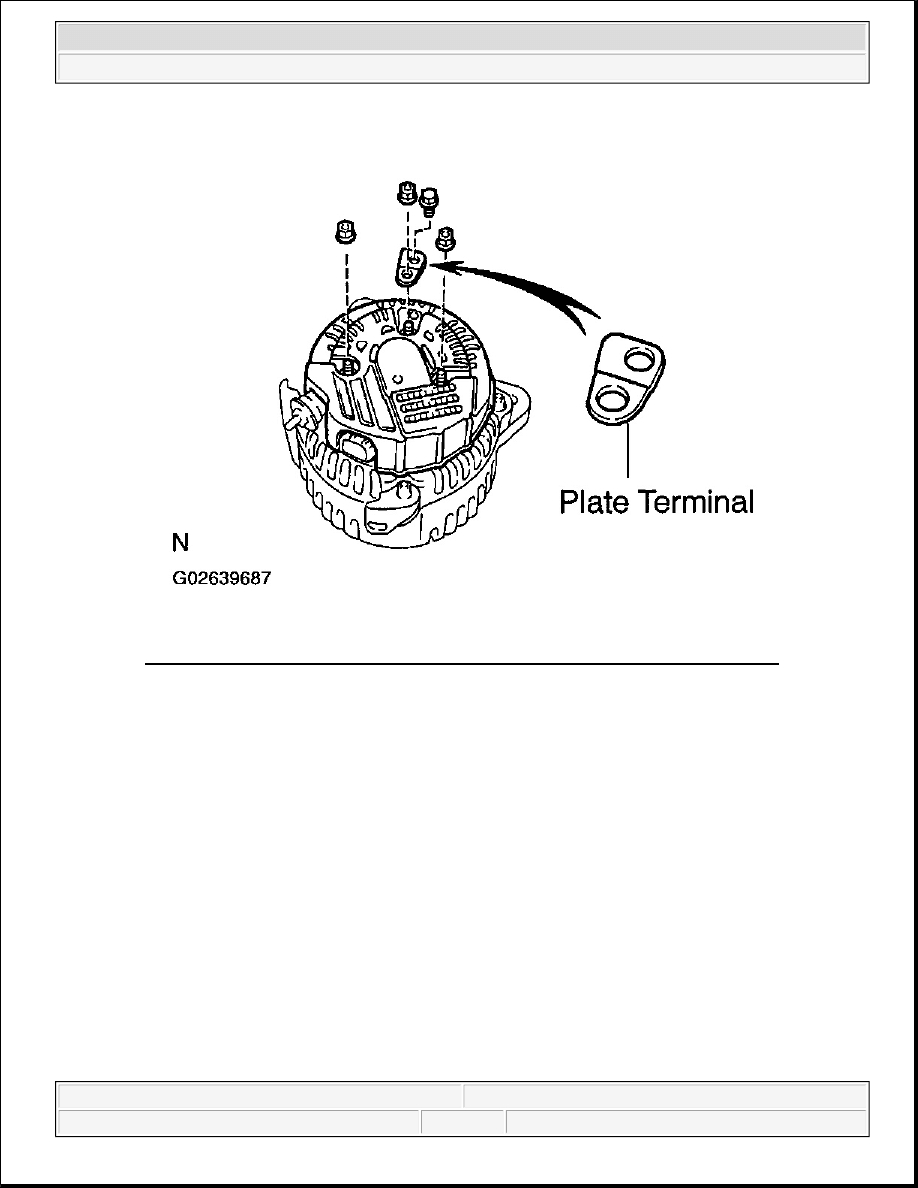
Fig. 15: Removing Bolt, 3 Nuts, Plate Terminal, End Cover & Brush Holder Cover
Courtesy of TOYOTA MOTOR SALES, U.S.A., INC.
2. 12 V 100 A type:
REMOVE REAR END COVER
Remove the 3 nuts and terminal insulator.
2005 Toyota RAV4
2005 ELECTRICAL Charging - RAV4
Microsoft
Tuesday, July 21, 2009 10:23:46 AM
Page 17
© 2005 Mitchell Repair Information Company, LLC.
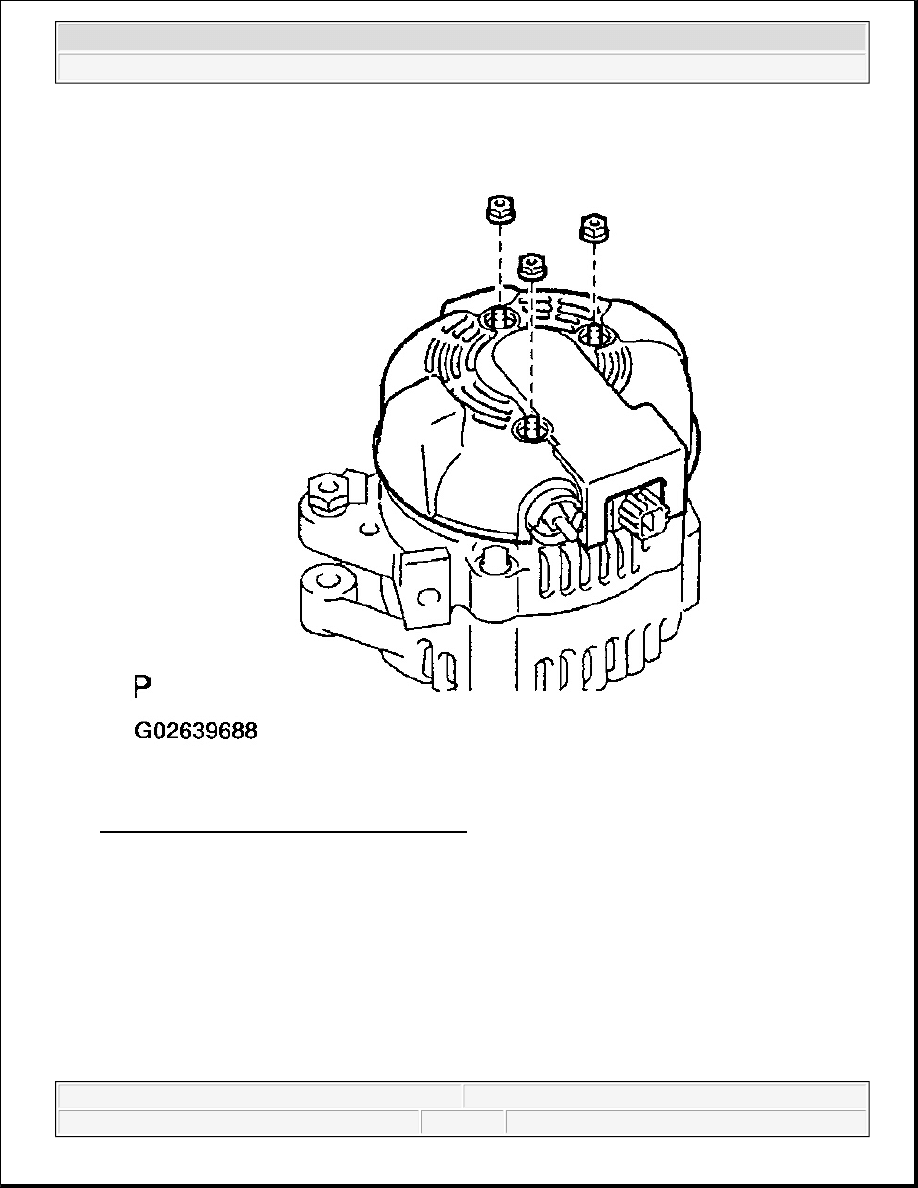
Fig. 16: Removing 3 Nuts & Terminal Insulator
Courtesy of TOYOTA MOTOR SALES, U.S.A., INC.
3. 12 V 90 A type:
REMOVE BRUSH HOLDER AND VOLTAGE REGULATOR
a. Remove the 5 screws, brush holder and voltage regulator.
b. Remove the seal plate from the rectifier end frame.
2005 Toyota RAV4
2005 ELECTRICAL Charging - RAV4
Microsoft
Tuesday, July 21, 2009 10:23:46 AM
Page 18
© 2005 Mitchell Repair Information Company, LLC.

Fig. 17: Removing 5 Screws, Brush Holder & Voltage Regulator
Courtesy of TOYOTA MOTOR SALES, U.S.A., INC.
4. 12 V 100 A type:
REMOVE BRUSH HOLDER AND TERMINAL INSULATOR
a. Remove the terminal insulator.
2005 Toyota RAV4
2005 ELECTRICAL Charging - RAV4
Microsoft
Tuesday, July 21, 2009 10:23:46 AM
Page 19
© 2005 Mitchell Repair Information Company, LLC.
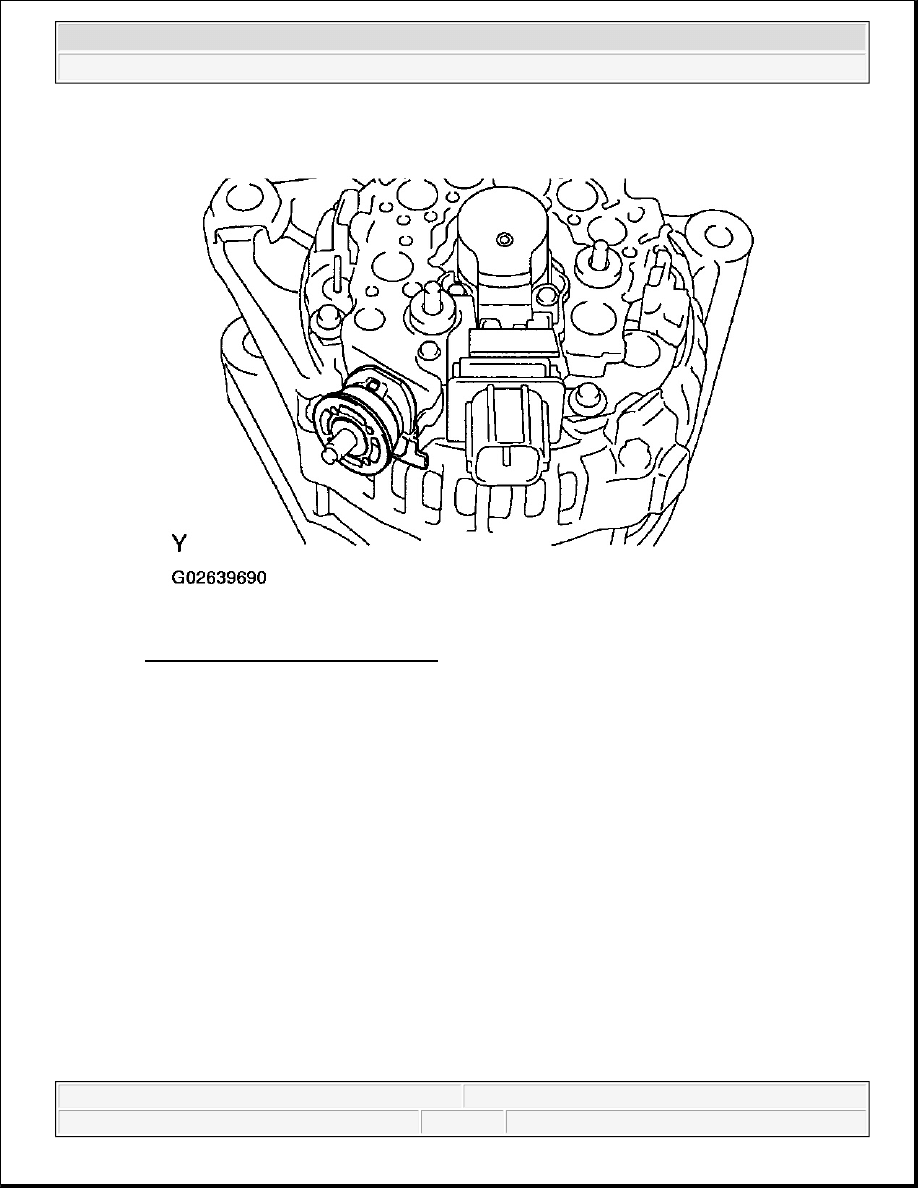
Fig. 18: Removing Terminal Insulator
Courtesy of TOYOTA MOTOR SALES, U.S.A., INC.
b. Remove the 2 screws and brush holder.
2005 Toyota RAV4
2005 ELECTRICAL Charging - RAV4
Microsoft
Tuesday, July 21, 2009 10:23:46 AM
Page 20
© 2005 Mitchell Repair Information Company, LLC.
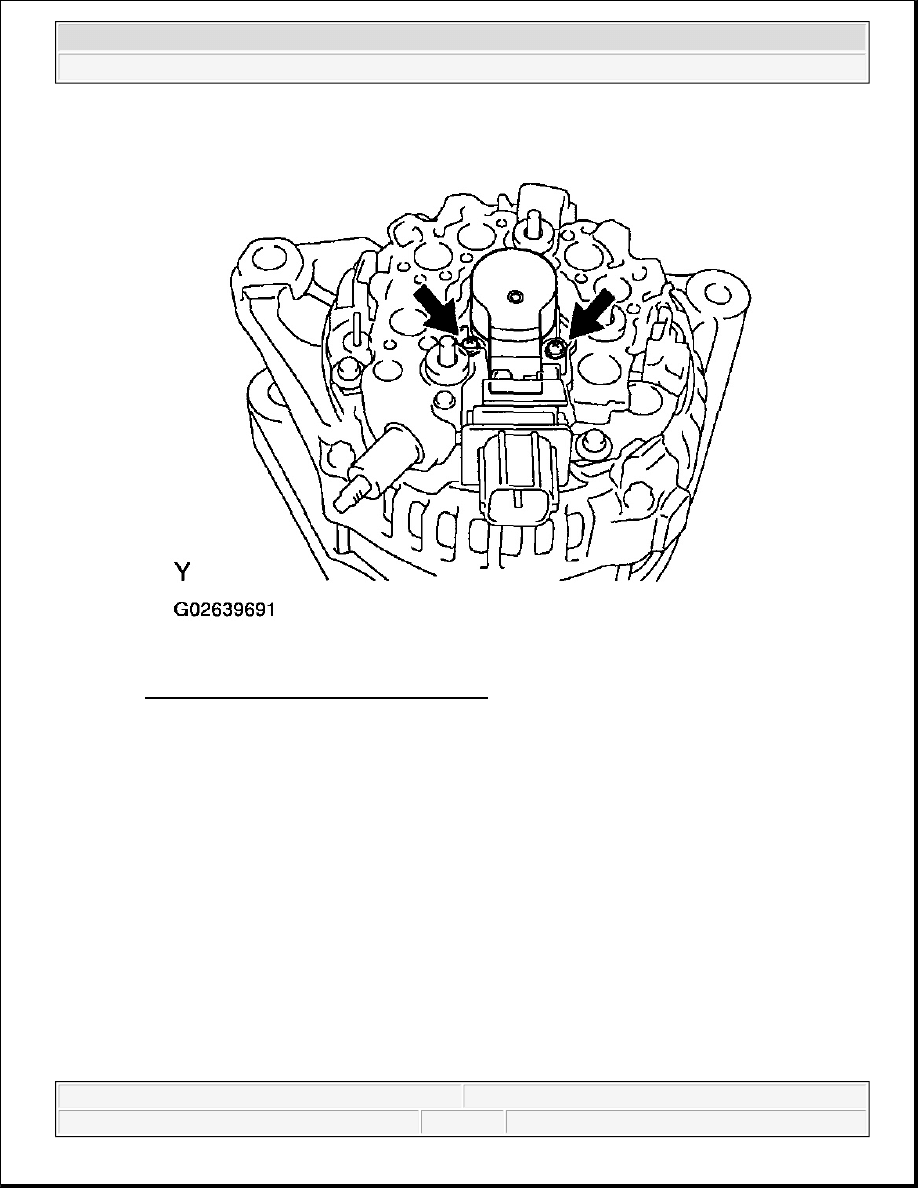
Fig. 19: Removing 2 Screws & Brush Holder
Courtesy of TOYOTA MOTOR SALES, U.S.A., INC.
5. 12 V 90 A type:
REMOVE RECTIFIER HOLDER
a. Remove the 4 screws and rectifier holder.
b. Remove the 4 rubber insulators.
2005 Toyota RAV4
2005 ELECTRICAL Charging - RAV4
Microsoft
Tuesday, July 21, 2009 10:23:46 AM
Page 21
© 2005 Mitchell Repair Information Company, LLC.

Fig. 20: Removing 4 Screws & Rectifier Holder
Courtesy of TOYOTA MOTOR SALES, U.S.A., INC.
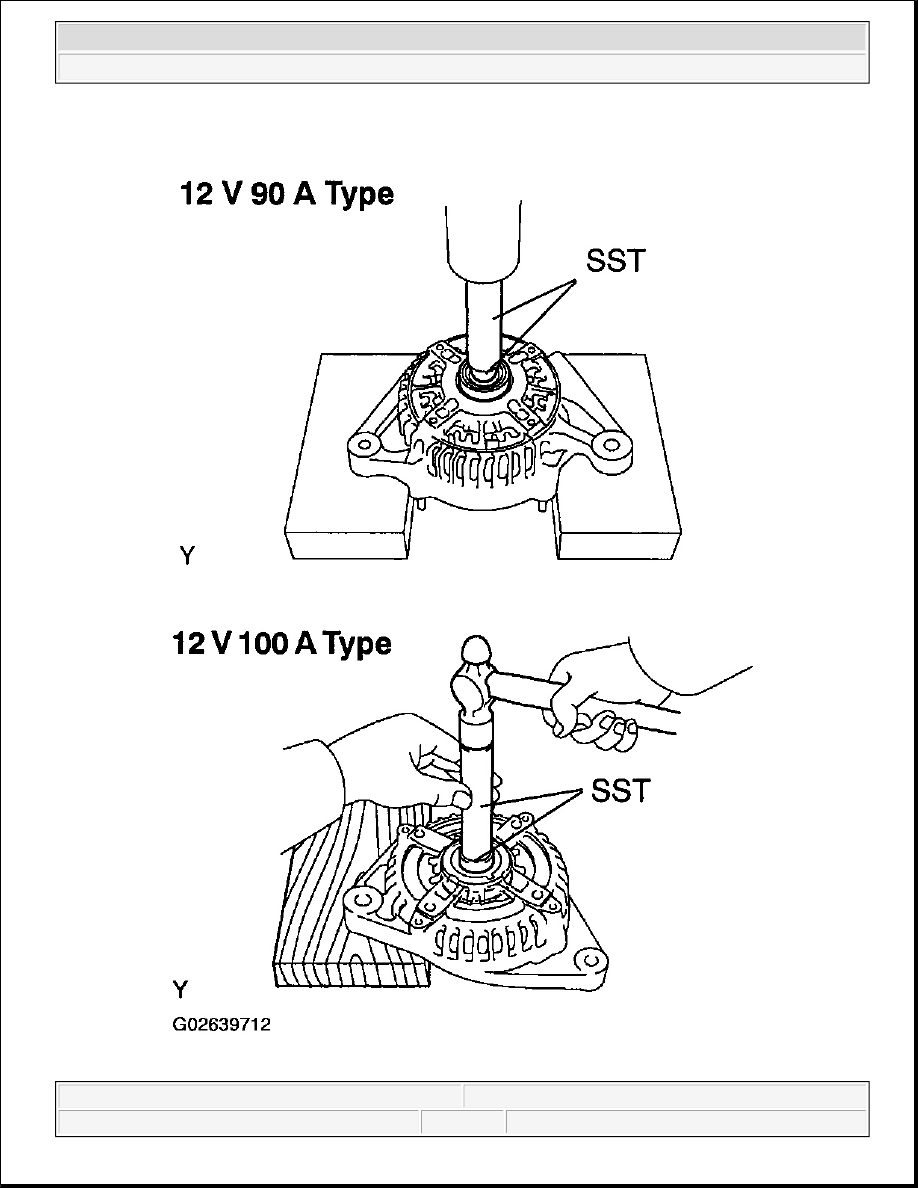
6. REMOVE PULLEY
a. Hold SST (A) with a torque wrench, and tighten SST (B) clockwise to the specified torque.
SST 09820-63011
Torque: 39 N.m (400 kgf.cm, 29 ft.lbf)
b. Check that SST (A) is secured to the rotor shaft.
2005 Toyota RAV4
2005 ELECTRICAL Charging - RAV4
Microsoft
Tuesday, July 21, 2009 10:23:46 AM
Page 22
© 2005 Mitchell Repair Information Company, LLC.
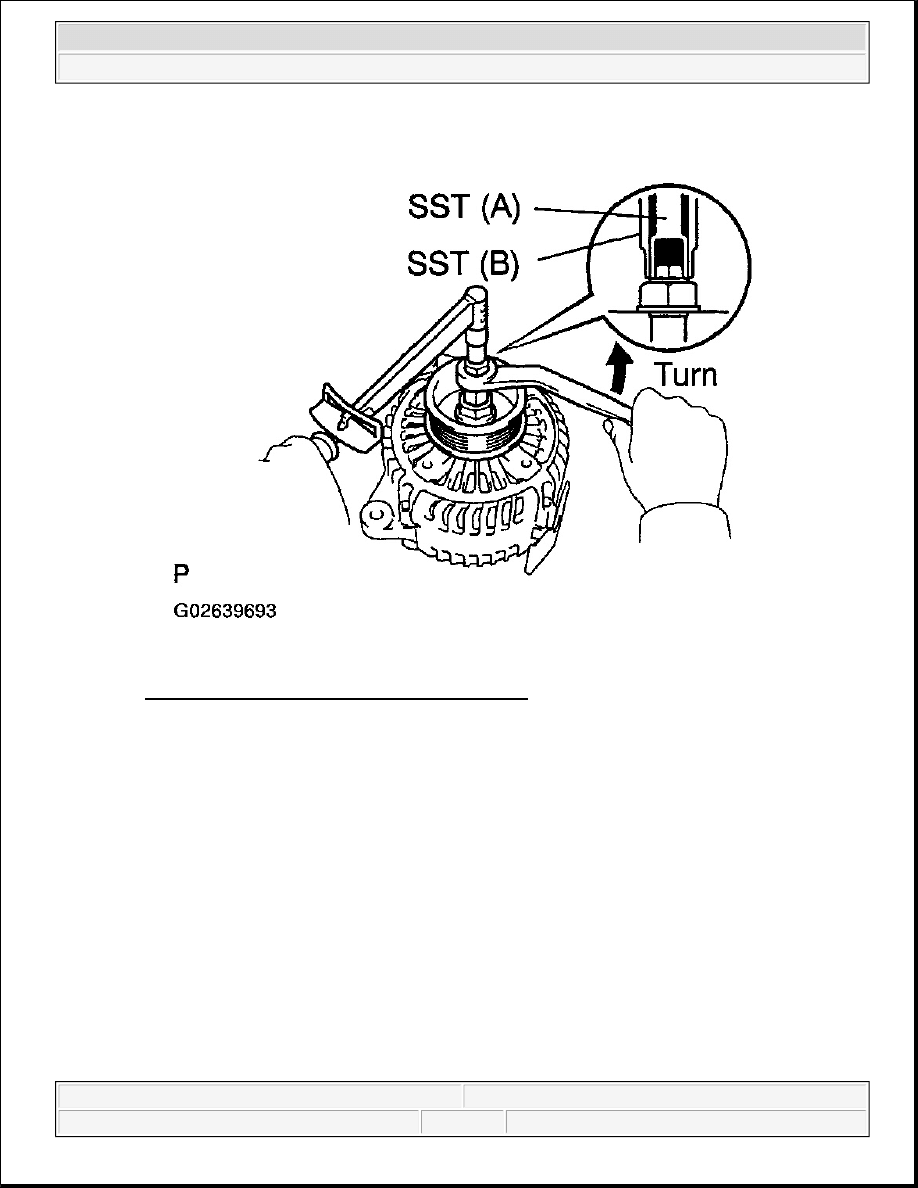
Fig. 21: Installing SST (A & B) To Remove Pulley
Courtesy of TOYOTA MOTOR SALES, U.S.A., INC.
c. Mount SST (C) in a vise.
d. Insert SST (B) into SST (C), and attach the pulley nut to SST (C).
2005 Toyota RAV4
2005 ELECTRICAL Charging - RAV4
Microsoft
Tuesday, July 21, 2009 10:23:46 AM
Page 23
© 2005 Mitchell Repair Information Company, LLC.
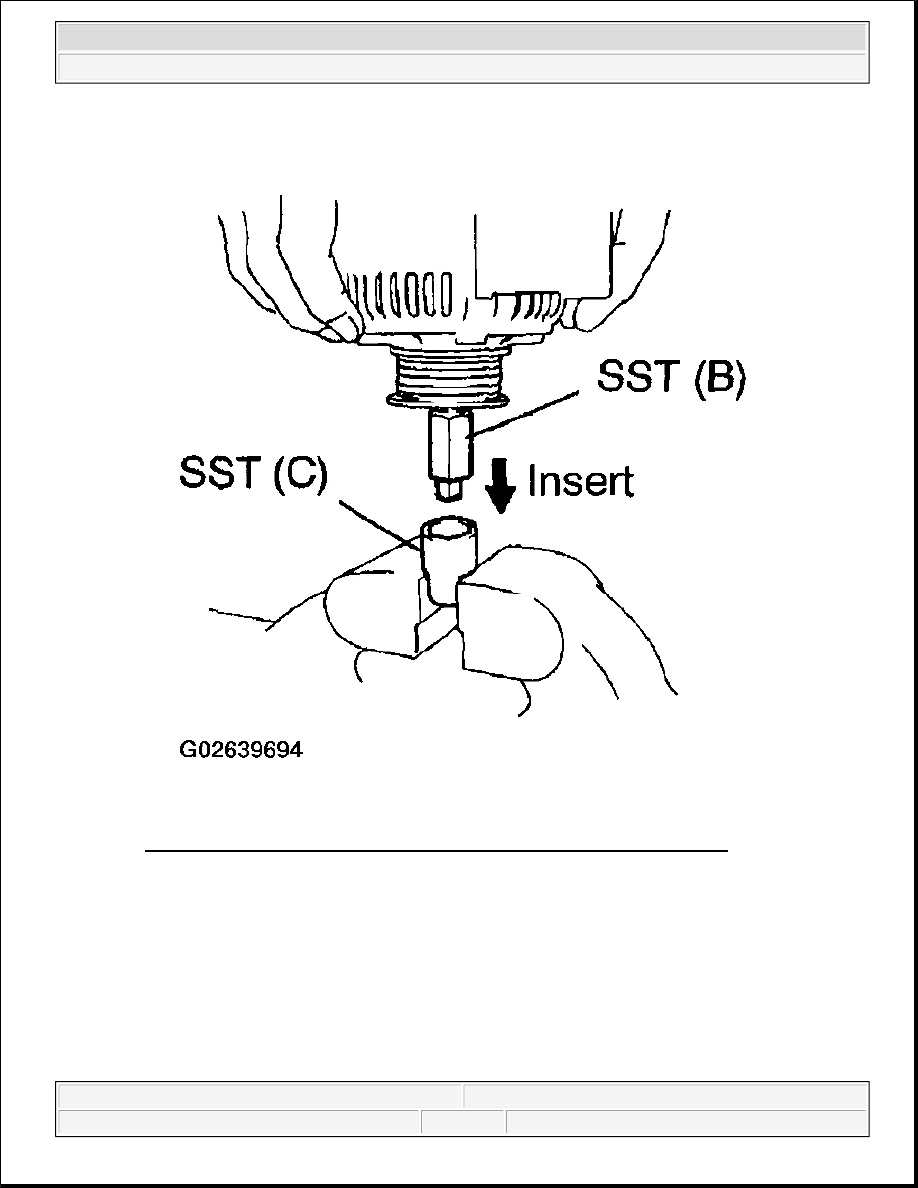
Fig. 22: Inserting SST (B) Into SST (C), & Attaching Pulley Nut To SST (C)
Courtesy of TOYOTA MOTOR SALES, U.S.A., INC.
e. To loosen the pulley nut, turn SST (A) in the direction shown in the illustration.
f. Remove the generator from SST (C).
NOTE:
To prevent damage to the rotor shaft, do not loosen the pulley nut
more than one-half of a turn.
2005 Toyota RAV4
2005 ELECTRICAL Charging - RAV4
Microsoft
Tuesday, July 21, 2009 10:23:46 AM
Page 24
© 2005 Mitchell Repair Information Company, LLC.
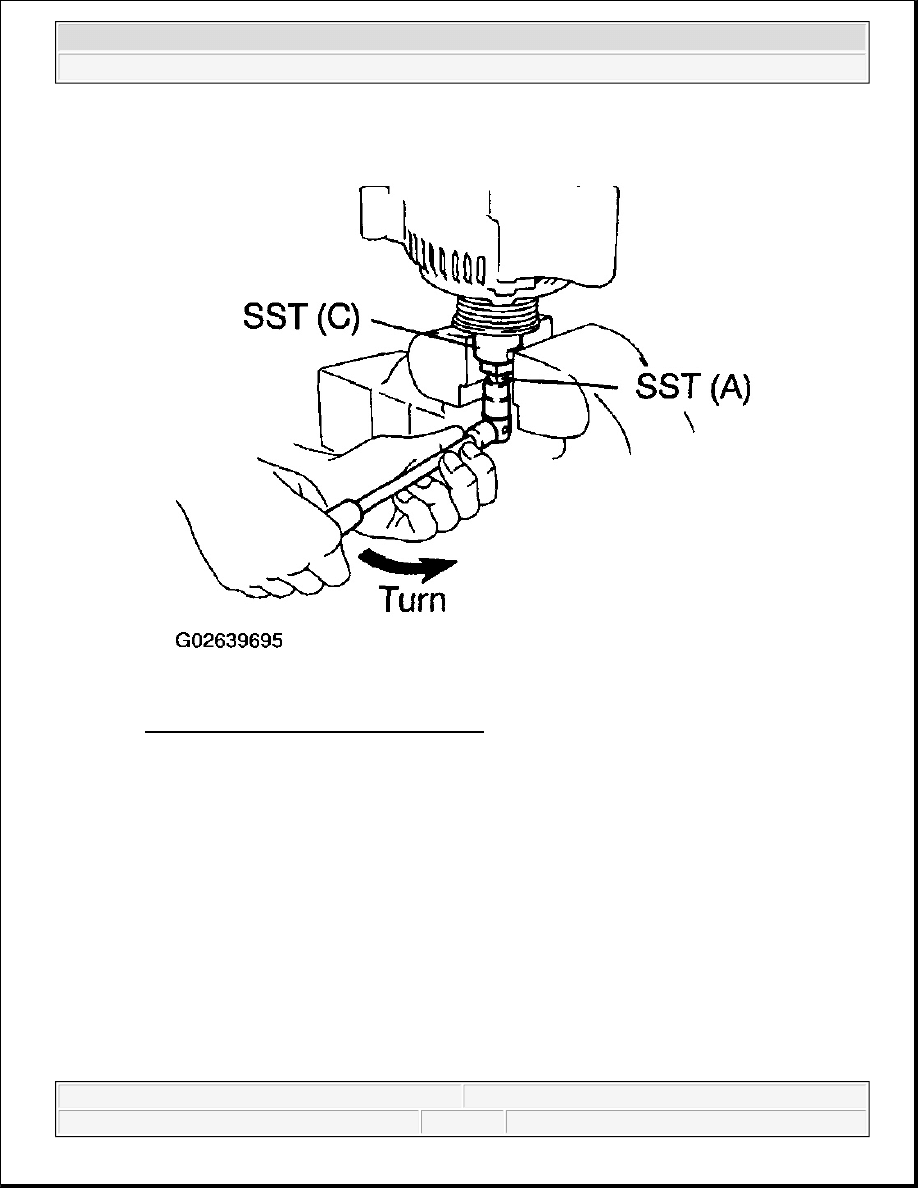
Fig. 23: Removing Generator From SST (C)
Courtesy of TOYOTA MOTOR SALES, U.S.A., INC.
g. Turn SST (B), and remove SST (A and B).
h. Remove the pulley nut and pulley.
2005 Toyota RAV4
2005 ELECTRICAL Charging - RAV4
Microsoft
Tuesday, July 21, 2009 10:23:46 AM
Page 25
© 2005 Mitchell Repair Information Company, LLC.

Fig. 24: Removing Pulley Nut & Pulley
Courtesy of TOYOTA MOTOR SALES, U.S.A., INC.
7. 12V 90 A type:
REMOVE RECTIFIER END FRAME
a. Remove the 4 nuts and wire clip.
2005 Toyota RAV4
2005 ELECTRICAL Charging - RAV4
Microsoft
Tuesday, July 21, 2009 10:23:46 AM
Page 26
© 2005 Mitchell Repair Information Company, LLC.
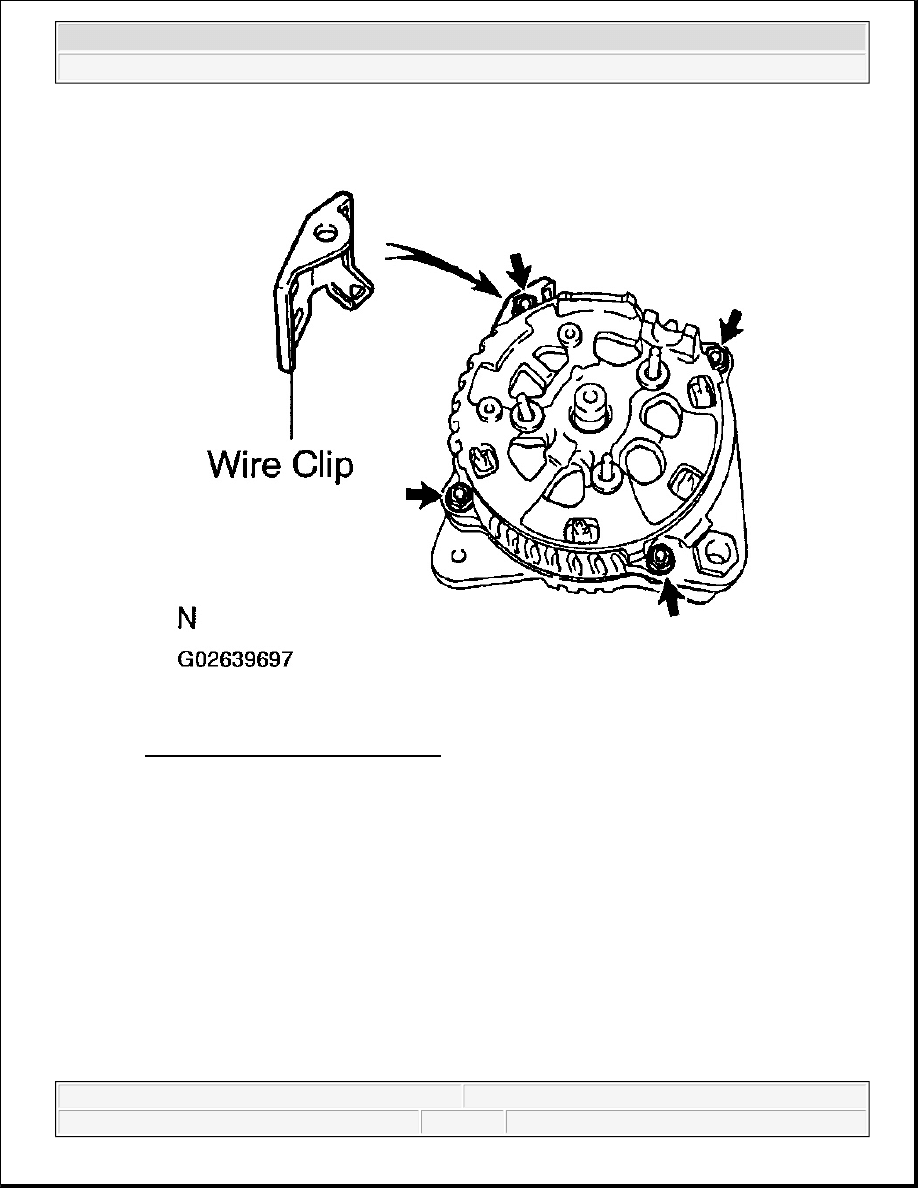
Fig. 25: Removing 4 Nuts & Wire Clip
Courtesy of TOYOTA MOTOR SALES, U.S.A., INC.
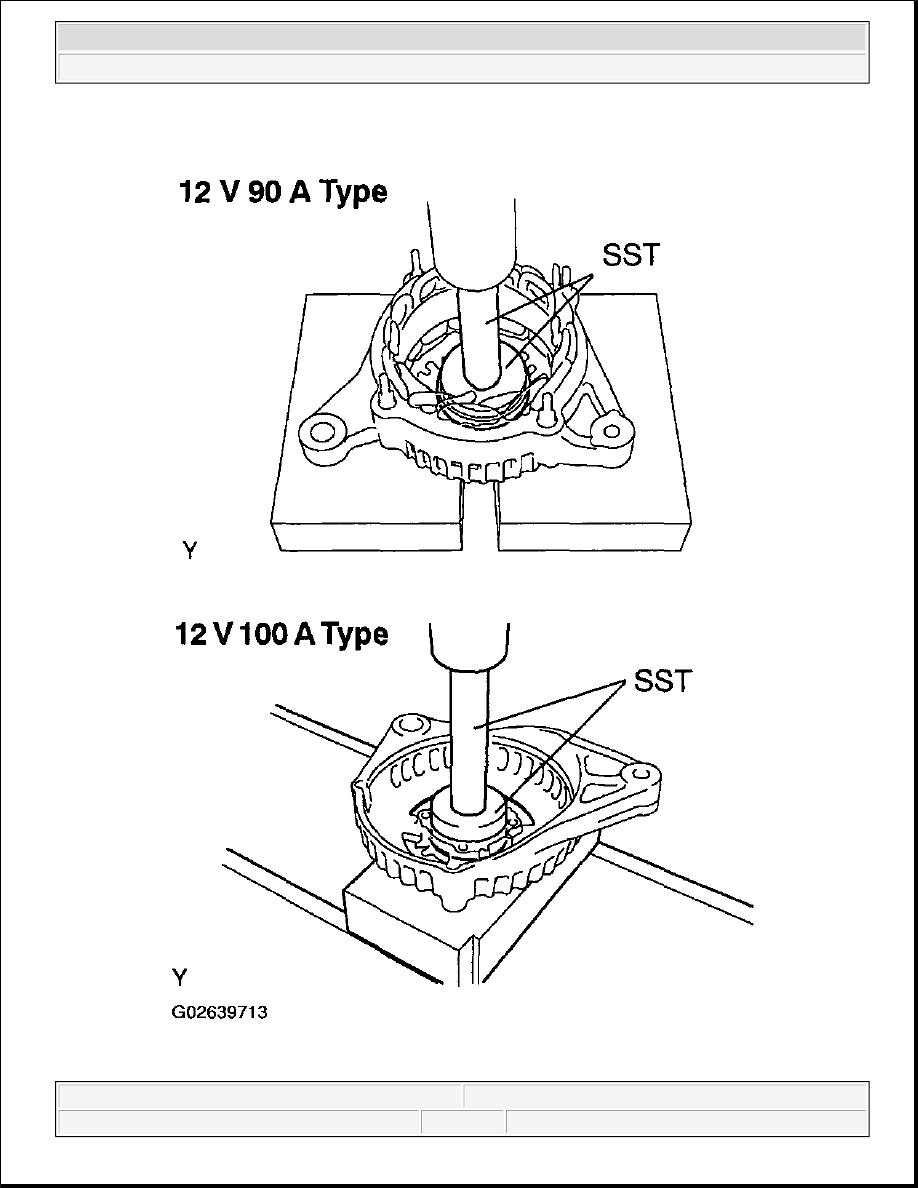
b. Using SST, remove the rectifier end frame.
SST 09286-46011
c. Remove the generator washer from the rotor.
2005 Toyota RAV4
2005 ELECTRICAL Charging - RAV4
Microsoft
Tuesday, July 21, 2009 10:23:46 AM
Page 27
© 2005 Mitchell Repair Information Company, LLC.
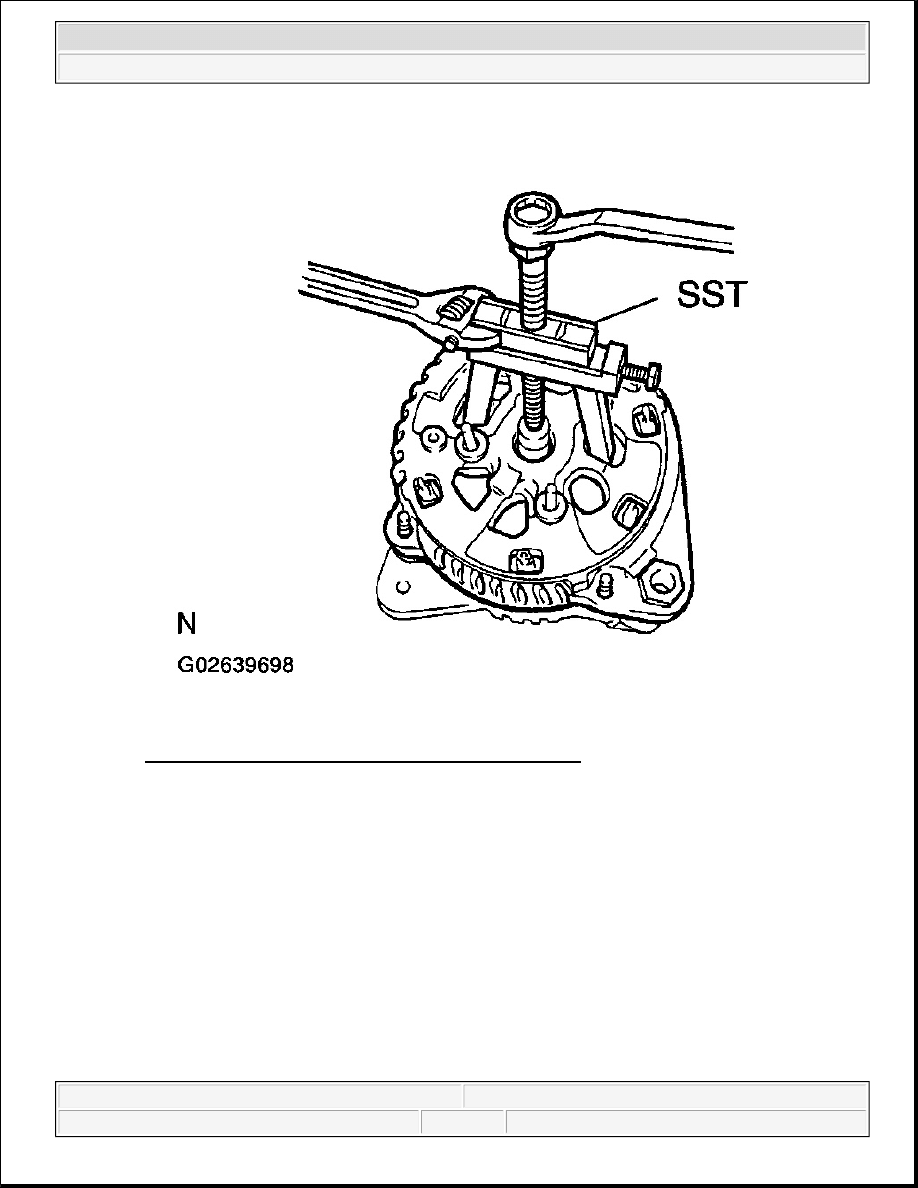
Fig. 26: Removing Rectifier End Frame (12V 90 A Type)
Courtesy of TOYOTA MOTOR SALES, U.S.A., INC.
8. 12V 100A type:
REMOVE RECTIFIER END FRAME
a. Remove the 4 bolts.
b. Remove the bolt and cord clip.
2005 Toyota RAV4
2005 ELECTRICAL Charging - RAV4
Microsoft
Tuesday, July 21, 2009 10:23:46 AM
Page 28
© 2005 Mitchell Repair Information Company, LLC.
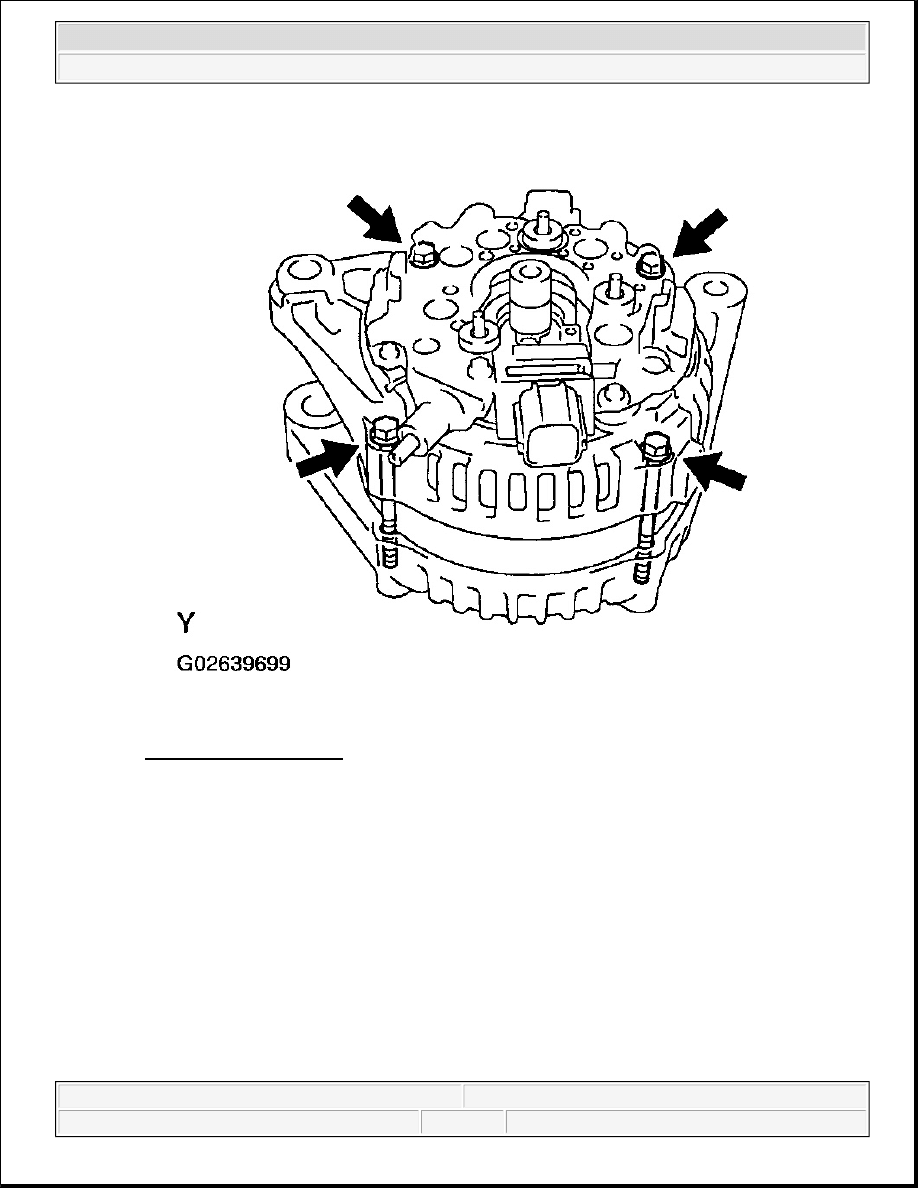
Fig. 27: Removing 4 Bolts
Courtesy of TOYOTA MOTOR SALES, U.S.A., INC.
c. Using SST, remove the rectifier end frame.
SST 09950-40011 (09951-04020, 09952-04010, 09953-04020, 09954-04010, 09955-04071)
d. Remove the alternator washer from the rotor.
9. REMOVE ROTOR FROM DRIVE END FRAME
2005 Toyota RAV4
2005 ELECTRICAL Charging - RAV4
Microsoft
Tuesday, July 21, 2009 10:23:46 AM
Page 29
© 2005 Mitchell Repair Information Company, LLC.
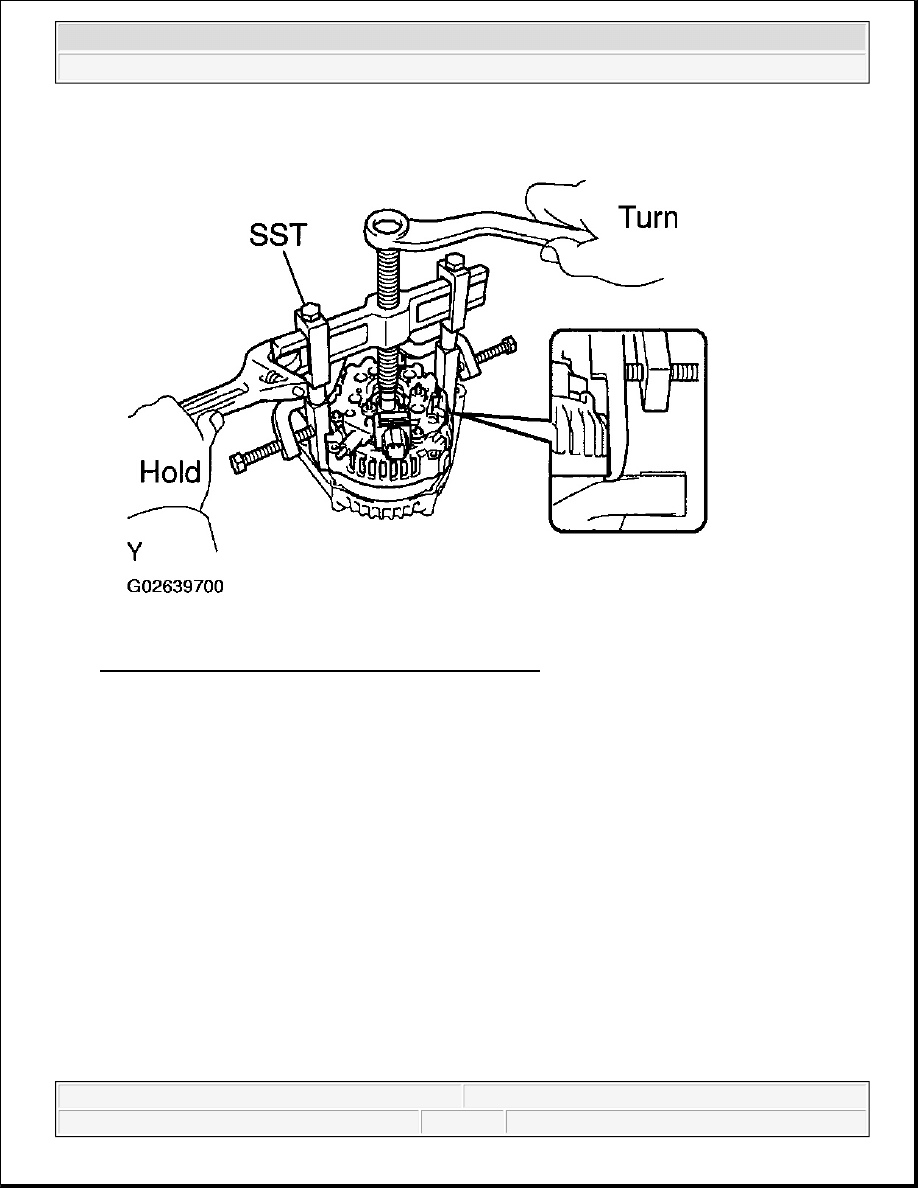
Fig. 28: Removing Rectifier End Frame (12V 100A Type)
Courtesy of TOYOTA MOTOR SALES, U.S.A., INC.
INSPECTION
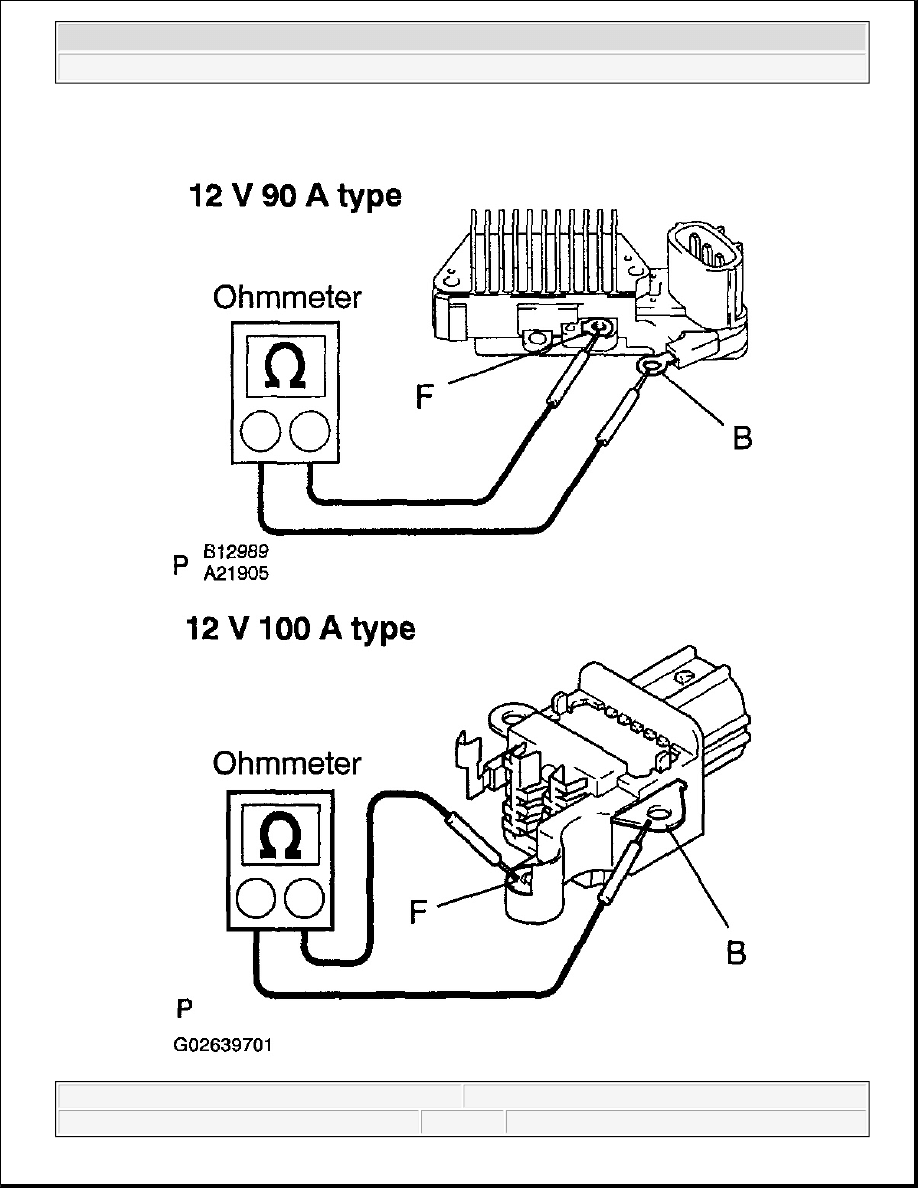
1. INSPECT VOLTAGE REGULATOR
a. Using an ohmmeter, measure the resistance between terminals F and B.
Standard:
When the positive and negative poles between terminals F and B are exchanged, there is a
resistance of Below 1 ohm in one way but a resistance of 10 kohm or higher in another way.
If the result is not as specified, replace the voltage regulator.
2005 Toyota RAV4
2005 ELECTRICAL Charging - RAV4
Microsoft
Tuesday, July 21, 2009 10:23:46 AM
Page 30
© 2005 Mitchell Repair Information Company, LLC.
2005 Toyota RAV4
2005 ELECTRICAL Charging - RAV4
Microsoft
Tuesday, July 21, 2009 10:23:46 AM
Page 31
© 2005 Mitchell Repair Information Company, LLC.
Fig. 29: Measuring Resistance Between Terminals F & B
Courtesy of TOYOTA MOTOR SALES, U.S.A., INC.
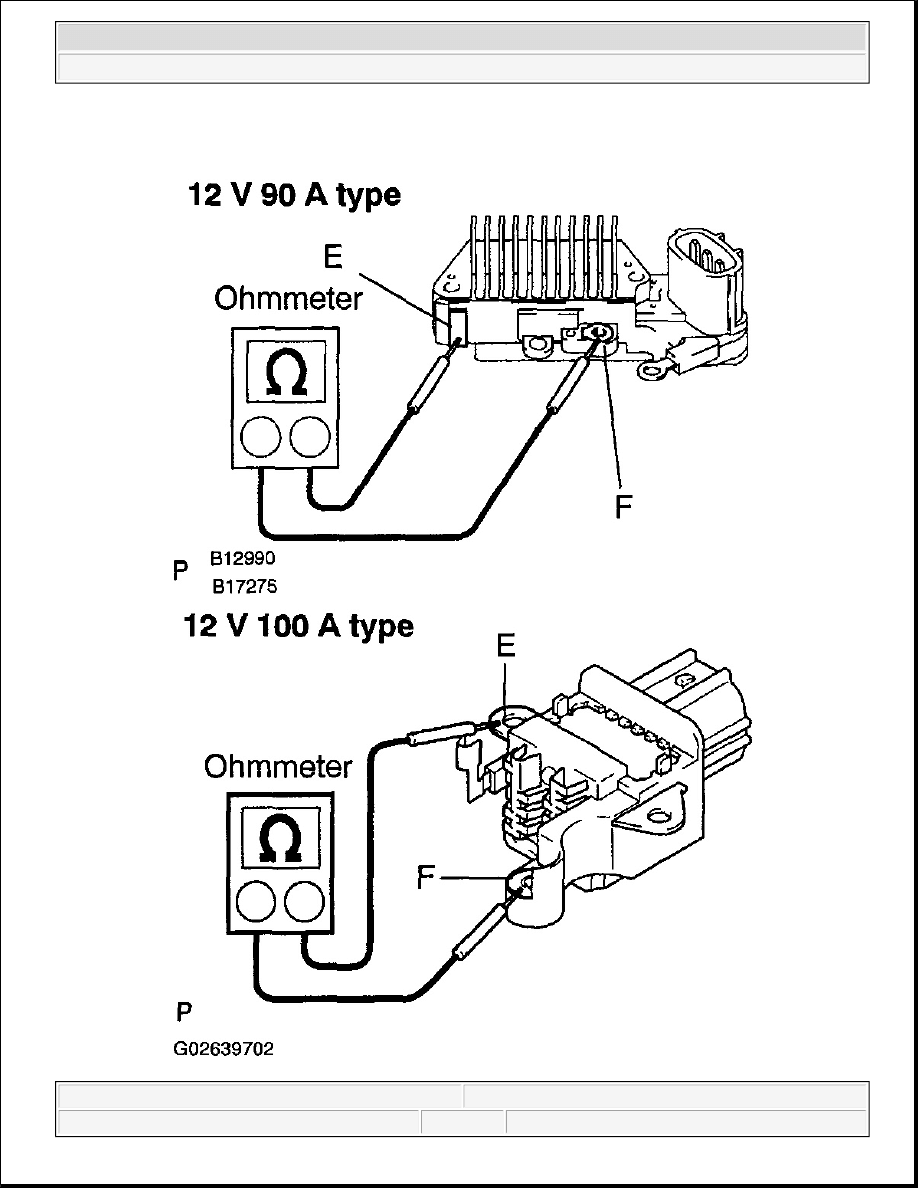
b. Using an ohmmeter, measure the resistance between terminals F and E.
Standard:
When the positive and negative poles between terminals F and E are exchanged, there is a
resistance of Below 1 ohm in one way but a resistance of 10 kohm or higher in another way.
If the result is not as specified, replace the voltage regulator.
2005 Toyota RAV4
2005 ELECTRICAL Charging - RAV4
Microsoft
Tuesday, July 21, 2009 10:23:46 AM
Page 32
© 2005 Mitchell Repair Information Company, LLC.
2005 Toyota RAV4
2005 ELECTRICAL Charging - RAV4
Microsoft
Tuesday, July 21, 2009 10:23:46 AM
Page 33
© 2005 Mitchell Repair Information Company, LLC.
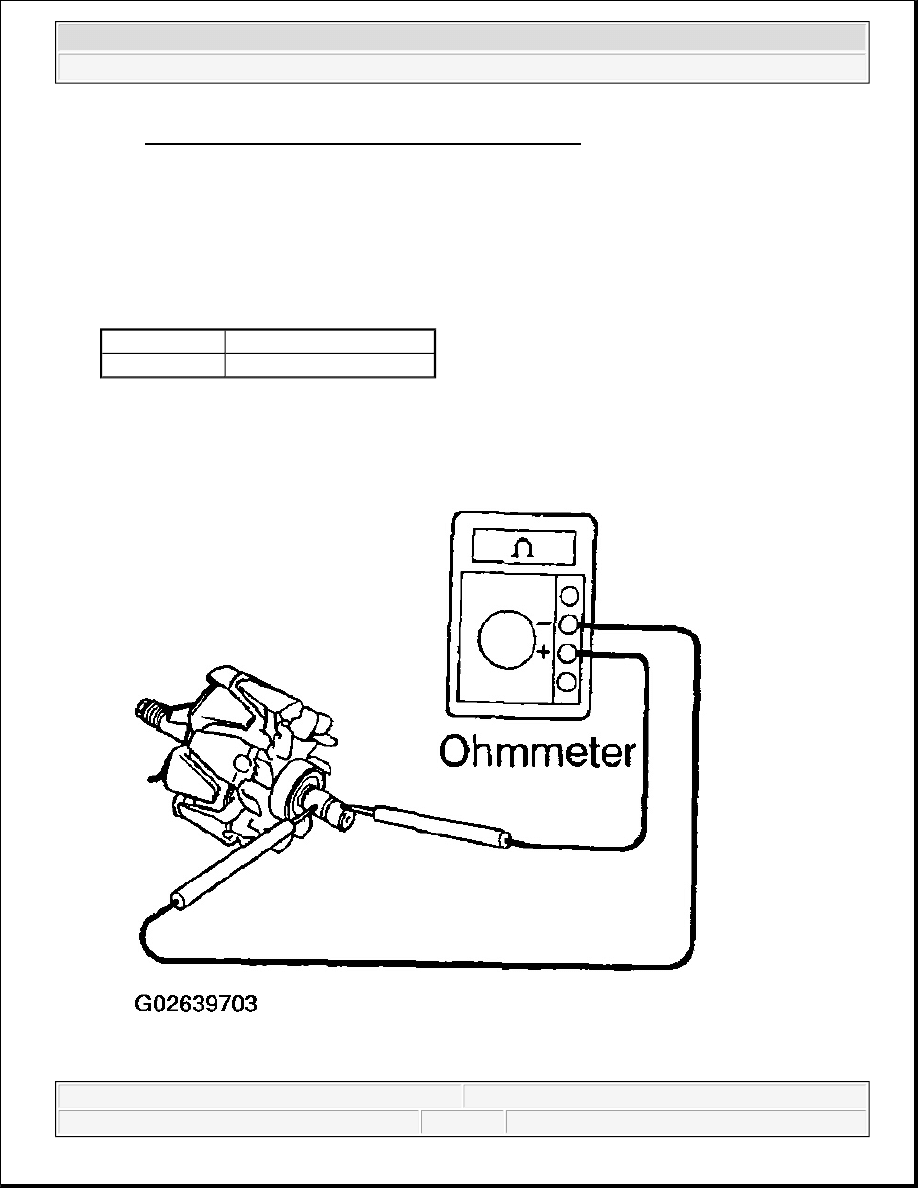
Fig. 30: Measuring Resistance Between Terminals F & E
Courtesy of TOYOTA MOTOR SALES, U.S.A., INC.
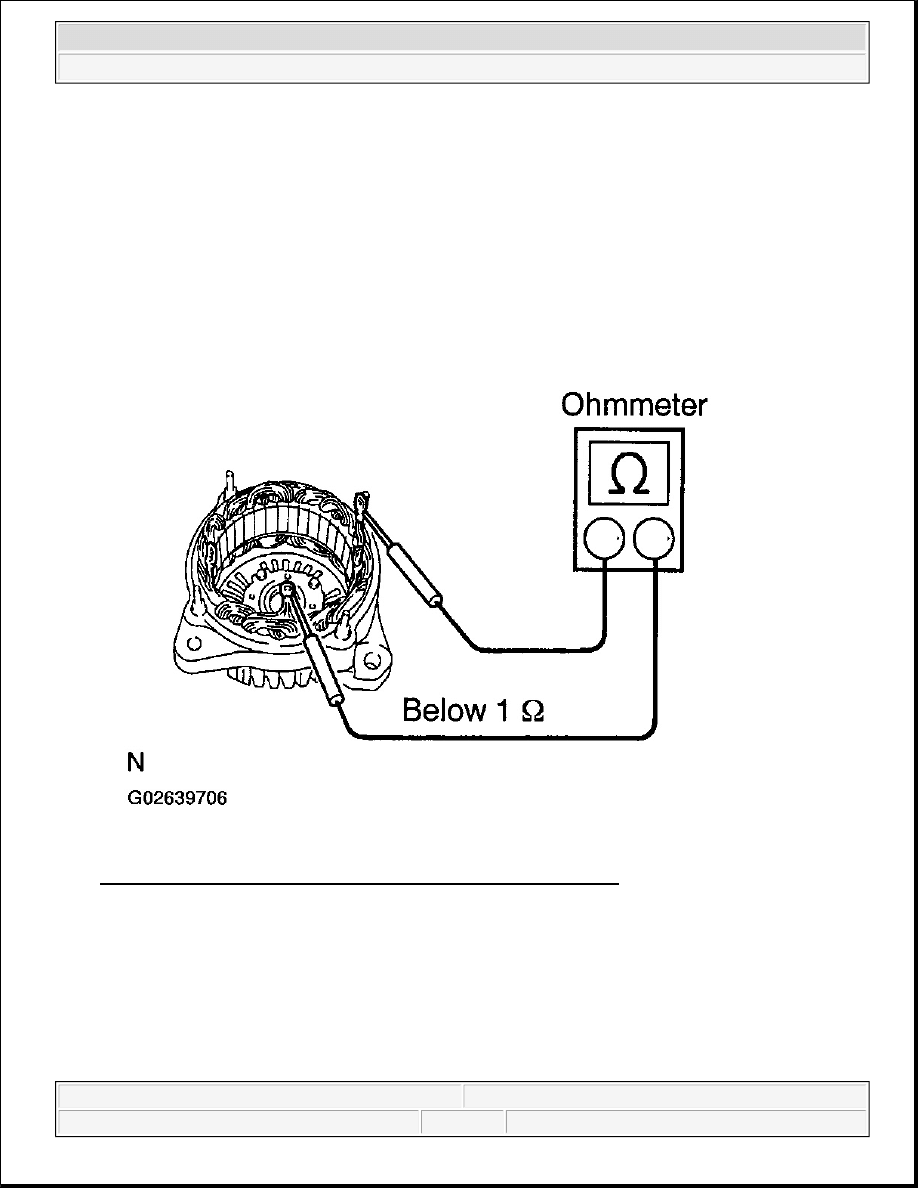
2. INSPECT ROTOR FOR OPEN CIRCUIT
Using an ohmmeter, measure the resistance between the slip rings.
Standard resistance:
SLIP RINGS: STANDARD RESISTANCE
If the result is not as specified, replace the rotor.
12 V 90 A type 2.1 o 2.5ohm at 20°C (68°F)
12 V 100 A type 2.3 o 2.7ohm at 20°C (68°F)
2005 Toyota RAV4
2005 ELECTRICAL Charging - RAV4
Microsoft
Tuesday, July 21, 2009 10:23:46 AM
Page 34
© 2005 Mitchell Repair Information Company, LLC.
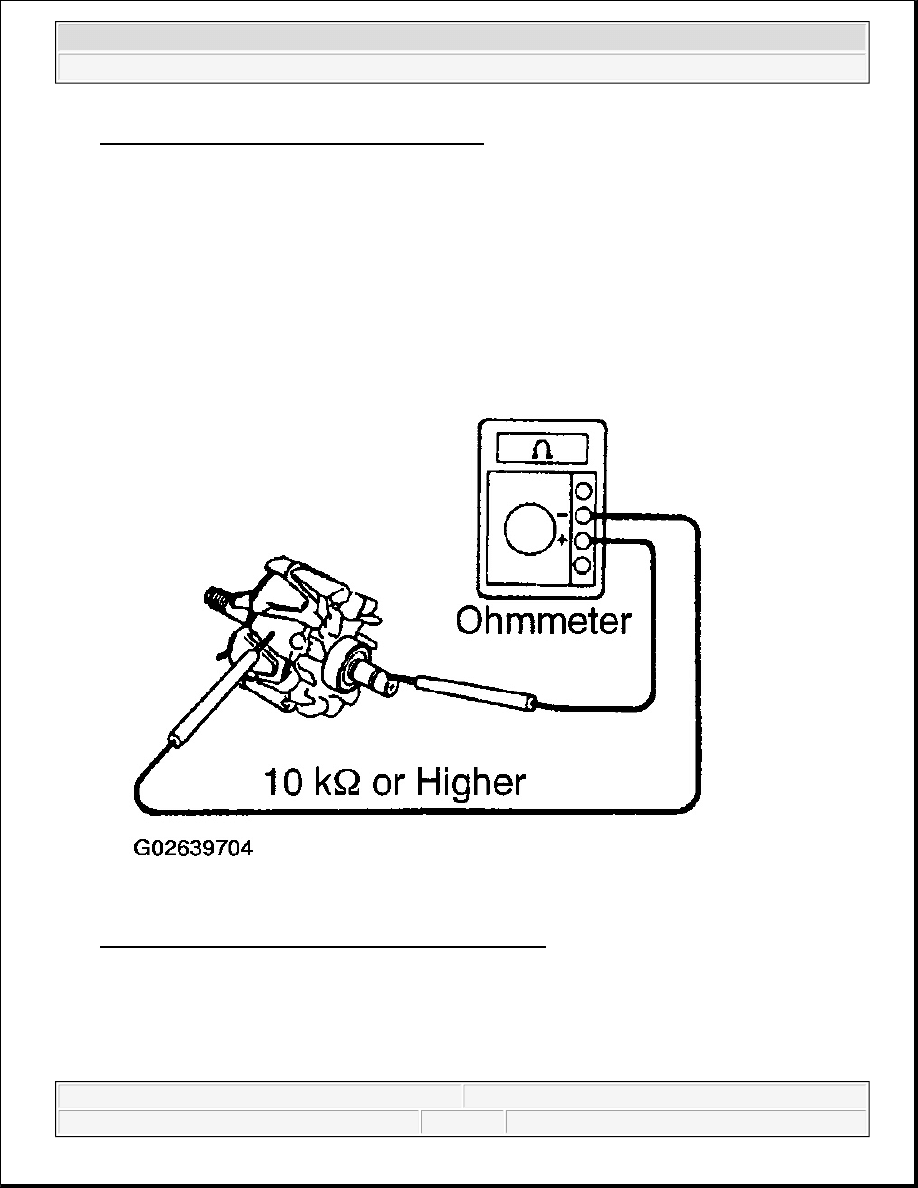
Fig. 31: Measuring Resistance Between Slip Rings
Courtesy of TOYOTA MOTOR SALES, U.S.A., INC.
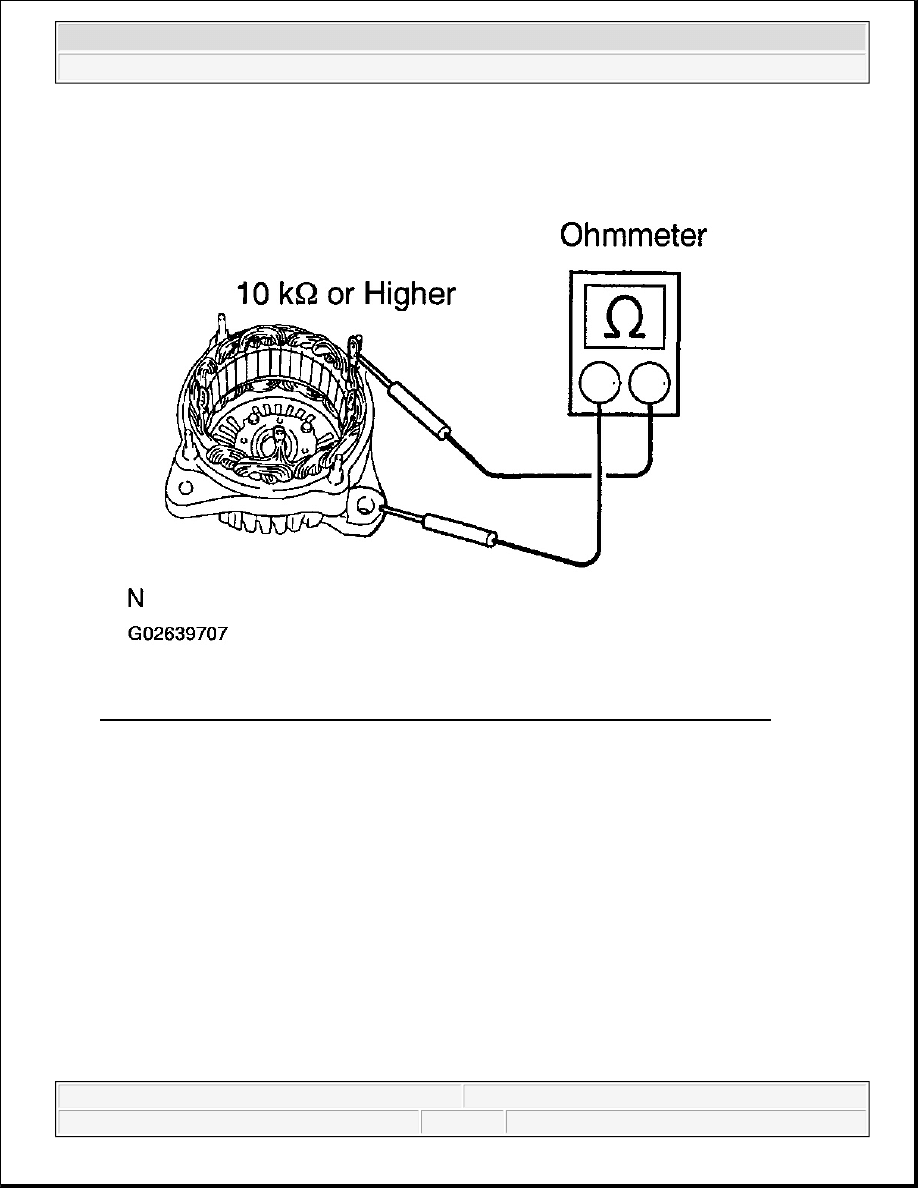
3. INSPECT ROTOR FOR GROUND
Using an ohmmeter, measure the resistance between the slip ring and rotor.
Standard: 10 kohm or higher
If the result is not as specified, replace the rotor.
Fig. 32: Measuring Resistance Between Slip Ring & Rotor
Courtesy of TOYOTA MOTOR SALES, U.S.A., INC.
4. 12V 90 A type:
INSPECT SLIP RINGS
2005 Toyota RAV4
2005 ELECTRICAL Charging - RAV4
Microsoft
Tuesday, July 21, 2009 10:23:46 AM
Page 35
© 2005 Mitchell Repair Information Company, LLC.
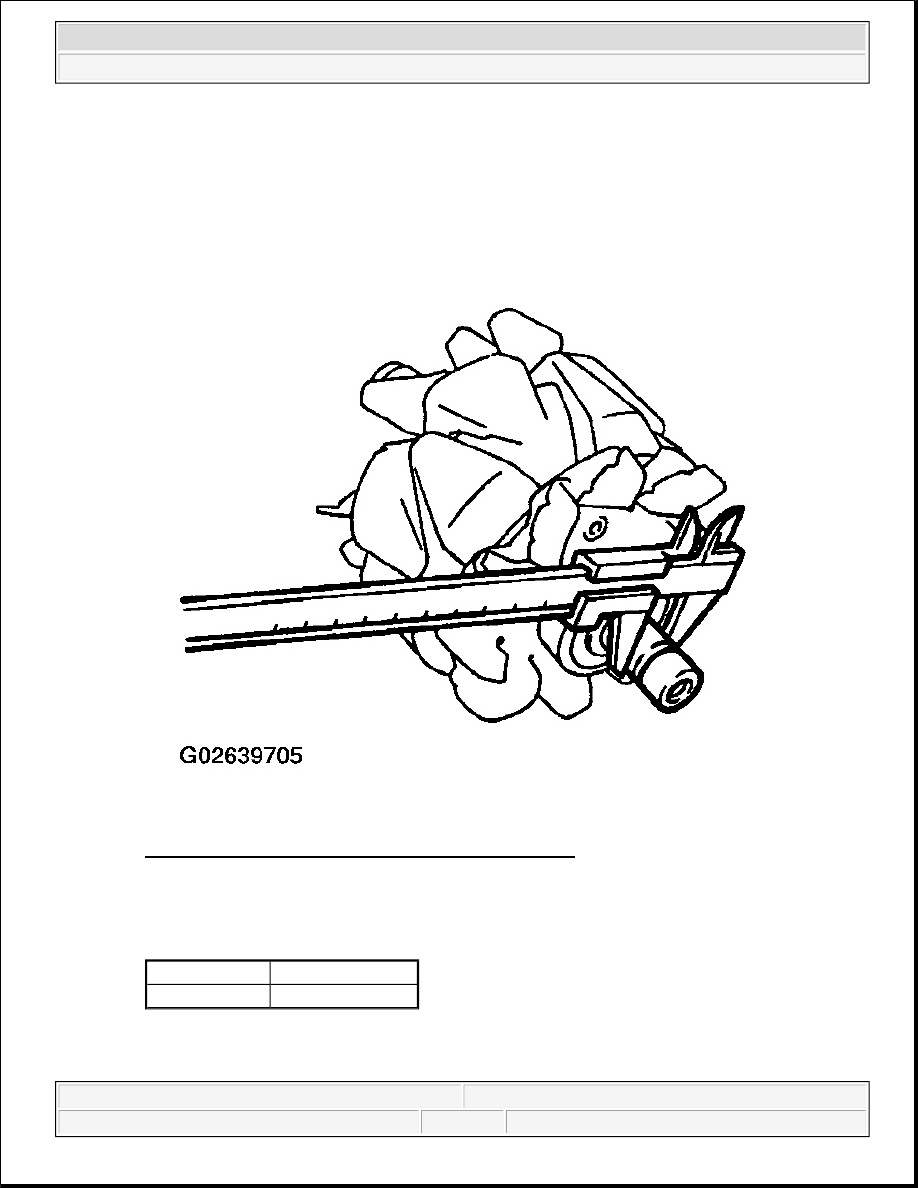
a. Check that the slip rings are not rough or scored. If rough or scored, replace the rotor.
b. Using vernier calipers, measure the slip ring diameter.
Standard diameter: 14.2 to 14.4 mm (0.559 to 0.567 in.)
Fig. 33: Measuring Slip Ring Diameter (12V 90 A Type)
Courtesy of TOYOTA MOTOR SALES, U.S.A., INC.
Minimum diameter:
SLIP RING: MINIMUM DIAMETER
If the diameter is less than the minimum, replace the rotor.
12 V 90 A type 12.8 mm (0.504 in.)
12 V 100 A type 14.0 mm (0.551 in.)
2005 Toyota RAV4
2005 ELECTRICAL Charging - RAV4
Microsoft
Tuesday, July 21, 2009 10:23:46 AM
Page 36
© 2005 Mitchell Repair Information Company, LLC.
5. 12 V 90 A type:
INSPECT STATOR FOR OPEN CIRCUIT
Using an ohmmeter, measure the resistance between the coil leads.
Standard: Below 1 ohm
If the result is not as specified, replace the drive end frame assembly.
Fig. 34: Measuring Resistance Between Coil Leads (12V 90 A Type)
Courtesy of TOYOTA MOTOR SALES, U.S.A., INC.
6. 12 V 90 A type:
INSPECT STATOR FOR GROUND
Using an ohmmeter, measure the resistance between the coil lead and drive end frame.
Standard: 10 kohm or higher
2005 Toyota RAV4
2005 ELECTRICAL Charging - RAV4
Microsoft
Tuesday, July 21, 2009 10:23:46 AM
Page 37
© 2005 Mitchell Repair Information Company, LLC.
If the result is not as specified, replace the drive end frame assembly.
Fig. 35: Measuring Resistance Between Coil Lead & Drive End Frame (12V 90 A Type)
Courtesy of TOYOTA MOTOR SALES, U.S.A., INC.
7. INSPECT EXPOSED BRUSH LENGTH
Using vernier calipers, measure the exposed brush length.
Standard exposed length: 9.5 to 11.5 mm (0.374 to 0.453 in.)
2005 Toyota RAV4
2005 ELECTRICAL Charging - RAV4
Microsoft
Tuesday, July 21, 2009 10:23:46 AM
Page 38
© 2005 Mitchell Repair Information Company, LLC.
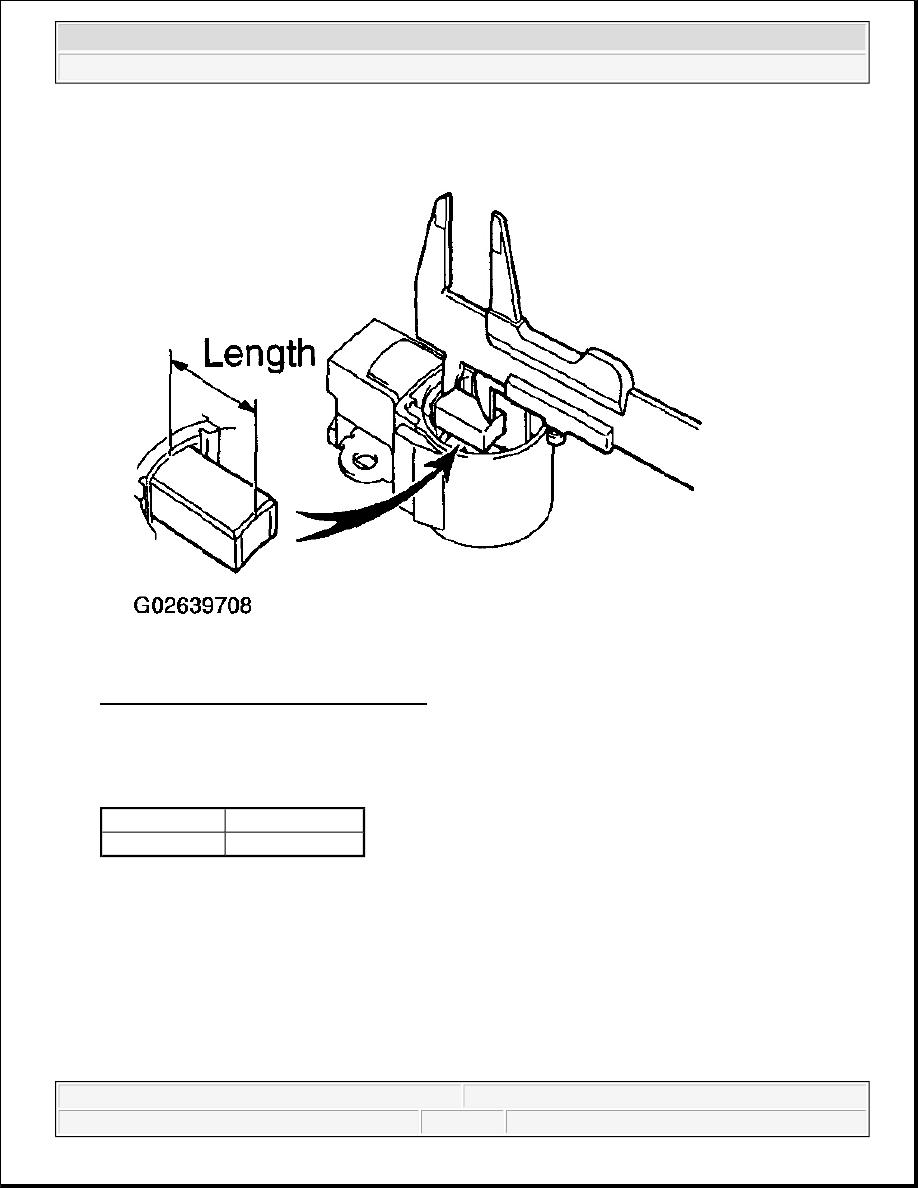
Fig. 36: Measuring Exposed Brush Length
Courtesy of TOYOTA MOTOR SALES, U.S.A., INC.
Minimum exposed length:
BRUSH LENGTH: MINIMUM EXPOSED LENGTH
If the exposed length is less than the minimum, replace the brush holder assembly.
8. 12 V 90 A type:
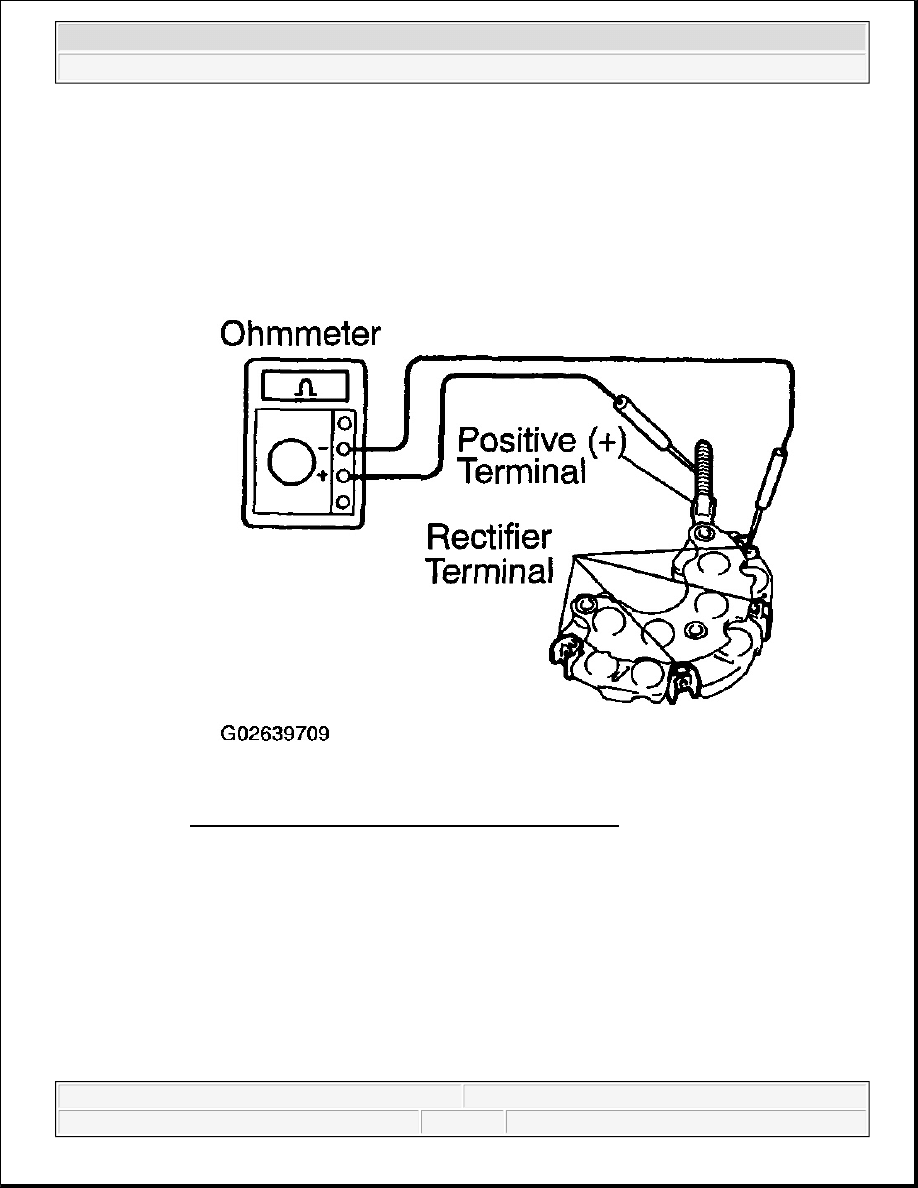
INSPECT RECTIFIERS (RECTIFIER HOLDER)
a. Check the positive (+) rectifier.
1. Using an ohmmeter, connect one tester probe to the positive (+) terminal and the other to
each rectifier terminal.
12 V 90 A type 4.5 mm (0.177 in.)
12 V 100 A type 4.5 mm (0.177 in.)
2005 Toyota RAV4
2005 ELECTRICAL Charging - RAV4
Microsoft
Tuesday, July 21, 2009 10:23:46 AM
Page 39
© 2005 Mitchell Repair Information Company, LLC.
2. Reverse the polarity of the tester probes and repeat step (a).
3. Check that one shows a resistance of Below 1 ohm and the other shows a resistance of 10
kohm or higher.
If the result is not as specified, replace the rectifier holder.
Fig. 37: Inspecting Rectifiers Terminal (12V 90 A Type)
Courtesy of TOYOTA MOTOR SALES, U.S.A., INC.
b. Check the negative (-) rectifier.
1. Using an ohmmeter, connect one tester probe to each negative (-) terminal and the other to
each rectifier terminal.
2. Reverse the polarity of the tester probes and repeat step (a).
3. Check that one shows a resistance of Below 1 ohm and the other shows a resistance of 10
kohm or higher.
If the result is not as specified, replace the rectifier holder.
2005 Toyota RAV4
2005 ELECTRICAL Charging - RAV4
Microsoft
Tuesday, July 21, 2009 10:23:46 AM
Page 40
© 2005 Mitchell Repair Information Company, LLC.
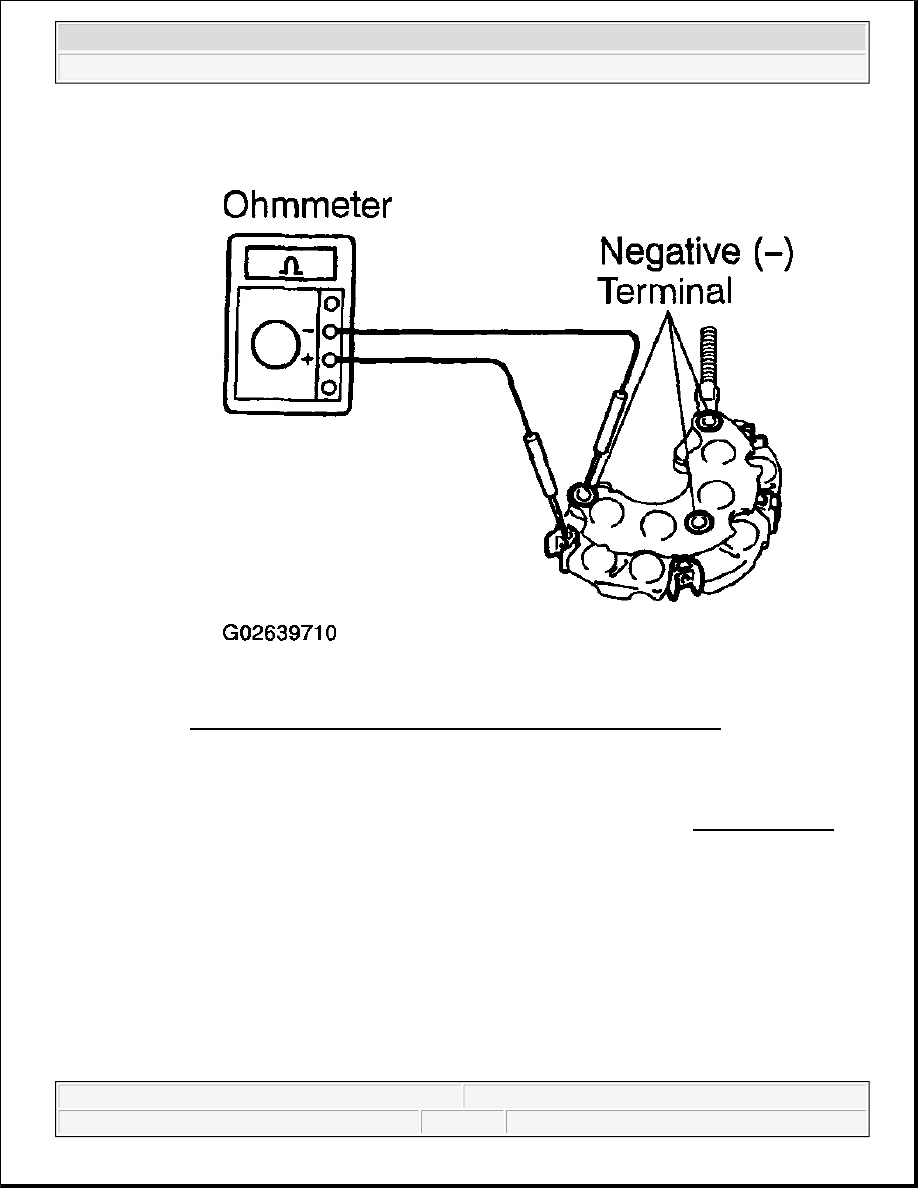
Fig. 38: Connecting One Tester Probe To Each Negative (-) Terminal
Courtesy of TOYOTA MOTOR SALES, U.S.A., INC.
9. INSPECT BEARINGS
Check that the bearing is not rough or worn. If necessary, replace the bearing (see REPLACEMENT).
REPLACEMENT
1. REPLACE FRONT BEARING
a. Remove the 4 screws and bearing retainer.
2005 Toyota RAV4
2005 ELECTRICAL Charging - RAV4
Microsoft
Tuesday, July 21, 2009 10:23:46 AM
Page 41
© 2005 Mitchell Repair Information Company, LLC.
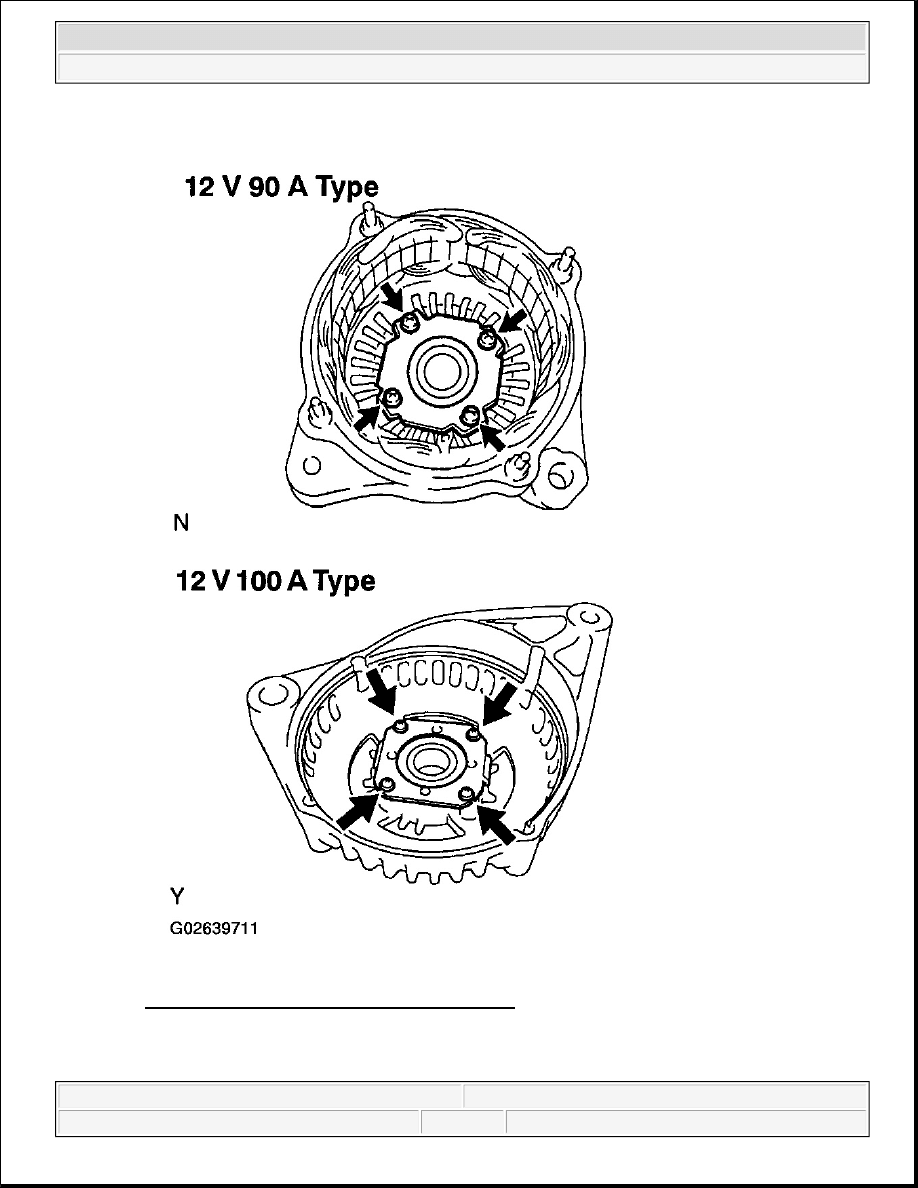
Fig. 39: Removing 4 Screws & Bearing Retainer
Courtesy of TOYOTA MOTOR SALES, U.S.A., INC.
b. Using SST and a press, press out the bearing.
2005 Toyota RAV4
2005 ELECTRICAL Charging - RAV4
Microsoft
Tuesday, July 21, 2009 10:23:46 AM
Page 42
© 2005 Mitchell Repair Information Company, LLC.

SST 09950-60010 (09951-00350), 09950-70010 (09951-07100)
2005 Toyota RAV4
2005 ELECTRICAL Charging - RAV4
Microsoft
Tuesday, July 21, 2009 10:23:46 AM
Page 43
© 2005 Mitchell Repair Information Company, LLC.
2005 Toyota RAV4
2005 ELECTRICAL Charging - RAV4
Microsoft
Tuesday, July 21, 2009 10:23:46 AM
Page 44
© 2005 Mitchell Repair Information Company, LLC.
Fig. 40: Pressing Out Bearing
Courtesy of TOYOTA MOTOR SALES, U.S.A., INC.
c. Using SST and a press, press in a new bearing.
SST 09950-60010 (09951-00530), 09950-70010 (09951-07100)
d. Install the bearing retainer with the 4 screws.
Torque:
3.0 N.m (31 kgf.cm, 27 in.lbf) for 12 V 90 A type
2.3 N.m (23 kgf.cm, 20 in.lbf) for 12 V 100 A type
2005 Toyota RAV4
2005 ELECTRICAL Charging - RAV4
Microsoft
Tuesday, July 21, 2009 10:23:46 AM
Page 45
© 2005 Mitchell Repair Information Company, LLC.
2005 Toyota RAV4
2005 ELECTRICAL Charging - RAV4
Microsoft
Tuesday, July 21, 2009 10:23:46 AM
Page 46
© 2005 Mitchell Repair Information Company, LLC.
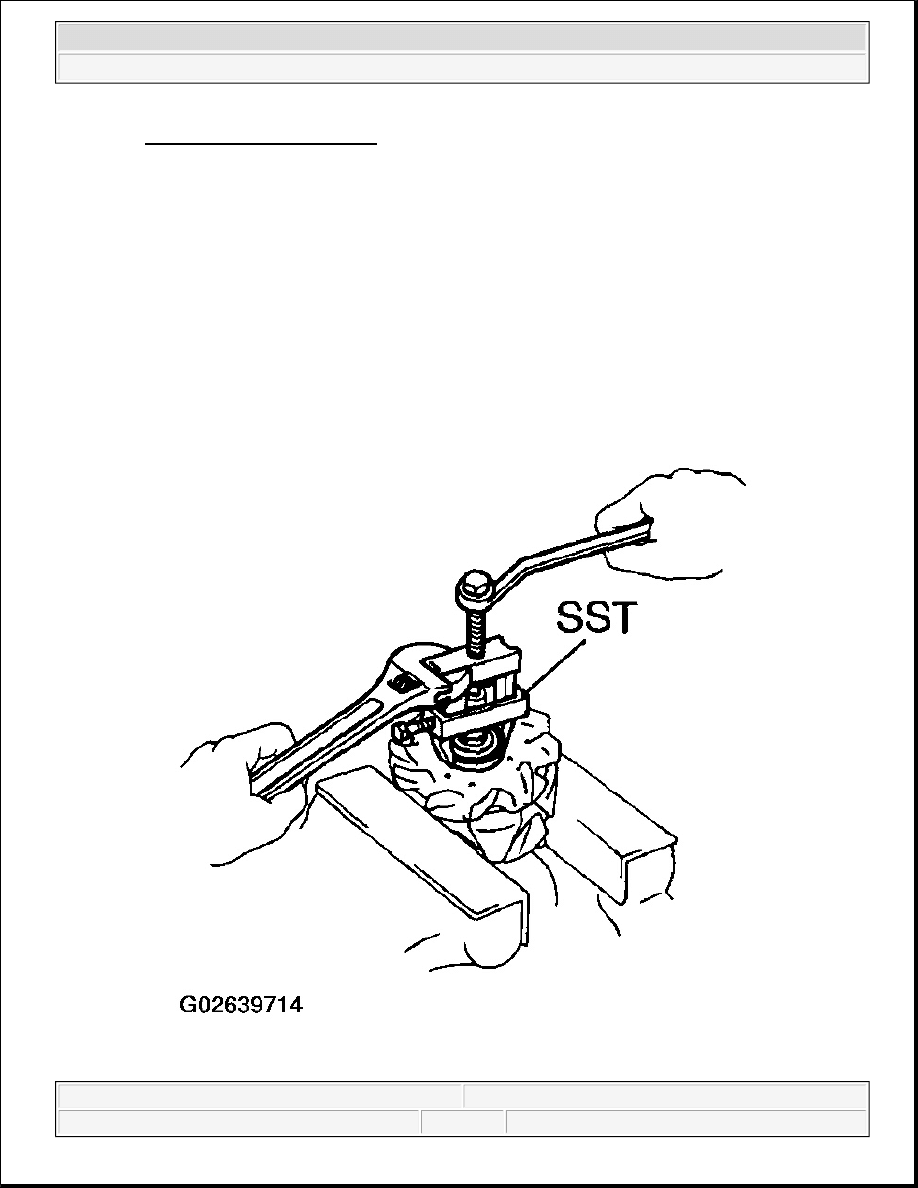
Fig. 41: Pressing New Bearing
Courtesy of TOYOTA MOTOR SALES, U.S.A., INC.
2. 12 V 90 A type:
REPLACE REAR BEARING
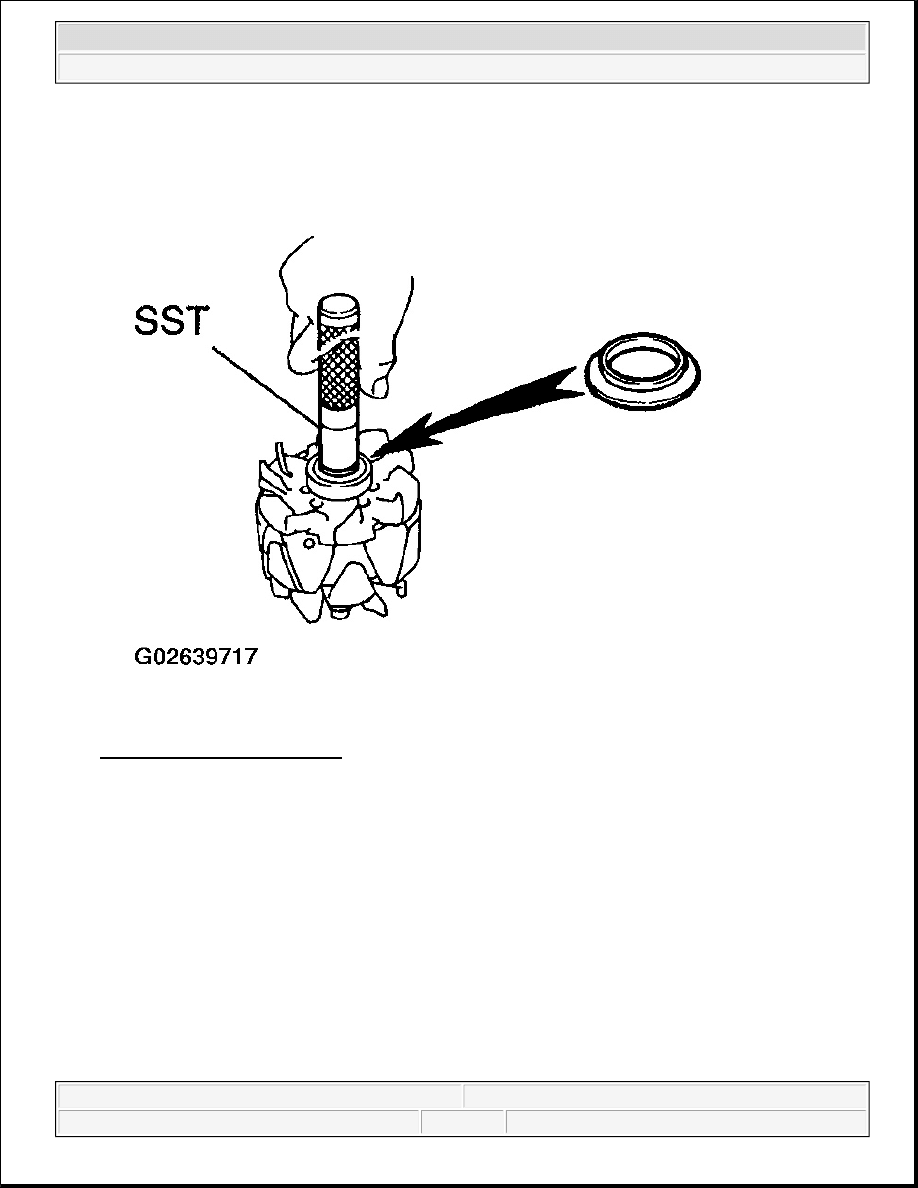
a. Using SST, remove the bearing cover (outside) and bearing.
SST 09821-00021
NOTE:
Be careful not to damage the fan.
2005 Toyota RAV4
2005 ELECTRICAL Charging - RAV4
Microsoft
Tuesday, July 21, 2009 10:23:46 AM
Page 47
© 2005 Mitchell Repair Information Company, LLC.
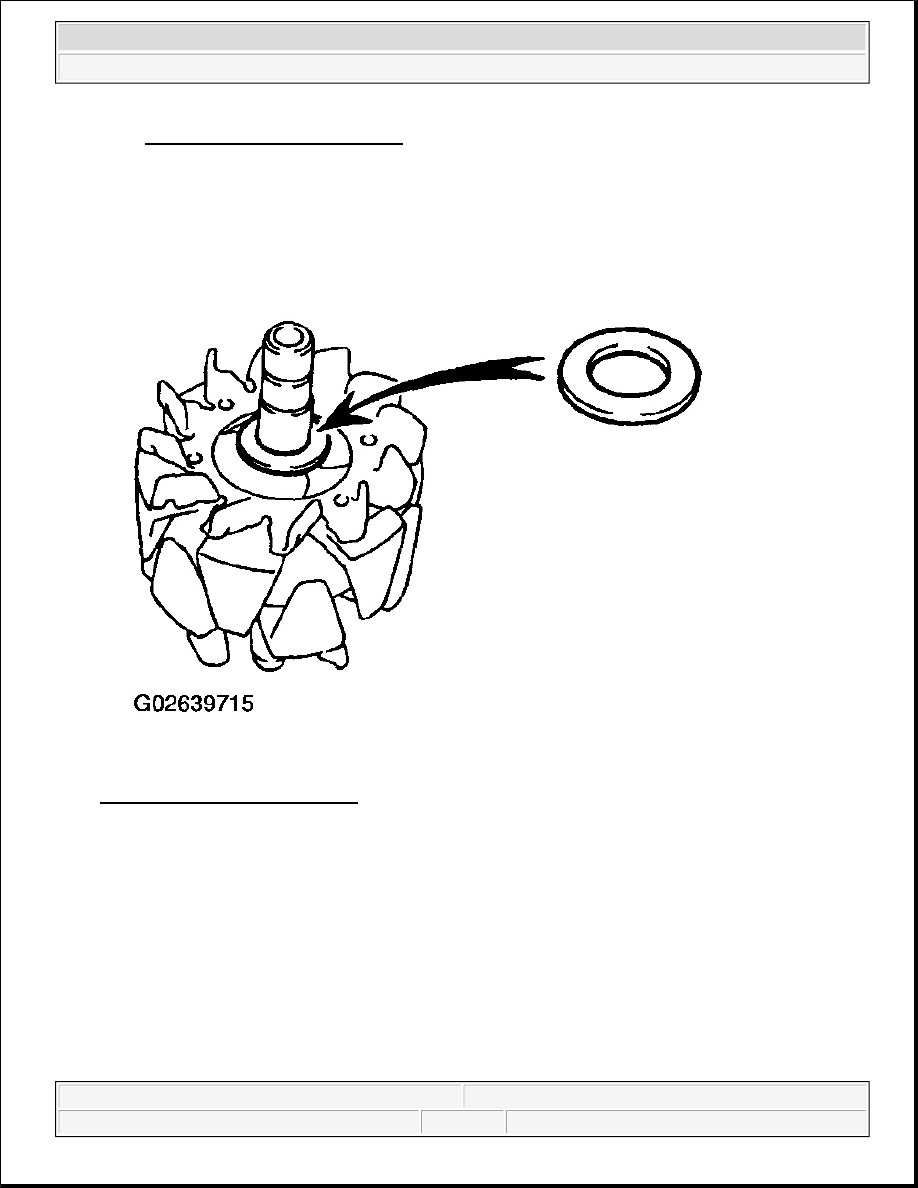
Fig. 42: Removing Bearing Cover
Courtesy of TOYOTA MOTOR SALES, U.S.A., INC.
3. Remove the bearing cover (inside).
4. Place the bearing cover (inside) on the rotor.
Fig. 43: Removing Bearing Cover
Courtesy of TOYOTA MOTOR SALES, U.S.A., INC.
5. Using SST and a press, press in a new bearing.
SST 09820-00031
2005 Toyota RAV4
2005 ELECTRICAL Charging - RAV4
Microsoft
Tuesday, July 21, 2009 10:23:46 AM
Page 48
© 2005 Mitchell Repair Information Company, LLC.
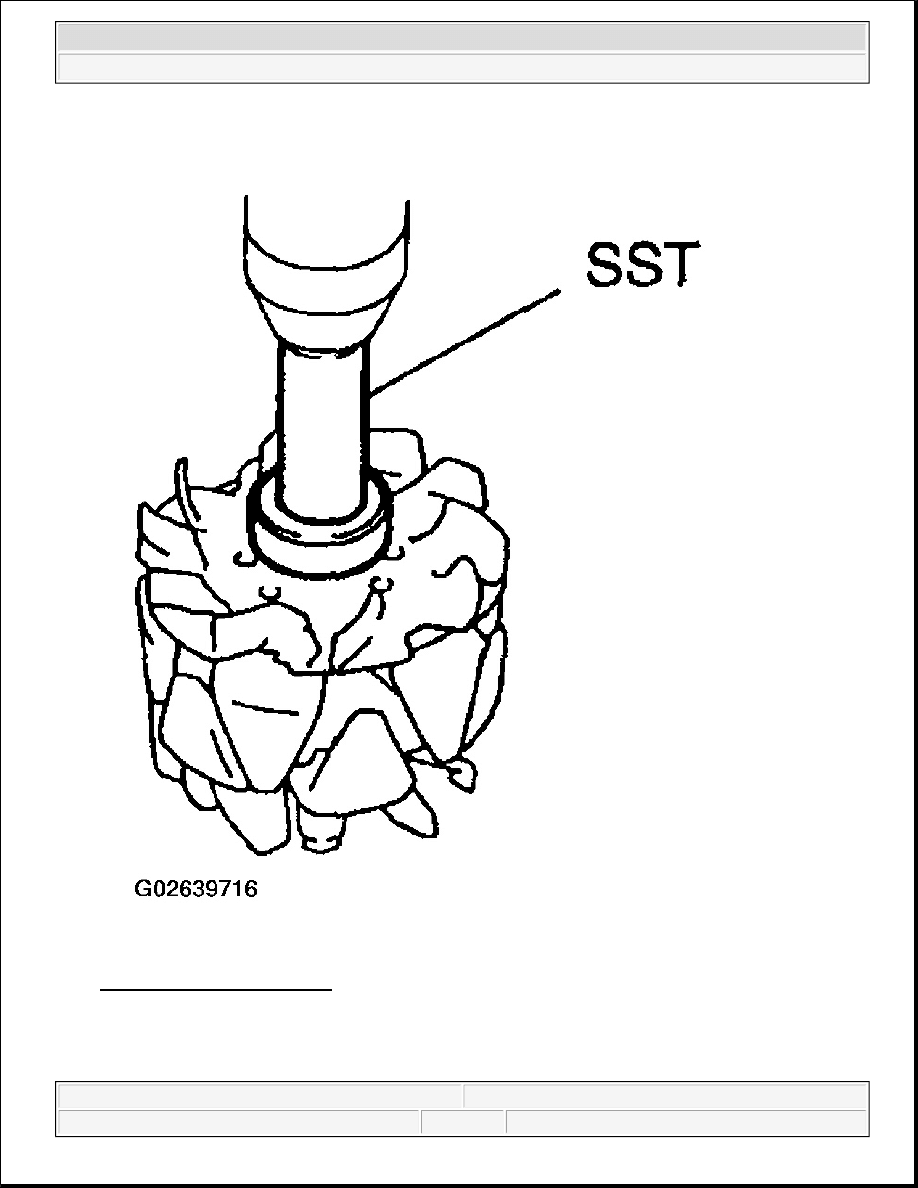
Fig. 44: Pressing New Bearing
Courtesy of TOYOTA MOTOR SALES, U.S.A., INC.
6. Using SST, push in the bearing cover (outside).
2005 Toyota RAV4
2005 ELECTRICAL Charging - RAV4
Microsoft
Tuesday, July 21, 2009 10:23:46 AM
Page 49
© 2005 Mitchell Repair Information Company, LLC.
SST 09825-76010
Fig. 45: Pushing Bearing Cover
Courtesy of TOYOTA MOTOR SALES, U.S.A., INC.
REASSEMBLY
1. 12 V 90 A type:
INSTALL ROTOR TO DRIVE END FRAME
a. Place the drive end frame on the pulley.
b. Install the rotor to the drive end frame.
2005 Toyota RAV4
2005 ELECTRICAL Charging - RAV4
Microsoft
Tuesday, July 21, 2009 10:23:46 AM
Page 50
© 2005 Mitchell Repair Information Company, LLC.
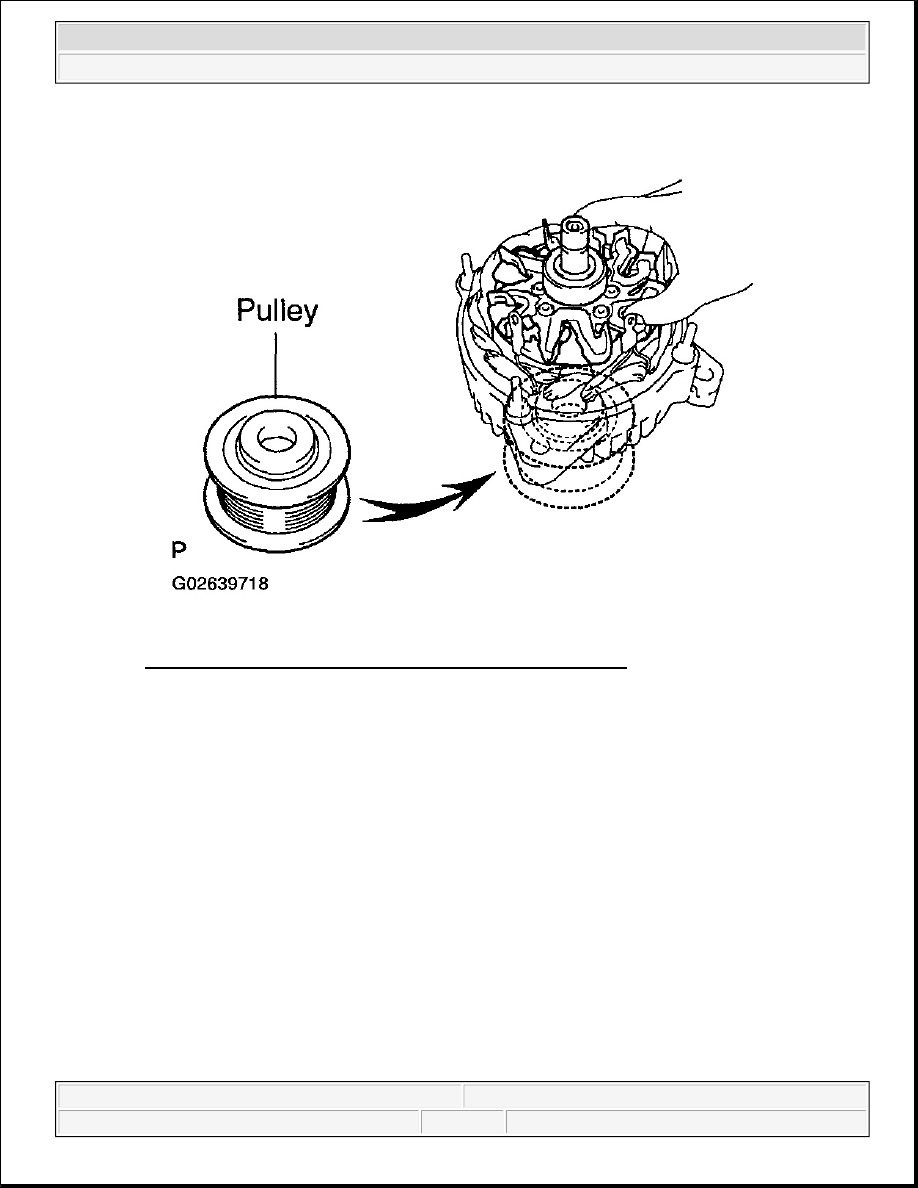
Fig. 46: Installing Rotor To Drive End Frame (12V 90 A Type)
Courtesy of TOYOTA MOTOR SALES, U.S.A., INC.
2. 12 V 100 A type:
INSTALL ROTOR TO DRIVE END FRAME
a. Place the drive end frame on the pulley.
b. Install the rotor to the drive end frame.
2005 Toyota RAV4
2005 ELECTRICAL Charging - RAV4
Microsoft
Tuesday, July 21, 2009 10:23:46 AM
Page 51
© 2005 Mitchell Repair Information Company, LLC.
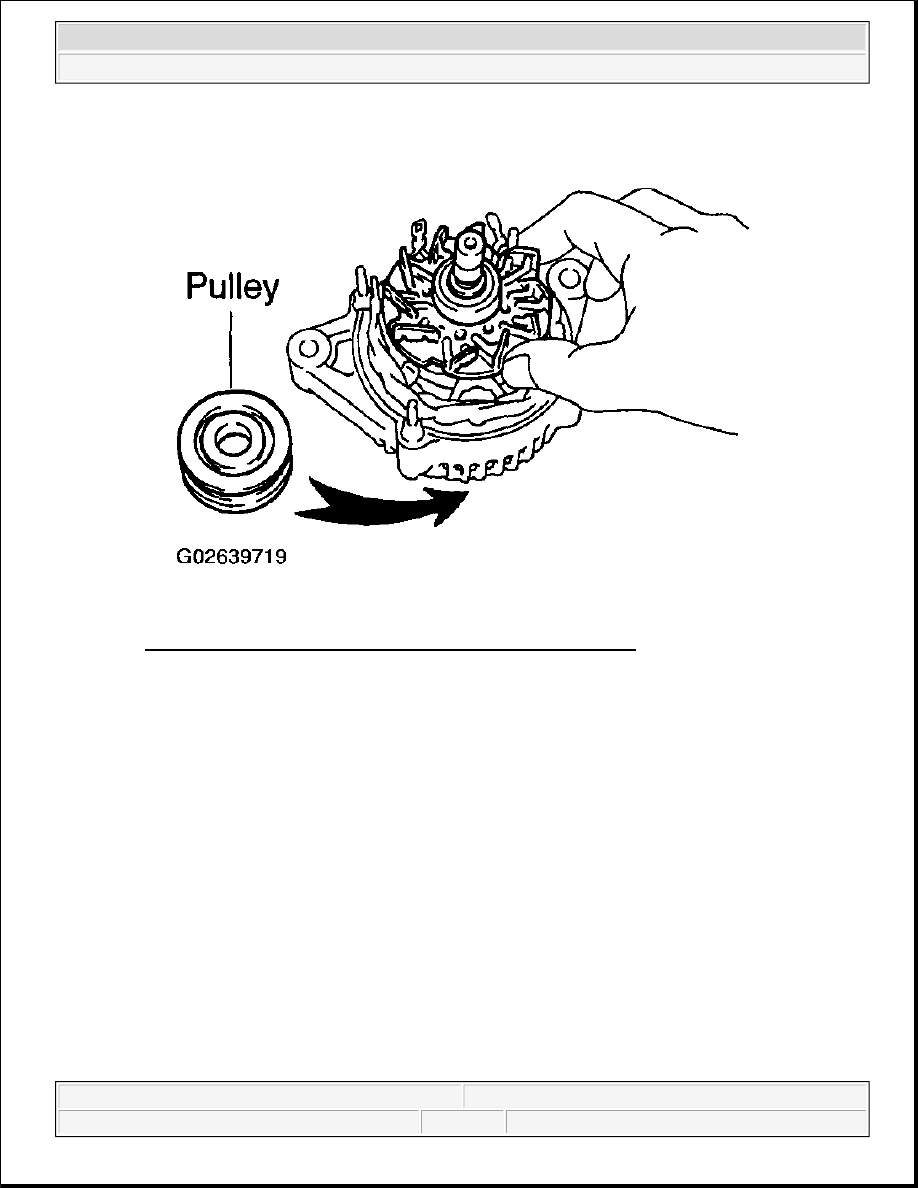
Fig. 47: Installing Rotor To Drive End Frame (12V 100 A Type)
Courtesy of TOYOTA MOTOR SALES, U.S.A., INC.
3. 12 V 90 A type:
INSTALL RECTIFIER END FRAME
a. Place the generator washer on the rotor.
2005 Toyota RAV4
2005 ELECTRICAL Charging - RAV4
Microsoft
Tuesday, July 21, 2009 10:23:46 AM
Page 52
© 2005 Mitchell Repair Information Company, LLC.
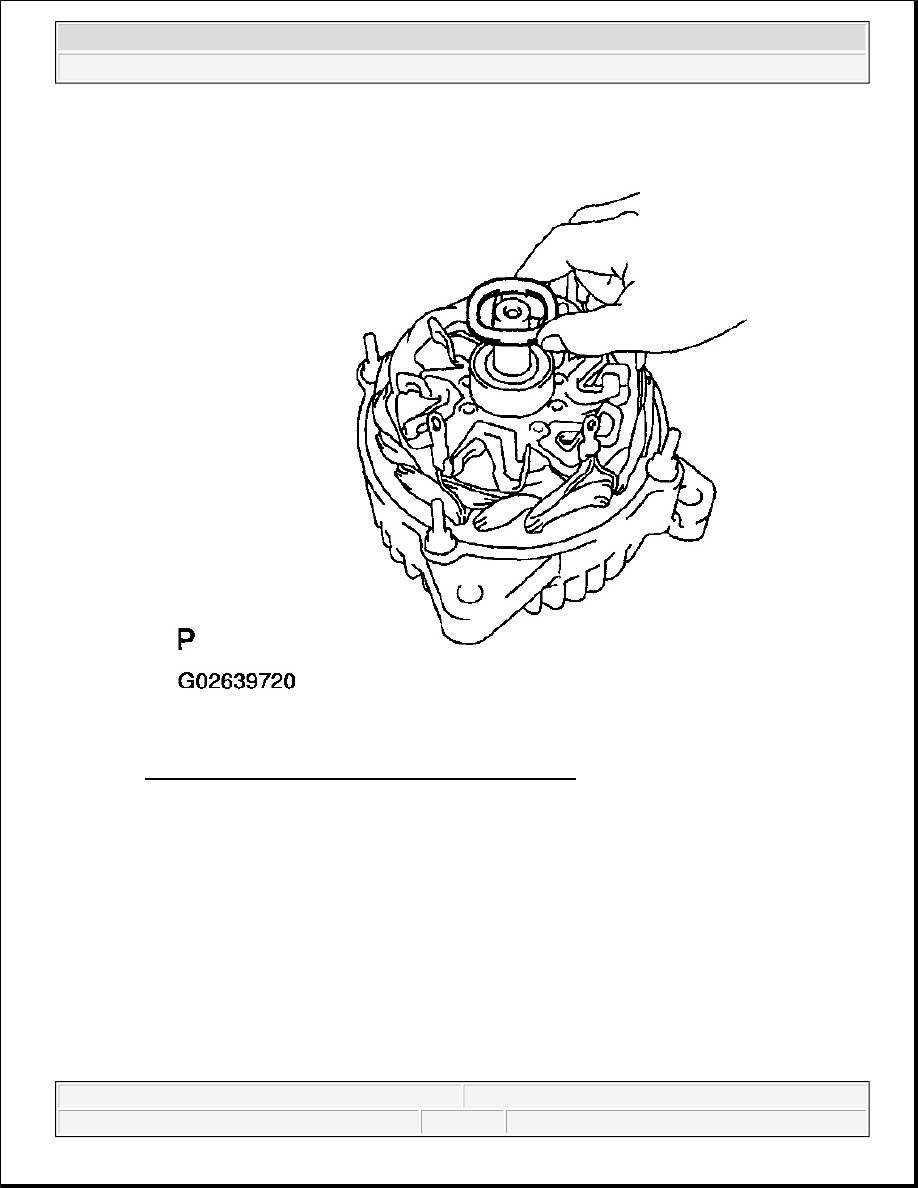
Fig. 48: Installing Rectifier End Frame (12V 90 A Type)
Courtesy of TOYOTA MOTOR SALES, U.S.A., INC.
b. Using a 29 mm socket wrench and press, slowly press in the rectifier end frame.
2005 Toyota RAV4
2005 ELECTRICAL Charging - RAV4
Microsoft
Tuesday, July 21, 2009 10:23:46 AM
Page 53
© 2005 Mitchell Repair Information Company, LLC.
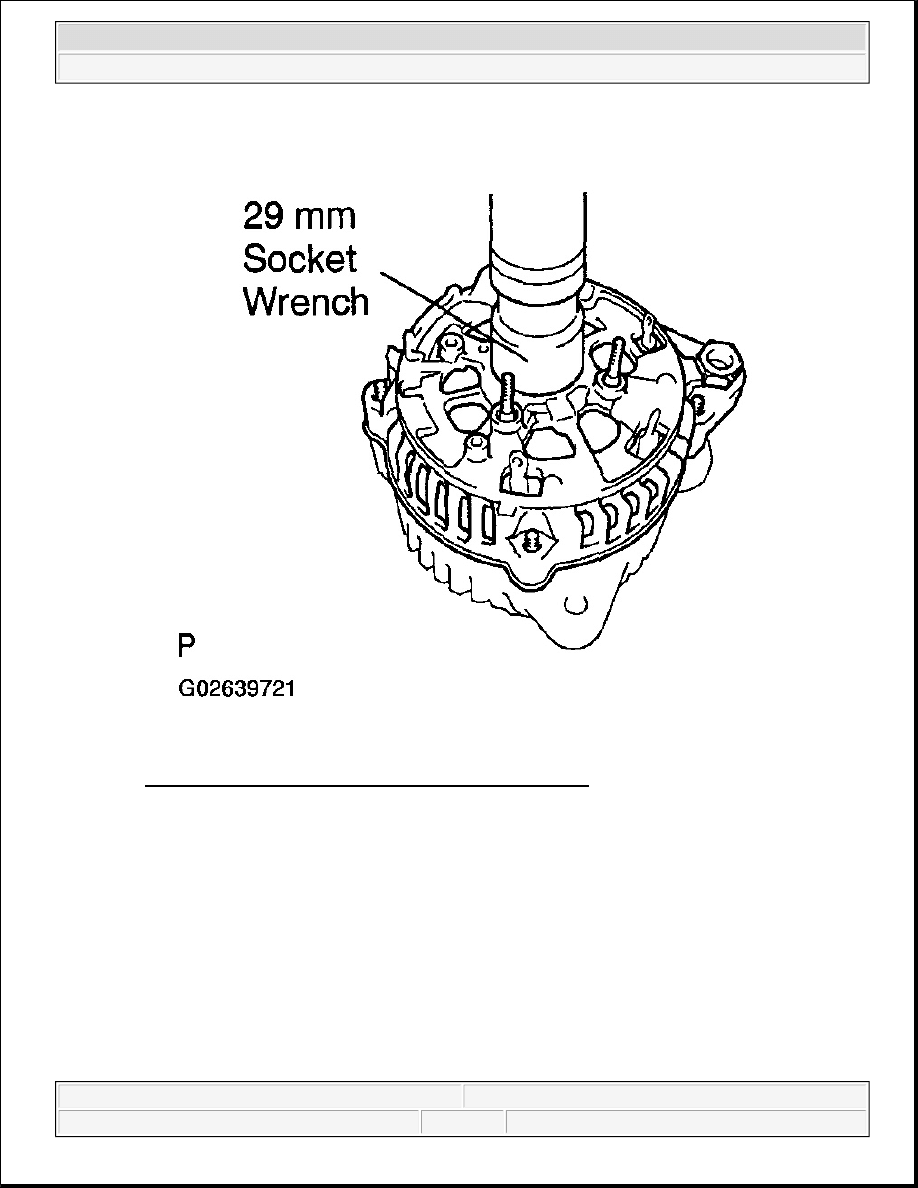
Fig. 49: Pressing In Rectifier End Frame (12V 90 A Type)
Courtesy of TOYOTA MOTOR SALES, U.S.A., INC.
c. Install the wire clip and 4 nuts.
Torque:
4.5 N.m (46 kgf.cm, 40 in.lbf) for without wire clip 5.4 N.m (55 kgf.cm, 48 in.lbf) for with wire
clip
2005 Toyota RAV4
2005 ELECTRICAL Charging - RAV4
Microsoft
Tuesday, July 21, 2009 10:23:46 AM
Page 54
© 2005 Mitchell Repair Information Company, LLC.
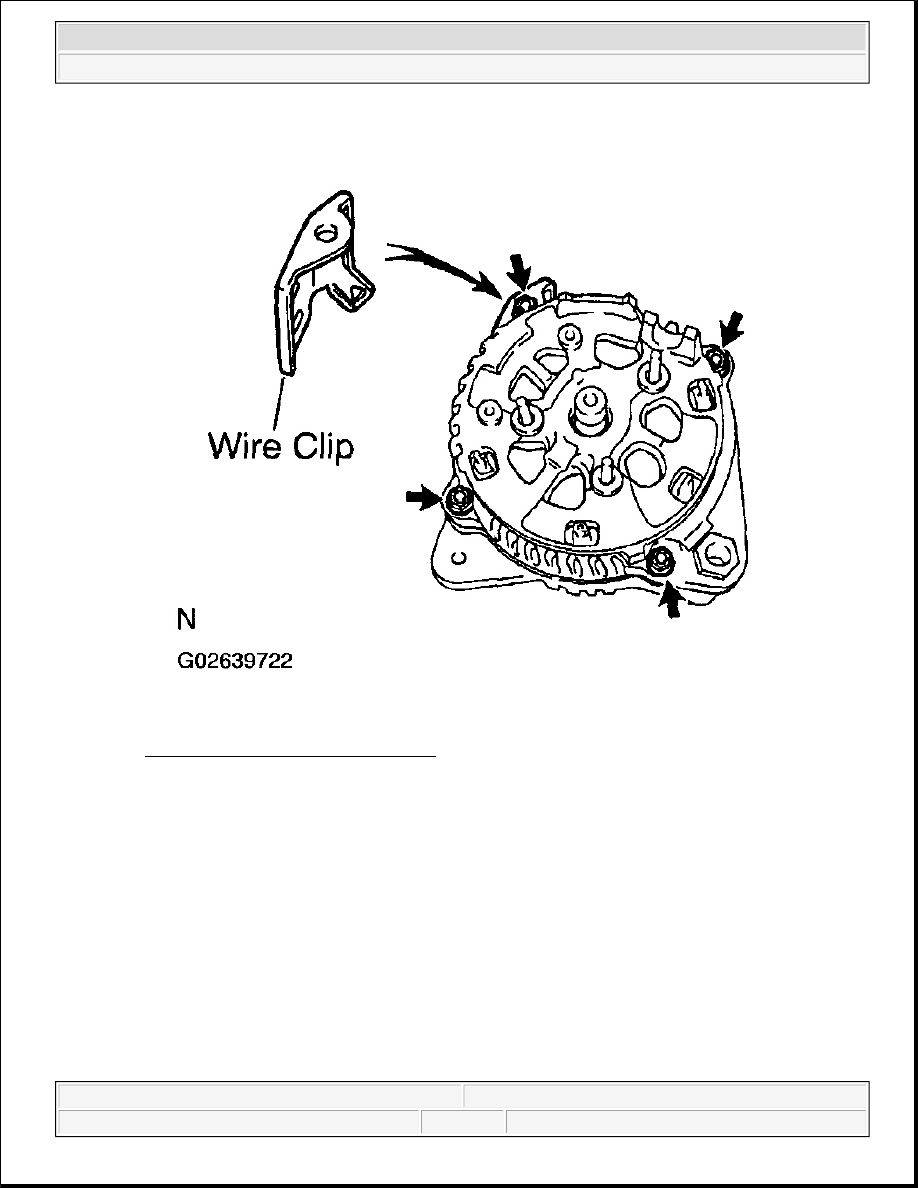
Fig. 50: Installing Wire Clip & 4 Nuts
Courtesy of TOYOTA MOTOR SALES, U.S.A., INC.
4. 12 V 100 A type:
INSTALL RECTIFIER END FRAME
a. Place the alternator washer on the rotor.
2005 Toyota RAV4
2005 ELECTRICAL Charging - RAV4
Microsoft
Tuesday, July 21, 2009 10:23:46 AM
Page 55
© 2005 Mitchell Repair Information Company, LLC.
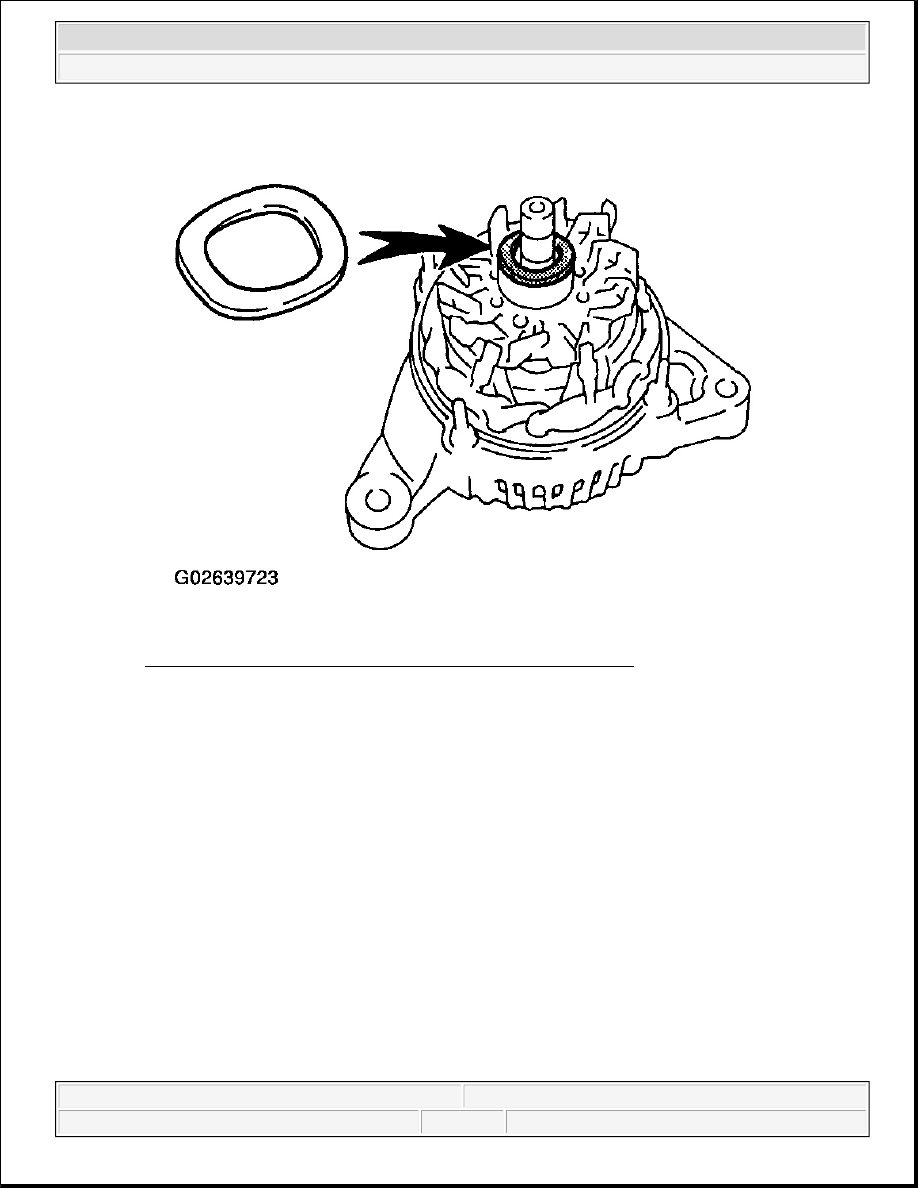
Fig. 51: Placing Alternator Washer On Rotor (12V 100 A Type)
Courtesy of TOYOTA MOTOR SALES, U.S.A., INC.
b. Using a 21 mm socket wrench and press, slowly press in the rectifier end frame.
2005 Toyota RAV4
2005 ELECTRICAL Charging - RAV4
Microsoft
Tuesday, July 21, 2009 10:23:46 AM
Page 56
© 2005 Mitchell Repair Information Company, LLC.
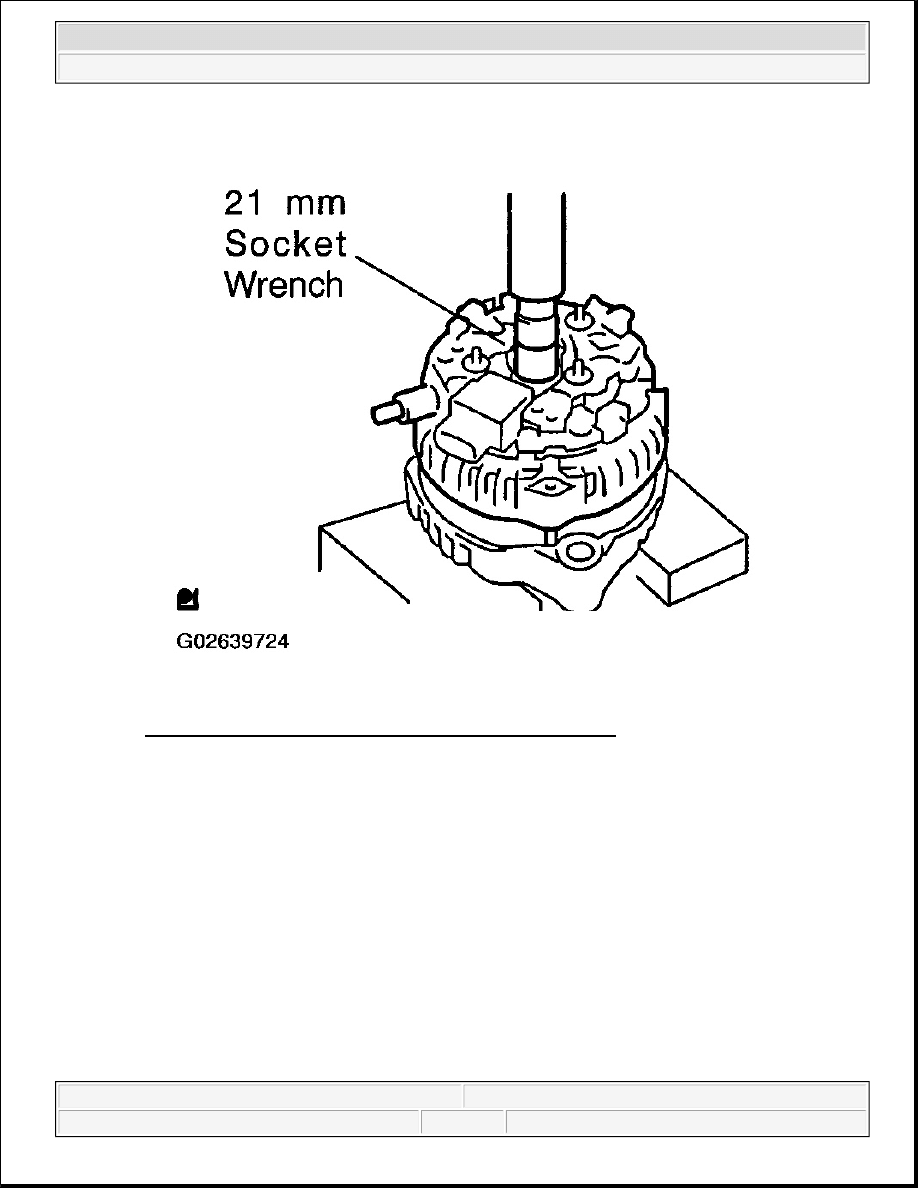
Fig. 52: Identifying 21 MM Socket Wrench (12V 100 A Type)
Courtesy of TOYOTA MOTOR SALES, U.S.A., INC.
c. Tighten the 4 bolts.
Torque: 5.8 N.m (59 kgf.cm, 51 in.lbf)
d. Install the cord clip with the bolt.
Torque: 4.5 N.m (46 kgf.cm, 40 in.lbf)
2005 Toyota RAV4
2005 ELECTRICAL Charging - RAV4
Microsoft
Tuesday, July 21, 2009 10:23:46 AM
Page 57
© 2005 Mitchell Repair Information Company, LLC.

Fig. 53: Tightening 4 Bolts
Courtesy of TOYOTA MOTOR SALES, U.S.A., INC.
5. INSTALL PULLEY
a. Install the pulley to the rotor shaft by tightening the pulley nut by hand.
b. Hold SST (A) with a torque wrench, and tighten SST (B) clockwise to the specified torque.
SST 09820-63011
Torque: 39 N.m (398 kgf.cm, 29 ft.lbf)
c. Check that SST (A) is secured to the pulley shaft.
2005 Toyota RAV4
2005 ELECTRICAL Charging - RAV4
Microsoft
Tuesday, July 21, 2009 10:23:46 AM
Page 58
© 2005 Mitchell Repair Information Company, LLC.
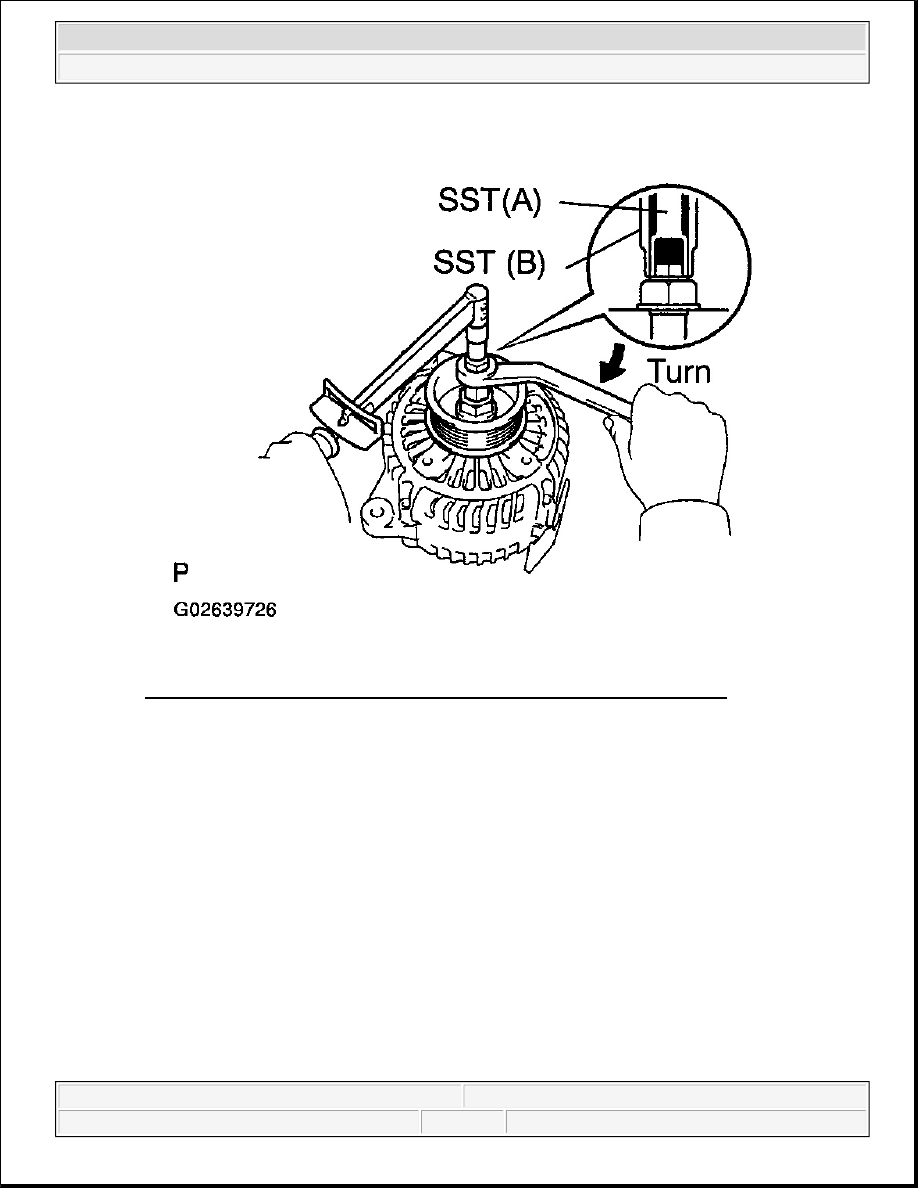
Fig. 54: Installing Pulley To Rotor Shaft By Tightening Pulley Nut By Hand
Courtesy of TOYOTA MOTOR SALES, U.S.A., INC.
d. Mount SST (C) in a vise.
e. Insert SST (B) into SST (C), and attach the pulley nut to SST (C).
2005 Toyota RAV4
2005 ELECTRICAL Charging - RAV4
Microsoft
Tuesday, July 21, 2009 10:23:46 AM
Page 59
© 2005 Mitchell Repair Information Company, LLC.
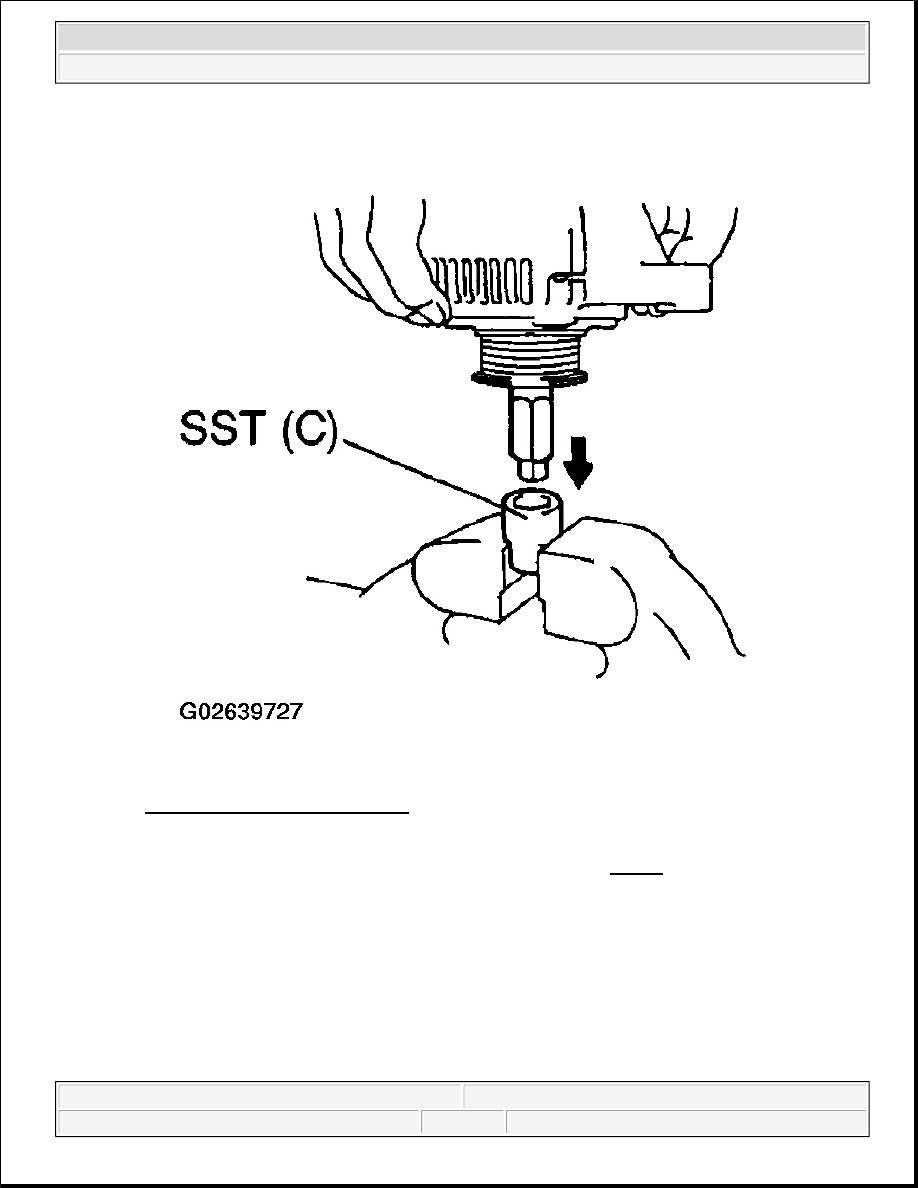
Fig. 55: Mounting SST (C) In Vise
Courtesy of TOYOTA MOTOR SALES, U.S.A., INC.
f. To torque the pulley nut, turn SST (A) in the direction shown in Fig. 56.
Torque: 111 N.m (1,132 kgf.cm, 82 ft.lbf)
g. Remove the generator from SST (C).
2005 Toyota RAV4
2005 ELECTRICAL Charging - RAV4
Microsoft
Tuesday, July 21, 2009 10:23:46 AM
Page 60
© 2005 Mitchell Repair Information Company, LLC.
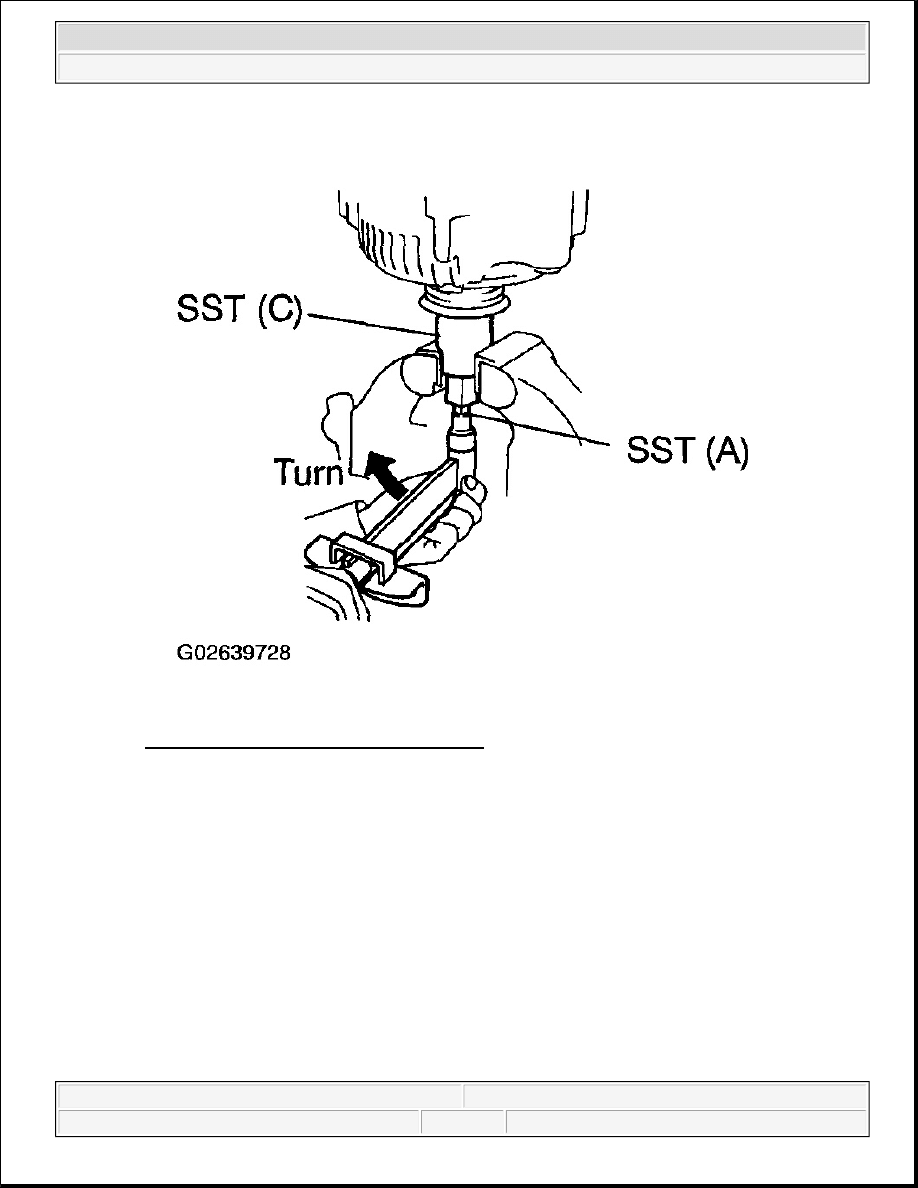
Fig. 56: Removing Generator From SST (C)
Courtesy of TOYOTA MOTOR SALES, U.S.A., INC.
h. Turn SST (B), and remove SST (A and B).
2005 Toyota RAV4
2005 ELECTRICAL Charging - RAV4
Microsoft
Tuesday, July 21, 2009 10:23:46 AM
Page 61
© 2005 Mitchell Repair Information Company, LLC.
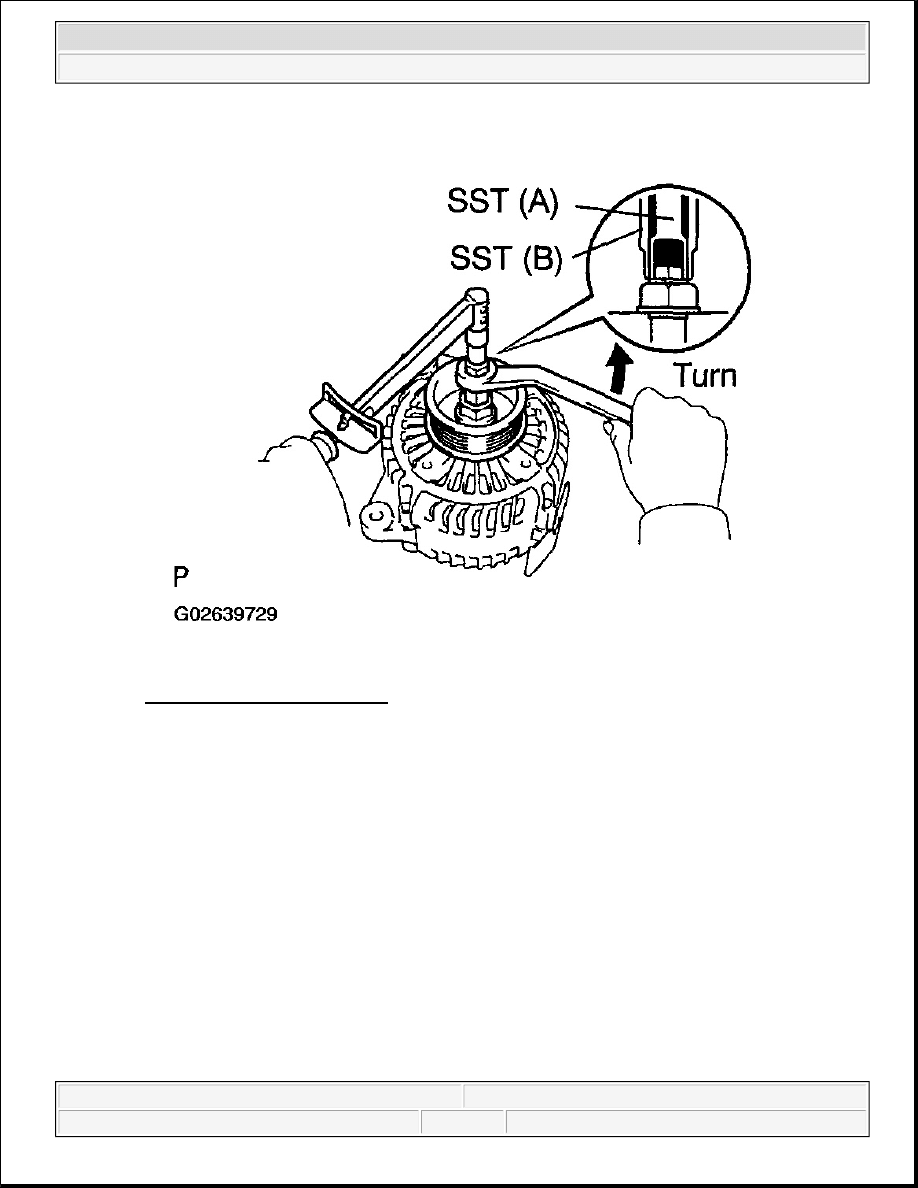
Fig. 57: Removing SST (A & B)
Courtesy of TOYOTA MOTOR SALES, U.S.A., INC.
6. 12 V 90 A type:
INSTALL RECTIFIER HOLDER
a. Install the 4 rubber insulators on the lead wires.
NOTE:
Be careful of the rubber insulators installation direction.
2005 Toyota RAV4
2005 ELECTRICAL Charging - RAV4
Microsoft
Tuesday, July 21, 2009 10:23:46 AM
Page 62
© 2005 Mitchell Repair Information Company, LLC.
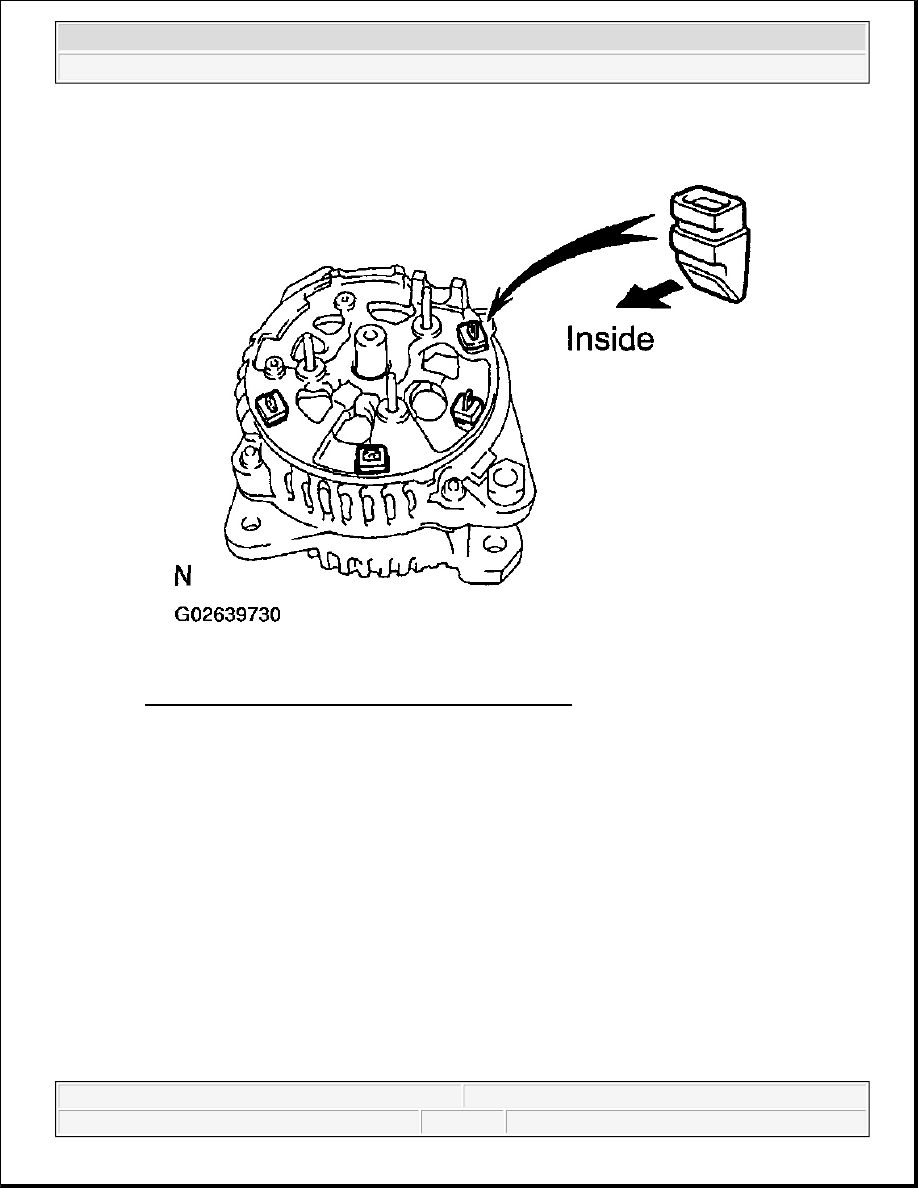
Fig. 58: Installing 4 Rubber Insulators (12V 90 A Type)
Courtesy of TOYOTA MOTOR SALES, U.S.A., INC.
b. Install the rectifier holder while pushing it with the 4 screws.
Torque: 2.9 N.m (30 kgf.cm, 26 in.lbf)
2005 Toyota RAV4
2005 ELECTRICAL Charging - RAV4
Microsoft
Tuesday, July 21, 2009 10:23:46 AM
Page 63
© 2005 Mitchell Repair Information Company, LLC.
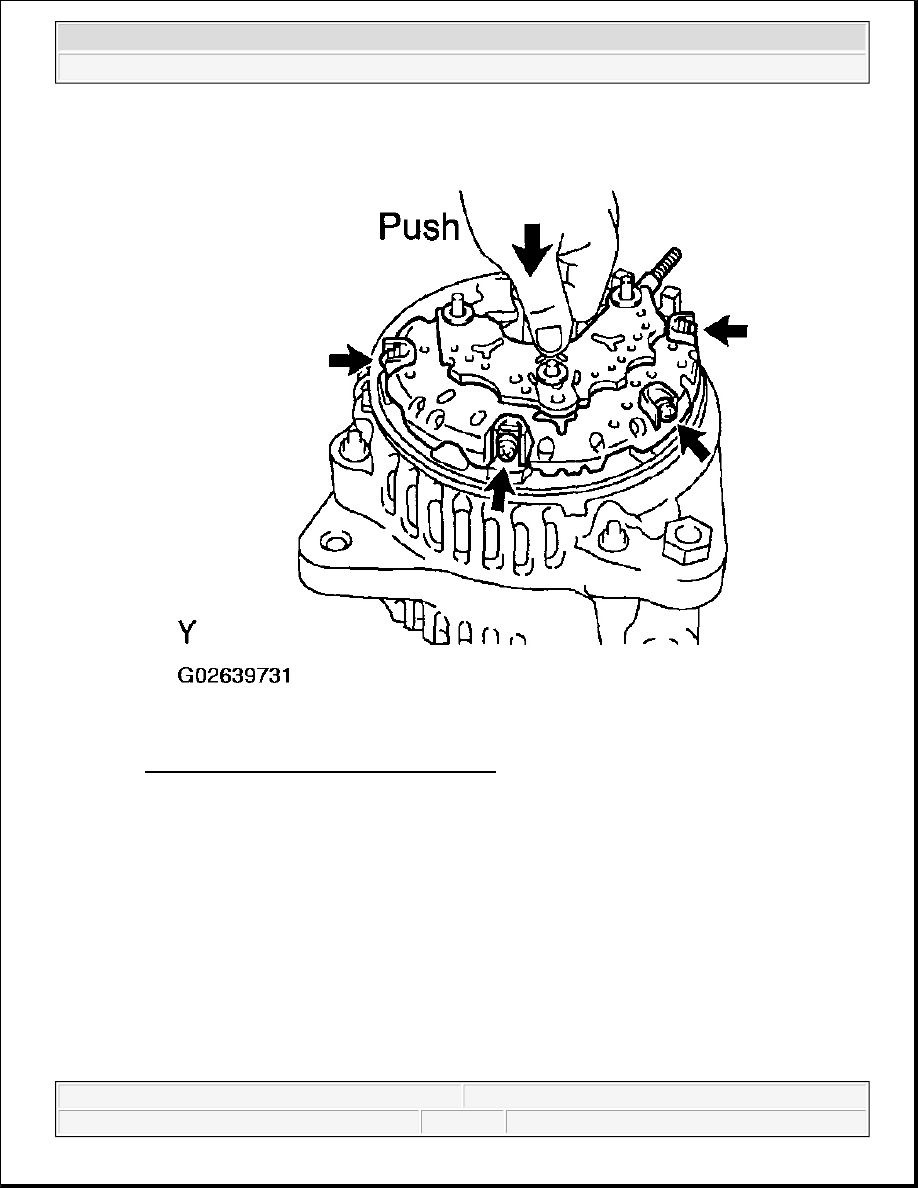
Fig. 59: Identifying 4 Screws (12V 90 A Type)
Courtesy of TOYOTA MOTOR SALES, U.S.A., INC.
7. 12 V 90 A type:
INSTALL VOLTAGE REGULATOR AND BRUSH HOLDER
a. Place the seal plate on the rectifier end frame.
2005 Toyota RAV4
2005 ELECTRICAL Charging - RAV4
Microsoft
Tuesday, July 21, 2009 10:23:46 AM
Page 64
© 2005 Mitchell Repair Information Company, LLC.
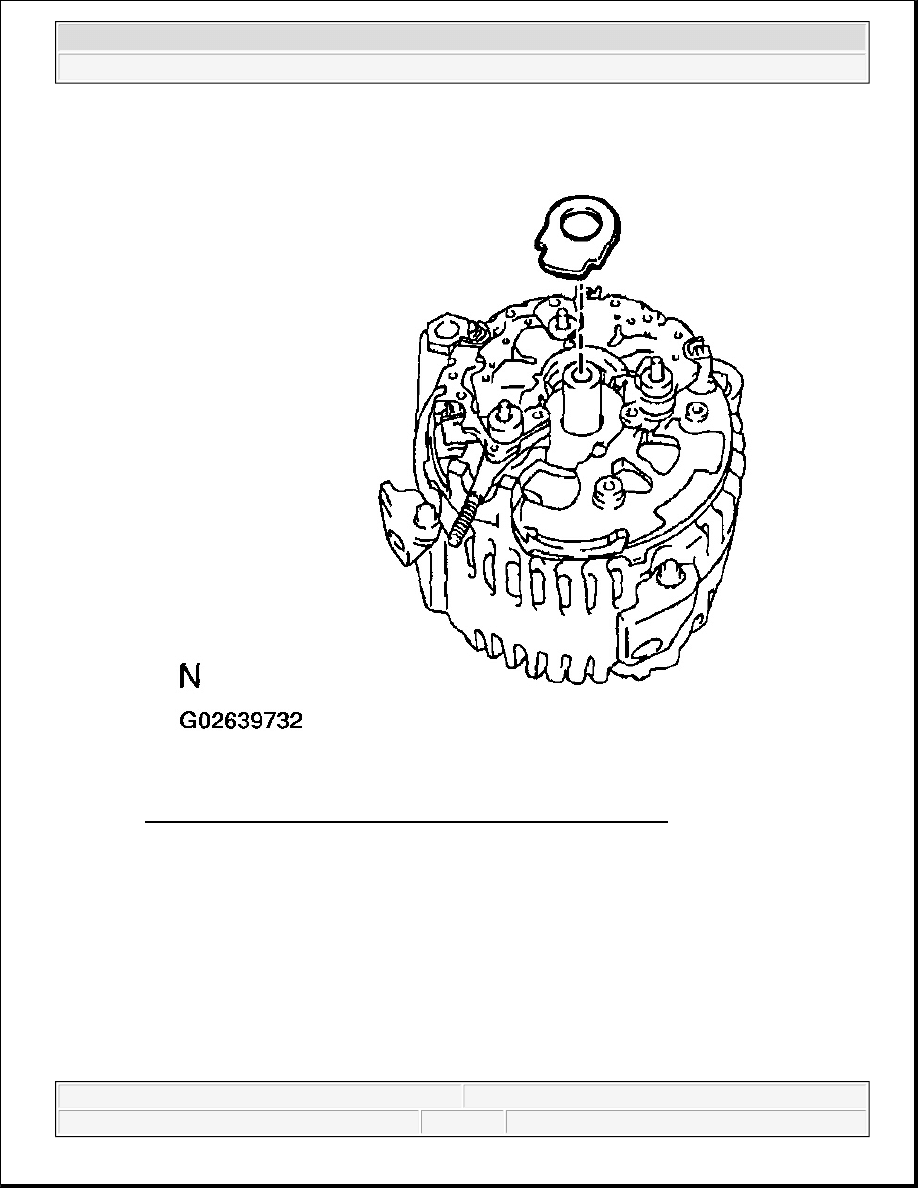
Fig. 60: Placing Seal Plate On Rectifier End Frame (12V 90 A Type)
Courtesy of TOYOTA MOTOR SALES, U.S.A., INC.
b. Place the voltage regulator and brush holder on the rectifier end frame.
c. Install the 5 screws.
Torque: 2.0 N.m (20 kgf.cm, 18 in.lbf)
NOTE:
Be careful of the holder installation direction.
2005 Toyota RAV4
2005 ELECTRICAL Charging - RAV4
Microsoft
Tuesday, July 21, 2009 10:23:46 AM
Page 65
© 2005 Mitchell Repair Information Company, LLC.
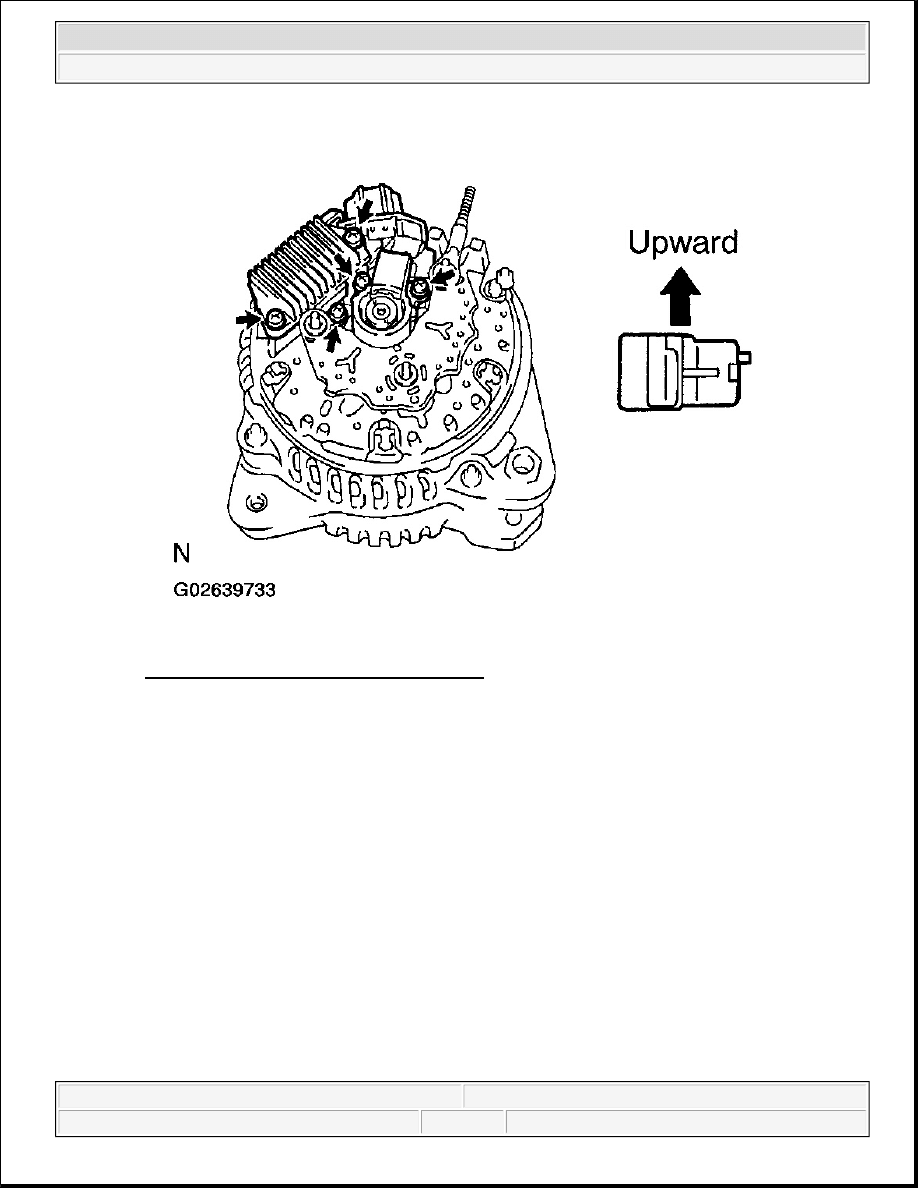
Fig. 61: Installing 5 Screws (12V 90 A Type)
Courtesy of TOYOTA MOTOR SALES, U.S.A., INC.
8. 12 V 100 A type:
INSTALL BRUSH HOLDER AND TERMINAL INSULATOR
a. While pushing the 2 brushes to inside the brush holder, insert a pin (diameter 1.0 mm (0.039 in.))
into the brush holder hole.
2005 Toyota RAV4
2005 ELECTRICAL Charging - RAV4
Microsoft
Tuesday, July 21, 2009 10:23:46 AM
Page 66
© 2005 Mitchell Repair Information Company, LLC.
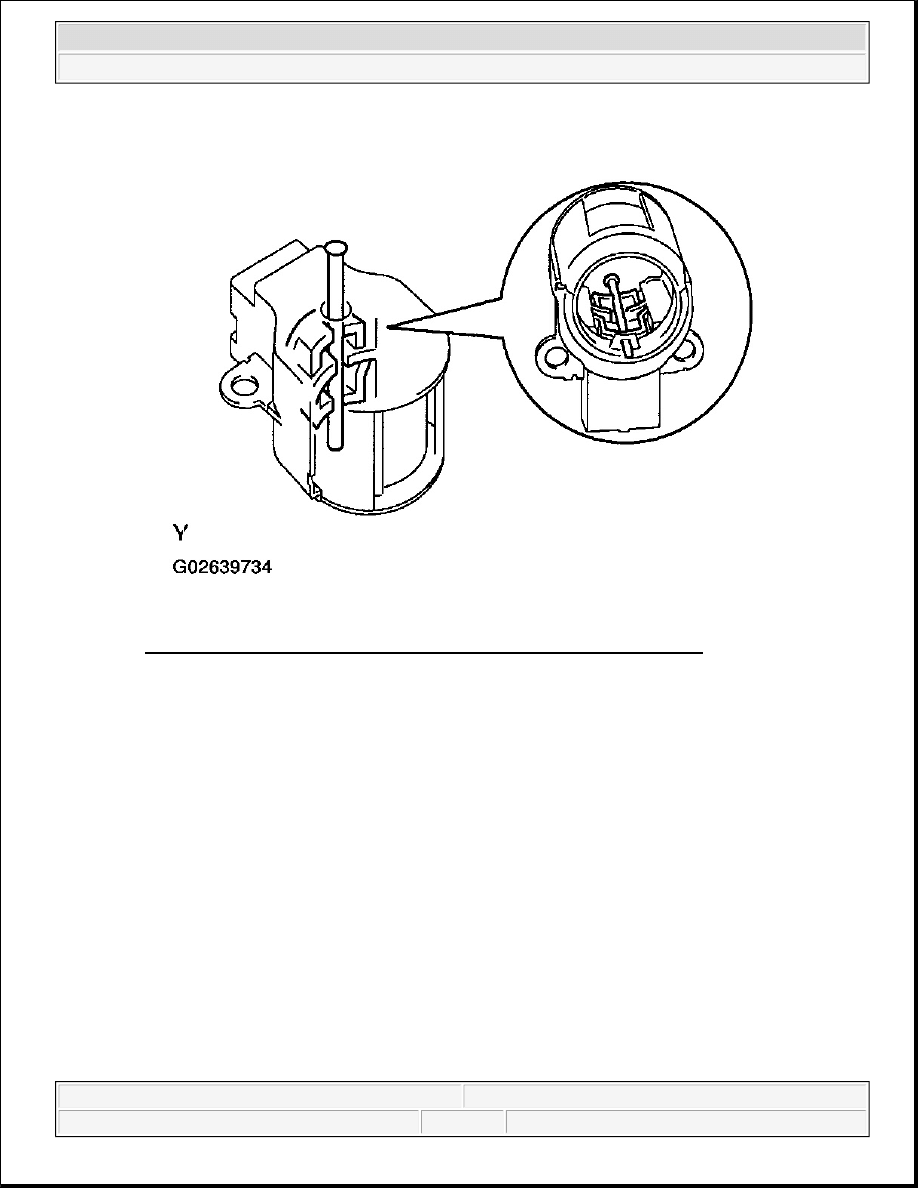
Fig. 62: Installing Brush Holder & Terminal Insulator (12V 100 A Type)
Courtesy of TOYOTA MOTOR SALES, U.S.A., INC.
b. Install the brush holder with the 2 screws.
Torque: 1.8 N.m (18 kgf.cm, 16 in.lbf)
c. Pull out the pin (diameter 1.0 mm (0.039 in.)) from the brush holder.
2005 Toyota RAV4
2005 ELECTRICAL Charging - RAV4
Microsoft
Tuesday, July 21, 2009 10:23:46 AM
Page 67
© 2005 Mitchell Repair Information Company, LLC.
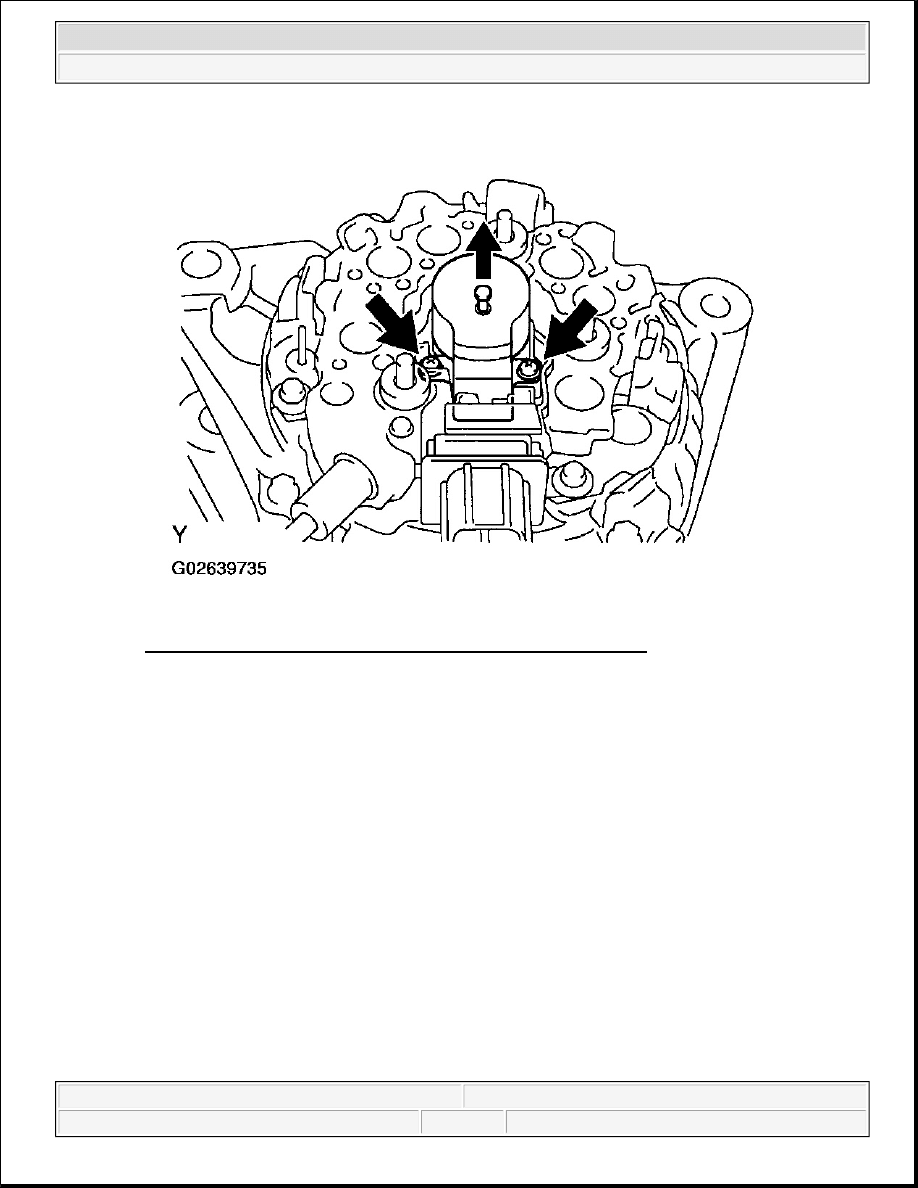
Fig. 63: Installing Brush Holder With 2 Screws (12V 100 A Type)
Courtesy of TOYOTA MOTOR SALES, U.S.A., INC.
d. Install the terminal insulator to the rectifier end frame.
2005 Toyota RAV4
2005 ELECTRICAL Charging - RAV4
Microsoft
Tuesday, July 21, 2009 10:23:46 AM
Page 68
© 2005 Mitchell Repair Information Company, LLC.

Fig. 64: Installing Terminal Insulator To Rectifier End Frame (12V 100 A Type)
Courtesy of TOYOTA MOTOR SALES, U.S.A., INC.
9. 12 V 90 A type:
INSTALL REAR END COVER
a. Place the brush holder cover on the brush holder.
2005 Toyota RAV4
2005 ELECTRICAL Charging - RAV4
Microsoft
Tuesday, July 21, 2009 10:23:46 AM
Page 69
© 2005 Mitchell Repair Information Company, LLC.
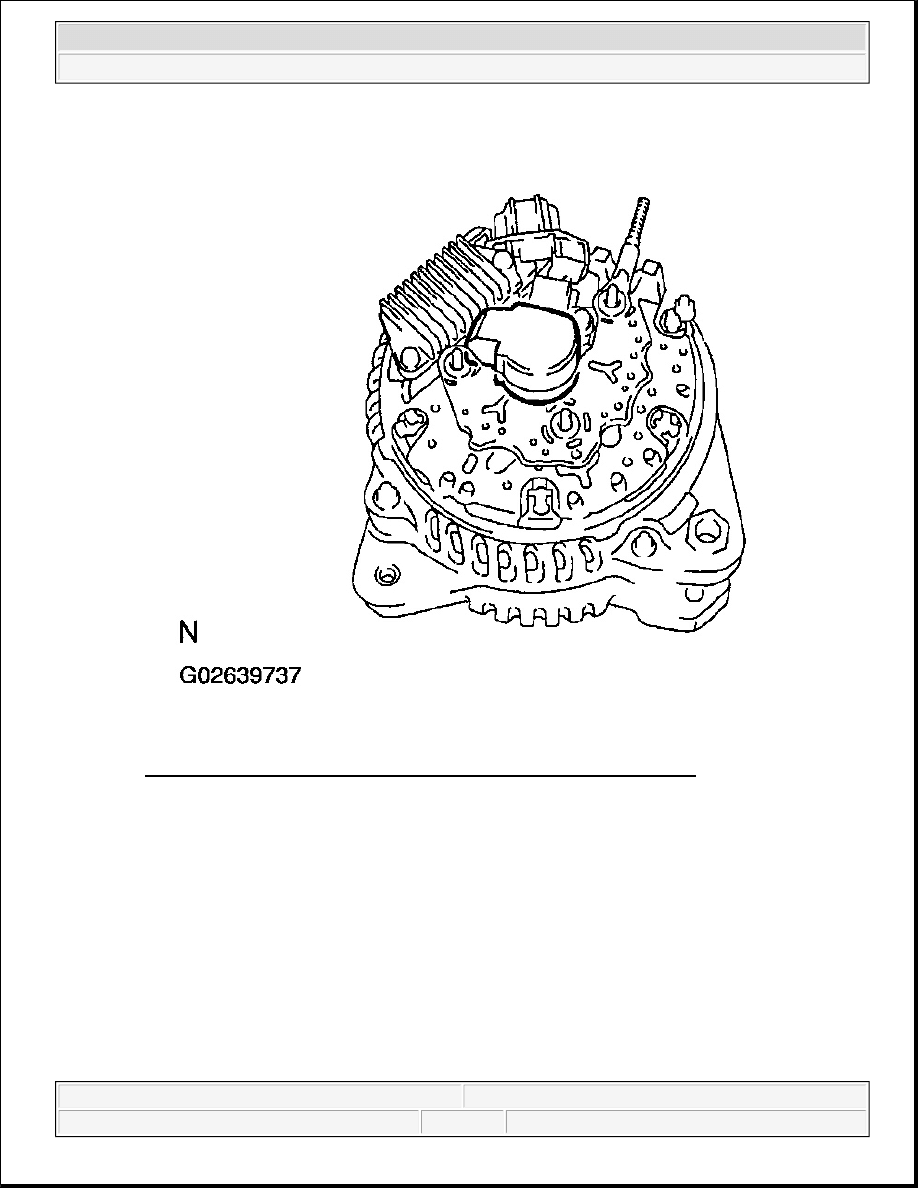
Fig. 65: Placing Brush Holder Cover On Brush Holder (12V 90 A Type)
Courtesy of TOYOTA MOTOR SALES, U.S.A., INC.
b. Install the end cover and plate terminal with the bolt and 3 nuts.
Torque:
4.4 N.m (45 kgf.cm, 39 in.lbf) for nut 3.9 N.m (40 kgf.cm, 35 in.lbf) for bolt
2005 Toyota RAV4
2005 ELECTRICAL Charging - RAV4
Microsoft
Tuesday, July 21, 2009 10:23:46 AM
Page 70
© 2005 Mitchell Repair Information Company, LLC.
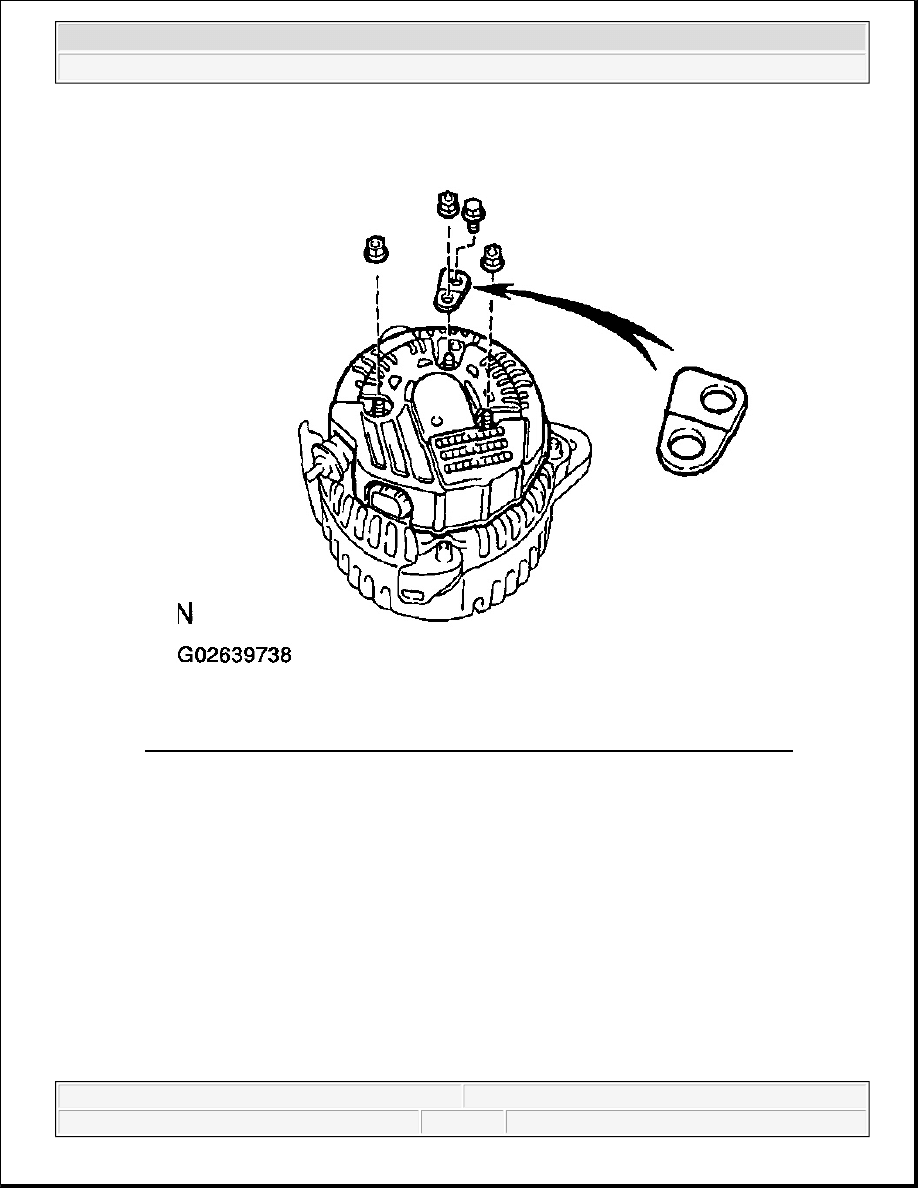
Fig. 66: Installing End Cover & Plate Terminal With Bolt & 3 Nuts (12V 90 A Type)
Courtesy of TOYOTA MOTOR SALES, U.S.A., INC.
c. Install the terminal insulator with the nut.
Torque: 4.1 N.m (42 kgf.cm, 36 in.lbf)
2005 Toyota RAV4
2005 ELECTRICAL Charging - RAV4
Microsoft
Tuesday, July 21, 2009 10:23:47 AM
Page 71
© 2005 Mitchell Repair Information Company, LLC.
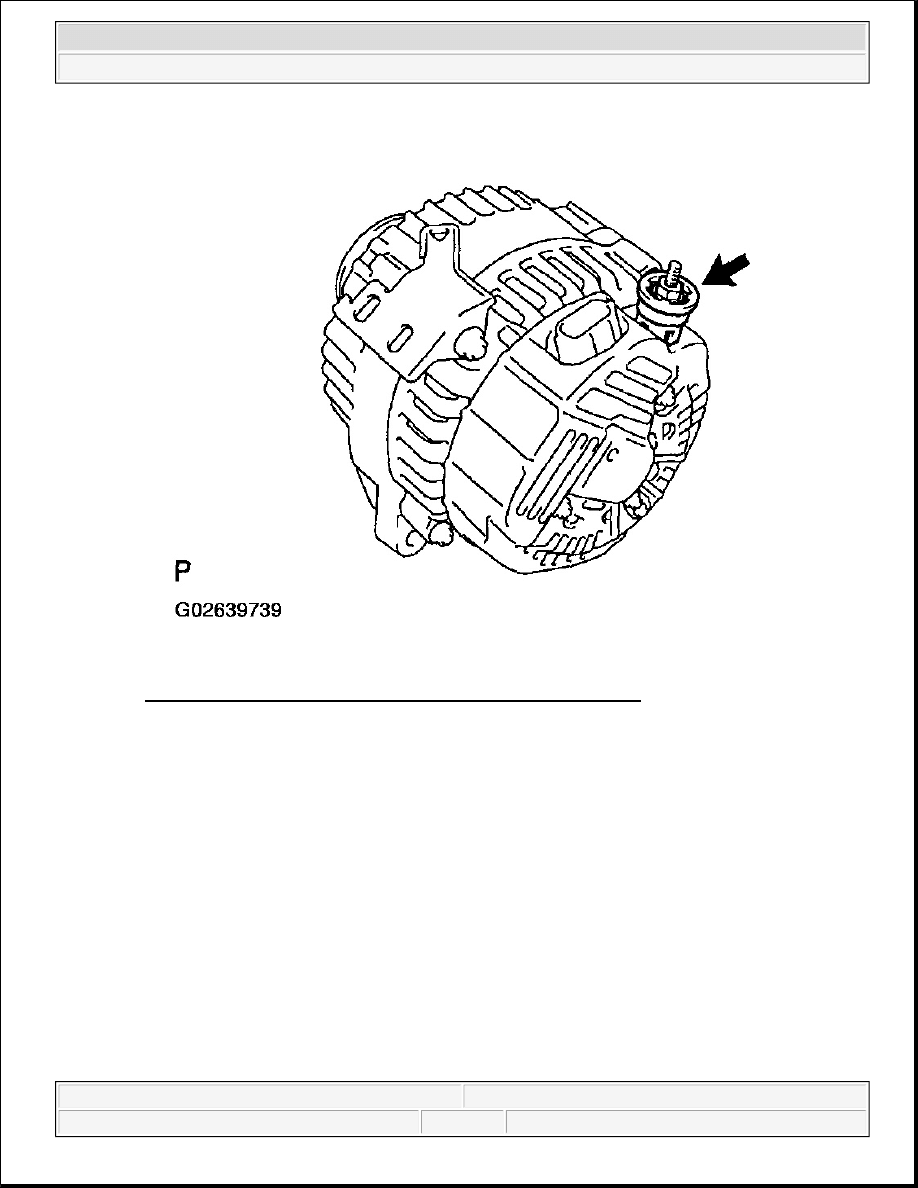
Fig. 67: Installing Terminal Insulator With Nut (12V 90 A Type)
Courtesy of TOYOTA MOTOR SALES, U.S.A., INC.
10. 12 V 100 A type:
INSTALL REAR END COVER
Install the end cover with the bolt and 3 nuts.
Torque: 4.6 N.m (47 kgf.cm, 41 in.lbf)
11. CHECK THAT ROTOR ROTATES SMOOTHLY
2005 Toyota RAV4
2005 ELECTRICAL Charging - RAV4
Microsoft
Tuesday, July 21, 2009 10:23:47 AM
Page 72
© 2005 Mitchell Repair Information Company, LLC.
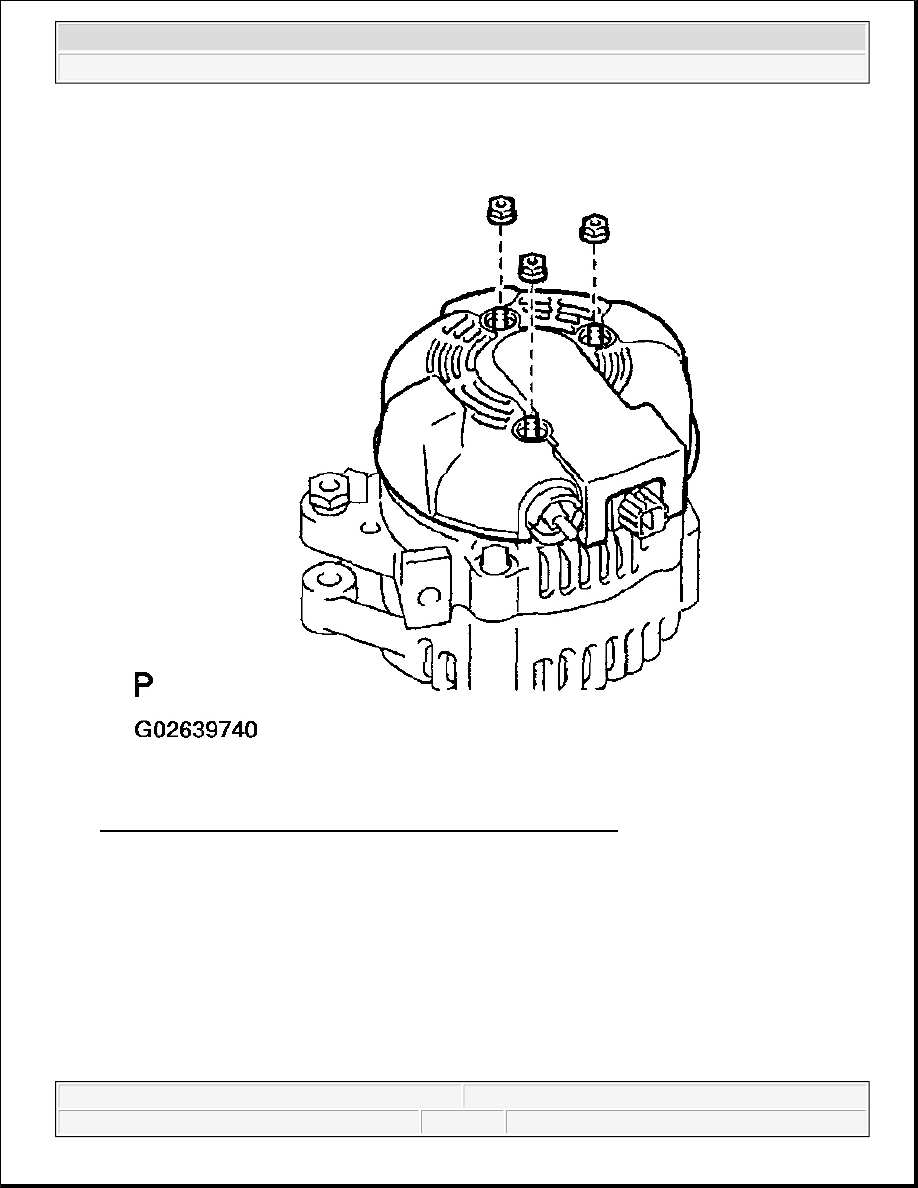
Fig. 68: Installing End Cover With Bolt & 3 Nuts (12V 100 A Type)
Courtesy of TOYOTA MOTOR SALES, U.S.A., INC.
INSTALLATION
1. INSTALL GENERATOR
a. Install the generator with the 2 bolts.
Torque:
52 N.m (530 kgf.cm, 38 ft.lbf) for bolt A
21 N.m (214 kgf.cm, 15 ft.lbf) for bolt B
2005 Toyota RAV4
2005 ELECTRICAL Charging - RAV4
Microsoft
Tuesday, July 21, 2009 10:23:47 AM
Page 73
© 2005 Mitchell Repair Information Company, LLC.
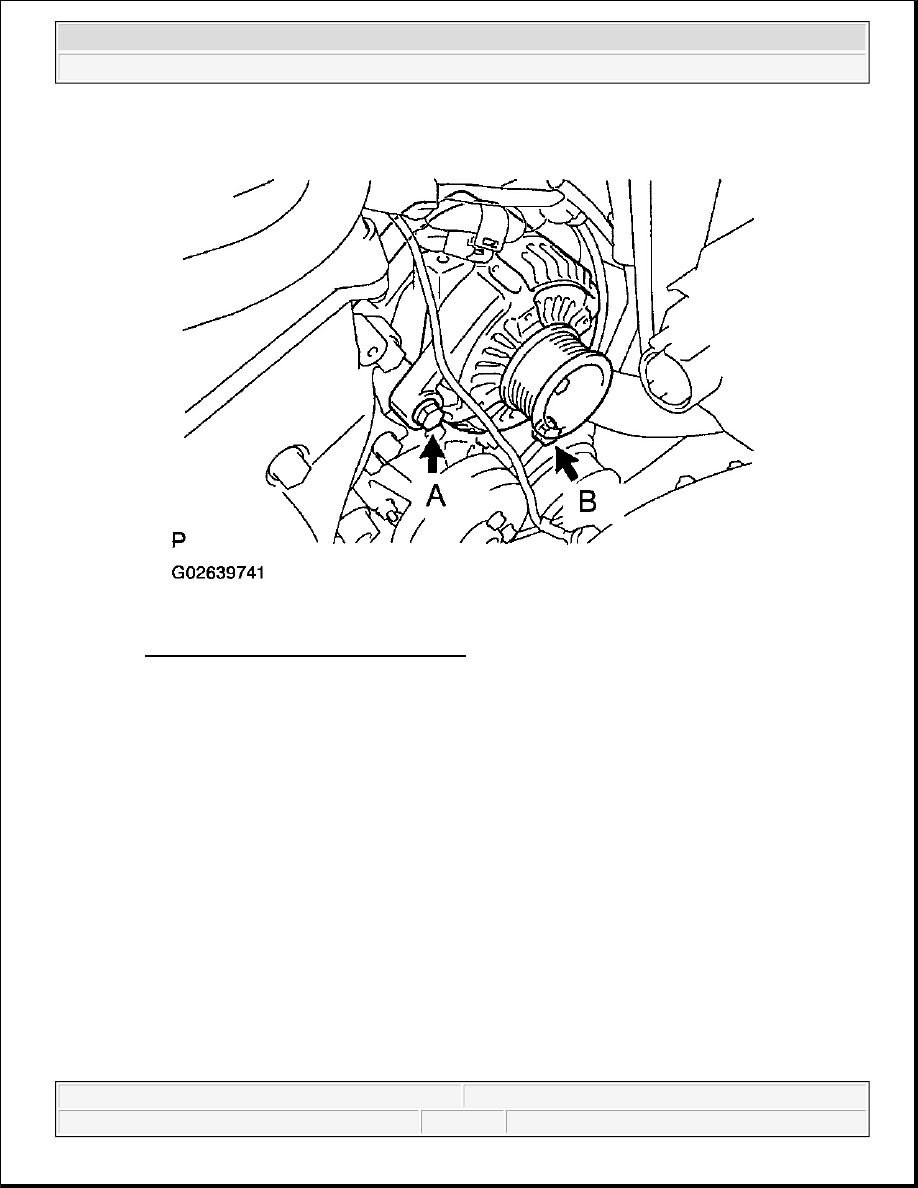
Fig. 69: Installing Generator With 2 Bolts
Courtesy of TOYOTA MOTOR SALES, U.S.A., INC.
b. Connect the generator connector.
c. Connect the generator wire with the nut, and install the cap.
Torque: 9.8 N.m (100 kgf.cm, 87 in.lbf)
d. Install the wire clamp to the wire clip.
e. Install the wire clip on the wire connectors to the generator.
2005 Toyota RAV4
2005 ELECTRICAL Charging - RAV4
Microsoft
Tuesday, July 21, 2009 10:23:47 AM
Page 74
© 2005 Mitchell Repair Information Company, LLC.
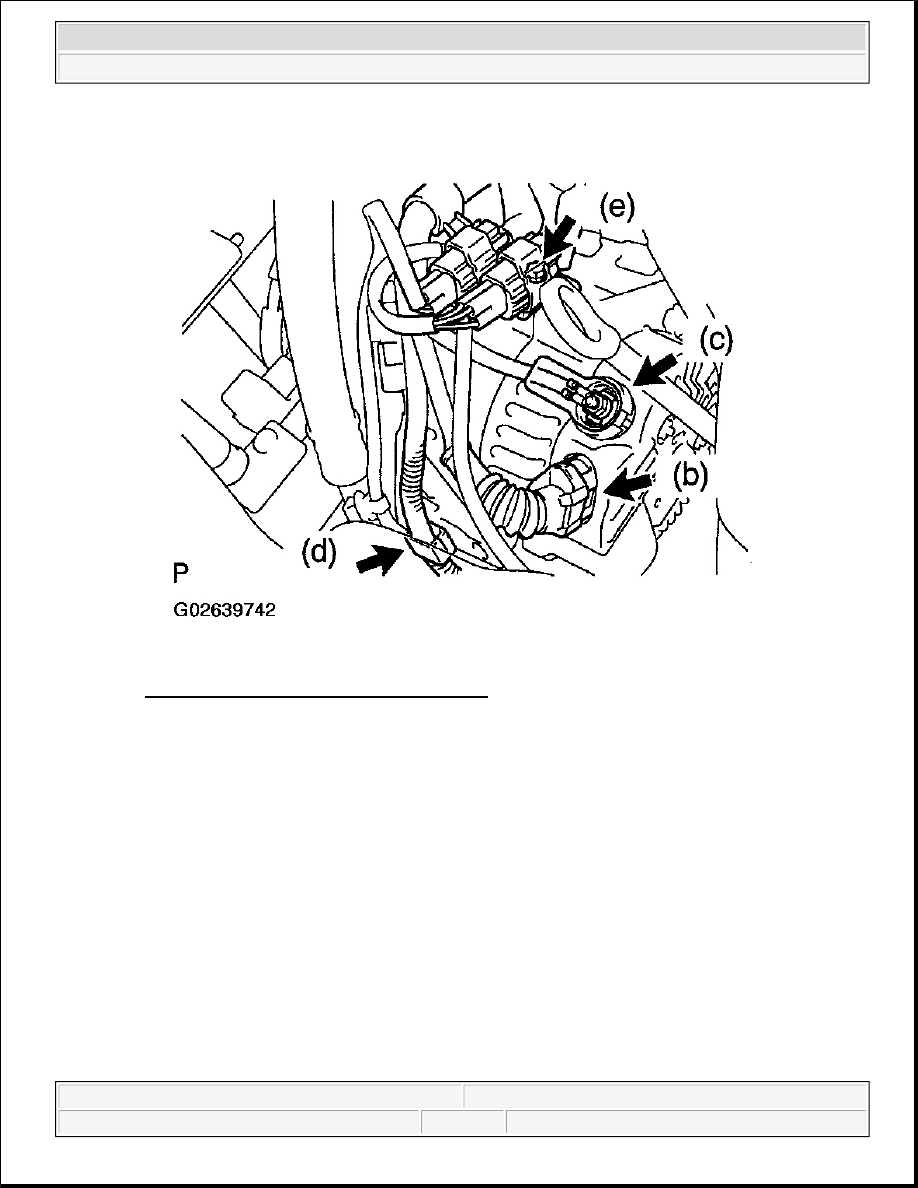
Fig. 70: Installing Wire Clamp To Wire Clip
Courtesy of TOYOTA MOTOR SALES, U.S.A., INC.
2. INSTALL DRIVE BELT
Hook SST on the hexagonal portion of the drive belt tensioner bracket, compress the drive belt tension by
turning the drive belt tensioner bracket clockwise, and install the drive belt.
SST 09249-63010
NOTE:
Compress the drive belt tensioner by taking 3 seconds or more and
installed the drive belt.
2005 Toyota RAV4
2005 ELECTRICAL Charging - RAV4
Microsoft
Tuesday, July 21, 2009 10:23:47 AM
Page 75
© 2005 Mitchell Repair Information Company, LLC.
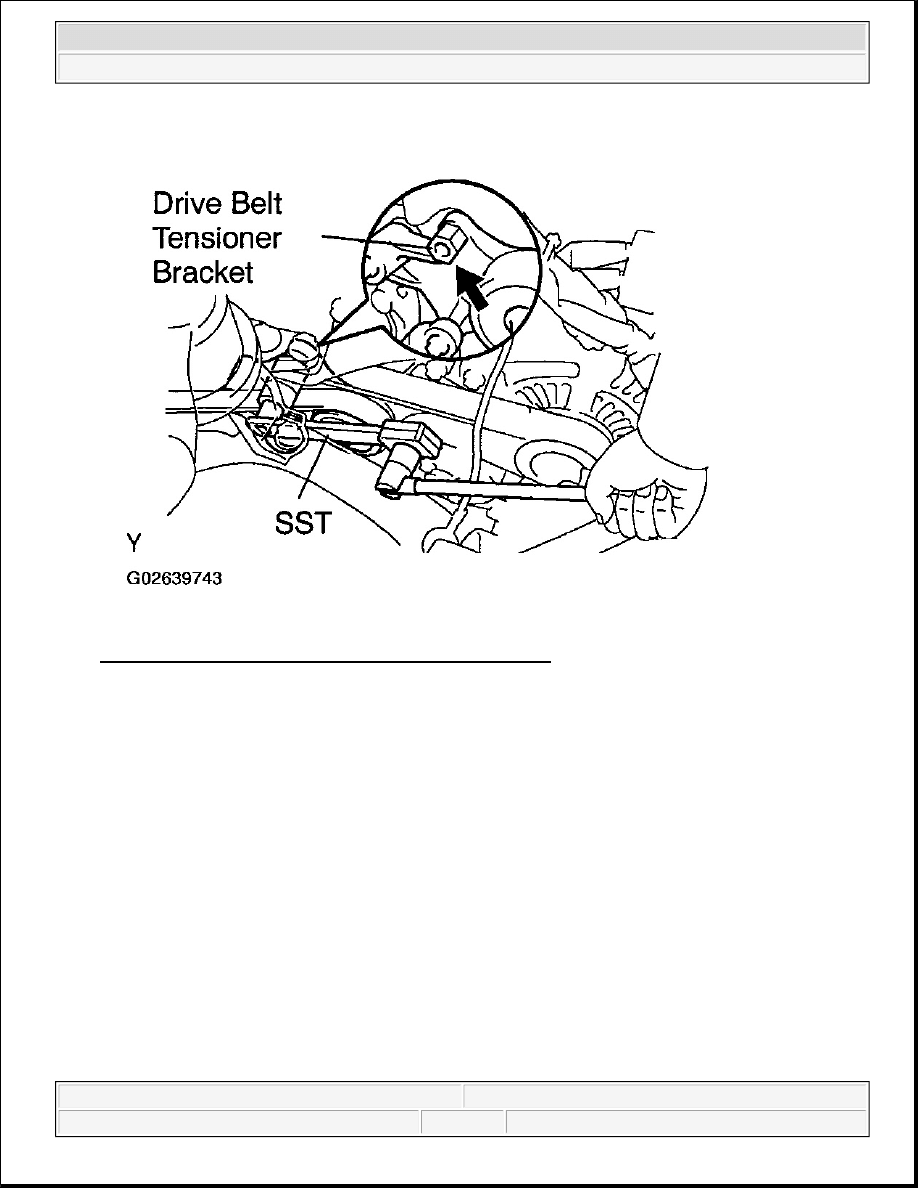
Fig. 71: Identifying Drive Belt Tensioner Bracket Hexagon
Courtesy of TOYOTA MOTOR SALES, U.S.A., INC.
2005 Toyota RAV4
2005 ELECTRICAL Charging - RAV4
Microsoft
Tuesday, July 21, 2009 10:23:47 AM
Page 76
© 2005 Mitchell Repair Information Company, LLC.
Wyszukiwarka
Podobne podstrony:
Charging
WIRELESS CHARGING OF MOBILE PHONES USING MICROWAVES
Free Energy Bedini Device And Method For Pulse Charging A Battery Patent Info 2004
19 Starting Charging
batt charging time
14 Charging System Alternator
NX650 P Section 16 Battery charging
19 Starting and Charging
NiCd Charging Circuit
Charging
Charging
96ZJ 8C CHARGING SYSTEM
Honoré de Balzac Le Peau de chargin résumé
14 Charging System Alternator
NX650 P Section 16 Battery charging
LVCCFSB2005 113 GSM Intermittent Charging Indication
BMW E38 schematic Charging circuit
więcej podobnych podstron