MACHINABILITY AND TOOL WEAR DURING
THE HIGH SPEED MILLING OF SOME HARDENED
TOOL STEELS
H.Chandrasekaran and U. Persson
Swedish Institute for Metals Research
Drottning Kristinas väg 48
114 28 Stockholm
Sweden
Abstract
High speed milling of tool steels in the hardened state is an expanding
field. Results from machinability and tool wear studies during the finish
milling of some hot and cold working tool steels using both cemented carbide
and CBN tool inserts are presented in this paper. Recommended cutting
speeds (75 to 600 m/min) and feeds (0,025 to 0,15 mm/tooth) were used
to compare tool performance as well as the surface integrity of the milled
surface. Microstructural study of the work material and SEM investigation
of the worn tools also formed part of this investigation.
While cemented carbide tools appear to be capable of milling the different
steels in our study, use of proper CBN tools and cutting conditions could im-
prove the milling productivity appreciably in the case of cold working steels.
However, in the case of hot working steels (50 HRC) the optimal cutting
conditions associated with CBN tools seem to be very sensitive to nominal
compositional changes in the work material. Obvious microstructural dam-
age or tensile residual stress was not seen during the present studies. The
limited SEM study of the tools indicated that adhesion induced micro chip-
ping could be the probable limiting factor during the high speed milling of
hotworking steels. The critical role of alloy content and structure was also
seen to play an important role on their machinability during hard milling.
1237

1238
6TH INTERNATIONAL TOOLING CONFERENCE
INTRODUCTION
The demand on the quality and productivity of dies, moulds and press tools
for metal and plastic forming industry is increasing continuously. Such cold
and hot working tools are traditionally manufactured through rough ma-
chining, finish machining followed by heat treatment. Grinding and EDM
(electro discharge machining) are often the final operation carried out. How-
ever, cutting tool and machine tool developments give us the possibility to
machine materials in the hardened state. This technology of hard machining
is capable of enhancing the overall production economy, arising from reduc-
tion in lead time and elimination of the grinding operation [1] . Improvement
in working environment due to the elimination of a cutting fluid is an addi-
tional outcome affecting the overall production economy very favourably.
Successful implementation of this technology however, requires the se-
lection of proper tools and cutting conditions [2]. The effective range of
cutting conditions for the milling of hardened steels (50 ∼ 60 HRC) with
conventional or super hard tool materials is rather narrow. Despite this,
industrial experience shows that similar tool steels with marginal compo-
sitional difference do display substantial difference in machinability in the
hardened state. Since it is possible to achieve the required hardness both
through composition and processing, the resulting effect on machinability is
difficult to predict, mainly because available information about the specific
effect of microstructural features such as matrix, carbide/other particles on
hard machinability is very little. This is one of the prime motives for the
present research effort.
Reliable information about the role of material microstructure on the
milling machinability of tool steels in the hardened state could be very useful
in practice and the present work is a step in this direction. The general objec-
tive of this study is to expand our knowledge base in the field of high speed
milling of typical tool steels in the hardened state. As both technical and
practical demands indicated, for our study we have chosen the fine milling
of these steels in the hardened state. The work material being the main pa-
rameter of interest, standard tools and cutting conditions were used during
the controlled milling tests. Systematic mapping of the evolution of tool
wear was followed by an examination of the worn tools and the machined
surface. Both SEM and optical microscopy was used in these investigations.

Machinability and Tool Wear During the High Speed Milling of Some Hardened...
1239
Limited surface integrity investigations were also carried out. These results
will be presented now.
WORK MATERIALS USED
It was proposed to use standard hot and cold working tool steels from the
market in the study and included the following materials, namely
five hot working tool steels, namely ORVAR Supreme, THG2000 and
3 variants of the grade DIEVAR
five cold working tool steels namely VANADIS 4 and CALDUR, P/M
HSS ASP 2023 and ASP2023S and bearing steel 100Cr6.
All the five hot working grades were heat treated to a hardness of 50
HRC. The hardness of the cold working grades varied from 61 HRC (CAL-
DUR), 62HRC (VANADIS 4, ASP 2030 and ASP2030S) and 63 HRC (steel
100Cr6).
Chemical analysis of the steels indicated that THG 2000 and ORVAR to
differ mainly in Si, and S content, while DIEVAR contains more Mo, but
lesser amounts of Si and V.
All the other grades contain much more C. The P/M grades VANADIS 4
and ASP2023 have comparatively higher alloy content, especially V. Cold
working grades CALDUR and the ball bearing steel 100Cr 6 are low alloyed
carbon steels.
The microstructural features of the work materials used in our study were
obtained from metallographic sections of the work material after nital (4%)
etching. All the tool steels investigated have a fine martensitic microstructure
in the hardened state. The P/M grade VANADIS 4 contains in addition a fine
distribution of primary carbides of CrC and VC, while ASP2023 contains
mainly primary carbides of WC and VC.
MILLING CUTTERS AND TOOL MATERIALS USED
Since both hot and cold working steels were involved, the required tool
material and recommended geometry also varied. Since the number of ma-
terial variants were many, it was proposed to compare their machinability
under one cutting condition in terms of speed, feed and depth of cut, suitable
for the chosen tool. The tool holders and the tools (material type and geome-
try) as well as the cutting conditions for the milling tests were selected on the

1240
6TH INTERNATIONAL TOOLING CONFERENCE
recommendations of the tool supplier. Bulk of the milling was carried out
using different grades of super hard tool material, namely cubic boron nitride
(CBN) from more than one supplier. For one material (ASP2023) other ce-
mented carbide and cermet grades were also used. Finish face milling using
end mills/face mills was the main test mode.
MILLING TESTS
Finish milling in the hardened state is characterised by small feeds and
depths of cut using small diameter cutters rotating at high speeds. In view
of the large number of material and tool combinations involved in our study
high speed milling tests were carried out of different laboratories, namely
Machining laboratory of Uddeholm Tooling AB at Hagfors, Secotools AB,
Fagersta and Sandvik Coromant AB, Stockholm. All tests were carried
out in the dry condition. A flank/notch wear of 0,2 mm (VB = 0,2 mm)
was the evaluation criterion used in these studies. In cases of uneven wear
the tests were stopped when the maximum wear level reached 0,2 mm.
Similarly, when the tool wear was too little the test was stopped to conserve
the resources. Tool wear was monitored at regular intervals using low power
toolmakers microscope.
The consolidated test conditions used are shown in Table 1. As a step
in mapping the observed tool wear and machinability behaviour of the tool
the worn tools were examined in SEM. Further an effort was also made to
map the surface integrity parameters of the milled surfaces. This included
measurement of surface quality (Profilometer), state of microstructure (met-
allographic section), subsurface deformation (microhardness) and residual
stresses (X-ray diffraction). These investigations were carried out only for
chosen test conditions only. We will now present the tool wear results and
the results obtained from SEM only.
RESULTS FROM TOOL WEAR STUDIES
Evolution of flank and notch wear during the milling of three DIEVAR
variants using CBN inserts is shown in Fig. 1. If both notch and flank wear
were present these were monitored. It can be readily seen that in the initial
stages both wear modes follow similar path. However, the resulting tool
wear for the three DIEVAR variants clearly shows that with marginal mate-
rial variation even at comparable hardness the tool wear could be affected.

Machinability and Tool Wear During the High Speed Milling of Some Hardened...
1241
Table 1.
The cutting conditions used for tool wear studies in milling
Tool steels tested
Tool grade
z
V
f
z
a
p
a
e
used
mm/tooth
m/min
mm
mm
ORWAR supreme
BN300
1
600
0,08
0,5
7
THG 2000
DIEVAR (1,2,3)
ASP 2023
CBN 20
2
400
0,15
0,3
4
ASP 2023S
CBN 20
2
400
0,15
4
0,3
VANADIS 4
CBN 20
2
400
0,15
4
0,3
ASP 2023S
F30M
2
75
0,15
4
0,6
ASP 2023S
390 CB50
2
400
0,15
1,5
0,3
ASP 2023S
390 CT530
2
75
0,15
1,5
0,3
ASP 2023S
390 1025 E
2
75
0,15
1,5
0,3
ASP 2023S
390 1025 M
2
75
0,15
1,5
0,3
CALDUR
CBN20
2
600
0,025
3
0,3
100Cr6
CBN20
2
600
0,025
3
0,3
CALDUR
CBN100
1
400
0,05
0,15
47
100Cr6
CBN100
1
400
0,05
0,15
47
CALDUR
CBN300
1
400
0,05
0,15
47
100Cr6
CBN300
1
400
0,05
0,15
47
Similar wear development was also seen in the case of other hotworking
grades. From these curves the tool life was computed using a flank wear
criterion of VB = 0,2 mm.
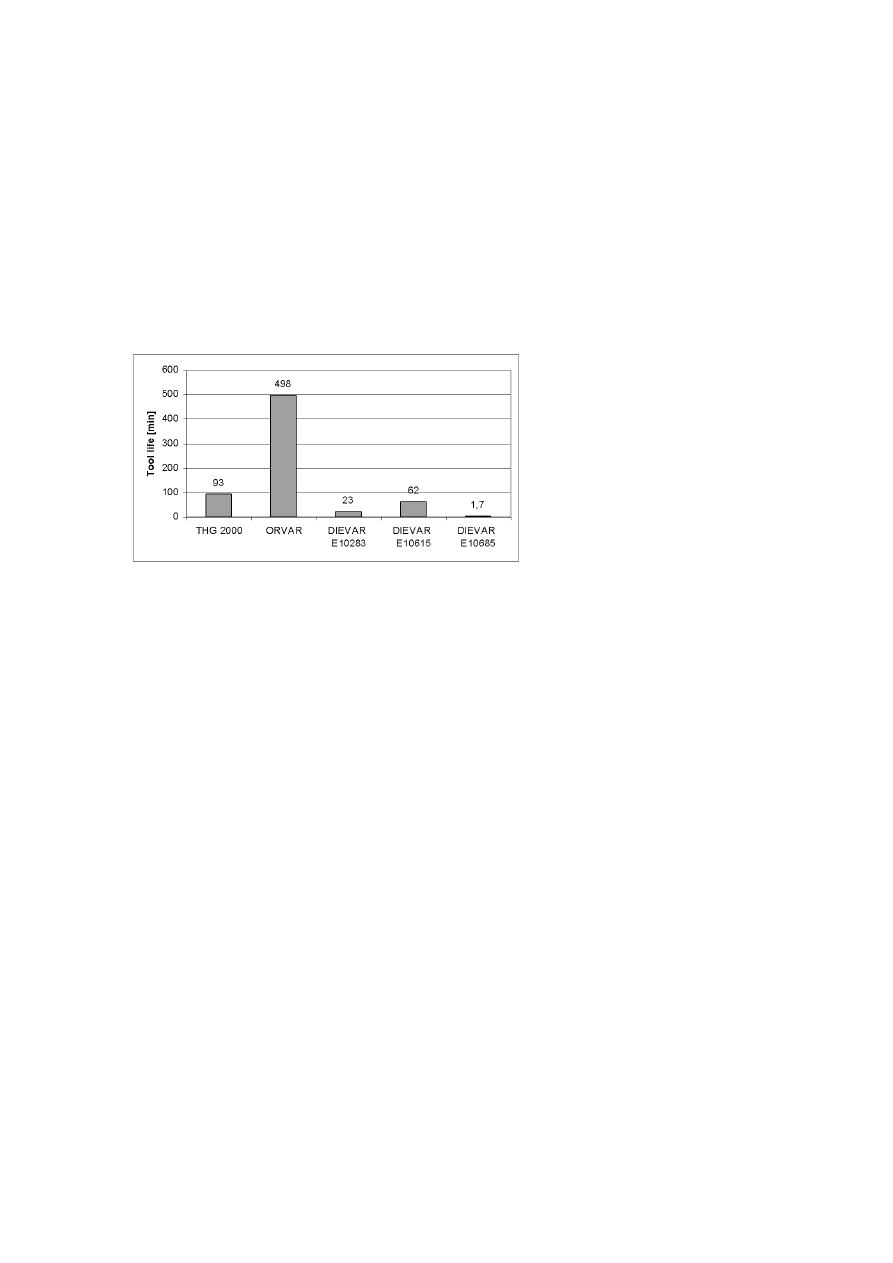
The consolidated tool life results for the five hotworking grades is shown
in Fig. 2. The machinability difference between the nominally similar (hard-
ness) grades in hard milling at identical cutting conditions could still differ
by almost two orders of magnitude as in the case of ORVAR and one of the
DIEVAR variants.
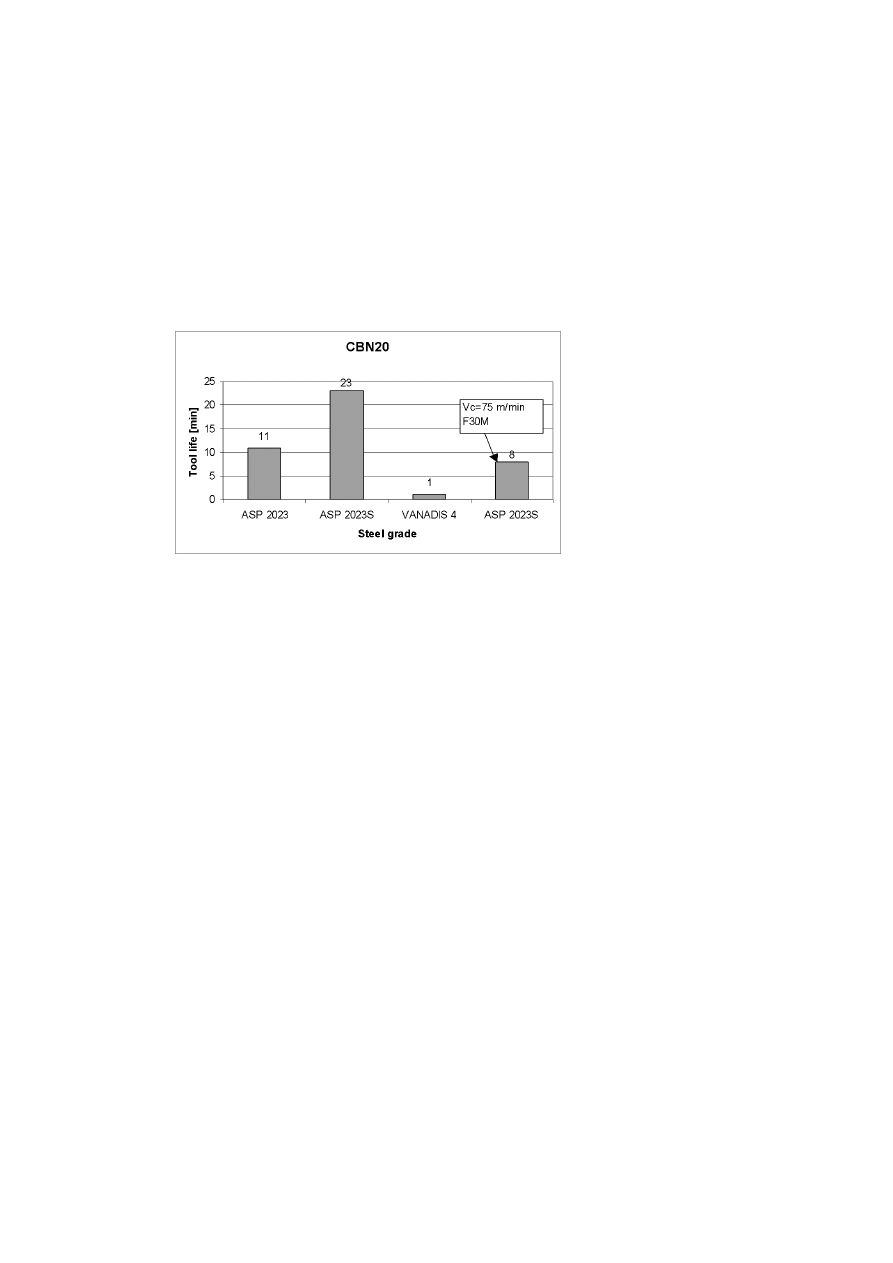
In the case of the cold working grades the four P/M processed variants, as
the workmaterial was in the form of circular bars, circular interpolation mode
was used to face mill using a milling cutter with two cutting edges. Both
CBN and a cemented carbide grade were used. The consolidated results are
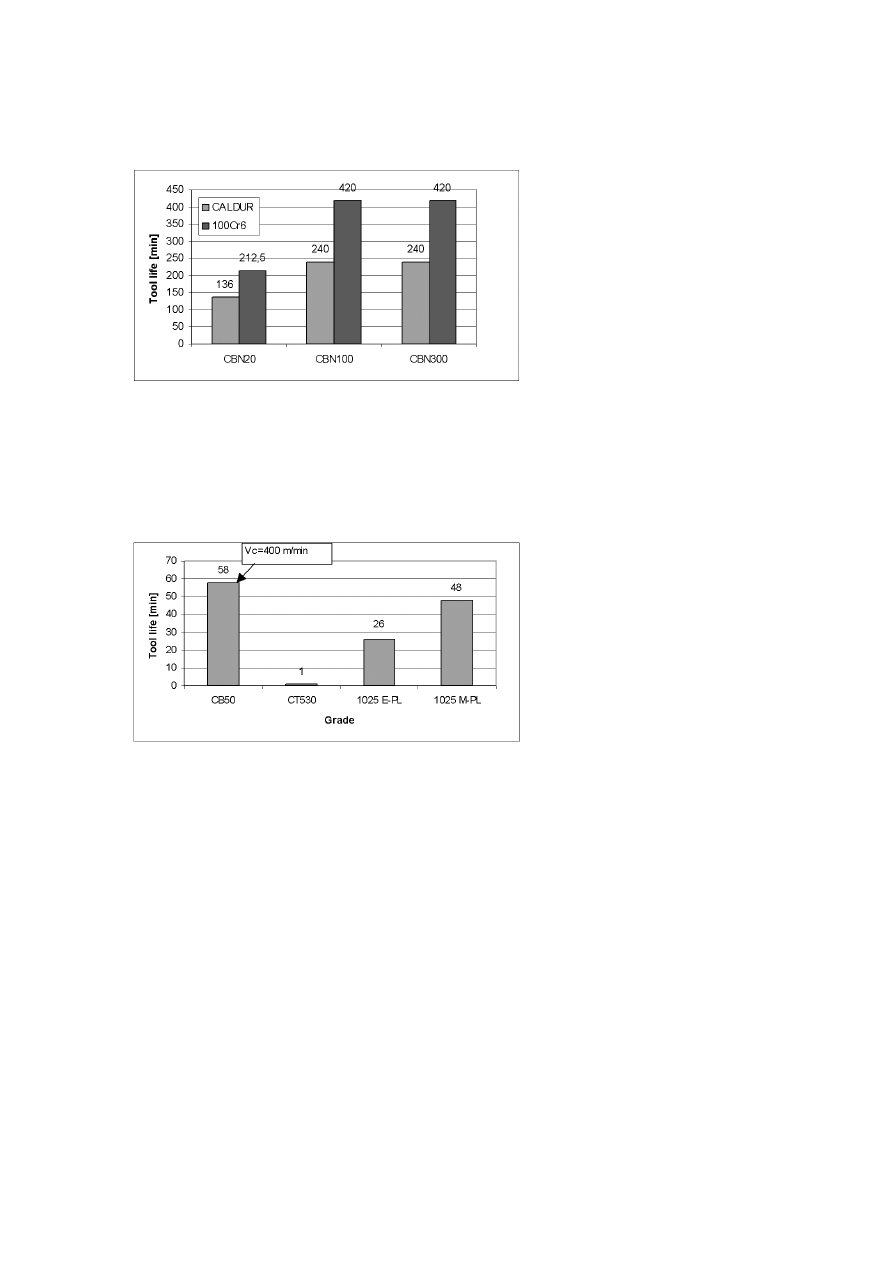
shown in Fig. 3. The critical role of tool grade selection was also evident in
the milling of the cold working grades. An almost 100% increase in tool life
was possible through the use of correct grade of CBN as shown in Fig. 4.

1242
6TH INTERNATIONAL TOOLING CONFERENCE
Figure 1.
Evolution of tool wear (flank and notch) for three variants of DIEVAR (E10615,
E10685 and E10283) using CBN (BN300) inserts; Vc=600 m/min, fz=0,08 mm/tooth, a
p
=7 mm and a
e
=0,5 mm.
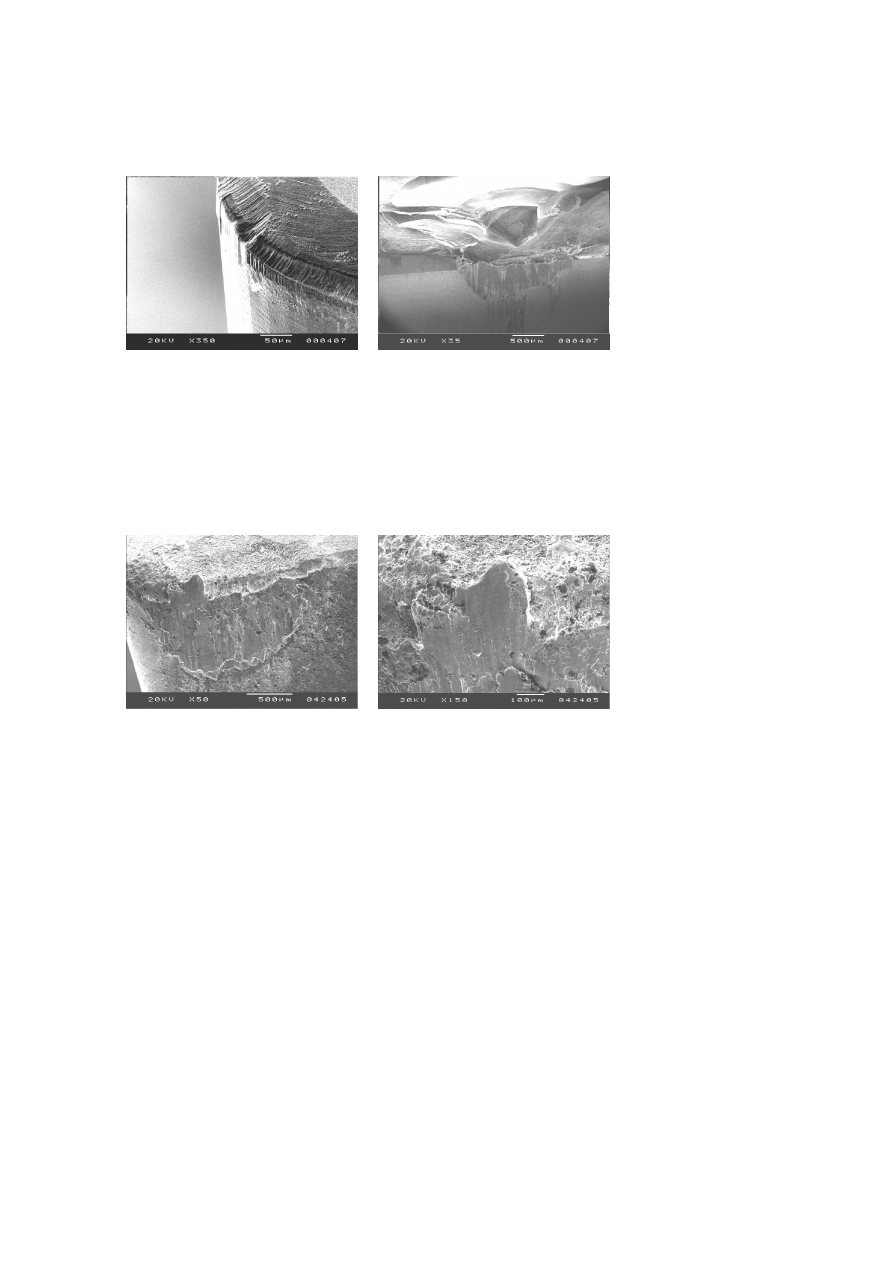
This was also evident in the case of cemented carbides shown in the case of
milling ASP2023S using CBN and a set of three cemented carbides (Fig. 5).
Evidently the cermet grade (CT530) is unsuitable for this workmaterial.
DISCUSSION OF RESULTS
In order to understand and interpret the observed machinability behaviour
in our studies additional investigation of the tools in SEM was carried out.
In the absence of systematic observation of the tools as a function of time
the observed difference in the appearance of the tools at the end of tool life
was used to draw qualitative information.
This indicated that in most cases associated with long tool life a stable
evolution of wear along both rake and flank surface was evident. This was
typical in the cases of ORVAR-CBN (BN300), CALDUR/100Cr6 – CBN
(CBN300).

Machinability and Tool Wear During the High Speed Milling of Some Hardened...
1243
In the absence of this the progress of wear was often through one or a
combination of following modes, namely abrasive wear along with progres-
sive micro-chipping and final destruction of edge, Fig. 6, severe notching
(many of the DIEVAR variants) and localised chipping. In many instance of
poor machinability tendency for notch formation and adhesion of the work
material to the tool was evident. In other words due to the interaction of
the microgeometry with the workmaterial at the prevalent cutting conditions
(cutting speed, feed and depth of cut), thermally induced tool-work interac-
tion enhancing the tendency for workmaterial adhesion takes place. If this
is postponed for a long time as in the case of 100Cr6 –CBN300 shown in
Fig. 7, the tool life is also prolonged. Indirect evidence for the above hy-
pothesis also came from the appearance of the chips. With progressive tool
wear the chip morphology and colour changed (thinner and wider) indicating
increased temperature. Under these conditions the notching at the depth of
cut line is also facilitated due to increased interaction with air (oxygen).
The improvement in the machinability of S alloyed ASP2023S grade is
another strong evidence of the traditional role of machinability improvement
additives. Stable presence of MnS layer could protect the tool from the large
primary carbides in the workmaterial [3]. The influence of other elements
likes Si and the intermittent nature of the contact phenomenon are additional
features affecting tool wear. This is also the possible reason for the observed
variations in the machinability of the hot working grades in our case.
CONCLUSIONS
Based on our experimental results and discussion, the following conclu-
sions are in order.
The finish milling of hardened tool-steel poses no technical problems
as such. But to achieve practical tool life optimal tools (material and
micro- geometry) and cutting conditions are critical.
Successful milling of most of the hardened steels with cemented car-
bide tools appears feasible. However, correct selection of cutting
conditions and type of CBN could result in high productivity for some
of the steels.
For a given hot working grade (50 HRC) apparently nominal com-
positional difference could affect machinability significantly. Milling

1244
6TH INTERNATIONAL TOOLING CONFERENCE
the grade ORVAR SUPREME with the same CBN grade at the same
cutting conditions resulted in the tool life variations of 2 orders of
magnitude.
Even at comparable bulk hardness level, increase in carbide content
contributes to the deterioration in the machinability of the cold work-
ing tool steels, as evidenced by 100Cr6 and VANADIS 4.
There is some evidence indicating that the tool-work interaction and
the formation of protective inclusion layers or reduction in the adhe-
sion of work material is closely related to the alloy content.
ACKNOWLEDGMENTS
We are thankful to VINNOVA, Uddeholm AB, Secotools AB, Sandvik
Coromant AB, Ovako AB and Erasteel Kloster AB for jointly financing this
project. Thanks are also due to Uddeholm AB (Staffan Gunnarsson), Sec-
otools AB (Bengt Högrelius) Sandvik Coromant AB (Rikard Sundström),
Erasteel Kloster (Jan Tiberg) and Ovako AB (Tomas Andersson) for the
supply of materials and milling tests.
REFERENCES
[1] K. KÖNIG, A. BERTHOLD and K-F. KOCH, (1993), Turning versus grinding – A
comparison of surface integrity aspects and attainable accuracies, Ann. of CIRP 42/1,
pp. 39–43.
[2] S. GUNNARSSON, (1996) Machining of hardened steels, "Progress in Tool Steels –
Proc. of 4th Int. Conf. On Tooling, Ruhr University, Bochum, Sept. 11–13, 1996, pp.
457–467.
[3] H. CHANDRASEKARAN, (1998) Machinability of ferrous alloys and the role of mi-
crostructural parameters– A literature survey, Report from Swedish Institute for Metals
Research, IM-3664.

Machinability and Tool Wear During the High Speed Milling of Some Hardened...
1245
Figure 2.
Tool life in milling of five hot working steels using CBN(BN300) inserts using
a criterion of VB =0,2 mm; Vc=600 m/min, fz=0,08 mm/tooth, a
p
=7 mm and a
e
=0,5 mm.

1246
6TH INTERNATIONAL TOOLING CONFERENCE
Figure 3.
Tool life in milling of four P/M cold working steels with CBN (BN20) and ce-
mented carbide inserts using a criterion of VB =0,2 mm; Vc=400 m/min, fz =0,15 mm/tooth,
a
p
=1,5 mm and a
e
=0,3 mm. Notice the changed cutting conditions for the carbide insert
F30M; Vc = 75 m/min and a
e
=0,6 mm.

Machinability and Tool Wear During the High Speed Milling of Some Hardened...
1247
Figure 4.
Tool life results for two cold working grades using different type of CBN inserts;
cutting conditions as in Table 1.
Figure 5.
Tool life as a function of tool material type in hard milling (circular interpolation)
of ASP2023S; cutting conditions as in Table 1.

1248
6TH INTERNATIONAL TOOLING CONFERENCE
(a)
(b)
Figure 6.
SEM view of CBN (BN300) tool edge after 496 min of milling in ORVAR;
observe the even flank wear (a), notch wear and chipping on the rake (b).
(a)
(b)
Figure 7.
SEM view of the cutting edge after milling 100Cr6 for 420 min.
using
CBN(CBN300) showing some material adhesion (a) and the same region at a higher magni-
fication (b).
Wyszukiwarka
Podobne podstrony:
Modeling and tool wear in drilling of CFRP
Coastal Paleogeography of the Central and Western Mediterranean during the Last 125,000
the effect of sowing date and growth stage on the essential oil composition of three types of parsle
Humanism During the Renaissance Political and?ucational
89 1268 1281 Tool Life and Tool Quality Summary of the Activities of the ICFG Subgroup
Jewish Women in the Ghettos, Concentration Camps, and Partisans During the Holocaust Sara Vicks
The Cambodian Campaign during the Vietnam War The History of the Controversial Invasion of Cambodia
Understanding the productives economy during the bronze age trought archeometallurgical and palaeo e
Use and signifance of socketed axes during the late bronze age
Philosophy Of Mind Minds,Machines,And Mathematics A Review Of Shadows Of The Mind By Roger Penrose
2011 H A Kishawy Lei Pang, M Balazinski Modeling oftool wear during hard turning with self propel
Self Replicating Turing Machines and Computer Viruses
Computing Machinery and Intelligence
James P Hogan Mind, Machines and Evolution
Kinematic, Kinetic and EMG Patterns During Downward Squatting
weather and what i wear
Coleman Playback From The Victrola To MP3, 100 Years Of Music, Machines, And Money
więcej podobnych podstron