
Modeling and tool wear in drilling of CFRP
D. Iliescu
a
, D. Gehin
a
, M.E. Gutierrez
b
, F. Girot
a,b,c,n
a
Arts et Me´tiers ParisTech—LAMEFIP, Esplanade des Arts et Me´tiers, 33405 Talence cedex, France
b
ETSIB - Universidad del Paı´s Vasco, Alameda de Urquijo s/n, 48013 Bilbao, Spain
c
IKERBASQUE, Basque Foundation for Science, 48011, Bilbao, Spain
a r t i c l e
i n f o
Article history:
Received 29 July 2009
Received in revised form
14 October 2009
Accepted 16 October 2009
Available online 5 November 2009
Keywords:
Tool wear
Modeling
Carbon fiber
Carbide tool
Diamond coating
Drilling
a b s t r a c t
This paper presents the prediction and evaluation of thrust force in drilling of carbon composite
material. In order to extend tool life and improve quality of hole drilling, a better understanding of
uncoated and coated tool behaviors is required. This paper describes the development of a
phenomenological model between the thrust force, the drilling parameters and the tool wear. The
experimental results indicate that the feed rate, the cutting speed and the tool wear are the most
significant factors affecting the thrust force. The model can then be used for tool-wear monitoring. The
model presented here is verified by experimental tests.
&
2009 Elsevier Ltd. All rights reserved.
1. Introduction
Carbon fiber-reinforced polymer composites materials (CFRP)
are characterized by a combination of high properties (specific
strength and stiffness, light weight, etc.), which make their use
especially attractive for aircraft and aerospace applications
However, these materials are extremely abrasive during the
machining operations. Machining of CFRP is difficult due to their
material discontinuity, inhomogenity and anisotropic nature.
Thus, the choice of the cutting tool and the optimal cutting
parameters is very important when cutting this kind of materials.
The machining process affects significantly these materials
leading to various modes of damages. This damage consists of
various fiber breakage, matrix cracking, fiber–matrix debonding
and plies delamination. To improve the quality of the machined
surface, some problems such as surface delamination and fiber/
resin pull-out have to be overcome. To achieve the desired surface
quality, it is necessary to understand the physical mechanisms of
the material removal and the kinetics of the machining process
affecting the performance of the cutting tools. Compared to the
machining of metals, studies on machining of composites are few
and limited in number.
Koplev
was the first in 1980 to conduct a series of
experiments under orthogonal cutting of carbon fiber-reinforced
polymer composites (CFRP). The author concluded that the chip
formation is strongly influenced by the fiber orientation and
occurs through a series of successive ruptures. The surface quality
and the delamination factor are strongly dependent on the cutting
parameters such as the tool geometry and cutting forces. Crack
propagation ahead of the tool tip (Mode I) was observed during
machining of laminates with 01 fiber orientation and compres-
sion-induced rupture was noticed during machining of laminates
with 901 fiber orientation. The cutting of negative fiber orienta-
tion graphite/epoxy composites was attributed to compression-
induced shear failure by Arola et al.
. For the same range of
fiber orientations Bhatnagar et al.
ascribed fiber breakage due
to axial tension as the cutting mechanism. Pwu and Hocheng
suggested that the fibers break when the bending stresses
exceeded the ultimate material strength. Arola and Ramulu
described the chip formation mechanisms during machining with
a diamond-tipped tool. The authors explained that the chip
formation is due to a brittle fracture independent of the fiber
orientation. Arola and Ramulu observed from experiments that
both cutting and thrust force registered a minimum in the 15–301
fiber orientation range and increased up to 901.
Among the several machining processes, drilling is one of the
most frequently used for the production of holes for screws, rivets
and bolts. Delamination and surface finish in drilling composite
materials have been found to be influenced by a number of factors
such as feed rate, cutting speed, drill geometry, tool wear and tool
ARTICLE IN PRESS
Contents lists available at
journal homepage:
www.elsevier.com/locate/ijmactool
International Journal of Machine Tools & Manufacture
0890-6955/$ - see front matter & 2009 Elsevier Ltd. All rights reserved.
doi:10.1016/j.ijmachtools.2009.10.004
n
Corresponding author at: Arts et Me´tiers ParisTech—LAMEFIP, Esplanade des Arts
et Me´tiers, 33405 Talence cedex, France. Tel.: +33 556 845 348/+34 946 017 394;
fax: +33 556 845 366/+34 946 014 215.
E-mail addresses: franck.girot@ensam.eu, franck_girot@ehu.es (F. Girot).
International Journal of Machine Tools & Manufacture 50 (2010) 204–213

ARTICLE IN PRESS
material. Delamination remains the most serious damage mode as
it reduces severely the load carrying capacity of laminated
composite structures and, therefore, must be avoided (Abrate
, Persson et al.
). The importance of tool geometry in
delamination reduction is evidenced by several authors. Piquet
et al.
suggested the use of a great number of cutting edges, in
order to increase the contact length between tool and part, a point
angle of 1181 and a small rake angle.
In addition to experimental methods, an analytical way is also
possible to predict the thrust force and delamination. Studies
based on linear elastic fracture mechanics theory have proposed
values for the critical cutting forces at the onset of delamination
during composite drilling. If the thrust force is exceeded,
delamination will occur. It is the uncut thickness that has to
withstand the indentation force induced by the drill. This
thickness tends towards zero as the drilling progresses, causing
the critical thrust force to be lower when the drill bit approaches
the exit side of the laminate. The first model was presented by
Hocheng and Dharan
. The authors studied the onset of
delamination in two different situations: push-out at exit and
peel-up at entrance. Based on the energy balance equation, the
expression for critical thrust force was modeled. Piquet et al.
considered the existence of a normal stress perpendicular to the
ply surface. To obtain the final result, the part of the plate located
beneath the drill has been modeled in terms of a thin circular
orthotropic plate. This representation does not take into account
the global deflection of the plate. It is only valid for a small
number of plies under the drill. Zhang et al.
considered a
different approach. In their model, the shape of the delamination
is elliptical even when multidirectional composites are drilled.
The ellipse has two principal directions aligned with the fiber
direction and the transverse direction of the uncut ply below the
drill tip. Jain and Yang
developed a model starting from
Hocheng and Dharan
, considering an elliptical shape of the
delamination area.
Tsao and Hocheng
analyzed the effect of a backup plate on
delamination. Results show that the use of a backup plate causes
an increase in the critical thrust force, allowing for higher feed
rates. In another work
, Tsao and Hocheng conducted several
experiences to prove the benefit of using special drill when
compared to commercially available tools, like twist drill. In this
study, it was possible to conclude that thrust force varies with
drill geometry and with feed rate. More recently, Tsao and
Hocheng
have presented the advantages of a core drill. The
influence of spindle speed was relatively insignificant. Fernandes
and Cook
investigated the thrust force during drilling with
‘‘one shot’’ drill bit. Their objective was to extend tool life and
improve hole quality. For that, a mathematical model leading to
the calculation of feed in order to keep thrust force under a critical
threshold was developed. Finally, Tsao
evaluated the
importance of pilot hole on delamination reduction when using
core and saw drills. Pilot hole eliminates the chisel edge effect,
reducing delamination hazard. The ratio of pre-drilled hole to drill
diameter must be controlled in order to drill with higher feed rate
without delamination. Recently, statistical tools had been used in
the search for optimal cutting conditions or tool design. Tsao
applied the Taguchi method and analysis of variance.
The wear is often defined as the amount of matter lost by the
tool. When wear is characterized by the appearance of ribbed
bands formed by abrasion on the clearance face, the life criteria
can be established from direct observations on the tool. The
friction of the workpiece against the clearance face shows a
frontal area of wear, whose height VB is more or less regularly.
One can quantify the lifetime of tools by simply measuring the
average width of wear VB. It is also possible to assess the damage
of a cutting tool from indirect criteria based on performance or
quality of machining. Thus, the surface condition and geometrical
tolerances of the parts can be used as indicators of the level of
wear. In drilling, for example, we can define the life of a drill by
the number of holes drilled meeting certain quality criteria. From
the wear criteria are established the lifetime models. The oldest
and most used is the Taylor’s model or modified Taylor’s model.
These models describe the relation between lifetime and the
cutting parameters such as cutting speed, feed rate, and cutting
depth. In the literature very few authors have introduced the wear
in their model.
The model of Tsao et al.
takes into account the tool wear
but does not include important machining parameters such as the
feed rate and the cutting speed. It correlates the feed load to the
tool wear and the damage of the material. Therefore, a machining
quality criterion is used (maximum load allowed to ensure a
certain quality). Lin and Ting
have proposed a model for
monitoring the wear. The feed load F and the torque M are fitted
as a function of the cutting parameters (cutting speed V
c
, feed rate
f (mm/rev) or feed speed V
f
(mm/min), tool diameter d and wear
W). The authors noted that the influence of wear on the feed load
F is more important than the influence of the wear on the torque
M. In other words, the recorded signal of the feed load is more
sensitive to changes in the tool wear than the torque signal.
In this paper, a phenomenological model based on the
evolution of the feed load (thrust force) with tool wear and
composite damage is developed. The model takes into account the
evolution of the feed load F with the feed rate f, the cutting speed
V
c
and the tool wear W. The cutting length L
c
is the length of the
path travelled by the tool tip when in contact with the composite
material, so different from the machined length. Experimental
work was also performed in order to validate the mathematical
model. Experimental and model results are compared.
2. Experimental approach
2.1. Procedures and experiments performed
In order to establish the model, only parameters with
significant effects on thrust force are included. In order to study
the effects of cutting parameters and tool wear on cutting force
signals, a series of experiments are conducted. Tests are carried
out on a rigid instrumented drilling bench, with a power of 14 kW
and a maximum rotation speed of 42,000 rpm, and a 5-axis
FATRONIK-HERA machine with a power of 40 kW and a maximum
rotation speed of 40,000 rpm.
The drilling bench is equipped with a high-speed spindle
FISHER-MFW 1230/42. A HEIDENHAIN TNC 124 system control
allows regulating the spindle rotation and the axial displacement
of the bench. The experimental data were collected with a data
acquisition system composed of a 9272 Kistler drilling dynam-
ometer and a 5019 A Kistler amplifier, which allow to measure
thrust forces. Average thrust forces for each test is estimated with
Table 1
. Drilling conditions and drilling sequence for tests on the drilling bench.
Test
conditions
Feed rate f
(mm/rev)
Spindle speed N
(rpm)
Cutting speed
V
c
(m/min)
A
0.05
3000
56.55
B
0.05
6000
113.10
C
0.05
9000
169.65
D
0.05
12000
226.19
E
0.1
3000
56.55
F
0.15
3000
56.55
Drilling sequence : A B C D A E F A E F A E F A E F A E F A B C D
D. Iliescu et al. / International Journal of Machine Tools & Manufacture 50 (2010) 204–213
205
ARTICLE IN PRESS
the Labview software. The procedure on the drilling bench
consists of 4 tests with constant feed rate and variable spindle
speed; then 15 tests (3 tests repeated 5 times) with a variable feed
rate and a constant cutting speed and finally 4 tests with constant
feed rate and variable cutting speed (
). The drillings have
been performed under dry conditions.
The FATRONIK -HERA 5-axis machine is equipped with
horizontal spindle, a vertical fixation table and a composite dust
aspiration system. Data acquisition system on 5-axis machine is
composed of a 9257B Kistler dynamometer and a 5019 A Kistler
amplifier. The procedure on the 5-axis machine is as follows: all
10 holes, the thrust forces are recorded. The following cutting
parameters have been used: f= 0.05 mm/rev and N =9000 rpm and
dry drilling.
With these cutting parameters the cutting length for
each hole is the same, which allows us to compare the tools
more easily. To study the influence of tool wear on the thrust
force, we took into account the contact length achieved by
each drill (Eq. 1).
L
c
¼
h
f
ffiffiffiffiffiffiffiffiffiffiffiffiffiffiffiffiffiffiffiffiffi
f
2
þ ð
p
dÞ
2
q
ð
1Þ
Table 2
. Mechanical properties of T800/914 composite material.
E
11
(GPa)
E
22
(GPa)
G
12
(GPa)
n
159
8.4
4.1
0.33
Table 3
. Tool geometries and coatings used in the study.
Tool
manufacturer
Reference
Point
angle
Helix
angle
Clearance
angle
Coating
DIAGER
22,690
1251
351
111 +271
-
SOFIMAG
Proto 2
1301
401
111 +251
-
SOFIMAG
Proto 4
1251 +901
351
101+ 251
-
DIAGER
22,691
1251
351
111 + 271
diamond
SOFIMAG
Proto 6
1301
401
111 +251
diamond BS
diamond CN
SOFIMAG
Proto 8
1251 +901
351
101+ 251
diamond BS
diamond CN
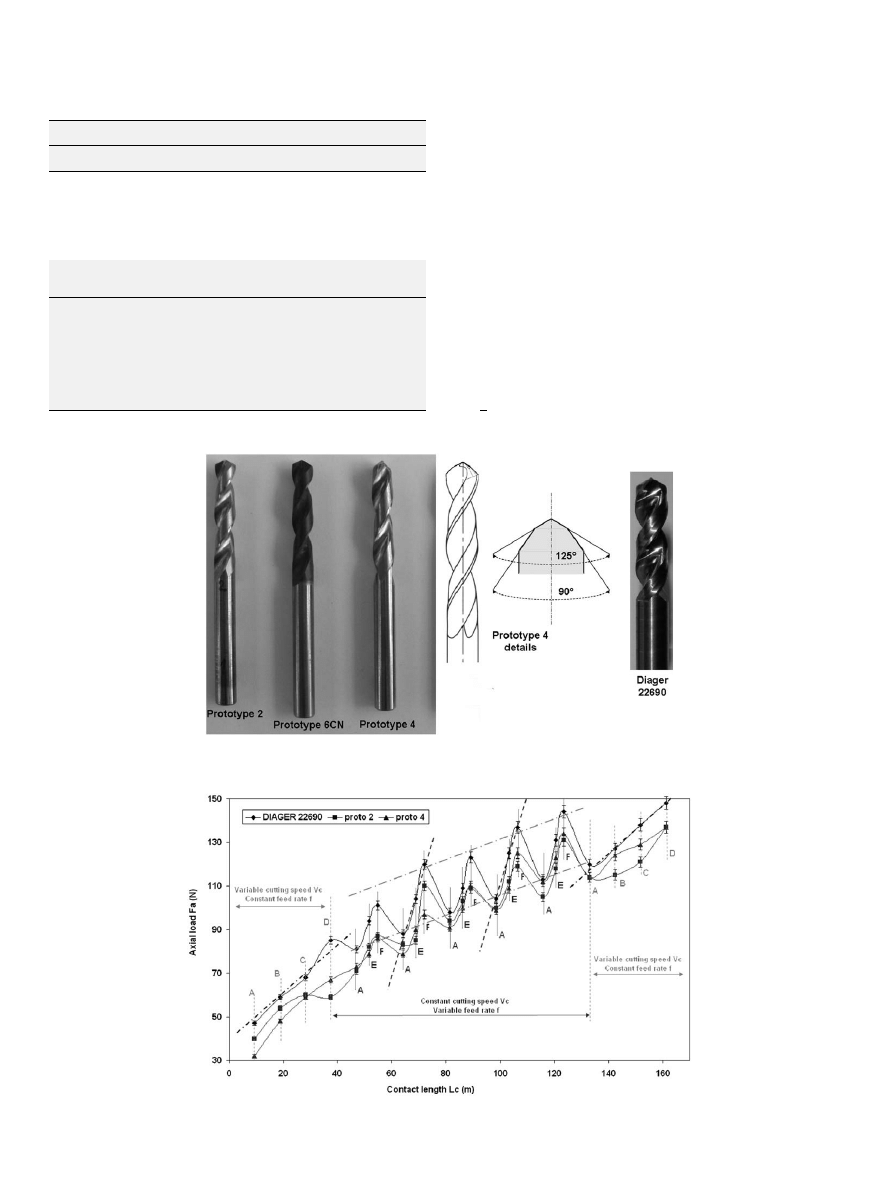
Fig. 1. Pictures of the 22,690 Diager drill, prototypes 2 and 4 and schematic details of prototype 4 geometry .
Fig. 2. Axial load during drilling for the uncoated prototypes and the 22,690 Diager reference drill. Conditions A–F are given in
.
D. Iliescu et al. / International Journal of Machine Tools & Manufacture 50 (2010) 204–213
206
ARTICLE IN PRESS
where h is the thickness of the material drilled (25 mm), f is the
feed rate and d is the tool diameter (6 mm).
The composite material employed consists of carbon fiber
T800 (
s
= 5589 MPa, E= 280 GPa, density
r
= 1,76 g/cm
3
and fiber
diameter of 7
m
m), and a 914 epoxy matrix (
). Each layer
(ply) has a width of 255
m
m with an average fiber rate of 60%. The
laminate material is highly oriented.
2.2. Tools and coatings used
To carry out various tests, uncoated (22,690) and diamond-
coated (22,691) twist drills from Diager have been used as
reference tools. Based on previous results, prototype drills were
developed and manufactured by Sofimag (France). The geome-
trical characteristics of Diager and prototype drills are given in
and
. The coatings used on prototypes are: Balzers
diamond plus
coating (nanocrystalline
structure, 6–12
m
m
thickness) noted BS, and Cemecon fiber speed coating (6–10
m
m
thickness) noted CN.
2.3. Results obtained
summarizes the tests performed on the drilling bench
for uncoated carbide prototypes. They are compared with
DIAGER 22690 drill, which is the uncoated carbide reference
tool. The results are reported for the drilling sequence defined in
(ABCD AEF AEF AEF AEF AEF ABCD). The waviness of the
graph is representative of the dependence of the axial or thrust
load F
a
with the cutting speed V
c
, the feed rate f and the tool
wear w. Prototype 2 and 4 drills have a thrust force lower than
22,690 Diager tool during the same tests. The geometry of
prototypes 2 and 4 is better suited to the machining of this type
of material. The points corresponding to a same tool and similar
drilling conditions point out an increase in evolution of the
thrust load due to tool wear (grey mixed dotted lines for
example). This evolution is independent of the cutting speed and
the feed rate (grey mixed dotted lines are parallel), which means
a linear tool wear. This linear wear is also pointed out when
comparing the tests under variable cutting speeds (parallel black
mixed dotted lines) or under variable feed rates (parrallel black
dotted lines).
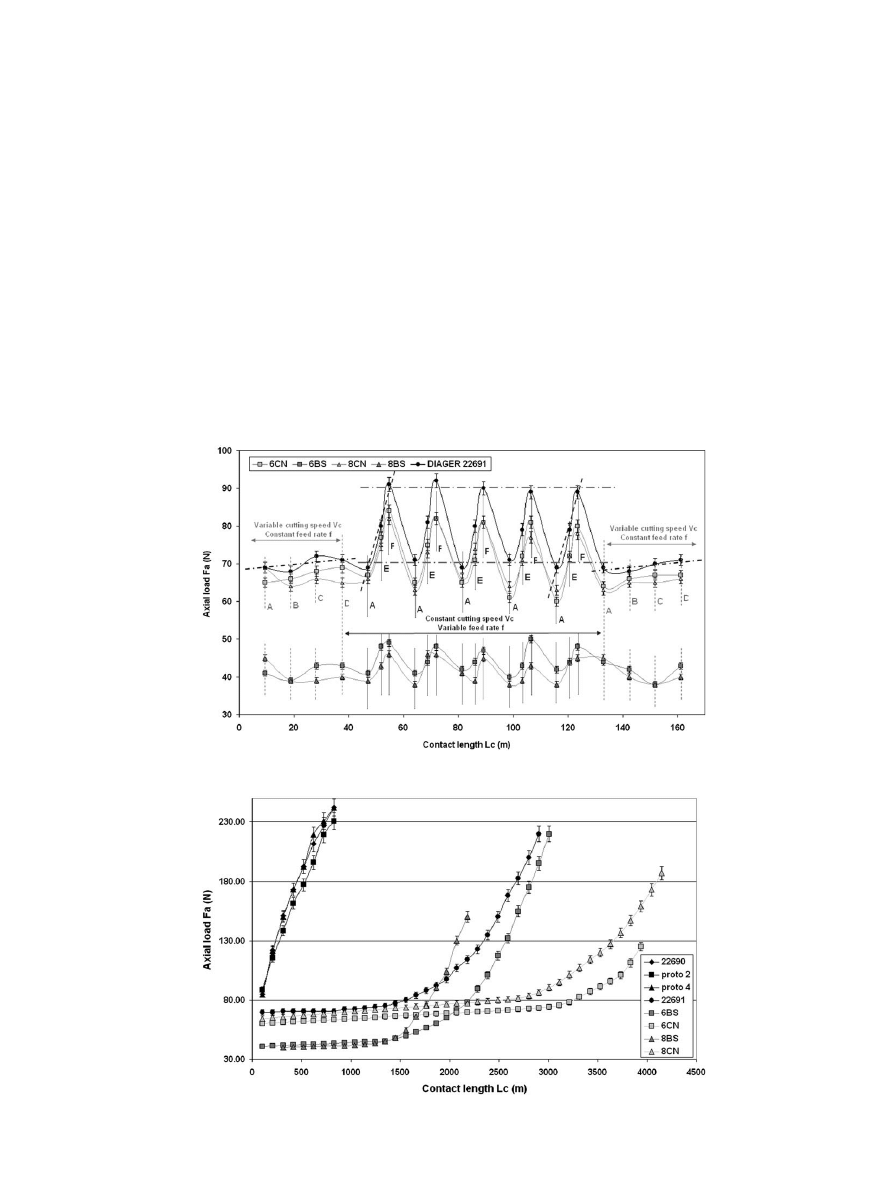
Fig. 3. Axial load during drilling for the coated prototypes and the 22691 Diager reference drill. Conditions A–F are given in
.
Fig. 4. Comparison of uncoated prototypes with the 22,690 Diager reference drill and coated prototypes with the 22,691 Diager reference drill.
D. Iliescu et al. / International Journal of Machine Tools & Manufacture 50 (2010) 204–213
207
ARTICLE IN PRESS
Tests performed on the drilling bench with diamond-coated
prototypes are compared with 22,691 Diager drill, which is the
diamond-coated reference tool (
). The good adhesion of
diamond on the carbide substrate is verified. Prototype 6 and 8
drills coated with Balzers (BS) and Cemecon (CN) diamond (6CN,
6BS, 8CN and 8BS) have lower thrust force than the 22,691 Diager
reference. All BS-coated prototypes exhibit significantly lower
thrust force than the CN-coated prototypes. All tools are not really
influenced by the spindle rotational speed. The influence of the
feed rate is more pronounced for CN- than for BS-coated
prototypes. Although the wear is also linear, its evolution is
very low compared to uncoated tools.
In order to highlight the geometries that are more resistant to
wear, endurance tests have been performed on a 5-axis FATRONIK
machine for uncoated and coated tools. In regard to uncoated carbide
tools, all geometries have spent wear tests under the same cutting
conditions as the reference drill (f=0.05 mm/rev and N=3000 rpm).
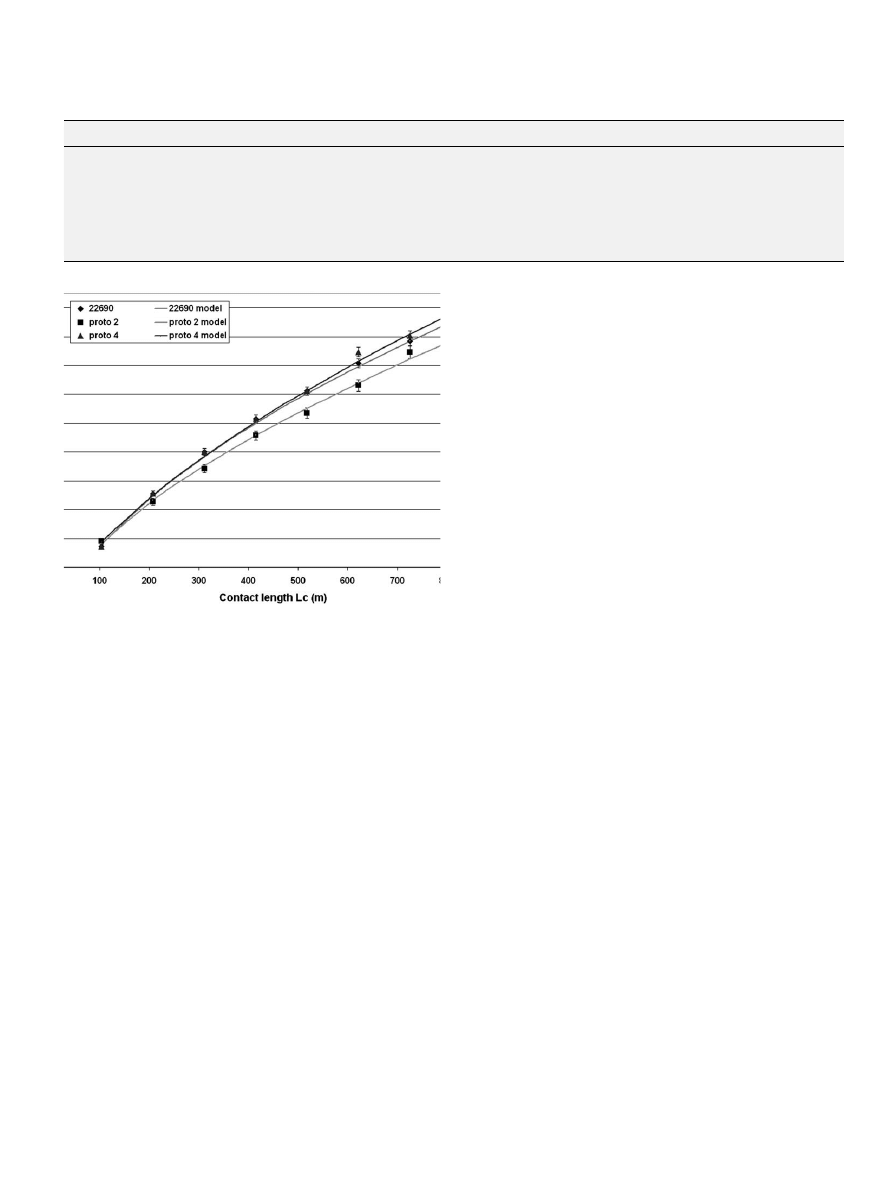
The prototype drills 2 and 4 seem to behave better when compared
with the reference tool (
). These wear tests confirmed the good
results of these two tools obtained on the bench drill.
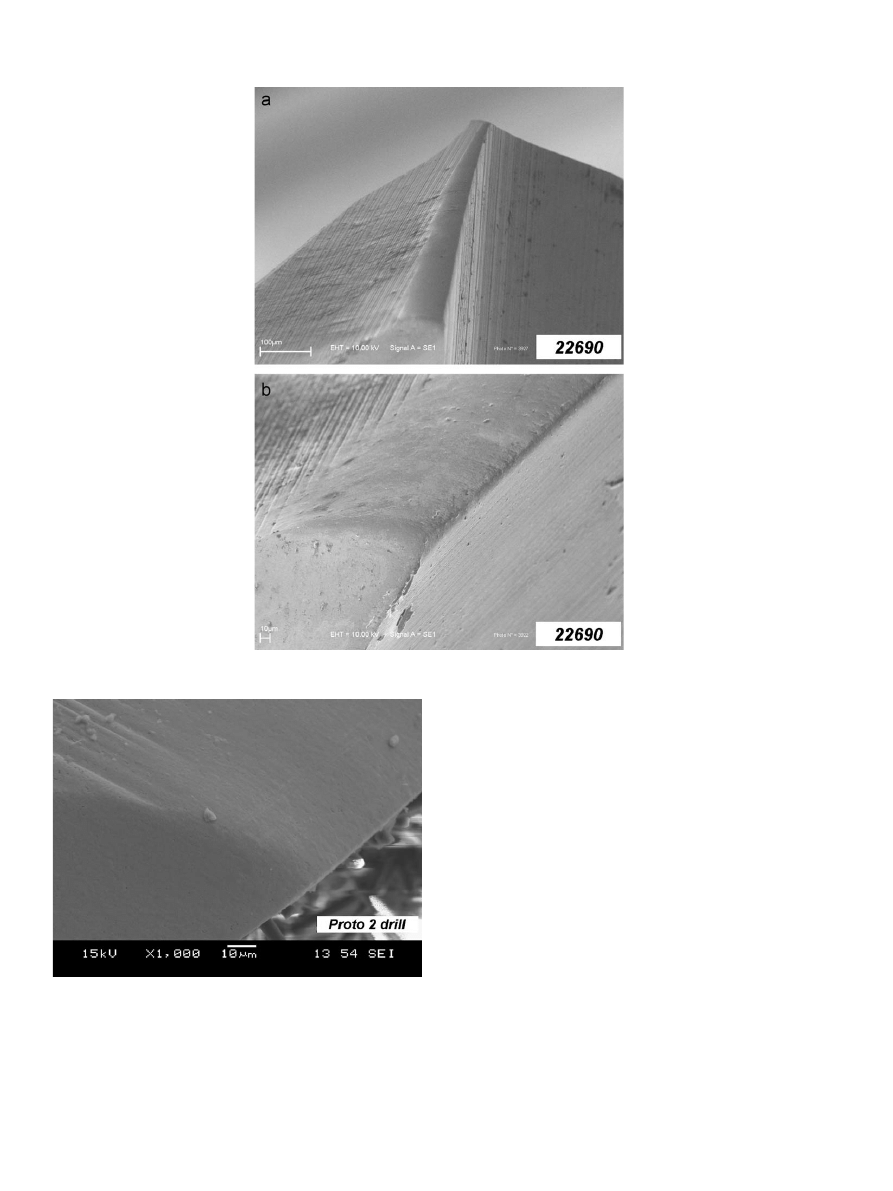
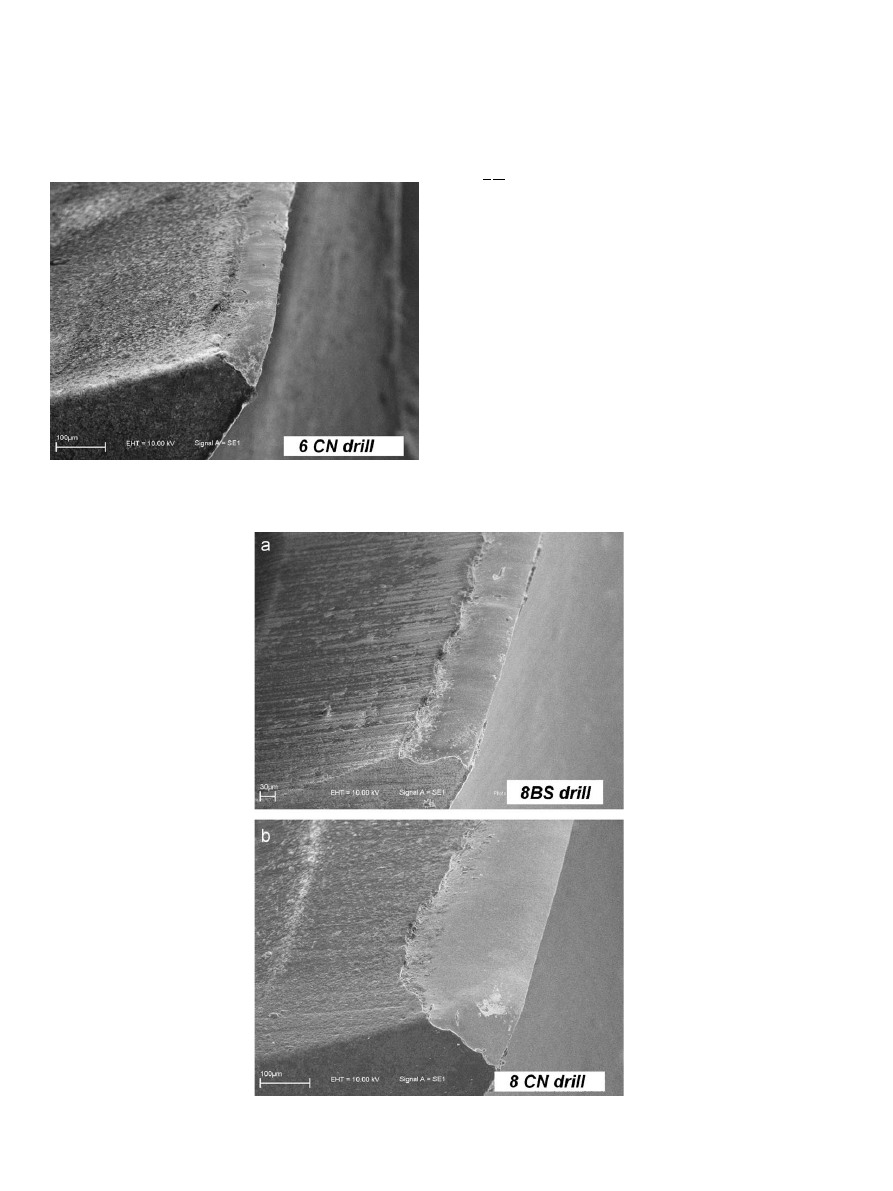
The SEM analysis of the worn tools, after 88 drillings, have
confirmed the abrasive nature of the wear, and the better
behavior of prototype 2 drill (
) with respect to reference
) and prototype 4 drills. The roundness of the cutting edge is
lower for the prototype 2 drill than for the other two drills.
In regard to diamond-coated carbide tools, endurance tests
have been performed on the same 5-axis FATRONIK. All geo-
metries have spent wear tests under the same cutting conditions
as the reference drill (f= 0.05 mm/rev and N =9000 rpm). Two
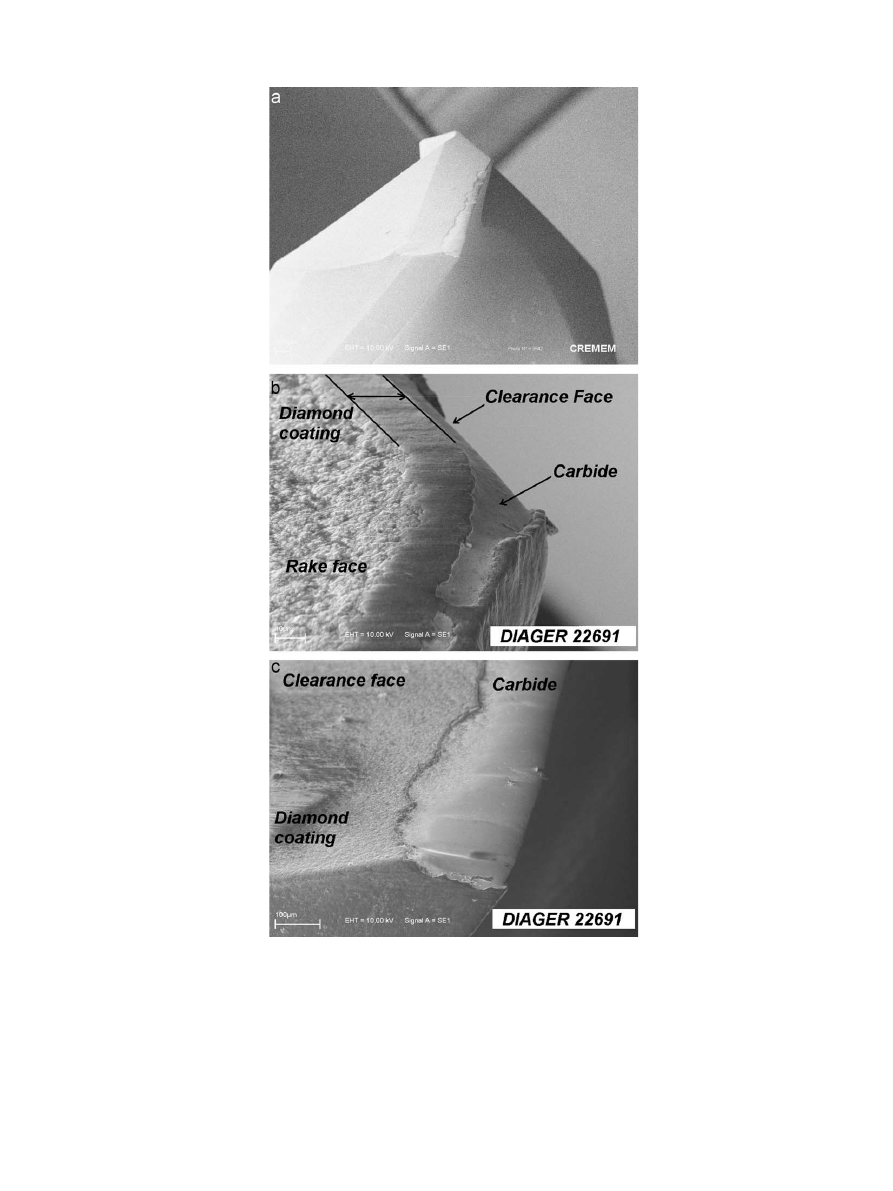
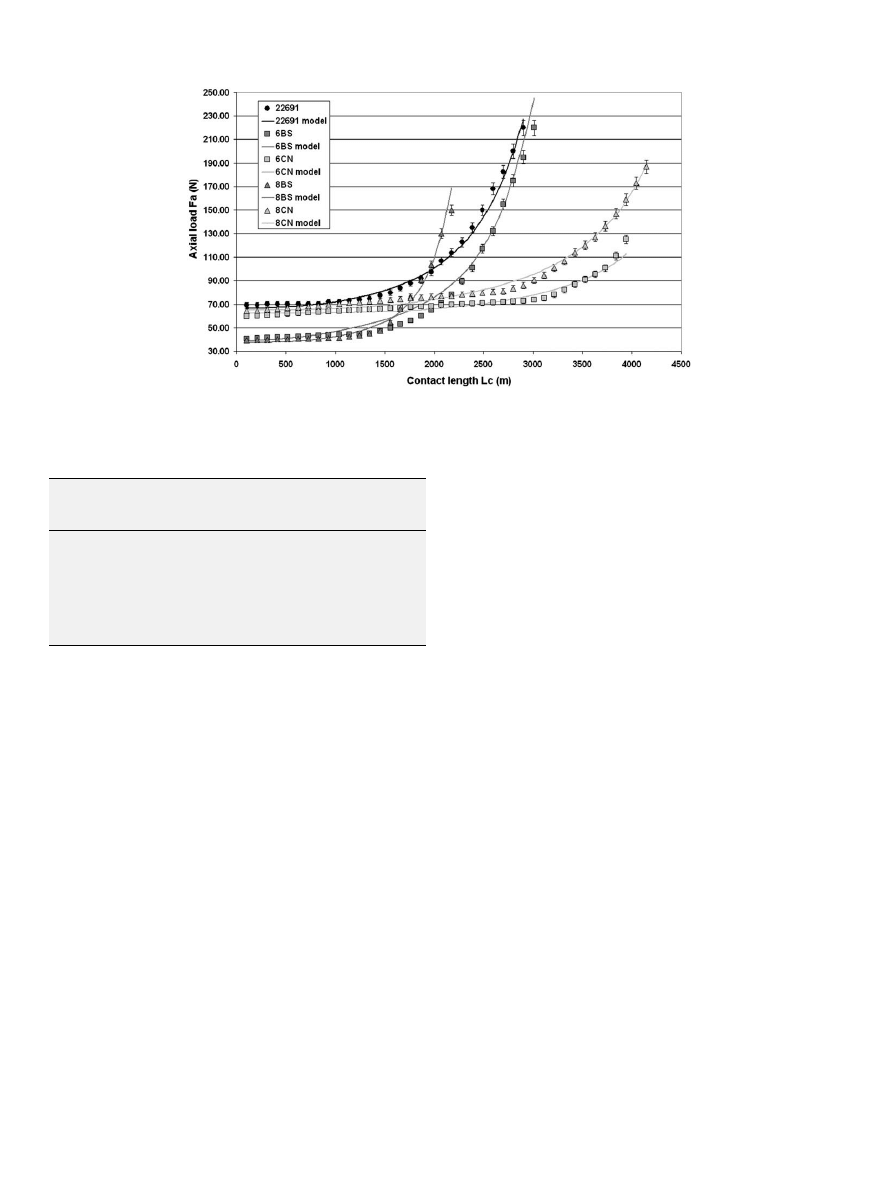
areas of the evolution curves (
) are well-defined: a first
linear zone where the diamond coating wears very slowly and a
second area corresponding to a local vanishing of the coating. In
second area the wear is more rapid because the carbide is no
Fig. 5. Carbide wear of 22690 Diager tool after 88 drillings.
Fig. 6. Carbide wear of prototype 2 after 88 drillings.
D. Iliescu et al. / International Journal of Machine Tools & Manufacture 50 (2010) 204–213
208
ARTICLE IN PRESS
longer protected by the coating and it will disappear in small
fragments, leaving even more unprotected carbide (
allows to point out the behavior of the tools and shows that
the tools coating have a good quality if they have a good adhesion
to the carbide and a regular wear.
The behavior of 22,691 Diager drill is comparable to
that of BS diamond-coated prototypes, which makes to think
that the type of coating are similar (nanocrystalline structure).
The difference that can be pointed out (lower thrust force for
low values of contact length) can be attributed to the tool
geometry.
CN diamond-coated drills have a greater life expectancy than
the other drills. The wear first area ends at L
c
=2800 m for CN
coating, and around 1500 m for BS or Diager coating. For CN
coating, this first area translates into greater hole numbers. The
prototype 6CN and 8CN drills have the best tool life.
Fig. 7. Diamond coating wear of 22691 Diager tool after 309 drillings.
D. Iliescu et al. / International Journal of Machine Tools & Manufacture 50 (2010) 204–213
209
ARTICLE IN PRESS
3. Phenomenological model for abrasive wear
The experimental results have confirmed that the thrust force
is influenced by feed rate, cutting speed and tool wear.
A major contribution in wear modeling was made by Archard
(Eq. 2). The worn volume (detached from the materials rubbing
together) is proportional to the force applied to the contact and
the contact length.
W ¼
K
3
FL
H
ð
2Þ
where W is the volumetric wear of the material, K the Archard
wear coefficient, F the contact force, L the cutting length and H the
hardness of the softest material, in this case the tool. So, the wear
is a function of the product of the axial force F
a
applied to the
cutting edge by the contact length between the cutting edge and
the composite material L
c
.
As it has been pointed out by different tests performed with
uncoated and diamond-coated tools (
), the abrasive
wear can be considered as quasi-linear with the contact length L
c
(or the cutting time t
c
). When considering the F
a
L
c
factor, this
dependence is of power law type for uncoated tools, and quasi-
constant on a large range and then of power type for the
diamond-coated tools.
Considering that the thrust force depends also on the feed rate
and the cutting speed, the following phenomenological model is
proposed:
F
a
¼
Kf
a
V
b
c
gðWÞ
ð
3Þ
Fig. 9. Diamond coating wear of 8BS and 8CN prototype tools after 243 and 440 drillings, respectively.
Fig. 8. Diamond coating wear of 6CN prototype tool after 410 drillings.
D. Iliescu et al. / International Journal of Machine Tools & Manufacture 50 (2010) 204–213
210
ARTICLE IN PRESS
where g(W) is a function of the tool wear and is defined as
follows:
gðWÞ ¼ ðW
0
þ
A
0
WÞ
d
for uncoated tools
gðWÞ ¼ W
0
þ
A
0
W
d
for diamond coated tools
ð
4Þ
During a test i, all the wear mechanisms related to the
machining sequences from i =1 to i 1 is taken into consideration.
The thrust force F
i
for the ith machining sequence depends on the
value of the tool wear reached after i 1 machining trials (Eq. 5).
F
ai
¼
K
c
f
a
i
V
b
ci
gðW
i1
Þ
ð
5Þ
gðW
i
Þ ¼ ð
W
0
þ
A
0
g
i1
Þ
d
for uncoated tools
gðW
i
Þ ¼
W
0
þ
A
0
g
i1
d
for diamond coated tools
ð
6Þ
g
i1
¼
X
i1
j ¼ 1
F
aj
L
cj
ð
7Þ
where W
0
is the initial value of cutting edge acuity, A
0
is the tool
abrasion rate, g(W
i
) is the tool wear after test i and K
c
is a constant
depending on the geometry of the tool and the properties of the
material being machined.
4. Results and analysis
4.1. Determination of the model constants for each tool
The constants of Eq. 5 (K
c
, W
0
, A
0
,
a
,
b
and
d
) are obtained from
the experimental data (
, after a multiple non-linear
regression and minimizing the residues. Then the values of the
models are compared with experimental ones (
).
4.2. Tool behavior comparison
4.2.1. Influence of tool geometry on axial load
K
c
is the coefficient that takes into account the tool geometry
as well as the material characteristics. But, since the material has
been the same for all experimental trials, this parameter is
representative of the influence of the tool geometry.
For the uncoated tools, the double point angle geometry leads
to the lowest K
c
. For the diamond-coated tools, the influence of
the diamond structure seems to be more important than the effect
of the tool geometry. The lowest value of K
c
is obtained for a
double point angle geometry associated with a Balzers coating.
But for the same geometry and the Cemecon coating the highest
value of K
c
is obtained. The geometry of Diager drill and prototype
2 tool are quite similar and the K
c
values obtained for 22,690 and
prototype 2 drills or 22,691 and Cemecon diamond-coated
prototype 2 drills are quite closed (14.9 and 16.5; 215 and 225).
But for Balzers diamond-coated prototype 2, the K
c
value is quite
different (1 3 0). This is probably due to the nanostructure of the
Balzers coating.
4.2.2. Influence of feed rate and cutting speed on axial load
a
and
b
are the coefficients that take into account the influence
of the feed rate and the cutting speed, respectively.
The values of
a
and
b
are the lowest for the prototype tool 4,
then for the prototype tool 2 and finally for the 22,690 Diager
reference drill. This classification is not affected by the presence of
a diamond coating.
Moreover, in the case of
b
coefficient, the use of a diamond
coating leads to a decrease in the obtained values pointing out
the low dependence of different tools with cutting speed
(a variation of the cutting speed does not affect significantly the
axial load).
The values of
a
and
b
are again lower for the Balzers diamond-
coated tools than for the Cemecon or Diager diamond-coated
drills certainly due to its nanocrystalline structure.
4.2.3. Influence of tool wear on axial load
The coefficients
d
, W
0
and A
0
describe the influence of tool
wear on the variation of the axial load. The coefficient
d
is the
dependence of axial load with tool wear, W
0
is representative of
the initial tool edge acuity and A
0
is the tool wear rate.
The coefficient
d
is mostly constant for all the uncoated tools
since the carbide material is quite similar (submicron grains; 94%
CW and 6% Co).
For coated tools, this coefficient
d
is lower for the Diager- and
the Balzers-coated drill (2359 and 2355, respectively), and higher
for the Cemecon-coated drill (
E2,947).
Table 4
. Values of the parameters of the model and regression coefficients.
Tool
K
c
a
b
d
W
0
A
0
Regression Coefficient r
DIAGER 22690
14.90
0.17
0.102
0.363
2.58
0.0199
0.999
Proto 2
16.50
0.102
0.02
0.363
17.31
0.0193
0.999
Proto 4
11.80
0.094
0.067
0.385
31.51
0.0196
0.998
DIAGER 22691
225
0.226
0.0102
2.359
0.55
1.68 10
-13
0.997
Proto 6 CN
215
0.2236
0.0485
3.227
0.44
8.67 10
-19
0.979
Proto 6 BS
130
0.1371
0.0089
1.931
0.43
1.02 10
-10
0.995
Proto 8 CN
288
0.2011
0.0194
2.666
0.37
9.80 10
-16
0.995
Proto 8 BS
92
0.1079
0.0069
2.779
0.54
1.20 10
-14
0.991
Fig. 10. Comparison of measured and estimated thrust force for uncoated tools.
D. Iliescu et al. / International Journal of Machine Tools & Manufacture 50 (2010) 204–213
211
ARTICLE IN PRESS
The initial tool edge acuity W
0
is lower for uncoated Diager
tool (2.58) than for prototype drills 2 and 4 (17.31 and 31.51,
respectively). These differences are due to the geometry of the
cutting edge that influence on their sharpness. However, the
lowest values of W
0
are reached with the coated tools (
E0.46).
The edge finishing techniques used before the coating of the drill
allow to improve the edge acuity although a 6–12
m
m thickness
coating is present.
The wear rate coefficient A
0
is similar for all the uncoated drills
since the carbide grade is the same (
E0.0196), while for the
coated tools this coefficient depends strongly on the microstruc-
ture of the diamond coating. The lowest wear rates are obtained
for the Cemecon coatings in concordance with the experimental
results. The highest wear rates for the Balzers coatings, which
means that the nanocrystalline structure of the coating wears
more quickly. The behavior of the Diager coatings is slightly better
than the Balzers coating.
4.3. Tool behavior optimization
The performance of the drill is limited by the damage induced
during the process on the composite material surface: plies
delamination during the exit of the drill, pull-out of fiber bundles
on the hole surface, and burning of the material. Usually, the first
damage type controls the drilling and determines when the tool
wear is sufficiently high to change the tool. The delamination
phenomenon has been extensively described in the literature
and depends significantly on the axial load
applied to the material and the mechanical characteristics of the
remaining material to drill (the final plies of the laminate)
. For the material used, the critical axial load
leading to delamination of the last and two last plies has been
evaluated to 120 and 280 N, respectively . Since the values of the
axial load have been recorded lower than 280 N, only the last ply
of the composite is able to delaminate. This behavior has been
confirmed experimentally for the range of drilling conditions.
The use of previous model allows to predict the number of
holes, which is possible to drill before delamination occurs
(
The predicted results are in good agreement with the
experimental values. In the case of uncoated tools, the experi-
mental values correspond to a tolerable delamination damage of
0.1 mm, which means that the experimental values are over-
estimated. In the case of coated tools, the predicted values are
overestimating the experimental results, which means that the
critical axial load leading to delamination of the last ply of the
laminate is lower than 120 N.
5. Conclusions
The wear of uncoated and diamond-coated carbide tools when
drilling CFRP is strongly dependent on the product of the axial
force F
a
applied to the cutting edge by the contact length between
the cutting edge and the composite material L
c
. It has been shown
that for uncoated carbide tools, this dependence is a power law
function, when for diamond-coated carbide tools the dependence
is linear and quasi-constant at the beginning and is power law
function at the end.
A phenomenological model of axial load taking into account
the tool wear has been proposed and is in good agreement with
experimental results.
To determine the model coefficients, a trial of limited
experiments (23 in this case) is large enough for uncoated drills.
For diamond-coated tools, an endurance test has to be added to
determine the dependence of axial load with long-term wear.
This procedure is well-adapted to abrasion damage modes
(machining of the CFRP, ceramic materials, etc.) where the wear
evolves linearly with time. In the case of metallic materials, a
procedure very similar is being evaluated. It consists in repeating
5 times randomly 9 lines of a factorial design in which 5 holes
were made (125 tests). The trial is completed if necessary by
Table 5
. Predicted and realized numbers of drillings before delamination of the last ply of
the composite laminate.
Tool reference
Numbers of holes
predicted before
delamination
Numbers of holes
realized before
delamination
Real
delamination
value (mm)
22690
22
33
0.1
Prototype 2
25
44
0.1
Prototype 4
22
33
0.1
22691
242
246
0
Prototype 6BS
265
255
0
Prototype 6CN
374
354
0
Prototype 8BS
214
205
0
Prototype 8CN
415
400
0
Fig. 11. Comparison of measured and estimated thrust force for diamond-coated tools.
D. Iliescu et al. / International Journal of Machine Tools & Manufacture 50 (2010) 204–213
212

ARTICLE IN PRESS
an endurance test to determine more accurately the dependence
of wear.
The model allows to predict the parallel evolution of axial load
and wear with different drilling sequences that a tool will face
during its life. The predictions made are in good agreement with
experimental data and allow to optimize the drilling sequence of
the CFRP. The differences between the model and experiments
can be attributed to a temperature deviation of the drill during
the tests, vibrations in the drilling of plates used for testing and
the choice of the mathematical function that describes the wear.
Concerning the prediction of the number of holes, the thrust
load leading to delamination of the last ply has been estimated
using the Piquet’s model
. Tests at different feed rates starting
from very low values would probably allow to determine more
accurately this critical axial load.
Moreover, the study has also pointed out the beneficial
effect of the presence of a diamond coating on the carbide drill
leading to tool life 10 to 12 times the tool life of the uncoated
carbide drill for cutting speeds 3 times higher (170 m/min instead
of 56 m/min).
Finally, the drill allowing to achieve the greatest number of
holes in the CFRP without delamination must follow the following
specifications:
a point angle ensuring a proper balance of the dril (near
125–1301) and allowing if compatible with a very progressive
output, which minimizes the thrust load (near 901),
an helix angle acting like a corkscrew (near 35–401),
a clearance angle between 101 and 251 with a preference for
the double slope flank geometry (101/111+ 251),
a Cemecon type diamond coating,
a cutting speed and a feed rate of 170 m/min and 0.05 mm/rev,
respectively.
These specifications correspond to the prototype 8, which gave
the best results and to a lesser extent the prototype 6.
Acknowledgements
The authors wish to thank J. BEGA for his help in the present
work and for conducting part of the experiments. Research
support was provided by the French Department of Education
and Science trough the contract n102K0538 (MEDOC project).
References
[1] WF. Smith, in: Principles of Materials Science and Engineering, McGraw-Hill,
New York, 1990 699–724.
[2] A. Koplev, Cutting of CFRP with single edge tools, in: Proceedings of the
Third International Conference on Composite Materials, Paris, (2), 1980,
pp. 1597–1605.
[3] A. Koplev, A. Lystrup, T. Vorm, The cutting process, chips and cutting forces in
machining CFRP, Composites 14 (4) (1983) 371–376.
[4] D. Arola, M. Ramulu, D.H. Wang, Chip formation in orthogonal trimming of
graphite/epoxy composite, Composites A 27 (1996) 121–133.
[5] N. Bhatnagar, N. Ramakrishana, N.K. Nail, R. Komanduri, On the machining of
fibre reinforced plastic (FRP) composite laminates, Int J. Mach. Tools Manuf.
35 (5) (1995) 701–716.
[6] H.Y. Pwu, H. Hocheng, Chip formation model of cutting fibre-reinforced
plastics perpendicular to fibre axis, Trans ASME 120 (1998) 192–196.
[7] D. Arola, M. Ramulu, Orthogonal cutting of fibre-reinforced composites:
a finite element analysis, Int J Mach Tool Manuf. 39 (5) (1997) 597–613.
[8] S. Abrate, Machining of composite materials, in: P.K. Mallick (Ed.), Composites
Engineering handbook, Marcel Dekker, New York, 1997, pp. 777–809.
[9] E. Persson, I. Eriksson, L. Zackrisson, Effects of hole machining defects on strength
and fatigue life of composite laminates, Composites A 28 (1997) 141–151.
[10] E. Persson, I. Eriksson, P. Hammersberg, Propagation of hole machining defects
in pin-loaded composite laminates, J Compos. Mater 31 (1997) 383–408.
[11] R. Piquet, B. Ferret, F. Lachaud, P. Swider, Experimental analysis of drilling
damage in thin carbon/epoxy plate using special drills, Composites A 31
(2000) 1107–1115.
[12] H. Hocheng, C.K.H. Dharan, Delamination during drilling in composite
laminates, J Eng Ind. 112 (1990) 236–239.
[13] L.B. Zhang, L.J. Wang, X.Y. Liu, A mechanical model for predicting critical
thrust forces in drilling composite laminates, Proc. Inst. Mech. Eng. B 215
(2001) 135–146.
[14] S. Jain, D.C.H. Yang, Effects of feed rate and chisel edge on delamination in
composites drilling, J. Eng. Ind. 115 (1993) 398–405.
[15] C.C. Tsao, H. Hocheng, Effects of exit back-up on delamination in drilling
composite materials using a saw drill and a core drill, Int. J. Mach. Tools
Manuf. 45 (2005) 1261–1270.
[16] H. Hocheng, C.C. Tsao, Effects of special drill bits on drilling-induced
delamination of composite materials, Int. J. Mach. Tools Manuf. 46 (2006)
1403–1416.
[17] C.C. Tsao, H. Hocheng, Parametric study on thrust force of core drill, J Mater
Proc. Technol. 192–193 (2007) 37–40.
[18] M. Fernandes, C. Cook, Drilling of carbon composites using a one shot drill bit.
Part II: empirical modelling of maximum thrust force, Int. J. Mach. Tools
Manuf. 46 (2006) 76–79.
[19] C.C. Tsao, The effect of pilot hole on delamination when core drilling
composite materials, Int. J. Mach. Tools Manuf. 46 (2006) 1653–1661.
[20] C.C. Tsao, Effect of pilot hole on thrust force by saw drill, Int. J. Mach. Tools
Manuf. 47 (2007) 2172–2176.
[21] C.C. Tsao, Prediction of thrust force of step drill in drilling composite material
by Taguchi method and radial basis function network, Int. J. Adv. Manuf.
Technol. 36 (2008) 11–18.
[22] C.C. Tsao, H. Hocheng, Effect of tool wear on delamination in drilling
composite materials, Int. J. Mech. Sci. 49 (8) (2007) 983–988.
[23] S.C. Lin, C.J. Ting, Tool wear monitoring in drilling using force signals, Wear
180 (1-2) (1995) 53–60.
[24] H. Hocheng, C.C Tsao, Comprehensive analysis of delamination in drilling of
composite materials with various drill bits, J. Mater. Proc. Technol. 140 (1–3)
(2003) 335–339.
[25] F. Lachaud, R. Piquet, F. Collombet, L. Surcin, Drilling of composite structures,
Compos. Struct. 52 (3–4) (2001) 511–516.
D. Iliescu et al. / International Journal of Machine Tools & Manufacture 50 (2010) 204–213
213
Document Outline
- Modeling and tool wear in drilling of CFRP
Wyszukiwarka
Podobne podstrony:
87 1237 1248 Machinability and Tool Wear During the High Speed Milling of Some Hardened
Interaction between ascorbic acid and gallic acid in a model of
Rodrigues & Vaz SUBLUMINAL AND SUPERLUMINAL SOLUTIONS IN VACUUM OF THE MAXWELL EQUATIONS AND THE MA
Cadmium, chromium, lead, manganese and nickel concentrations in blood of women in non polluted areas
Mathematical and technical optima in design of weld steel shell structures
PROPAGATION MODELING AND ANALYSIS OF VIRUSES IN P2P NETWORKS
Minimum Quantity Lubrication Drilling of Lightweight Aluminum and Magnesium Alloys Used in A
Functional Origins of Religious Concepts Ontological and Strategic Selection in Evolved Minds
16 197 208 Material Behaviour of Powder Metall Tool Steels in Tensile
Civil Society and Political Theory in the Work of Luhmann
79 1111 1124 The Performance of Spray Formed Tool Steels in Comparison to Conventional
02 Modeling and Design of a Micromechanical Phase Shifting Gate Optical ModulatorW42 03
54 767 780 Numerical Models and Their Validity in the Prediction of Heat Checking in Die
No Man's land Gender bias and social constructivism in the diagnosis of borderline personality disor
Adorno [on] 'Immanent Critique' and 'Dialetical Mimesis' in Adorno & Horkheimer's Dialectic of Enli
15 Multi annual variability of cloudiness and sunshine duration in Cracow between 1826 and 2005
więcej podobnych podstron