200
PLANT SHELF
Copyright 2004 Martian Auctions
866

Smart gardeners don't wait for
the ground to thaw and the air to
warm before starting their spring
gardening. The first seeds are al-
ways sown inside the house in a
spot that gets plenty of sunshine.
Unfortunately, space is usually a
limiting factor in most seed starting
operations. Only a few windows
normally get sufficient sunshine to
produce healthy seedlings, and
there never seems to be enough
window ledge to satisfy your aspi-
rations. However, you can expand
your preseason gardening space
with the suspended seed starter
shown here.
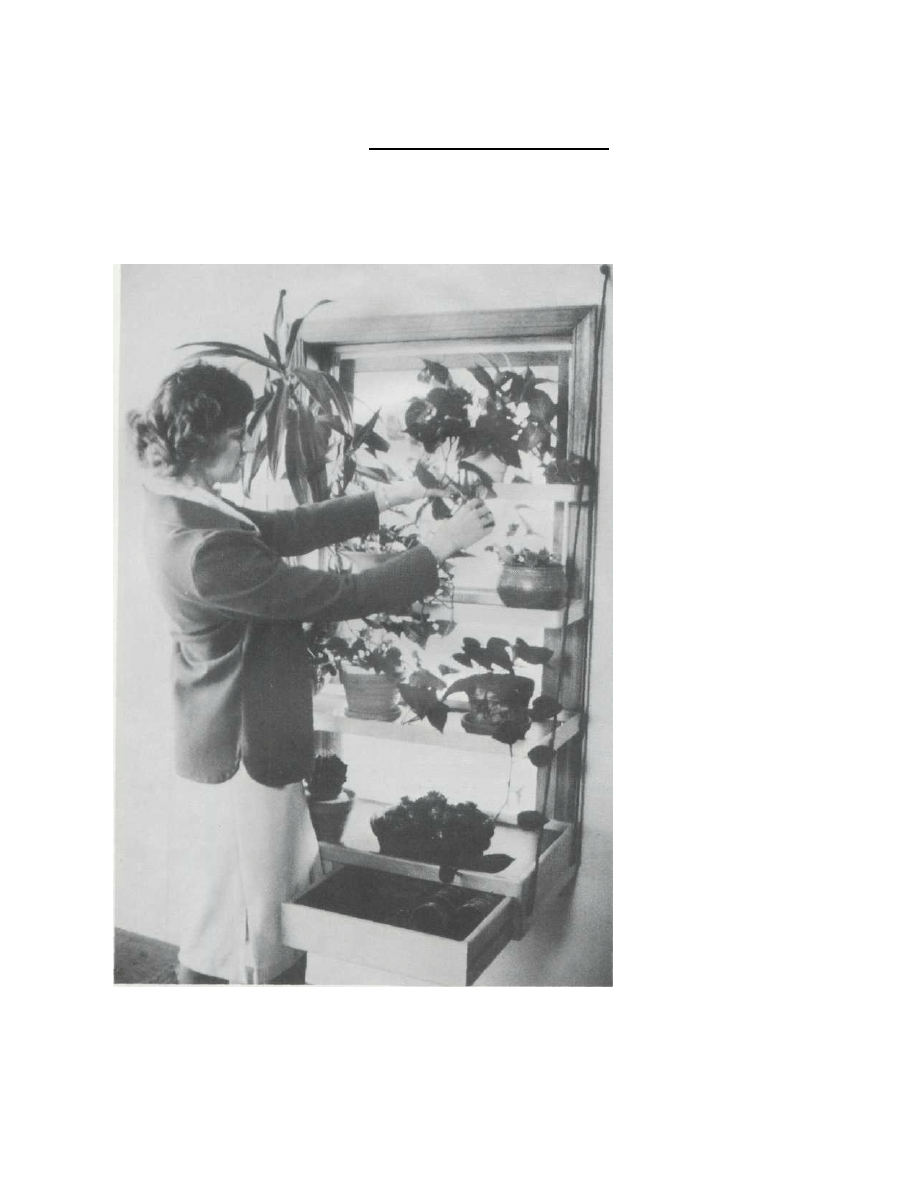
This four-tiered shelf unit is de-
signed to be mounted into a stan-
dard window frame. The shelves,
which are removable to facilitate
larger plants, are supported by two
metal side frames. The bottom shelf
is designed to rest on the window
sill; consequently, this and all oth-
er shelf dimensions must be sized
to your particular window. The unit
receives plenty of light, takes up
no floor space, and can be dis-
mounted easily when not in use.
Tools, soil, and miscellaneous gar-
dening materials are conveniently
stored in the two drawers under
the bottom shelf.
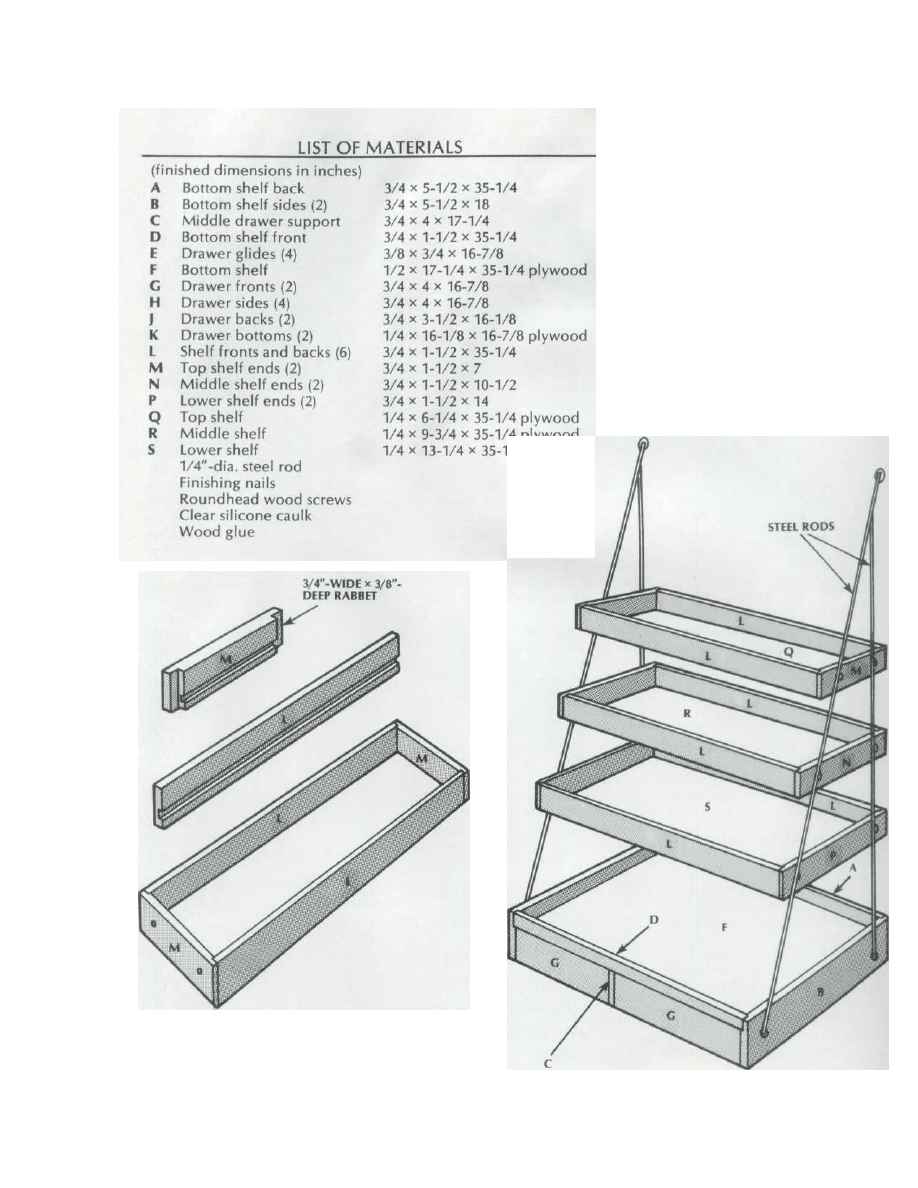
1. To begin building your indoor
garden, start by cutting the bottom
shelf back (A) to length. Cut a 1/2"-
wide x 3/8"-deep groove in the
back, one inch from the top edge,
to hold the plywood bottom.
2. Cut the bottom shelf sides (B) to
length. Cut a 1/2"-wide x 3/8"-
deep groove in each side, one inch
from the top edge, to hold the
plywood shelf. Machine a 3/4"-
wide x 3/8"-deep rabbet on the
back inside end of each side piece.
Make a right and left piece.
3. Cut a blind rabbet 3/4" wide x
3/8" deep x 1-1/2" long on the un
cut end of each side to accept the
bottom shelf front (D).
4. Cut the middle drawer support
(C) and the drawer glides (E) to
length. Glue and nail the drawer
glides to the middle drawer sup
port and the side pieces.
5. Cut the bottom shelf front to
length. Cut a 1/2"-high x 3/8"-
deep rabbet in the bottom inside
edge to accept the plywood shelf.
6. Cut the bottom shelf (F) to size.
Assemble the shelf unit parts using
glue and 5d finishing nails.
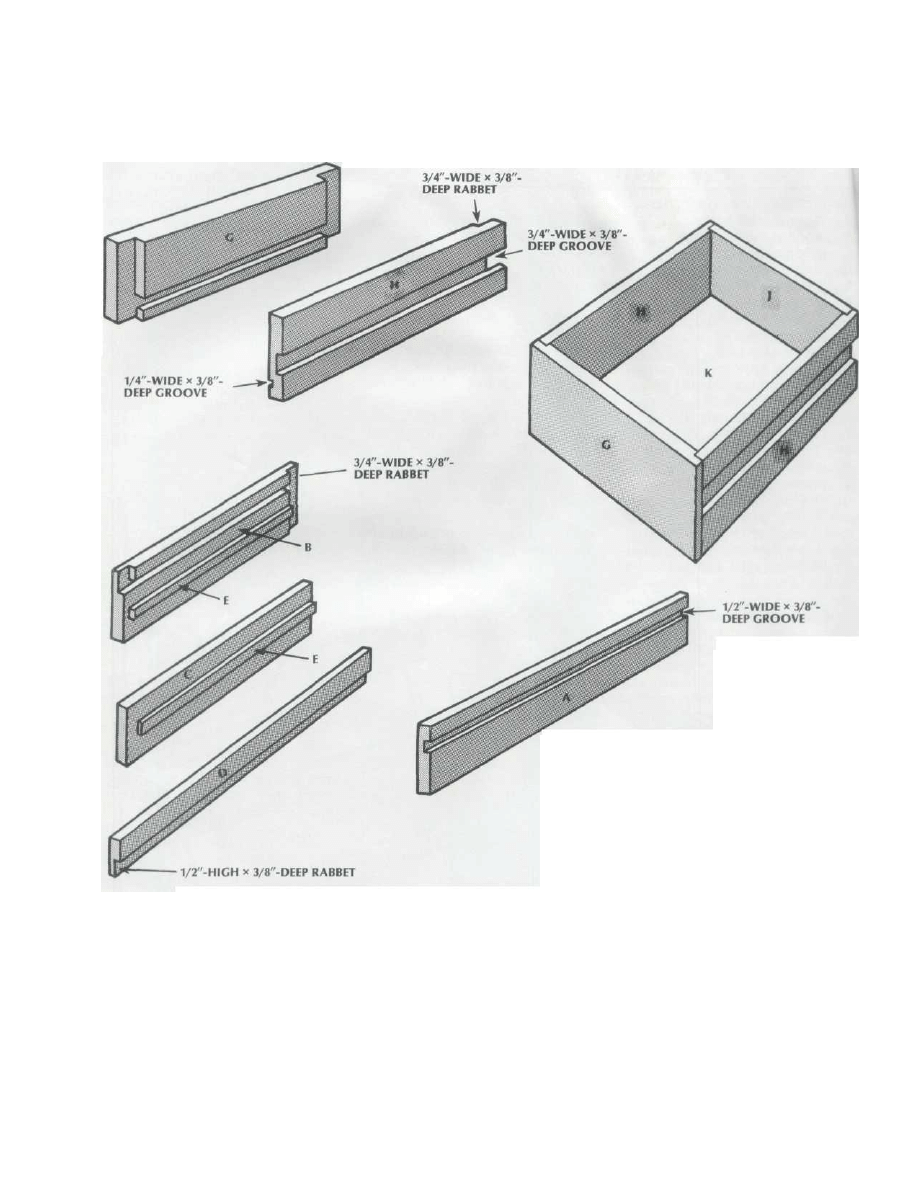
7. Cut the drawer fronts (G) and
sides (H) to length. Machine a 3/4"-
wide x 3/8"-deep rabbet on each
end of the drawer fronts to accept
the drawer sides.
8. Machine a 1/4"-wide x 3/8"-
deep groove on each drawer front
to accept the drawer bottom, 1/4"
from the bottom edge.
9. Machine the same 1/4" x 3/8"
groove on each side piece. Cut a
Copyright 2004 Martian Auctions
867
3/4"-wide x 3/8"-deep groove on
the outside face of each drawer
side for the drawer glides.
10. Machine a 3/4"-wide x 3/8"-
deep rabbet on the end of each
side piece to accept the back panel.
11. Cut the drawer backs (j) and
drawer bottoms (K) to size.
12. Assemble the drawer sides,
front, back, and bottom with glue
and nails. Note that the back must
be installed flush at the top; also,
the bottom cannot be glued; it
must always be nailed.
13. Cut the top, middle, and lower
shelf ends (M, N, P) to length. Ma
chine a 3/4"-wide x 3/8"-deep rab-
Copyright 2004 Martian Auctions
868
bet on each end of the pieces. Ma-
chine a 1/4"-wide x 3/8"-deep
groove 1/4" from the bottom edge
of each piece.
14. Cut the shelf fronts and backs
(L) to length. Machine a 1/4"-wide
x 3/8"-deep groove 1/4" from the
bottom edge of each piece.
14. Cut the top, middle,and
lower
shelf bottoms (Q, R, S) to size. As
semble all the shelf elements with
glue and nails, except the bottom,
which should not be glued.
16. Machine a 1/4" radius on all
sharp edges of the shelf frames, or
round them over with a sanding
block.
16. Sand all surfaces and finish as
desired; polyurethane varnish is
recommended. Caulk the inside
joints of the shelves with clear sil-
icone caulking.
18. Cut the 1/4"-
diameter steel
rods to length for
the back and
main supports.
Position and weld
the back supports to the main sup
ports.
18. Braze the 3/8"-diameter steel
washers to the ends of the 1/4"-
diameter supports. Position the
1/4" steel washers and braze them
to the supports at the desired loca
tions.
19. Wire brush the side frames to
remove loose scale and dirt. Paint
the side frames.
20. Attach the side frames to the
shelf units. Use #12 x 3/4" round
head wood screws for the top
three shelves and #12x1-1/4"
roundhead wood screws for the
shelf with drawers.
21. Mount the unit to the window
with #14 x 2-1/2" wood screws.
Copyright 2004 Martian Auctions
869
Wyszukiwarka
Podobne podstrony:
adjustable plant shelf polka na kwiaty
PLANT EVOLUTION
4 Plant Structure, Growth and Development, before ppt
plant cloning
#07 Flue Gas Plant
No 004 CCS Demonstration Plant fully integrated into new unit 858 MW
Plant Display
Sansewieria gwinejska, wężownica łac Sansevieria trifasciata ang Snake plant
Ściągi, Angielski 4, air pollution zanieczyszczenie powietrza alternative energy energia alternatywn
fitopatologia, Microarrays are one of the new emerging methods in plant virology currently being dev
Heavy metal toxicity,effect on plant growth and metal uptake
Gilded Scroll Shelf
Topic 13 AHL Plants IB III Lecture 2 Plant Tissues and Organs
PLANT DIVISIONS
Adjustable Plant Shelves
epigenetic control of plant dev Nieznany
Caffeine a well known but little mentioned compound in plant science
więcej podobnych podstron