
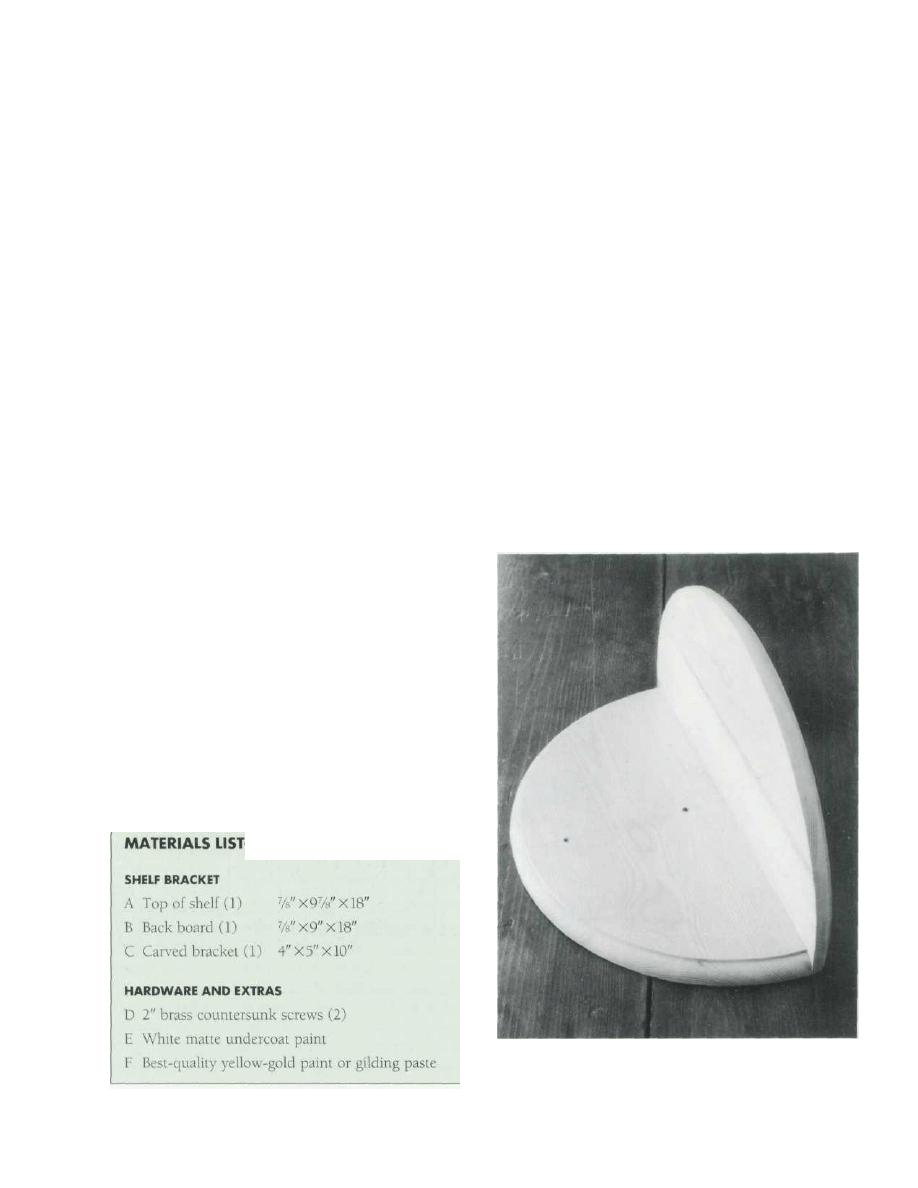
Gilded Scroll Shelf
y dictionary defines a console shelf as being an
ornamental bracket—especially one used to sup-
port a bust—while a scroll is described as being a decora-
tive carving in the form of a stylized roll of parchment.
Okay, not very exciting you might think, just a shelf and
a bracket. But give the shelf a semicircular form and an
ogee-type lip profile, embellish the scroll with a wee bit
of carving and coat of gold paint, and then put the two
together, and suddenly—Pow!—you have a really special
eye-catching item, a truly unique and dynamic piece of
woodwork.
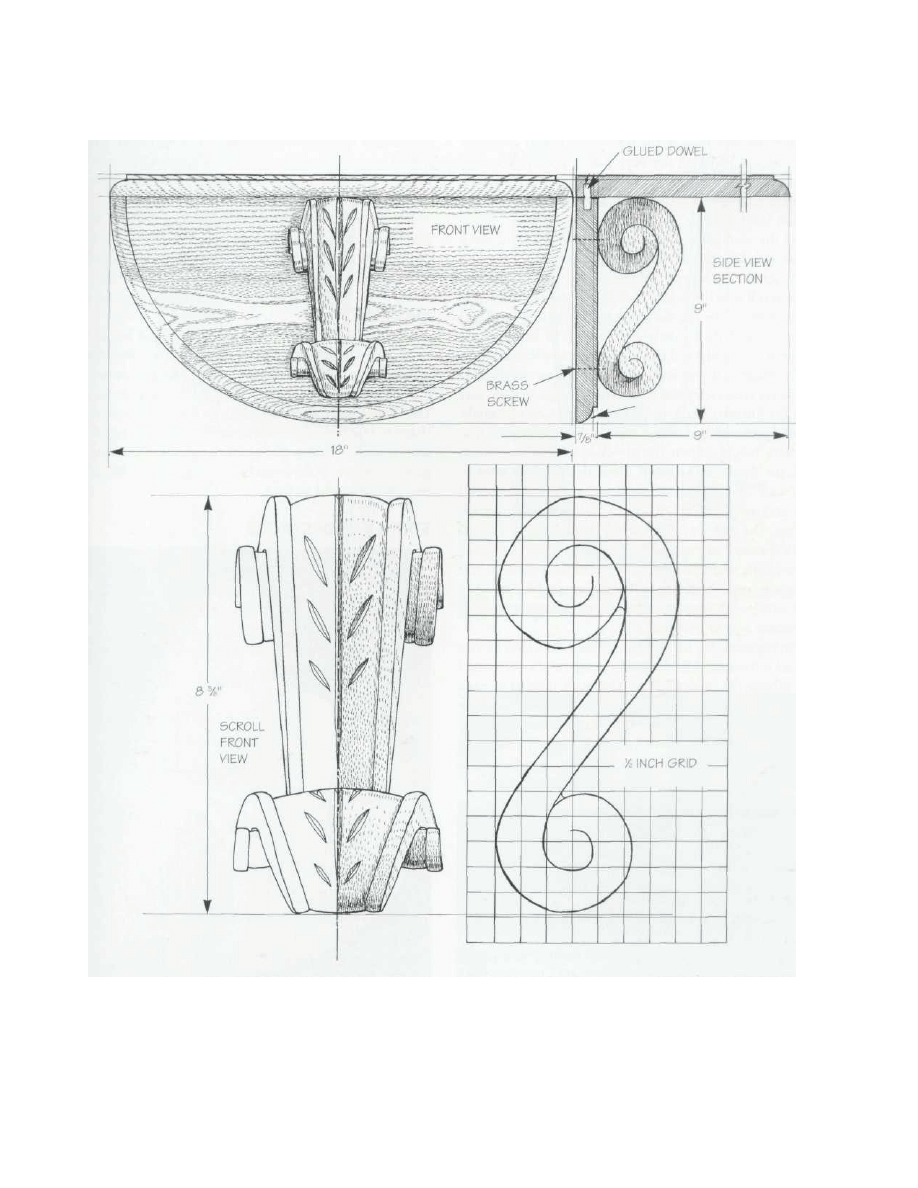
MAKING THE SHELF
The actual shelf is very straightforward—really no more
than two half-circles butted and dowelled at right angles.
That said, you do have to be mindful at the layout stage
that the top board—the one that will become the shelf
surface—needs to measure the radius of the circle from
front to back, plus the thickness of the wood.
Use a compass, ruler and square to set out the wood:
Fret the two forms out with a band saw. Use a router or
moulding plane to cut the lip profile. Then use glue and
hidden dowels to butt the forms together at right angles.
M
Copyright 2004 Martian Auctions
914
Copyright 2004 Martian Auctions
915
MAKING THE BRACKET
Having chosen your block of easy-to-carve wood, press
transfer the side view of the scroll through to the wood
and then cut it out on the band saw. Then run a center
line down the front lace. Next, take some masking tape
and use it to establish the tapered shape of the scroll as
seen in front view.
Set the workpiece side-down on the bench and use a
mallet and shallow-sweep straight gouge to lower the side
of the scroll. The best way of visualizing the lowered side
of the scroll is to think of it as a mountain road that starts
at the center of the big end of the scroll, curls around and
downhill, and then slowly back uphill to finish at the
center of the small scroll. Staying with this mountain-and-
roads imagery, if you leave the scroll on its side, and if
you lower your viewpoint to bench level, you will see that
with the finished scroll, the scroll centers—or you might
say the peaks around which the roads curl—are both at
the same height. When you are clear in your own mind
as to the shape of the scroll, carve down to the level of
the "road" on one side of the scroll, then flip the scroll
over and work the other side in identical mirror-image
reverse. The best way of ensuring that the scroll is sym-
metrical as seen in front view is to slightly lower the "road"
on one side and then the other, and then back to the
other side, and so on. You will find that this little-by-little
approach—with constant reference to the center line—is
the easiest way to proceed.
Having made the sides of the scroll, turn it over so you
can see it front-on. Use the masking tape and a soft pencil
to establish the 1/4"-wide track that runs parallel to each
side edge. When you are happy with the guidelines, use
a knife and gouge to work and model the central area
until it is lowered by about 3/16" and is slightly
convex.
When you have what you consider is a well-formed
and modeled scroll, use the graded sandpapers to rub it
down to a smooth finish. Make sure that all the nooks
and creases are crisp and clean. This done, draw the styl-
ized foliage imagery on the front face of the scroll, incise
it with the knife, and then give the whole works a coat of
matte white undercoat paint, followed by a coat of best-
quality gold paint.
Run a couple holes in from the back of the shelf sup-
port, use brass screws to fix the bracket to the shelf, and
finally give the whole works a coat of thin varnish and/
or a burnishing with beeswax polish.
SPECIAL TIP
Though generally in woodcarvmg your wood has to be
attractive, straight-grained, free from splits and knots and
relatively easy to carve, there are times when, as the wood
is to be painted, you don't have to worry about its looks.
This being the case, you could go for an inexpensive,
characterless but easy-to-carve variety like jelutong. That
said, if you relish the notion of the project but want to
go for a uniform plain wood blond look, then 1 think your
best choice would be lime.
STEP-BY-STEP STAGES
1 Butt the two halves of the shelf together and fit
with glue and secret dowels.
Copyright 2004 Martian Auctions
916
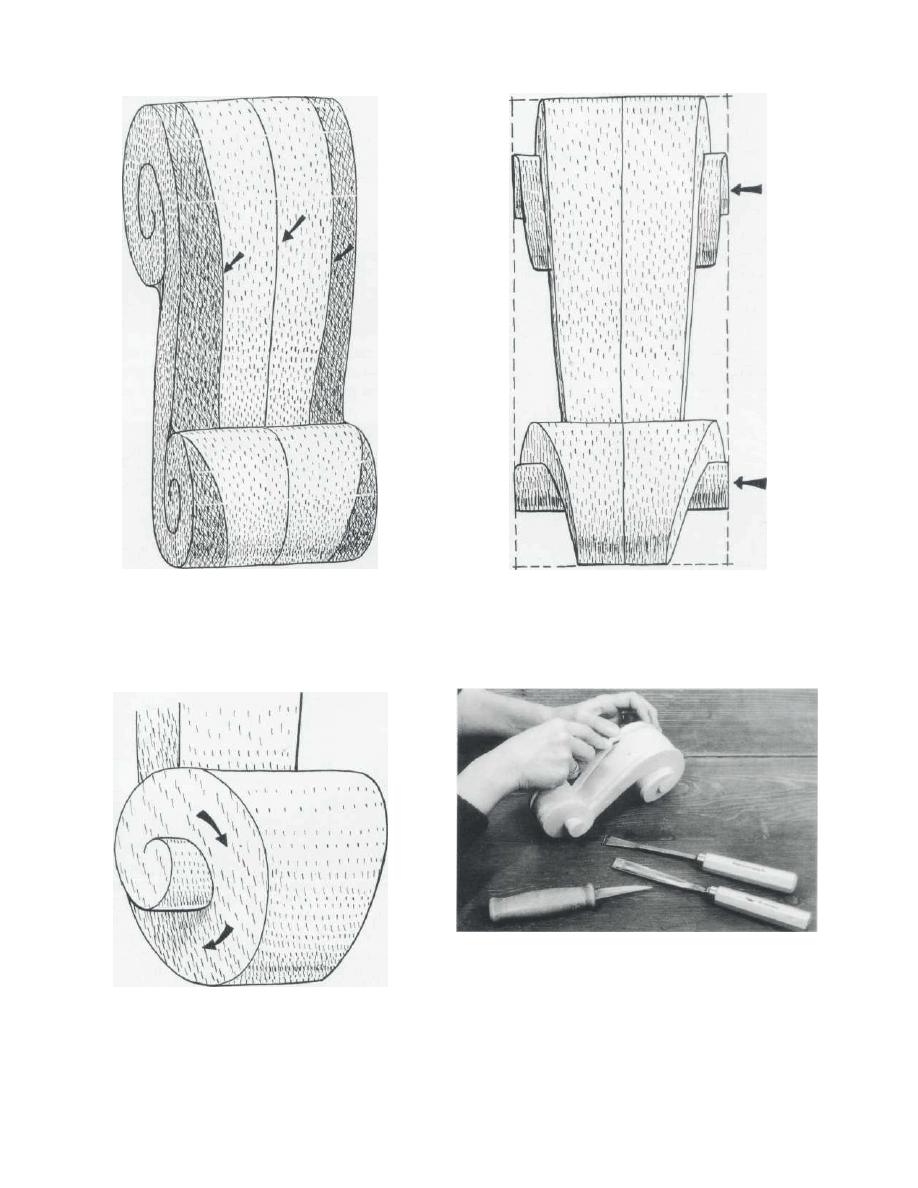
2 When you have made the blank and used the masking
tape to establish the shape of the bracket as seen in front
view, shade in the waste that needs to be cut away.
Note that the arrows indicate the center line and the
sides.
3 If you have carved it correctly, you will see that
the scroll peaks are at the same level.
4 The mountain road analogy perfectly describes how
the side-face curls down, around and up. Be watchful as
you lower the "road" that the "cliff face—meaning the
face that in this view goes vertically up from the road and
through to the peak—is cleanly worked.
5 Use a knife to clean up the sides and to deepen the
stop-cut that defines the depth and shape of the
camber.
Copyright 2004 Martian Auctions
917
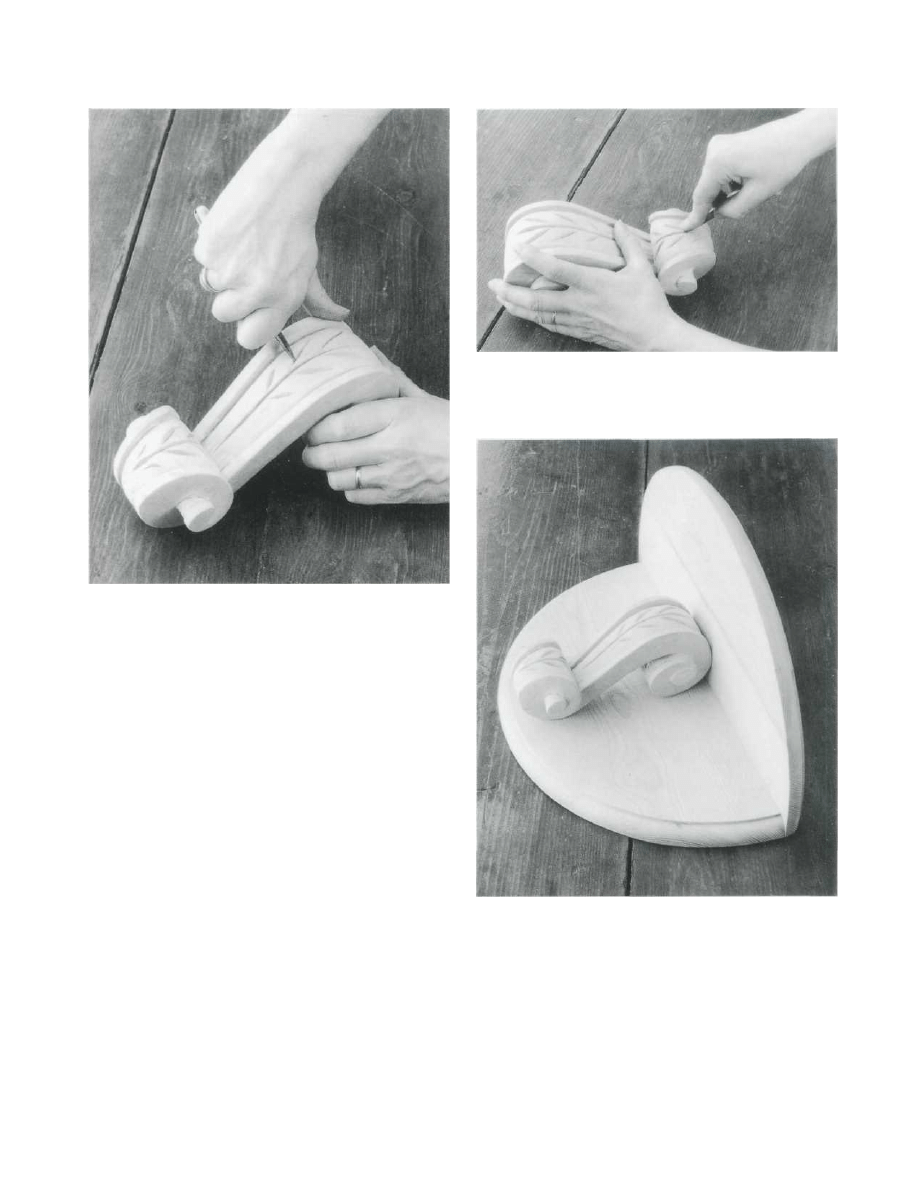
6 The incised cuts are best worked with three strokes:
one stop-cut to set in the center line and to establish
the depth of the incision, followed up by an angled cut
at each side to establish the width of the incision and to
remove the waste.
7 Be careful when you are working the top of the
small scroll that you don't dig too deeply i n t o what will
be end grain.
8 Having used a ruler and square to draw in the
center line, do a dry-run fit of the scroll. Establish
the position of the screw holes by taking your eye-
level down to the face of the wood and identifying
the scroll-to-shelf contact points.
Copyright 2004 Martian Auctions
918

GILDING THE SCROLL BRACKET
STEP-BY-STEP STAGES
Woodworkers are forever coming up with new and excit-
ing ideas. I'm sure you know what I mean. One moment
you are hall way through a project, and the next . . .
Eureka! A new idea or variation springs to mind. And
so it was with this project. The moment I had finished
describing how to carve the bracket and give it a lick of
gold paint, it suddenly occurred to me that perhaps it
would be more in keeping with the wood carving tradition
to gild the bracket.
Though gilding is a technique that requires a good deal
of time and patience, the end result is stunning, well
worth the effort. There are two methods of gilding: oil
and water. 1 have opted for what is best described as the
shortcut oil technique. That is to say, I follow the whole
procedure for the gold painting, and then finish up with
the gilding.
THE GILDING PROCEDURE
Give the finished carving a couple of coats of matte white
undercoat paint followed by a coat of gold paint, and
w a i t for the paint to dry. Then take a piece of fine-grade
sandpaper and rub the carving down to a smooth-to-the-
touch finish—the smoother the better.
Being mindful that the oil gold size dries in about 25
minutes, give a small area at the back of the bracket a
swift thin coat. When the size is tacky—almost dry—slide
one of the gold leaf sheets out onto the plywood and cut
it in to small postage-stamp pieces. Press straight down
with the lull length of the blade.
Now for the tricky part! Take the brush or tip, pass it
a couple of times over your hair to increase the static, and
then touch it down so that it picks up a small piece of
gold leaf. Lay the gold leaf down onto the tacky size and
dab it into place with a pad of lint-free cotton cloth. Take
up the second piece of gold leaf and lay it down alongside
the first so that there is a slight overlap. Continue until
the whole surface of the bracket is covered in gold.
Finally, dust the surface with a dry brush to remove
loose pieces of gold, and the job is done.
1 Having made sure that everything is clean, dry and
free from dust—your hands, the blade and the ply-
wood—take the blade and press the whole length of the
cutting edge down hard on the gold leaf. Make the cut by
slightly rocking the blade.
2 Wipe the brush over your hair to increase the static,
then swiftly pick up the gold leaf and lay it down on
the tacky gold size. Press the leaf down with a clean
cotton pad.
Copyright 2004 Martian Auctions
919
COMBINATION AND MULTIPLANES
I don't like routers. Okay, so maybe they are the best
thing since sliced bread. Yes, they do a wonderful job,
and 1 agree that they aren't as expensive as they used to
be, and there is no doubting that they get the job done
in almost no time at all. I know all the arguments. The
thing is, I don't like routers because of all the dust and
noise. But how do I cut my moldings, grooves, tongues,
rounds, hollows and all the other profiles? Well, the beau-
tifully simple answer is, 1 use an old Stanley 45 combina-
tion plane.
The Stanley 45 is, to my way of thinking, one of the
most beautiful woodworking tools ever invented.
It came into being at the end of the nineteenth century,
when there was a huge push by the iron plane manufac-
turers to come up with a single do-it-all plane. You have
to remember that up until that time, every type and size
of s l o t , tongue, fillet and fancy profile needed to be
worked with a dedicated plane. Can you imagine? If you
were a keen woodworker in the nineteenth century, it's
likely you would have needed 40 to 50 or more different
wooden moulding planes!
The Stanley 45 is a quality tool, more like a hand-built
gun than a plane. It has a main body piece with a sledge-
skate sole runner and a rosewood handle; a cutter clamp
and integral depth gauge with a large knurled wheel; two
nickel steel outrigger arms that are fixed to the main body
with screws; a middle section with an integral handle and
sledge-skate sole runner that fits onto the outrigger arms;
a fence with a rosewood runner; and a selection of 45
plus cutting irons. And as if all that isn't enough, my
Stanley 45 is covered in fancy caste motifs; dripping with
chrome and nickel plate; heavy with thumbscrews, lock-
ing nuts, wing nuts, adjusting screws, cutting spurs and
knobs; and supplied with the set of cutting irons packaged
in a wooden wallet. Better yet, the whole works fits into
the most attractive tin presentation box.
And just in case you are wondering . . . yes, the plane
does indeed live up to its looks. Of course, it has to be
carefully tuned and the irons need to be kept sharp, but
that said, it is a most efficient tool.
Setting up the Plane
As to why Stanley stopped making the "45" way back in
the 1960s, who can say. They are still being sought by
today's woodworkers, and though they are relatively easy
to obtain, the main problem is that most secondhand 45's
come disassembled and without the necessary setting,
tuning and using instructions.
And just in case you are one of the growing army of
avid user-collectors who have a secondhand Stanley 45,
and would dearly like to know how it needs to be sorted
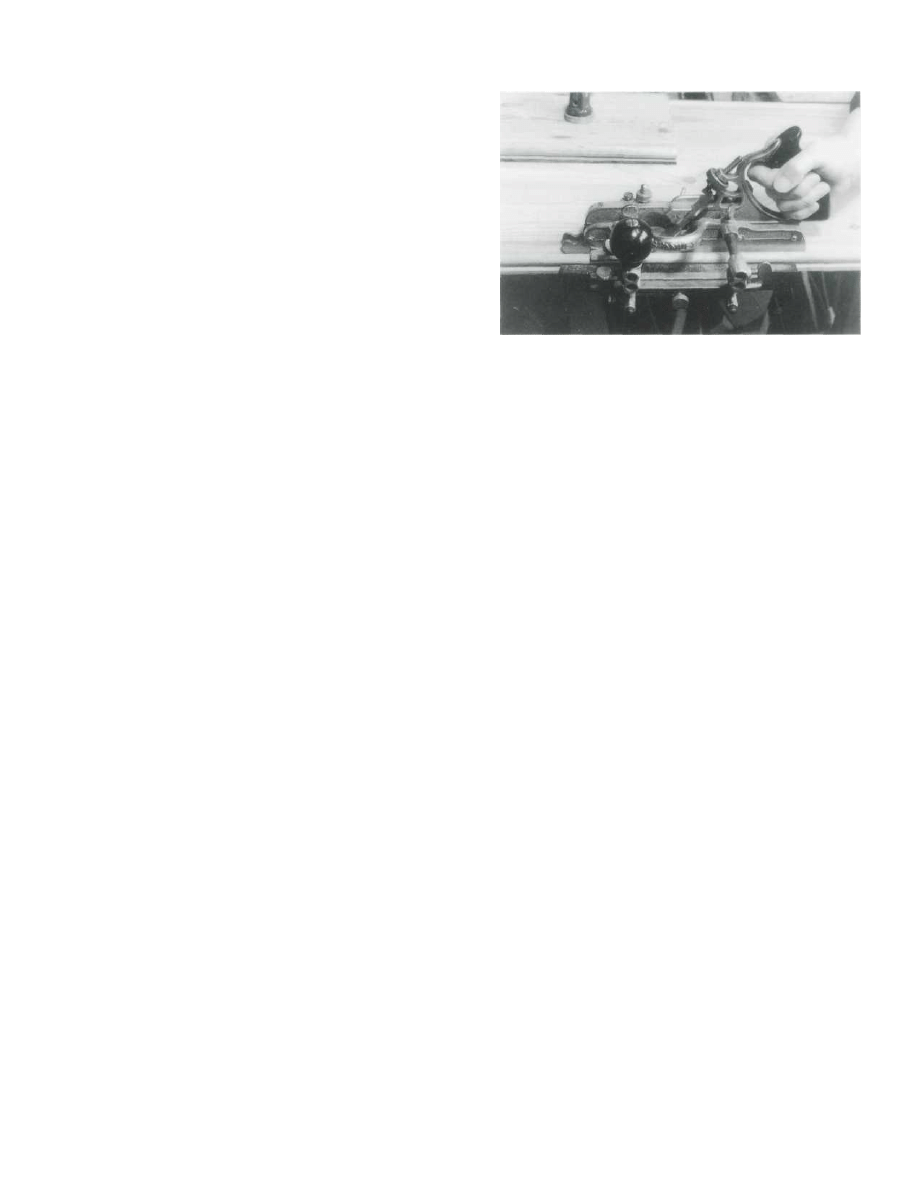
STANLEY COMBINATION PLANE
The legendary Stanley 45 in action.
and tuned, then help is at hand.
The order of setting up or tuning—the way I do it—
is as follows. I first select a cutting iron and check that
the edge is clean and well honed. If necessary, I wipe it
on the oilstone and use a slipstone and a strop to bring
the cutter bevel to a razor-sharp, 35° edge. This done, I
fit the cutting iron into the groove and adjust the wing
nut so that the iron is held in position. Next, I slide the
middle sole runner on the outrigger arms and slide it up
to the body of the plane so that the blade has a runner at
each side edge. If I am going to cut across the run of the
grain, I set the spurs so that the little cutter or nicker
blade is in the down position. Lastly, I measure and set
the fence and the plane is ready for action.
Okay, the plane is well set up and tuned, you have a
nice straight-grained piece of wood in the vise, and you
are ready to go. The first thing to do is get a household
candle and wipe it over the sole and fence of the plane.
Certainly it sounds a bit strange, but a couple strokes with
the candle will dramatically reduce the friction—it will
just about cut your sweat by half. And just in case you
don't believe me, try it without the candle—ha!
When you are ready to go, with the depth gauge set,
set the runners down on the workpiece so that the fence
is hanging over the side edge of the workpiece. Clench
that fence hard up against the side edge, and then take
repeated passes until the groove, tongue or profile is cut.
The best procedure is to start at the end of the wood
furthest away from you, and then gradually back up. Of
course, you might need to adjust the depth of cut, but if
you have it all together, with the plane nicely tuned and
set up, the rest is easy.
As 1 said at the beginning, the Stanley 45 is a beautiful
tool: no dust, no deafening noise, no need for a mask or ear
plugs, no motors or dangling cables. Just a sweet slickkk ...
slickkk . . . as the paper-thin shavings curl up.
Copyright 2004 Martian Auctions
920

Copyright 2004 Martian Auctions
921
Wyszukiwarka
Podobne podstrony:
jewelry box scroll patterns
Bathroom Shelf
Pegged Display Shelf
Plant Shelf
33 1 3 061 The Flying Burrito Brother's The Gilded Palace of Sin Bob Proehl (pdf)
The Elder Scrolls Online w 10 prostych krokach
The Elder Scrolls V Skyrim Dragonborn poradnik do gry
adjustable plant shelf polka na kwiaty
Shelf Bathtub Book Reading
Wish Upon A Star Shelf
PO C060201 AGL Scroll ZR18 ZR81
Ripley Scroll
shelf with bat shaped sides wieszak
Shelf pine shelves
Shelf Shelving Unit
Joel Rosenberg [Jihad 04] The Copper Scroll
więcej podobnych podstron