Medium Height Pine Shelves
Christopher Swingley
Introduction
Here is a set of inexpensive bookshelves that can be built in a weekend and a day using hand tools. The
joinery is complex – through dovetails joining the top to the sides, with sliding dovetail joints for the fixed
shelves – but the result is a very sturdy set of shelves with no visible fasteners. Inspiration for this project
came from Charles H. Hayward’s Cabinetmaking for beginners.
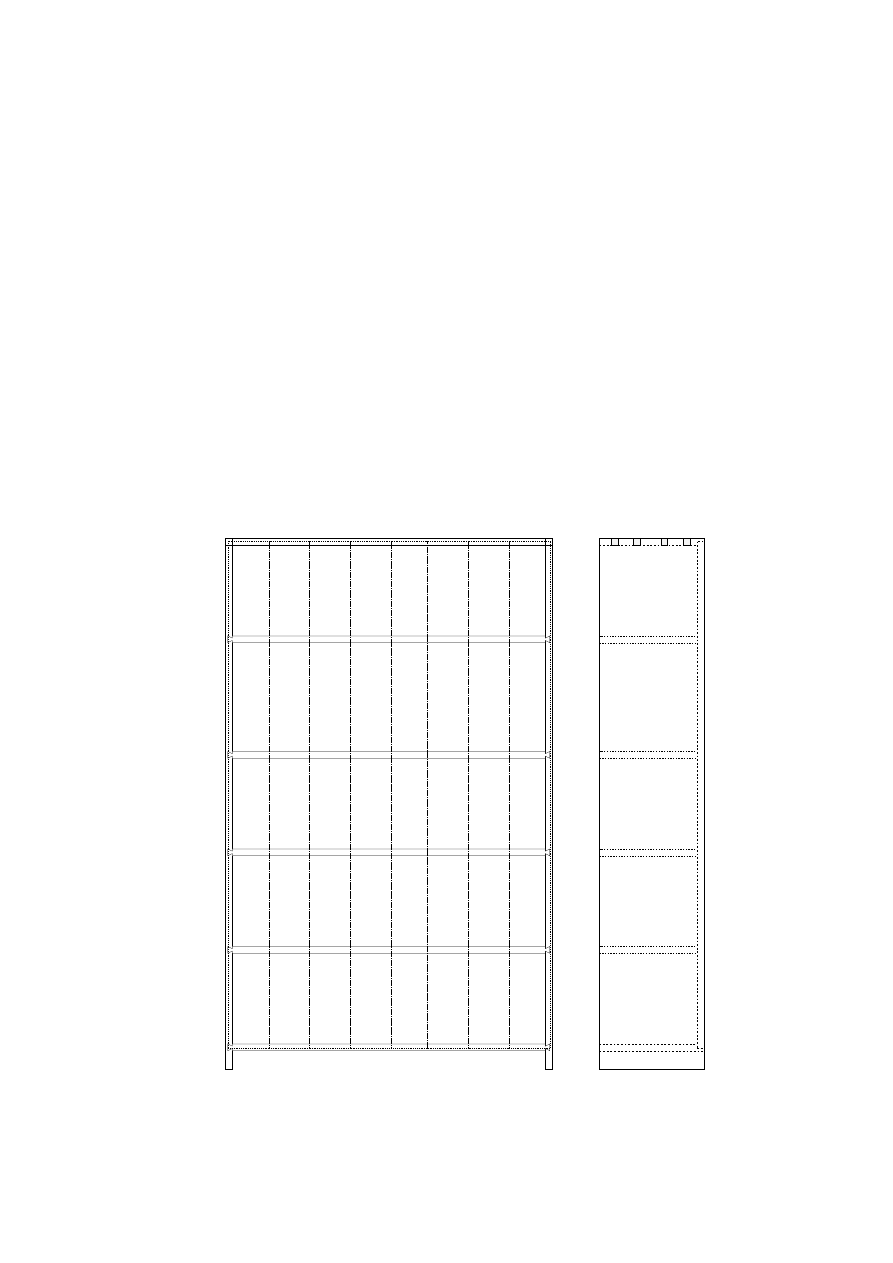
Plans
These plans show the design of the bookshelves. The height and width were chosen to allow a minimum
amount of waste using eight foot dimensional lumber. A taller case would mean narrower shelves, or you
would need longer stock.
10"
2"
10"
10"
12"
10"
58 1/2"
36"
34 1/2"
10"
10 3/4"
11 1/2"
12"
10"
10"
10"
2"
56"
4 1/2"
A
A
A
C
C
C
C
D
B
C
C
C
C
D
B
E
E
1

To build the project, as laid out, requires 7 eight foot pieces of 1 × 12 lumber. If you build the project with
a plywood back, or without a back, only 4 eight foot 1 × 12 boards are necessary.
As mentioned, the top is joined to the sides using through dovetails, which are lightly glued. Each of the
shelves is joined to the sides using sliding dovetails, which are glued at the front of the case. The sides, top,
and bottom shelf are rabbetted to contain the back, which is composed of ship-lapped boards, nailed at the
center of each board into the rabbets and the shelves.
Cut List
Key
Qty
Description
T
W
L
Notes
A
2
Sides
3
/
4
11
1
/
2
58
1
/
2
Dovetail pins on the top, rabbet cut in
the back, female sliding dovetail cut for
the shelves.
B
1
Top
3
/
4
311
1
/
2
36
Dovetails on the top, rabbet cut in the
underside of the back.
C
4
Middle shelves
3
/
4
10
3
/
4
35
1
/
4
Dimensions include a
3
/
8
00
male sliding
dovetail on each end.
D
1
Bottom shelf
3
/
4
11
1
/
2
35
1
/
4
Dimensions include a
3
/
8
00
male sliding
dovetail on each end, rabbet cut in the
top of the back.
E
8
Back pieces
3
/
4
4
1
/
2
56
Middle boards have rabbets cut on op-
poside sides so adjoining boards can
overlap. End boards have a single rab-
bet along the edge.
All dimensions are in inches.
Construction Notes
The first step is to cut the sides and the shelves to size. Cut to within
1
/
1
6
00
of the line and plane the edges
square and to the cut line. Use a shooting board if you have one, or a carpenter’s square if you don’t. Rip
3
/
4
00
off the interior shelves to accomodate the back, and plane the edges smooth and square.
Next, strike lines for the sliding dovetails in the sides of the shelves. Mark the lines with a marking knife,
and remove a sliver of material from the waste side so your saw will track to the line. Cutting each dovetail
slot exactly the same is very important. Set up a bevel gauge to the same angle as on your dovetail plane,
and cut the sides of the dovetail slots with a stair saw. If you don’t have a stair saw, use a cross-cut backsaw
and mark the depth on the front and back of the sides. Be sure to cut at the angle indicated by the bevel
gauge.
Start removing the waste by chopping in from the ends using a sharp chisel. Plow the remainder of the
groove using a router plane. Be sure to plow all the dovetail slots to the same depth.
Before cutting the dovetail on the ends of the shelves, strike a line on the top face that matches the edge of
the dovetail plane blade. This will reduce tearout on the portion of the shelves that will be visible. Use a
mortise gauge to strike lines on the ends of the shelves to indicate how deep to plow the dovetails. Be sure
to test your setup for both parts to the joint before cutting them in the shelves. Very small errors can result
in a joint that is much too loose. Carefully test each joint to make sure it will be tight and square when it
is finally driven home.
Now that the shelves and sides are cut, re-measure the length for the top and cut it to size. Plane the edges
square.
Next, plow a rabbet in the top, sides and bottom shelf for the back pieces.
Finally, cut through dovetails to join the top and the sides. Note that the rabbet in the sides and top will
need to be covered, so take this into account when cutting the dovetails and removing the waste. When
viewed from the top and the sides, there should be no voids.
2

Note that if you are building this project from construction grade lumber, the wood will probably be much
wetter than furniture grade wood, and will start drying as soon as you bring it into your shop. This means
that all pieces that you aren’t currently working on should be clamped into a “drying rack” so they dry flat.
This is especially important for the shelves – it will be very difficult to drive the shelves into the dovetail
slots if they have warped. I used the
3
/
4
00
offcuts from the shelves as stickers, and clamped all the shelves
together with two stickers between them. If pieces warped anyway, I put wet rags on the concave surface
until the pieces were reasonable flat again.
Before joining the pieces together, cut the end pieces for the back. Having at least two pieces from the back
to attach will help hold the shelves square while the glue dries. The back pieces are 1 × 12 lumber, ripped in
half, and cut to fit in the rabbet in the back of the case. For the two end pieces, plow a rabbet along only
one of the long sides. All of the other back pieces receive two rabbets on opposite sides. You may want to
chamfer or round over the edges of the boards where they will meet when assembled. A small chamfer helps
to hide any irregularity in the joint between the boards.
With the joinery cut for the top, sides, shelves, and two back pieces, smooth the pieces and remove any
defects using a smooth plane.
Now for some assembly. Put glue on the pins and tails of the top dovetail joint and fit the top to the sides.
Next drive in the bottom shelf, from the front, without any glue, until the front shelf is within a few inches
of the front of the case. Apply a little glue to the dovetail on the shelf and drive the shelf flush with the
front of the case. Wipe up any excess glue. Drive in all the remaning shelves in the same way, with glue only
at the front end of the shelf. This way if the shelves and the sides expand and contract at different rates,
they can move independently, but the front of the shelves will remain flush with the front of the case.
Finally, attach the left and right end boards to the back of the case. Make sure that the case is square before
nailing the boards. Use a single nail driven in to each shelf (and the top), placed near the side of the case.
Also be sure that one board has the rabbet facing forward, and one has the rabbet facing backward.
Cut the remainder of the back boards, rabbet the opposite edges, and fit them to the back. Apply a chamfer
to the forward edges, if desired. When there is space for only one more board, measure the proper width
for this board, cut, rabbet and smooth it. Be sure that there is at least a
1
/
8
00
gap between the end of one
board and the edge of the rabbet of the next to allow for expansion and contraction.
Smooth the back boards, fit them to the case, and nail each board to the shelves. Apply the finish of your
choice.
Notes
Copyright c
2002, Christopher Swingley, cswingle@iarc.uaf.edu
Permission is granted to make and distribute verbatim copies of these plans, provided the copyright notice
and this permission notice are preserved on all copies.
Permission is granted to copy and distribute modified versions of these plans under the conditions for verbatim
copying, provided that the entire resulting derived work is distributed under the terms of a permission notice
identical to this one, and that credit is given to the original author.
3
Wyszukiwarka
Podobne podstrony:
Shelf Contemporary Shelves
Shelf BUILDING A Simple Pine BOOKCASE
Gilded Scroll Shelf
Adjustable Plant Shelves
buchowski pine zaniewski
Kiku with Pine Needles (S12)
firstword pine
Bathroom Shelf
Pegged Display Shelf
Plant Shelf
adjustable plant shelf polka na kwiaty
pine coffee table
pine
Joe R Lansdale [Collins Pine 2] Mucho Mojo
Joe R Lansdale Collins & Pine 04 Bad Chili (com v4 0)
Shelf Bathtub Book Reading
Wish Upon A Star Shelf
Supporting Shelves
shelf with bat shaped sides wieszak
więcej podobnych podstron