Supporting Shelves
by Stephen Winchester
I
earn my living by making cabinetry—not cookie-cut-
ter kitchens, but one-of-a-kind pieces and custom
built-ins. Every cabinet I build has at least one shelf.
And some—hutches and book cabinets, for example-
have many. As both designer and fabricator in most cas-
es, I try to balance style, function and cost when figuring
out how to support shelves in a cabinet.
Over the years, I have come to favor several tech-
niques that achieve that happy balance between ele-
gance and efficiency (the five methods I use most often
are described below and on the following four pages).
Fixed or adjustable shelving
Style of cabinetry is the most important factor in deter-
mining which of the methods of shelving support I use.
The next most important factor is cost. For cabinets in
kitchens, pantries and utility rooms, fixed shelves are
generally fine (see the story below). But for most of my
work, clients want adjustable shelves. Shelf standards,
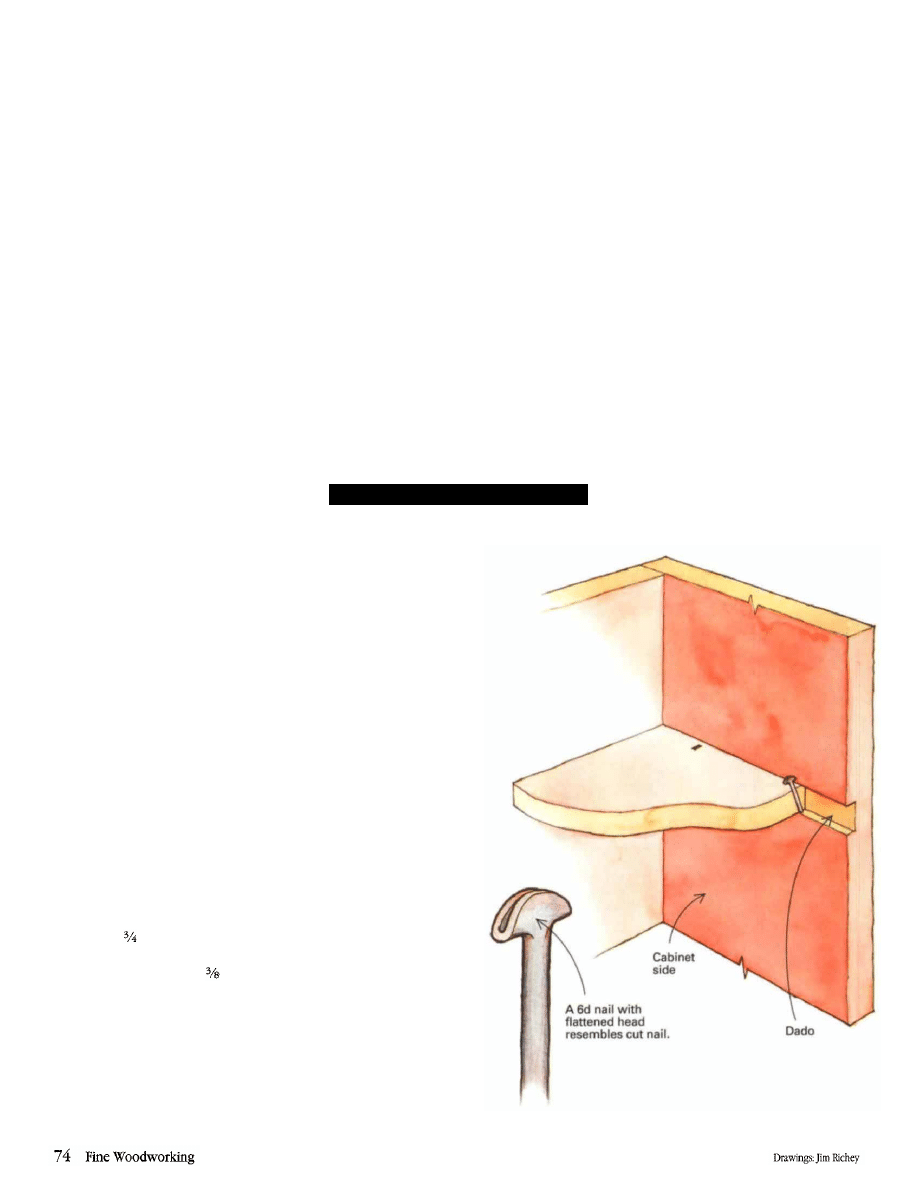
BLIND-NAILED DADO
For fixed shelving,
there's only one choice
Here in New Hampshire, paint-
ed pine cupboards are popular.
They're a frequent choice for
kitchen cabinets, where one or
two shelves are all that's neces-
sary. These shelves can be
fixed at standard intervals to al-
low for stacks of plates and
glasses. For these shelves, I use
a blind-nailed dado (see the
drawing at right). It's quick,
and the shelves are strong and
look neat.
Because my clients like the
look of handplaned boards, I
plane the sides, top, bottom
and shelves of the cupboards
after taking them to thickness
with my planer. Then I cut the
shelf stock in. longer than
the inside measurement of the
cabinet (this allows for a -in.
dado in each upright) and
mark the dadoes directly from
the ends of the shelves, using
a sharp knife. I also number
everything so that if the
shelves vary slightly in thick-
ness, they will still fit their
dadoes snugly.
I remove the waste with the
radial-arm saw, using a dado
set that's slightly smaller than
the width of the finished slot. I
take two passes and cut just to
the scored line on each side.
Shelves are installed as the
case is assembled. Then I drill
for the nails to avoid splitting
the stock. I use 6d box or fin-
ish nails and take care not to
drive one through the side of
the cabinet. With the box nails,
I hammer the heads flat on the
sides, so they look more like
a cut nail.
These cabinets are of a tradi-
tional style, so I usually attach
a face frame to their front
edges. If you want a frameless,
more contemporary-looking
cabinet, you could stop the
dadoes shy of the front of the
cabinet, square them up and
have blind dadoes.
My methods aren't as crude as using stamped-steel
sliding dovetails.
brackets but neither are they as fussy as routing tapered
Five methods for installing
shelves that combine elegance and efficiency
long vertical tracks that go into a case's sides, are the
most visible and utilitarian-looking, but they're also the
quickest to install (see the story below). Drilling holes in
the side of the case for shelf pins is the next quickest (see
the story on p. 76). Another technique employs what I
call invisible wires that slip into thin kerfs in the ends of
the shelves (see the story on p. 77). And there are saw-
tooth supports, which are quite elegant, but relatively
time-consuming (see the story on p. 78). The more com-
plicated the method, the more I have to charge.
As far as function goes, any of these supports will hold
a reasonable load: 3 ft. of books shouldn't be a problem.
Even the thin, invisible wires have a tremendous amount
of shear strength.
In the rare instances I've made shelves longer than
36 in., I've used a strongback, which is a wooden rein-
forcing bar either beneath or at the front of a shelf. Even
with a strongback, though, I wouldn't plan to stack 4 ft. of
encyclopedias on an otherwise unsupported shelf.
Stephen Winchester is a professional cabinetmaker and
furnituremaker in Gilmanton, N.H.
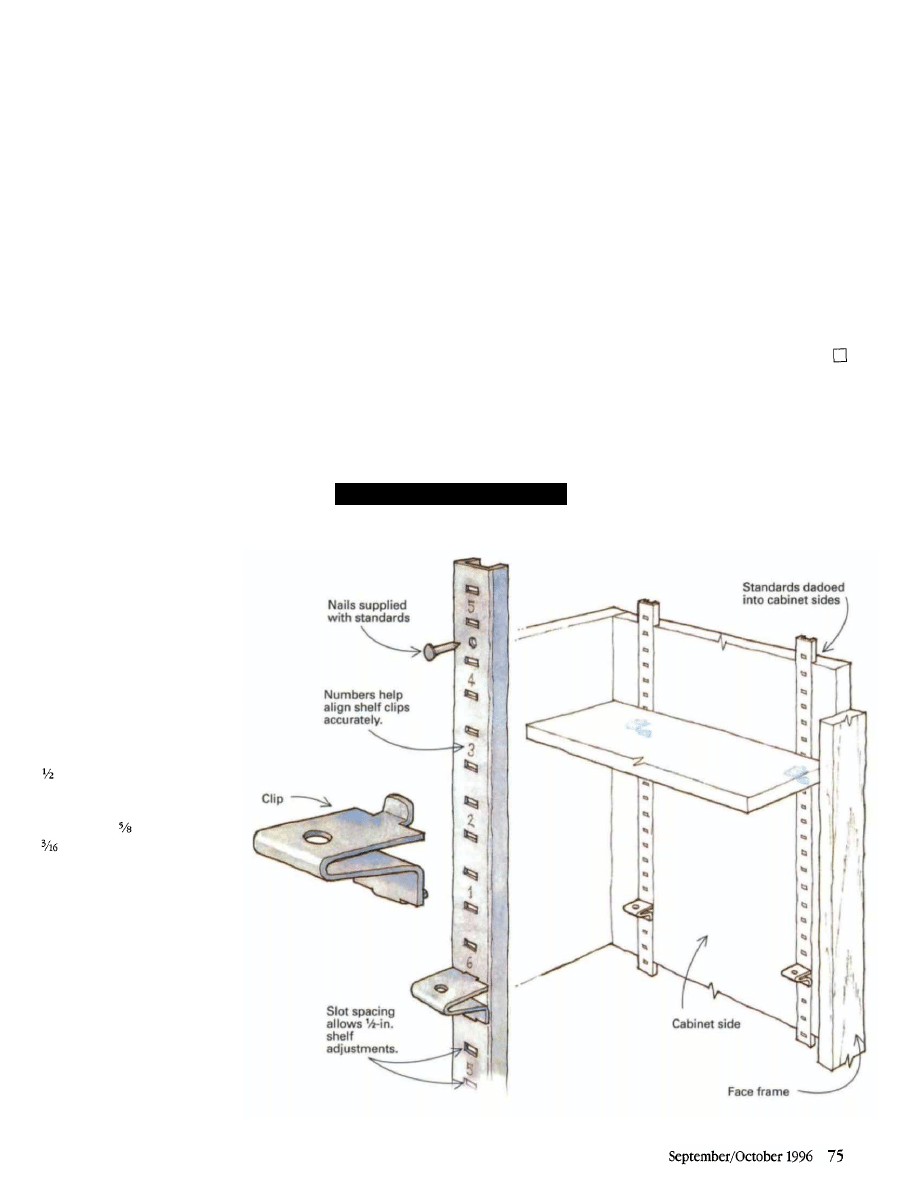
SHELF STANDARDS
Utility player:
quick and simple
Shelf standards are the quick-
est, simplest way of installing
adjustable shelving (see the
drawing at right). They're not,
however, the most attractive.
Still, there are situations where
they're the perfect solution,
and they can be painted to
match the cabinet. The spacing
between holes for the clips is
in., so standards are the most
adjustable of the methods I use.
To install the standards, I
plow a dado in. wide and
in. deep all the way from
the top to the bottom of the
cabinet sides. Then I assemble
the cabinet, finish it and nail
the standards in, paying atten-
tion to which end of the stan-
dard is up.
I nail the standards to the
cabinet sides with the special
nails that come with the stan-
dards. If cabinets are going to
be placed next to each other,
make sure they don't share a
side (each case needs to have
its own wall), or the nails will
hit each other.
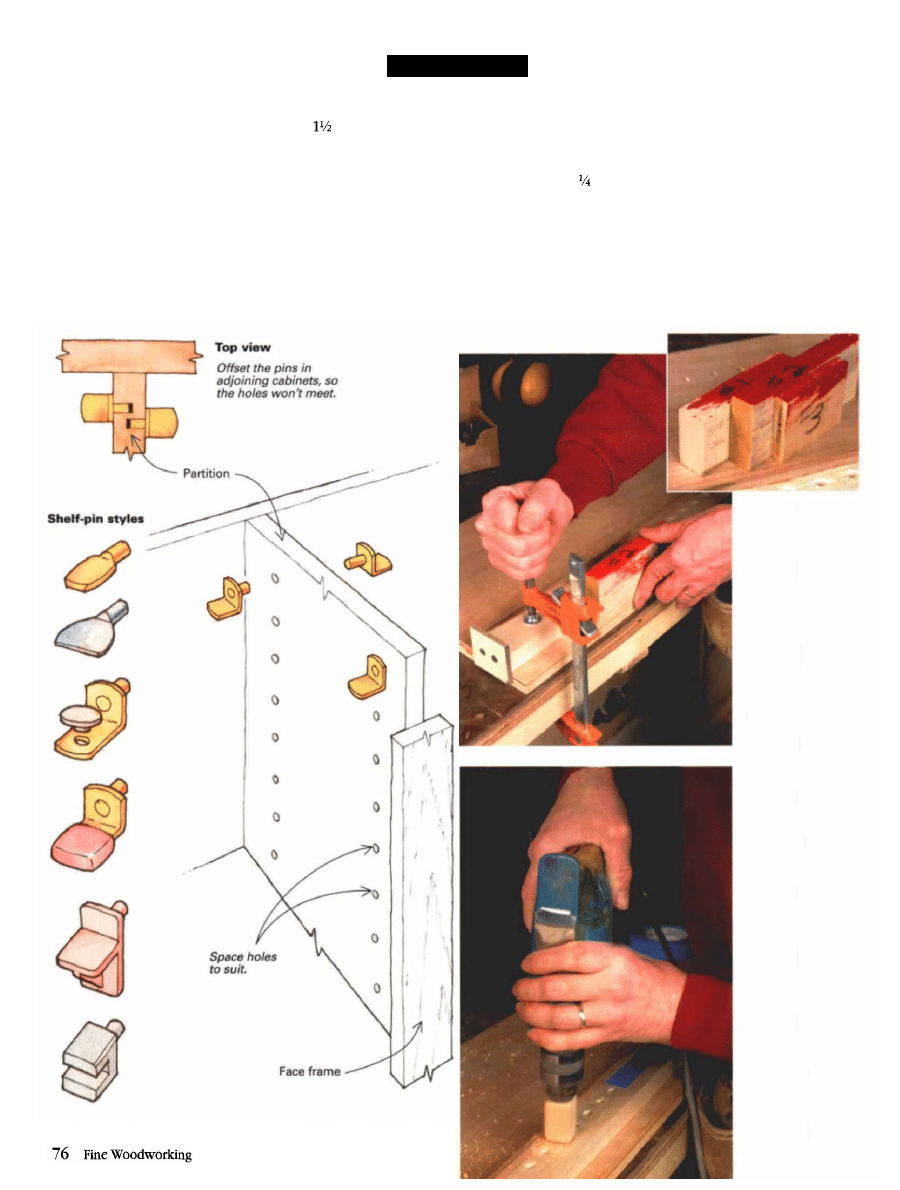
SHELF PINS
The old standby
I like shelf pins because they're
quick and easy to install (see
the photos below), very little
hardware shows and, depend-
ing on how closely the holes
are spaced, they're almost infi-
nitely adjustable. Spacing the
holes 1 in. on center works out
about right. I also set the row
of holes in. from the edges
of the case sides. I drill the
holes using a shopmade tem-
plate before assembling the
cabinet. I measure for the
shelves after assembly.
Pins are available in a num-
ber of different shapes, sizes
and materials, including plastic,
plated steel and brass. You can
even get pins with rubber
cushions for use with glass
shelving. The most common
sizes are 5mm and in. And
if you don't like the look of
commercial pins, you can al-
ways whittle your own (see
FWW
#98, p. 65).
I don't need to drill holes all
the way from the top to the
bottom of the sides. I figure out
the minimum and maximum
spacing I'd like between
shelves. Then I lay out lines on
the case sides reflecting those
parameters. For example, I nev-
er drill holes closer than 5 in.
from the top or bottom of a
case because a shelf that close
generally wouldn't be useful.
Drilling shelf-
pin holes. A tem-
plate with an
end-stop positions
the template
accurately top to
bottom and elimi-
nates the possibil-
ity of measuring
errors (left). A
gauge block en-
sures a consistent
setback from the
edge of the case.
Different-width
gauge blocks can
be used for spe-
cial applications,
such as drilling
offset pin holes
from both sides of
one upright (inset
photo above and
drawing at left).
A wooden stop
block sets the
depth (left). It
won't move
either, like many
metal collars.
Blue masking
tape indicates
where the holes
in the case sides
should stop.
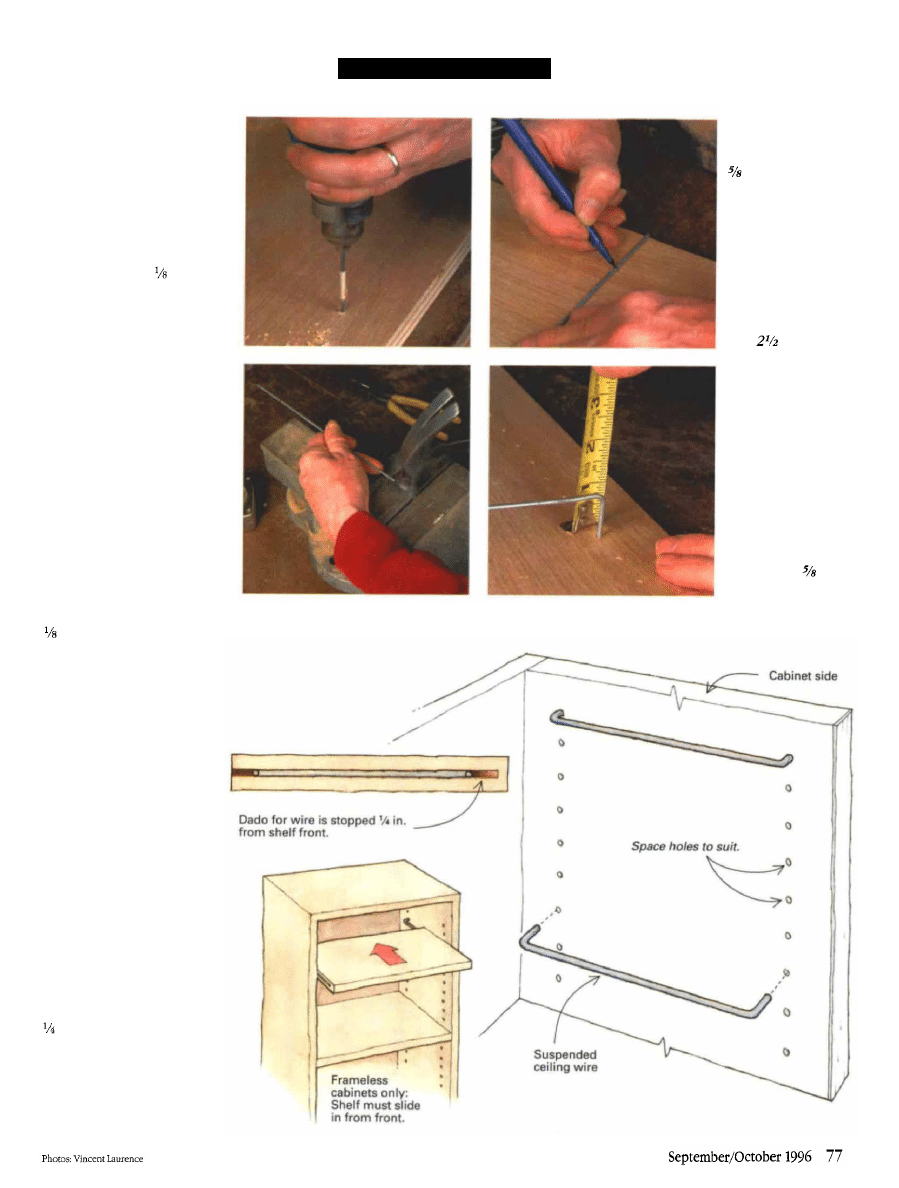
INVISIBLE WIRES
Great for contemporary
cabinets
This method is pretty slick and
looks great on more contem-
porary, frameless cabinetry.
The only thing that will show
on a cabinet with shelves sup-
ported by these "invisible"
wires is a series of -in. holes.
No hardware is visible at all.
But because the shelves
slide onto the wires, you can't
use them on cabinets that
have face frames (see the
drawing below).
It's nearly as easy to cut,
bend and install invisible wires
as it is to install shelf pins. If I
have a bunch of cabinets to
do, I make a template, just as I
do for shelf pins. If I only have
a few to do, I use a marking
gauge and a tape measure to
lay out the hole centers.
I use suspended-ceiling wire
(available from most home
centers and large lumberyards)
for the supports. It's about
in. dia., and a 10 ft. length
costs less than $2. In a pinch,
coat-hanger wire could be
used. I measure the diameter
of the wire with a caliper and
then choose a bit to match. I
also drill a test hole to make
sure the wire fits snugly but
not so tightly that it has to be
pounded in.
I snip the wire to length with
a pair of lineman's pliers and
bend the wires in a vise. To get
the wire to bend in the right
place, I position it so the mark
indicating the bend is just
above the vise jaws. I bend it
by hand first and then tap the
corner flat with a hammer.
Blind slots for the wires are cut
in the ends of each shelf on
the tablesaw but are stopped
in. shy of the front edge of
each shelf. I use a standard-
kerf blade, but if you use a
thin-kerf blade, just make two
passes. The slots are centered
on the ends of the shelves.
Installing wire
supports. Drill
the holes about
in. deep (top
left). Masking tape
is an effective
depth gauge. Cut
the wire to length,
and mark it for
bending (top
right). The wire
should be as long
as the distance be-
tween the holes
plus in.—twice
the depth of the
holes and twice
the amount of
wire sticking out
before it bends. To
bend the wire, put
it in the vise, push
it over by hand
and tap it flat with
a hammer (bot-
tom left). Check
for consistency
(bottom right).
Wires should pro-
trude about in.
from each hole.
Trim if necessary.
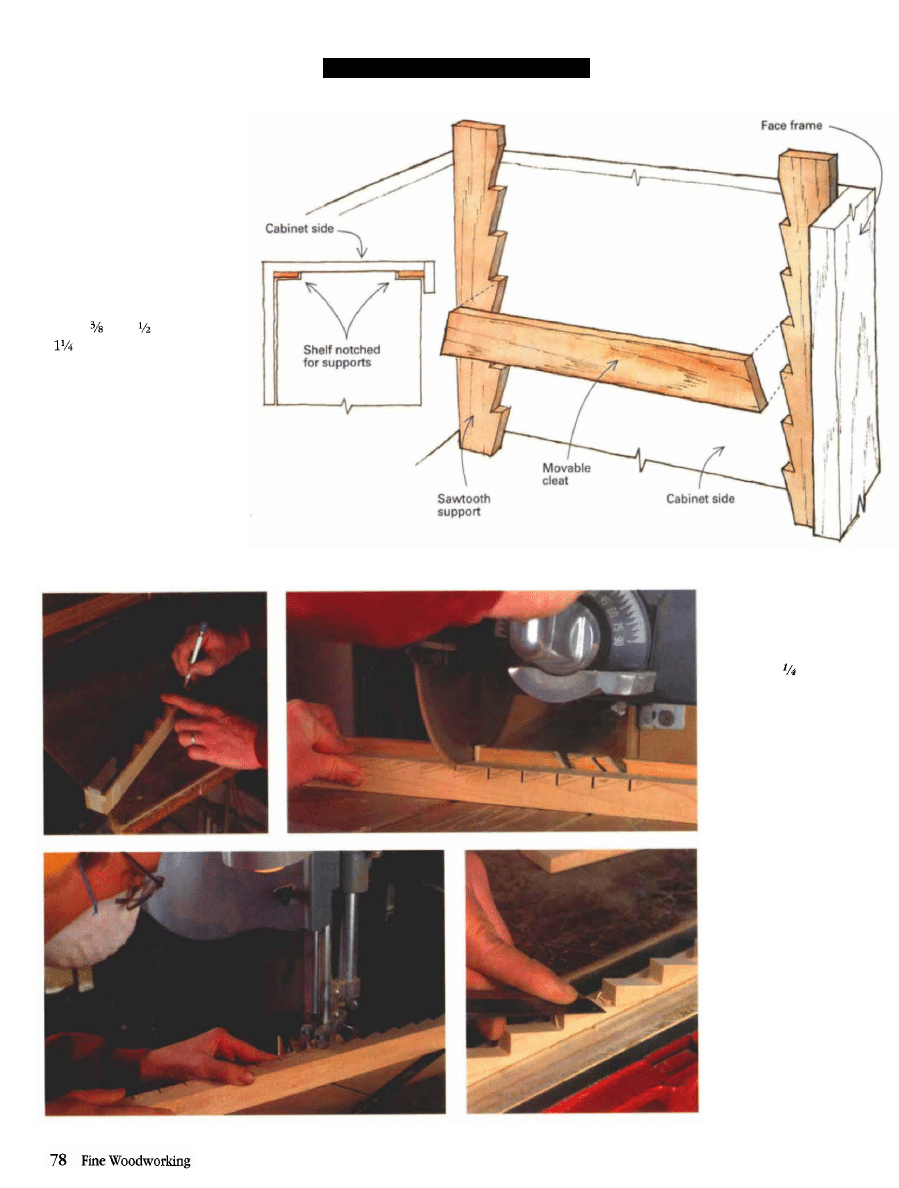
SAWTOOTH SUPPORTS
The most elegant
supports
I've saved the best-looking
shelf supports for last. They're
not difficult to make—just a
little time-consuming (see the
photos below).
After milling stock for the
sawtooth supports and the
cleats that go between them
(both are the same dimensions,
about in. to in. thick and
in. wide), I mark the four
uprights from a sawtooth pat-
tern. Then I saw them out to-
gether on the radial-arm saw
and the bandsaw.
I clean up sawmarks with a
chisel and glue and nail the
sawtoothed strips to the car-
case sides at the front and rear.
Cleats span the distance be-
tween supports; the shelves are
notched around them.
Making sawtooth
supports. Mark out
sawtooth patterns on
the dimensioned stock
(top left). A pattern
made from -in. hard-
board speeds layout.
Tape the four uprights
together, and then tape
the pattern to the stack
to keep the pattern in
place. Cut the straight
part of the sawtooth on
the radial-arm saw or
tablesaw (top right).
Bandsaw the angled
part of the sawtooth
(bottom left). Then
pare the faces of the
sawteeth smooth, and
clean out the corners
(bottom right).
Document Outline
- SAVE
Wyszukiwarka
Podobne podstrony:
alcatel support document for cable system in cuba
cg100 prog iii airbag restore devices support list
Intelligence Support Activity
MCWP 4 11 1 Health Service Support Operations
Guidelines for Persons and Organizations Providing Support for Victims of Forced Migration
Polymer Supported Reagents
Knockdown Work Support
Ligament Support (Ankle Joint) tapeSP
do zespołów o support
HOMEWORK3 support
Bartom NMT support concepts for tunnel in weak rocks
BASIC TRAUMA LIFE SUPPORT DLA PARAMEDYKOW I RATOWNIKOW MEDYCZNYCH 2006
Basic Trauma Life Support, Medyczne, PPS,DOC,PDFi inne
EN Rolled ballscrew RBS support unit WBK
Support
Abductor Pollicis Longus Muscle and Extensor Pollicis Brevis Muscle Support KT method
Adjustable Plant Shelves
key pro m8 supported models for vw
więcej podobnych podstron