533
In This Chapter
19
Creating and Editing
Surfaces
This Autodesk
®
Mechanical Desktop
®
tutorial
introduces surfaces grouped by function, and provides
instructions for creating the different types of surfaces.
You learn surface types, practice surface modeling, and
work with modeling some typical surfaces.
Once you have completed this lesson, you will
understand the techniques required to surface a more
complex part.
■
Creating surfaces—motion
based, skin, and derived
■
Joining and trimming surfaces
■
Editing surfaces

534
|
Chapter 19
Creating and Editing Surfaces
Key Terms
Term
Definition
augmented line
A 3D polyline with vector information at each vertex. An augmented line is a
surface creation tool that allows you to control the curvature and the tangency
of a surface.
base surface
A basic underlying surface that carries a shape across a larger area. Can be
trimmed to precise shapes as needed, but the base surface remains intact and
may be displayed.
derived surface
A surface that gets some or all of its attributes from one or more base surfaces.
motion-based surface
A surface created by moving wires through space.
rail
One or more curved lines along which a surface is swept. Rails form the
curvature of a swept surface.
skin surface
The surface draped over a wireframe.
surface normal
A short line perpendicular to a surface that shows where the surface starts and
which direction is out.
surface primitive
Surface created by values you specify. It does not require a wireframe model.
U or V display lines
Lines that correspond to rails and wires.
wire
Generic term for lines, arcs, circles, ellipses, 2D and 3D polylines, augmented
lines, and splines.
wireframe modeling
Wires and surface parts intermixed to construct the basic framework of a 3D
model. The initial step in creating a surfaced model.
wireframe surfacing
Covering a wireframe model with surfaces.
Basic Concepts of Creating Surfaces
|
535
Basic Concepts of Creating Surfaces
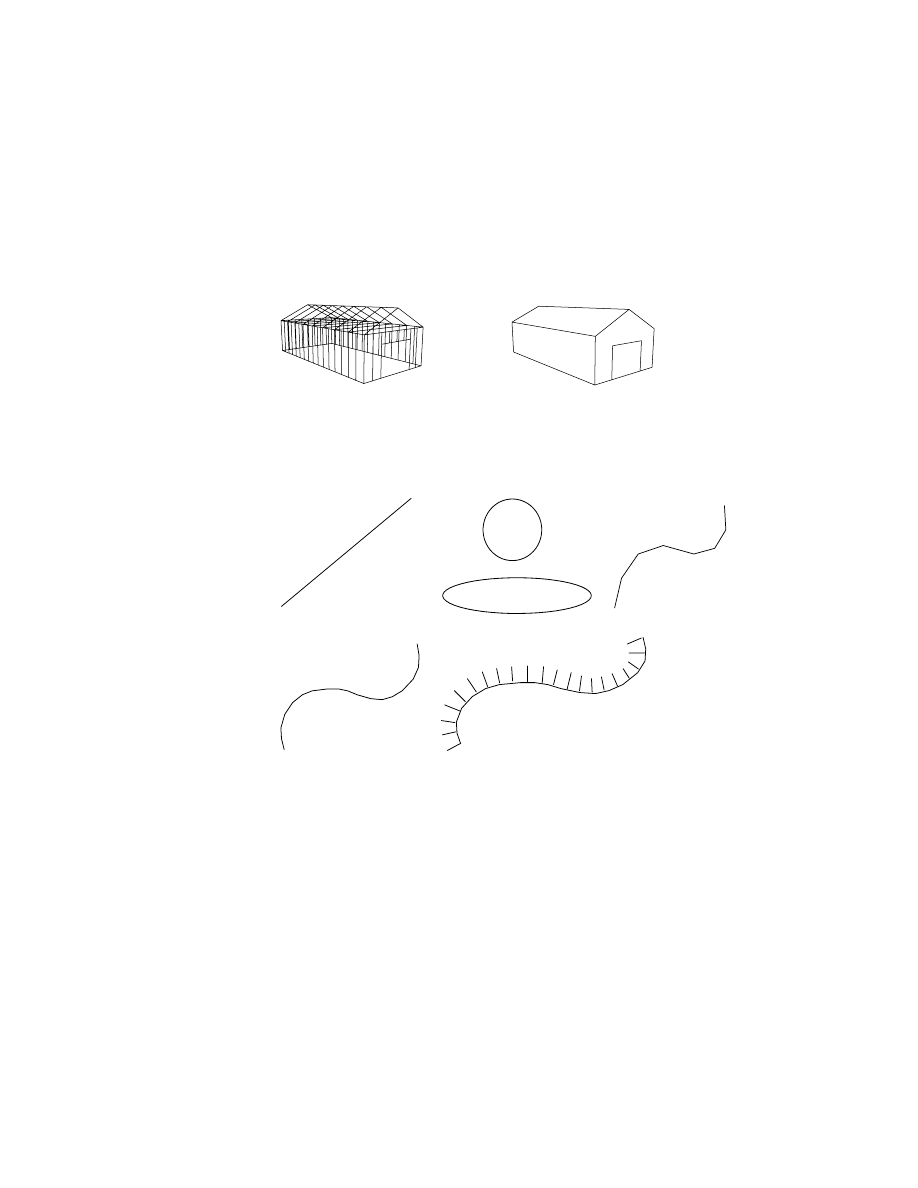
Three-dimensional surface modeling can be compared to constructing a
building. You start by establishing the initial shape. Then you cover the
rough framing with siding and roofing.
One approach to surface modeling is to create a 3D framework of wires. Wire
is a generic term for lines, arcs, circles, ellipses, 2D and 3D polylines, aug-
mented lines, and splines, including splines created from existing part edges.
This framework is called a wireframe.
Wires and surface parts can be intermixed to construct the framework of your
3D model. This initial step in creating a surfaced model is called wireframe
modeling.
Once the 3D wireframe model is created, the next step is to cover the frame-
work with a surface. This task is called wireframe surfacing. This technique is
one approach to creating surfaces.
rough frame
siding applied
line
ellipse
polyline
spline
augmented line
circle
536
|
Chapter 19
Creating and Editing Surfaces
Working with Surfaces
In this tutorial you’ll learn about these types of surfaces:
■
Primitive, created by specifying values
■
Motion-based, created by moving wires through space
■
Skin, applied over a wireframe
■
Derived, generated from existing surfaces
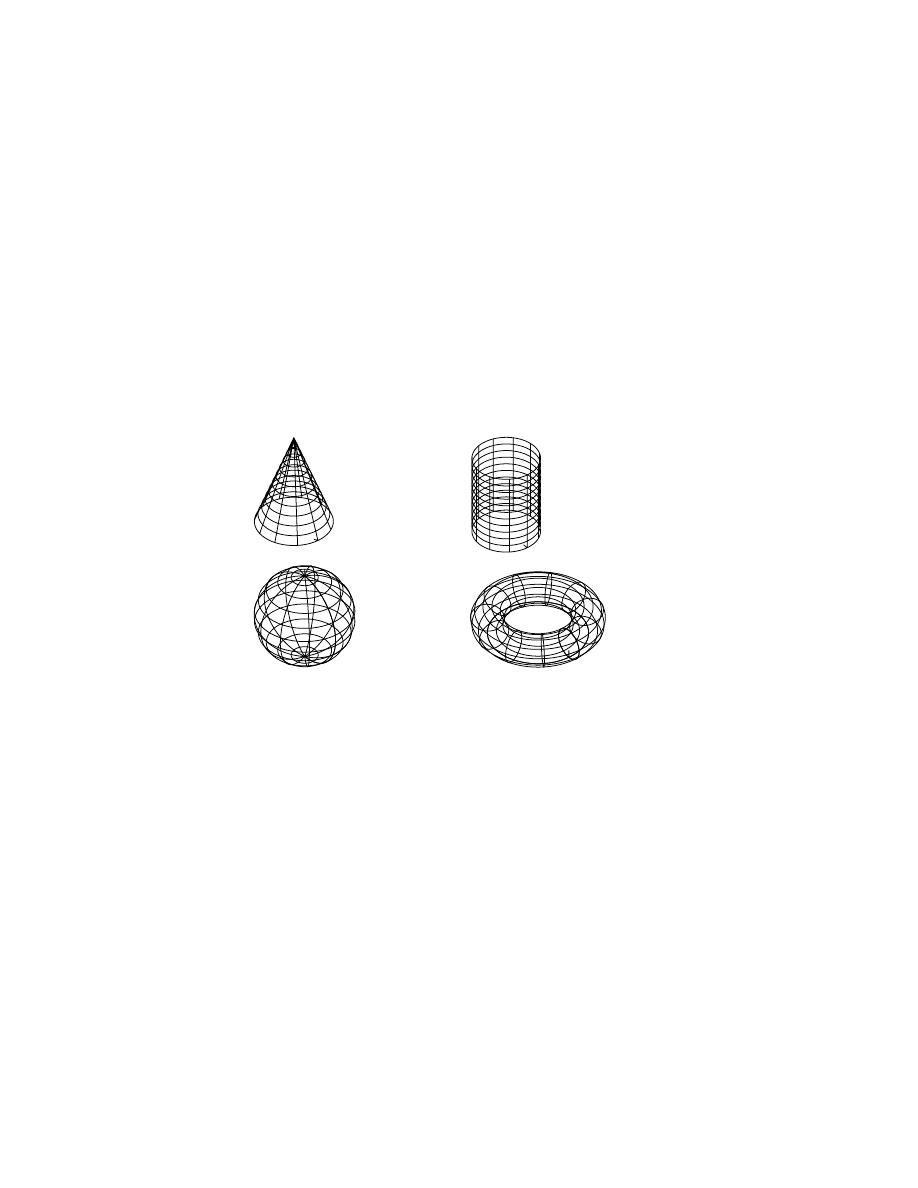
Primitive surfaces (cone, cylinder, sphere, and torus) do not require wire-
frames for their construction. To create a sphere surface, for example, you
determine the center of the sphere and then enter a value for its radius. Prim-
itive surfaces are most often used for conceptual design.
You can practice creating primitive surfaces on your own by choosing Surface
➤ Create Primitives.
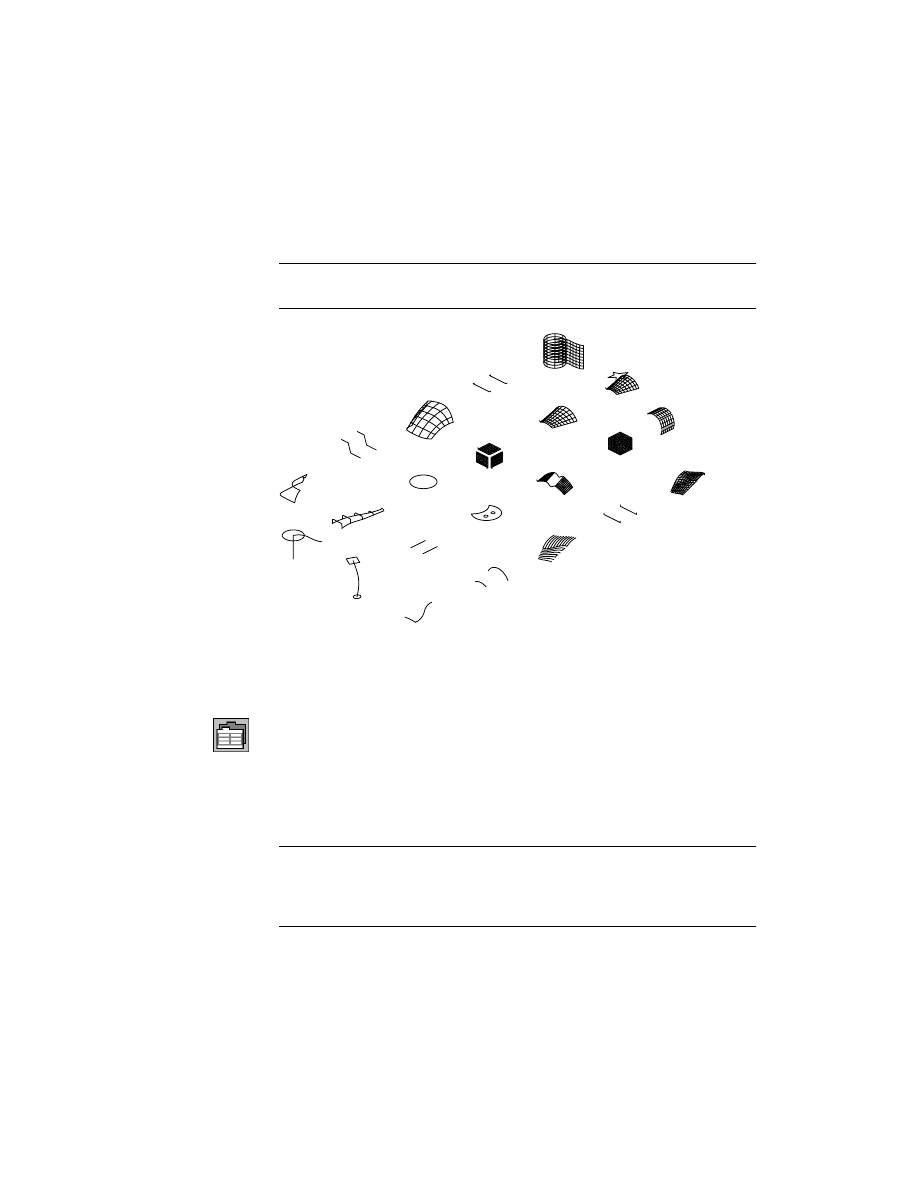
In this tutorial, you’ll practice working with motion-based, skin, and derived
surfaces you create from wireframes. You’ll also work with simple wireframe
geometry to learn surfacing techniques.
After you create each surface, use the Extents option of the
ZOOM
command
to redisplay all of the wireframes provided in the drawing file. Then zoom to
enlarge the object you need for the next exercise.
Working with Surfaces
|
537
To set up your file
1
Open the file t_surfs.dwg in the desktop\tutorial folder. The wireframe objects
you need for this lesson are included in this file.
NOTE
Back up the tutorial drawing files so you still have the original files if you
make a mistake. See “Backing up Tutorial Drawing Files” on page 40.
Surface lines, called U and V lines, indicate the direction of the surface.
Increasing the number of lines increases the density of the surface image.
2
Use the Mechanical Options dialog box to change the number of surface
lines used to display surfaces.
Desktop Menu
Surface ➤ Surface Options
Choose the Surface tab, and in Surface Properties specify:
U Display Wires:
Enter 7
V Display Wires:
Enter 7
Choose OK.
NOTE
If you shade the surfaces you create to better view them, adjust the
AutoCAD setting that controls back faces. Go to Assist ➤ Options and select the
System tab. Choose Properties, then clear the check box for Discard Back Faces.
Choose Apply & Close, then OK.
You are ready to create your first surfaces.
538
|
Chapter 19
Creating and Editing Surfaces
Creating Motion-Based Surfaces
Some surfaces are created by “moving” wires through space. These motion-
based surfaces are revolved, extruded, and swept.
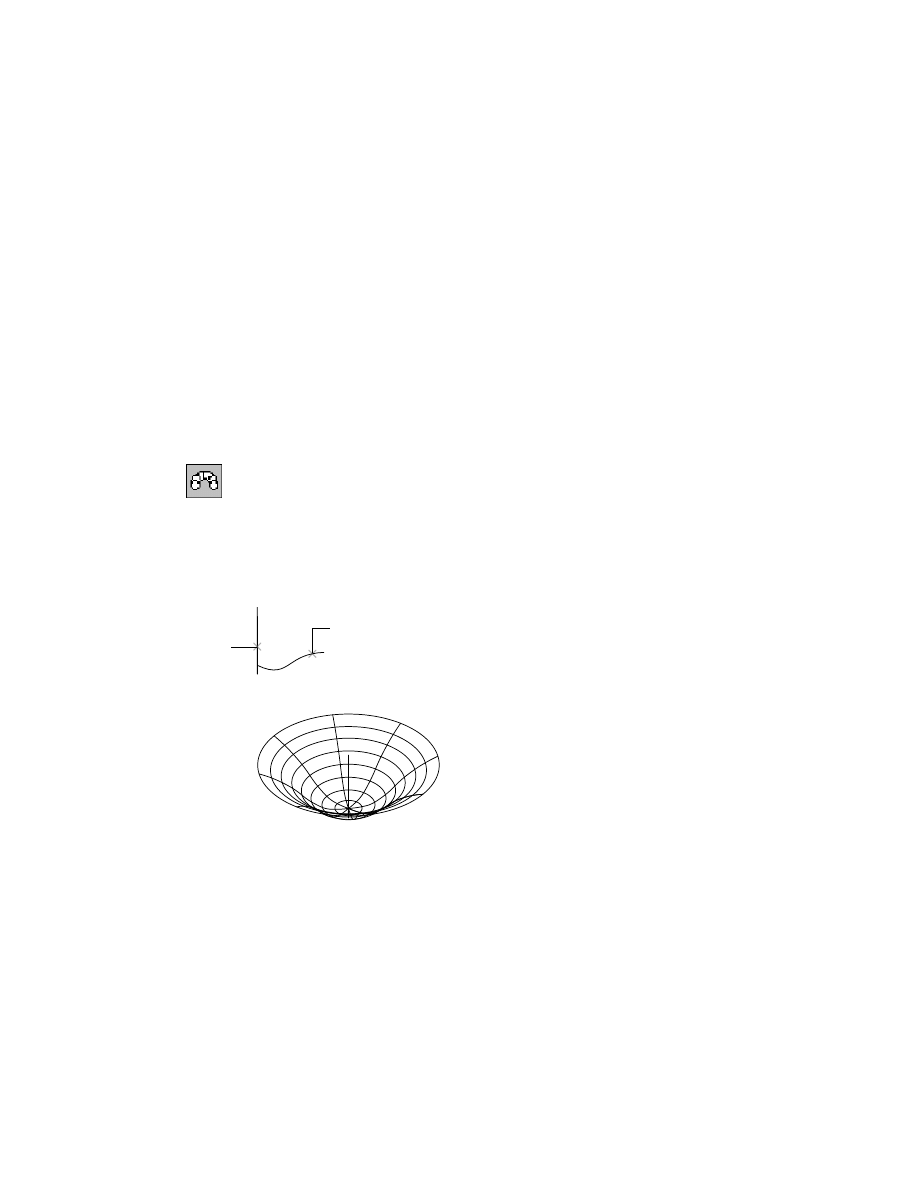
Revolved Surfaces
A revolved surface uses two wires: one establishes the constant shape of the
surface, and the other is the axis about which to spin the shape. The revolved
surface is created by the motion of a wire shape through space.
To revolve a surface
1
Use
AMREVOLVESF
to revolve a spline curve about an axis, responding to the
prompts.
Desktop Menu
Surface ➤ Create Surface ➤ Revolve
Select path curves to revolve:
Select spline (1)
Select path curves to revolve:
Press
ENTER
Specify axis start point or [Wire]:
Enter w
Select wire to define axis:
Select line (2)
Enter start angle <0>:
Press
ENTER
Enter included angle (+=ccw, -=cw) <Full circle>:
Press
ENTER
The curve revolves about the vertical line.
2
Use the Zoom Extents option of
ZOOM
to redisplay all the wireframes and
select the object for the next exercise.
1
2
Creating Motion-Based Surfaces
|
539
Extruded Surfaces
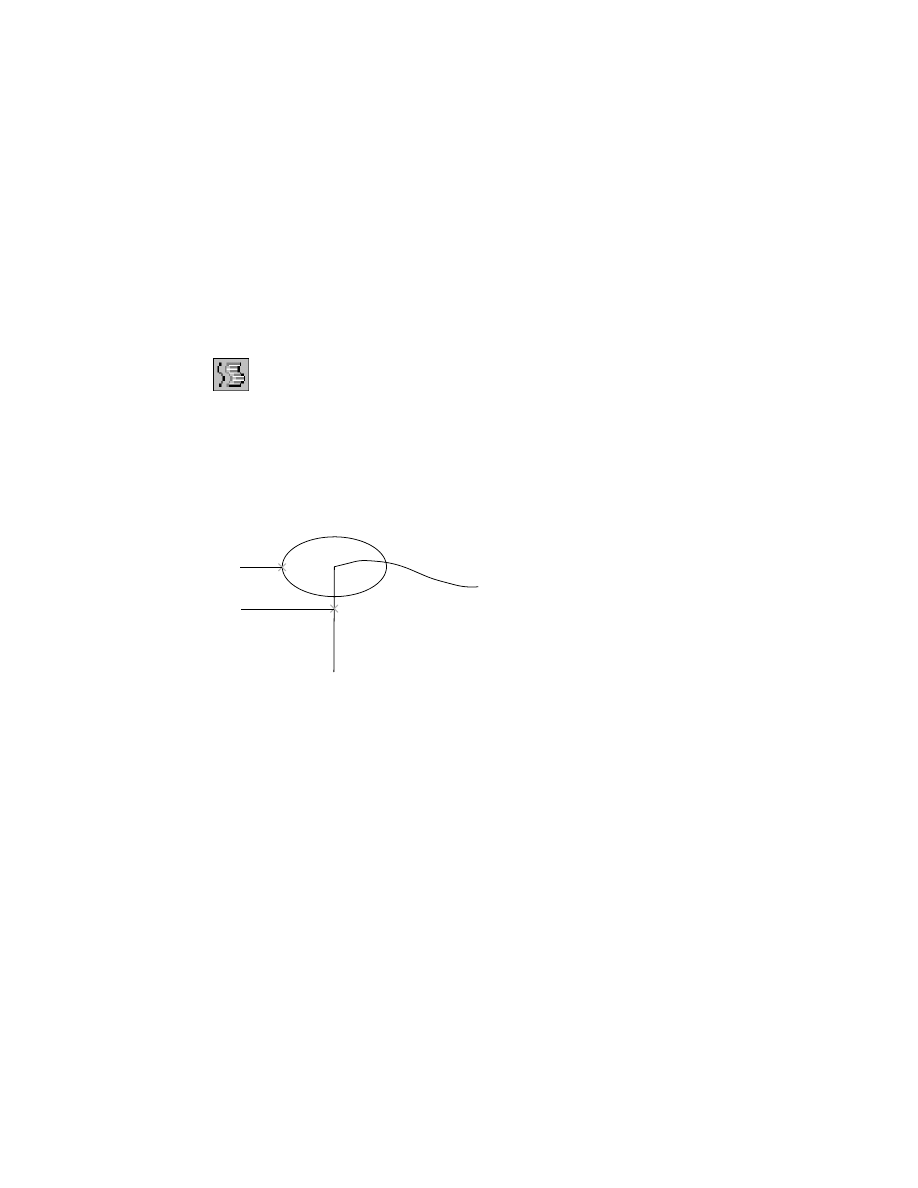
An extruded surface is created by a 3D wire shape moved along a straight line.
You select a line, polyline, arc, or spline to extrude, and you specify the direc-
tion and magnitude of the extrusion.
To extrude a surface
1
Use
AMEXTRUDESF
to extrude a circle into a cylinder, responding to the
prompts.
Desktop Menu
Surface ➤ Create Surface ➤ Extrude
Select wires to extrude:
Select circle (1)
Select wires to extrude:
Press
ENTER
Define direction and length.
Specify start point or [Viewdir/Wire/X/Y/Z]:
Enter w
Select wire to define direction:
Select line (2) above its midpoint
Enter an option [Accept/Flip] <Accept>:
Press
ENTER
to accept the extrude direction
Enter taper angle <0>:
Press
ENTER
to accept the default
The extrusion direction is determined by your selection point on the wire.
You selected the upper half of the line to extrude the circle along the length
of the line. To extrude the circle in the opposite direction, select a location
below the midpoint of the line.
1
2
540
|
Chapter 19
Creating and Editing Surfaces
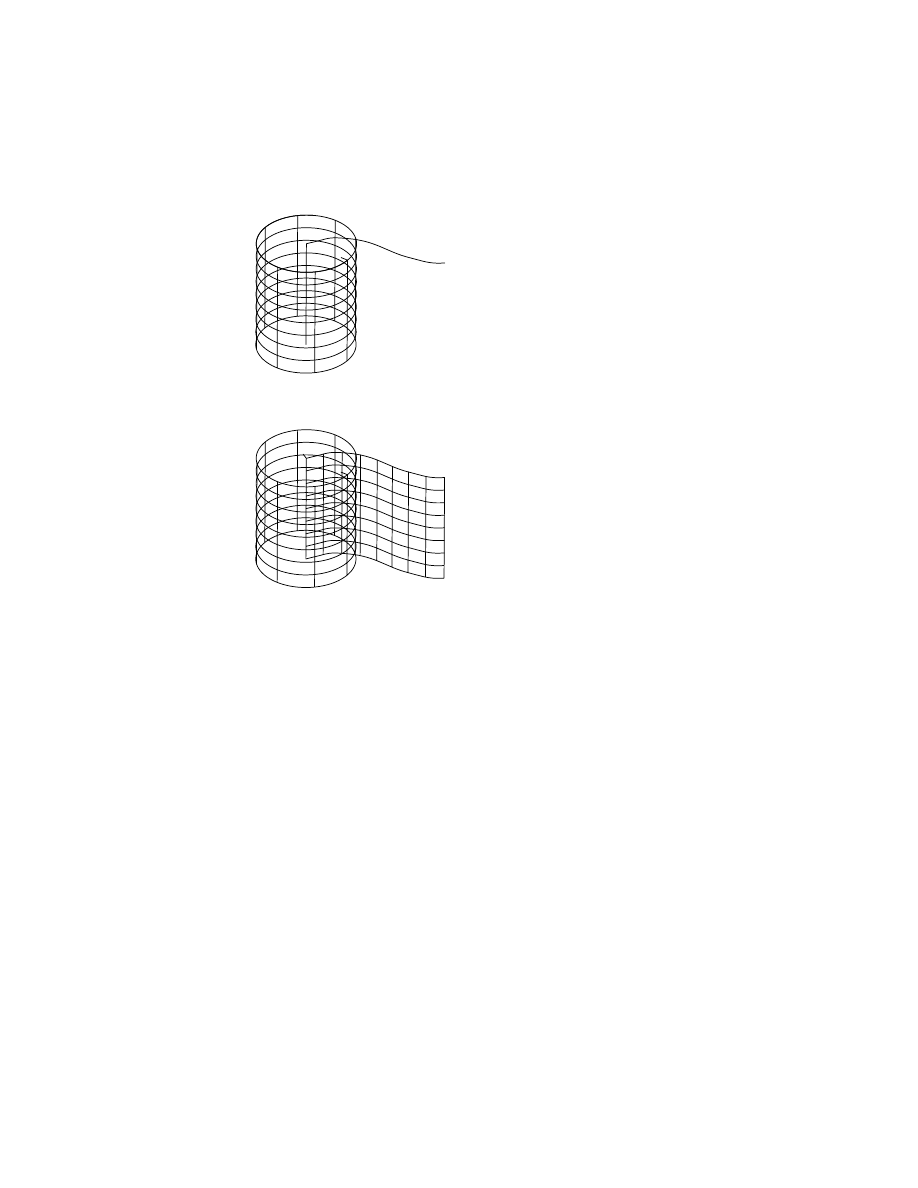
The extruded surface should look like this.
2
For more practice, choose Extrude again. Select the spline and then a location
on the line to determine the length and direction.
Because the line is obscured by the first surface you created, you may have
difficulty selecting it. Press
CTRL
as you select, to cycle through the objects.
Press
ENTER
when the line is highlighted.
3
Use the Zoom Extents option of
ZOOM
to redisplay all the wireframes and
select the object for the next exercise.
Swept Surfaces
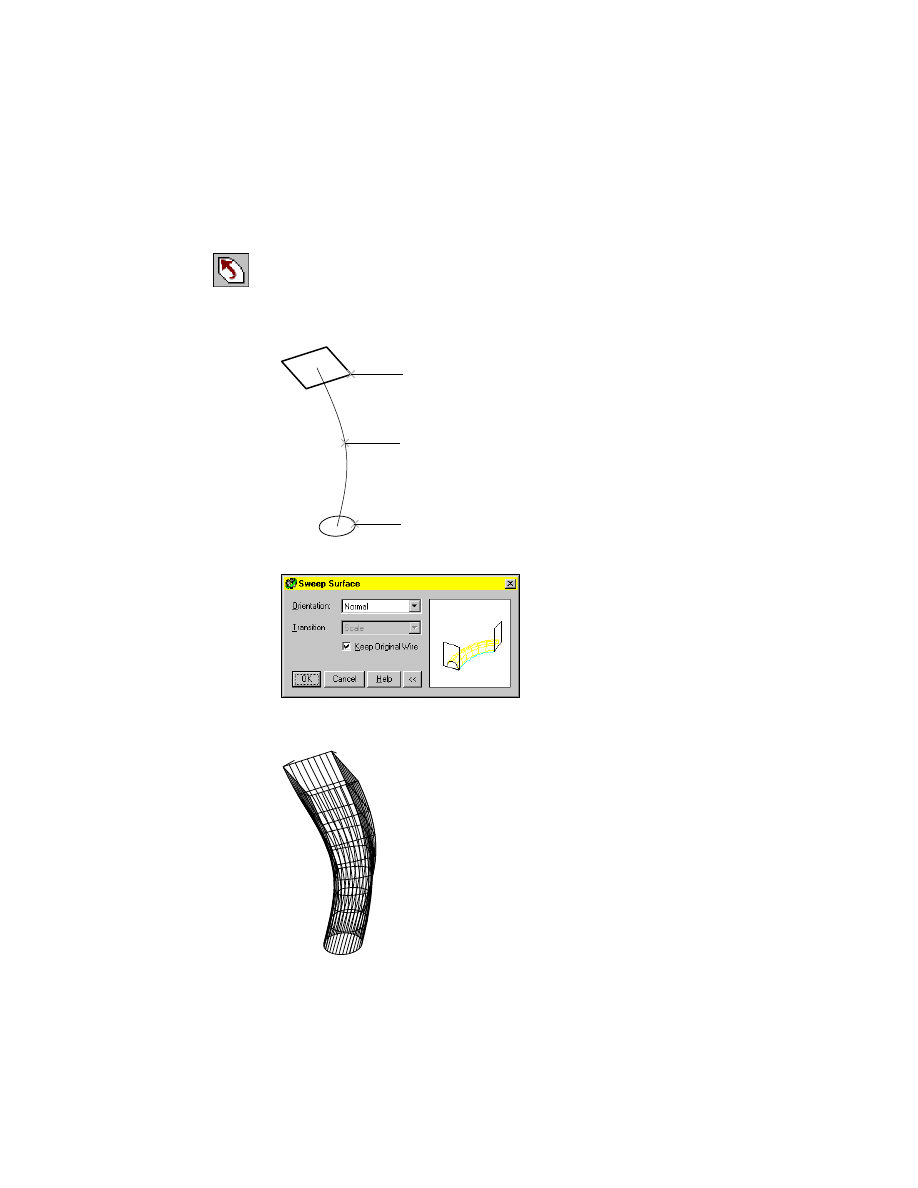
A swept surface is a wire cross section moved along a curved line called a rail.
You can use multiple cross sections and one or two rails. The lines on the
swept surface in the illustration are U and V display lines. Cross sections can
be dissimilar but you need to select them in order.
In this exercise, you use different combinations of cross sections and rails to
create four swept surfaces.
Creating Motion-Based Surfaces
|
541
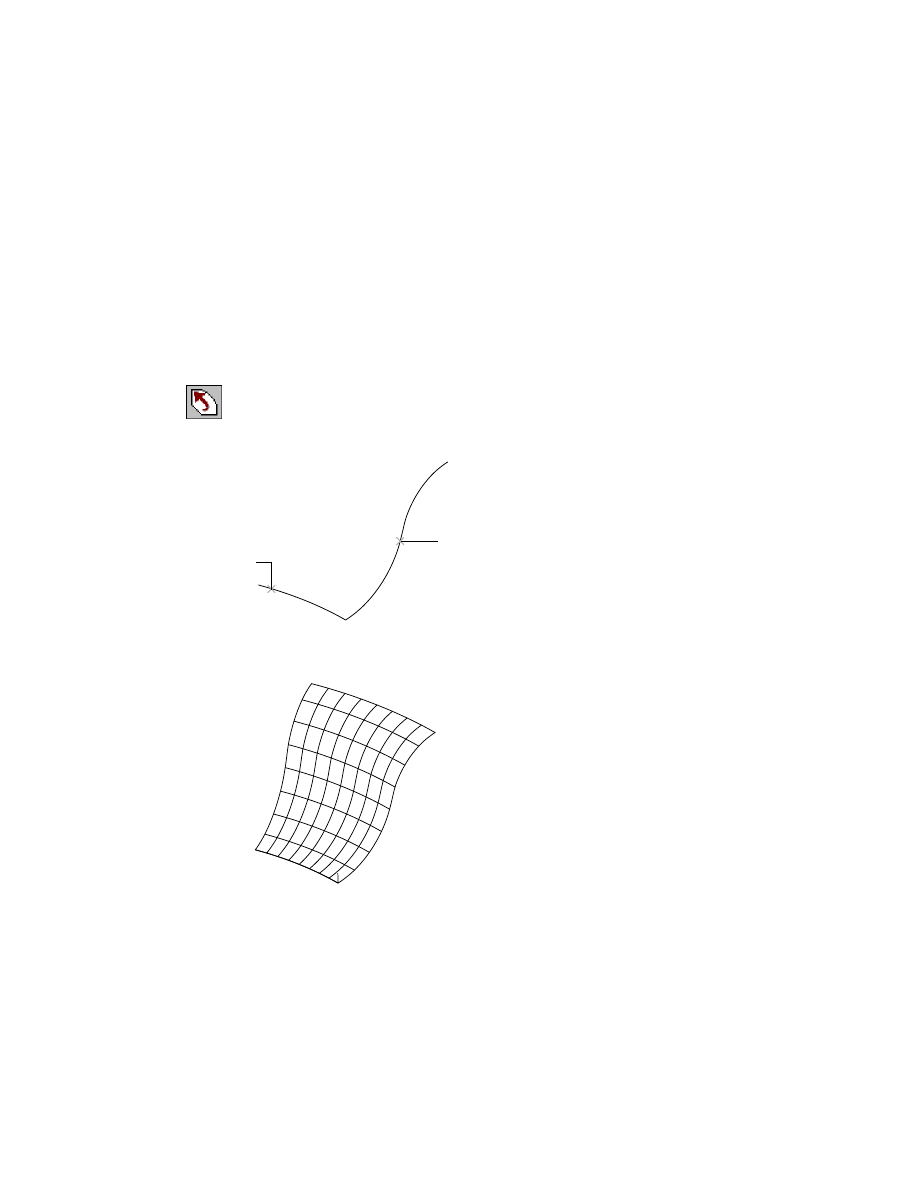
To create a swept surface
1
Use
AMSWEEPSF
to sweep two cross sections along a rail, responding to the
prompts.
Desktop Menu
Surface ➤ Create Surface ➤ Sweep
Select cross sections:
Select the first cross section (1)
Select cross sections:
Select the second cross section (2) and press
ENTER
Select rails:
Select line (3) and press
ENTER
2
In the Sweep Surface dialog box, choose OK to accept default settings.
A message tells you that four surfaces will be created. Choose Continue. The
surfaces should look like this.
2
3
1
542
|
Chapter 19
Creating and Editing Surfaces
You can select the individual surfaces to see the shape of each one.
Because one of the cross sections has sharp corners, a single surface cannot
be created. Instead, four separate surfaces are created, each corresponding to
one side of the rectangular cross section. For more information, see “To sur-
face polylines with sharp corners” on page 550.
3
Use the Extents option of
ZOOM
to redisplay all the wireframes and select the
object for the next exercise.
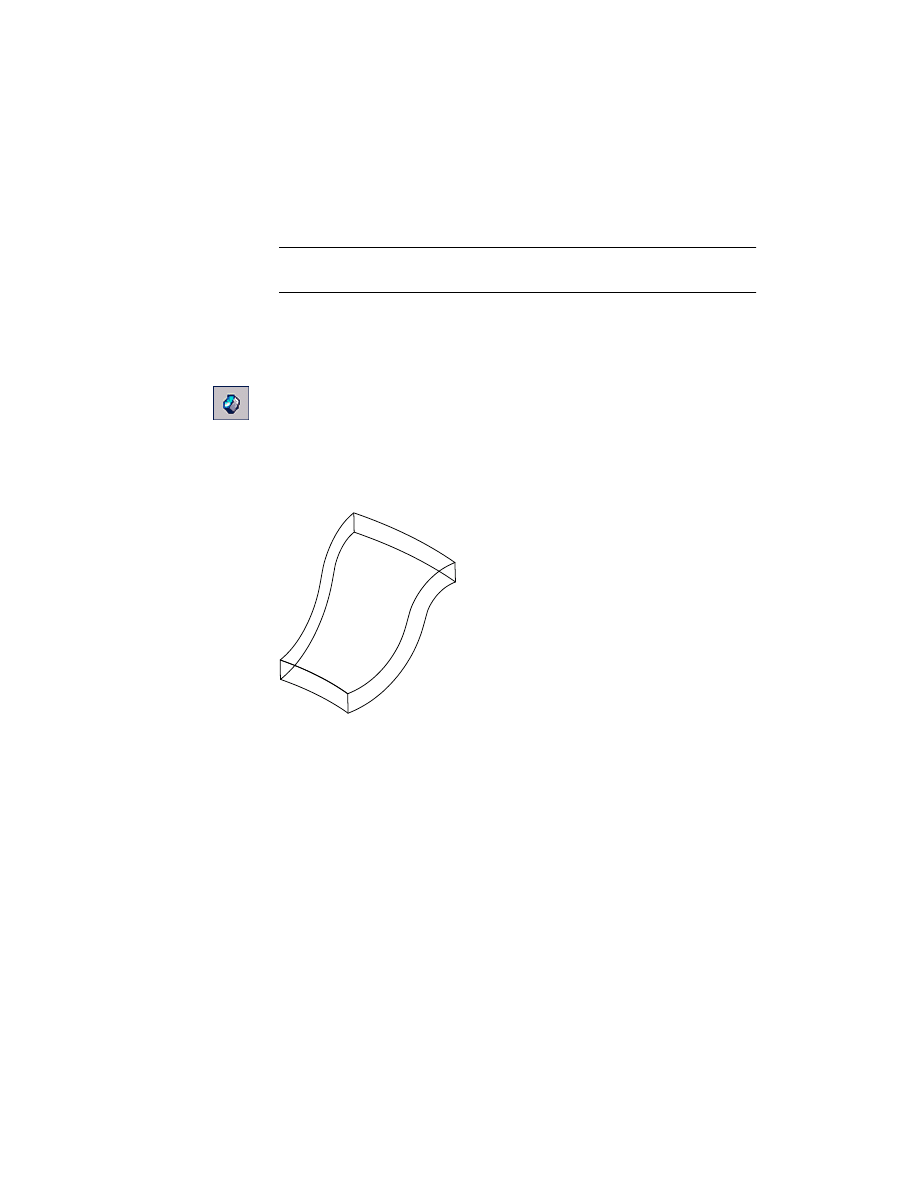
To sweep a spline along a rail
1
Sweep one spline along a rail, responding to the prompts.
Desktop Menu
Surface ➤ Create Surface ➤ Sweep
Select cross sections:
Select spline (1) and press
ENTER
Select rails:
Select line (2) and press
ENTER
2
In the Sweep Surface dialog box, choose OK to accept the default settings.
Your surface should look like this.
1
2
Creating Motion-Based Surfaces
|
543
You created a nonuniform rational B-spline (NURBS) surface from a spline.
You can convert a NURBS surface into a part by adding thickness.
NOTE
Save a copy of your NURBS surface if you will need it later. When you
thicken a surface, the original surface is consumed and disappears.
To convert a NURBS surface to a solid
1
Use
AMTHICKEN
to convert a NURBS surface to a thin solid, responding to the
prompts.
Desktop Menu
Surface ➤ Surface Thicken
Select surfaces to thicken:
Select the surface
Select surfaces to thicken:
Press
ENTER
Select direction to thicken [Flip/Accept] <Accept>:
Flip to point the direction arrow down, and press
ENTER
Thickness <1.0000>:
Press
ENTER
A solid is created, and a new part icon is displayed in the Browser.
2
Use the Extents option of
ZOOM
to redisplay all the wireframes and select the
object for the next exercise.
A swept surface is useful when your design has different shapes at either end.
544
|
Chapter 19
Creating and Editing Surfaces
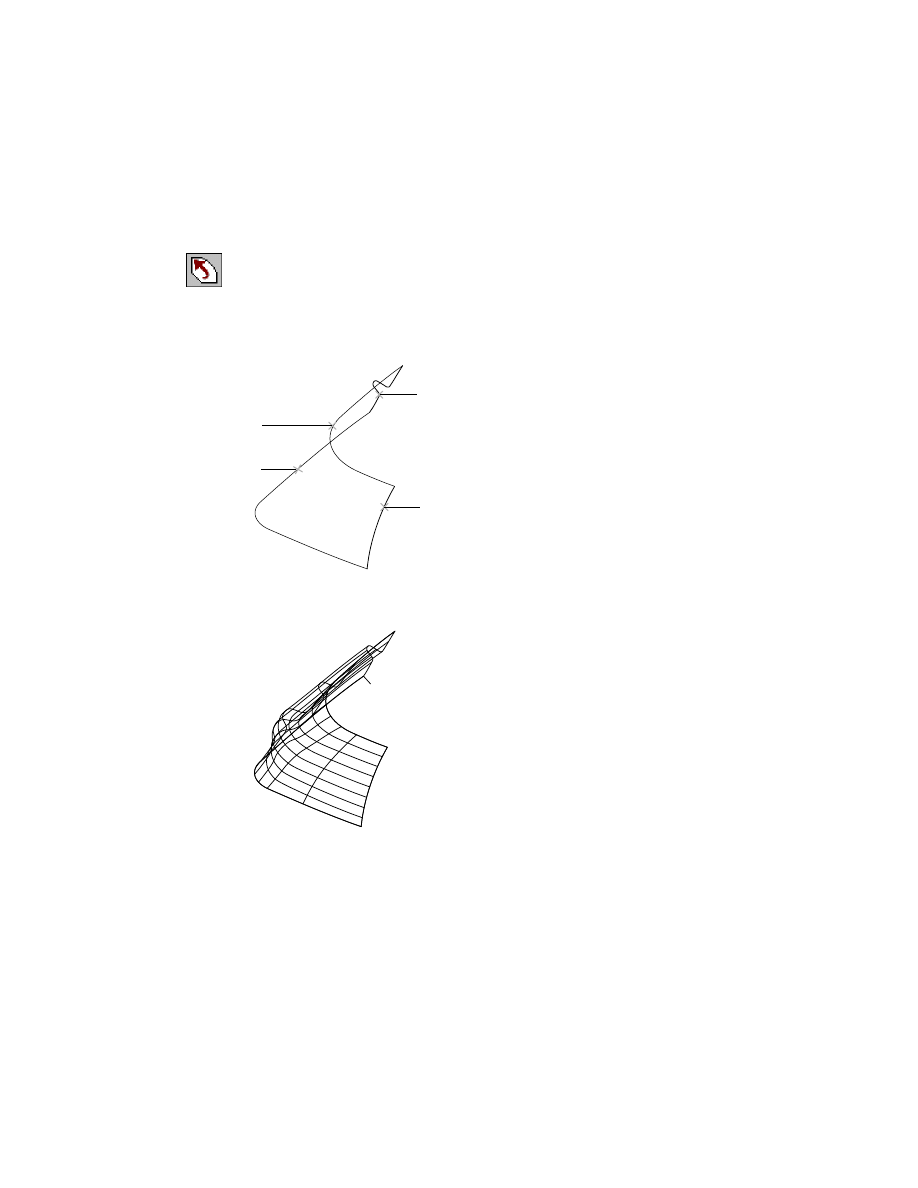
To sweep dissimilar shapes
1
Sweep two dissimilar shapes along two nonparallel rails, responding to the
prompts.
Desktop Menu
Surface ➤ Create Surface ➤ Sweep
Select cross sections:
Select first shape (1)
Select cross sections:
Select second shape (2) and press
ENTER
Select rails:
Select first rail (3)
Select rails:
Select second rail (4)
2
In the Sweep Surface dialog box, choose OK to accept the default settings.
The swept surface should look like this.
3
Use the Extents option of
ZOOM
to redisplay all the wireframes and select the
object for the next exercise.
3
2
1
4
Creating Motion-Based Surfaces
|
545
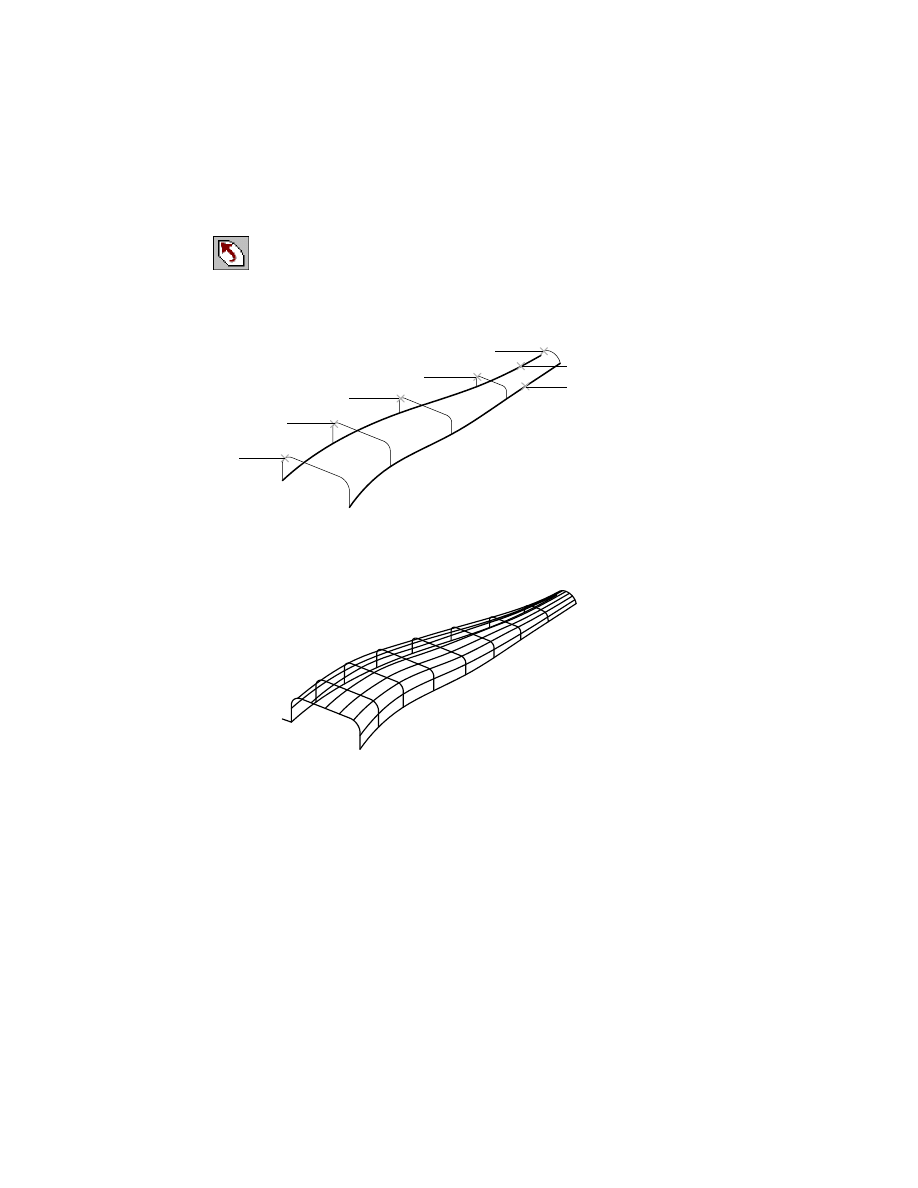
To sweep multiple cross sections along two rails
1
Sweep multiple cross sections along two rails, responding to the prompts.
Desktop Menu
Surface ➤ Create Surface ➤ Sweep
Select cross sections:
Select cross sections (1) through (5) in consecutive order and press
ENTER
Select rails:
Select first rail (6)
Select rails:
Select second rail (7)
2
In the Sweep Surface dialog box, choose OK to accept the default scale.
Because the cross sections have rounded corners, a single surface results. If
the cross section had square corners, three surfaces would have been created.
3
Use the Extents option of
ZOOM
to redisplay all the wireframes and select the
object for the next exercise.
6
7
5
4
3
2
1
546
|
Chapter 19
Creating and Editing Surfaces
Creating Skin Surfaces
A skin surface drapes over a wireframe model. After the wireframe is
removed, the surface retains the shape of the wireframe. Skin surfaces are
ruled, planar, lofted U, and lofted UV.
Ruled Surfaces
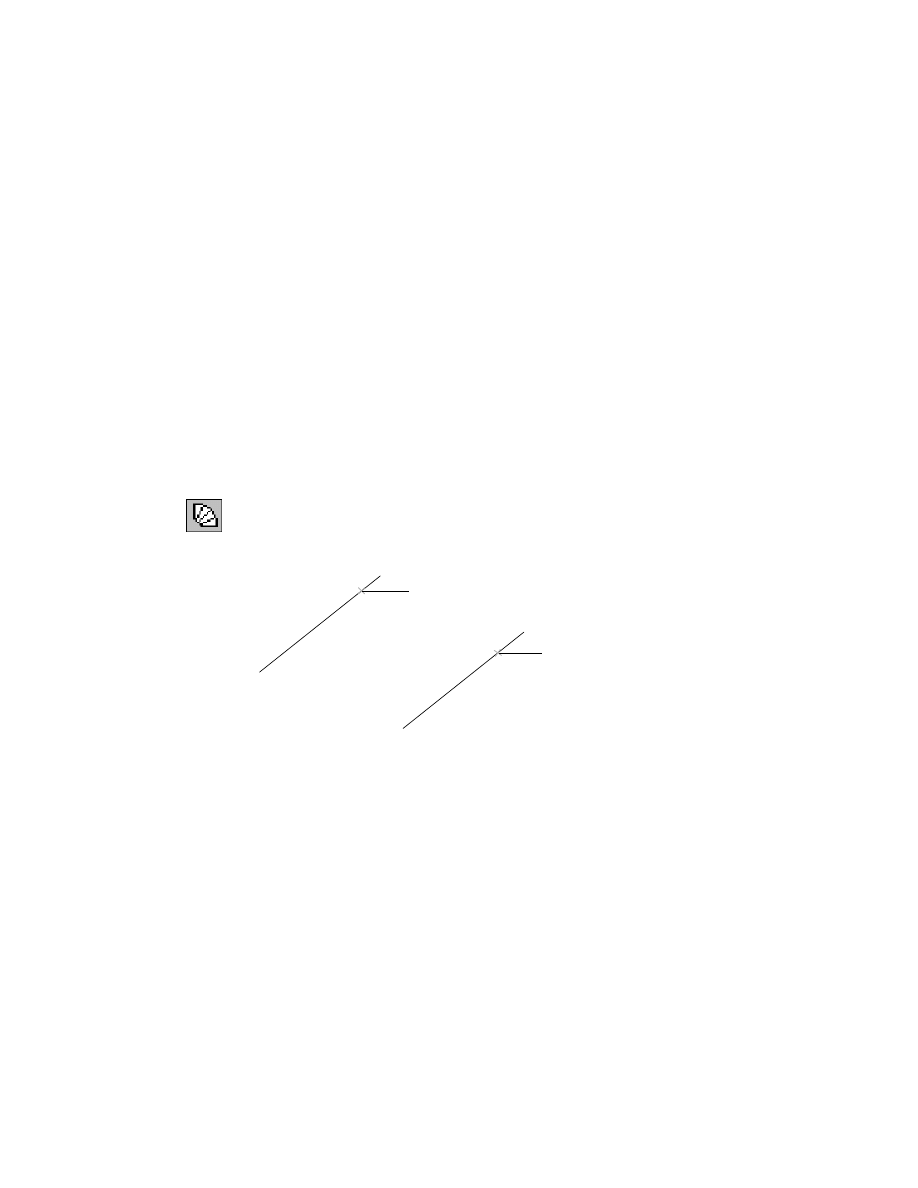
A ruled surface is a straight, flat shape stretched between two wires of any 3D
shape. You can create a ruled surface between any two nonintersecting wires
that can represent the top and the bottom. The top and bottom can be open
or closed wires. You can create a ruled surface from two augmented lines as
well, and from a single augmented line by adding thickness to it.
To surface two wires
1
Use
AMRULE
to create the ruled surface, responding to the prompts.
Desktop Menu
Surface ➤ Create Surface ➤ Rule
Select first wire:
Select line (1)
Select second wire:
Select line (2)
1
2
Creating Skin Surfaces
|
547
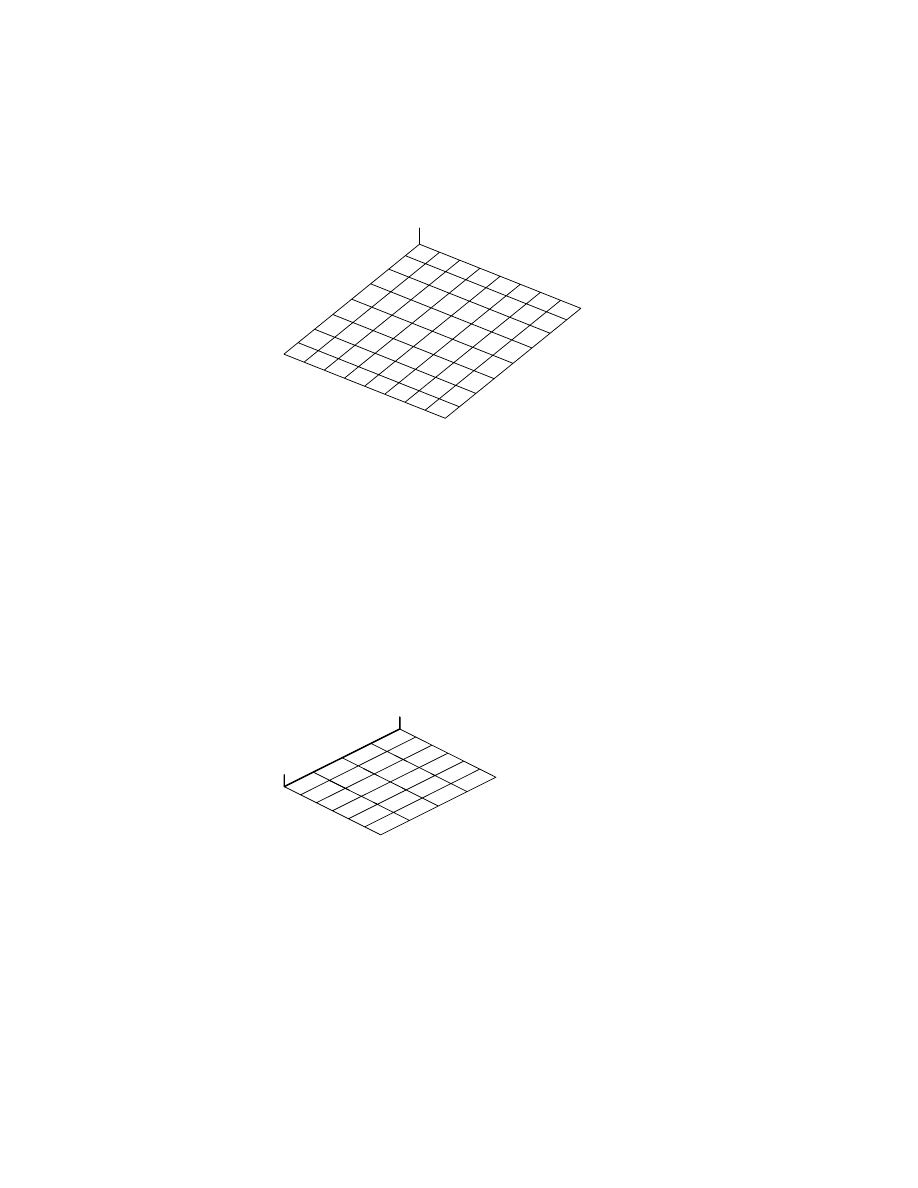
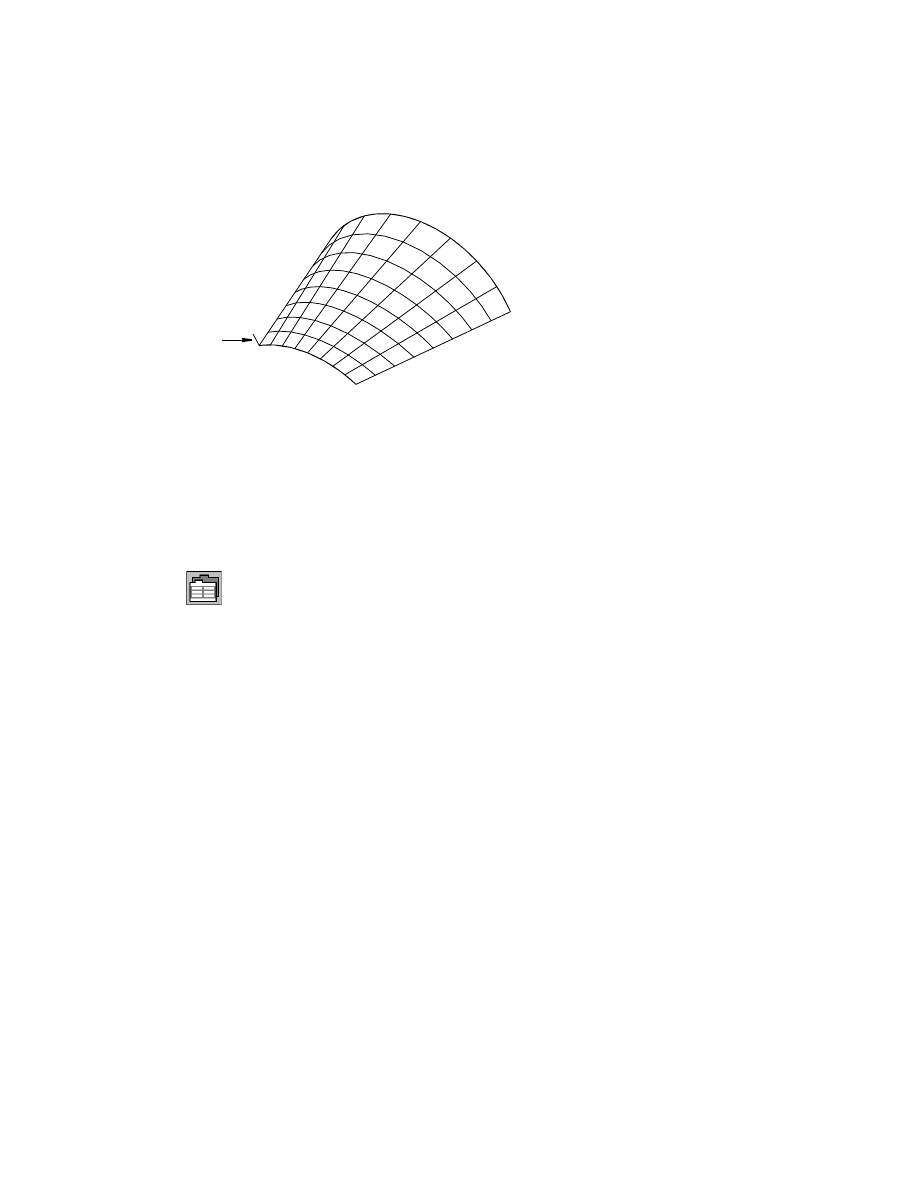
The ruled surface shows the surface normal, a short vertical line in one corner.
A surface normal shows where the surface starts and which direction is out.
If surface normal indicators are too small, use the
DISPSF
system variable to
change the size. In the Individual Surface Display dialog box, change the
value in the Normal Length field. Adjust the setting as needed.
You can create a ruled surface from two augment lines, or by adding width to
a single augmented line. Besides using the command method, you can access
AMAUGMENT
in the Desktop menu by choosing Surface ➤ Create Wireframe
➤ Augmented Lines.
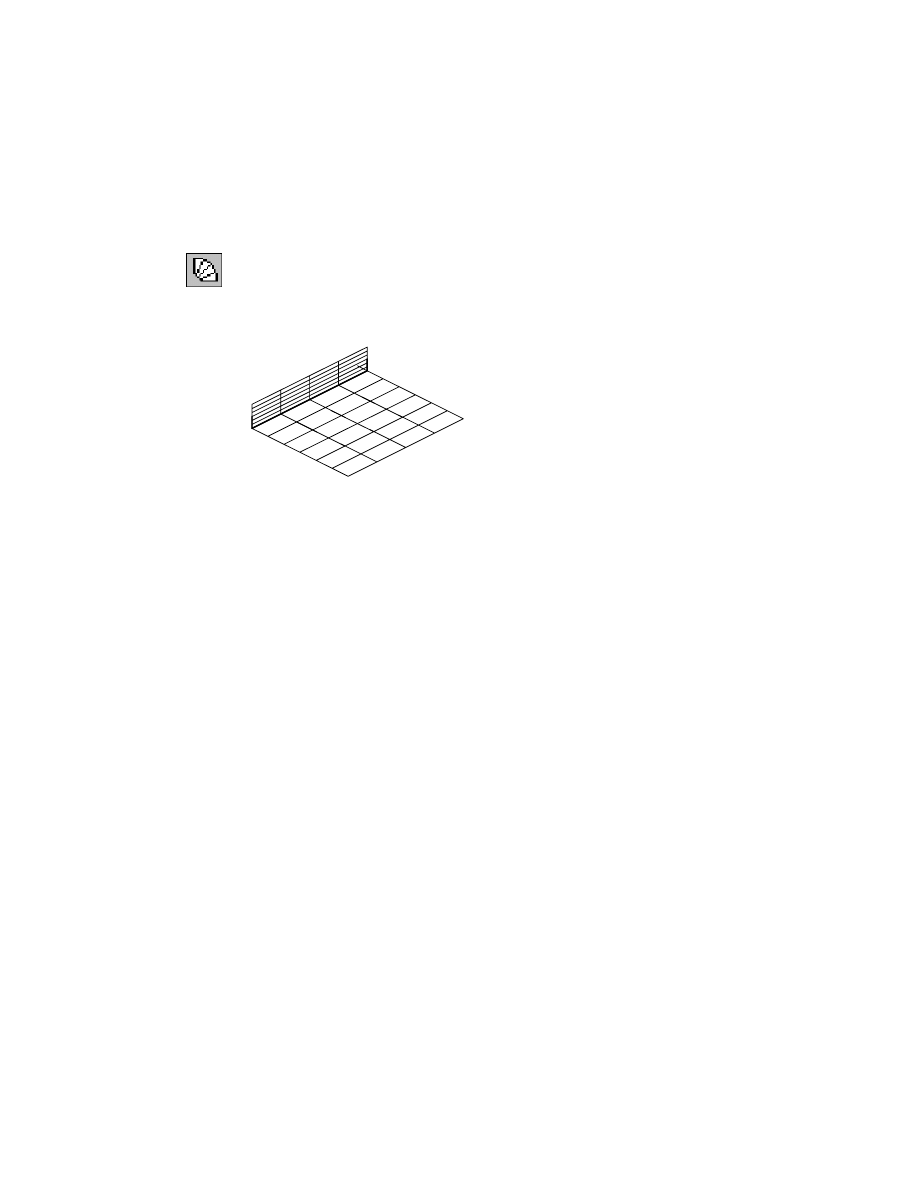
To create an augmented line on a surface
1
Use
AMAUGMENT
to create an augmented line on the surface.
Command
AMAUGMENT
Select surface wire or [Angle/Distance/Spacing]:
Select the leftmost wire of the surface
Select surface wire or [Angle/Distance/Spacing]:
Press
ENTER
When you use an augmented wire to create a surface, the vectors are ignored.
You specify a value for the width of the surface.
548
|
Chapter 19
Creating and Editing Surfaces
To surface an augmented line
1
Use
AMRULE
to create a surface from the augmented wire, responding to the
prompts.
Desktop Menu
Surface ➤ Create Surface ➤ Rule
Select first wire:
Select the augmented line
Enter an option [Next/Accept] <Accept>:
Press
ENTER
Enter width (or) [Select second wire] <1.0000>:
Press
ENTER
The surface extends beyond the vectors to the specified width.
You can use this technique to create a ruled surface normal to any existing
ruled surface. First you create a parting line on the surface and project it to get
an augmented line, and then create the ruled surface from the augmented line.
2
Undo the surfaces you created so that you can use the two original aug-
mented lines in subsequent exercises.
Desktop Menu
Edit ➤ Undo
3
Use the Extents option of
ZOOM
to redisplay all of the wireframes and select
the object for the next exercise.
Creating Skin Surfaces
|
549
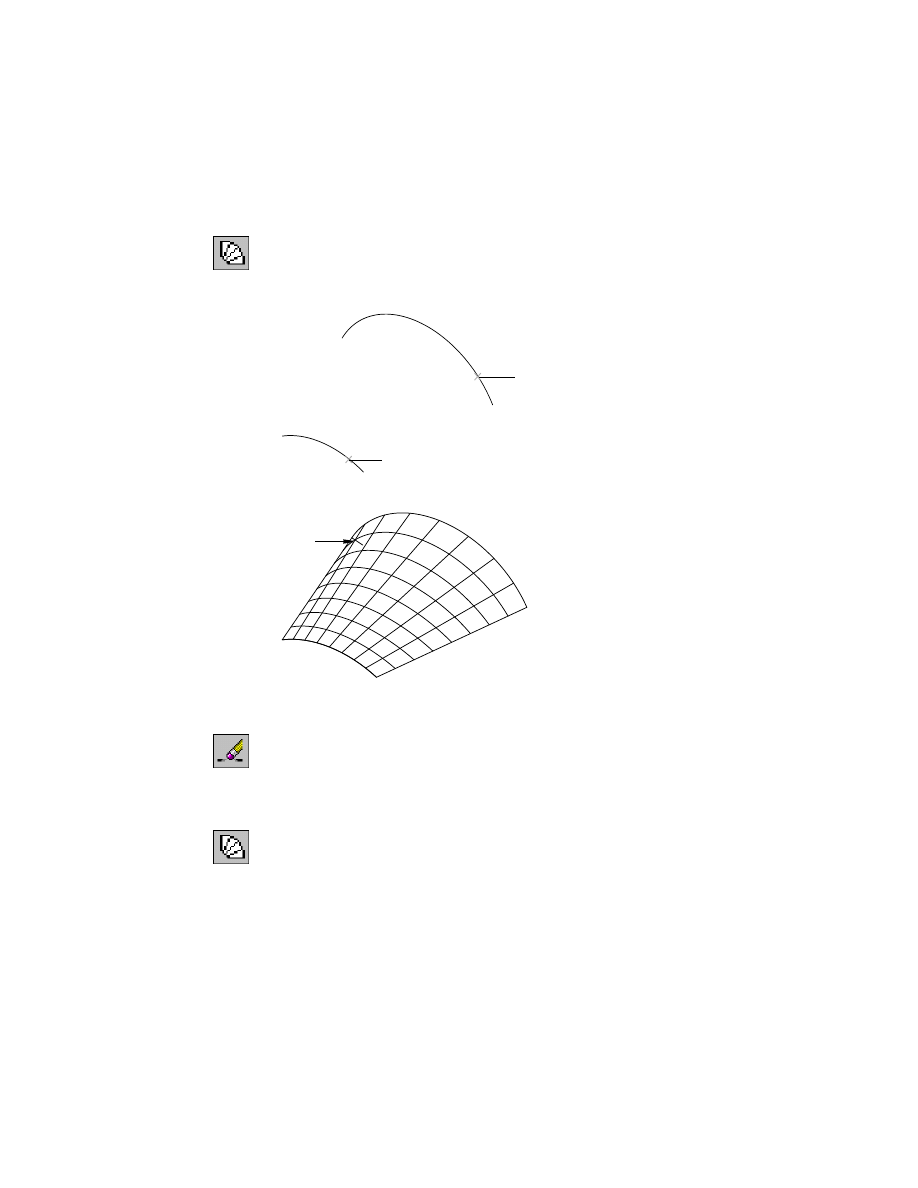
To surface two arcs with different radii
1
Create a surface from two arcs of different radii, responding to the prompts.
Desktop Menu
Surface ➤ Create Surface ➤ Rule
Select first wire:
Select arc (1)
Select second wire:
Select arc (2)
The ruled surface should look like this.
2
To experiment, use the previous example and select the arcs in a different order.
3
Erase the surface you just created.
Desktop Menu
Modify ➤ Erase
Select the surface and press
ENTER
.
If creating the surface was the last command, you can use
UNDO
.
4
Create a surface again, selecting the arcs in reverse order.
Desktop Menu
Surface ➤ Create Surface ➤ Rule
Select first wire:
Select arc (2)
Select second wire:
Select arc (1)
1
2
surface normal
550
|
Chapter 19
Creating and Editing Surfaces
Selecting the arcs in different order changes the surface normal.
5
Use the Extents option of
ZOOM
to redisplay all of the wireframes and select
the object for the next exercise.
In the next exercise, you surface polylines. A surface follows a spline exactly
but approximates the polyline by a curve. The Polyline Fit default setting of
150 maintains all corners less than 150 degrees as sharp corners. In such
cases, multiple surfaces are created.
To surface polylines with sharp corners
1
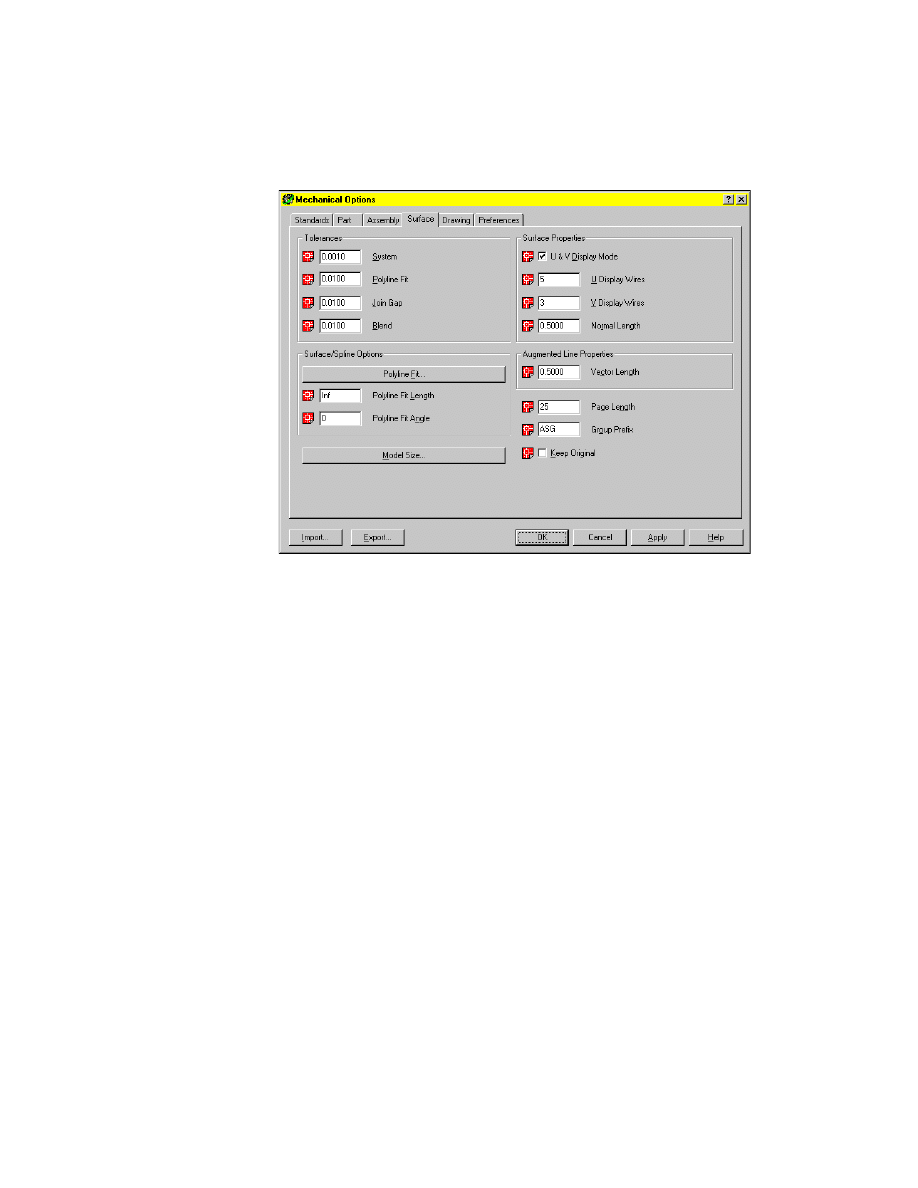
Use the Mechanical Options dialog box to adjust the Polyline Fit settings:
Desktop Menu
Surface ➤ Surface Options
Choose the Surfaces tab and then choose Polyline Fit.
2
In the Polyline Fit dialog box, change the angle setting to 0 and change the
length setting to inf (infinity) or a specific length longer than the longest line
segment.
surface
normal
Creating Skin Surfaces
|
551
Choose OK.
These settings force sharp corners to convert to a smooth curved surface.
3
Choose OK to exit the Mechanical Options dialog box.
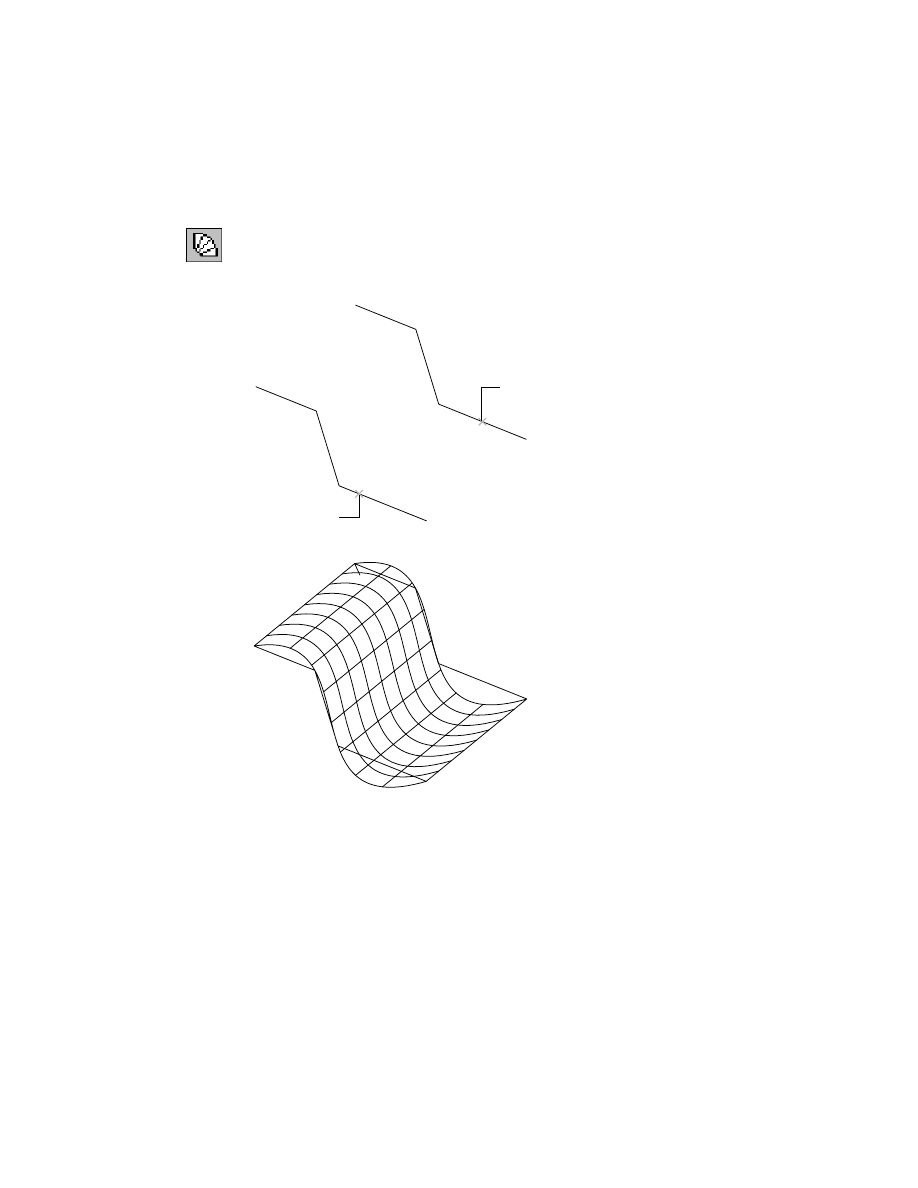
552
|
Chapter 19
Creating and Editing Surfaces
4
Use
AMRULE
to create a curved surface from polylines drawn with sharp cor-
ners, responding to the prompts.
Desktop Menu
Surface ➤ Create Surface ➤ Rule
Select first wire:
Select polyline (1)
Select second wire:
Select polyline (2)
A continuous smooth curved surface is created.
5
Use the Extents option of
ZOOM
to redisplay all of the wireframes and select
the object for the next exercise.
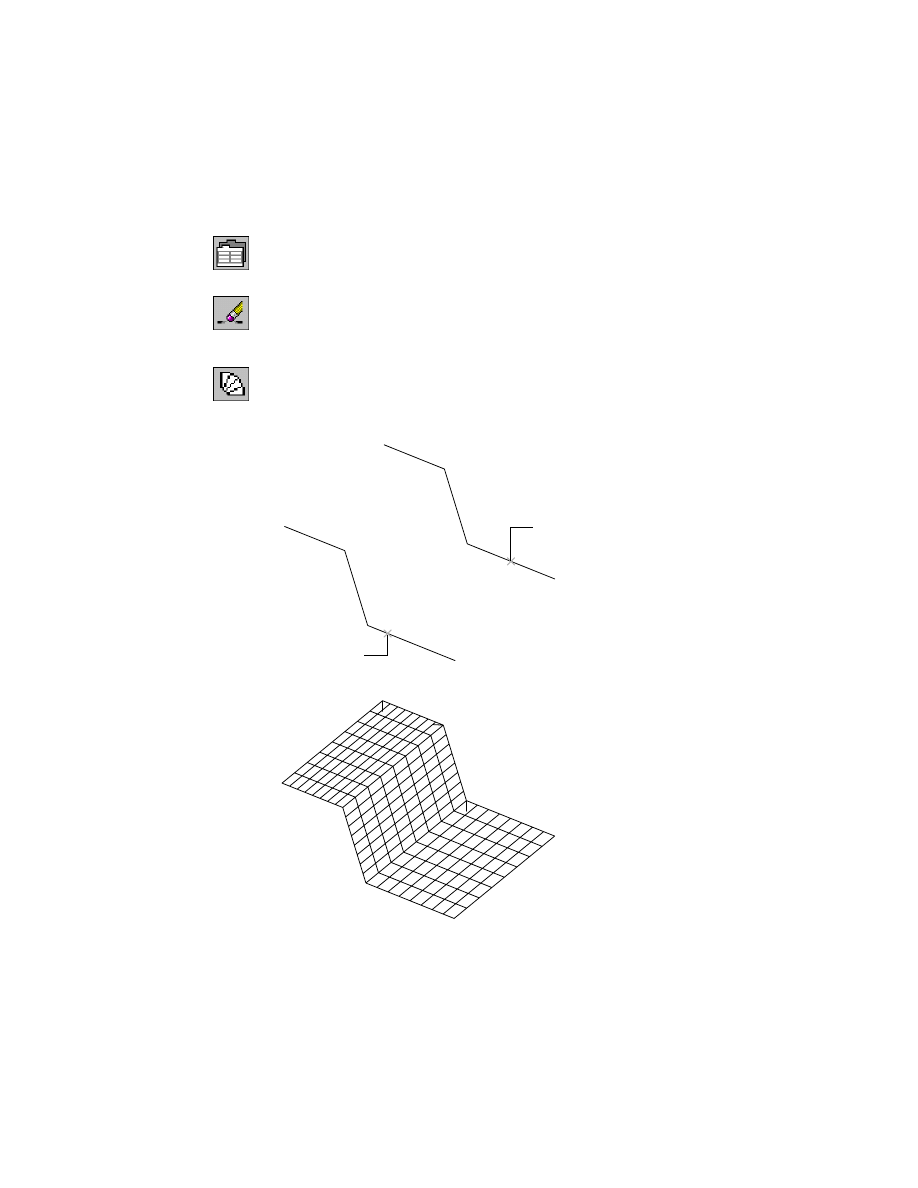
Now use the same polylines, but choose a fit angle to recognize sharp corners.
Use the Polyline Fit dialog box to change the angle setting until the image
tile resembles the angles you want to recognize as corners. Choose a setting
between 150 and 165 to recognize most corners.
2
1
Creating Skin Surfaces
|
553
To create surfaces with sharp angles
1
Use
AMOPTIONS
to reset the fit angle to 150 and re-create the ruled surface.
Desktop Menu
Surface ➤ Surface Options
2
Erase the surface you just created.
Desktop Menu
Modify ➤ Erase
3
Use
AMRULE
to create three ruled surfaces from polylines drawn with sharp
corners, responding to the prompts.
Desktop Menu
Surface ➤ Create Surface ➤ Rule
Select first wire:
Select polyline (1)
Select second wire:
Select polyline (2)
4
A message tells you that three surfaces will be created. Choose Continue.
The three surfaces follow the sharp corners of the polylines.
2
1
554
|
Chapter 19
Creating and Editing Surfaces
5
Use the Extents option of
ZOOM
to redisplay all of the wireframes and select
the object for the next exercise.
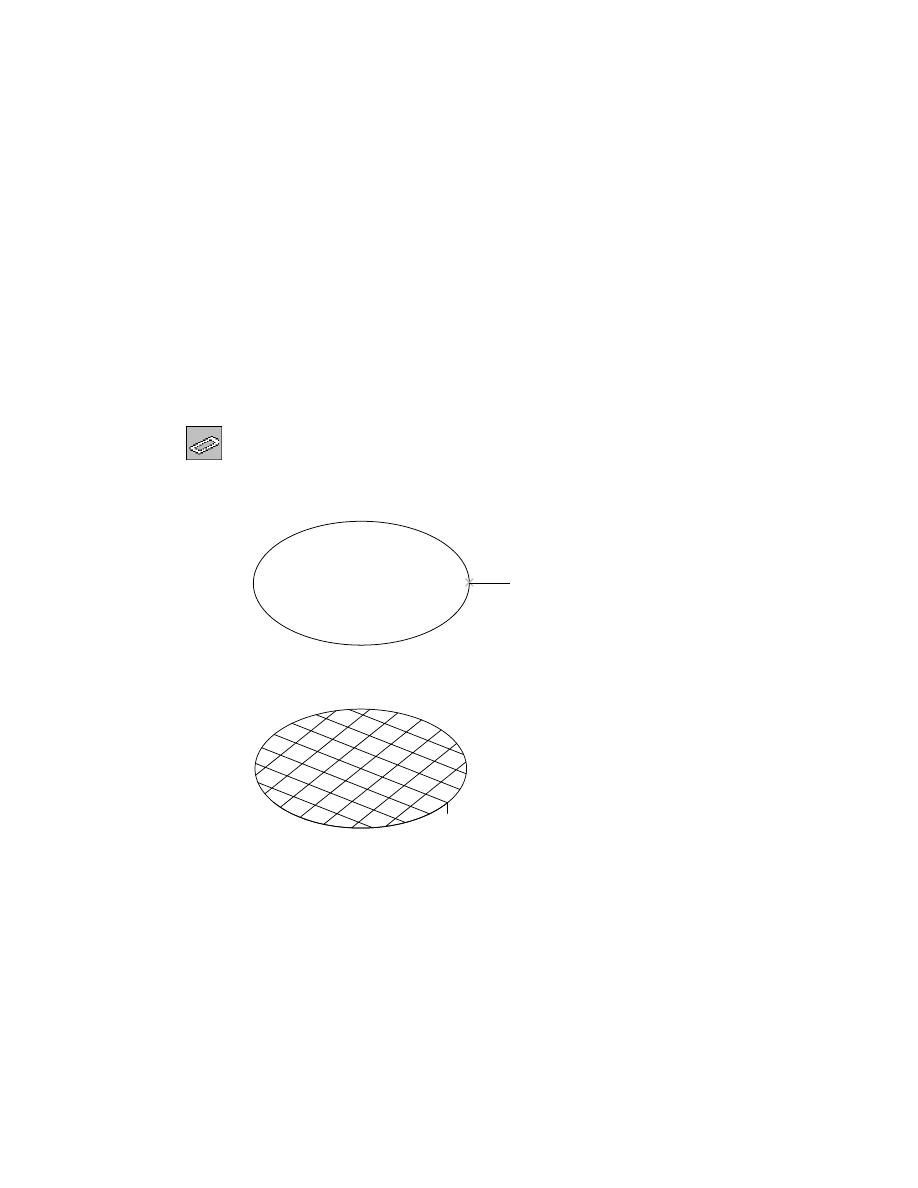
Trimmed Planar Surfaces
A planar surface may be constructed from lines, arcs, splines, polylines, or
simply two locations, if the selected objects are closed and on the same plane.
The exterior shape of the 2D wire shape becomes the trimmed edge of the
surface. In this exercise, you create trimmed planar surfaces.
To create a planar trimmed surface using a closed polyline
1
Use
AMPLANE
to create a planar trim surface from a closed polyline, respond-
ing to the prompts.
Desktop Menu
Surface ➤ Create Surface ➤ Planar Trim
Specify first corner or [Plane/Wires]: _wire
Select wires:
Select object (1)
Select wires:
Press
ENTER
The planar surface is trimmed, using the closed polyline as the border. The U
and V lines appear inside the border.
2
Use the Extents option of
ZOOM
to redisplay all of the wireframes, and select
the object for the next exercise.
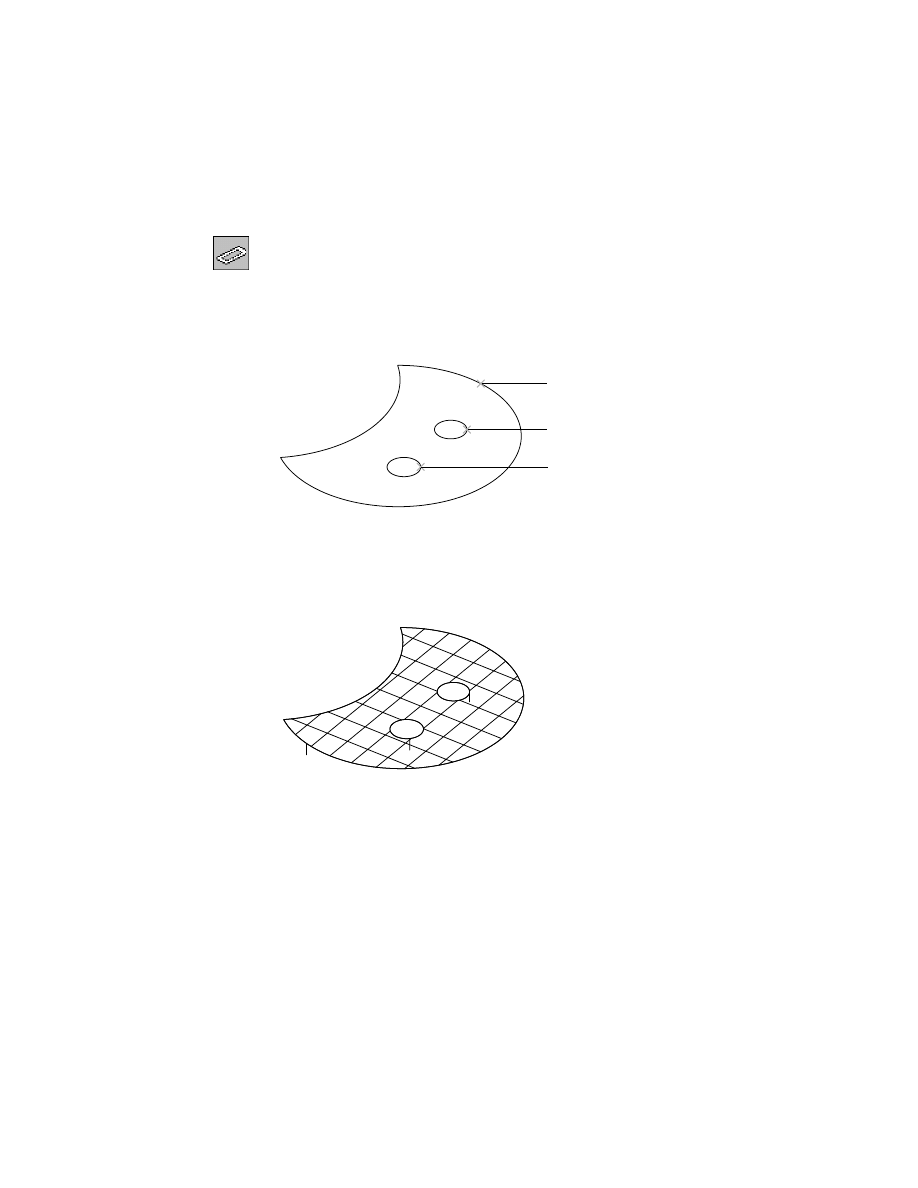
The closed polyline for the next exercise contains two interior circles that are
coplanar. You create a trimmed surface using the polyline and circles.
1
Creating Skin Surfaces
|
555
To create a trimmed planar surface using three closed polylines
1
Create a planar trim surface from three polylines, responding to the prompts.
Desktop Menu
Surface ➤ Create Surface ➤ Planar Trim
Specify first corner or [Plane/Wires]: _wire
Select wires:
Select object (1)
Select wires:
Select interior circle (2)
Select wires:
Select circle (3)
Select wires:
Press
ENTER
Instead of selecting the objects individually, you could also drag a crossing
window around all of them and press
ENTER
.
A trimmed planar surface is automatically trimmed to the largest boundary
created by the wire. As in this example, when closed areas exist inside the
boundary, these holes are trimmed out.
2
Use the Extents option of
ZOOM
to redisplay all of the wireframes, and select
the object for the next exercise.
Lofted Surfaces
You can create a lofted surface from one or two sets of wires, each with similar
attributes, such as having approximately the same direction. You must select
the wires in consecutive order.
1
2
3
3
1
556
|
Chapter 19
Creating and Editing Surfaces
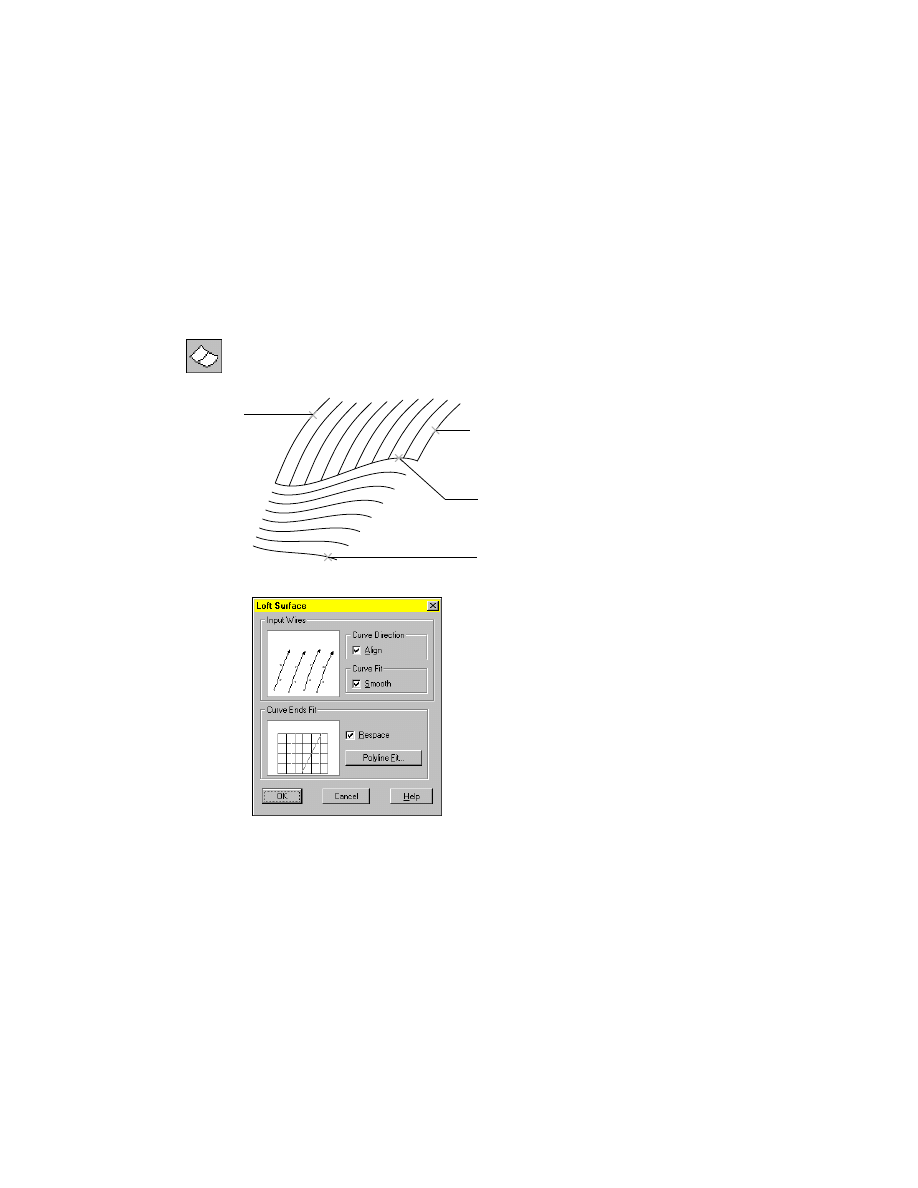
A lofted U surface is stretched between any number of wires that share similar
characteristics. The example contains two sets of wires from which you create
two surfaces. The light blue polylines are approximately horizontal, and the
green lines are approximately vertical. First, you create a surface from the
horizontal polylines.
To create a lofted surface using a set of wires
1
Use
AMLOFTU
to surface a set of vertical wires, responding to the prompts.
Desktop Menu
Surface ➤ Create Surface ➤ LoftU
Select U wires:
Select lines (1) through (8) in consecutive order and press
ENTER
2
In the Loft Surface dialog box, choose OK to accept the default settings.
9
18
1
8
Creating Skin Surfaces
|
557
3
Surface a set of horizontal wires, responding to the prompts.
Desktop Menu
Surface ➤ Create Surface ➤ LoftU
Select U wires:
Select lines (9) through (18) in consecutive order and press
ENTER
4
In the Loft Surface dialog box, choose OK to accept the default settings.
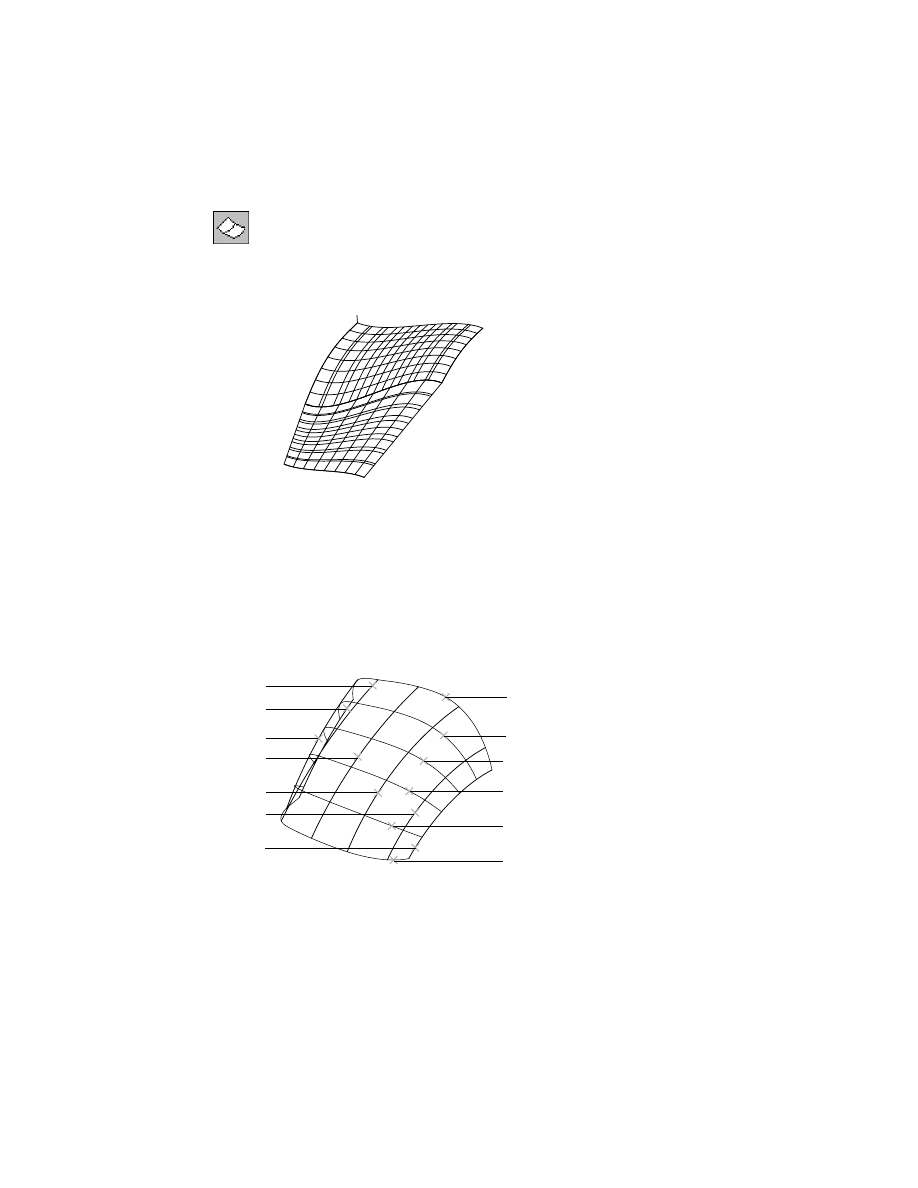
The two surfaces, one horizontal and one vertical, should look like these.
5
Use the Extents option of
ZOOM
to redisplay all the wireframes and select the
object for the next exercise.
A lofted UV surface is stretched over two sets of wires. Each wire in one set
crosses every wire in the other set. Two sets of wires can accurately describe
a complex surface.
You can select wires directly, as you did in the previous exercise, or you can
select two groups of wires. In this exercise, you create two groups of wires and
then create a lofted surface from the two groups. The wires in the U direction
are magenta (purple), and those in the V direction are cyan (light blue).
3
1
2
4
5
6
8
9
10
11
12
13
7
558
|
Chapter 19
Creating and Editing Surfaces
To create a single lofted surface from two groups of wires
1
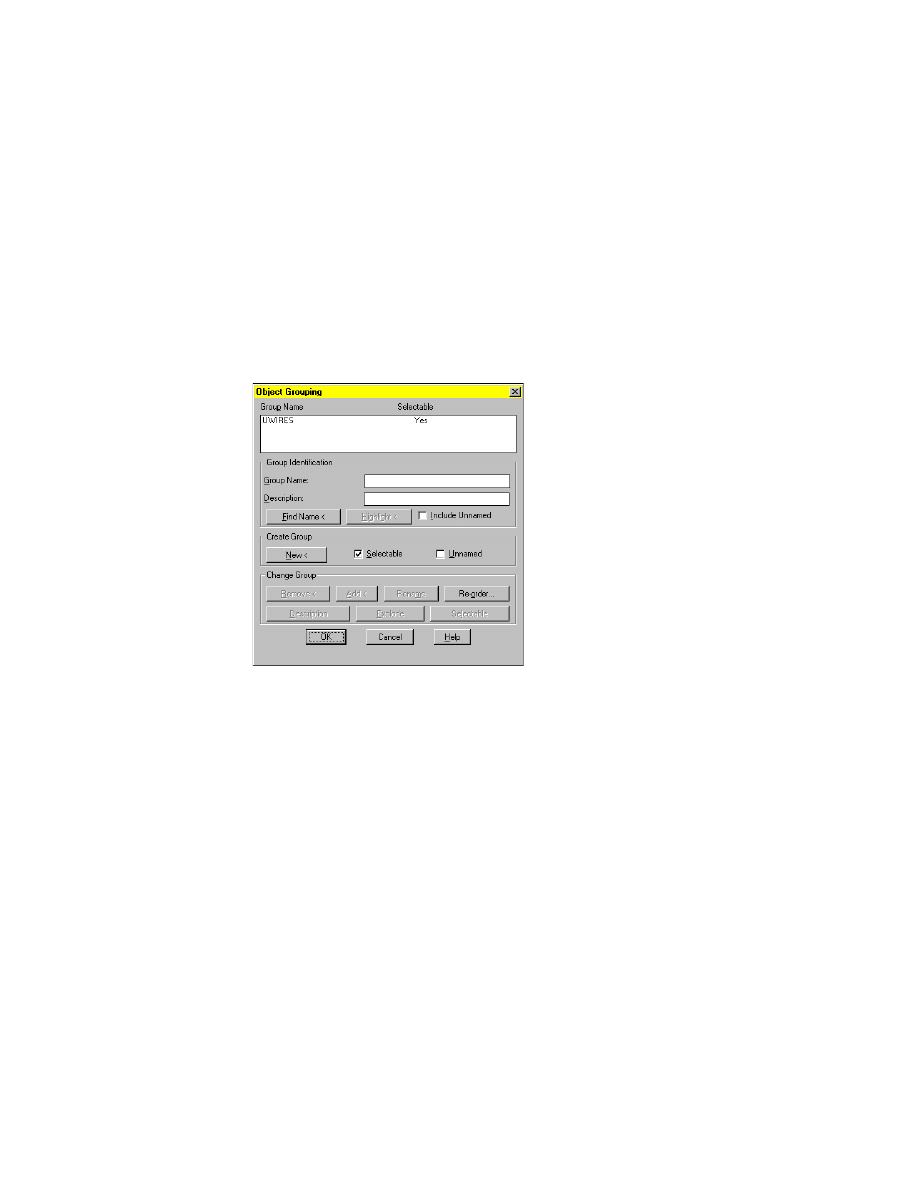
Group the magenta U lines.
Command
GROUP
In the Object Grouping dialog box specify:
Group Name:
Enter uwires
Create Group:
Choose New to close the dialog box
Respond to the prompt as follows:
Select objects:
Select lines (1) through (7) in consecutive order and press
ENTER
In the Object Grouping dialog box, choose OK.
2
Press
ENTER
to repeat the
GROUP
command.
In the Object Grouping dialog box specify:
Group name:
Enter vwires
Create Group:
Choose New to close the dialog box
Respond to the prompt as follows:
Select objects:
Select lines (8) through (13) in consecutive order and press
ENTER
In the dialog box, choose OK.
Creating Derived Surfaces
|
559
3
Use
AMLOFTU
to loft a surface from two groups of wires, responding to the
prompts.
Desktop Menu
Surface ➤ Create Surface ➤ LoftUV
Select U wires:
Enter g
Enter group name:
Enter uwires
7 found
Select U wires:
Press
ENTER
Select V wires:
Enter g
Enter group name:
Enter vwires
6 found
Select V wires:
Press
ENTER
Enter an option [eXit/Loft/Node check] <Loft>:
Press
ENTER
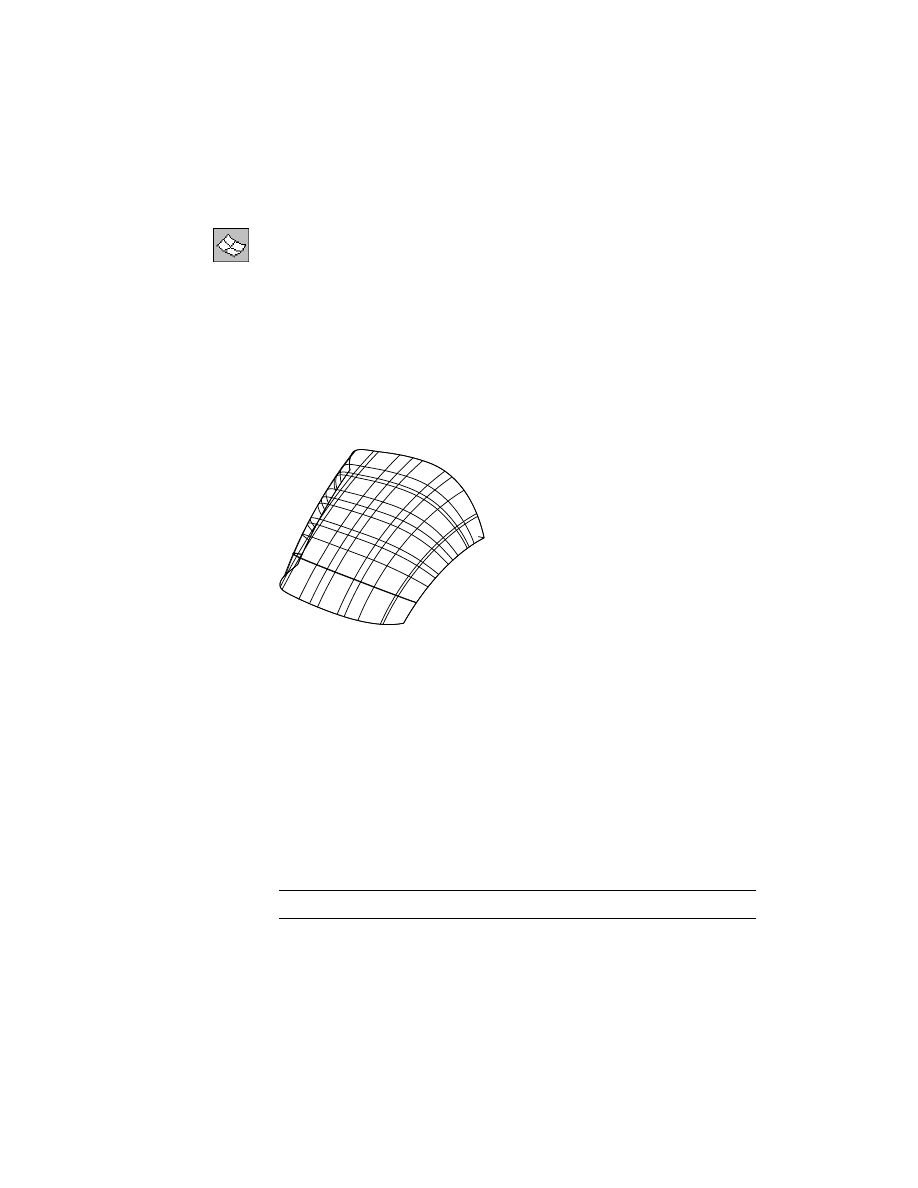
You have created a surface from the two groups of wires.
4
Use the Extents option of
ZOOM
to redisplay all of the wireframes and select
the object for the next exercise.
Creating Derived Surfaces
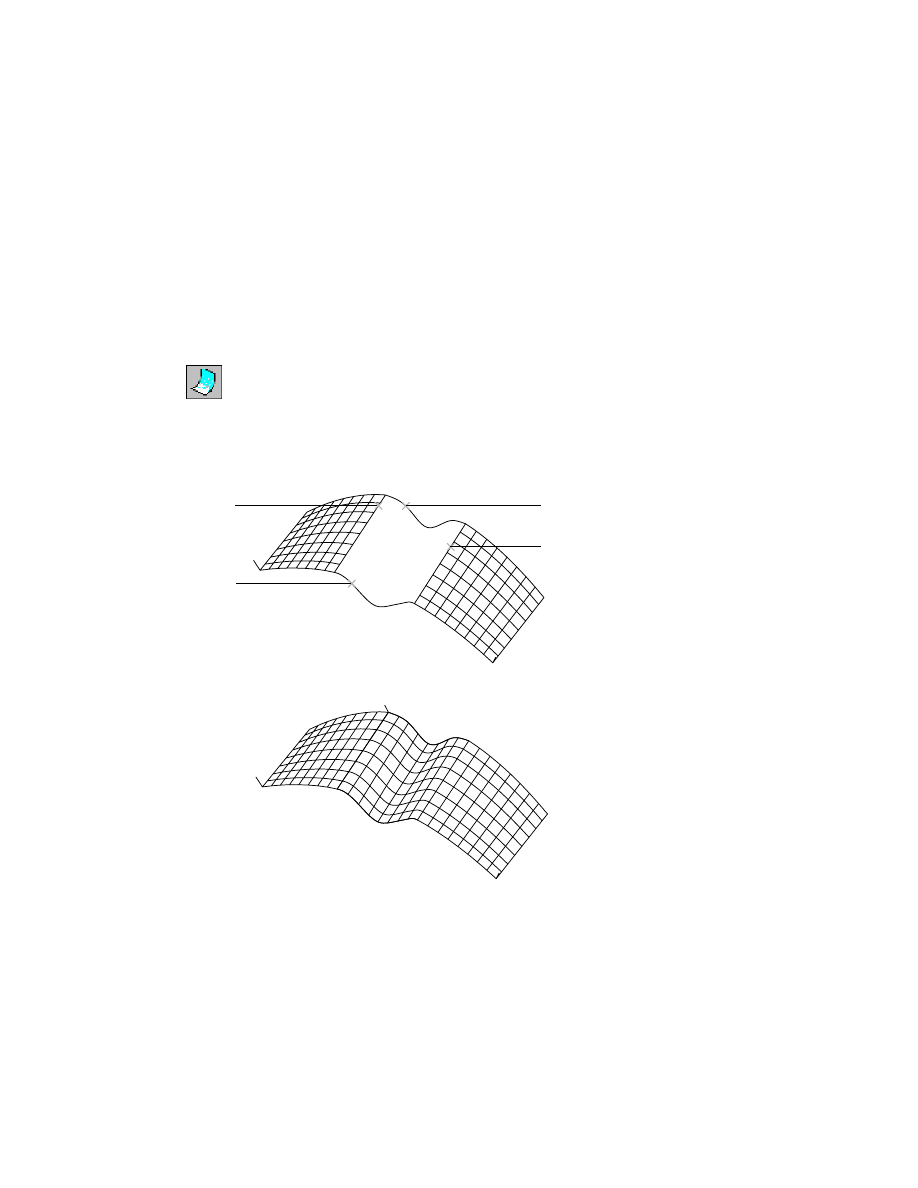
Derived surfaces are generated from existing surfaces: blended, offset, fillet,
and corner fillet. Derived surfaces can be trimmed.
Blended Surfaces
You can create a blended surface between two, three, or four wires or surfaces.
The blended surface is tangent to the surfaces or wires from which it is created.
NOTE
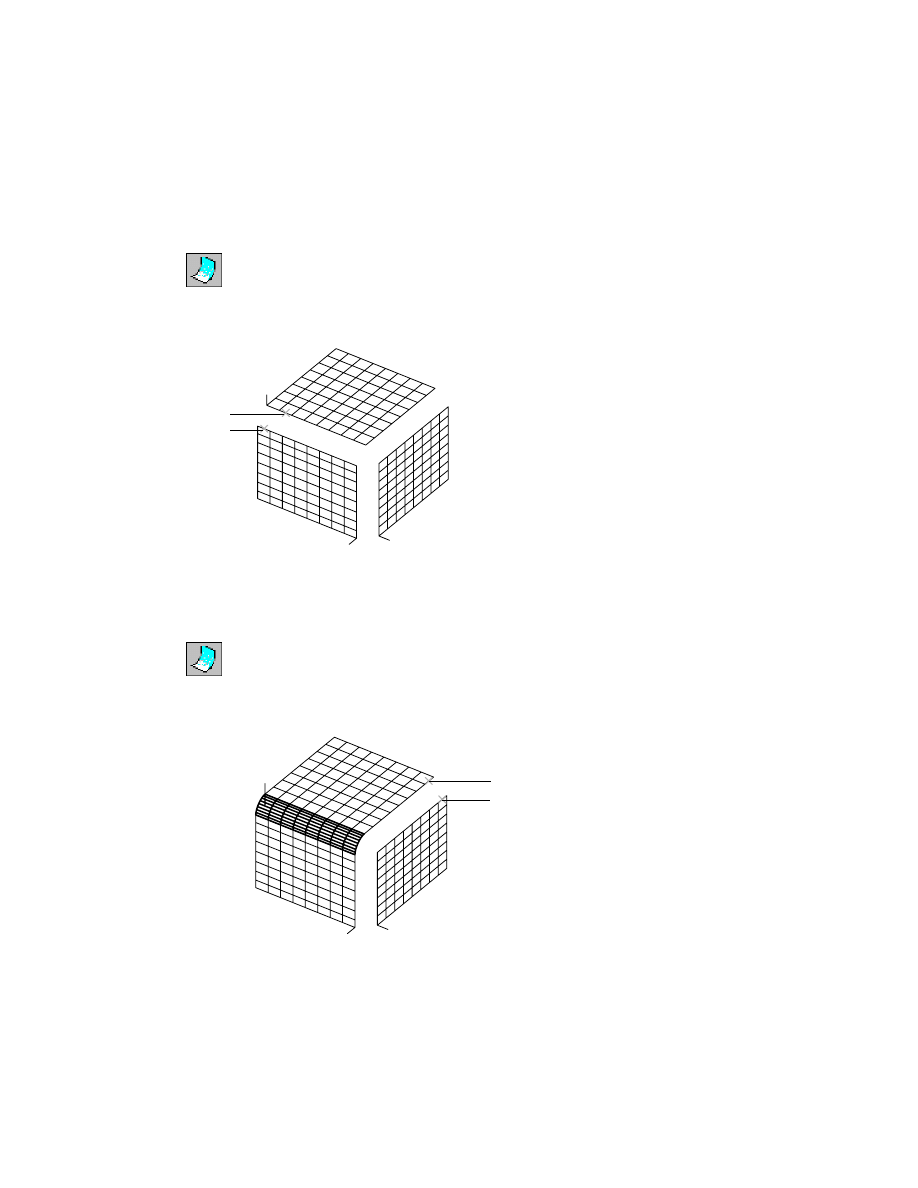
To create surfaces correctly, select lines at points shown in the illustrations.
560
|
Chapter 19
Creating and Editing Surfaces
To create a blended surface
1
Use
AMBLEND
to create a blended surface from two wires, responding to the
prompts.
Desktop Menu
Surface ➤ Create Surface ➤ Blend
Select first wire:
Select surface (1)
Select second wire:
Select surface (2)
Select third wire [Weights]:
Press
ENTER
You have created the first blended surface.
The type of object you select affects the blended surface. When you select sur-
faces or augmented lines, you are prompted for the weight of the surface edge.
2
Create the second blended surface, responding to the prompts.
Desktop Menu
Surface ➤ Create Surface ➤ Blend
Select first wire:
Select surface (3)
Select second wire:
Select surface (4)
Select third wire [Weights]:
Press
ENTER
1
2
3
4
Creating Derived Surfaces
|
561
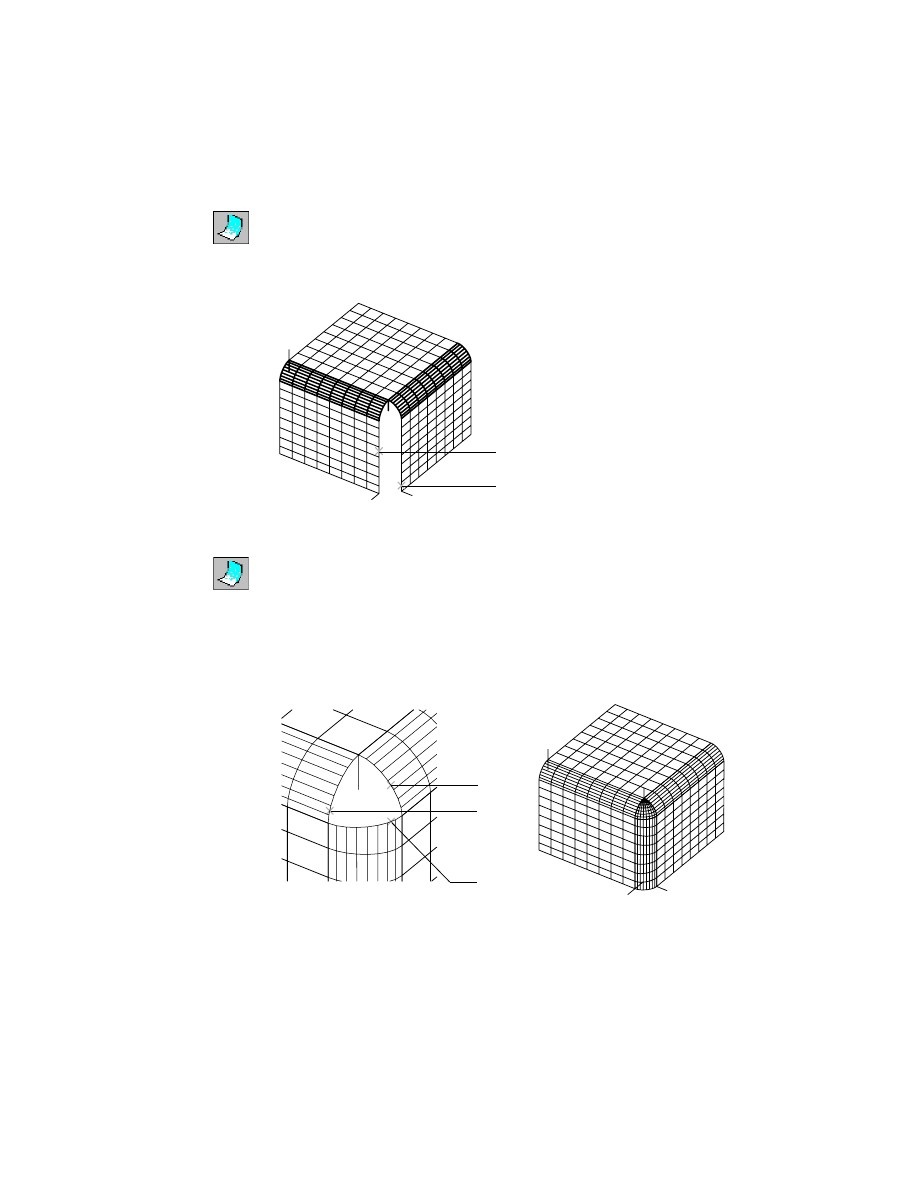
3
Create the third blended surface, responding to the prompts.
Desktop Menu
Surface ➤ Create Surface ➤ Blend
Select first wire:
Select surface (5)
Select second wire:
Select surface (6)
Select third wire [Weights]:
Press
ENTER
4
Use
ZOOM
to enlarge the corner area created by the blended surfaces.
5
Use
AMBLEND
to create a corner blended surface, responding to the prompts.
Desktop Menu
Surface ➤ Create Surface ➤ Blend.
Select first wire:
Select surface (7)
Enter an option [next/Accept] <Accept>:
Press
ENTER
Select second wire:
Select surface (8)
Enter an option [next/Accept] <Accept>:
Press
ENTER
Select third wire [Weights]:
Select surface (9)
Select fourth wire:
Press
ENTER
The order in which you select the objects to blend determines the orientation
of the corner created by the blend.
5
6
7
8
9
562
|
Chapter 19
Creating and Editing Surfaces
Use the Extents option of
ZOOM
to redisplay all of the wireframes and select
the object for the next exercise.
Next, you create a blended surface from two surfaces and lines. To create a
blended surface from four objects, make the selections in the order shown;
the objects cannot be selected in consecutive order.
To blend surfaces and lines
1
Use
AMBLEND
to create a surface from two surfaces and two lines, responding
to the prompts.
Desktop Menu
Surface ➤ Create Surface ➤ Blend
Select first wire:
Select surface (1)
Select second wire:
Select surface (2)
Enter an option [Next/Accept] <Accept>:
Press
ENTER
Select third wire [Weights]:
Select wire (3)
Select fourth wire:
Select wire (4)
The new surface is created between the original surfaces and lines.
2
Use the Extents option of
ZOOM
to redisplay all of the wireframes and select
the object for the next exercise.
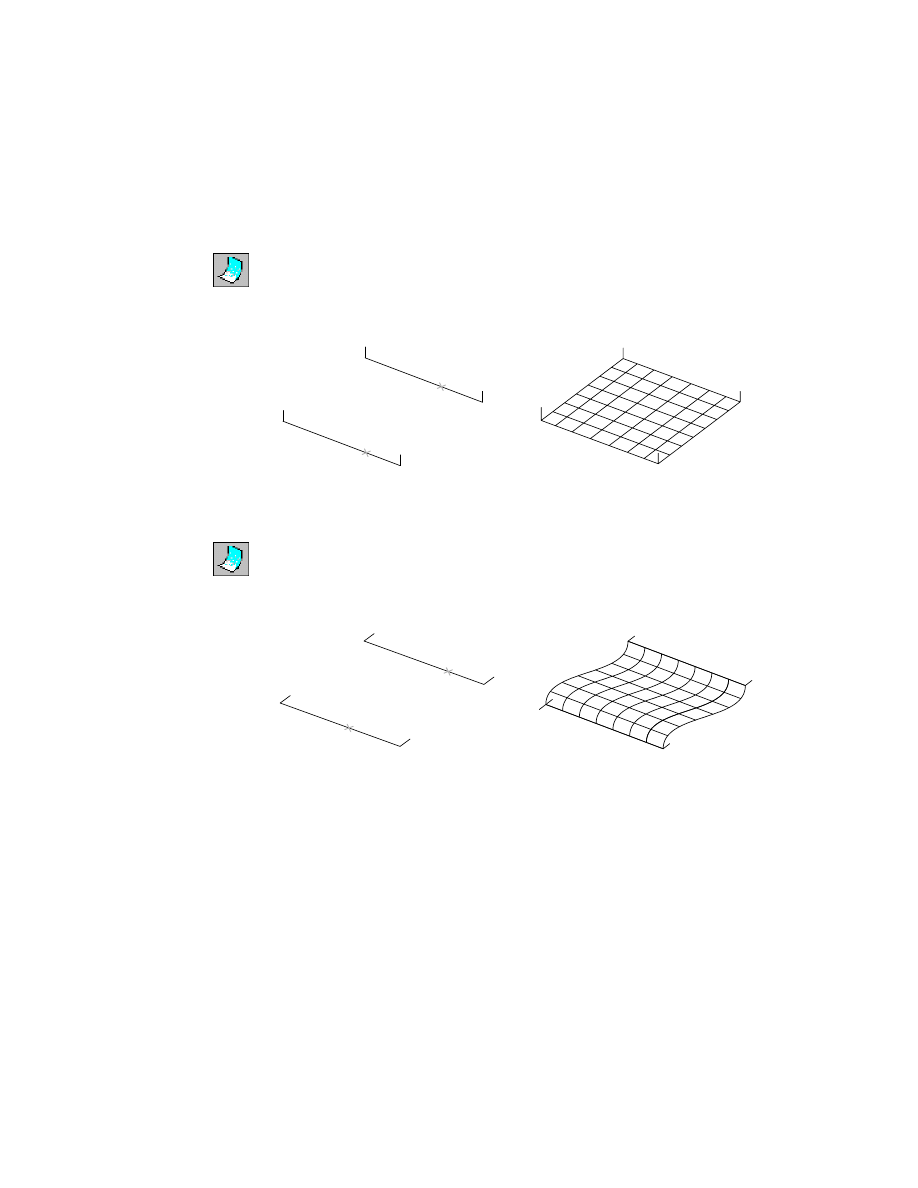
Next, you create two surfaces, each blended from two augmented lines.
1
4
3
2
Creating Derived Surfaces
|
563
To blend augmented lines
1
Use
AMBLEND
to create a surface from two augmented lines, responding to
the prompts.
Desktop Menu
Surface ➤ Create Surface ➤ Blend
Select first wire:
Select line (1)
Select second wire:
Select line (2)
Select third wire [Weights]:
Press
ENTER
2
Use
ZOOM
to redisplay wireframes. Then select the second set of lines.
3
Create a surface from the second set of augmented lines, responding to the
prompts.
Desktop Menu
Surface ➤ Create Surface ➤ Blend
Select first wire:
Select augmented line (1)
Select second wire:
Select augmented line (2)
Select third wire [Weights]:
Press
ENTER
Compare these two surfaces to see how the direction of the augmented line
vectors affects the resulting surface.
4
Use the Extents option of
ZOOM
to redisplay all of the wireframes and select
the object for the next exercise.
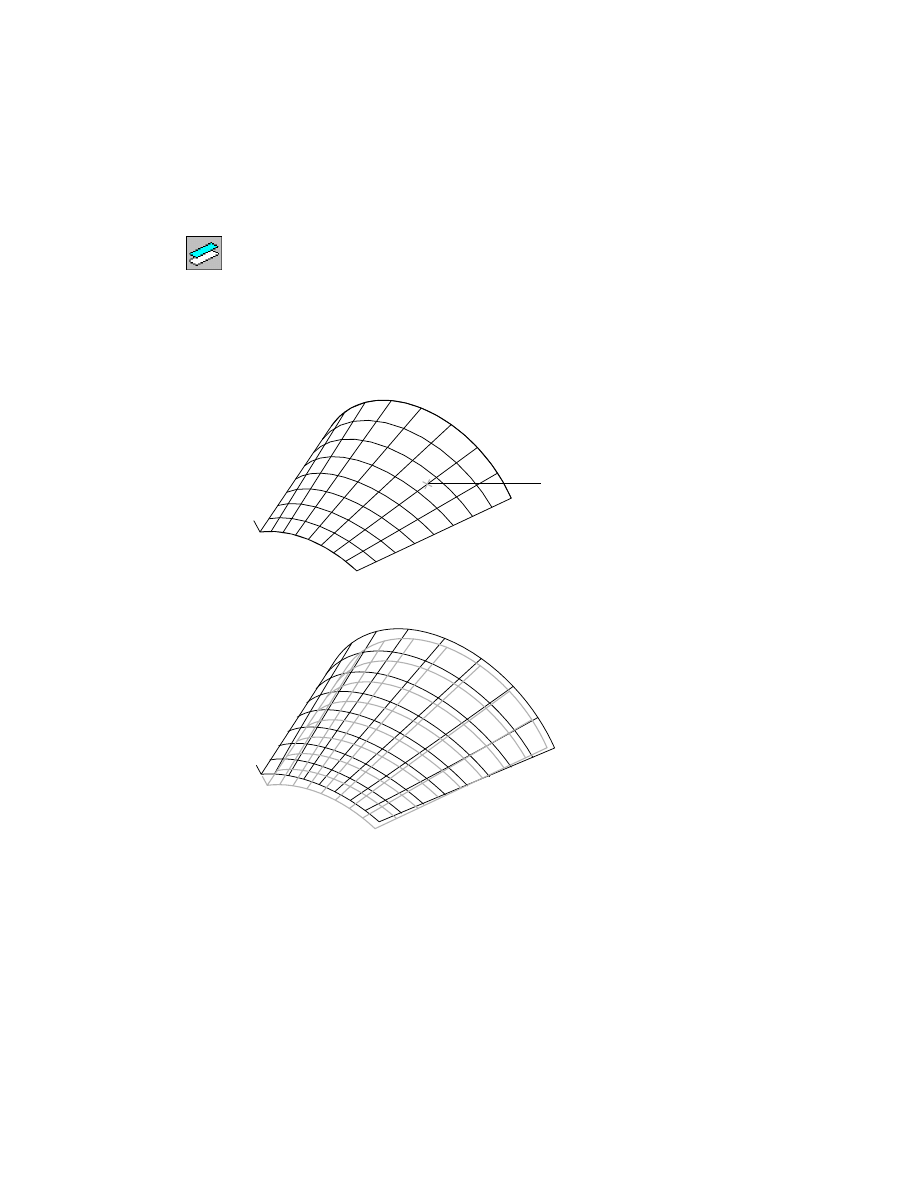
Offset Surfaces
An offset surface is a duplicate of an existing surface, offset by a specific dis-
tance. When you create an offset surface, you can keep the original or remove
it, as needed.
1
2
1
2
564
|
Chapter 19
Creating and Editing Surfaces
To create an offset surface
1
Use
AMOFFSETSF
to create an offset surface, responding to the prompts.
Desktop Menu
Surface ➤ Create Surface ➤ Offset
Select surfaces to offset:
Select surface (1)
Select surfaces to offset:
Press
ENTER
Distance=1.0000 Keep=Yes
Enter offset distance or [Keep] <1.0000>:
Enter k
Keep original surface(s) [Yes/No] <No>:
Enter y
Distance=1.0000 Keep=Yes
Enter offset distance or [Keep] <1.0000>:
Enter 0.5
The new surface is offset from the original surface, which is normal at all
locations.
2
Use the Extents option of
ZOOM
to redisplay all of the wireframes and select
the object for the next exercise.
1
Creating Derived Surfaces
|
565
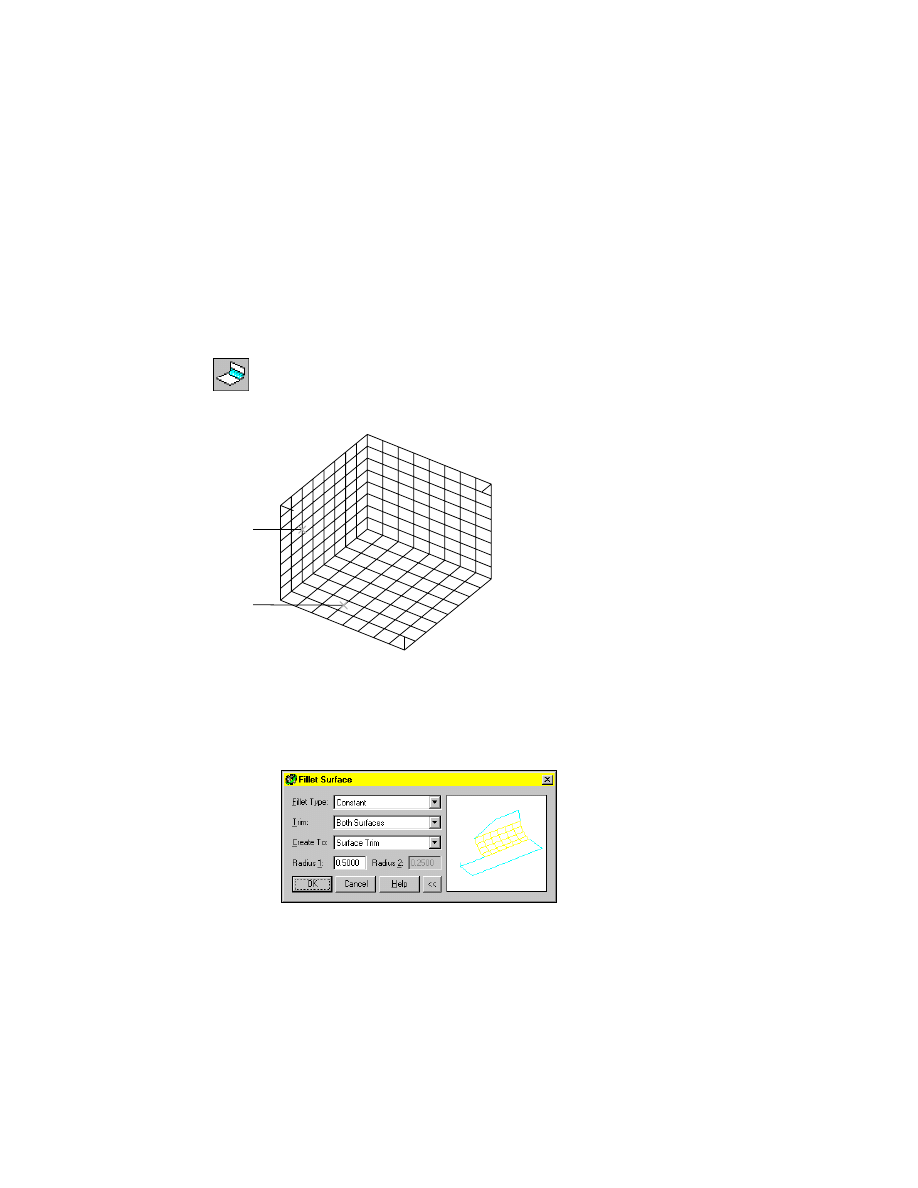
Fillet and Corner Surfaces
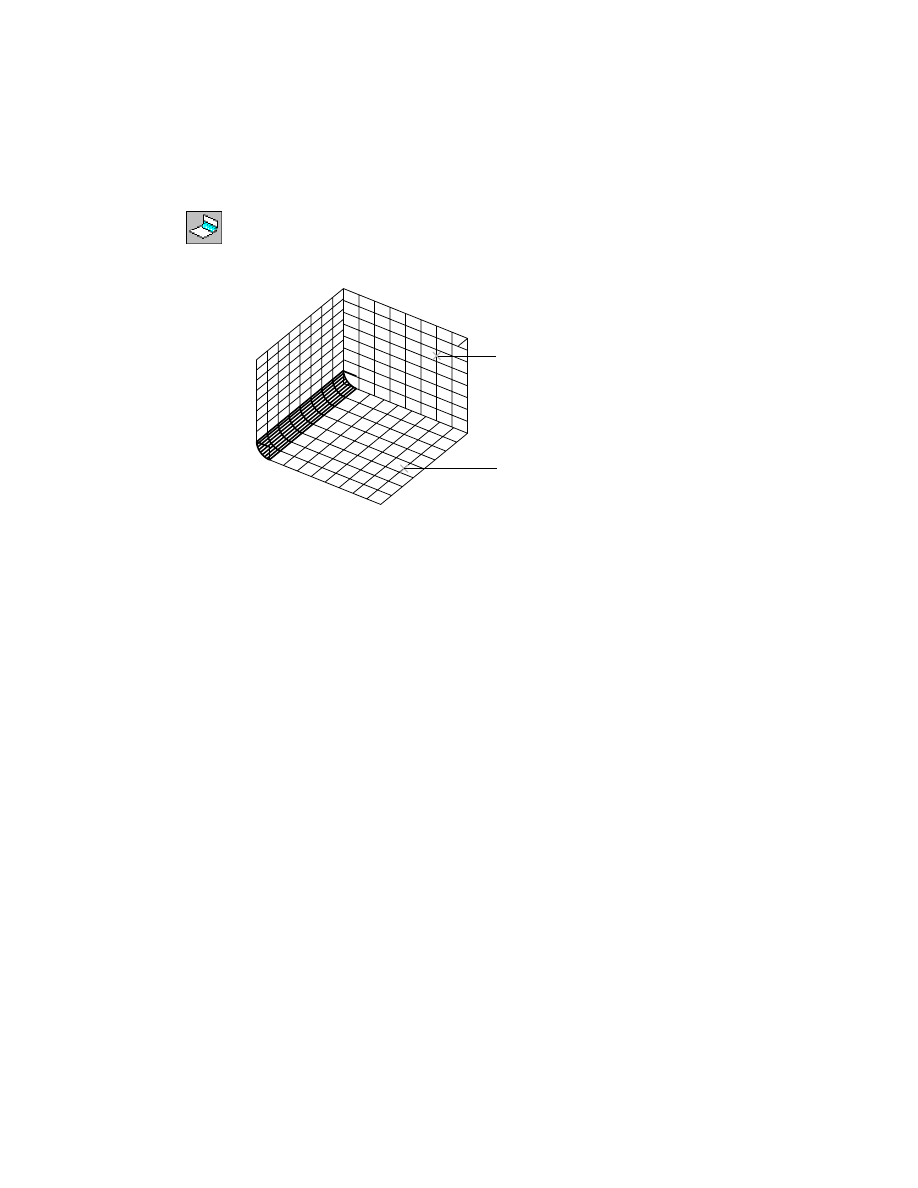
In this exercise, you create fillet surfaces between two selected surfaces, and
a corner fillet where three fillet surfaces intersect. You trim the original sur-
faces back to the fillet surfaces.
To create fillet and corner surfaces
1
Use
AMFILLETSF
to create a fillet between two surfaces, responding to the
prompts.
Desktop Menu
Surface ➤ Create Surface ➤ Fillet
Select first surface or quilt interior edge:
Select surface (1)
Select second surface:
Select surface (2)
2
In the Fillet Surface dialog box, specify:
Fillet Type:
Constant
Trim:
Both Surfaces
Create To:
Surface Trim
Radius:
Enter 0.5
Choose OK.
1
2
566
|
Chapter 19
Creating and Editing Surfaces
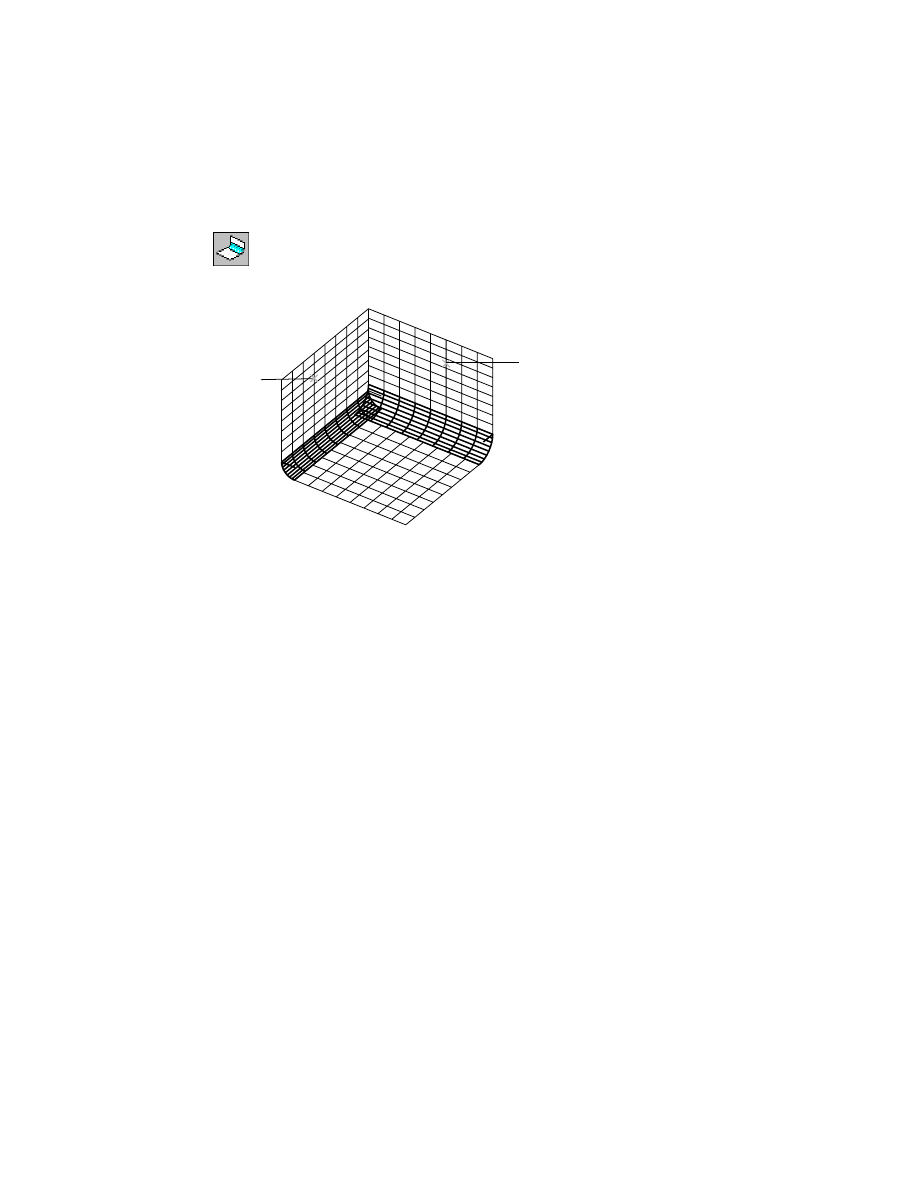
3
Create a fillet between another two surfaces, responding to the prompts.
Desktop Menu
Surface ➤ Create Surface ➤ Fillet
Select first surface or quilt interior edge:
Select surface (3)
Select second surface:
Select surface (4)
4
In the Fillet Surface dialog box, specify:
Fillet Type:
Constant
Trim:
Both Surfaces
Create To:
Base Surface
Radius:
Enter 0.75
Choose OK.
The Base Surface option was not available when you created the first fillet
surface. It is available now because the first surface was trimmed and now
differs from the base surface. Next, trim to the base surface, not the trimmed
surface.
3
4
Creating Derived Surfaces
|
567
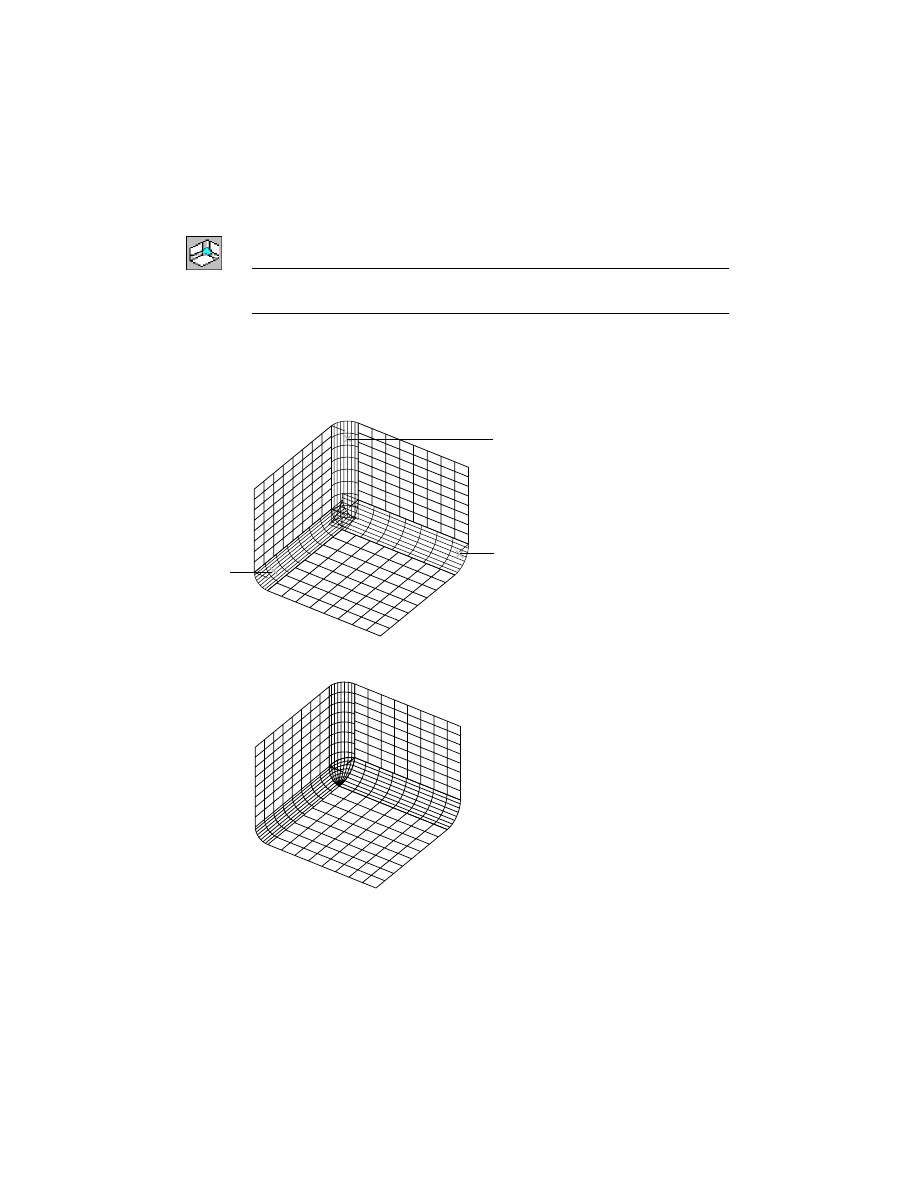
The next illustration shows both fillets, which you will trim later.
5
Create a fillet between another two surfaces, responding to the prompts.
Desktop Menu
Surface ➤ Create Surface ➤ Fillet
Select first surface or quilt interior edge:
Select surface (5)
Select second surface:
Select surface (6)
6
In the Fillet Surface dialog box, specify:
Fillet Type:
Constant
Trim:
Both Surfaces
Create To:
Base Surface
Radius:
Enter 0.6
Choose OK.
The fillets overlap at the corner. You need to trim the overlap with a corner
fillet.
6
5
568
|
Chapter 19
Creating and Editing Surfaces
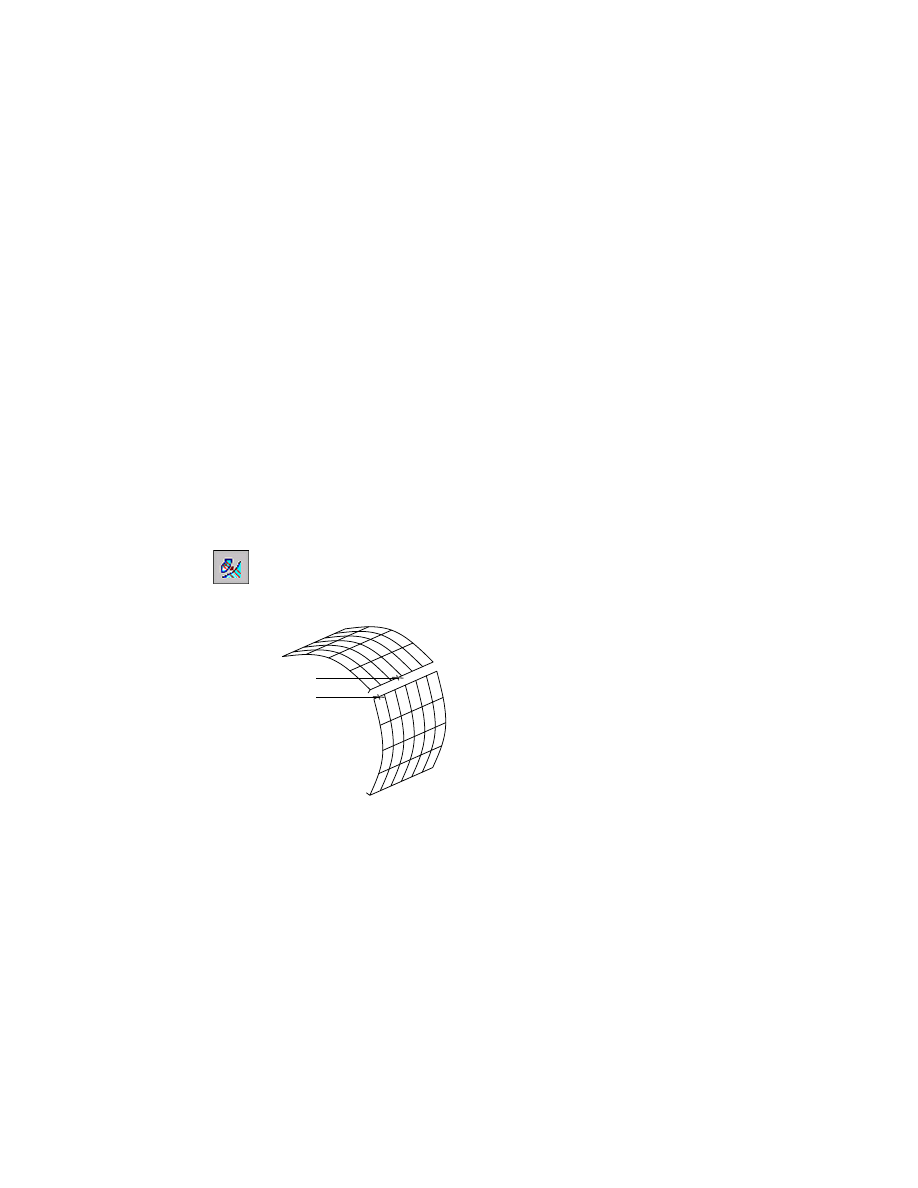
To create a corner fillet
1
Use
AMCORNER
to trim the overlapping fillets, responding to the prompts.
Desktop Menu
Surface ➤ Create Surface ➤ Corner Fillet
NOTE
The default is set to trim the corner fillet to the three fillet surfaces. If you
do not want to trim, enter T at the first prompt and change the setting to No.
Trim=Yes
Select first fillet surface or [Trim]:
Select surface (7)
Select first fillet surface or [Trim]:
Select surface (8)
Select first fillet surface or [Trim]:
Select surface (9)
The trimmed corner fillet looks like this.
2
Use the Extents option of
ZOOM
and select the object for the next exercise.
7
8
9
Editing Surfaces
|
569
Editing Surfaces
As you create models, you need to combine surfaces and trim them where
they overlap. You will learn four surface editing techniques: adjusting sur-
faces, joining surfaces, trimming surfaces at intersections, and trimming
surfaces by projection.
Adjusting Adjacent Surfaces
You can control the tangency of two adjacent surfaces by adjusting them to
create one continuous surface. When you select the edges of two adjacent
surfaces to adjust, the first edge you select is the control surface. You can use
a quilt for the control surface. By default, 20 per cent of the total area of each
surface is adjusted. You can change the percentage for either or both of the
the adjustment areas, depending on which surface shape you need to retain.
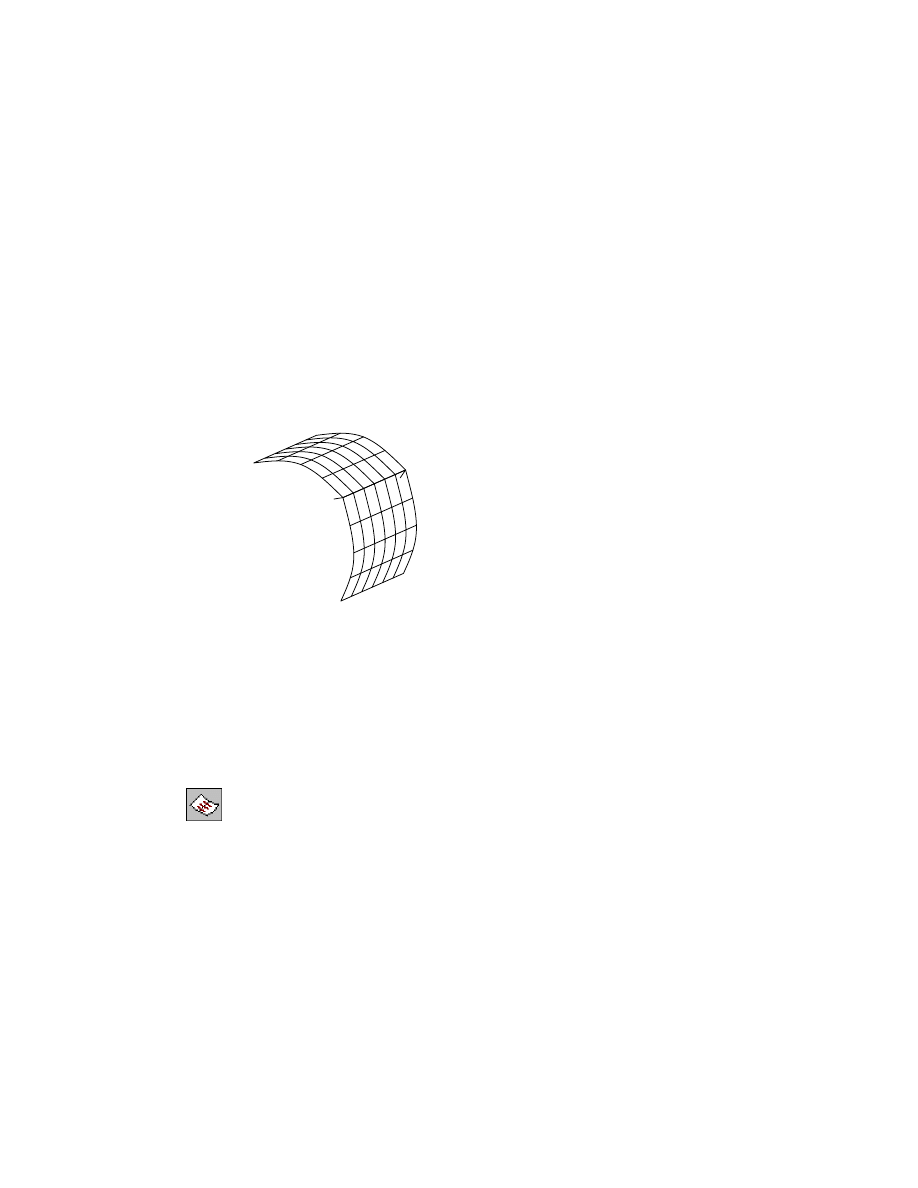
To adjust adjacent surfaces
1
Use AMADJUST to convert two surfaces into one surface, responding to the
prompts.
Desktop Menu
Surface ➤ Edit Surface ➤ Adjust
Select surface edge to adjust:
Select the control surface edge (1)
Select surface edge to adjust:
Select the adjacent surface edge (2)
1
2
570
|
Chapter 19
Creating and Editing Surfaces
First surface=20.0000% Second surface=20.0000% cOntinuity=Smooth
Keep=No
Enter an option [First surface/Second surface/cOntinuity/Keep] <Continue>:
Enter s
Enter adjustment for the second surface <20.0000%>:
Enter 40
First surface=20.0000% Second surface=40.0000% cOntinuity=Smooth
Keep=No
Enter an option [First surface/Second surface/cOntinuity/Keep] <Continue>:
Enter o
Continuity [Coincident/Smooth] <Coincident>:
Press
ENTER
First surface=20.0000% Second surface=40.0000% cOntinuity=Coincident
Keep=No
Enter an option [First surface/Second surface/cOntinuity/Keep] <Continue>:
Press
ENTER
The two surfaces are adjusted to meet.
Joining Surfaces
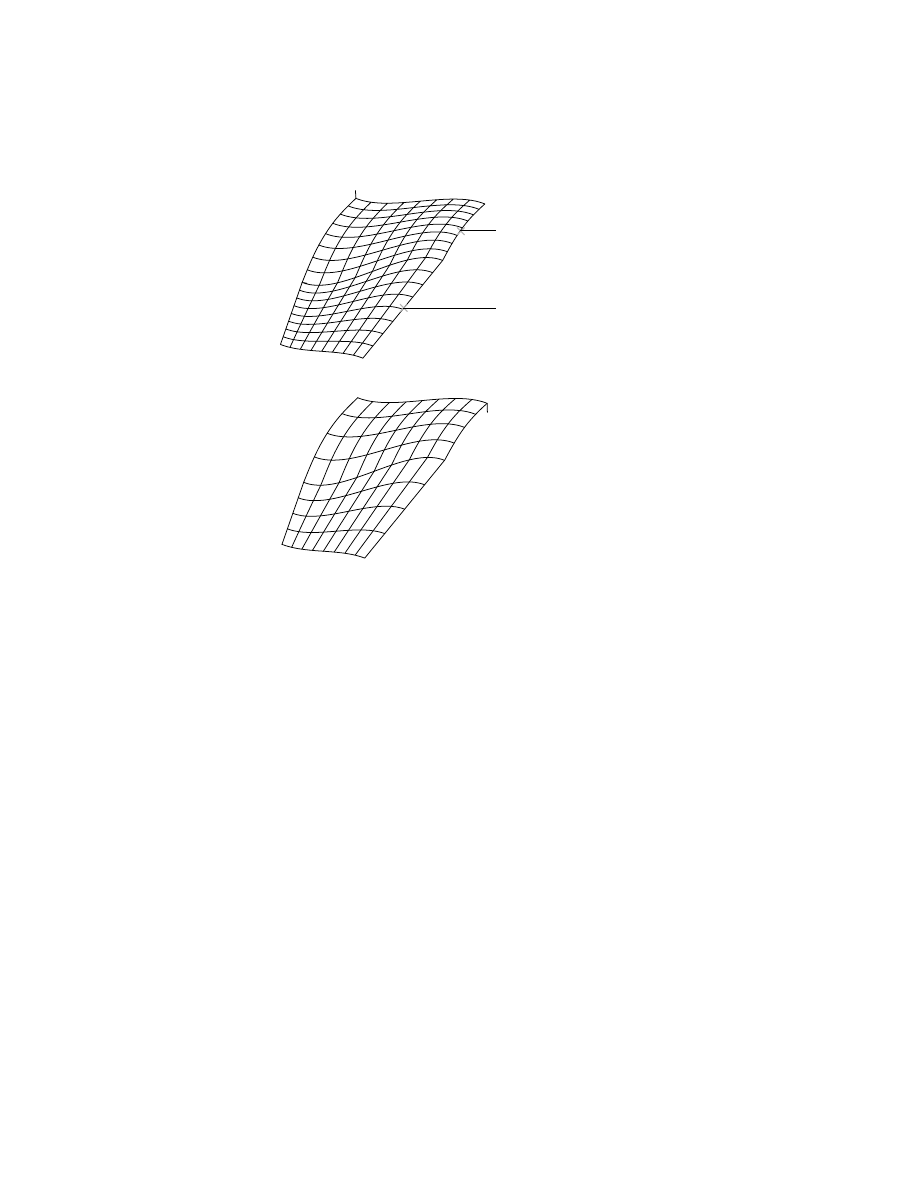
You can join multiple surfaces into a single surface. Each surface is indicated
by two surface normal indicators.
To join surfaces
1
Use
AMJOINSF
to join the surfaces you select, responding to the prompts.
Desktop Menu
Surface ➤ Edit Surface ➤ Join
Select surfaces to join:
Select surface (1)
Select surfaces to join:
Select surface (2)
Select surfaces to join:
Press
ENTER
Editing Surfaces
|
571
The two surfaces are joined. Only one surface normal indicator is shown.
To force two surfaces to join, choose Surface ➤ Surface Options. In the
Mechanical Options dialog box, choose the Surface tab and adjust the Join
Gap Tolerance. Two untrimmed surfaces are joined automatically if they are
within twice the gap tolerance.
2
Use the Extents option of
ZOOM
to redisplay all of the wireframes and select
the object for the next exercise.
Trimming Intersecting Surfaces
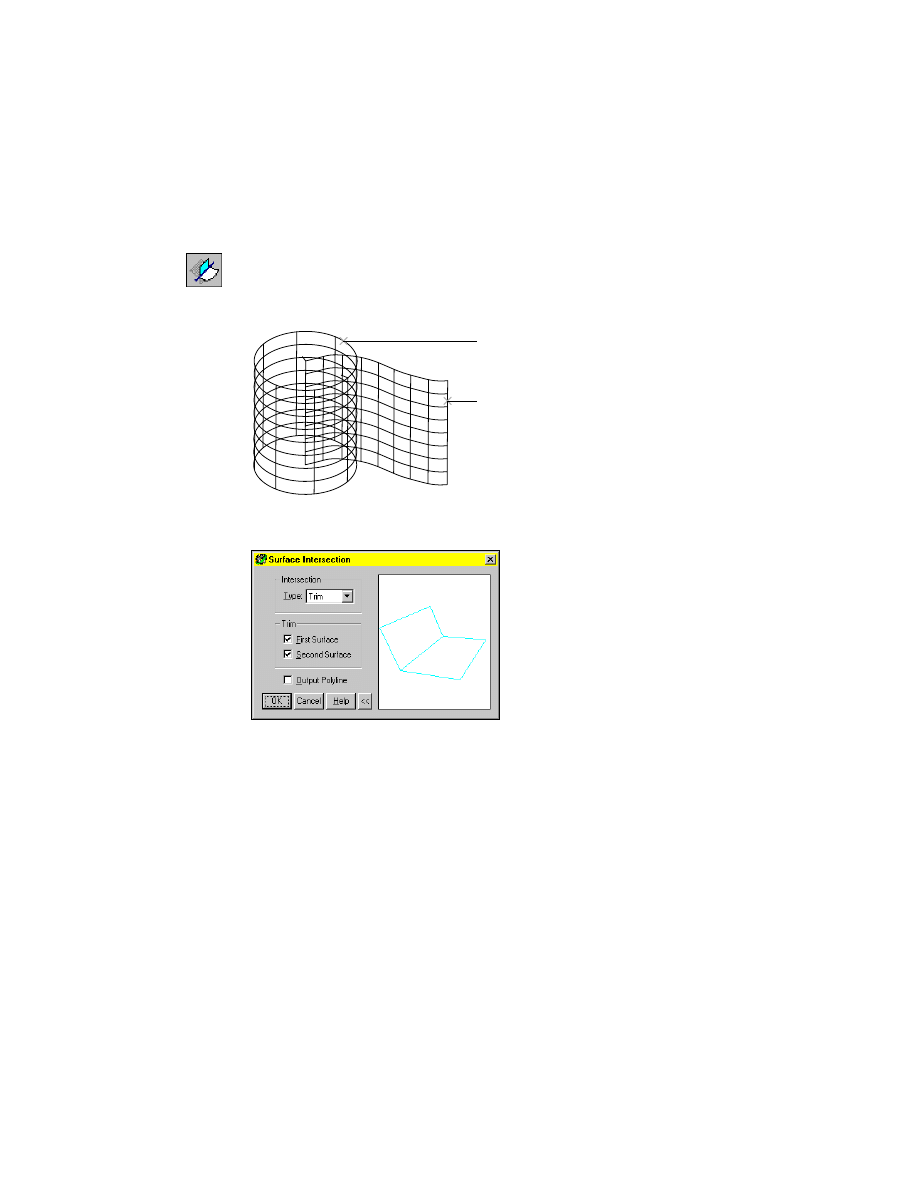
You can trim intersecting surfaces, including quilted surfaces, and create a 3D
polyline at the intersection. The 3D polyline can then be used to create
another surface.
A 3D point is created at the intersection of a wire curve and a surface or quilt.
If the wire curve intersects the surface or quilt more than once, points are cre-
ated everywhere an intersection takes place.
When you trim, always make your selections on the portion of the surface
you want to keep.
1
2
572
|
Chapter 19
Creating and Editing Surfaces
To trim intersecting surfaces
1
Use
AMINTERSF
to trim the surface you want to keep, responding to the
prompts.
Desktop Menu
Surface ➤ Edit Surface ➤ Intersect Trim
Select first surface/quilt or wire:
Select surface (1)
Select second surface:
Select surface (2)
2
In the Surface Intersection dialog box, check the options indicated in the fol-
lowing illustration and choose OK.
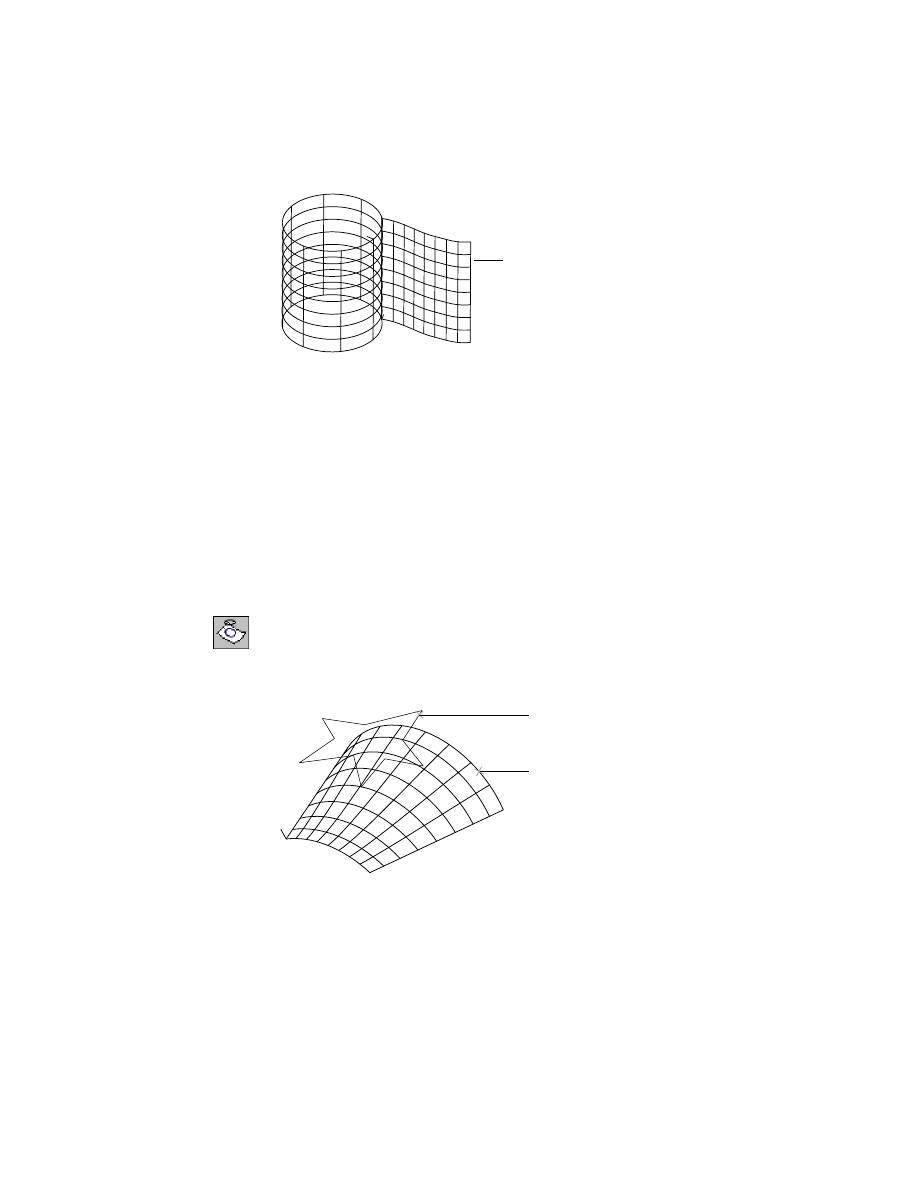
The first surface you selected is trimmed at its intersection with the second
surface.
Using the Trim options, you can trim neither, one, or both surfaces at their
intersection. As you change these options, the dynamic image in the dialog
box displays the results.
1
2
Editing Surfaces
|
573
3
Use
UNDO
to erase the trim. Then try selecting surfaces at different locations.
4
Use the Extents option of
ZOOM
to redisplay all of the wireframes and select
the object for the next exercise.
Trimming Surfaces by Projection
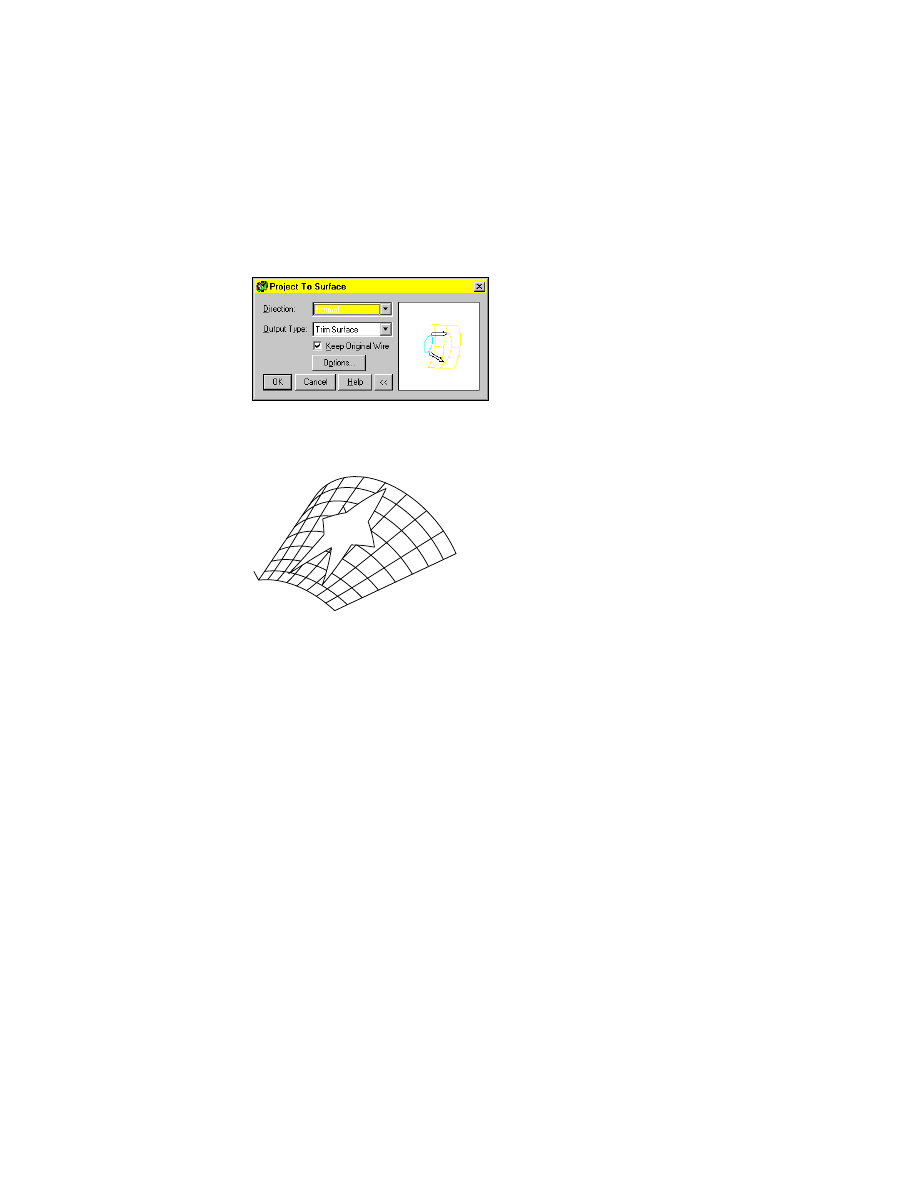
You can project a wire onto a surface to trim a shape that corresponds to the
wire shape. You select the portion of the surface you want to keep.
In this exercise, you trim a curved surface with a star-shaped polyline.
To trim a surface by a projected wire
1
Use
AMPROJECT
to project the wire to trim the surface, responding to the
prompts.
Desktop Menu
Surface ➤ Edit Surface ➤ Project Trim
Select wires to project:
Select polyline (1) and press
ENTER
Select target surfaces/quilts:
Select surface (2) on the side you want to keep
Select target surfaces/quilts:
Press
ENTER
1
1
2
2
574
|
Chapter 19
Creating and Editing Surfaces
2
In the Project to Surface dialog box, specify:
Direction:
Choose Normal
Output Type:
Choose Trim Surface
Keep Original Wire:
Check the check box
Choose OK.
The polyline is projected onto the curved surface, trimming out the surface
inside the polyline.
3
Use
UNDO
and try different selection points and output types for the
projection.
Wyszukiwarka
Podobne podstrony:
surfacefinishmetrologyiss1 140102202845 phpapp01
Dance, Shield Modelling of sound ®elds in enclosed spaces with absorbent room surfaces
Autonomic Nerve (Palmar Surface) tapeSP
Cell surface in the interaction Nieznany
1998 Bustillo Surface Micromach Nieznany (2)
07 2002 Koukitu Surface polarity GaN
Capability of high pressure cooling in the turning of surface hardened piston rods
Autonomic Nerve (Plantar Surface) tapeSP
Ch20 Combine Parts & Surfaces
Genomes3e ppt ch19
Comparative testing and evaluation of hard surface disinfectants
Ch19 plastics
65 935 946 Laser Surface Treatment of The High Nitrogen Steel X30CrMoN15 1
Ch19 Cams
Ch21 Surface Wireframe Models
24 Surface Biology by AFM
ch19
ch19
więcej podobnych podstron