
April 2002
License Agreement
Waterloo Hydrogeologic Inc. retains the ownership of this copy of the software. This copy is licensed to you for use under
the following conditions:
I. Copyright Notice
This software is protected by both Canadian copyright law and international treaty provisions. Therefore, you must treat
this software JUST LIKE A BOOK, with the following single exception. Waterloo Hydrogeologic Inc. authorizes you to make
archive copies of the software for the sole purpose of backing-up our software and protecting your investment from loss.
By saying "JUST LIKE A BOOK", Waterloo Hydrogeologic Inc. means, for example, that this software may be used by
any number of people and may be freely moved from one computer location to another, so long as there is NO POSSIBILITY of it
being used at one location while it is being used at another. Just like a book can’t be read by two different people in two different
places at the same time.
Specifically, you may not distribute, rent, sub-license, or lease the software or documentation; alter, modify, or adapt the
software or documentation, including, but not limited to, translating, decompiling, disassembling, or creating derivative works
without the prior written consent of Waterloo Hydrogeologic Inc.. The provided software and documentation contain trade secrets
and it is agreed by the licensee that these trade secrets will not be disclosed to non-licensed persons without written consent of
Waterloo Hydrogeologic Inc..
II. Warranty
Waterloo Hydrogeologic Inc. warrants that, under normal use, the material of the CD-ROM and the documentation will be
free of defects in materials and workmanship for a period of 30 days from the date of purchase. In the event of notification of
defects in material or workmanship, Waterloo Hydrogeologic Inc. will replace the defective CD-ROM or documentation.
The remedy for breach of this warranty shall be limited to replacement and shall not encompass any other damages,
including but not limited to loss of profit, and special, incidental, consequential, or other similar claims.
III. Disclaimer
Except as specifically provided above, neither the developer(s) of this software nor any person or organization acting on
behalf of him (them) makes any warranty, express or implied, with respect to this software. In no event will Waterloo
Hydrogeologic Inc. assume any liabilities with respect to the use, or misuse, of this software, or the interpretation, or
misinterpretation, of any results obtained from this software, or for direct, indirect, special, incidental, or consequential damages
resulting from the use of this software.
Specifically, Waterloo Hydrogeologic Inc. is not responsible for any costs including, but not limited to, those incurred as a
result of lost profits or revenue, loss of use of the computer program, loss of data, the costs of recovering such programs or data,
the cost of any substitute program, claims by third parties, or for other similar costs. In no case shall Waterloo Hydrogeologic
Inc.’s liability exceed the amount of the license fee.
IV. Infringement Protection
Waterloo Hydrogeologic Inc. is the sole owner of this software. Waterloo Hydrogeologic Inc. warrants that neither the
software and documentation nor any component, including elements provided by others and incorporated into the software and
documentation, infringes upon or violates any patent, trademark, copyright, trade secret, or other proprietary right.
Royalties or other charges for any patent, trademark, copyright, trade secret or other proprietary information to be used in
the software and documentation shall be considered as included in the contract price.
V. Governing Law
This license agreement shall be construed, interpreted, and governed by the laws of the Province of Ontario, Canada, and
the United States. Any terms or conditions of this agreement found to be unenforceable, illegal, or contrary to public policy in any
jurisdiction will be deleted, but will not affect the remaining terms and conditions of the agreement.
VI. Entire Agreement
This agreement constitutes the entire agreement between you and Waterloo Hydrogeologic Inc.

Table of Contents
i
Table of Contents
Visual MODFLOW........................................................................... 1
Hardware Requirements ............................................................................................... 1
Windows95/NT Swap File............................................................................................. 1
Installing Visual MODFLOW ....................................................................................... 1
Starting Visual MODFLOW ......................................................................................... 2
How to Contact WHI..................................................................................................... 2
General Installation ......................................................................... 3
Visual MODFLOW General Installation Instructions.................................................. 3
Installing from the CD-ROM ........................................................................................ 4
Stand-Alone Installations.............................................................................................. 5
Network Installations: Installing a Network Server ................................................... 10
Network Installations: Installing a Network Client .................................................... 12


1
Visual MODFLOW
Hardware Requirements
To run Visual MODFLOW you will need the following minimum system
configuration:
• Pentium-based computer
• 64 MB of RAM (256 MB recommended)
• CD ROM drive
• A hard drive with at least 100 Mbytes free disk space;
• Win98/WinNT4.0 (Service Pack 3)/Win2000/WinXP.
If you have any problems with your particular system configuration, please make sure
that you followed the installation instructions precisely (see Chapter 2, General
Installation). If the problem is still unresolved, contact your hardware experts. Finally,
if you are still having trouble, see the section in this chapter on How to Contact WHI.
Windows95/NT Swap File
Windows 95/NT manages the systems virtual memory. To change these settings please
see your system administrator.
Installing Visual MODFLOW
Visual MODFLOW must be installed on your hard disk or network disk to run. Please
read the section on hardware requirements at the beginning of this chapter to ensure that
your system meets the requirements before performing the installation. The
Setup32.exe executable file is used to install Visual MODFLOW for
Windows 98/NT/2000/XP.
The installation procedure is outlined in Chapter 2.

2
Chapter 1 - Visual MODFLOW
Starting Visual MODFLOW
Once the program has been installed, simply double click on the Visual MODFLOW
3.0 shortcut icon or click on Start/Programs/WHI Software/Visual MODFLOW
3.0/Visual MODFLOW 3.0.
How to Contact WHI
If after reading this manual and using Visual MODFLOW, you would like to contact
Waterloo Hydrogeologic with comments, suggestions, or if you need technical
assistance with your software installation, you can reach us at:
Waterloo Hydrogeologic Inc.
460 Phillip Street - Suite 101
Waterloo, Ontario, CANADA, N2L 5J2
Phone (519) 746 1798
Fax (519) 885 5262
Email: techsupport@flowpath.com
Web: www.waterloohydrogeologic.com

Visual MODFLOW General Installation Instructions
3
General Installation
This document provides detailed instructions for installing Visual MODFLOW on your
computer. The following topics will be covered:
• Installing from the CD-ROM
• Stand-Alone Installations
• Network Installations (Server)
• Network Installations (Client)
Visual MODFLOW General Installation Instructions
Visual MODFLOW now incorporates software networking, giving your organization
more flexibility to manage and run Visual MODFLOW over a network. Network
Installations are extremely useful for maintaining version control from a single point.
Network Installations are used when one or more licenses of Visual MODFLOW are
required to run over a network. The Network Server acts as the source computer on
which all Visual MODFLOW installation files are placed. Client Installations are used
to run Visual MODFLOW over the Network on the Client computers. The Client
Installations run Visual MODFLOW from the Server, using system files and resources
of the Server. Client Installations install only a minimum set of required system files.
Stand-Alone Installations are used when a single license of Visual MODFLOW is
required to run on a single computer. Stand-Alone Installations install all of the
required application files and the system files on each Stand-Alone computer.
4
Chapter 2 - General Installation
Installing from the CD-ROM
Please follow the steps below to install Visual MODFLOW from the CD-ROM.
[1]
Close all other Windows applications.
[2]
Insert the Visual MODFLOW CD into your CD-ROM drive.
[3]
This will initiate the Visual MODFLOW Navigator. If the navigator does not start
after one minute, explore the CD-ROM drive and double click on Install.exe.
[4]
To begin installing Visual MODFLOW to your hard disk, click on;
Visual MODFLOW 3.0 Installation
[5]
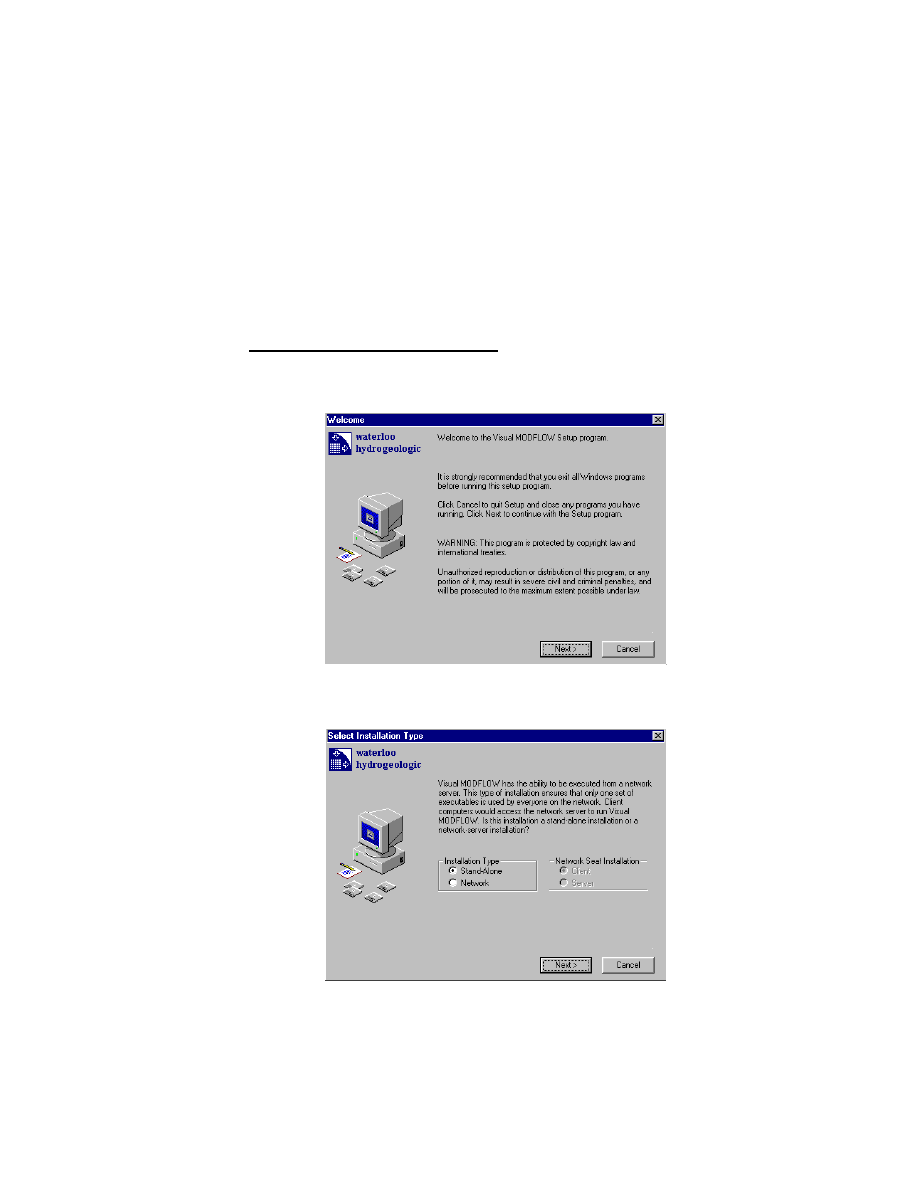
The Visual MODFLOW Welcome window will appear. Click on [Next>] to
continue.
[6]
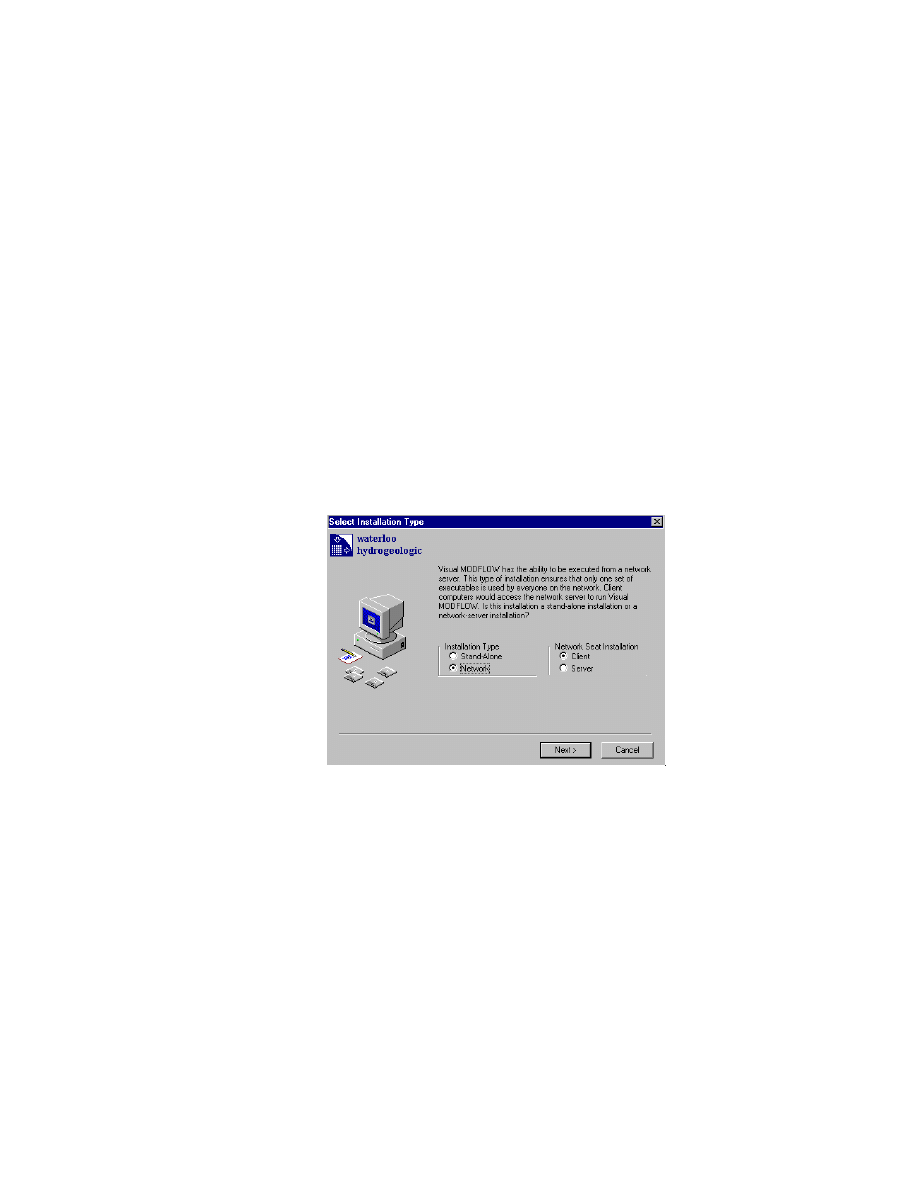
The following window will appear prompting you to select the type of installation
you wish to use.
Visual MODFLOW General Installation Instructions
5
If you are installing the Stand-Alone version of Visual MODFLOW, then proceed with
the following instructions. If you are installing the Network version of Visual
MODFLOW, then please proceed to the instructions on page 10.
Stand-Alone Installations
[7]
To install a Stand-Alone license of Visual MODFLOW, click on [Stand-Alone],
followed by [Next>].
[8]
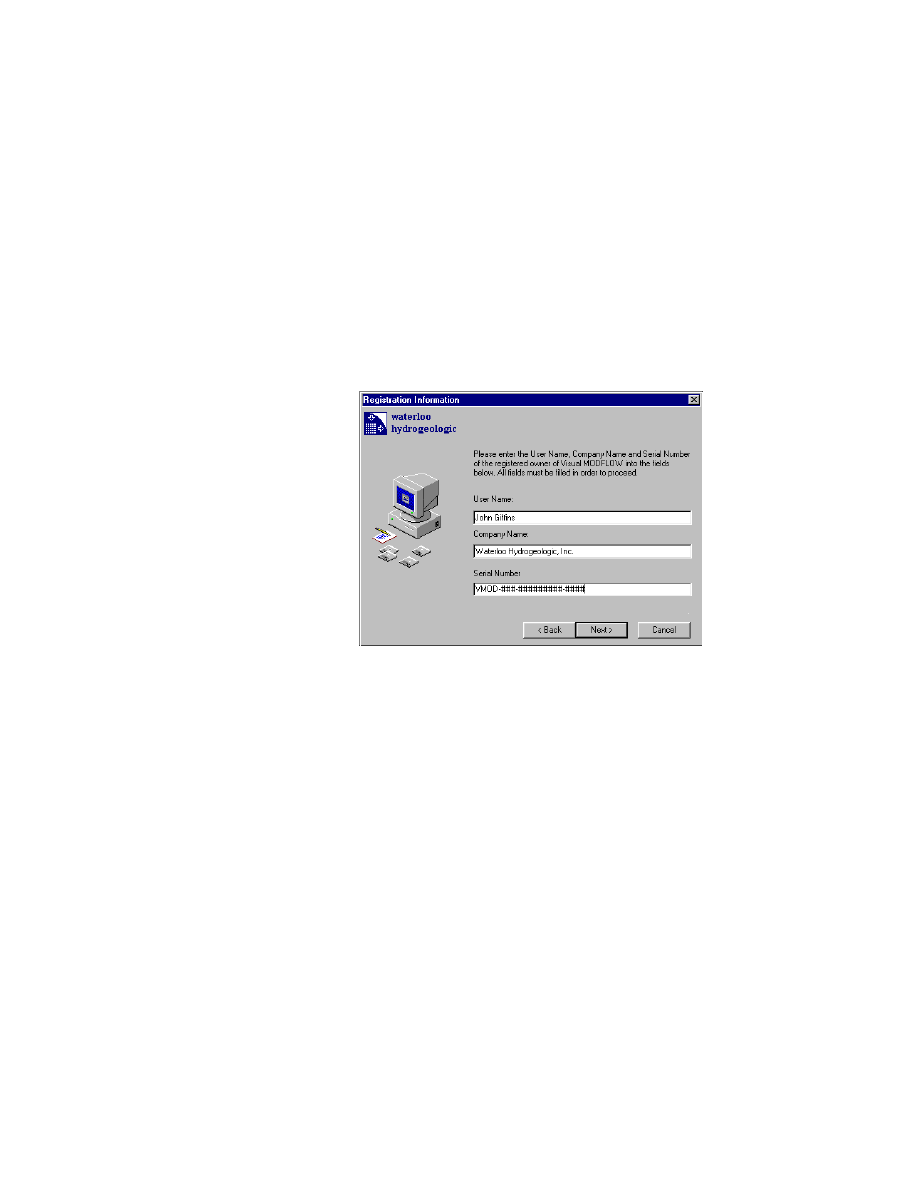
The next window will prompt you to enter your name, company name, and serial
number. Use all upper case letters and hyphens for the serial number. When all
fields have been entered, click on [Next>].
6
Chapter 2 - General Installation
[9]
Your serial number will be verified. If you have entered an invalid or incorrect
serial number, you will be prompted to go back and re-enter the serial number.
Please be sure to enter the serial number precisely, being sure to include upper-
case letters and hyphens. If you have successfully entered the serial number, the
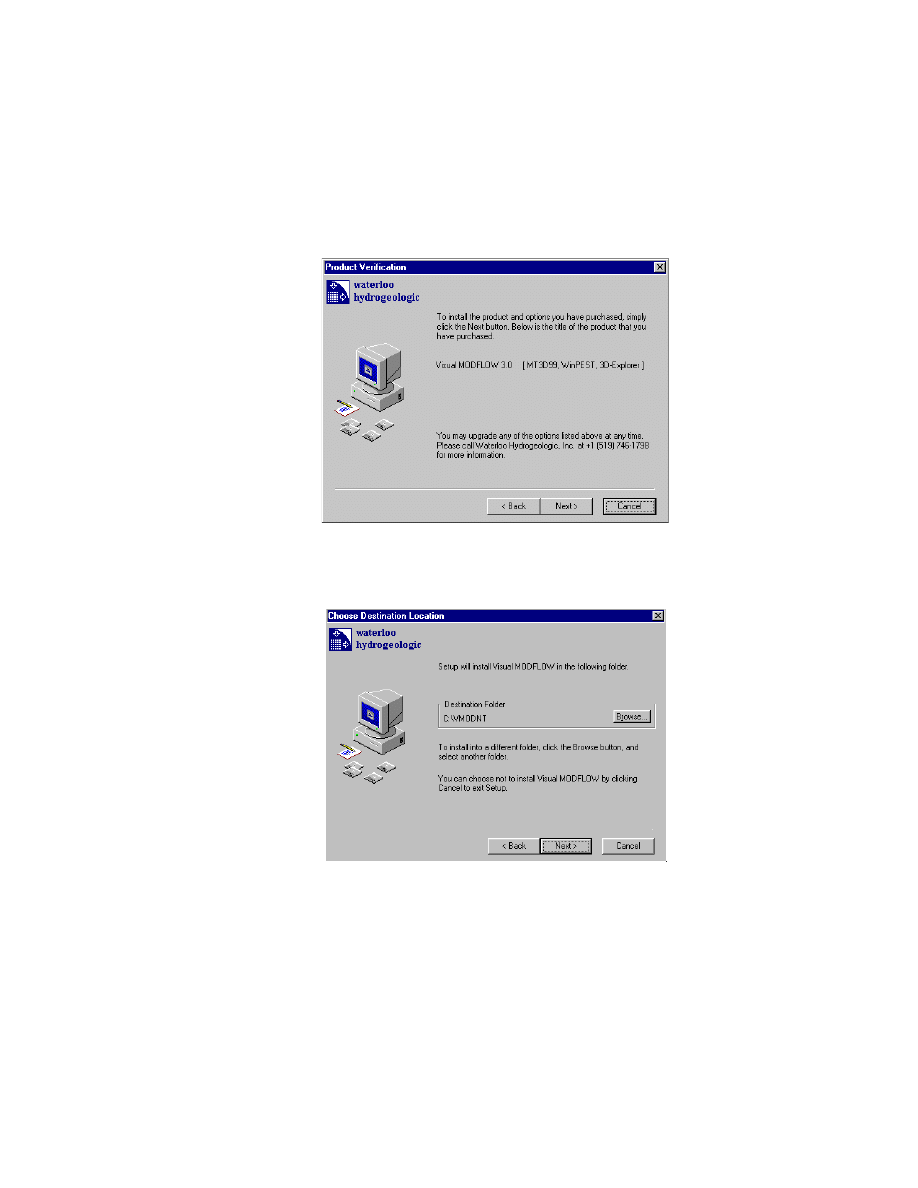
following confirmation window will appear. Click on [Next>] to continue.
[10] Locate and define the directory on your computer where you wish to install
Visual MODFLOW. The default directory is C:\VMODNT\ . Click on [Next>]
when you have chosen the appropriate directory.
[11] The next window is used to backup all files replaced during the Visual
MODFLOW installation. Select [Yes], if you wish to backup your files and select
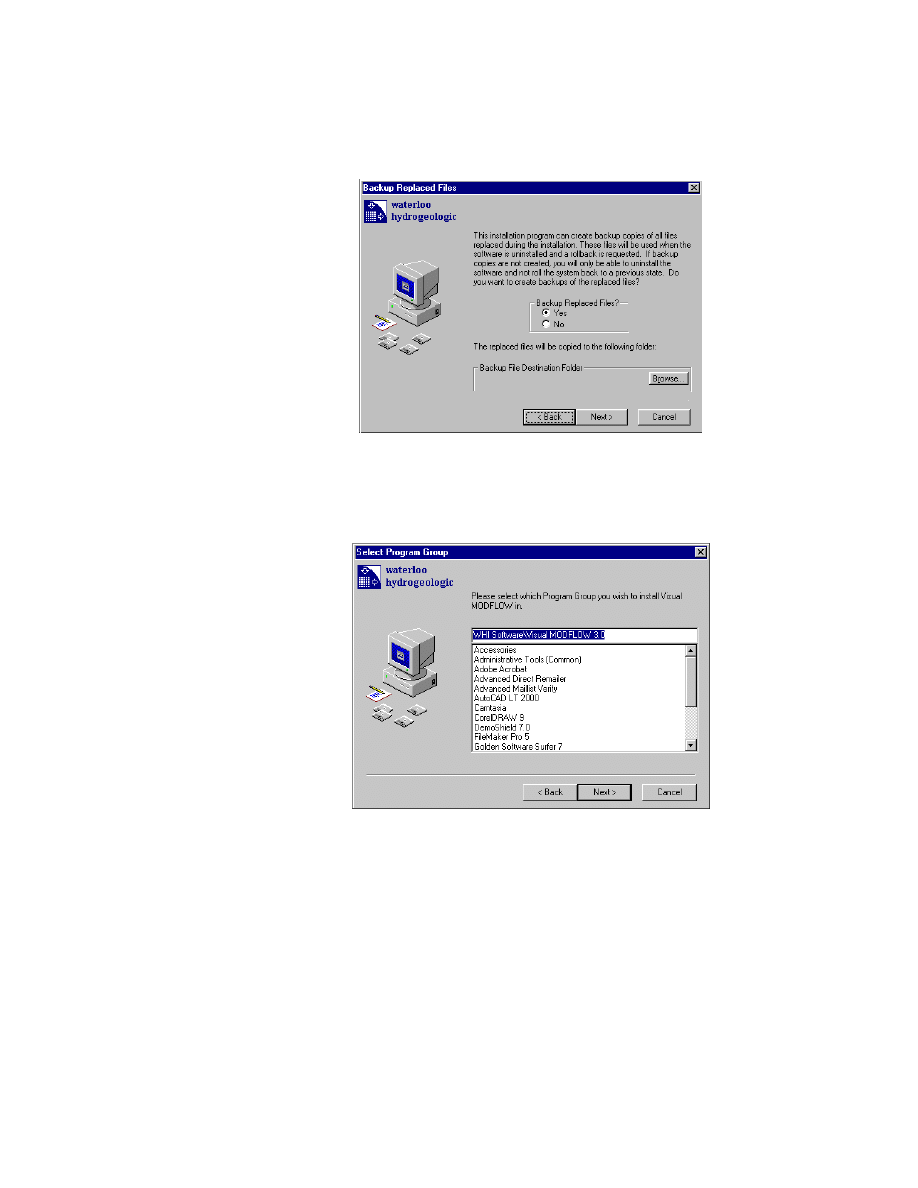
Visual MODFLOW General Installation Instructions
7
the location. Click on [Next>] to continue.
[12] Select the program group you wish to associate Visual MODFLOW with. The
default is, WHI Software\Visual MODFLOW 3.0\ . To continue click on
[Next>].
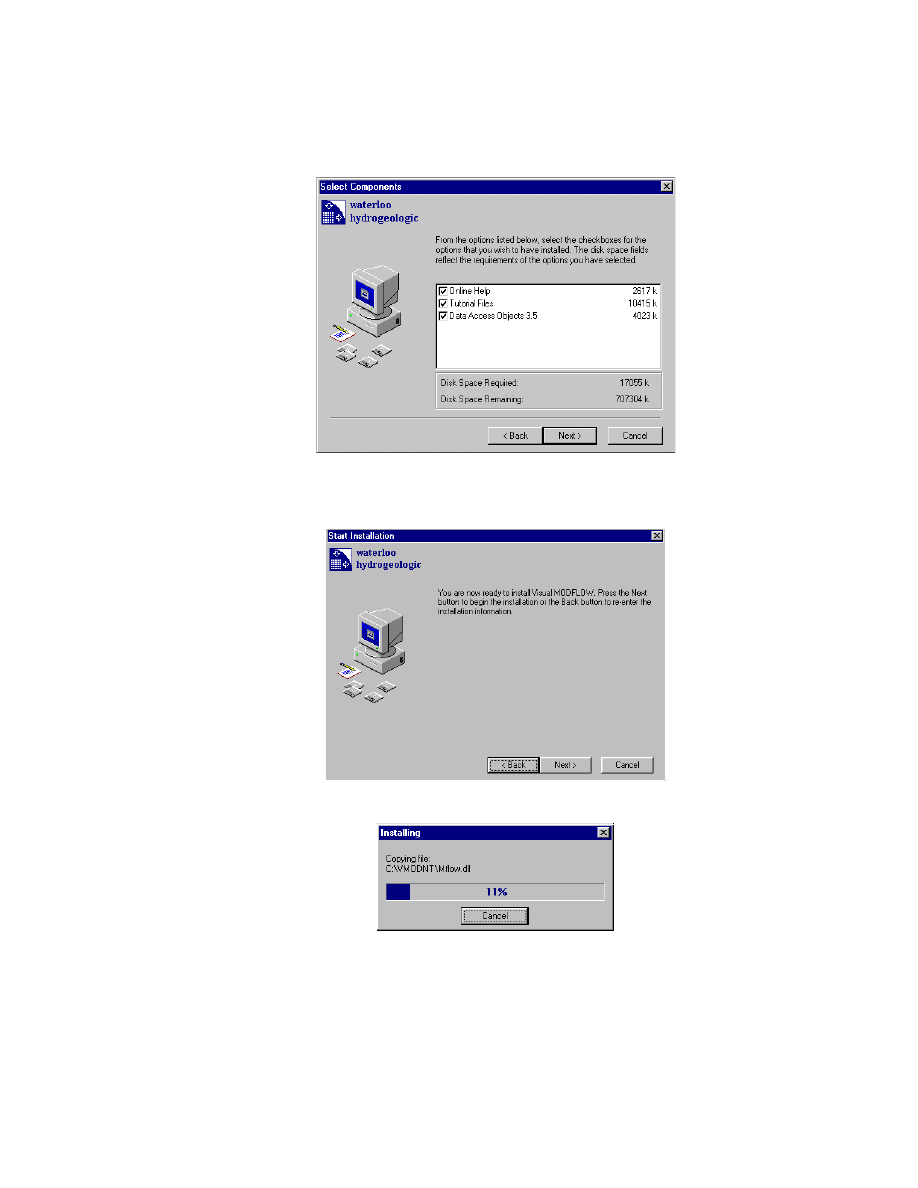
[13] Select the components you wish to include with your Visual MODFLOW
installation. When the components have been selected, click on [Next>].
8
Chapter 2 - General Installation
[14] You are now ready to install Visual MODFLOW. Click on [Next>] to finalize the
Visual MODFLOW installation.
Visual MODFLOW General Installation Instructions
9
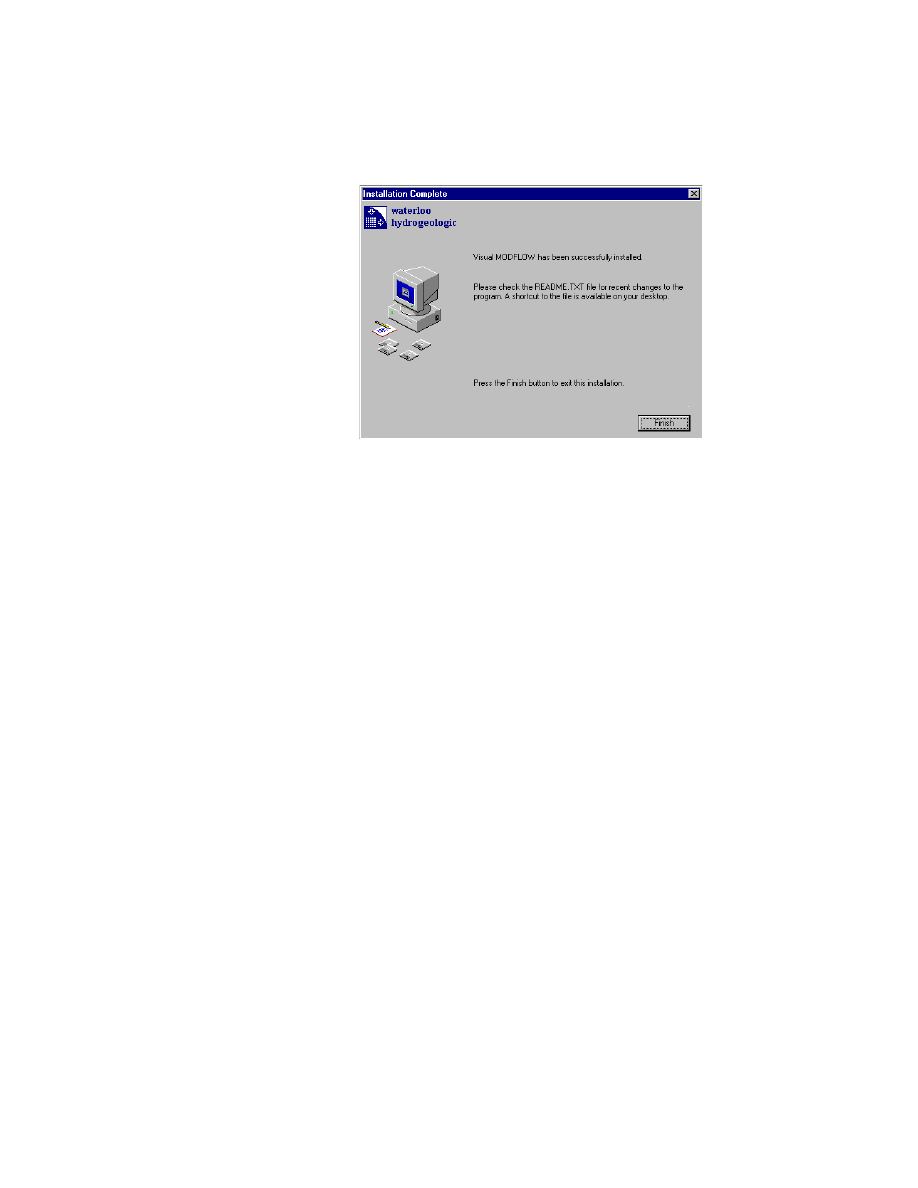
[15] Click on [Finish>] to complete the Visual MODFLOW installation.
NOTE: Click on [OK] to restart your computer
(you may need to restart).
You have now successfully installed the Stand-Alone version of Visual MODFLOW.

10
Chapter 2 - General Installation
Network Installations: Installing a Network Server
(Continued from page 5)
A Network Installation is designed to allow one or more licenses to “float”. Depending
on the number of licenses purchased, you may use Visual MODFLOW on any
computer over the Network. To use the Network Installation, a network license must
be available through the Server. Access to the Server from other computers requires
that you install the Client Installation of Visual MODFLOW on those computers.
[7]
To install the Visual MODFLOW Server, follow steps [1] through [5]. In the
Select Installation Type dialog box (step [6]), select the buttons for [Network]
and [Server]. To continue with the installation, click on [Next>].
[8]
The next Window will prompt you to enter your name, company name, and serial
number. Use upper case letters and hyphens where specified. Click on [Next>]
when completed.
[9]
Your serial number will be verified. If you have entered an invalid or incorrect
serial number, you will be prompted to go back and re-enter the serial number. If
you have successfully entered the serial number, click on [Next>].
[10] Locate and define the directory on your computer where you wish to install
Visual MODFLOW. The default directory is C:\VMODNT\ . To continue, click
on [Next>].
[11] The next window is used to backup all files replaced during the Visual
MODFLOW installation. Select YES, if you wish to backup your files and select
the location. To continue, click on [Next>].
[12] Select the program group you wish to associate Visual MODFLOW with. The
default is; WHI Software\Visual MODFLOW 3.0\. To continue, click on
[Next>].

Visual MODFLOW General Installation Instructions
11
[13] Select the components you wish to include with your Visual MODFLOW
installation. Once selected, click on [Next>].
NOTE: If your network uses Novell Netware, be sure to install the Novell Netware
Software Protection Drivers component.
[14] You are now ready to install the Visual MODFLOW Server. Click on [Next>] to
finalize the Visual MODFLOW installation.
• Click on [Continue >] for DCW SetupEx
(Only for Software Protected versions running on
Windows NT operating systems)
• Click on [Finish>] to complete the Visual MODFLOW install
• Click on [OK>] to restart your computer
(you may need to restart)
.
You have now successfully installed the Visual MODFLOW Server. To run Visual
MODFLOW over the Network, you must install Client Installations. Please be sure
to refer to your license agreement when running multiple licenses of Visual
MODFLOW. To run Visual MODFLOW on other computers over the Network, see
the next section for installing a Network Client.
12
Chapter 2 - General Installation
Network Installations: Installing a Network Client
To use Visual MODFLOW on additional computers over the Network, you will be
required to install the Visual MODFLOW Network Client. The Client will
communicate with the Server for required systems files.
[15] To install the Client, insert the Visual MODFLOW installation CD ROM and
begin the installation following steps [1] through [5].
NOTE: Before installing a Network Client Installation, you must map a drive to
the location where the Network Server was installed. For example, a
Network Server Installation is installed on drive G: on a computer called
Server1. Client computers must have a network drive mapped to Server1’s
drive G:. This drive must remain mapped for as long as the Client / Server
Installations are used. For more information, see your Systems
Administrator or the Windows On-Line Help.
[16] Once in the Select Installation Type window, begin the Visual MODFLOW
Client Installation by clicking on the [Network] and [Client] buttons. To
continue, click on [Next>].

Visual MODFLOW General Installation Instructions
13
[17] The next window is used to locate the Server Installation of Visual MODFLOW.
Please select the drive you have already mapped and then click on [Next>].
[18] Locate and define the directory on your computer where you wish all temporary
Visual MODFLOW files to be placed. The default directory is C:\VMODNT\ .
The Client must have read/write access to this location. If you do not know,
please contact your Systems Administrator for assistance. To continue, click on
[Next>].

14
Chapter 2 - General Installation
[19] You are now ready to install the Visual MODFLOW Client. Click on [Next >] to
finalize the installation.
• Click on [Continue >] for DCW SetupEx
(Only for Software Protected versions run-
ning on Windows NT operating systems)
• Click on [Finish>] to complete the Visual MODFLOW installation
• Click on [OK>] to restart your computer
(you may need to restart).
You have now successfully installed the Visual MODFLOW Client.
To open Visual MODFLOW, you may select the shortcut placed on your Desktop.
Simply double-click the Visual MODFLOW 3.0 icon.
Wyszukiwarka
Podobne podstrony:
installation guide
04 vpuml installation guide
install guide
Installation Guide
install guide
HP System Management Homepage Installation Guide (September 2008)
gmax tempest install guide
HP System Management Homepage Installation Guide (March 2008)
Installation Removal guide RUS
Installation Guide Licensing gu Nieznany
4 4 1 guide de l utilisateur 1 installation
Installation Guide for WindowsXP
c20h c28h c40h c60h installation guide
installation guide
install guide
Mac OS X Installation Guide
Guide to the installation of PV systems 2nd Edition
03 bpva installation guide
Installation Guide, Software Registration Form
więcej podobnych podstron