
Every effort has been made to ensure that the infor-
mation in this document is complete, accurate, and
up-to-date. Okidata assumes no responsibility for the
results of errors beyond its control. Okidata also
cannot guarantee that changes in software and
equipment made by other manufacturers and referred
to in this guide will not affect the applicability of the
information in it. Mention of software products
manufactured by other companies does not necessar-
ily constitute endorsement by Okidata.
Copyright 1998 by Okidata. All rights reserved.
First edition September, 1998.
Written and produced by the Okidata Training & Publica-
tions Department. Please address any comments on this
publication
• by mail to:
Training & Publications Department
Okidata, Division of Oki America, Inc.
2000 Bishops Gate Blvd.
Mount Laurel, New Jersey 08054-4620
• or by email to:
pubs@okidata.com
We welcome you to visit our web site:
http://www.okidata.com
Year 2000 Compliance
All products currently sold by Okidata are Year 2000
Compliant. Each product contains information
technology that accurately processes date and time
data between the years 1999 and 2000. These prod-
ucts, when used in combination with products pur-
chased from other manufacturers, whose products
properly exchange date and time information, will
accurately process the date and time. All future
products are committed to meeting the same Year
2000 compliance.
E
NERGY
S
TAR
As an E
NERGY
S
TAR
®
Partner, Okidata
has determined that this product
meets the E
NERGY
S
TAR
guidelines
for energy efficiency.
OKI, OKIDATA and OKIPAGE are registered trademarks/
marques déposées/marcas registradas, and OKIcare is a
trademark of Oki Electric Industry Company, Ltd.
Adobe, Acrobat, Acrobat Reader, Illustrator, PageMaker,
Photoshop, PostScript and Type Manager are trademarks of
Adobe Systems Inc., which may be registered in certain
jurisdictions. CorelDRAW is a registered trademark of Corel
Corporation. E
NERGY
S
TAR
is a registered trademark of the
United States Environmental Protection Agency. HP and PCL
are registered trademarks of Hewlett-Packard. Macintosh is a
trademark of Apple Computer, Inc., registered in the U.S. and
other countries. Macromedia and FreeHand are registered
trademarks of Macromedia, Inc. PANTONE is a registered
trademark of Pantone, Inc. QuarkXPress is a registered
trademark of Quark, Inc. and all applicable affiliated compa-
nies. Windows is either a registered trademark or a trademark
of Microsoft Corporation in the United States and/or other
countries.


Contents
Obtaining Service ................................................. 1
Okidata Online ................................................. 1
Your Dealer ...................................................... 1
Customer Support Center ................................ 1
Customer Support Representatives ................. 2
Faxable Facts ................................................... 2
Warranty Service .............................................. 3
Okidata Service Centers ....................................... 3
Shipping Your Printer .......................................... 3
OKIcare™ Service Enhancement Programs ..... 4
Print Media ........................................................... 5
Selecting Print Media ...................................... 5
Paper Tray ..................................................... 5
Front Feeder .................................................. 5
Loading the Paper Tray ................................... 6
Printing on Special Media ............................... 7
Using the Front Feeder
with Multiple Sheets .................................... 8
Paper Tray Gauge ............................................ 8
Control Panel ........................................................ 9
Left Side .......................................................... 9
Right Side ........................................................ 9
Printing the Menus ........................................ 10
Using the Quick Access Menus ..................... 10
Printer Maintenance .......................................... 11
Purchasing Supplies ...................................... 11
Ways to Purchase ........................................ 11
Supply Order Numbers .................................. 11
Replacing a Toner Cartridge .......................... 12
Replacing an Image Drum ............................. 14
Toner Waste Box Replacement ...................... 17
Oil Roller Replacement ................................. 17
Transfer Belt Replacement ............................ 17
Color Registration .............................................. 18
Setting the Color Registration for
Windows 95/98/NT 4.0 .................................. 18
Windows NT 3.1x .......................................... 20
Macintosh ...................................................... 22
Problem Solving .................................................. 24
Paper Jams ..................................................... 24
Paper Input Jam .......................................... 24
Paper Feed Jam ........................................... 25

Paper Exit Jam ............................................ 26
Print Quality ...................................................... 28
Display Messages ................................................ 30
Normal Operation .......................................... 30
Maintenance .................................................. 30
Problems ........................................................ 31
Call for Service .............................................. 32
Setting Power Saving Mode ............................... 33
Uninstall Printer Software ................................ 34
Windows 95, 98 ............................................. 34
Windows 3.1x ................................................ 34
Windows NT 4.0 ............................................ 34
Windows NT 3.51 .......................................... 34
Macintosh ...................................................... 34
Emergency Procedure for Toner ....................... 35
Companion Documentation and Software
on the CD
• User’s Guide
*
Print Media
*
Service & Support
*
Maintenance
*
Printer Control
*
Specifications
• Color Guide
*
The Use of Color
*
Color Perception
*
The Electromagnetic Spectrum
*
Primary & Secondary Colors
*
Specifying Color, etc.
• PANTONE
®
“Importing Color Palettes Into
Desktop Publishing Applications”
.
Adobe
®
Illustrator
®
Adobe PhotoShip
®
Adobe PageMaker
Corel Draw
®
Quark XPress
®
Macromedia
®
FreeHand
®
etc.
• Adobe Type Manager Software
• PostScript Screen Fonts

1
Obtaining
Service
This information is valid for the United States and
Canada only.
If you can’t solve your printer problem after reading
this manual, contact these sources for service or
support.
Okidata Online
Visit the Okidata Web Site at
http://www.okidata.com
for the latest information on:
•
Software drivers
•
Product guides
•
Customer support
•
Corporate information
•
Dealers
•
Documentation
Your Dealer
Consult the store where you purchased your printer,
or call 1-800-OKIDATA (800-654-3282) for the
location of the nearest authorized Okidata service
dealer. Have your ZIP code ready.
•
Proof of purchase is required for warranty work.
Be sure to retain your purchase documents.
•
Prices and minimum charges may vary.
The Okidata Customer
Support Center
For customer support, call 1-800-OKIDATA
(1-800-654-3282). The Okidata
Information System Automated Attendant
is available 24 hours a day, 7 days a
week.
The system can provide immediate assistance with:
•
Basic printer operating procedures
•
Sales and service referrals
•
Parts and consumable referrals
•
Product information

2
Okidata Customer Support
Representatives
Agents are available 24 hours a day, 7 days a week.
Please be sure that you are calling from a telephone close
to your printer, so you can describe your problem
accurately. Our customer service representative are
trained on all current Okidata products They can answer
your questions regarding:
•
Installation of your printer
•
Determination of printer issues and require
service
•
Consumer relations
•
Interface information
•
Availability and installation of printer drivers.
(CSRs are not trained to provide assistance with
the use of commercial software packages.
Please consult your software user’s manual for
times and availability of their support).
Faxable Facts
You can have product and support information faxed
automatically to you through Okidata’s Faxable Facts, an
online document retrieval system. A touch-tone tele-
phone and facsimile machine with a designated telephone
number are required.
Call toll-free at 1-800-654-6651, press option 2 to hear a
description of how Faxable Facts works. If you are
calling for the first time, order a catalog of available
documents. This faxback system is accessible 24 hours a
day, 7 days a week. The following information can be
faxed to you in minutes:
•
Product data brochures
•
Product part numbers and pricing (USA and
Canadian)
•
User tips
•
Accessories, options, and consumables part
numbers and pricing (USA and Canadian)

3
Warranty Service
Your printer is warranted for one year from date of
purchase except for the printheads (LED imaging arrays),
which are warranted for a period of five years from date
of purchase.
If your printer hardware should fail during the warranty
period, Okidata will repair (or replace at its option) on-
site, at the original purchaser’s facility, within a 50 mile
radius of an authorized service center and without
charge, any defective component(s) of the Okipage 8c
(U.S. and Canada only).
For details, see the Limited Warranty in the “Warranty,
Specifications and Regulatory Information” booklet.
Okidata Authorized Dealers
and Service Centers
(United States and Canada)
Call 1-800-OKIDATA (800-654-3282)
Fax: 1-609-222-5247
Shipping your Printer
If it is necessary to ship your printer, call
1-800-OKIDATA (800-654-3282) for shipping
instructions and the location of your nearest au-
thorized service dealer. It is important to follow
specific repacking procedures to avoid damage
to your color printer.

4
OKI
care
™ Service Enhancement
Programs
This program offers you the opportunity to purchase
additional warranty service for your OKIPAGE 8c
printer. For pricing and more detailed information see
the enclosed brochure, or call
1-800-OKIDATA (1-800-654-3282)
or, visit our Web site:
http://www.okidata.com

5
Selecting Print Media
Paper Tray
•
Standard paper
(Recommended: Hammermill 24-lb.)
•
Letterhead Stationery
Capacity: up to 500 sheets of 20-lb paper
Weight: 20 to 28 lb
Minimum dimensions: 3.4" W x 5.5" L
Maximum dimensions: 8.5" W x 14" L
Front Feeder
•
Standard paper
(Recommended: Hammermill 24-lb.)
•
Letterhead Stationery
•
Transparencies (Recommended 3M CG 3710)
•
Card Stock
•
Labels
Capacity: up to 100 sheets of 20-lb. paper
up to 50 transparencies
Weight: 20 to 44 lb.
Minimum dimensions: 3.4" W x 5.5" L
Maximum dimensions: 8.5" W x 14" L
See the Print Media and Specifications sections of
your online 8c User’s Guide for more details on
recommended print media.
Print Media
6
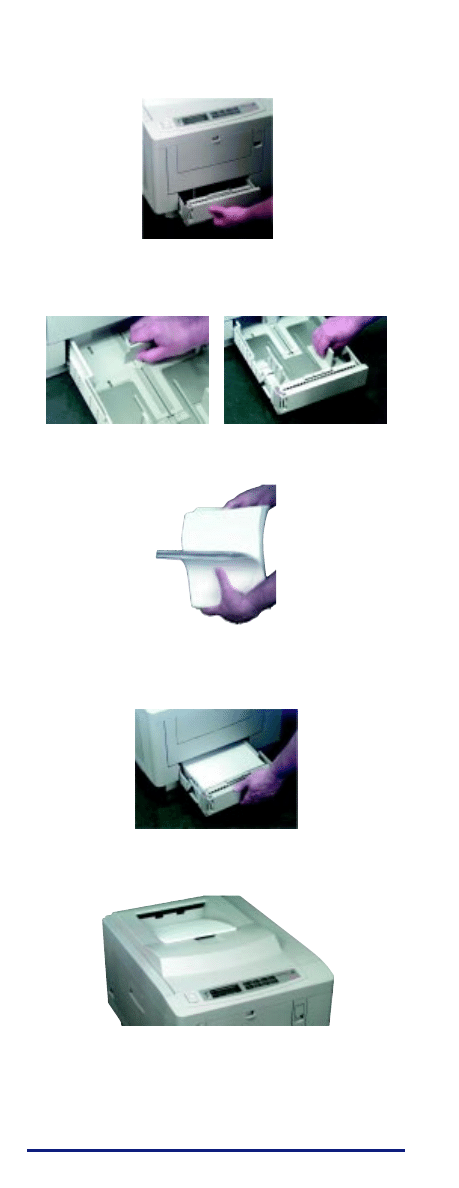
Loading the Paper Tray
1. Pull the paper tray out of the printer.
2. Adjust the paper guides for the size of the paper
you will be using.
3. Fan a ream of paper.
4. Place the paper in the tray and slide the tray back
into the printer.
Top Exit: Document Stacker
The Document Stacker is the one normally used.
Sheets stack face-down. Maximum capacity is 250
sheets of 20 lb. paper.
7
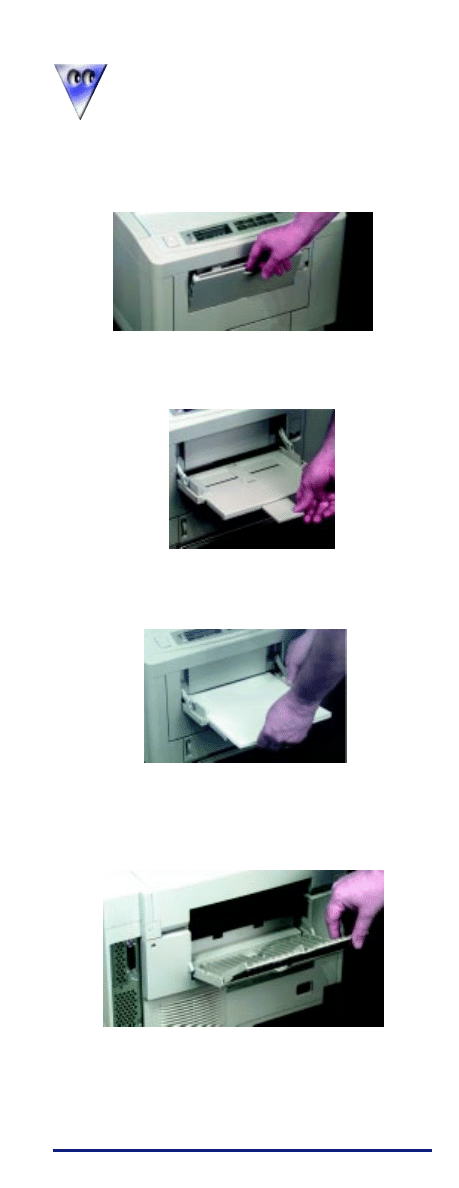
Printing on Special Media
If you are printing transparencies, labels or
card stock, you must use the Front Feeder
and rear exit (Special Media Stacker) to
provide a straight-through path.
To set up the Front Feeder:
1. Pull the Front Feeder down.
2. Flip out the paper support, then swing out the
paper extender.
3. Adjust the paper feed guides for the print media
you are using and load the media.
To engage the Special Media Stacker:
1. From the rear of the printer, pull the stacker
down and open the extender.
Media will feed to the rear, stacked face-up.
Maximum capacity is 100 sheets of 20 lb. paper.
8
Using the Front Feeder
with Multiple Sheets
If you are going to use the front feeder to feed a stack
of print media, you need to go into the menu and set
the printer paper input default to the Front Feeder:
1. Press the ON LINE button (printer goes off line).
2. Press and release TRAY TYPE.
3. Press Enter.
4. Press
©/Reset until FRONT TRAY appears on the
display.
5. Press Enter to select FRONT TRAY.
An asterisk appears to indicate the new default
setting.
6. Press ON LINE to engage the setting and exit the
menu.
When printing using the Front Feeder,
be sure to set your software for front
feed:
1. Enter the printer setup menu
2. Select front feeder.
3. Select the media type, size and
orientation.
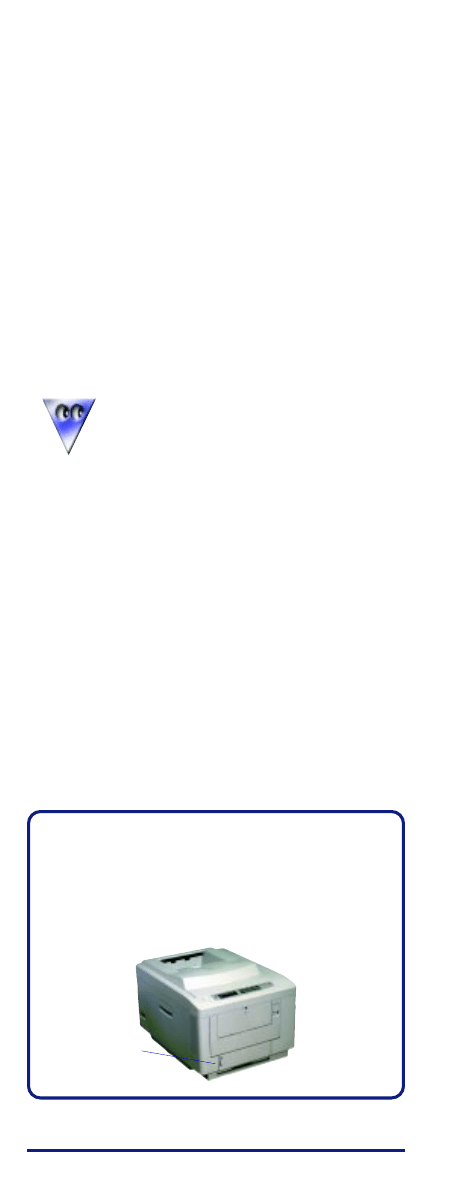
Paper Tray Gauge
The red paper tray gauge on the front of the printer
indicates how much paper is left in the tray. This
eliminates the need to open the drawer to check to
see how much paper is left.
Gauge
9
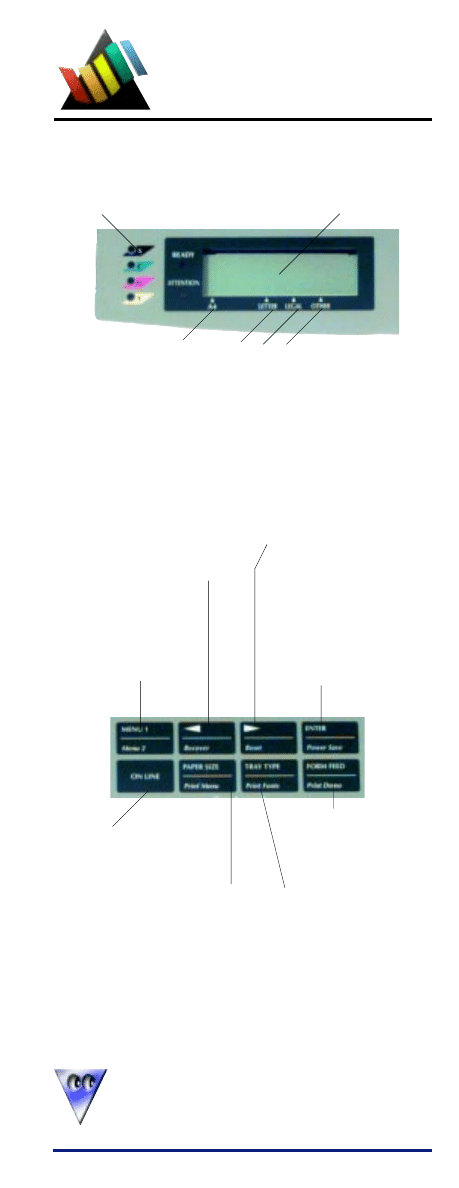
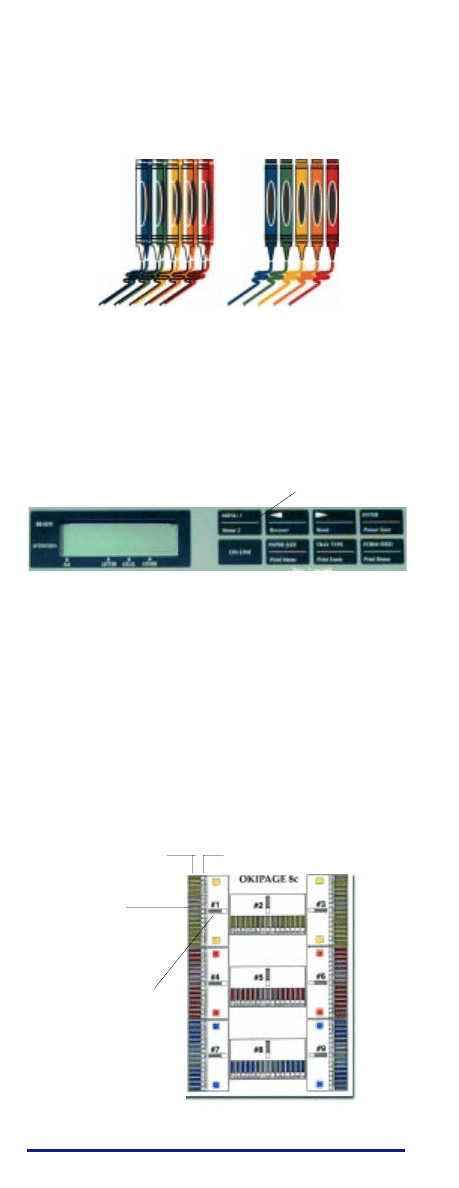
Control Panel
Right Side
The control panel buttons are dual function: press
and release to engage the top function; press and
hold for 2 to 3 seconds to engage the bottom func-
tion.
Left Side
Most printer features are selected directly in your soft-
ware application or in the status monitor software
included with your printer. You can also select features in
the printer menus using the control panel. However,
software settings will override control panel settings.
See the online User’s Guide on the
OKIPAGE 8c CD for details on the printer
menus.
Press:
In Menu Mode returns to
previous item.
Hold:
Clears error condition and
returns printer on-line
Press:
Enters Level-1 menu.
Hold:
Enters Level-2 menu.
Press:
Changes printer status
from on-line to off-line.
Press:
Enters the Paper Size Quick Menu.
Hold:
Prints a listing of the current and
default menu setting.
Press:
In Menu Mode advances
to next item.
Hold:
Deletes data in buffer
and executes internal
reset.
Press:
In Menu Mode: sets
displayed Menu
item as the user
default.
Hold:
Enters the Power
Save quick menu.
Press:
Ejects the current
page.
Hold:
Prints a Demo Page.
Press:
Enters the Tray Select
Quick Menu.
Hold:
Prints a sample of
installed printer fonts.
Paper Size Indicators
Toner Low Indicators
LCD Display

10
Printing the Menus
To print a list of the menu items and their current set-
tings:
1. Place the printer off-line (press ON LINE).
2. Press and hold PAPER SIZE/Print Menu until the
display reads PRINT MENU.
3. To print the menu for the HP PCL5C emulation,
press ENTER/Power Save. To print the menu for
PostScript, press
©/Reset so that PS shows on the
second line of the display, then press ENTER/
Power Save.
4. The menu prints.
The printout shows the factory default settings, the
current settings, and the amount of memory installed in
your printer.
Using the Quick Access Menus
The PAPER SIZE, TRAY TYPE, and POWER SAVE
menu features can be accessed directly without having to
step through each menu category.
To do this:
1. Place the printer off-line (press ON LINE).
2. Press and release PAPER SIZE, or
Press and release TRAY TYPE, or
Press POWER SAVE for two full seconds.
3. Press repeatedly until you see the selection you
want.
4. Press ENTER/Power Save to set the selection as the
default. An asterisk (*) appears to indicat the new
default setting.
5. Press ON LINE to exit the menu and place the
printer back on-line.
For information on Power Save, see “Set-
ting Power Saving Mode.”

11
Printer
Maintenance
Purchasing Supplies
Before you order, know your printer model number (see
the front of the printer) and have the correct part number
and description of the item.
Ways to Purchase
• Consult the dealer where you purchased your printer.
• Consult an Okidata Authorized Sales or Service
Dealer.
• Call 1-800-OKIDATA for the nearest Authorized Sales
and Service location. Have your ZIP code ready.
• Check office supply catalogs or your local stationery
store. Most carry OKI brand supplies.
• Call 1-800-OKIDATA (1-800-654-3282), and order
your supplies directly from Okidata using a major
credit card.
Supply Order Numbers
Part #
Item
40370602
Yellow Toner Cartridge Kit
40370603
Magenta Toner Cartridge Kit
40370604
Cyan Toner Cartridge Kit
40370201
Black Image Drum Kit
40370301
Yellow Image Drum Kit
40370302
Magenta Image Drum Kit
40370303
Cyan Image Drum Kit
40490801
Transfer Belt
40490901
Fuser Kit 120V
40490904
Fuser Kit 240V
40645301
Oil Roller Kit
40645401
Waste Toner Bottle Kit
12
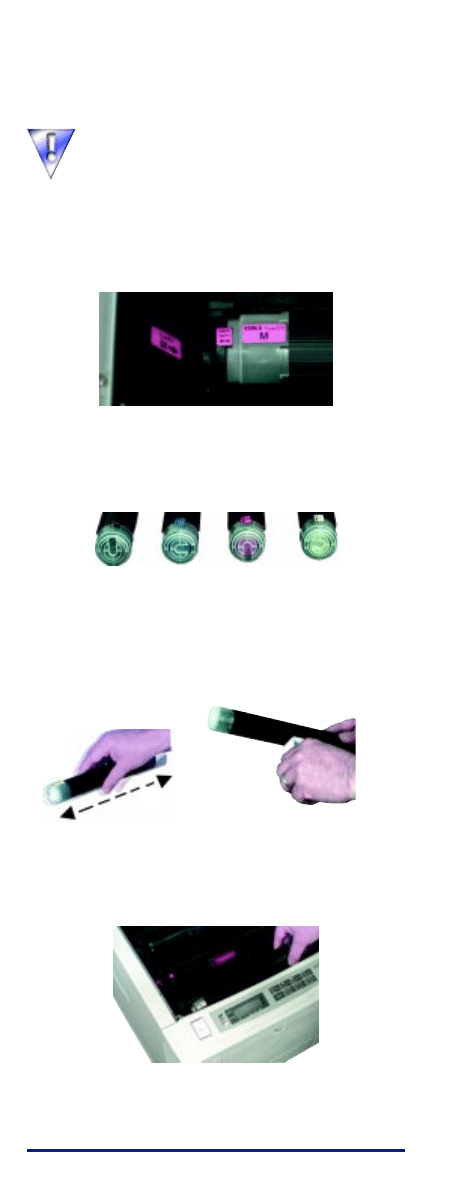
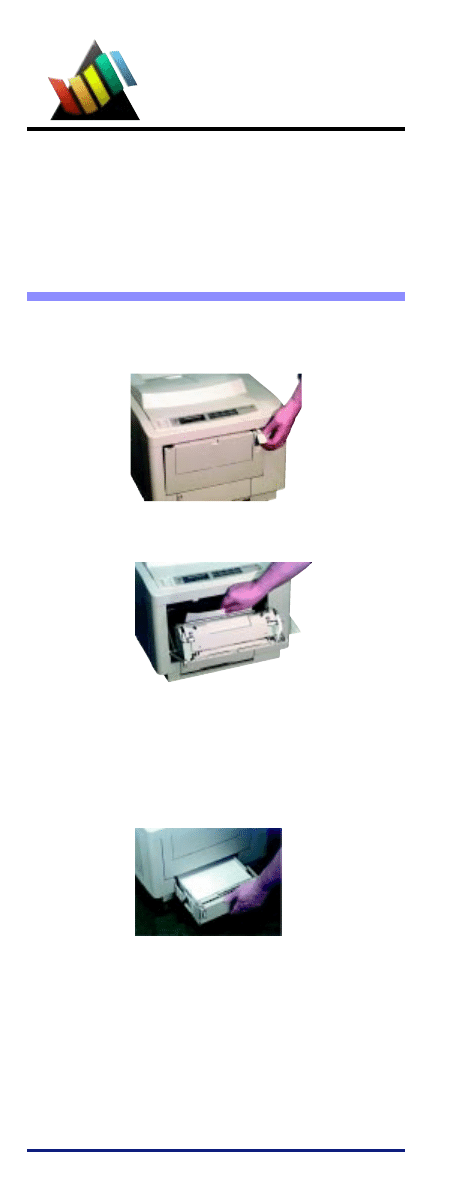
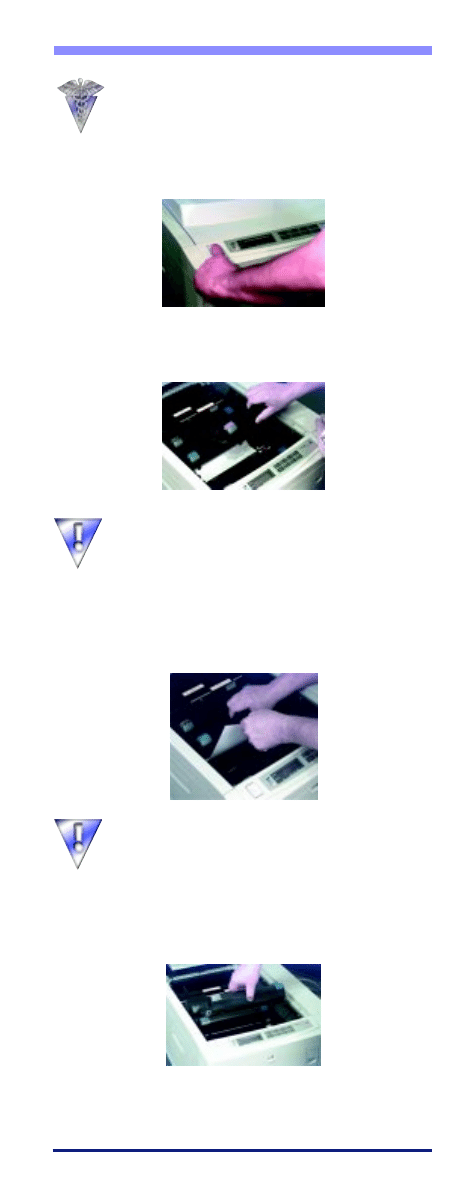
Replacing a Toner Cartridge
Replace a toner cartridge when the TONER EMPTY
message displays. The corresponding color LCD
indicator will light.
Be careful to install each color toner
cartridge in the corresponding color image
drum!
To make this easy, each image drum, toner cartridge and
slot in the printer has a color-coded label marked with
the corresponding letter (Y = yellow, M = magenta,
C = cyan, K = black).
In addition, the end of each toner cartridge is keyed so
that it will only fit into the correct color image drum.
1. Remove the new toner cartridge from its packaging
and shake it back and forth a few times to distribute
the toner evenly, then peel the tape off the bottom of
the cartridge.
2. Insert the left end of the cartridge in the correct
color image drum image drum, placing the recess
in the end of the cartridge under the color-coded
tab on the image drum.
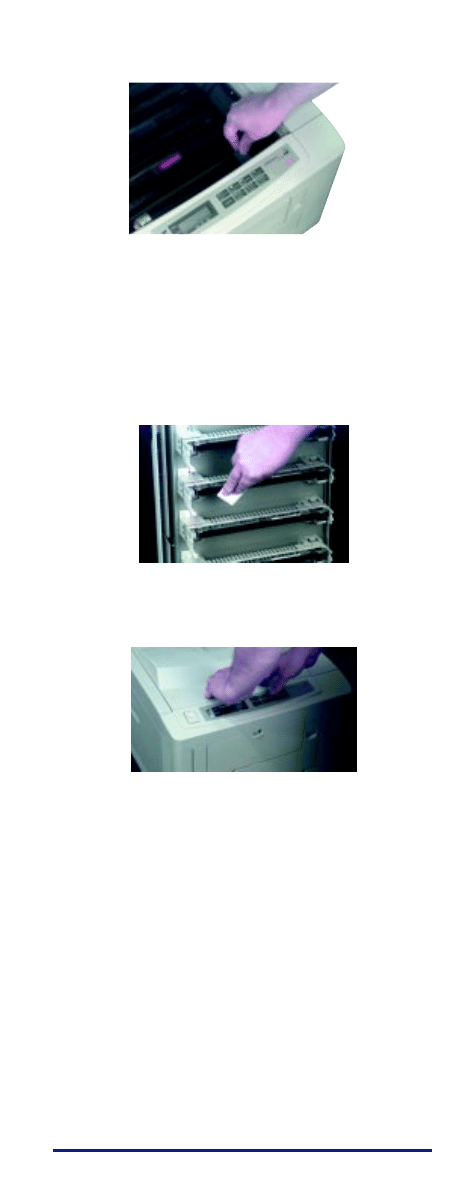
13
3. Lower the right end of the toner cartridge, aligning the
slot on the cartridge with the ridge in the image drum.
4. Push the colored lock lever toward the back of the
printer until it stops.
5. Clean the LED arrays
Open the LED lens cleaner package supplied with the
toner cartridge and use it to clean the LED arrays.
6. Close the cover.

14
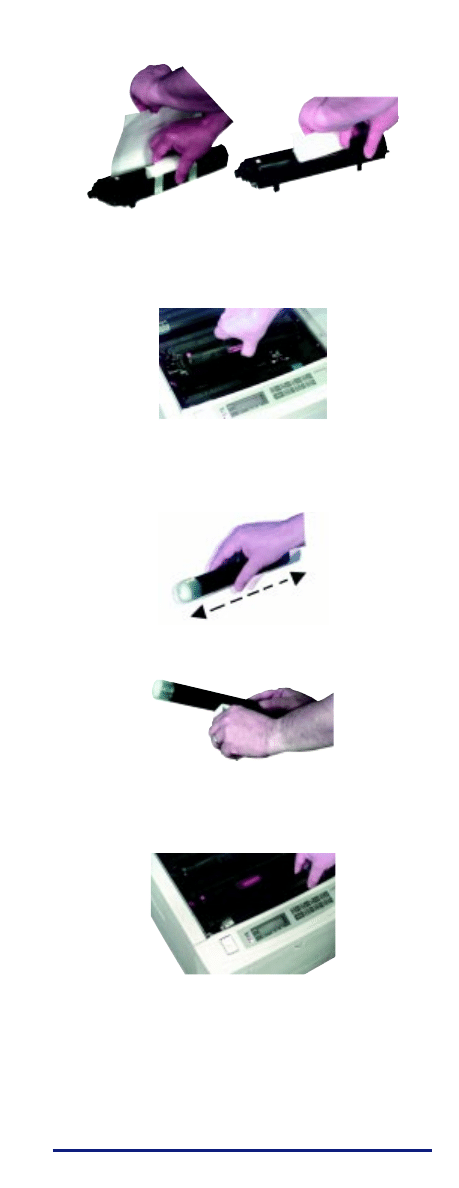
Replacing an Image Drum
Replace an image drum when the CHANGE DRUM
message displays. The corresponding color LCD indica-
tor will light.
CHANGE DRUM displays when the image drum has
reached 90% of its life. Recover temporarily by opening
and closing the cover, CHANGE DRUM displays after
printing every 20 pages until a new drum is installed.
Change the image drum cartridge when the print
becomes faint or begins to deteriorate.
Caution!
The fuser may be HOT (note CAUTION-HOT
labels).
Each image drum, toner cartridge, and slot in the printer
has a label marked with its corresponding color:
1. Turn the printer off and wait a few minutes for the
fuser to cool down.
2. Press the OPEN button and lift the cover.
3. Lift the image drum, with toner installed, out of the
printer. Discard both in accordance with local regula-
tions.
4. Unwrap the new image drum package.
Careful! To avoid damage to the drum, do not
touch the shiny green surface.
15
4. remove the protective paper, and toner well insert.
5. Insert the new image drum cartridge: match the color-
coded label on the image drum with the color-coded
label in the printer.
6. Remove the new toner cartridge from the packaging
and shake it from side to side a few times to distribute
the toner evenly.
7. Peel the tape off the bottom of the cartridge.
8. Insert the left end of the toner cartridge into the toner
well, placing the recess in the end of the cartridge
under the tab on the image drum.
9. Lower the right side of the cartridge, aligning the slot
with the ridge in the image drum.
10. Push the colored lock lever toward the back of the
printer until it stops.

16
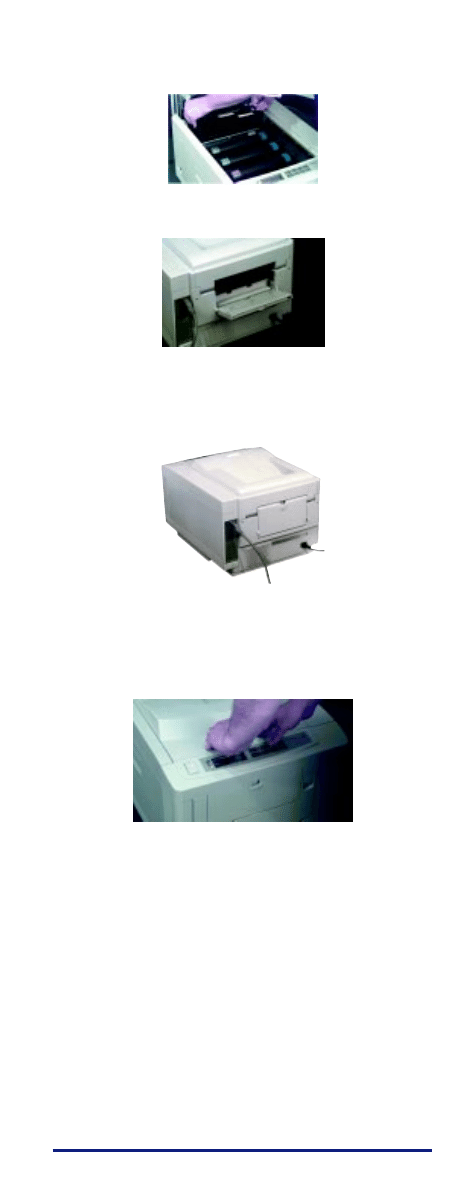
11. Open the LED Lens Cleaner supplied with the toner
cartridge and use it to clean the LED arrays.
12. Close the printer cover, pressing down to lock it in
place.
13. Reset the Drum Counter:
a. Press the MENU 1/Menu 2 button while turning the
printer on.
USER MNT appears on the display.
b. Press the MENU 1/Menu 2 button until the message
corresponding to the drum you are replacing
appears. For example, if you are replacing the
magenta image drum:
MAGENTA DRMCNT
RESET
c. Press the ENTER/POWER SAVE button.
RESETTING briefly appears on the display.
d. Press the ON LINE button.
17
Toner Waste Box Replacement
To avoid color mixture, the remaining toner formed on
the drum is wiped into a waste toner box with a cleaning
blade. When you see the message WASTE TNR NR
FULL on the display, you need to replace the toner waste
box.
Purchase Kit #40645401. Replacement instructions are
included in the kit and in the online User’s Guide.
Oil Roller Replacement
When OIL ROLLER LIFE appears on the display, you
need to change the oil roller unit. Purchase Kit
#40645301. Replacement instructions are included in the
kit and in the online User’s Guide.
Transfer Belt Replacement
When you see the message BELT LIFE on the printer
display, you need to change the Transfer Belt Unit.
Purchase Kit #40490801
.
Replacement instructions are
included in the kit and in the online User’s Guide.
18
Setting the Color Registration for
Windows 95/98/NT 4.0
Since each color is printed separately, you must set the
color registration to ensure that the colors line up
properly:
To ensure optimum print quality, you should set the color
registration on a routine basis (once a month or so).
It is also recommended that you set the color registration
when you change toner or image drums, when you load
paper in the paper tray, or if you move the printer.
1. Open the Color Registration Utility: click Start
→
→
→
→
→
Programs
→
→
→
→
→
Okipage 8c
→
→
→
→
→
Okipage 8c Color
Registration Utility.
2. Make sure Okipage 8c on LPT1: (or Okipage 8c PS
on LPT1:) is highlighted in the box (if you are using a
port other than LPT1:, make sure that port is
highlighted).
3. Click Print Color Calibration page.
The printer prints a color test page with 9 sections,
each with a series of lined boxes in it:
Color
Registration
Lined Boxes
Lined Box Numbers
Section #1
List Box
Out of Registration
Proper Registration

19
6. Repeat steps 4 and 5 for the remaining eight
sections.
7. Click Send changes to the printer.
The printer prints another color test page. This
time, the box where no color shows should be box
+1, 0, or -1 for each section. If it isn’t, repeat steps
3 through 6 until it does.
8. Click Close.
4. Beginning with section #1, find the lined boxwhere no
color shows in the spaces between the black lines and
note its corresponding number.
If more than one box has no color, select the
one closest to zero. If all the boxes have
color, select the lightest one, nearest zero.
5. On the screen, find the corresponding list box (in this
case, #1—yellow, left) and scroll to the number you
noted.
List Box #1
20
Setting the Color Registration for
Windows 3.1x
Since each color is printed separately, you must set the
color registration to ensure that the colors line up prop-
erly:
To ensure optimum print quality, you should set the color
registration on a routine basis (once a month or so).
It is also recommended that you set the color registration
when you change toner or image drums, when you load
paper in the paper tray, or if you move the printer.
1. Open the Status Monitor (click the Status Monitor
icon in the Okipage 8c program group).
2. Click on Operator Panel.
3. Click the Color Registration tab.
4. Click Color Pattern Print.
The printer prints a color test page with 9 sections,
each with a series of lined boxes in it:
Lined Boxes
Lined Box Numbers
List Box
Section #1
Out of Registration
Proper Registration

21
4. Beginning with section #1, find the box where no
color shows in the spaces between the black lines and
note its corresponding number.
If more than one box has no color, select the
one closest to zero. If all the boxes have
color, select the lightest one, nearest zero.
5. On the screen, find the corresponding list box (in this
case, #1—yellow, left) and scroll to the number you
noted.
6. Repeat steps 4 and 5 for the remaining eight sections.
7. Click Apply.
8. Click Color Pattern Print.
The printer prints another color test page. This time,
the box where no color shows should correspond to
box +1, 0, or -1 for each section. If it isn’t, repeat
steps 3 through 6 until it does.
9. Click OK.
List Box #1
22
Setting Color Registration for the
Macintosh
Since each color is printed separately, you must set the
color registration to ensure that the colors line up prop-
erly:
To ensure optimum print quality, you should set the color
registration on a routine basis (once a month or so).
It is also recommended that you set the color registration
when you change toner or image drums, when you load
paper in the paper tray, or if you move the printer.
To set the color registration:
1. Turn the printer off, then press and hold the
MENU 1/Menu 2 button while you turn the printer on.
Continue to hold the button until
USER MNT
appears
on the display, then release it.
2. Press the MENU 1/Menu 2 button repeatedly until
COLOR REG ADJUST EXECUTE
appears on the
display.
3. Press the ENTER/Power Save button.
After a few seconds,
INITIALIZING
appears on the
display, then
PRINT PATTERN
displays. The printer
prints a color test page with 9 sections, each with a
series of lined boxes in it:
Lined Boxes
Lined Box Numbers
List Box
Section #1
Out of Registration
Proper Registration
Press

23
4. Beginning with section #1, find the lined box where
no color shows in the spaces between the black lines
and note its corresponding number.
If more than one box has no color, select the
one closest to zero. If all the boxes have
color, select the lightest one, nearest zero.
5. The display reads
ADJUST #1
, with the number 0 on
the second line. Press
©
/Reset
to increase the number
or
§
/Recover to decrease it, until the second line reads
the number of the correct box for section #1.
6. Press the MENU 1/Menu 2 button to move to section
#2 (display:
ADJUST #2
), and repeat the process to
select the box which shows no color in the spaces
between the black lines.
7. Repeat step 6 for each of the remaining seven sec-
tions. If you need to go back, hold MENU 1/Menu 2
down to move backwards through the menu.
8. When you are satisfied with your selections, press
MENU 1/Menu 2 repeatedly until
PRINT EXECUTE
appears on the display.
9. Press the ENTER/Power Save button.
The printer prints another color test page. This time,
the box where no color shows should correspond to
box +1, 0, or -1 for each section. If it doesn’t, press
the MENU 1/Menu 2 button and repeat steps 4
through 9 until it does.
10.Press the ON LINE button to save the settings and
exit the menu.
24
If a paper jam occurs, a message displays which
indicates the location of the jam. Once the jam is
cleared, the cover is closed, and warming up is
complete, the printer prints all the pages affected by
the jam.
Paper Input Jam
Paper has jammed between the tray and the first image drum
cartridge.
1. Lift the front feeder latch and pull the cover down.
2. Pull out any paper.
Note: If paper has advanced up to the first image
drum and resists pulling, use the Paper Feed Jam
procedure.
3. Pull out the paper tray and remove any partially
fed sheets.
4. Check the paper in the tray—it should be neatly
stacked, no sheets bent or stuck together.
5. Push the tray in gently—a full tray is heavy and
can damage the printer if slammed shut.
Problem
Solving
25
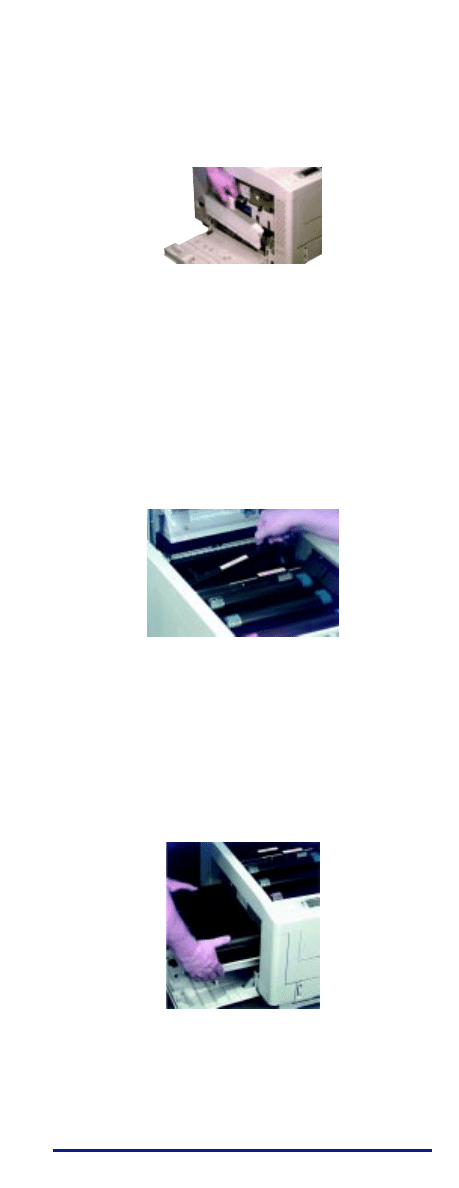
Paper Feed Jam
Paper has jammed under the image drums.
Be careful—do not touch the hot surfaces
around the fuser. Look for the yellow
warning labels.
1. Press the OPEN button and lift the top cover all the
way open.
2. Lift out each image drum cartridge and check under-
neath for sheets of paper.
Protect the drum cartridges from scratching
and exposure to strong light—especially
sunlight. For best protection, place them in
the black lightproof bags supplied.
3. When you have uncovered any sheets of paper,
carefully remove them. If possible, pull forward to
avoid spilling toner.
Be careful—do not scratch the transfer belt.
Do not use sharp instruments.
4. Place each image drum cartridge back into position in
the locating slots at each side of the printer. Be sure
to match the colored label on each cartridge with its
corresponding colored label in the printer.
5. Close the top cover and press down firmly on both
side to make sure that it is locked.
26
Paper Exit Jam
Paper has jammed in the fuser or between the fuser and the
paper exit.
Be careful—do not touch the hot surfaces
around the fuser. Look for the yellow warn-
ing labels.
1. Press the OPEN button and lift the top cover all the
way open.
2. Push the two colored fuser latch levers towards the
rear of the printer.
3. Lift the fuser by its two handles straight up and out of
the printer.
4. Pull the sheet of paper out of the fuser.
levers
27
5. Lower the fuser back into the printer, press down
firmly to seat it, then pull on the two blue levers to
make sure that the fuser is locked in position.
6. Open the rear exit stacker.
7. Look into the rear of the printer and remove any
pieces you find.
8. Close the rear exit stacker.
9. Close the top cover and press down firmly on both
sides to make sure that it is locked. Printing continues
automatically when you close the top cover, after a
short pause to allow the fuser to warm up.

28
Print Quality
The printer uses separate cartridges of cyan, magenta,
yellow and black toner to generate high definition
color images. Factors causing print quality problems
may affect only one color, or several colors, so the
results may be unpredictable.
For general information on using color, see
the online Color Guide.
See the online User’s Guide for additional
print quality symptoms and solutions.
Colors do not print as expected.
Reason:
A computer monitor and a printer use different
methods to generate colors based on a different set of
primaries —Red, Green and Blue (RGB) for moni-
tors, Cyan, Magenta, yellow and Black (CMYK) for
printers. This may lead to a color print not resem-
bling the original on-screen image.
Solution:
The Color Options tab (within the printer driver)
provides a list of color matching techniques and
adjustments to provide color balance in your docu-
ment.
You can use the color bars at the bottom of the Menu
Page to help isolate which color is causing the prob-
lem. To generate a Menu Page, press and hold the
FORM FEED/Print Demo button for several seconds.
The Menu page prints.
Colors are shifted or not lined up properly.
Reason:
Color registration is incorrect.
Solution:
Color registration needs to be reset. See “Color
Registration.” It is recommended that you reset color
registration when you change toner or image drums,
when you load paper in the paper tray, or if you
move the printer.
Press

29
Blank sheets printed/one or more colors
missing.
Reason:
An image drum cartridge may have been exposed to
light, or LED array or image drum contacts may have
failed.
Solution:
Leave image drum cartridge in total darkness for
several hours. If this fails to restore it, install a new
image drum cartridge.
Reason:
Empty or missing toner cartridge.
Solution:
Install new toner cartridge.
Entire page or one color prints faintly.
Reason:
Empty toner cartridge. Pages get fainter after toner is
used up.
Solution:
Install new toner cartridge.
Reason:
LED array is dirty.
Solution:
Clean the LED array.
Page prints all one color.
Reason:
Hardware problem
Solution:
Contact your service representative.
Page has gray or speckled background.
Reason:
Static electricity causes toner to stick to background
Solution:
Change paper to an acceptable laser bond and use a
humidifier.
Reason:
Image drum has been exposed to light.
Solution:
Leave image drum cartridge in total darkness for
several hours. If this fails to restore it, install a new
image drum cartridge.

30
Display Messages
Messages on the display panel show the status of the
printer. For a complete list of messages, see the online
User’s Guide. Following is a limited list of these
messages and if necessary, the recommended action.
Normal Operation
RESET TO FLUSH
(PostScript) Data currently in the printer can be deleted
by pressing the ON LINE button, then the RESET
button.
RESET
Press the RESET button to delete data left in the printer
and return the printer to the defaults you have set.
POWER SAVING
The printer is in power saving mode—the heating unit
has been turned off to save energy. When data is sent to
the printer, it automatically warms up briefly before
printing.
[paper size] [tray]
PAPER REQUEST
The printer is requesting a different size paper in the
indicated tray. Load the requested paper in the tray.
[paper size] MANUAL
[media type] REQUEST
Insert a page of the indicated size and type (paper,
envelope) in the frontl feeder.
Maintenance
TNR LOW [color]
One or more toner cartridges are nearly empty. The status
lights also indicate which color(s). Have the necessary
cartridge available. For replacement instructions, see
“Replacing a Toner Cartridge.”
[color]
TONER EMPTY
The indicated toner has run out—this message appears 50
pages after the TNR LOW message. Install a new toner
cartridge. For replacement instructions, see “Replacing a
Toner Cartridge.”
You can clear this message by opening and closing the
printer cover; the message appears again after 20 pages
are printed.
OIL ROLLER LIFE
The fuser oil roller needs to be replaced. When the
ATTENTION light is on, the printer can continue to
function. When the ATTENTION light is flashing,
replace the oil roller immediately. For replacement
instructions, refer to the online User’s Guide.
CHG DRUM [color]
One or more of the image drums needs to be replaced.
The status lights also indicate which color(s). For
replacement instructions, see “Replacing an Image
Drum.”

31
WASTE TNR
NR FULL
The waste toner box is almost full. Be prepared to
replace it when the WASTE TONER FULL message
appears.
WASTE TONER FULL
The waste toner box is full. For replacement instructions,
see “Printer Maintenance” or refer to the online User’s
Guide
FUSER LIFE
The fuser needs to be replaced. For replacement instruc-
tions, see “Printer Maintenance” or refer to the online
User’s Guide.
BELT LIFE
The transfer belt needs to be replaced. For replacement
instructions, see “Printer Maintenance” or refer to the
online User’s Guide..
Problems
HOPPING ERROR
Paper being fed from the paper tray has jammed. For
clearing instructions, see “Clearing Paper Input Jams.”
ERROR PAPER SIZE
CHECK [tray]
The paper size detected by the printer in the tray indi-
cated is incorrect for the current print job. Make sure the
size of the paper in the tray matches the size your
software calls for.
TRAY 1 INSTALL
The printer is trying to automatically switch to the
second paper tray when Tray 1 paper ran out. Do not
remove Tray 1 until the automatic switching process is
complete.
ERROR MEMORY
OVERFLOW
The current page is too complex and cannot be printed.
Try simplifying the page or reducing the resolution to
300 dpi. If this happens often, consider adding memory
to the printer. See the online User’s Guide for details on
memory upgrade options.
ERROR RECEIVE
BUFFER OVERFLOW
The transfer of data from the computer to the printer is
not properly coordinated. Check the printer cable and
printer interface menu settings. Adding optional memory
can also help the problem. See the online User’s Guide
for details on memory upgrade options.
TNR SNS [color]
Make sure the indicated image drum is installed. If it is,
lift it out and check the black lever on the right side
(facing the printer) of the metal rod below the image
drum—make sure there is no paper blocking it and that it
moves freely.

32
CANNOT USE A6
PAPER ON TRAY 2
The second paper tray cannot feed A6 size paper. Use
Tray 1 or the manual feed slot.
ERROR
D6 [#########]
Yellow image drum is not installed properly. Open the
top cover, check, and reinstall as necessary. For instruc-
tions, see “Replacing the Image Drum.”
ERROR
D7 [#########]
Magenta image drum is not installed properly. Open the
top cover, check, and reinstall as necessary. For instruc-
tions, see “Replacing the Image Drum.”
ERROR
D8 [#########]
Yellow image drum is not installed properly. Open the
top cover, check, and reinstall as necessary. For instruc-
tions, see “Replacing the Image Drum.”
ERROR
D9 [#########]
Black image drum is not installed properly. Open the top
cover, check, and reinstall as necessary. For instructions,
see “Replacing the Image Drum.”
ERROR
DF [#########]
The transfer belt unit is not installed correctly. Open the
top and left-hand side covers, check and reinstall as
necessary. For instructions, see “Printer Maintenance ” or
the online User’s Guide.
ERROR
E0 [#########]
The fuser unit is not installed correctly. Open the top and
left-hand side covers, check and reinstall as necessary.
For instructions, see “Printer Maintenance ” or the online
User’s Guide.
Call for Service
If you see any of these messages, turn the printer off,
then turn it on again. If this does not clear it, make a note
of the error message, and contact your authorized
Okidata service dealer. For information on obtaining
service, see “Obtaining Service.”
EEPROM RESETTING
or
ERROR
[nn] [#########]
where nn is not listed above
or
ERROR CONTROLLER
[nn-########]

33
E
NERGY
S
TAR
As an E
NERGY
S
TAR
®
Partner,
Okidata has determined that this
product meets the E
NERGY
S
TAR
guidelines for energy efficiency.
Setting Power Saving Mode
In power saving mode, the heating unit has been turned
off to save energy. When data is sent to the printer, it
automatically warms up briefly before printing.
If you want to disable or change this setting:
1. Place the printer off line (press ON LINE).
2. Press POWER SAVE for two full seconds.
3. Press
© repeatedly until you see the selection you
want.
4. Press ENTER/Power Save to set the selection as the
default. An aserisk (*) appears to indicate the new
default setting.
5. Press ON LINE to exit the menu and place the printer
back on line.
Power Saving Selections
0 SEC*
Reduces power consumption.
Immediatiately after printer stops
receiving data, fuser heating element
shuts off: 30 seconds later fan shuts off
When the printer receives data, the
fuser warms up before printing begins.
8 MIN
Reduces power consumption. Eight
minutes after printer stops receiving
data, the fuser heating element shuts
off; 30 seconds later fan shuts off.
When the printer receives data, the
fuser warms up before printing
begins.
DISABLE
Fuser and fan are always on, printer
is ready to print immediately.

34
Uninstall Printer Software
If you want to remove the printer driver or status monitor
from your hard drive, use the following procedure:
Always close the status monitor before
uninstalling. Some components may not be
removed if the status monitor is running.
Windows 95, 98
1. From the Taskbar, click Start→
→
→
→
→Settings→
→
→
→
→Control
Panel.
2. Double-click the Add/Remove Programs icon.
3. On the Install/Uninstall tab, select the OKIPAGE
8c Software and click Add/Remove.
4. Continue with the uninstall following the on-screen
instructions.
5. To delete the OKIPAGE 8c printer driver, right-click
on the OKIPAGE 8c icon in the Printers Folder,
and select Delete from the menu.
Windows 3.1x
1. From Program Manager double-click the
OKIPAGE 8c icon (or the group where your printer
is installed).
2. Double-click the UnInstallShield icon.
3. Continue with the uninstall following the on-screen
instructions.
Windows NT 4.0
1. From the Taskbar, click Start→
→
→
→
→Settings→
→
→
→
→Control
Panel
2. Double click on the Add/Remove Programs icon
3. Select the OKIPAGE 8c and click on Add/Remove.
4. Proceed with the uninstall following the on-screen
instructions.
5. To delete the OKIPAGE 8c printer driver, right-click
on the printer icon in the Printers Folder, and select
Delete from the menu.
Windows NT 3.51
Delete the Okidata OKIPAGE 8c icon from the program
group.
Macintosh
Double click on System→
→
→
→
→Folder→
→
→
→
→Extension→
→
→
→
→Printer
Description. Locate the Okipage 8c and drag to the
Trash icon.

35
Emergency Procedure for Toner
EMERGENCY FIRST AID PROCEDURES
Emergency
Procedure
Toner
Dilute by giving two glasses of
swallowed
water and induce vomiting by
(ingested)
administering Syrup of Ipecac (follow
manufacturer’s instructions). Seek
medical attention.
NEVER give anything by mouth or
attempt to induce vomiting in a
person who is unconscious.
Toner
Remove person to fresh air.
inhaled
Seek medical attention.
Toner gets
Flush eyes with large quantities of
cool
in the eyes
water for 15 minutes, keeping the
eyelids open with fingers. Seek
medical attention.
Note
Small amounts of toner on skin or
clothing can easily be removed with
soap and cold water. Hot water makes
toner harder to remove.
For more information, contact Okidata at:
2000 Bishops Gate Boulevard
Mount Laurel, NJ 08054
Emergency Information: 1-800-OKIDATA

36
Wyszukiwarka
Podobne podstrony:
Okidata OKIPAGE 10e User Manual
Okidata Okipage 14e Parts Manual
Okidata Okipage 14e Parts Manual
cas test platform user manual
CARPROG Opel ECU programmer user manual
elm327 interface viecar obd2 bluetooth scanner user manual
autel power scan ps100 user manual
Chartplanner user manual
INPA User manual
all100 user manual
CARPROG user manual
FX2N 485 BD User's Manual JY992 Nieznany
mb sbc tool user manual
07 Altistart48 user manual
iphone user manual pdf
PRDM 0010 Upgrade user manual UPG 0001
TK105 GPS Tracker User Manual
więcej podobnych podstron