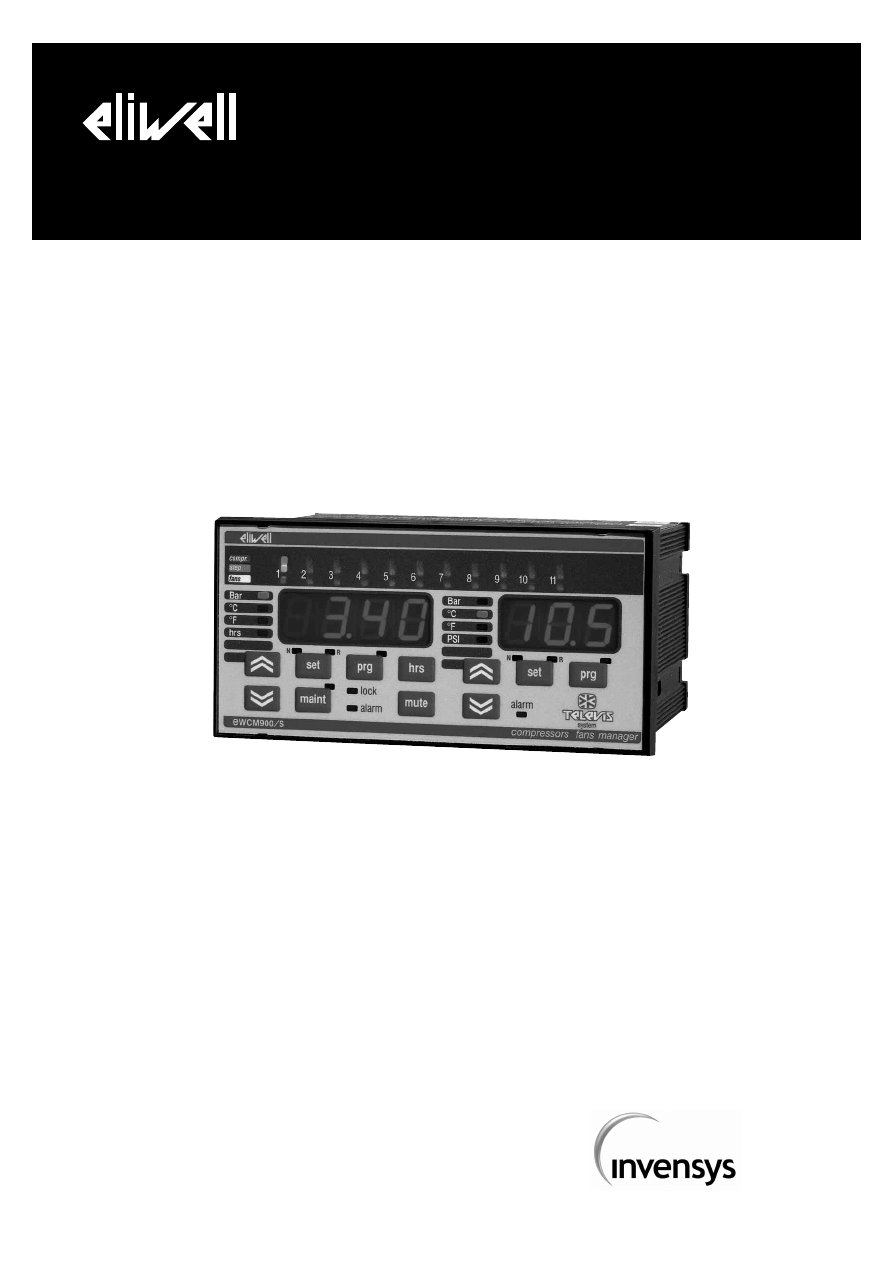
EWCM 900
electronic controller for compressors and fans
technical user manual

2
Summary
1. INTRODUCTION .......................................................................................................................... 5
1.1. VERSIONS ................................................................................................................................ 5
1.2. GENERAL CHARACTERISTICS ................................................................................................ 5
2. USER INTERFACE ...................................................................................................................... 6
2.1. COMPRESSOR SECTION.......................................................................................................... 6
2.1.1. CONTROLS............................................................................................................................ 6
2.1.2. DISPLAY................................................................................................................................ 6
2.2. FAN SECTION ........................................................................................................................... 6
2.2.1. CONTROLS............................................................................................................................ 6
2.2.2. DISPLAY................................................................................................................................ 7
2.3. OTHER DISPLAYS .................................................................................................................... 7
3. DIGITAL INPUTS AND OUTPUTS ........................................................................................... 7
3.1. DIGITAL INPUTS....................................................................................................................... 7
3.1.1. ALARM INPUTS ..................................................................................................................... 7
3.1.2. OTHER INPUTS...................................................................................................................... 7
3.2. ANALOGIC INPUTS .................................................................................................................. 7
3.3. OUTPUTS ON RELAY ............................................................................................................... 8
3.4. OTHER CONNECTIONS ............................................................................................................ 8
4. PARAMETER PROGRAMMING................................................................................................ 8
4.1. SELECTING THE MENU............................................................................................................ 8
4.2. PARAMETER DISPLAY AND MODIFICATION ........................................................................... 8
4.3. ENABLING FOR PROGRAMMING............................................................................................. 8
5. LIST OF PARAMETERS ........................................................................................................... 9
5.1. COMPRESSOR SECTION CONFIGURATION PARAMETERS .................................................... 9
5.1.1. PLANT DIMENSIONING.......................................................................................................... 9
5.1.2. CONFIGURING THE SUCTION PROBE..................................................................................10
5.1.3. CONFIGURING OTHER INPUTS ............................................................................................11
5.2. OPERATIVE PARAMETERS OF THE COMPRESSOR SECTION...............................................11
5.2.1. INTERNAL CLOCK................................................................................................................11
5.2.2. COMPRESSOR REGULATION...............................................................................................11
5.2.3. WORK SET POINT.................................................................................................................13
5.2.4. ALARMS ...............................................................................................................................13
5.2.5. USER INTERFACE ................................................................................................................14

3
5.2.6. REMOTE MANAGEMENT (TELEVIS / EWTD SYSTEM)..........................................................14
5.3. FAN SECTION CONFIGURATION PARAMETERS ....................................................................14
5.3.1. PLANT DIMENSIONING.........................................................................................................14
5.3.2. DELIVERY PROBE CONFIGURATION ...................................................................................14
5.3.3. CONFIGURATION OF OTHER INPUTS ..................................................................................14
5.3.4. PASSWORD..........................................................................................................................14
5.4. FAN SECTION OPERATION PARAMETERS.............................................................................15
5.4.1. FAN REGULATION................................................................................................................15
5.4.2. WORK SETPOINT .................................................................................................................15
5.4.3. ALARMS ...............................................................................................................................15
5.4.4. PASSWORD..........................................................................................................................15
5.5. SUMMARY OF THE PARAMETERS..........................................................................................15
6. OPERATION................................................................................................................................18
6.1. SETPOINT DISPLAY AND MODIFICATION...............................................................................18
6.2.1. COMPRESSORS ...................................................................................................................18
6.2.2. FANS.....................................................................................................................................18
6.3. DURATION OF COMPRESSOR AND VALVE OPERATION .......................................................19
6.3.1. DISPLAY...............................................................................................................................19
6.3.2. ZERO SETTING.....................................................................................................................19
6.3.3. FANS.....................................................................................................................................19
6.4. “AVAILABLE / IN MAINTENANCE” STATE ..............................................................................19
6.4.1. DISPLAY...............................................................................................................................19
6.4.2. MODIFICATION.....................................................................................................................19
6.4.3. FANS.....................................................................................................................................19
7. DIAGNOSTICS ...........................................................................................................................19
7.1. ALARM DIGITAL INPUTS.........................................................................................................19
7.1.1. PRESSURE ALARMS ............................................................................................................20
7.1.2. RESOURCE-ASSOCIATED ALARM .......................................................................................20
7.2. PROBE FAILURE ALARM ........................................................................................................20
7.3. ALARMS FOR SETTING THE OPERATION LIMITS ..................................................................20
7.4. OTHER ALARMS .....................................................................................................................20
7.5. ALARM SILENCING .................................................................................................................21
7.6. MANUAL RESETTING..............................................................................................................21
7.7. SUMMARY OF THE ALARM CONDITIONS ...............................................................................21

4
8. INSTALLATION ..........................................................................................................................21
8.1. MECHANICAL ASSEMBLY AND WORKING ENVIRONMENT. ..................................................21
8.2. ELECTRICAL CONNECTIONS..................................................................................................22
9. PERMITTED USE........................................................................................................................22
10. Uses not allowed ....................................................................................................................22
11. Responsibility and residual risks.......................................................................................22
12. TECHNICAL DATA..................................................................................................................23
5
1. INTRODUCTION
1.1. VERSIONS
EWCM 900 is a controller dedicated to controlling the compression and condensation phases, by managing
the compressors and fans, for applications in refrigeration plants.
The instrument controls more than one compressor, of the reciprocating type, even with different powers and
stepped-capacities (partialisations):
-
simple homogeneous units (no power fractionating),
-
multiple stage homogeneous units (multiple stages with the same power)
-
simple, non homogeneous units.
Furthermore, it is also possible to control the fans of the condensing unit.
The instrument can control the resources (fans, compressors, with respective steps) by using 11 relay
outputs, assigned by configuration.
1.2. GENERAL CHARACTERISTICS
EWCM 900 is available in the versions for pressure or temperature input, both having the same type of
control and regulation. The inputs detect the conditions of the compressor section (suction) and the fan
section (delivery).
•
Pressure transducers: with 4…20 mA current signal, of type EWPA 007, 030.
•
Temperature probe: with NTC type sensor.
•
Compressor and fan control: 11 outputs on relays for controlling the resources (condensation fans and
compressors), with corresponding alarm inputs energised.
•
Resources enabled according to a fixed sequence or rotation (to equalise the operation times or the
resources.
•
Alarm detection through digital (from pressurestats and resources) and analogic (from probe or
transducer) inputs, for both sections, based on specific parameters.
•
Setting the parameters and display of the operation variables by means of quantities and units of
measure that can be user-selected: pressure (Bar, PSI), in the relative or absolute scale, temperature
(°C, °F).
•
Control of the sections (compressors and fans) by means of two separate displays (three- and four-digit
respectively).
•
Two setpoints programmable according to the time-period (normal and reduced rate).
•
Serial connection for the Televis / EWTD system.
•
Safety system that carries out a continuous inspection on the operation of the instrument hardware: if
there is EWCM failure or a power failure, the "safety" relay output is enabled, and transfers control of the
plant to a device prepared for emergency, thus ensuring minimum operation until expert personnel are
able to come.
Fig.1.

6
2. USER INTERFACE
2.1. COMPRESSOR SECTION
2.1.1. CONTROLS
“PRG” KEY: parameter programming key. It is used to access two distinct menus (“opr” and “cnf”) and to
end the programme.
“HRS” KEY: the key is used to display the time (in hours) the compressors have been operating.
“MAINT” KEY: the key is used for displaying or modifying the "available" or "in maintenance" state regarding
the compressors.
“SET” KEY: this key displays the setpoints, according to the normal set–reduced set succession, each in the
different display units.
The enabled setpoint is always signalled by the corresponding LED (SET N or SET R).
During programming, it is used to access the parameter value displayed and to confirm any setting done.
“UP” KEY: Any setpoint or parameter values displayed can be modified with it by increasing the value. If
the value is displayed, it shows the conversion sequence of the value in the different units of measure. If the
parameter menu label is displayed, it scrolls the list of parameters.
“DOWN” KEY: Any setpoint or parameter values displayed can be modified with it by decreasing the value.
If the value is displayed, it shows the conversion sequence of the value in the different units of measure.
“MUTE” KEY: this is the key for silencing and cancelling alarms as well as for zero setting the compressor
operation time.
2.1.2. DISPLAY
“LOCK” LED: keyboard lock signal (modifications not enabled).
“ALARM” LED: alarms triggered signal.
LED for UNIT OF MEASUREMENT (3 + PSI LED): indicates the unit of measurement regarding the current
display (pressure – Bar, PSI; temperature - °C, °F).
“HRS” LED: signals the compressor operation time display (in hours).
“SET N” LED: ON when the normal setpoint is enabled; flashes when the normal setpoint is being set or
displayed ("SET" key pressed). (1)
“SET R” LED: ON when the reduced setpoint is enabled; flashes when the reduced setpoint is being set or
displayed ("SET" key pressed) (1)
“PRG” LED: flashes when programming is in progress (after pressing the “PRG” key).
“MAINT” LED: ON for display or modification of compressor state.
LED of state: see OTHER DISPLAYS.
FOUR-DIGIT DISPLAY: Displays the value read on the suction probe, in the unit of measurement chosen
with the “dEU” parameter. It indicates the equivalent values in the other units (corresponding measuring unit
LED. Signals the duration of operation of each compressor (identified by is respective LED, with LED “HRS”
ON, by pressing the “HRS” key).
Finally, it also displays the setpoints set as well as the two parameter menus regarding the compressors.
The quantities (values of readings and parameters) are represented with different resolutions (see
TECHNICAL DATA).
If an alarm is on, normal display alternates with the display of the alarm code.
2.2. FAN SECTION
2.2.1. CONTROLS
“PRG” KEY: Parameter programming key. Accesses two distinct menus (“opr” and “cnf”) and to end the
programme.
“SET” KEY: This is the key for displaying the settings for normal and reduced work, and the programming
parameters.
“UP” KEY: key for increasing the values.
“DOWN” KEY: key for decreasing the values.
“SET” KEY: key for displaying the work setpoints according to the normal set – reduced set succession
each in different display units. The corresponding LED always signals which set is active (SET N or SET R
LED).
During programming, it permits access to the parameter value displayed and confirmation of any settings
entered.

7
2.2.2. DISPLAY
“ALARM” LED: Signals alarm ON.
LED for UNIT OF MEASUREMENT of the QUANTITY DISPLAYED (3 + PSI LEDs): indicates the unit of
measure regarding the current display (pressure – Bar, PSI; temperature - °C, °F).
“SET N” LED: ON when normal setpoint is active, flashing when the normal setpoint is being set or
displayed by pressing the “SET” key. (1)
“SET R” LED: ON when the reduced setpoint is enabled; flashing when setting or displaying the reduced
setpoint when the key “SET ” is pressed. (1)
“PRG” LED: flashes when programming is in progress (after key “PRG” is pressed).
State LED: see OTHER DISPLAYS.
THREE-DIGIT DISPLAY: Displays the value read off the condensation probe (delivery), in the unit of
measurement chosen with parameter “dEU”. It indicates the equivalent values in the other units (LEDs in the
corresponding units of measure). It displays the setpoints set as well as the two parameter menus regarding
the fans.
The physical sizes (readings and parameter values) are represented each with a different resolution (see
TECHNICAL DATA).
In case an alarm is triggered, normal display is alternated with the alarm code.
(1)= since the setpoint (normal or reduced) is in force for both sections, the two LEDs regarding the given
setpoint are switched on simultaneously for each section.
2.3. OTHER DISPLAYS
LEDs FOR THE STATE OF THE COMPRESSORS AND STEPS (total 22 LEDs: 11 red + 11 green, situated
above): they indicate the operational state of the outputs assigned to compressors and probable capacity
stepping (partialisations).
LEDs for THE STATE OF THE FANS (total 11 yellow LEDs, situated above): they indicate the operation
state of the outputs assigned to the fans.
PSI LEDs: indicate that the unit of measurement for the current display is PSI (pounds per square inch). It is
found near the fan section. It is only enabled by parameter setting “PSI”. If enabled, all values (readings,
setpoints, and parameters of the "physical quantity" type)are expressed in PSI, on both displays.
3. DIGITAL INPUTS AND OUTPUTS
3.1. DIGITAL INPUTS
3.1.1. ALARM INPUTS
The following contacts are live.
INPUT FROM PRESSURESTAT (LOW PRESSURE ALARM): for signals from a low pressure alarm,
depending on the condition of the pressurestat connected to terminals 5 and 6. It is controlled by the
compressors/SEP parameters. Input at the same power voltage.
INPUT FROM PRESSURESTAT (HIGH PRESSURE ALARM): for signals from high pressure alarm,
depending on the condition of the pressurestat connected to terminals 7 and 8. It is controlled with the
fans/SEP parameters. Input to the same power voltage.
ALARMS: 11 inputs protecting the compressors and fans; for signals from alarms depending on devices
connected to them (e.g. thermal cutout protection)connected to terminals 22 to 43. Controlled by
compressors/ALIP parameters.
3.1.2. OTHER INPUTS
REDUCED SET: for enabling the reduced setpoint, by means of a clean, not live contact, (terminals 13 and
14). It is controlled by the compressors/rSIP parameter.
3.2. ANALOGIC INPUTS
Depending on the model, the inputs are compatible with:
•
Pressure transducers having 4…20 mA current signals, even of the non self-powered type, of the EWPA
007, 030 type.
•
Temperature probes, with type NTC sensor.
SUCTION, COMPRESSOR SECTION: 1 input for transducer (EWPA 007) or probe (terminals 15 and 16).
DELIVERY, FAN SECTION: 1 input for transducer (EWPA 030) or probe (terminals 17 and 18).

8
3.3. OUTPUTS ON RELAY
RESOURCE REGULATION: 11 outputs on clean contact, configurable, for controlling the resources
(compressors, steps, fans), via terminals 44 to 65.
ALARM: alarm signalling output; under alarm conditions, permits enabling of external devices; clean contact,
normally closed (terminals 1 and 2).
SAFETY: output for transfer of control tasks to another pre-selected device, in case of instrument failure or
power failure; normally closed contact (terminals 3 and 4).
Notes: the SAFETY and ALARM relays have open contacts in case of failure or alarm, respectively. The
safety relay is open when the instrument is not powered, closed when the instrument is powered (in normal
operation).
3.4. OTHER CONNECTIONS
SERIAL PORT: RS-485 type, for connection to Televis /EWTD system, via terminals 19 (gnd), 20 (+), 21 (-).
INSTRUMENT POWER SUPPLY: power input (terminals 9 and 10). Take note of the instrument label for the
rated power supply voltage.
4. PARAMETER PROGRAMMING
4.1. SELECTING THE MENU
The following are the parameter menus:
•
Operative “oPr” for compressor section
•
Operative “oPr” for fan section
•
Configuration “CnF” for compressor section
•
Configuration “CnF” for fan section
In the text, the relative path is described as section/menu or section/parameter.
Access to the menus:
•
Compressors/“oPr”: press and release the key “PRG” and then the key UP corresponding to the
section.
•
Fan/“oPr”: press and release “PRG” and then “UP” regarding the section.
•
Compressors/“CnF”: press “PRG” twice and then “UP” regarding the section.
•
Fans/“CnF”: press “PRG” twice and then “UP” regarding the section.
To quit programming press the key “PRG” once more, storing in memory is automatic.
If the password regarding the menu has been enabled, access to the corresponding parameters is prevented
(display “PAS”). See ENABLING FOR PROGRAMMING.
4.2. PARAMETER DISPLAY AND MODIFICATION
After having entered the required parameter menu, the following operations can be carried out, using the
corresponding section keys:
•
scroll through the parameters: press the direction keys “UP” or “DOWN”;
•
display the parameter value: press “SET”;
•
modify the value displayed: press the direction keys “UP” or “DOWN” once more;
•
exit parameter modification: press the “SET” key again.
4.3. ENABLING FOR PROGRAMMING
There are four passwords available for accessing parameter programming.
The passwords can be enabled, independently, for one or more of the following menus:
•
compressors/“oPr”: Parameter “Pso”.
•
Fan/“oPr”: Parameter “Pso”.
•
Compressors/“CnF”: Parameter “Psc”.
•
Fan/“CnF”: Parameter “Psc”.
In the menu selected, when display or modification is accessed the label “PAS” appears, if the parameter
corresponding to the menu was set;
•
press the “SET” key;
•
compose the password by using the “UP” and “DOWN” keys;
•
If the password is correct, press the “SET” key and then the “UP” key;
•
if the password is not correct, programming is automatically exited.

9
Attention: all the parameters regarding the passwords can take on the following values:
•
0= password disabled;
•
1…254= password enabled to the corresponding value.
•
the password “255” is also available, reserved password: THE CORRESPONDING VALUE “255”
CANNOT BE COMPOSED.
5. LIST OF PARAMETERS
Some parameters are referred to the quantity or unit of measurement selected with “dEU”, “PSI”. The
corresponding limits and number of decimal places depend on the setting of “dEU”, “PSI”. By varying the
setting, the values are converted to the new unit of measurement.
These parameters are defined as “quantities” below.
Of these, some parameters are available only for the pressure input versions and so are defined "for
pressure".
5.1. COMPRESSOR SECTION CONFIGURATION PARAMETERS
5.1.1. PLANT DIMENSIONING
CPnU: ComPressor NUmber. Number of compressors present in the plant.
CtyP: Compressor TYPe. Type of compressor and regulation. A distinction is to made between machines
having the same power (homogeneous) or not, since in the different cases the type of regulation available
changes:
•
neutral zone regulation: selected for compressors with differing power, not with capacity stepping
(partialisation).
•
proportional band regulation: it is selected for the compressors of equal power (homogeneous), with
capacity stepping (partialisation).
In the case of capacity stepping (partialisation), non homogeneous compressors, both regulations are
possible:
•
neutral zone: preferable with a few, high-pressure compressors;
•
proportional band: permits greater regulation precision even though it entails frequent switching-on and
switching-off of the compressors.
0 = compressors of different power – neutral zone regulation;
1 = homogeneous compressors – proportional band regulation.
Notes 1: With proportional band regulation with homogeneous compressors, it is possible to:
•
Disable the steps to force saturation of the resources, see parameter “sat”.
•
Control switching-on and switching-off to distribute the resources (standard mode): preferentially a step
of the enabled compressor is entered first, then a step of the compressor enabled second, and so on.
Considering the amount of resources required, it corresponds to the maximum number of enabled
compressors. See parameter “rot”.
•
Control switching-on and switching off according to a fixed sequence.
•
Set the “chief” role for a designated compressor. The “chief” compressor is enabled first and disabled
last in the resource control sequence, see parameter “nCPC”.
Note 2: the “chief” role can be assigned even in the case of neutral zone regulation with non-homogeneous
compressors.
PC1 … PC11: Power Compressor 1 … 11. Parameters for setting the power of the single compressors, in
case these have different powers (available only for CtyP = 0). The power is identified by a value (between 1
and 255) proportional to the power of the compressor.
Example 1: 3 non-homogeneous compressors, not capacity-stepped (non partialised), of 10, 20 and 40 Hp.
•
“PC1” = 10, “PC2” = 20 e “PC3” = 40, or “PC1” = 1, “PC2” = 2 and “PC3” = 4, etc.
Example 2: 4 homogeneous compressors, not capacity-stepped (non partialised); if the neutral zone
operation is requested (CtyP = 0), for PC1 … PC11 the same value must be set: “PC1” = 1, “PC2” = 1,
“PC3” = 1, “PC4” = 1, or any other number.
CPSt: ComPressor STep. Number of steps available for each compressor, if these are homogeneous and
capacity-stepped (partialised) (parameter enabled only for CtyP = 1). It is the same as the number of
capacity valves plus 1.
Note 1: The value of this parameter is automatically forced to 1 if compressors of different powers have been
selected (CtyP = 0).
Note 2: Connect the compressor and its capacity-stepping (partialisations) occupying in sequence the
positions on the terminal block.
10
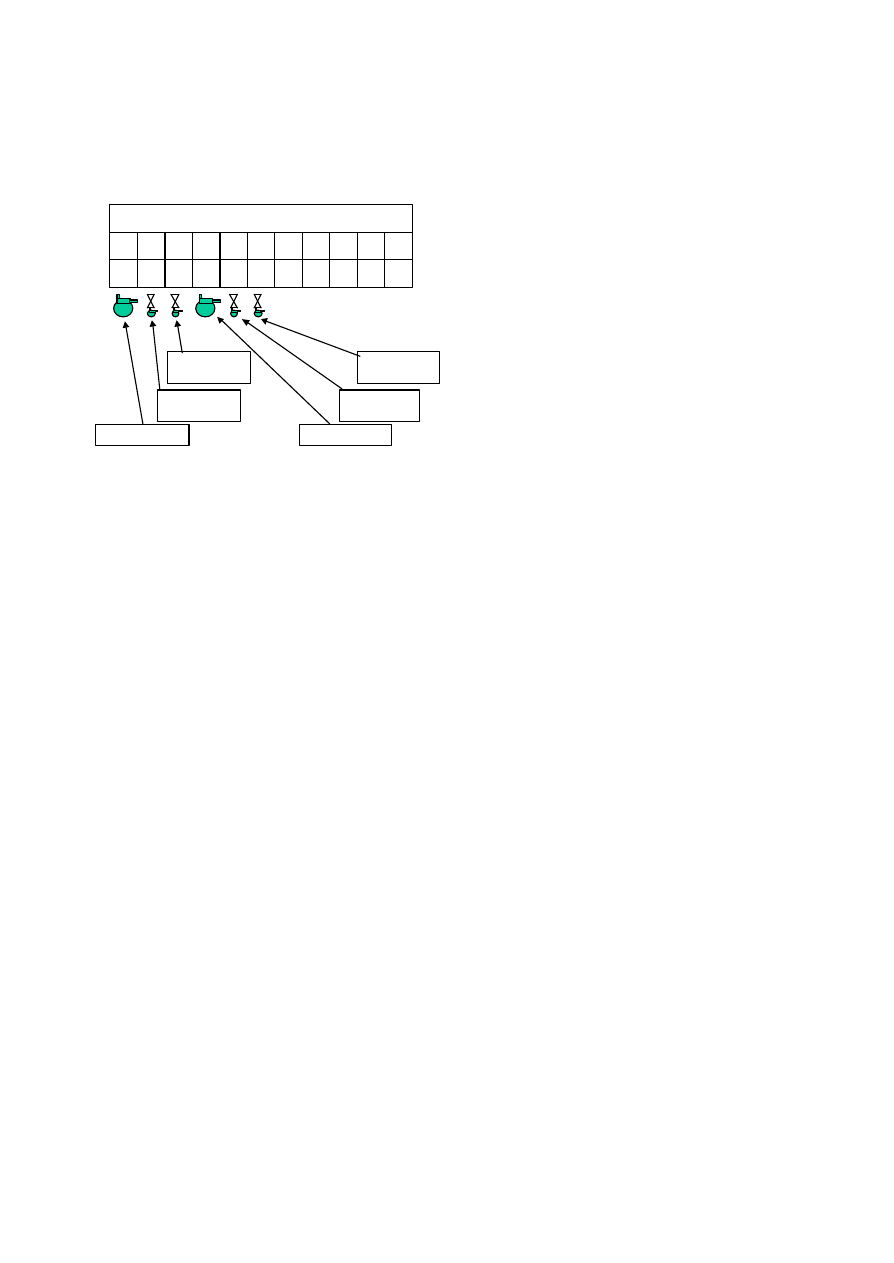
Example: with a number of compressors CpnU = 2, each with steps CPSt = 3, the relays must be connected
as below:
Fig.2.
1
2
3
4
5
6
7
8
9
10
11
Resources: sequence of connection to the terminal block
Compressor 1
Valve 1 of
compressor 1
Valve 2 of
compressor 1
Compressor 2
Valve 1 of
compressor 2
Valve 2 of
compressor 2
44-45 46-47 48-49 50-51 52-53 54-55 56-57 58-59 60-61 62-63 64-65
rot: compressor ROTation. Control, using compressor rotation. It permits choosing among the following
ways of insertion:
•
fixed sequence: enabling of the first compressor of the sequence – insertion of the steps of the first
compressor (if present) – enabling of the second compressor, and so on.
•
rotation: depending on the duration of operation, switching on of the compressors in increasing order:
enabling of the compressor (with minimum operation) – insertion of the corresponding steps (if present)
– enabling of the second compressor (in terms of duration of operation). The purpose is to balance the
number of hours of operation.
0 = fixed sequence;
1 = compressor rotation.
sat: compressor SATuration. Control through resource saturation. It enables the saturation algorithm, only
for homogeneous, capacity partialised compressors. The disable sequence is: disabling of the step of the
last enabled compressor (if rot = 0), or the one with more hours of duty (if rot = 1) – disabling of the other
steps of the same compressor (until it switches off) – and so on. Considering the amount of resources
requested, it corresponds to the maximum number of compressors.
0 = standard operation
1 = resource saturation
nCPC: Number ComPressor Chief. Identification of the “master” compressor. Permits assigning one of the
compressors the role of chief. If set to "0", control via the chief is disabled. Otherwise, the compressor
number is set according to the order of connection to the terminal board.
FtyP: Freon TYPe. The type of refrigerating gas used in the plant. The refrigerant must be set for the
conversion of the temperature – pressure data carried out by the instrument and therefore for optimum
system operation.
0 = R 134a;
1 = R 22;
2 = R 502;
3 = R 404a;
4 = R 407c;
5 = R 507;
6 = R 410a.
PSI: Display of the values (readings, set point, parameters) in the PSI as unit of measurement. If enabled, all
the values are expressed in PSI, even for the fan section. In this case the “PSI” LEDs, and those
corresponding to the units previously assigned to the two sections.
0 = unit of measurement selected with “dEU”;
1 = values converted to PSI.
5.1.2. CONFIGURING THE SUCTION PROBE

11
P04: Pressure at 4 mA. Pressure value read by the transducer and to be associated with the 4 mA input
current (“quantity”; for pressure).
P20: Pressure at 20 mA. Pressure value read by the transducer and to be associated with the 20 mA input
current (“quantity”; for pressure).
CAL: CALibration. Calibration of the transducer or probe reading (“quantity”).
5.1.3. CONFIGURING OTHER INPUTS
SEP: SEt alarm Polarity. Alarm input polarity (terminals 5 and 6). It determines the state of contact, for the
pressurestat associated with low pressure signalling, corresponding to the triggered alarm.
0 = alarm in the absence of voltage;
1 = alarm in the presence of voltage.
rSIP: Reduced Set Input Polarity. Reduced setpoint input polarity (terminals 13 and 14). It determines the
state of the contact corresponding to the reduced setpoint mode enabling.
0 = reduced setpoint active with contacts open;
1 = reduced setpoint active with contacts closed.
ALIP: ALarm Input Polarity. Polarity of the alarm inputs associated with the resources (compressors and
fans, terminals from 22 to 43). It determines the state of the contact corresponding to the triggered alarm.
0 = alarm in the absence of mains voltage;
1 = alarm in the presence of mains voltage.
StPP: STep outPuts Polarity. Polarity of the outputs for the capacity valves. It determines the state of the
relays, associated with the capacity valves (only for homogeneous stepped-capacity (partialised)
compressors.
0 = valve connection (step enabled) if the contact is closed (and viceversa);
1 = valve connection (step enabled) if the contact is open (and viceversa);.
The relays associated with the compressors do not depend on the “StPP” setting.
5.1.4. Password and Production Setting
Psc: PaSsword Configuration. Password to access the configuration parameters, see ENABLING FOR
PROGRAMMING.
tAb: TABle of parameters. Index of configuration of parameters set in production; cannot be modified by the
user.
5.2. OPERATIVE PARAMETERS OF THE COMPRESSOR SECTION
5.2.1. INTERNAL CLOCK
Parameters for setting the internal clock on which is based the operation according to the normal or reduced
setpoint.
Pri: PRImes. Sets the minutes of the current time on the internal clock of the instrument.
HoUr: HOURs. Sets the current hour on the internal clock.
dAY: DAY. Sets the current day of the week on the internal clock.
Note: 1 = Sunday ; 7 = Saturday.
5.2.2. COMPRESSOR REGULATION
dEU: DEfault Unit. Sets the dimension or unit of measurement used for display (reading, setpoint,
parameters).
0 = bar;
1 = °C;
2 = °F.
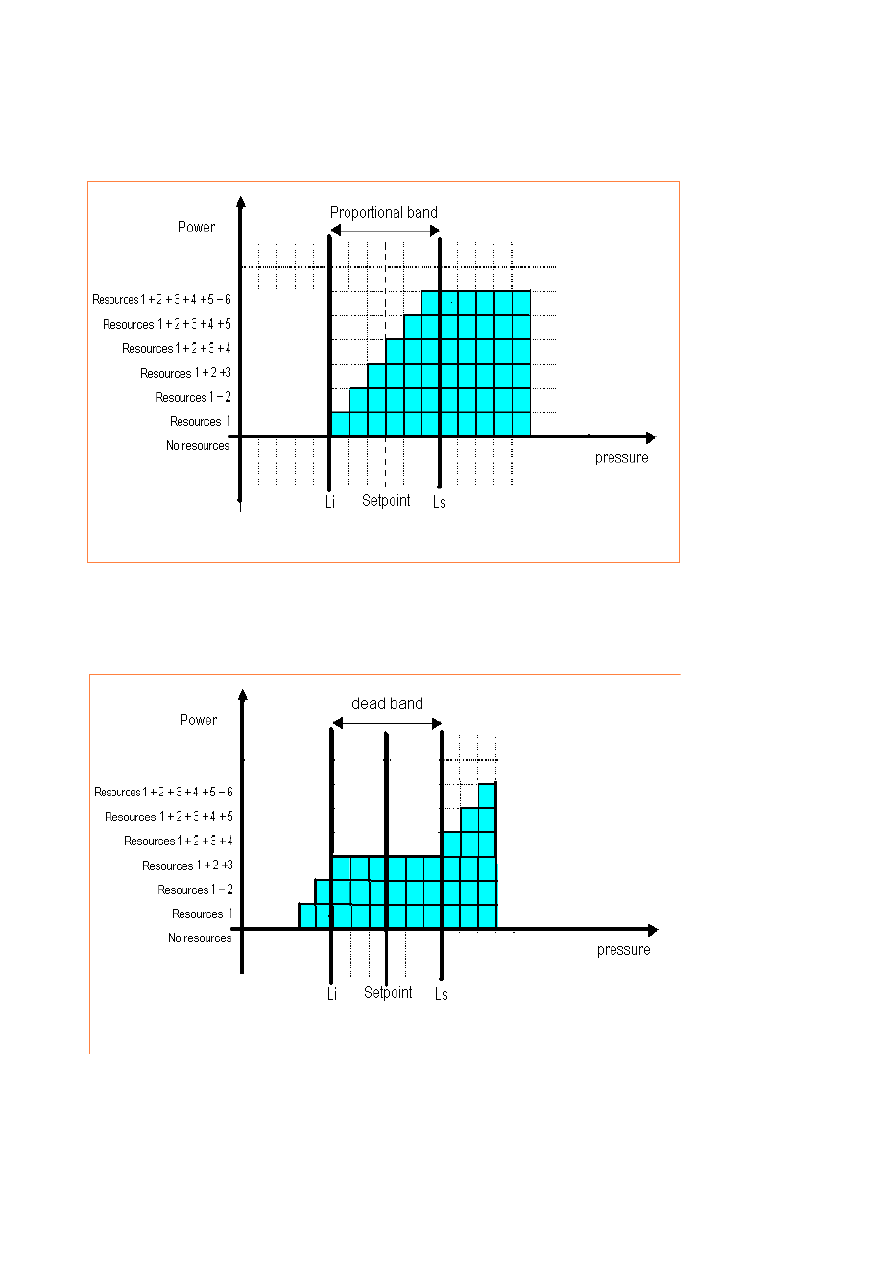
Pbd: Proportional BanD. Amplitude of the proportional band and the neutral zone. The unit of measurement
depends on the setting of “dEU”, “quantity”.
The band (or zone) is symmetrical compared to the work setpoint, with extremes: set+Pbd/2 … set–Pbd/2.
Distinguish cases of:
•
proportional band (homogeneous compressors, CtyP= 1): regulation is proportional inside the band,
connecting or disconnecting the resource according to the power requested. See fig. 3.
•
neutral zone (compressors of different power, CtyP= 0, also possible for homogeneous non capacity-
stepped (partialised) compressors): If the actual pressure (or temperature) is greater than set+Pbd/2
then the compressor call phase starts, if less than set–Pbd/2 then the compressor release phase starts.
Inside the neutral zone, connections or disconnections of resources are not expected. See fig.4.
12
Fig.3.-4.

13
onon: ON/ON compressor. The least time between two consecutive switch-ons of the same compressor.
oFon: OFf/ON compressor. The least time between switch-off and switch-on of the same compressor.
don: Delay ON. Delay between consecutive enablings of two different steps (or compressors).
doF: Delay OFf. Delay between consecutive releases of two different steps (or compressors).
donF: Delay ON/oFf. Minimum duration of compressor operation, from connection to the next disconnection.
FdLy: First DeLaY on. Enables the delay between the call for a step and its actual enabling. The delay is
equivalent to “don”. If this parameter is not enabled, every step is triggered at the moment of the call so long
as the delay from the previous triggering is respected. If enabled, the triggering of the step is delayed with
respect to the call for a “don” value. This prolongs all the intervals between connections, even in cases of
triggering following a condition of equilibrium and first triggering.
0 = no;
1 = yes.
FdLF: First DeLay oFf. Enables the delay between the request for release and the actual disconnection of
the step. The delay is equal to “doF”. The behaviour is similar to that of “FdLy”.
0 = no;
1 = yes
odo: Output Delay at On. Duration of compressor output override starting from switch-on of the instrument.
5.2.3. WORK SET POINT
LSE: Lower SEt. Minimum programming level of the setpoint; “quantity” parameter.
HSE: Higher SEt. Maximum programming level of the setpoint; “quantity” parameter
StrS: Start Time Reduced Set. Starting time for the reduced setpoint operation time interval. If the parameter
is set to "0", operation with reduced setpoint is disabled (the normal setpoint is always enabled).
SPrS: StoP time Reduced Set. Stopping time for the reduced setpoint operation time interval. If the
parameter is set to "0", operation with reduced setpoint is disabled (normal setpoint is always enabled).
rSd1…rSd7: Reduced Set Day 1…7. Enabling of the reduced setpoint for each day of the week, based on
the time interval limited by StrS, SPrS.
The following cases can be distinguished:
•
Strs = SPrs = 0; setting of rSd1…rSd7:
0 : the normal setpoint is always enabled;
1 : the reduced setpoint is always enabled;
•
Else, setting of rSd1…rSd7:
0: reduced setpoint enabled in the time interval Strs…SPrs, on the day referred to in parameter
rSd1…rSd7; besides the interval the normal setpoint is valid.
1: normal setpoint Strs…SPrs active enabled; besides the interval the reduced setpoint is valid.
Note: rSd1 = Sunday; rSd7 = Saturday.
5.2.4. ALARMS
UAro: Unit AlaRm Override. This selects the unit of measurement for the alarm silenced time, set by
parameter “Aro”.
0 = minutes;
1 = hours.
Aro: AlaRm Override. Duration of alarm silenced: This is the period following the silencing of an alarm during
which the alarm relay is disabled, to avoid signalling alarms that are triggered too close to each other.
PAO: Power Alarm Override. Duration of alarm override at switch-on. It is the period, starting from instrument
switch-on, before an alarm is signalled.
LAL: Lower ALarm. Minimum pressure alarm. This is the value that, subtracted from the setpoint value,
determines the minimum alarm threshold. The alarm is signalled as “03”. “Quantity” parameter.
HAL: Higher ALarm. Maximum pressure alarm. This is the value, added to the setpoint value, determines the
maximum alarm threshold. The alarm is signalled as “04”. “Quantity” parameter.
Note: the alarms regarding “LAL” and “HAL” are generated when the regulation probe finds a value that
exceeds the corresponding set limit.
tAo: Time Alarm Override. Delay before signalling the minimum or maximum alarm.
SEr: SERvice. Interval for service/maintenance request. This is the duration of operation after which the
compressor request for service/maintenance is automatically signalled. The compressor in question is
excluded from operation. The interval set is common to all compressors.
PEn: Pressurestat Errors Number. Number of times the low pressure pressurestat should be triggered, in the
interval defined by “PEI”, before an “0L” alarm condition is triggered. If set to "0", the pressurestat error
function is overridden.

14
PEI: Pressurestat Errors Interval (time). Time interval in which to count the times the suction pressurestat
has been triggered (see parameter “PEn ”).
CPP: Compressor Probe Protection. It determines how the compressors are controlled in case of faulty
suction probe (signalling “01”).
0 = maintaining the resources entered at the moment of the failure;
1 = entering the resources established by parameters “SPr” and “PoPr”.
Note: if CPP = 1, the number of designated steps is enabled (with parameter SPr, only to regulate the
proportional band, homogeneous compressor), or the resources corresponding to the selected power (with
parameter PoPr, only for neutral zone regulation).
SPr: Step PRobe protection. Number of steps to be entered if the suction probe is faulty, if proportional
band regulation has been set (homogeneous compressors, CtyP = 1; CPP = 1).
PoPr: POwer with faulty PRobe. Power to be entered if suction probe is damaged, if neutral zone regulation
has been set (non homogeneous compressors or even homogeneous compressors that are not capacity-
stepped (partialised), if CtyP = 0; CPP = 1). Value according to the proportionality adopted for the
parameters PC1 … PC11.
5.2.5. USER INTERFACE
rELP: RELative Pressure. Selection of absolute or relative pressure display.
0 = absolute pressure;
1 = relative pressure.
Loc: keyboard LOCk function. It locks the keyboard, disabling the following functions:
•
Parameter modification,
•
Setpoint modification,
•
zero-setting the work hours counter for the various compressors (maintenance).
Lockout is signalled by the “LOCK” LED switching on. The parameter “Loc” does remain accessible.
0 = keyboard enabled for modification;
1 = keyboard locked.
Pso: PaSsword Operating. Password for access to operative parameters, see ENABLING FOR
PROGRAMMING.
5.2.6. REMOTE MANAGEMENT (TELEVIS / EWTD SYSTEM)
FAA: FAmily Address. This is used to set the "family" code to be assigned to each instrument for recognition
in the sphere of the remote management network.
dEA: DEvice Address. This is used to set the "address" code to assign to each instrument for recognition in
the sphere of the remote management network.
tAb: TABle of parameters. Parameter configuration index set in the factory; not modifiable by the user.
EL1: ELIWELL 1. Parameter that cannot be modified by the user.
EL2: ELIWELL 2. Parameter that cannot be modified by the user.
5.3. FAN SECTION CONFIGURATION PARAMETERS
5.3.1. PLANT DIMENSIONING
nFn: number of Fans. The number of fans the plant has.
5.3.2. DELIVERY PROBE CONFIGURATION
P04: Pressure at 4 mA. Pressure value read off the transducer to be associated with the 4 mA input current
(“quantity”; for pressure).
P20: Pressure at 20 mA. Pressure value read off the transducer to be associated with the 20 mA input
current (“quantity”; for pressure).
CAL: CALibration. Calibration of the transducer or delivery probe reading. (“quantity”).
5.3.3. CONFIGURATION OF OTHER INPUTS
SEP: SEt alarm Polarity. Alarm input polarity (terminals 7 and 8). It determines the state of the contact, for
the pressurestat associated with the high pressure signalling, corresponding to the alarm triggered.
0 = alarm in the absence of voltage;
1 = alarm in the presence of voltage.
5.3.4. PASSWORD
Psc: PaSsword Configuration. Password for access to the configuration parameters, see ENABLING FOR
PROGRAMMING.

15
tAb: TABle of parameters. parameter configuration index set in production; not modifiable by the user.
5.4. FAN SECTION OPERATION PARAMETERS
5.4.1. FAN REGULATION
dEU: DEfault Unit. Sets the dimension or the unit of measurement used for display (readings, setpoint,
parameters).
0 = bar;
1 = °C;
2 = °F.
Pbd: Proportional BanD. Amplitude of the proportional band for fan regulation.
The unit of measurement depends on the setting of “dEU”, “quantity”. The band is symmetrical compared to
the work setpoint, with extremes: set+Pbd/2 … set–Pbd/2. Inside the band the regulation is proportional,
connecting or disconnecting a resource according to the power required.
don: Delay ON. Delay time between two consecutive fan enablings.
doF: Delay OFf. Delay time between two consecutive fans releases.
rot: ROTation. Control via fan rotation, in enabling and in release:
•
fixed sequence: enabling/release of the first fan of the sequence – second fan of the sequence and so
on.
•
rotation: depends on the duration of operation, enabling/release of the fans in order of increasing
duration. The purpose is to balance the number of hours of operation.
0 = fixed sequence;
1 = rotation of the fans.
5.4.2. WORK SETPOINT
LSE: Lower SEt. Minimum programming limit of the setpoint; “quantity” parameter.
HSE: Higher SEt. Maximum programming limit of the setpoint; “quantity” parameter.
5.4.3. ALARMS
LAL: Lower ALarm. Minimum pressure alarm. Value that, subtracted from the setpoint, determines the
minimum alarm threshold. The alarm is signalled as “03”. “Quantity” parameter.
HAL: Higher ALarm. Maximum pressure alarm. Value that, subtracted from the setpoint, determines the
maximum alarm threshold. The alarm is signalled as “04”. “Quantity” parameter.
Note: the alarms corresponding to “LAL” and “HAL” are generated when the value found by the regulation
probe exceeds the corresponding set limit.
PEn: Pressurestat Errors Number. Number of times the pressurestat associated with signalling high pressure
must be triggered, as defined by the interval “PEI ”, before it can be considered an alarm condition “0H”. If set
to "0", pressurestat error is overridden.
PEI: Pressurestat Errors Interval time. The time interval for counting the number of times the pressurestat
has been triggered (see parameter “PEn ”).
FPP: Fan Probe Protection. It determines the kind of fan control if the delivery probe is damaged (alarm
signalling “01”).
0 = fans kept connected at the moment of failure;
1 = fan connection based on parameter “FPr”.
FPr: Fan Probe number. Number of fans to be connected if the delivery probe is damaged; enabled only for
FPP = 1.
5.4.4. PASSWORD
Pso: PaSsword Operating. Password to access the operation parameters, see ENABLING FOR
PROGRAMMING.
tAb: TABle of parameters. Factory set parameter configuration index; it cannot be modified by the user.
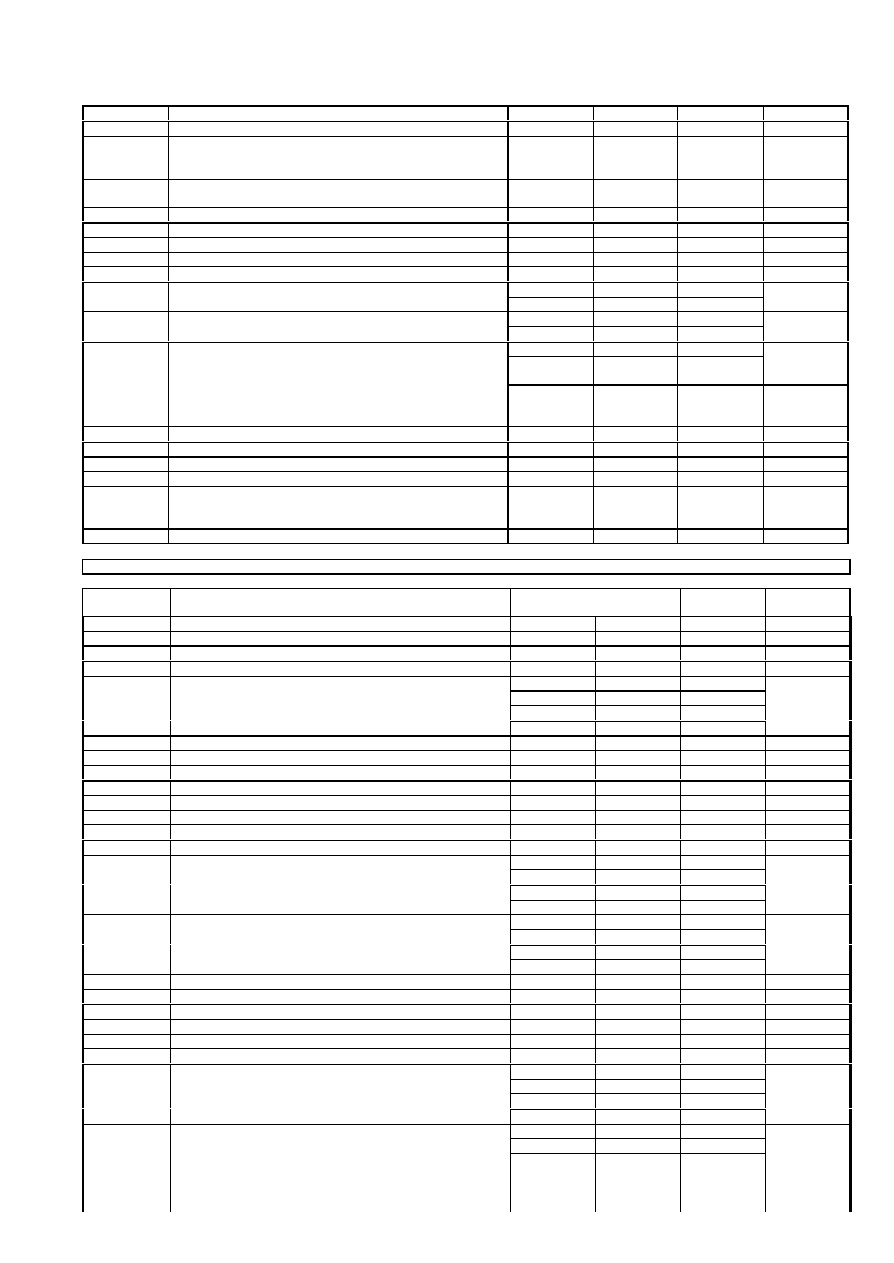
5.5. SUMMARY OF THE PARAMETERS
COMPRESSOR SECTION
CONFIGURATION PARAMETERS
Parameter
Description
Interval and default
Unit of
measurement
Notes
16
CpnU
Number of compressors
1…11
7
Number
CtyP
Type of compressor
0-1
1
Number
PC1..PC11
Power of compressor 1…11 (if non homogeneous
compressors)
1…255
1
Number
Values
proportional to
the powers
CPSt
Number of steps per compressor (if homogeneous
compressors)
1…6
1
Number
Rot
Rotation or fixed sequence
0-1
0
Number
Sat
Saturation
0-1
0
Number
NCPC
Number: “Chief” compressor
0…11
0
Number
FtyP
Type of refrigerating gas used
0…6
1
Number
PSI
Pressure display in PSI
0-1
0
Number
0,0…8,0
0,5
Bar
P04
Pressure corresponding to 4 mA from transducer
0,0…
…
PSI
Only pressure;
Quantity
0,0…31,0
8,0
Bar
P20
Pressure corresponding to 20 mA from transducer
0,0…
…
PSI
Only pressure;
Quantity
-0,5…0,5
0,0
Bar
-50…50
0
PSI
For press.
transd.;
Quantity
CAL
Calibration of temperature probe or pressure transducer
-5…5
0
°C/°F
For temp.
probe;
Quantity
SEP
pressurestat alarm input polarity
0-1
1
Number
RSIP
Reduced setpoint input polarity
0-1
1
Number
ALIP
Compressor alarm input polarity
0-1
1
Number
StPP
Compressor steps output polarity
0-1
1
Number
Psc
Configuration parameters Password
0…254
0
Number
The value 255
must not be
set
TAb
Configuration parameters index
/
/
/
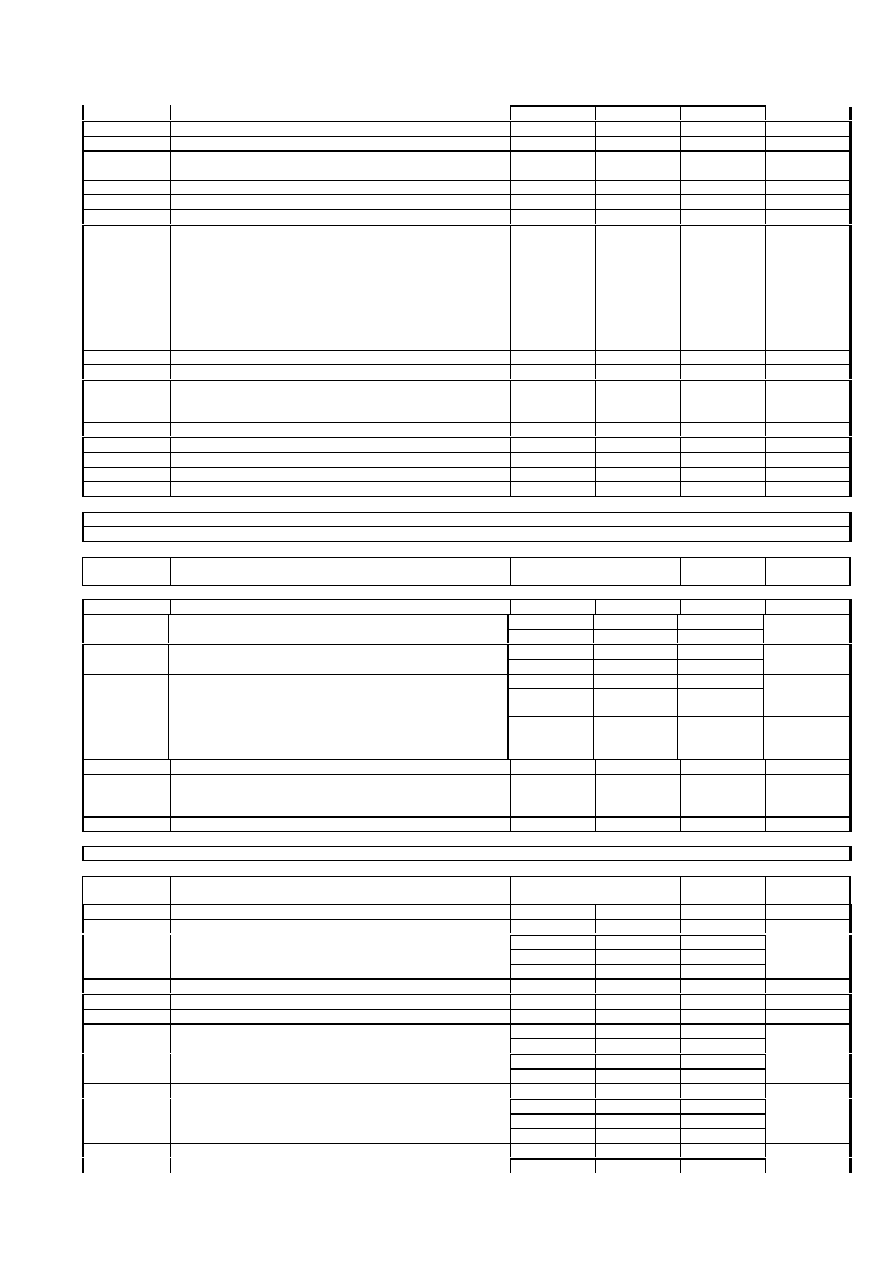
OPERATIVE PARAMETERS
Parameter
Description
Interval and default
Unit of
measurement
Notes
Pri
Minutes for clock programming
0…59
0
Minutes
HoUr
Hours for clock programming
0…23
0
Ore
DAY
Day for clock programming
1…7
0
Number
DEU
Unit of measurement for display
0…2
0
Number
0,1…5,0
0,4
Bar
…
…
PSI
…
…
°C
Pbd
Amplitude of proportional band (or neutral zone)
…
…
°F
Quantity
onon
Delay between consecutive startups
0…255
5
Minutes
ofon
Delay between switch-off and startup
0…255
5
Minutes
don
Startup delay between two resources
0…255
15
Seconds
dof
Release delay between two resources
0…255
5
Seconds
donF
Minimum operation time
0…255
15
Seconds
FdLy
Enables don for first delay
0-1
1
Number
FdLF
Enables dof for first delay
0-1
1
Number
odo
Output delay on instrument switch-on
0…255
0
Seconds
0,1…HSE
0,2
Bar
…HSE
PSI
…HSE
°C
LSE
Minimum setpoint value
…HSE
°F
Quantity
LSE…25
5
Bar
LSE…
PSI
LSE…
°C
HSE
Maximum setpoint value
LSE…
°F
Quantity
StrS
Time for start of reduced setpoint
0…24
0
Ore
SPrS
Time for end of reduced setpoint
0…24
0
Ore
rSd1…rSd7
Enables reduced setpoint for days 1…7
0-1
0
Number
UAro
Unit of measurement for alarm silencing
0-1
1
Number
Aro
Alarm silenced time
0…255
15
Minutes
PAO
Alarm override on switch-on
0…255
30
Minutes
0,01…25
5
Bar
PSI
°C
LAL
Minimum pressure alarm
°F
Quantity
0,01…25
5
Bar
PSI
HAL
Maximum pressure alarm
°C
Quantity
17
°F
tAo
Alarm signalling delay
0…255
0
Minutes
SEr
Interval for maintenance/service request
1…9999
3000
Ore
PEn
Number of pressurestat triggerings before alarm is
signalled
0…15
5
Number
PEI
Pressurestat triggerings count interval
0…15
15
Minutes
CPP
State of compressors for damaged probe
0-1
0
Number
SPr
State of steps for damaged probe
0…CpnU
1
Number
PoPr
Power to connect for damaged probe
0…255
0
Number
According to
the
proportionality
of
PC1 …
PC11;
The upper limit
cannot exceed
the value: PC1
+ … + PC11
rELP
Absolute or relative pressure display
0-1
1
Number
Loc
Keyboard lock
0-1
1
Number
Pso
Operation parameters Password
0…255
0
Number
The value 255
must not be
set
FAA
Instrument family for remote management
13…14
13
Number
dEA
Instrument address for remote management
0…14
0
Number
tAb
Parameter programming index (reserved)
/
/
/
EL1
Reserved
/
/
/
EL2
Reserved
/
/
/
CONDENSER FAN SECTION
CONFIGURATION PARAMETERS
Parameter
Description
Interval and default
Unit of
measurement
Notes
nFn
Number of fans
0…10
4
Number
0,0…8,0
0,5
Bar
P04
Pressure corresponding to 4 mA from transducer
0,0…
…
PSI
Only pressure;
Quantity
0,0…31,0
8,0
Bar
P20
Pressure corresponding to 20 mA from transducer
0,0…
…
PSI
Only pressure;
Quantity
-0,5…0,5
0,0
Bar
-50…50
0
PSI
For press.
transd.;
Quantity
CAL
Calibration of temperature probe or pressure transducer
-5…5
0
°C/°F
For temp.
probe;
Quantity
SEP
Pressurestat alarm input polarity
0-1
1
Number
Psc
Configuration parameters password
0…254
0
Number
The value 255
must not be
set
tAb
Configuration parameters index (reserved)
/
/
/
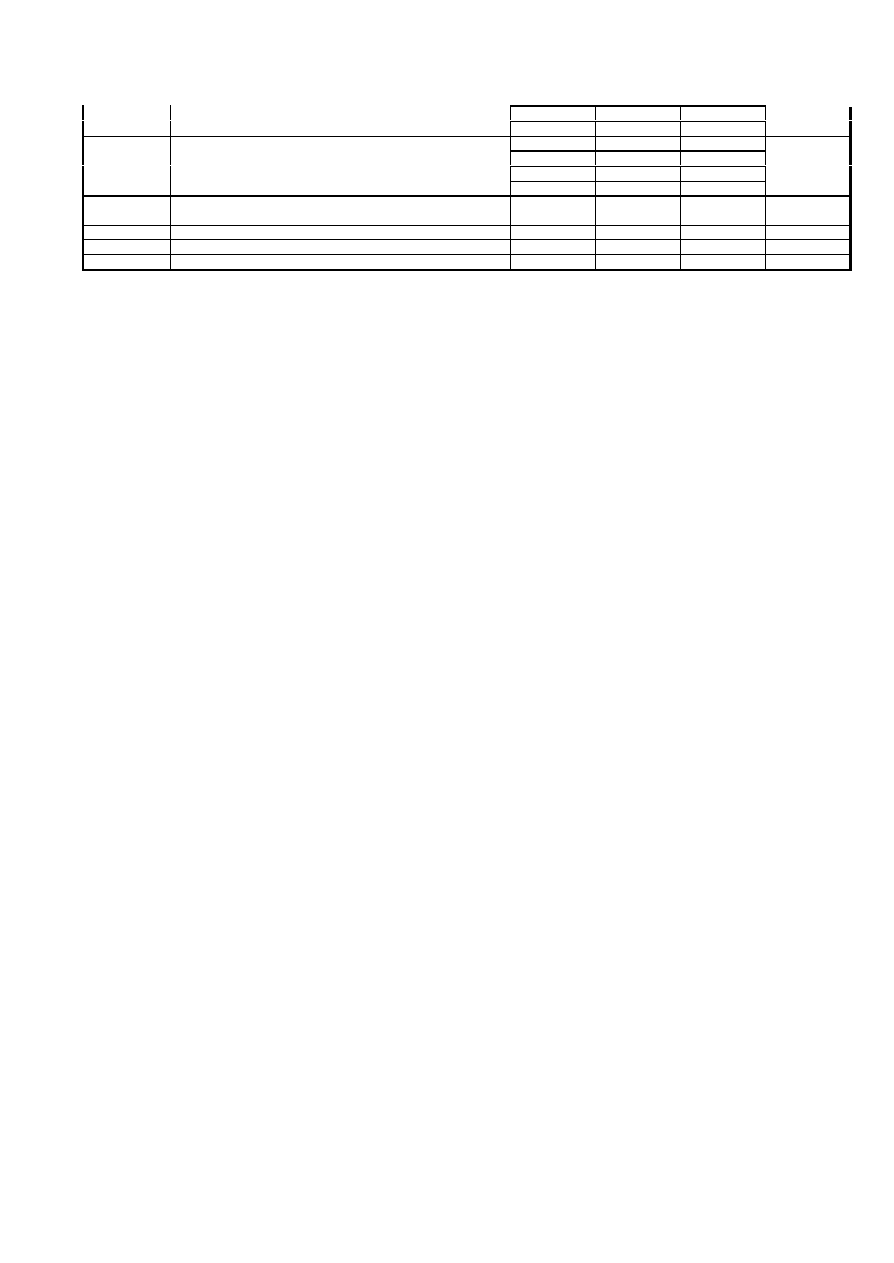
OPERATION PARAMETERS
Parameter
Description
Interval and default
Unit of
measurement
Notes
dEU
Unit of measurement for display
0…2
0
Number
0,1…5,0
0,4
Bar
…
…
PSI
…
…
°C
Pbd
Proportional band
…
…
°F
Quantity
don
Startup delay between two resources
0…255
15
Seconds
doF
Release delay between two resources
0…255
5
Seconds
rot
Rotation or fixed sequence
0-1
1
Number
0,1…HSE
0,2
Bar
…HSE
PSI
…HSE
°C
LSE
Minimum setpoint value
…HSE
°F
Quantity
LSE…25
5
Bar
LSE…
PSI
LSE…
°C
HSE
Maximum setpoint value
LSE…
°F
Quantity
0,01…25
5
Bar
LAL
Minimum pressure alarm
PSI
Quantity
18
°C
°F
0,01…25
5
Bar
PSI
°C
HAL
Maximum pressure alarm
°F
Quantity
PEn
Number of pressurestat triggerings before alarm is
signalled
0…15
5
Number
PEI
Pressurestat triggerings count interval
0…15
15
Minutes
FPP
State of fans for damaged probe
0-1
0
Number
FPr
Number of fans for damaged probe
0…nfn
4
Number
6. OPERATION
6.1. SETPOINT DISPLAY AND MODIFICATION
•
Normal Setpoint: this is the steady work setpoint.
•
Reduced Setpoint: this is the work setpoint that can be set in those moments of less involvement of the
plant (e.g. during night hours and on holidays), and so save energy.
Press and release the “SET” key to display the normal setpoint in the unit of measurement chosen as
standard in the parameters programming phase.
Press the “SET” key repeatedly to display the normal setpoint consecutively, in the different units of
measurement, and then the reduced setpoint in the different units.
The selection of the type of unit of measurement is indicated by the Bar, or PSI or °C or °F LED switching on.
The active setpoint is indicated by the corresponding pilot LED switching on (LED “N” Normal and LED “R”
Reduced).
To modify the value of the setpoint displayed press the “UP” and “DOWN” keys directly.
The following paragraphs describe some procedures regarding the compressor and fan states. Note that for
the compressors the operation duration is referred to the whole compressor, whereas the states of the
resources and maintenance are referred to the compressor with its stepped-capacity (partialisation) (if
present).
Example: two compressors, each with two stepped-capacity (partialisation) (total 3+3 steps, set as resources
1…6, see fig. 2). Displays regarding the resources: for the duration of operation 1, 4 (red LEDs); for the state
of maintenance – 1 (red, combined with 2, 3 green), 4 (red, plus 5, 6 green); for the state of the resources
1,2,3,4,5,6 (red and green LEDs depending on the type of resource and eventual timings).
6.2. DISPLAY OF THE STATE OF THE RESOURCES
6.2.1. COMPRESSORS
The connections of the resources are conditioned by the call (situation of plant)and by the delay parameters.
In the same way, disconnection entails triggering the release of the resource in use and respect of the delays
set.
If set, the resource connection delay (compressor or stepped-capacity (partialisation)) is signalled by the
corresponding green LED flashing, that lasts from call to connection.
Once connected, the LEDs stay on continuously:
•
red (for the compressors)
•
green (for stepped-capacity (partialisation)).
The delay regarding the release of the resource is signalled by the flashing of the corresponding green LED.
At the moment of disconnection, the LEDs mentioned, switch off.
For alarms regarding digital inputs, the LED associated with the compressor flashes, with the “ALARM” LED
on continuously and the display showing the alarm code.
6.2.2. FANS
The connections and disconnections are linked, as for the compressors, to the triggering (in terms of
resources needed) and the delays set.
The display is similar to the previous one, but only the yellow LEDs are referred to.
After the call and until connection, the LED corresponding to the fan involved flashes.
If the LED is on continuously, the corresponding resource is in operation.
During release the LED flashes for the duration of the delay connected. On disconnection the LED switches
off.

19
If the alarm corresponds to a digital input, the LED associated with it flashes, with the "ALARM" LED on
continuously and the alarm code on the display.
6.3. DURATION OF COMPRESSOR AND VALVE OPERATION
6.3.1. DISPLAY
Press and release the “HRS” key: the “HRS” LED switches on and stays on.
The duration of operation of the first compressor is displayed, in hours.
Press the “UP” key within 5 seconds to pass to the next compressors.
The red LED flashes (state of the compressors, above) to indicate which compressor has been selected.
After the last compressor has been displayed, press the “UP” key again and the duration of operation of the
fans is displayed.
6.3.2. ZERO SETTING
For each compressor, zero setting of the time of operation is obtained by holding down the “MUTE” key.
6.3.3. FANS
After the display regarding the last compressor, press the “UP” key again to display the number of hours of
operation of the fans. The duration can be set to zero, as explained at the previous paragraph; yet for the
fans the duration of operation has no effect on the request for maintenance with the consequent disabling
(see parameter “SEr”).
6.4. “AVAILABLE / IN MAINTENANCE” STATE
6.4.1. DISPLAY
Press and release the “MAINT” key: the “MAINT” key switches on and stays on.
The state of the first compressor is displayed.
The state is indicated on the display as follows:
•
“onLn” (on Line) = compressor “available”
•
“oFLn” (oFf Line) = compressor “in maintenance”.
Press the “UP” key within 5 seconds to pass to the next compressors.
The red LED flashing (state of the compressors) indicates which compressor has been selected.
After the display of the last compressor, press the “UP” key to display the states regarding the fans.
6.4.2. MODIFICATION
The state of the compressor selected is modified by pressing the “MUTE” key for more than 5 seconds: the
“MAINT” LED flashes.
The change of state is indicated on the display (label “onLn”, “oFLn”).
The “in maintenance” state continues being signalled, for each compressor, by the flashing of the
corresponding red LED and the green LEDs regarding the capacity stepping (partialisation) (if present). The
output is always disabled when the compressor is in maintenance.
6.4.3. FANS
After the display regarding the last compressor, press the “UP” key again to display and if necessary, modify
the states regarding the fans, as at the preceding paragraph.
7. DIAGNOSTICS
The following conditions are signalled by the LEDs switching on and messages appearing on the display, as
will be explained in detail.
The messages displayed on the left, compressor section, are preceded by the abbreviation “Er”. Those
displayed on the right, fan section, are preceded by “E”.
If an alarm is triggered, the “ALARM ” LED of the section regarding the alarm (compressors or fans) is on.
For all alarms, the alarm output is enabled (terminals 1 and 2 closed).
7.1. ALARM DIGITAL INPUTS

20
The digital inputs supply two types of alarm, caused, respectively, by the triggering of the pressurestat (2
inputs) and the devices associated with each resource (11 inputs). Besides what has been described before,
appear:
•
alarm message on the display of the corresponding section: 0L appears in the compressor section, 0H
in the fan section, 02 depending on the relationship with the resource.
•
For alarm 02, flashing of the LED associated with the resource (red LED for the compressor, yellow for
the fans).
7.1.1. PRESSURE ALARMS
Terminals 5-6 and 7-8. Parameters: compressors/“SEP” and fans/”SEP”.
These inputs are connected to the pressurestats assigned respectively to the low and high pressure alarms.
The alarms generated are 0L and 0H. These cases are distinguished:
•
input for low pressure alarm (normally associated with the condition in suction).
All the outputs regarding the compressors and the fans are disabled.
For a generic triggering of the pressurestat, there is no signalling on the display, resetting is automatic.
When the number of pressurestat triggerings is equal to “PEn” in the time “PEI”, there is a signalling on the
left-hand display (0L). In this case resetting is manual (the “MUTE” key must be pressed for more than 5
seconds).
•
high pressure alarm input (normally associated with the delivery condition).
All the corresponding outputs to the compressors are disabled. All the outputs regarding the fans are
enabled.
For a generic triggering of the pressurestat, there is no signalling on the display, resetting is automatic.
When the number of pressurestat triggerings are equal to “PEn ” in the time “PEI”, it is signalled on the left-
hand display (0H). In that case resetting is manual (the “MUTE” key must be pressed for more than 5
seconds).
7.1.2. RESOURCE-ASSOCIATED ALARM
Terminals from 22 to 43, parameter “ALIP”.
The protections regarding the compressors and fans are connected to these inputs.
If one of the protections trip (for example, for lack of oil in the compressor, overheating, etc.), the
corresponding output will be disabled. the cases are:
•
Alarm regarding the compressor: red LED, corresponding to the compressor, flashing and the “ALARM”
LED on continuously, on the left-hand display appears “02”, alternating to the probe reading.
•
Alarm regarding the fan: yellow LED, corresponding to the fan, flashing and the “ALARM” LED on
continuously. On the right-hand display appears “02”, alternating to the probe reading.
If the alarm is silenced, “ALARM” LED flashes. The alarm is reset automatically.
The alarm inputs count are based on the number of compressors, not the number of steps.
Example: the first three alarm inputs 22-23, 24-25, 26-27, will be assigned, one for each compressor, to
three compressors with two capacity-steps (partilisations).
7.2. PROBE FAILURE ALARM
This consists in a connection or functional defect of the suction or delivery probes. This is displayed on the
left- and right-hand displays, respectively with the message 01. It is controlled by the parameters “CPP”,
“SPr”, “PoPr” (suction – compressor section) and “FPP”, “FPr” (delivery – fan section), that guarantee a
specific use of the resources. Automatic reset (the resources are enabled according to the parameters
mentioned).
7.3. ALARMS FOR SETTING THE OPERATION LIMITS
This consists in overcoming the operation limits, which means too high a pressure (delivery) or too low (in
suction). It is controlled by the parameters “HAL”, “LAL”. Silencing is permitted. The cases are:
•
Low pressure alarm, value measured by the probe during suction is less than set – LAL. Signalled on
the left-hand display, with message 03. This alarm is reset automatically when the value measured
exceeds set – LAL/2 (deviation less than half of LAL).
•
High pressure alarm, value measured by the probe in delivery is greater than set + HAL. Signalled on
the right-hand display, with message 04. Automatic reset when the value measured decreases below set
+ HAL/2 (deviation less than half of HAL).
7.4. OTHER ALARMS
•
Mistaken programming of the clock (see parameters “Pri”, “HoUr” and “dAY”). Signalled with message
11. Reset: set clock.
21
•
Mistaken programming of the parameters (example: number and characteristics of the resources
exceeding the ties …). Signalled with message 12. Alarm reset is manual.
•
Instrument self-diagnosis alarm, due, for example, to electrical interference, over-voltage. Signalled with
message 13. Alarm reset is manual.
•
Request for maintenance. This indicates that at least one of the compressors has reached the duration
of operation (parameter “SEr”) for which a request for maintenance is signalled. The compressor in
alarm is signalled by the flashing of its resource LED (red) and is disabled at the same time. It is
signalled with message 14. Alarm reset: set to zero the number of hours of operation for the compressor
in question.
7.5. ALARM SILENCING
Press and release the “MUTE” key to disable the alarm relay output, the “ALARM” LED flashes, indicating
that the alarm condition is still active, though the automatic reset could trip.
The alarm stays silenced for a duration that can be set by the parameters “UAro” and “Aro”.
If during the silenced time other alarms are intercepted by the EWCM Alarm reset is manual silencing is
cancelled and the new alarm will be signalled.
7.6. MANUAL RESETTING
Press the “MUTE” key. The left-hand display shows the message “CanC”. Keeping the key still pressed,
“rES” appears: at this point, the alarm has been reset.
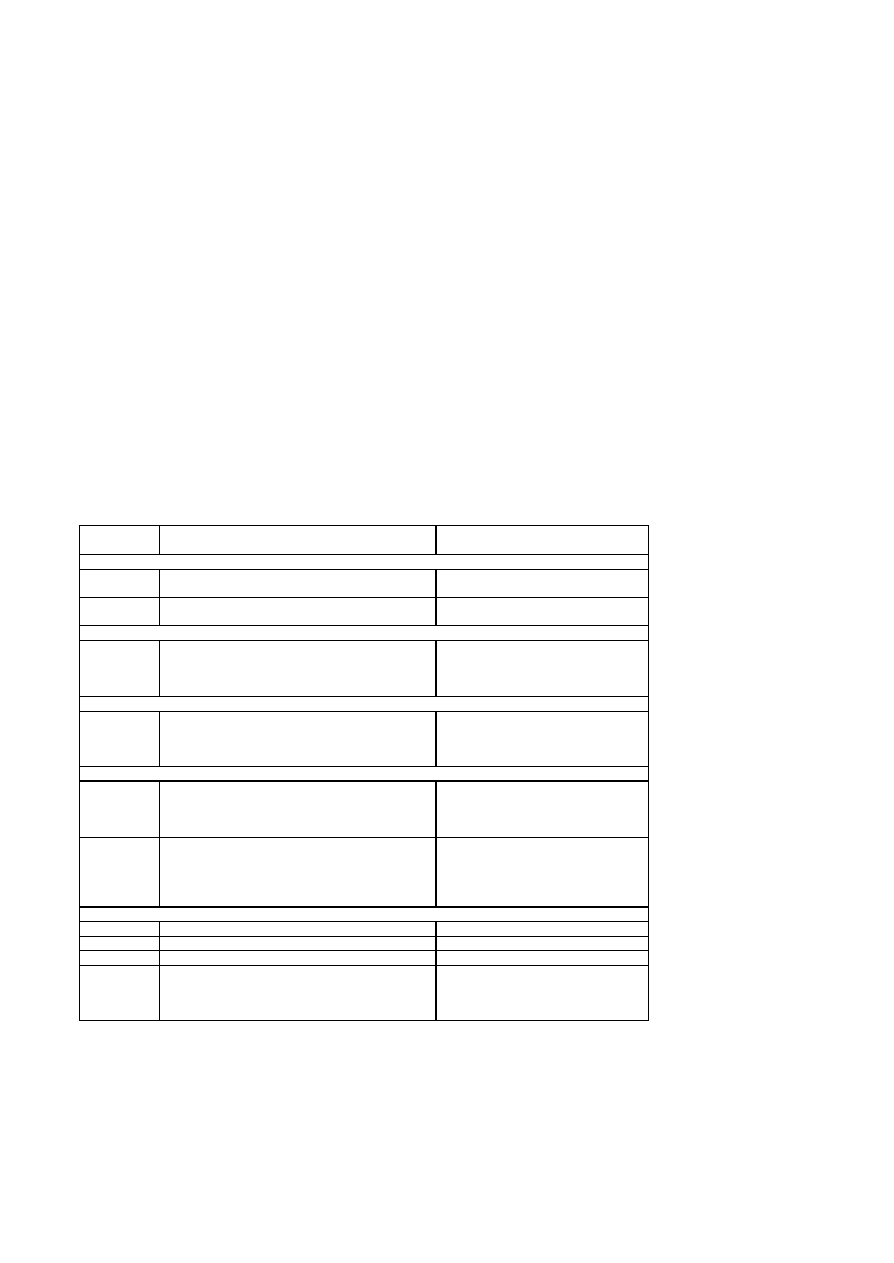
7.7. SUMMARY OF THE ALARM CONDITIONS
MESSAGE
DESCRIPTION
RESET
Pressurestat alarms:
0L
Regarding the "minimum pressure" pressurestat
(terminals 5, 6).
0H
Regarding the "maximum pressure" pressurestat
(terminals 7, 8).
Probe failure alarm:
01
Probe damage (suction or delivery).
Parameters: “CPP”, “SPr”, “PoPr” (suction –
compressor section) e “FPP”, “FPr” (delivery –
fan section)
automatic (the resources are enabled
according to the parameters named).
Other digital input alarms:
02
Regarding compressor and fan protection
devices. Entails disabling the resource
(compressor with possible steps, or fan), to which
the alarm is referred.
automatic
Alarms for setting the operation limits:
03
Low pressure alarm, if the value measured by the
probe is less than set – LAL.
Automatic resetting when the value
measured exceeds set – LAL/2
(deviation less than half of LAL).
Silencing, no resetting.
04
High pressure alarm, if the value measured by the
probe is greater than set + HAL.
Automatic reset when the value
measured decreases below set +
HAL/2 (deviation less than half of
HAL).
Silencing, no resetting.
Other Alarms
11
Mistaken programming of the clock.
Set clock.
12
Mistaken programming of the parameters.
Manual
13
Instrument self-diagnosis alarm.
Manual
14
Request for maintenance. See parameter “SEr”.
The compressor in alarm is signalled with the
corresponding resource LED flashing (red) and it
is at the same time disabled.
Set the number of operation hours to
zero for the compressor in question.
8. INSTALLATION
8.1. MECHANICAL ASSEMBLY AND WORKING ENVIRONMENT.
The instrument must be installed on a panel, on a 138 x 67 mm hole, fastened with the bracket supplied.
For correct operation, the installation environmental temperature, must be between 0 e 55 °C.

22
Avoid installing in rooms with very high humidity (particularly where there is much condensation) or dirt.
There is available, on request, a protective cover that can be applied to the front panel and capable of
offering an IP55 protection rating.
8.2. ELECTRICAL CONNECTIONS
The operations must be carried out by an expert. Always switch off the instrument when working on the
electrical connections.
The instrument is equipped with screw terminal blocks, that can be disconnected) for connecting the electric
wires. Use cables with cross-section
≤
2,5 mm
2
; insert only one wire per terminal for the power connections.
Make sure that the power supply voltage is in compliance with that specified (check the label on the
instrument).
The relay outputs, on single contact, are clear of voltage.
Do not exceed the maximum current allowed for the different outputs (check on the aforementioned label).
For greater loads, use a contactor of suitable characteristics.
The temperature probes need no insertion polarity; their cables can be extended by using normal twin wire
flex (the extension has an importance on the behaviour of the instrument electromagnetic capabilities; great
care must be taken with the cables).
For the pressure transducers, respect the insertion polarity. It would be best to use transducers capable of
accepting a non-regulated power voltage. In particular, it is advisable to use the EWPA 007 and 030
transducers, for measuring the high pressure (delivery) and low-pressure (suction) sections.
Serial connection for Televis / EWTD: pay particular attention to the electromagnetic interference. It is
advisable top use Belden-type screened twin flex.
The probe cables, transducers and serial connections must be separated from the wires of the relay contacts
and from all parts with dangerous voltage, in general, by using insulation and distances that guarantee at
least double or reinforced insulation.
For electromagnetic compatibility, it would be advisable to do the separation by using separate insulating
ducts and proper fastening methods for the cables.
9. PERMITTED USE
For safety reasons the instrument must be installed and used according to the instructions supplied: in
particular, under normal conditions, parts bearing dangerous voltages must not be accessible.
The device must be suitably protected from water and dust and must also only be accessible by using a tool
(except the front panel).
The device may be incorporated in appliances or plants used for refrigeration and it has been inspected
under the safety aspects, according to the European Equalised Regulations used for reference. It may be
classified:
•
According to its construction as an automatic, electronic, standalone control device, to be incorporated
in a plant.
•
According to its automatic operating features as a control device, 1 BY type;
•
As a Class A device, according to the class and structure of the software it uses.
10. USES NOT ALLOWED
Any other use different from that allowed is prohibited. We point out that relay contacts are of the functional
type, and therefore subject to breakdown. Any protection devices required by the rules concerning this
product or dictated by common sense due to obvious safety reasons should be applied outside the
instrument.
11. RESPONSIBILITY AND RESIDUAL RISKS
Eliwell / Invensys Climate Controls Italia is not liable for any damages deriving from:
•
installation/use different from that intended and, in particular, not conforming to the safety standards
prescribed by the regulations and/or herewith given in this technical sheet
§ use on appliances that do not guarantee adequate protection against electrical shock, water and dust
under the conditions of assembly realised;
§ use on appliances that allow access to dangerous parts without the use of tools or without warnings;

23
§ tampering with and/or alteration of the product;
§ installation/use in appliances not conforming to the standards and dispositions of the laws in force.
12. TECHNICAL DATA
Container: in black Noryl plastic material, extinguishing rating UL 94 V-0.
Dimensions: front panel 72x144 mm, depth 120 mm.
Assembly: On panel on a 138x67 mm hole, with fastening brackets.
Protection of front panel: IP 54 rating.
Connections: screw-type with terminals that can be disconnected.
Display: on two displays (4-digit for compressor section, 3-digit for fan section), digit height: 12.5 mm.
Dimensions and unit of measurement used: temperature (°C, °F), pressure (bar, PSI).
Resolution: 0.01 bar – 0.1 PSI (°C) – 1 °F (compressor section display). 0.1 bar (°C) – 1 PSI (°F) (fan
section display).
Precision: better than 0.5% of bottom scale.
Compatibility for refrigerating gas: R 22, R 134a, R 502, R 404a, R 407c, R 507, R 410a.
Analogic inputs: 1 (suction) + 1 (delivery). Compatible, depending on model, with pressure transducer
(4…20 mA current, programmable interval) or with temperature probe (type NTC).
Digital inputs from pressurestat: 1 (high pressure alarm) + 1 (low pressure alarm); opto-insulated, live (the
same voltage as power supply).
Alarm digital inputs: 11 contacts; opto-insulated, live (the same voltage as power supply).
Digital input for reduced setpoint: 1 clean contact form setpoint enabling.
Alarm output: on relay 6(3)A 250V AC.
Safety output (instrument damage/failure): on relay 6(3)A 250V AC.
Outputs configurable for resource regulation: 11 – on relay 6(3)A 250V AC.
Serial port: type RS-485 for connection to Televis / EWTD.
Operation temperature: 0…55 °C.
Storing temperature: -30…75 °C.
Power supply: 220/230, 110/115, 24, 12 V
∼
.
Information on power supply: voltage tolerance ±10%, frequency 50/60 Hz, maximum absorbed power 10
VA.
24
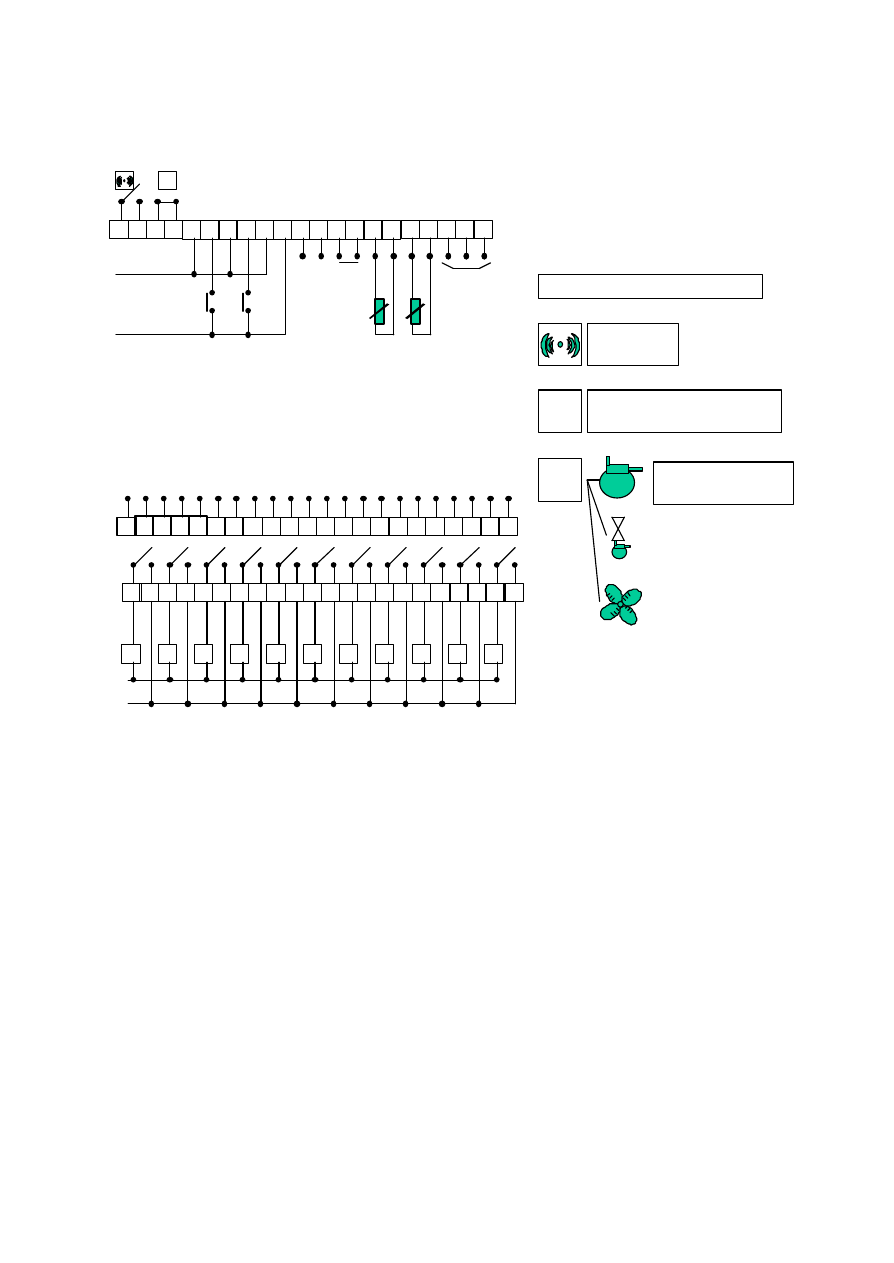
Fig.5.
1
2
3
4
5
6
7
8
9
10
11
12
13
14
15
16
17
18
19
20
21
44 45
46
47
48
49
50
51
52
53
54
55
56
57
58
59
60
61
62
63
64
65
22 23
24
25
26
27
28
29
30
31
32
33
34
35
36
37
38
39
40
41
42
43
REFERRED TO POWERED INSTRUMENT
!
!
POWER SUPPLY
LOW PRESSURE
ALARM INPUT
HIGH PRESSURE
ALARM INPUT
GND
REDUCED
SETPOINT
FOR NTC TEMPERATURE
PROBE INPUT
+
-
GND
RS-232 SERIAL
CONNECTION
SUCTION TEMP.
PROBE
DELIVERY TEMP.
PROBE
PHASE
NEUTRAL
r
r
r
r
r
r
r
r
r
r
r
r
r
r
r
r
r
r
r
r
r
r
SAFETY RELAY
OPEN WHEN INSTRUMENT IS NOT POWERED;
OPEN FOR DAMAGE OR POWER FAILURE
ALARM RELAY
r
r
RESOURCE RELAY OF THE TYPE:
COMPRESSOR
CAPACITY VALVE
FAN
!
!
25
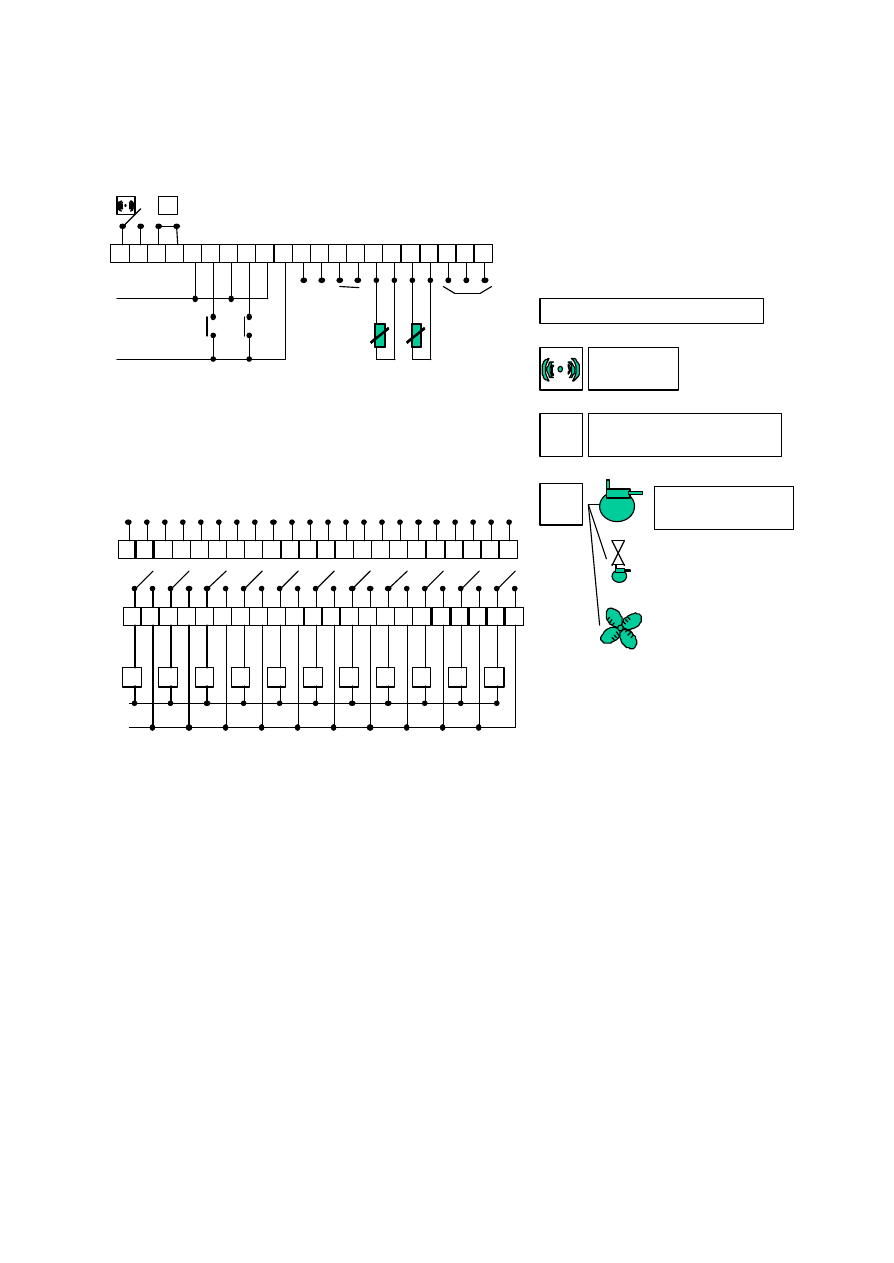
Fig.6.
1
2
3
4
5
6
7
8
9
10
11
12
13
14
15
16
17
18
19
20
21
44 45
46
47
48
49
50
51
52
53
54
55
56
57
58
59
60
61
62
63
64
65
22 23
24
25
26
27
28
29
30
31
32
33
34
35
36
37
38
39
40
41
42
43
REFERRED TO THE POWERRED INSTRUMENT
!
!
ALIMENTAZIONE
LOW PRESSURE
ALARM INPUT
HIGH PRESSURE
ALARM INPUT
GND
REDUCED
SETPOINT
FOR 4-20mA CURRENT INPUT
FROM PRESSURE TRANSDUCER
+ -
GND
RS-232 SERIAL
CONNECTION
PHASE
NEUTRAL
r
r
r
r
r
r
r
r
r
r
r
r
r
r
r
r
r
r
r
r
r
r
SAFETY RELAY
OPEN WHEN INSTRUMENT IS NOT POWERED;
OPEN FOR DAMAGE OR POWER FAILURE
ALARM RELAY
r
r
RELAY FOR RESOURCE OF TYPE:
COMPRESSOR
CAPACITY VALVE
FAN
!
!
SUCTION
TRANSDUCER
EWPA 007
DELIVERY
TRANSDUCER
EWPA 030
+
+
-
-

26
This technical publication is the exclusive property of Invensys Climate Controls Italia s.p.a. who absolutely
prohibits its reproduction and distribution without the express authorisation of Invensys Climate Controls
Italia s.p.a..
Although the greatest care has been exercised in the preparation of this document Invensys Climate
Controls Italia s.p.a. and any person or company involved in creating and drawing up this document cannot
be retained liable and will accept no liability whatsoever connected with its use.
Invensys Climate Controls Italia s.p.a. reserves the right to make any changes or improvements, aesthetic or
functional, without prior notice and in any moment.

Invensys Climate Controls s.p.a.
via dell'Industria, 15
Zona Industriale Paludi
32010 Pieve d'Alpago (BL)
ITALY
Telephone +39 0437 986111
Facsimile +39 0437 986066
Email eliwell@invensysclimate.com
Internet http:/www.eliwell.com
An Invensys company
Wyszukiwarka
Podobne podstrony:
900
wykaz czynności walec cA 900
900
801 900
900
BN 69 0455 01 Transport w kopalniach odkrywkowych Skrajnia taboru 900 mm
Orange SMART na karte promocja Pakiet 900 sms [2013 04 16]
Prezes bierze 900 pensji pracownika
900 9000 (10)
900 901
900
900
09 pyt od 801 do 900, Nieruchomości, Nieruchomości - pośrednik
900
La donna nel '900
więcej podobnych podstron