SERVICE SHEET No. 710
October 1948
ALL MODELS
CHAIN ALTERATIONS AND REPAIRS
A chain rarely breaks if it is kept properly lubricated and adjusted. Usually it is worn out
long before it reaches breaking point. The rear chain is the most heavily stressed and is
therefore the one most likely to give trouble. Spare parts should be carried to enable the
rider to carry out a repair on the road with the aid of a chain rivet extractor (see Fig. X7).
The front chain will probably be worn out before it requires shortening.
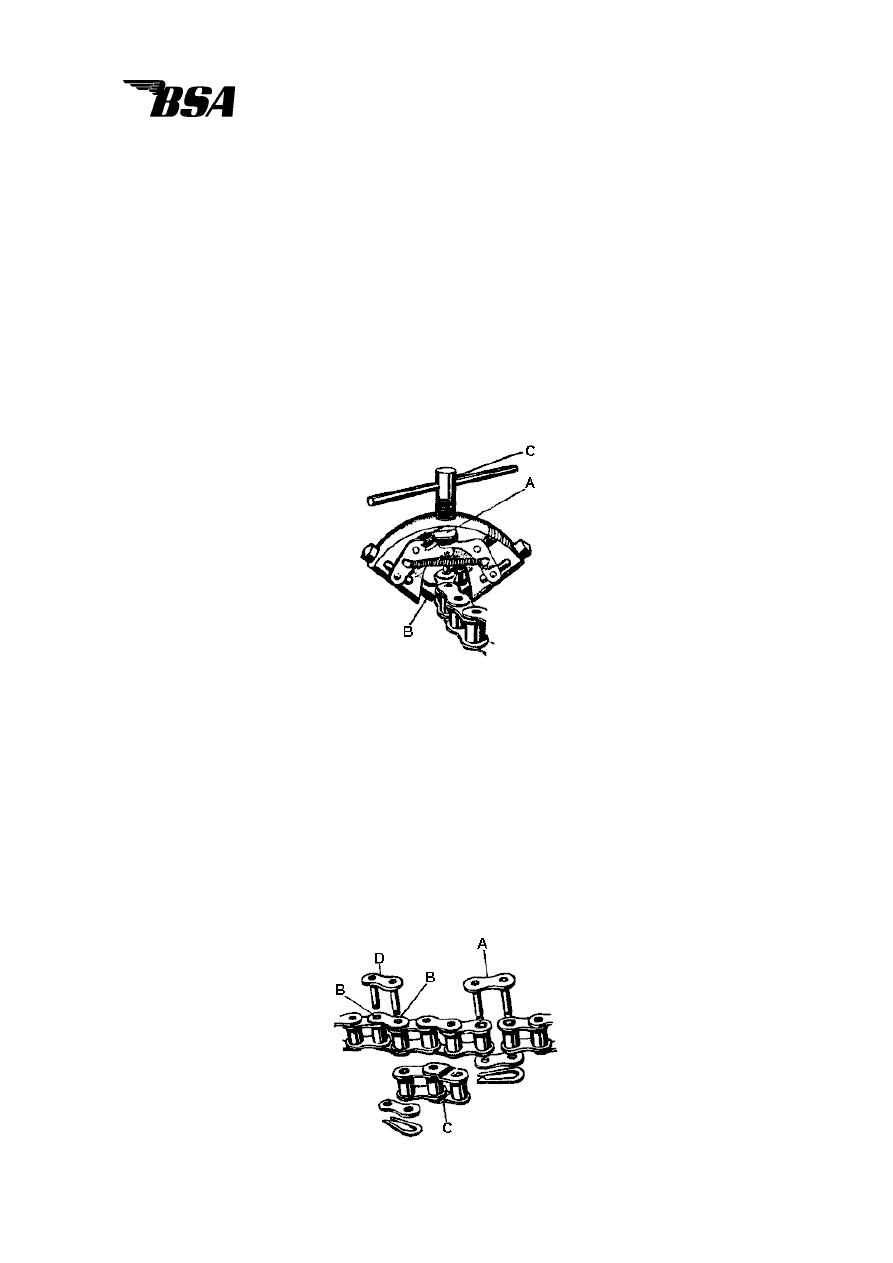
How to use the Chain Rivet Extractor
First press down lever (
A
) Fig. X7 to open the two jaws (
B
). Insert the link to be removed
so that the jaws grip the roller and support the uppermost inner side plate. The punch (
C
)
is then screwed on to the rivet head until the rivet is forced through the outer plate.
Fig. X7.
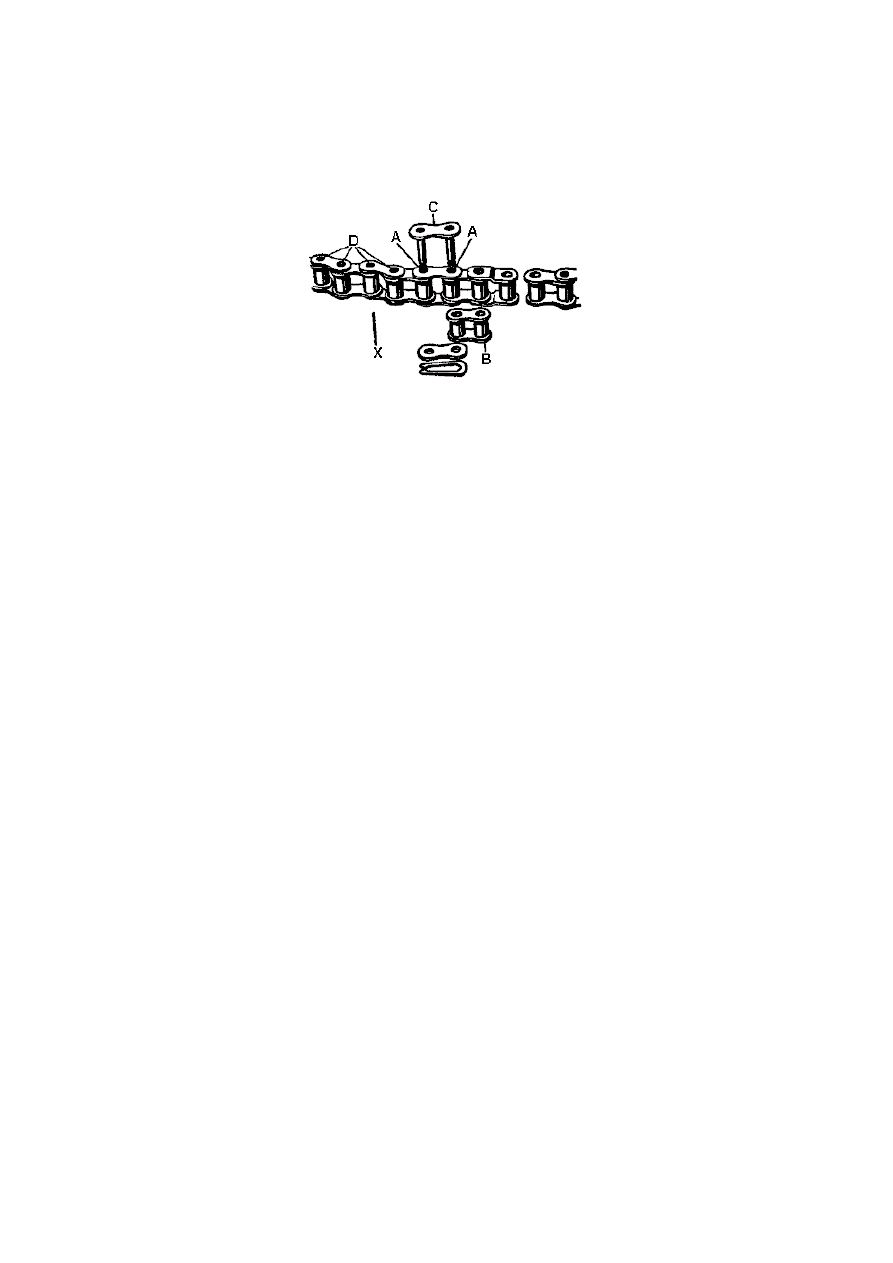
To shorten a worn Rear Chain
After a big mileage, the rear chain may have stretched so that no further adjustment is
possible by the usual method. In this case it is possible to shorten the chain by one link or
pitch, so increasing its useful life. First remove the single connecting spring link (
A
)
securing the two ends of the chain, Fig. X8. If the chain terminates in two ordinary links
as in Fig. X8 (in which case the chain will be an even number of pitches) extract the third
and fourth rivets (
B
) from the end and replace the detached three pitches by a single
connecting link (
C
). The connection is made with an additional spring link (
D
). If one
end of the chain has a double cranked link, Fig. X9—in which case the chain will have an
odd number of pitches—extract the second and third rivets (
A
), releasing the cranked link
unit complete, which can be retained for further use. Replace with one inner link (
B
) and
again connect up with an additional single connecting link (
C
).
Fig. X8.
B.S.A. Service Sheet No. 710 (contd.)
To repair a damaged Chain
If a roller or link has been damaged (
X
) Fig. X9, remove rivets (
D
), take out the damaged
link and replace with one inner link, secured by two single connecting links.
Fig. X9.
It is important that the spring clip fastener should always be put on so that the closed
end faces the direction of travel of the chain—i.e. when clip is on top run of chain, closed
end is toward front of machine—when clip is on bottom run, closed end is towards rear of
machine.
It should be noted that once a rivet has been extracted it must not he used again, so
that it is important to check that the correct rivet is being removed before actually
removing it. In the case of double cranked links, the complete unit comprises an inner
link and the cranked outer link—three rollers in all—and these must never be separated.
Fitting Rear Chain
To fit a new rear chain, turn wheel until the spring link of the old chain is located on rear
sprocket. Disconnect, and allow the lower run to drop down. Join the top run of the old
chain to the new chain by means of the connecting link, and then by pulling on the bottom
run of the old chain the new one will be carried round the gearbox sprocket. Then the old
chain can be disconnected and the ends of the new one joined together.
When the rear chain breaks and falls from its sprockets, the new or repaired chain can
be replaced without taking off the chainguards. One end of the chain must be fed (from
the rear) under the front end of the rear top chainguard on to the gearbox sprocket. A
long bladed screwdriver or a piece of stiff wire may assist this operation. When the chain
has located on the sprocket teeth, engage a gear and gently turn gearbox over with the
kickstarter. This will feed chain round gearbox sprocket. When sufficient length of chain
is hanging below sprocket, disengage gear and chain can then be pulled round until both
runs can be fed inside rear chainguard and engaged on rear wheel sprocket.
B.S.A. MOTOR CYCLES LTD., Service Department, Armoury Road, Birmingham 11.
B.S.A. PRESS
Wyszukiwarka
Podobne podstrony:
710 711
710
Cechy szczególne silników F9Q 710 i 736
710
710
710
710
Blondynka i 710 tka
710
710
710
710
710 711
Seinfeld 710 The Gum
Nuestro Circulo 710 DIALOGO CON LA POLIFACETICA CLAUDIA AMURA, PRIMERA GM IBEROAMERICANA 26 de marz
więcej podobnych podstron