7
Brittle fracture
7.1
Conventional approaches to design against brittle
fracture
A brittle fracture in a metal is a result of crack propagation across
crystallographic planes and is frequently associated with little plastic
deformation. The propagation of a cleavage crack, as it is known, requires
much less energy than does a ductile crack and so can occur at an applied
stress much lower than that at which failure would normally be expected. In
engineering materials, such a fracture usually starts from some notch such as
a fatigue crack, a welding crack or lack of fusion ± in other words a highly
localised stress concentration. The explanation of the metallurgical
mechanisms and influences surrounding brittle fracture are very compli-
cated and the reader who wishes to know more should consult references
such as Honeycombe.
22
One of the principal reasons why the subject of brittle fracture occupies a
key place in the design of steel fabrications is that the ferritic steels change
their fracture behaviour with temperature, from being notch brittle at lower
temperatures to being notch ductile at higher temperatures. What is more,
the temperature at which this change takes place depends on the chemical
composition and metallurgical structure of the steel. This is more than an
academic distinction because this transition from brittle to ductile behaviour
takes place close to the temperature at which many steel fabrications
operate. The phenomenon is associated particularly with welded fabrica-
tions because the energy required to propagate a brittle fracture is low which
means that the stress required to start the crack can be supplied just by the
residual stresses from welding without the necessity of an externally applied
stress. Welds may supply a stress concentration in the form of a crack.
Furthermore welding can damage the fracture toughness of the steel, and in
the past some weld metals themselves had very poor fracture toughness. A
brittle fracture can be driven by the strain energy locked up in the metal and
may not need an external load or force to start it. Brittle fracture is a fast
moving unstable fracture which has been known to sever complete sections

of welded bridges, ships, pressure vessels and pipelines. The speed of the
progression of the crack front has been calculated as about half the speed of
sound in the steel. In some cases the crack has been arrested by the
exhaustion of the strain energy or by its running into a region of high
fracture toughness. The basis of the approach to design and fabrication to
prevent brittle fracture occurring then lies in appropriate material selection
and welding procedure development.
In a limited number of applications steps are taken in design to introduce
devices which will arrest a running crack. For example in pipelines and other
vessels the longitudinal welds in adjacent pipe lengths are offset to avoid
presenting a continuous path of similar properties along which a fracture
could run. As an alternative to this, a ring of thicker material or higher
toughness material may be inserted at intervals which locally reduces the
stress sufficiently to arrest a crack. It has to be recognised that it requires a
material of much higher fracture toughness to stop a crack than would have
been necessary to have prevented it starting in the first place.
We should recognise that the consequences of service can also lead to
circumstances where a brittle fracture may occur in a fabrication which was
initially sound. For example fatigue or corrosion cracks may grow to a
critical size during the life of the fabrication; irradiation in nuclear plant can
reduce the fracture toughness of steels. Materials other than ferritic steels
need to have defined fracture toughness but they do not exhibit a significant
change of that property with temperature and so the question of material
selection has one less dimension. We shall see later on in this chapter how
the steel can be tested to classify its suitability for use in any particular
circumstance but first we need to consider the factors that have a bearing on
the requirements for fracture toughness.
For any given quality of fabrication these are:
. thickness
. applied stress
. fracture toughness.
The criterion of applied stress referred to here is not a question of small
differences in calculated stress in a member but whether or not there are
large areas of high stress concentration and constraint. Examples of these
areas are the nodes in tubular joints where there are large local bending
stresses, caused by incompatibility of deformations, and the stress
concentrations inherent in openings, nozzles and branches in pipelines,
pipework and pressure vessels. Greater thickness is a feature which
engenders tri-axial stress systems which favour plane strain conditions. In
addition thicker material will contain more widely spread residual stress
systems than thinner material. For any combination of thickness and stress
we can then choose the level of parent metal fracture toughness which
76
Welded design ± theory and practice

research and experience has shown to be appropriate. Perhaps it is not
unexpected that the appropriate choice will be set down in a standard
specification for the product or application which we have in mind and
which itself will refer to a range of steel specifications in another standard.
The application will also perhaps introduce as a basis of selection other
criteria which have not been mentioned so far such as that of risk,
represented by the hazards, their consequences and the likelihood of their
occurrence.
7.2
Fracture toughness testing and specification
Incidents of brittle fracture in riveted structures were reported in the late
nineteenth century and of welded structures in the 1930s but no coherent
approach to investigating the reasons emerged. Eventually it was the
fracture of the hulls of more than one fifth of the nearly five thousand
`Liberty Ships' built in the Second World War which led to work on
categorising welded steels by their propensity to brittle fracture.
23, 24
The
Liberty Ship was a type of merchant ship, virtually mass produced by
welding in the USA in response to the need to keep the UK and the USSR
supplied with fuel, arms, food and other necessities in the face of the
German attempt to blockade the North Atlantic and other sea routes using
submarines. Investigations in the USA and the UK concluded that incidents
of brittle fracture in these ships were more likely to have occurred where the
Charpy test energy of the steel was less than 15 ft lb (20 J). Even today most
structural steel specifications use this measure of fracture toughness, even if
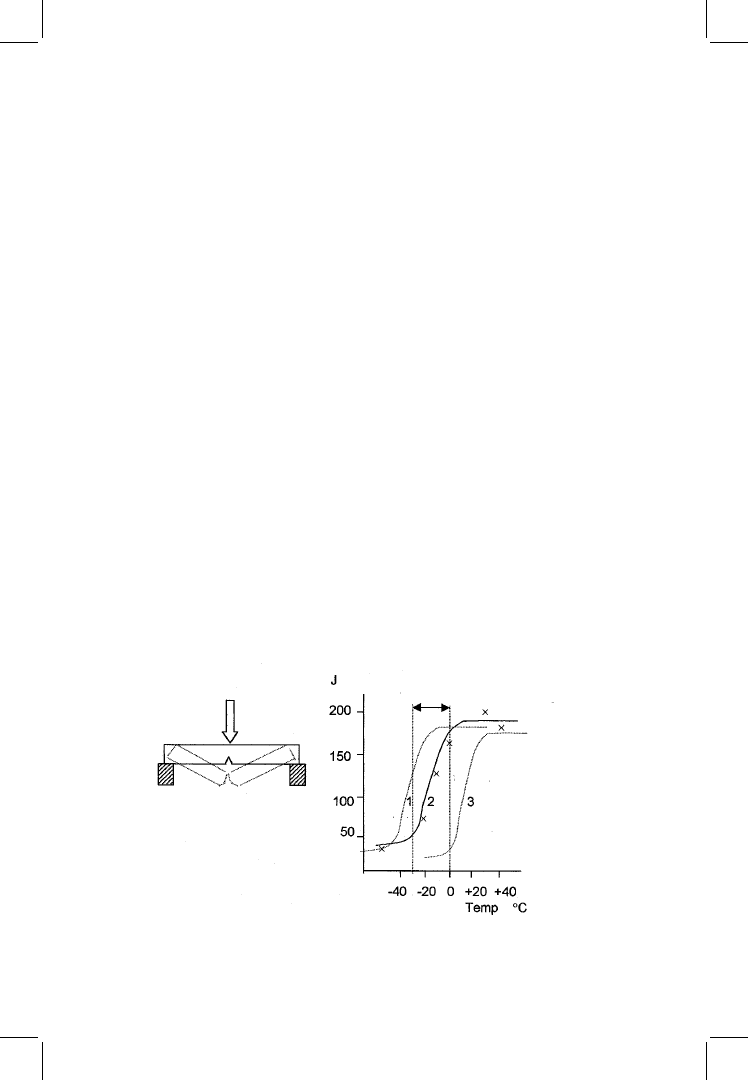
not the same numerical value. In the Charpy test a notched bar of the steel is
struck by a pendulum (Fig. 7.1). The energy absorbed by the bending and
7.1 Charpy test specimen and typical results.
Transition temperature range
Energy
Brittle fracture
77

fracturing of the bar is a measure of the fracture toughness of the steel.
These tests are done on a number of samples at different temperatures and
the energy absorbed is found to vary with the temperature. The change of
energy occurs over a range of temperature called the transition temperature
range. The energy measured is not a fundamental measurement which can
be mathematically related to quantities such as stress intensity although
certain empirical relationships have been derived. However as a result of
experience, certain minimum values of Charpy test energy have been found
which give freedom from brittle fracture in conventionally fabricated
constructions. The full line, 2, is the curve given by the set of results marked
X. The higher results to the right are on what is called the upper shelf
although the minimum values required by many specifications will often be
found in the transition range but above the lower shelf figures. The
steelmaker can produce steels with different levels of fracture toughness and
different transition temperature ranges as in lines 1 and 3. Within the
carbon±manganese steels this is achieved by a combination of metallurgy,
mechanical working and heat treatments. Generally the finer the grain size
of the steel and the fewer the non-metallic inclusions the higher will be the
fracture toughness. This property in the parent material determines the
lowest temperature at which a fabrication can be used, provided that it is
not overridden by the weld and heat affected zone properties. The minimum
temperature at which it is practical to use carbon±manganese steel
fabrications is around ±408C. The alloy steels containing around 9% nickel
are suitable down to around ±1908C. Below that temperature austenitic
steels or aluminium alloys can be used. Although they exhibit no sharp
transition temperature effect their fracture toughness still has to be
controlled.
The temperature at which the minimum Charpy energy is specified is not
necessarily the minimum temperature at which the fabrication can be used
safely. The Charpy test specimen is of a standard size, 55 6 10 6 10 mm,
regardless of the thickness of the steel from which it is taken. (There are sub-
standard sizes for materials thinner than 10 mm.) The effects of thickness
which we have spoken about mean that as the thickness goes up we have to
use a steel with the minimum required Charpy energy at lower test
temperatures. For example, a typical offshore platform specification might
require a certain minimum energy level at certain Charpy test temperatures,
depending on the minimum service temperatures, for as-welded, i.e. not post
weld heat treated, fabrications in regions of high stress. These regions would
normally be the nodal joints in tubular structures. For other parts of the
structure less demanding properties might be required. These temperatures
apply to carbon±manganese steels of all strengths and a different Charpy
energy is required of each grade of steel. Typically the minimum energy
required is equivalent numerically in Joules to one tenth of the highest
78
Welded design ± theory and practice

minimum yield strength of that grade of steel in N/mm
2
. This is necessary
because the energy required to bend a Charpy test specimen prior to fracture
in a higher yield strength steel will be greater than that required for a lower
strength steel.
Other products such as buildings and bridges have their own require-
ments which are usually less demanding than those for offshore construc-
tion; they recognise the stress concentrations, service conditions, the
consequences of failure and the customary levels of control in the respective
industries. These requirements are expressed in various ways. In some
products the required Charpy test temperature for the steel is related to a
range of thicknesses. In others the thickness of the steel requires a certain
steel grade without direct reference to a Charpy value or some other
measure of notch toughness.
In summary the Charpy test has a number of limitations. As well as being
conducted on a thickness of material not necessarily representative of the
structure in question, the test measures both the energy absorbed in bending
and then fracturing the specimen; further, it is carried out at a high loading
rate unrelated to most service conditions. These features mean that it is not
a basic measure of the ability of a material to survive and the results cannot
be interpreted in a quantitative way. Nonetheless it has the benefit of using
easily made and repeatable specimens and the test itself is simple and quick.
It is therefore a valuable quality control tool.
7.3
Fracture mechanics and other tests
Where a more discriminating test than the Charpy test or one giving results
which can be applied to the assessment of defects is required, a fracture
mechanics test can be used. Such tests can use a specimen from the full
thickness of the material under study and with a crack starting notch which
is more representative of actual weld defects than the rather blunt notch of
the Charpy specimen. The state of stress around the tip of a sharp crack can
be described by a quantity known as the stress intensity, K
1.
In a fully elastic
material this quantity may reach a critical value at which fracture occurs,
K
1C
. We can measure this by carrying out a fracture mechanics test which
entails bending a cracked specimen and measuring the load at which
fracture occurs. By calculating the stress at the crack tip at fracture the value
of K
1C
can be calculated. This can be used to make an assessment of the
significance and acceptability of weld defects or fatigue cracks if the stresses
are elastic.
However we have seen that structural steels are far from being elastic
when they reach yield point. The stress distribution around a crack or other
weld defect is extremely complicated especially when plasticity comes into
play. In the welded joint the residual stresses are a significant part of the
Brittle fracture
79

overall stress pattern. To investigate this situation a test on an actual weld in
a realistic thickness of plate was needed. This led in the 1960s to the
development of the Wells wide plate test and the crack opening
displacement (COD) test at the British Welding Research Association
(BWRA, later to become TWI).
23
Welds with artificial defects were made in
a test plate to give a specimen about 1 m square which itself was welded into
cast end pieces through which loads from hydraulic capsules were applied,
eventually up to 4 000 tonnes. The COD test involved taking a sample of the
similar type of weld as a coupon and cutting into it a notch. This specimen
was then put in bending whilst the opening of the notch was measured until
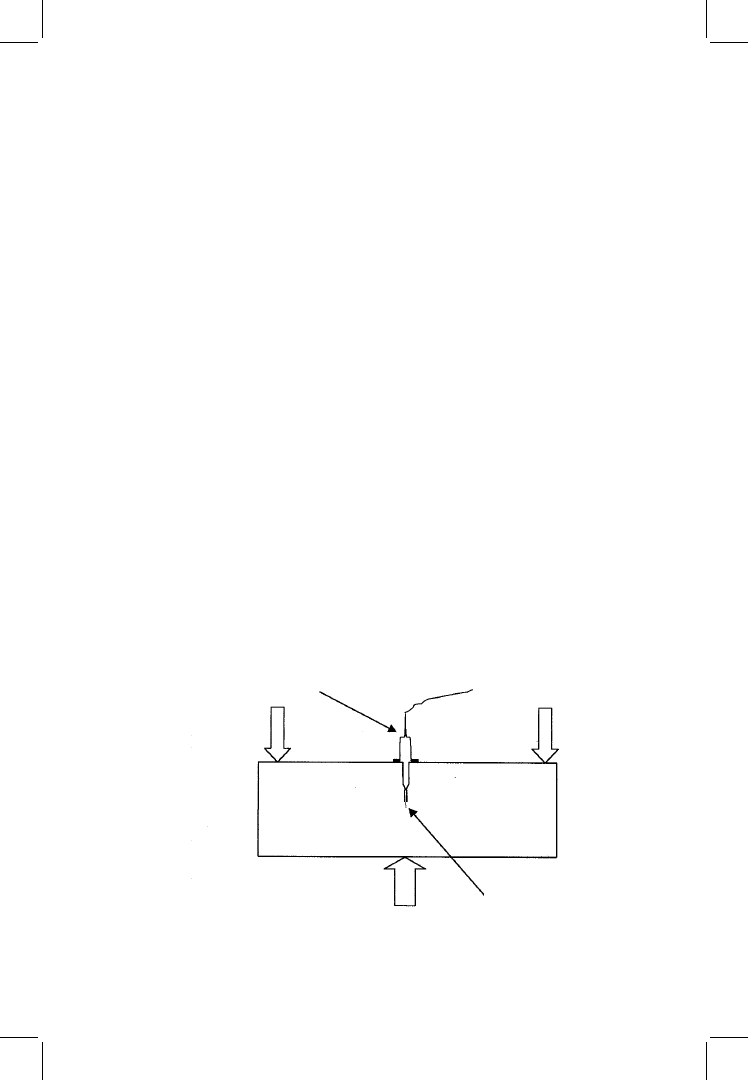
fracture occurred. The test was further developed with more refined
measuring techniques and the extension of the notch by fatigue cracking
(Fig. 7.2). This gave the finest possible notch and one which could be
produced consistently. Even at low applied stresses the crack tip actually
stretches plastically and this can be measured as the crack tip opening
displacement, d (CTOD). The value of this as measured at fracture is used in
assessment of the significance of cracks or other features, particularly in
welded joints. In preparing the specimen the notch is first sawn and then
grown by fatigue cracking to produce the finest possible and most consistent
crack tip. The opening of the notch is measured by an electrical
displacement gauge and the actual tip opening is calculated on the basis
of the crack and bar geometry. The use of a fatigue cracked notch not only
ensures that the finest crack is produced but it can be placed within the cross
section of a welded joint so as to sample quite narrow regions of a particular
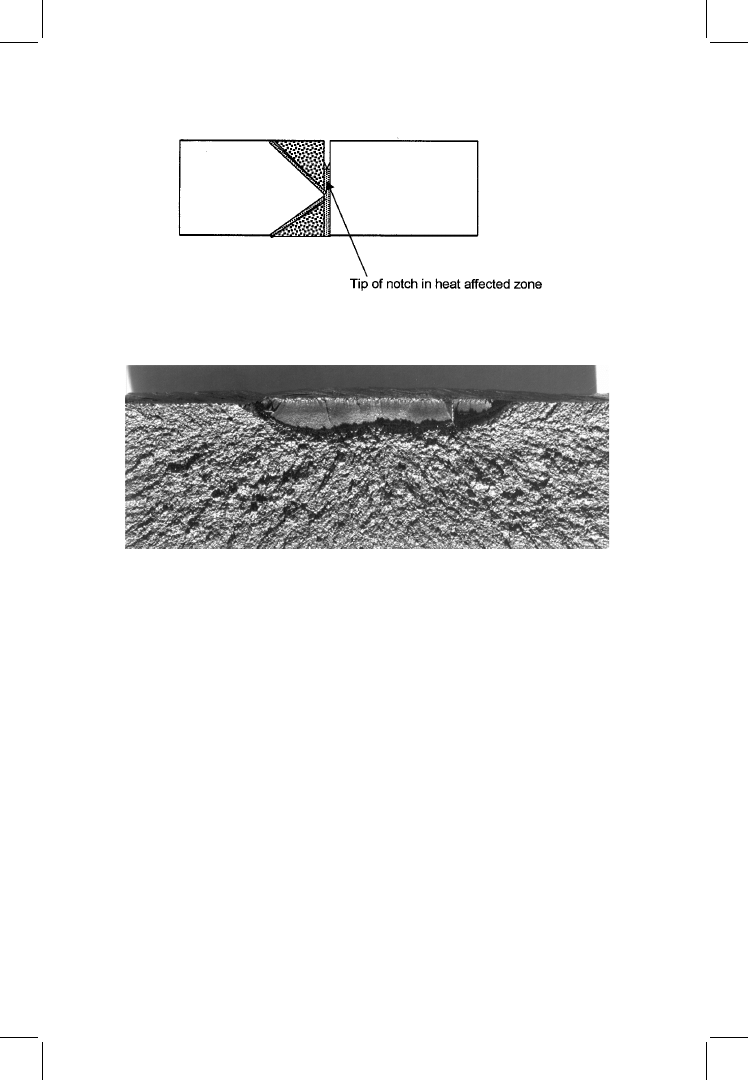
microstructure in the weld metal or the heat affected zone. In Fig. 7.3 a `K'
preparation has been used to give a heat affected zone straight across the
section so that the fracture will always be within the same microstructure as
7.2 Specimen set up for crack tip opening displacement test.
Clip gauge
Fatigue crack
80
Welded design ± theory and practice

7.3 CTOD test specimen for a butt weld showing the tip of the notch in a
weld selected.
7.4 A brittle fracture (photograph by courtesy of TWI).
it moves into the specimen. Fig. 7.4 shows a brittle fracture surface with the
typical chevron pattern `pointing' to the originating crack.
Brittle fracture
81
Document Outline
- Table of Contents
- 7. Brittle Fracture
- Index
Wyszukiwarka
Podobne podstrony:
EŚT 07 Użytkowanie środków transportu
07 Windows
07 MOTYWACJAid 6731 ppt
Planowanie strategiczne i operac Konferencja AWF 18 X 07
Wyklad 2 TM 07 03 09
ankieta 07 08
Szkol Okres Pracodawcy 07 Koszty wypadków
Wyk 07 Osprz t Koparki
zarządzanie projektem pkt 07
Prezentacja NFIN 07
6 Zagrozenia biosfery 07 05 05
więcej podobnych podstron