133
JOINTED HARDWOOD
BOOKCASE
Copyright 2004 Martian Auctions
603
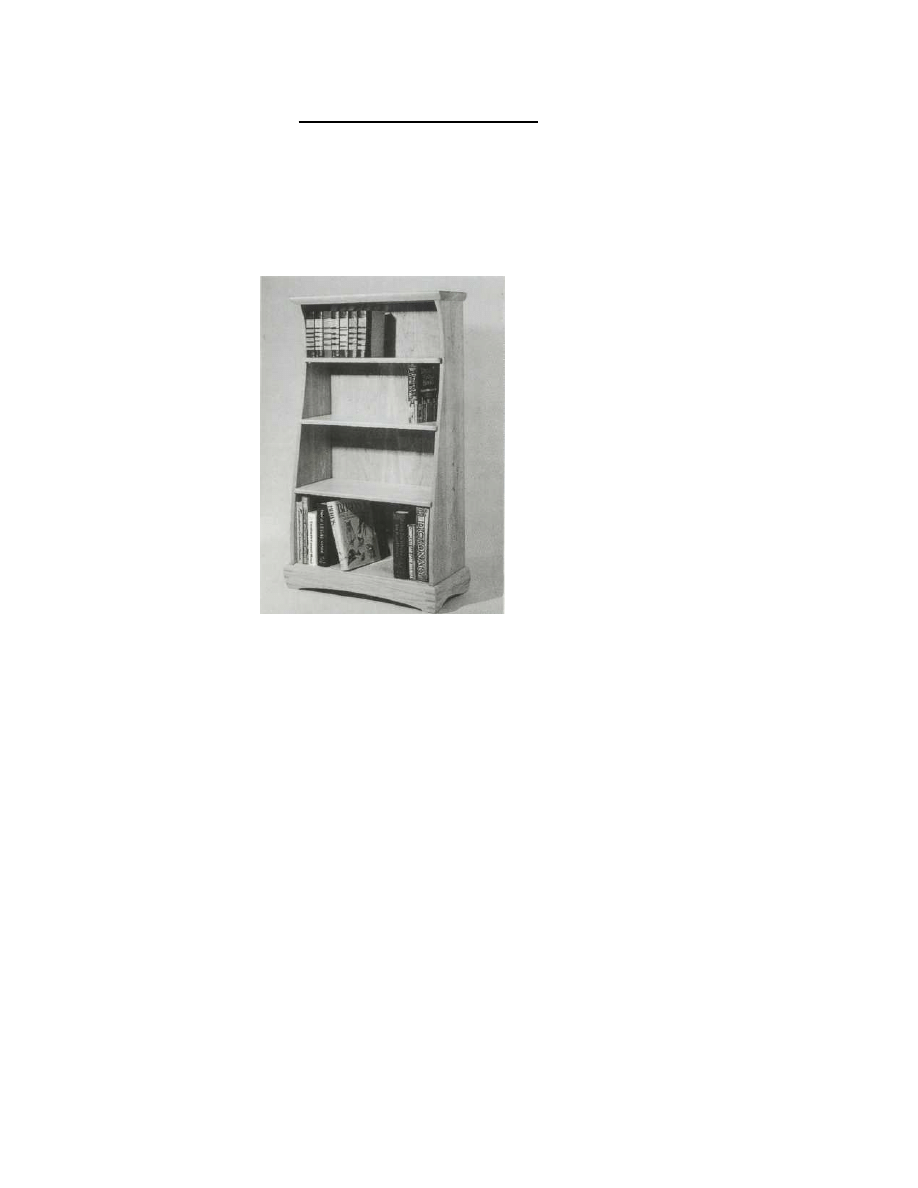
The softly flowing lines and sturdy jointed construction of
this hardwood bookcase can be achieved only by careful
workmanship, fitting and shaping each part to blend with
the whole. It is a job for an experienced craftsman.
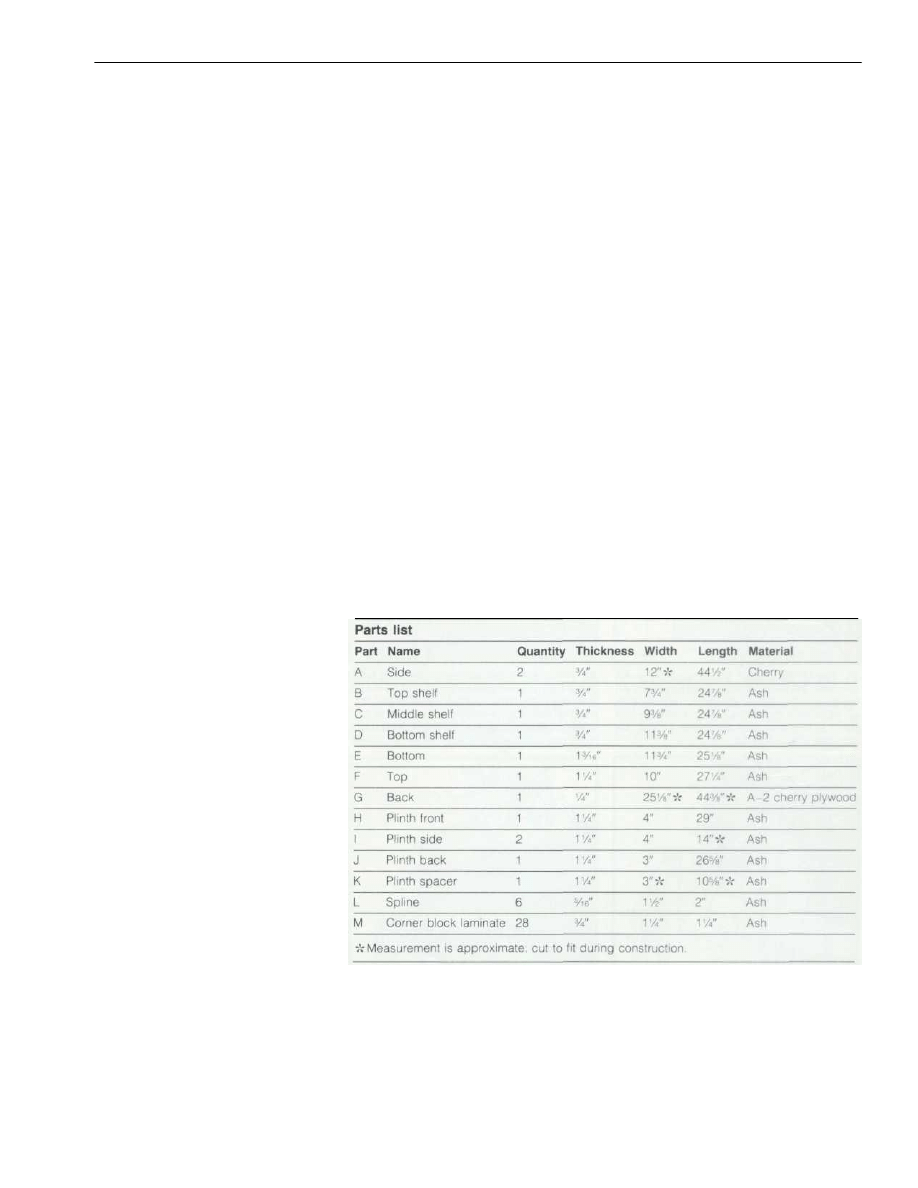
The care begins with the selection of
wood. The sides are of richly textured
cherry, noted for its graceful figuring, and the
horizontal members are of light-
colored ash, straight grained and dura-
ble. These hardwoods are seldom found at
reasonable prices in the widths needed for
the project; therefore, it is necessary to
edge-join narrower boards (see opposite
page). Choose the boards carefully so that
the colors and figures will blend; to bring
up the figure of unplaned wood so that you
can see it, brush a little paint thinner on the
surface. In any case, the faces of the boards
must be planed flat before edge-joining and
planed again afterward for a good, flush
surface. Buy rough lumber at least 1/4 inch
thicker than specified in the chart below;
buy dressed lumber at least 1/8 inch thicker.
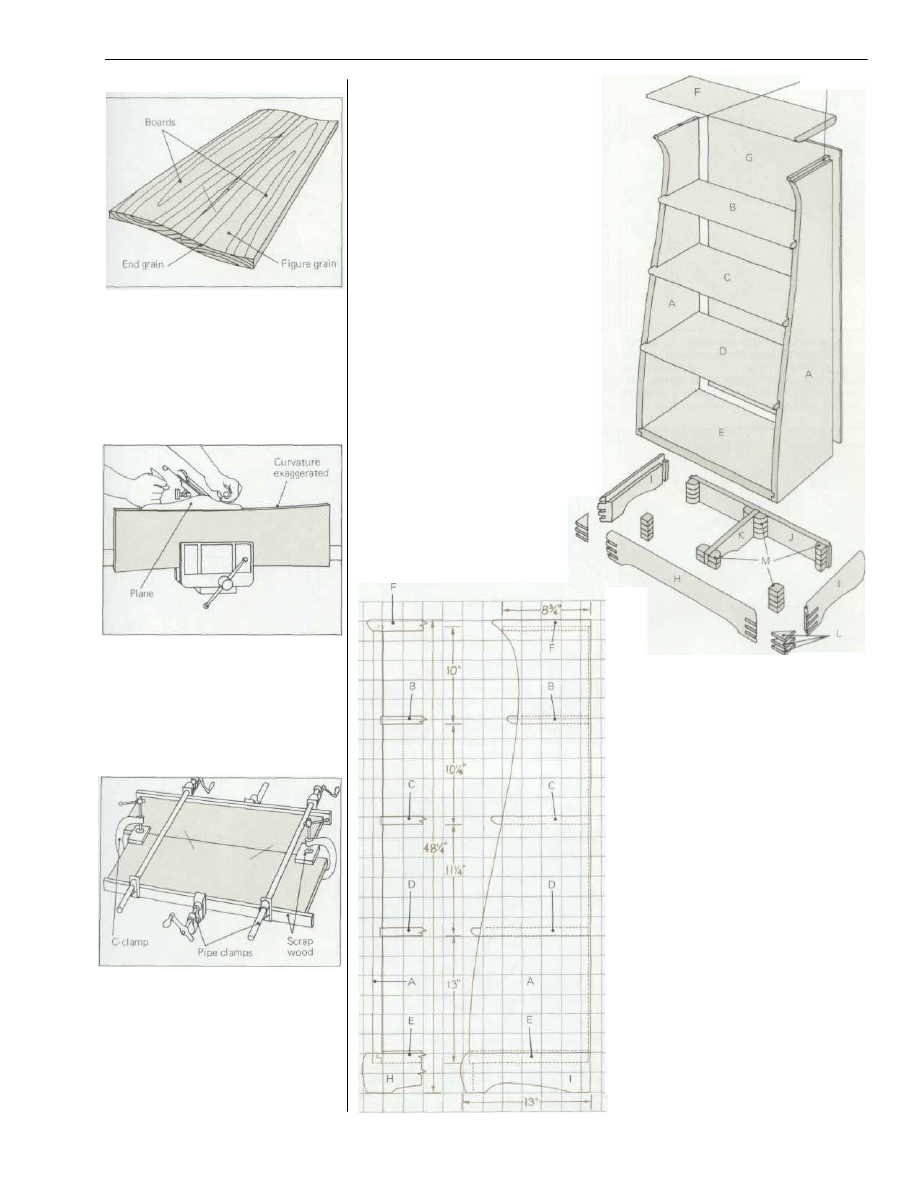
The joinery looks deceptively simple The
shelves are glued into dadoes in the sides
with no attempt to conceal the joints. This
means that the dadoes must be precisely cut
to the thickness of the shelves—there is no
tolerance for error. In this project
instructions are given for fitting these and
the several tongue-and-groove joints when
using a dado head on a radial arm or table
saw.
All edges and corners are rounded and
shaped by hand. This is a matter
of esthetic judgment, based in
part on the figure and quality of
the wood you are using. A
spokeshave and drawknife are
the tools of choice, but you can
use a rasp, plane, Surform tool,
and sandpaper to good effect.
Note that the edge of the plinth
front (H) is 3/16 inch below the
upper face of the bottom piece (E)
and that both corners are rounded
where they meet. This is a
traditional way of turning a
possible defect into a design
advantage. The shelf unit is not
joined to the plinth; if the two
surfaces were flush, the crack
between them'would always
show. In this way, the crack is
concealed at the bottom of a
graceful ripple.
Because the weight of a full
bookcase will tend to force the
joints of the plinth apart, the
mitered joints are reinforced
with splines, and laminated
corner blocks are glued all
around.
Finishing: To bring out the
warmth of the wood, rub in
several coats of tung oil, allowing
plenty of drying time.
Tools and materials: Drill with twist bits
and countersink. Table saw or radial arm
saw with combination blade, dado head,
and splining jig Band, saber, or coping
saw. Several 6" C-clamps and 6' bar or
pipe clamps, quick-action clamps (optional).
Smooth plane, jack plane, block plane.
Rasp, spokeshave, drawknife. and/or
Surform tool. Wooden mallet, 1/4"
and 3/8"
straight chisels. Try square, combination
square, framing square, steel ruler, steel
tape rule, wooden extension rule, knife,
pencil. Nos. 60, 80, 120, and 220
sandpaper. Paraffin or beeswax, carpenter's
glue. Wood (see above). One 2 1/4" No 10
flathead wood screw, 3/4" No 6 panhead
wood screws.
Copyright 2004 Martian Auctions
604
Choosing boards. First, look at the end
grain As a board ages, it will tend to cup in
the opposite direction from the arch of the
annual rings To minimize the effect of this
warpage. lay boards side by side so that the
direction of the arch alternates. Align boards
so that their figures blend into an attractive
pattern Use a pencil to make a few slanting
lines across each joint to guide in
realignment Saw boards to approximate
length.
Preparing boards. Plane to within 1/8 in. of
final thickness. Plane edges smooth and
square The boards will eventually shrink a
little more across the ends than across the
middle; to prevent the wood from splitting at
the ends when this happens, plane both
edges of joint slightly concave the center of
the joint should be separated by a gap that
you can squeeze shut with your hands (less
than 1/64 in.)
Gluing and clamping. Apply all clamps
before gluing, mark positons and order of
application. Then unclamp and apply a thin
even coat of glue to both edges of joint.
Reclamp quickly, tightening firmly but not
forcing out all glue First, use C-clamps to
align faces of boards at both ends Then
apply bar or pipe clamp across center,
forcing faces of boards into alignment, if
necessary, as you tighten. Remaining clamps
should alternate top and bottom
After joining boards for sides (A), shelves
(B, C. and D), bottom (E), and top (F), cut
all stock to final length, and plane to final
thickness Rip shelves, top, and bottom to
width. Use 2-in. grid (see p.48) to make full-
size patterns for sides (A), plinth front (H),
and plinth sides (I) and to guide in shaping
the protruding edges of the top and shelves
(Step 4) To make the pattern for the plinth
front, duplicate the section shown and its
mirror image, connect the lines for the
cutout portion with an arc that rises to the
same height as the cutouts in the sides
Trace patterns onto side pieces (A).
Before cutting the long S curve, use a table
saw or radial arm saw to make a square cut
from the top edge of each piece, 83/4 in
from the back, for the front of the tongues
Then rough-cut the pieces individually with a
band saw, saber saw, or coping saw Clamp
them back to back, and shape them
simultaneously to the line with a rasp
drawknife, or spokeshave Cut rabbets into
the top outer edges of the sides, leaving
tongues 1/2 in. thick and 1/2 in. deep Cut the
dadoes for the shelves 1/4 in. deep, marking
the width of each dado from the thickness of
the shelf that will fit into it. (Measurements
between shelf dadoes are given from bottom
edge to bottom edge; to achieve dado cuts
that match the thickness of the wood, make
test cuts in scrap wood inserting paper
washers between dado heads as necessary.)
To ensure that the shelves will be level, lay
the side pieces side by side and mark
across both at once
Edge-joining boards
Tongues
Exploded view shows how parts fit together
All joints are glued except those securing
the back (G) to the shelf unit which are
secured with 3/4-in. No. 6 panhead wood
screws (Step 18); use a 5/64-in. bit for pilot
holes. The shelf unit is not joined to the
plinth but rests on the plinth back (J) and
spacer (K) and inside the rabbets of the
plinth front (H) and sides (I)—if a plinth side
were glued to a side (A) of the shelf unit, the
fact that the grains run in opposite directions
would cause stress, and probably splitting,
in the shelf side. The corner blocks (M) that
reinforce the joints of the plinth are
intentionally laminated with the wood grains
running in alternate directions, ensuring that
no joint Is compromised by the sole
presence of end grain. The front joints of the
plinth are further reinforced by splines (L)
Vie in. thick; order ash stock planed to
thickness, or cut a strip to thickness on a
table saw, then dado slots to fit (Step 15).
There is little danger of the shelf unit
slipping backward on the plinth, but if you
wish to ensure its security, drill and
countersink a 3/16-in. hole up through the
front part of the plinth spacer (K) and drive
a 2 1/4-in. No 10 wood screw through it;
drill a 1/64-in. pilot hole in the bottom. You
can also glue two slotted blocks onto the
plinth back (J) to receive additional, smaller
screws
Copyright 2004 Martian Auctions
605
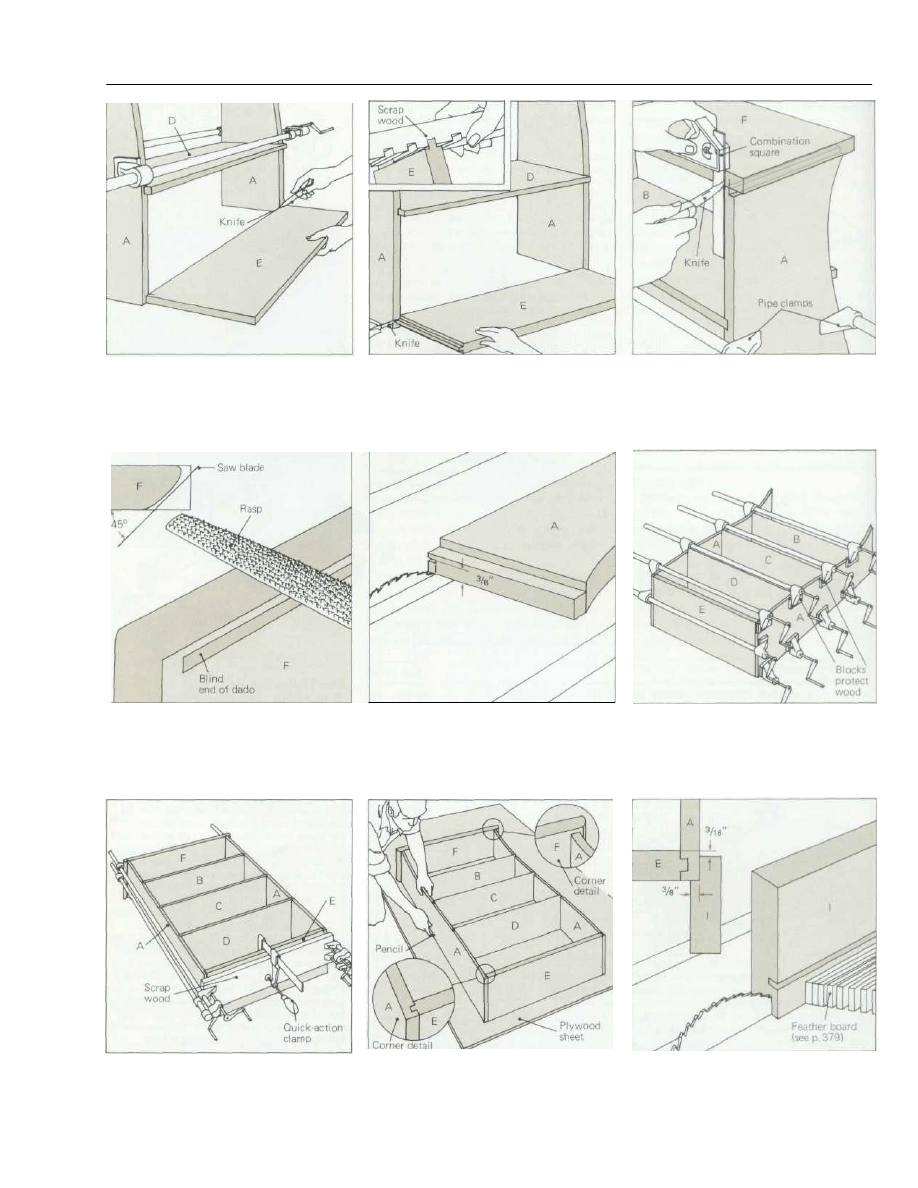
Jointed hardwood bookcase
1. Clamp sides (A) and shelves (B, C. and D)
together with all joints square. Center bottom
(E) against front edge: use a sharp knife to
mark points where bottom meets sides. Rab-
bet both ends of E to these marks, leaving
tongues centered and 1/2 in thick.
2. With a sharp knife mark position and thick-
ness of tongues on front and back of sides
(A). Make test cuts in scrap wood to set dado
heads to exact width and depth needed; then
cut dadoes in sides to receive tongues of bot-
tom Reassemble unit with bottom in place
3. Position top (F) so its back is flush and over-
hang is equal on sides Mark width of tongues
on back of top and mark front of tongues on
underside Cut dadoes to receive tongues
(see Step 2) Dadoes do not go all the way
through; finish blind ends with a chisel.
4. With top in place, sketch rounded patterns
on edges of top (F) and shelves (B. C, and D)
Disassemble unit and shape edges; use table
saw set at 45° to remove the main body of
wood from lower edge. Finish shaping with
jack plane, rasp, and No 60 sandpaper
5. Cut 1/4-in rabbets 3/8 in deep in back of
sides (A) and top (F) to receive 1/4/-in.
plywood back. Sand all interior surfaces with
No 80 sandpaper, then with No 120, and
finally No 220 Assemble shelves, bottom,
and sides without glue, applying all clamps
6. Use a bar or pipe clamp across the front
and back of each shelf and the bottom, and
apply another across center of bottom to pre-
vent buckling Mark placement of clamps and
disassemble Appty glue to dadoes and re-
clamp quickly Let glue dry
7. Before gluing top (F) to its tongues, cut a
piece of scrap the same length as top to over-
hang the bottom and equalize the pressure of
clamping Apply glue to dadoes and clamp
top in place, using two bar or pipe clamps
on each end, running to scrap on bottom
8. To find most attractive figure for back (G)
lay shelf unit on plywood sheet. Trace outline
of unit, and cut plywood to outline. Then fi t
back precisely within rabbets on sides and
top Sand back with Nos 80, 120, and 220
sandpaper; do not secure it to unit
9. Rip stock for plinth front (H) and sides (I),
and plane to width Cut each piece 3-4 in.
longer than specified. Cut rabbets 3/8 in. deep
along one face of each piece to receive shelf
unit; to find width of rabbets, deduct 3/16 in.
from thickness of bottom (E).
Copyright 2004 Martian Auctions
606
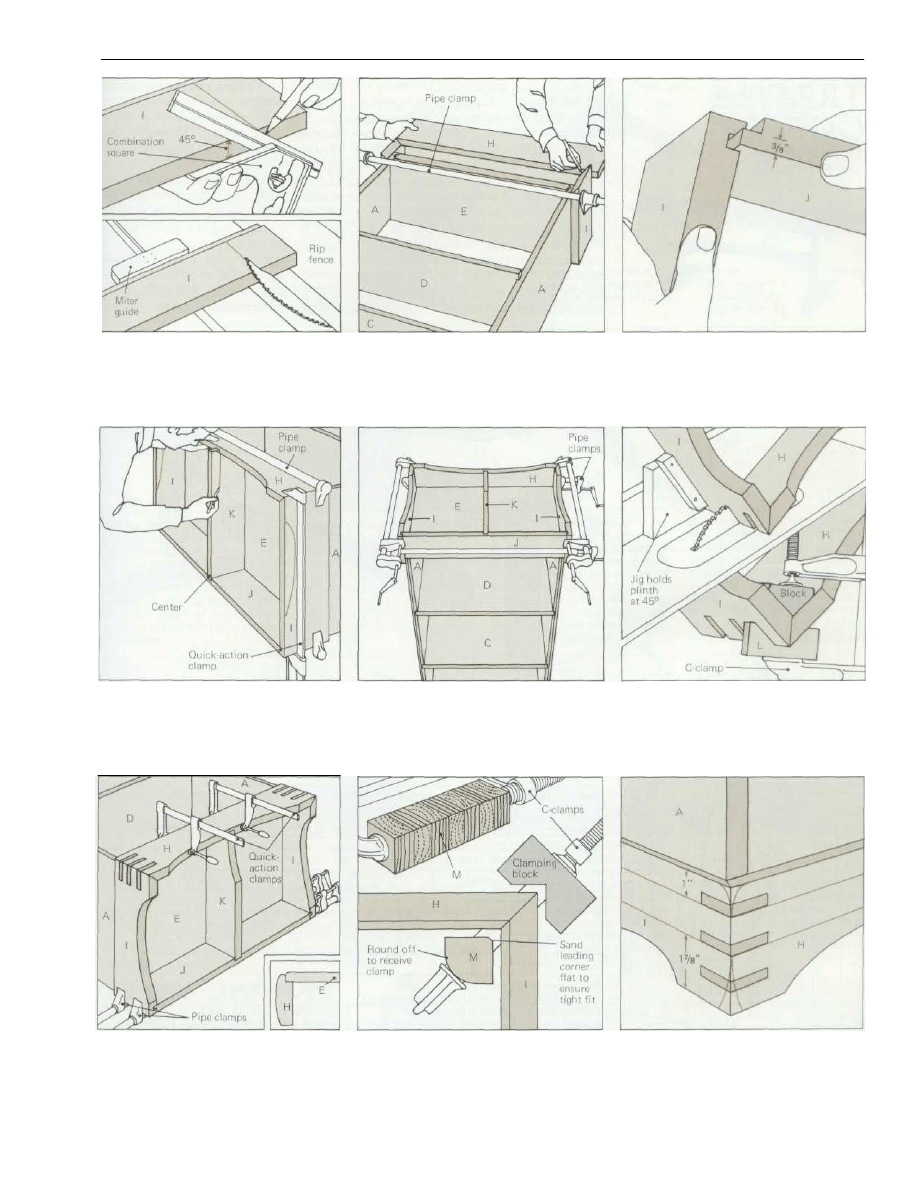
10. Cut 45° bevels on front end of each plinth
side (I) and one end of front (H) For accurate
cuts, scribe edge of wood first with combina-
tion square; set table saw to 45° and cut 1/16
in too long, then shave to line, adjusting blade
if needed Check cuts with square
11. Clamp plinth sides (I) to shelf unit so bev-
eled ends align with front of unit Fit plinth front
(H) by holding beveled end against one side
bevel and marking other end; cut overlong.
then shave a little at a time until both mitered
joints f i t snugly Cut sides to length
12. Rip and plane stock for plinth back (J) and
spacer (K) to width of unrabbeted portion of
sides. Cut plinth back to length Rabbet both
rear corners, leaving tongues 3/8 in thick
Mark and cut dadoes in plinth sides (I) to fit
(See Steps 1 and 2.)
13. Cut dadoes to receive spacer 1/4 in deep
across center of inner faces of plinth front and
back Clamp plinth pieces in place around
shelf unit and cut spacer to fi t between da-
does Scribe and rough-cut cutouts on plinth
front and sides and front end of spacer.
14. Rub wax on front corners of shelf unit.
Then, after establishing clamping procedure
with a dry run. apply a thin coat of glue to all
mitered ends and clamp plinth together
around shelf unit. (Put back and spacer in
place for clamping, but do not glue them )
15. Dado three slots across each mitered
corner, using scrap wood to set width and
depth of saw. Cut splines (L) square to length
of slots. Apply glue Use a C-clamp to force
each into its slot When glue dries, saw splines
parallel to wood surface; plane flush
16. With rasp and sandpaper, shape inner
edges of plinth sides and front, finish shaping
cutout sections, and round front edge of bot-
tom piece (E). Clamp plinth to unit, gluing
tongues of back (J) into their dadoes. When
dry, glue and clamp spacer (K) in place.
17. Glue corner block laminates (M) in stacks,
alternating grain direction. Saw to lengths
needed Glue and clamp into joints of plinth.
When glue is dry, begin shaping plinth First,
rule lines along face of front (H) and sides (I)
1 in. from top edge and 1 7/8 in from bottom.
18. Trace pattern for rounding plinth onto both
faces of front corners and onto rear edge
Plane to desired shape Complete shaping all
edges with No. 80 sandpaper, then sand with
Nos 120 and 220. Finish shelf unit, plinth and
back, then screw back in place
Copyright 2004 Martian Auctions
607
Wyszukiwarka
Podobne podstrony:
hardwood 1 1
Chairside Bookcase
Early American Bookcase
Barrister Bookcase
American Woodworker Two Part Bookcase id 58984 (2)
hardwood 1 1
Build an Arts and Crafts Bookcase
Hardwood
hardwood 1 1
Flooring Locking Hardwood Installation (24785)
Quick and Clean Bookcases
Book case Mission Style Bookcase
2 Woodworking Plans Timber Bookcase
Bookcase 2
shelf Trapezoidal Bookcase Plans
Accelerated Drying of Single Hardwood Boards by Combined Vacuum Microwave Application
więcej podobnych podstron