1
Chapter 1: Scanning Tutorial
Appendices
Chapter 2: The TWAIN Dialog Box
SCANNER
USER’S GUIDE

2
Scanning Tutorial
Get (Acquire) and Use the Scan Dialog Box ..... 3
The Scan Dialog Box ......................................... 4
Get (Acquire) and Use the TWAIN Dialog Box .. 6
The TWAIN Dialog Box .................................... 7
Performing a Simple Scan ................................. 8
Select the Scan Size ..................................... 8
Prescan the Image ........................................ 8
Set the Image Size ........................................ 8
Using the Zoom Tools .................................. 9
Set the Scan Mode ........................................ 9
Set the Resolution ....................................... 9
Execute the Scan .......................................... 9
Document Positioning ...................................... 10
Scanning Tips ................................................... 11
The TWAIN Dialog Box
The Preview Window and Buttons .................... 13
TWAIN Control Settings .................................. 15
The Main Folder ......................................... 15
Scan Source................................................. 16
The Enhancement Folder ............................ 19
The Filters Folder ............................................. 20
About Folder .................................................... 21
Using Batch Scan ............................................. 22
Appendices
A: Troubleshooting ........................................... 22
B: Maintenance ................................................ 23
Table of Contents
3
Scanning Tutorial
There are two separate methods to scan an
image. The Scan dialog box which is ideal for
quick and simple scans and the TWAIN dialog
box which offers more control over the output.
This chapter shows you how to:
1. Use the Scan Dialog Box
2. Get (Acquire) and Use the TWAIN Dialog
Box
3. Perform a Simple Scan
4. Position a Document
5. Scanning Tips
1
To access the Scan Dialog Box:
The Direct Scan Icon: Simply double click the left Mouse
Button on the Direct Scan icon that is located in your Windows
notification bar.
1
4
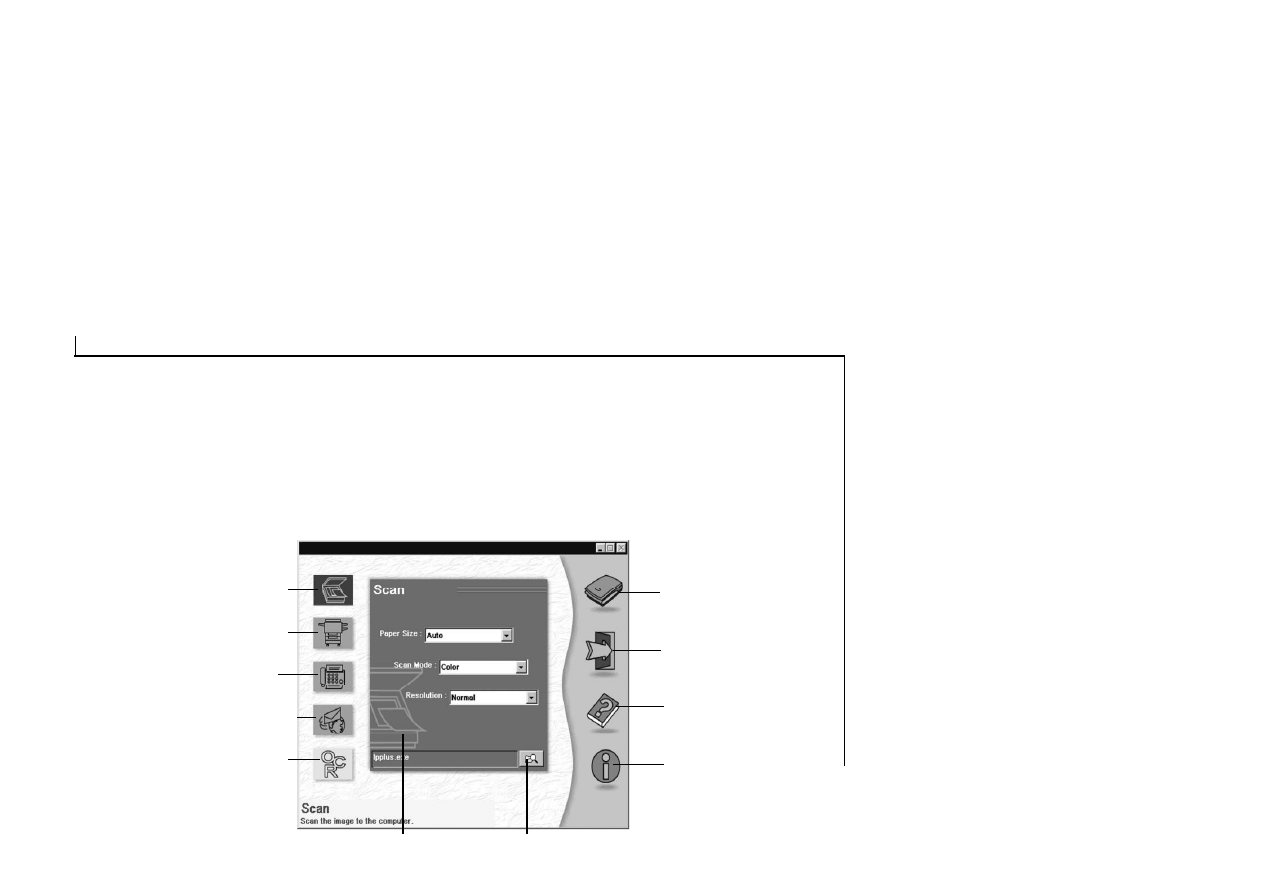
The Scan Dialog Box
The Scan dialog box allows you to perform
several functions using your scanner (e.g. scan,
copy, fax). Simply select the function that you
wish to use by clicking on the appropriate page
icon and the corresponding menu page will appear.
Be sure to make the proper adjustments in regards to
Paper Size, Scan Mode, and/or Resolution before
Scanning.
Scan Page
Icon
Copy Page
Icon
E-Mail Page
Icon
OCR Page
Icon
Fax Page
Icon
Exit
Help
About
Browser Icon
Menu Page
Scan
5
Scan Page:
Scans the image or document to the
computer.
Copy Page:
Copies the image or document.
Fax Page:
Scans and faxes the image or document.
E-Mail Page:
Scans and sends the image or document to
the Internet
OCR Page:
Converts the image document to a text file
Scan:
Scans the image or document and allows for
various features depending on the Menu
Page that you are currently in.
Copies your image or document to your
printer in Copy.
Faxes your image or document in Fax.
E-mails your image or document to the
internet in E-mail.
Scans the document for editing into your
OCR software in OCR.
Exit:
Exits the program.
Help:
Offers available on-line help for all of the
scanner and software functions.
About:
Shows product information.
The Browse Icon: This icon allows you to
select the software application you would
like to open the scanned image into.

6
You can call up the TWAIN dialog box from
within any TWAIN-compliant software such as
the application software bundled with the
scanner. To get into the TWAIN dialog box, the
steps are:
1. Launch Windows.
2. Launch the TWAIN-compliant program (e.g.
iPhoto+).
3. Under the File menu open the Acquire
command and choose Select Source. The
Select Source dialog box appears.
Note: In some image editing software you
may choose Select Source directly from the
Select Source command rather than the
Acquire command.
Get (Acquire) and Use the TWAIN Dialog Box
4. Choose your scanner in the Select Source dialog
box. If there is only one source available, it is
automatically selected.
5. Click the Select button. The Select Source dialog
box closes.
6. Return to the File menu. Locate and click the
Acquire command. The Acquire command is
likely to be found beside the Select command.
The TWAIN dialog box appears.
2
7
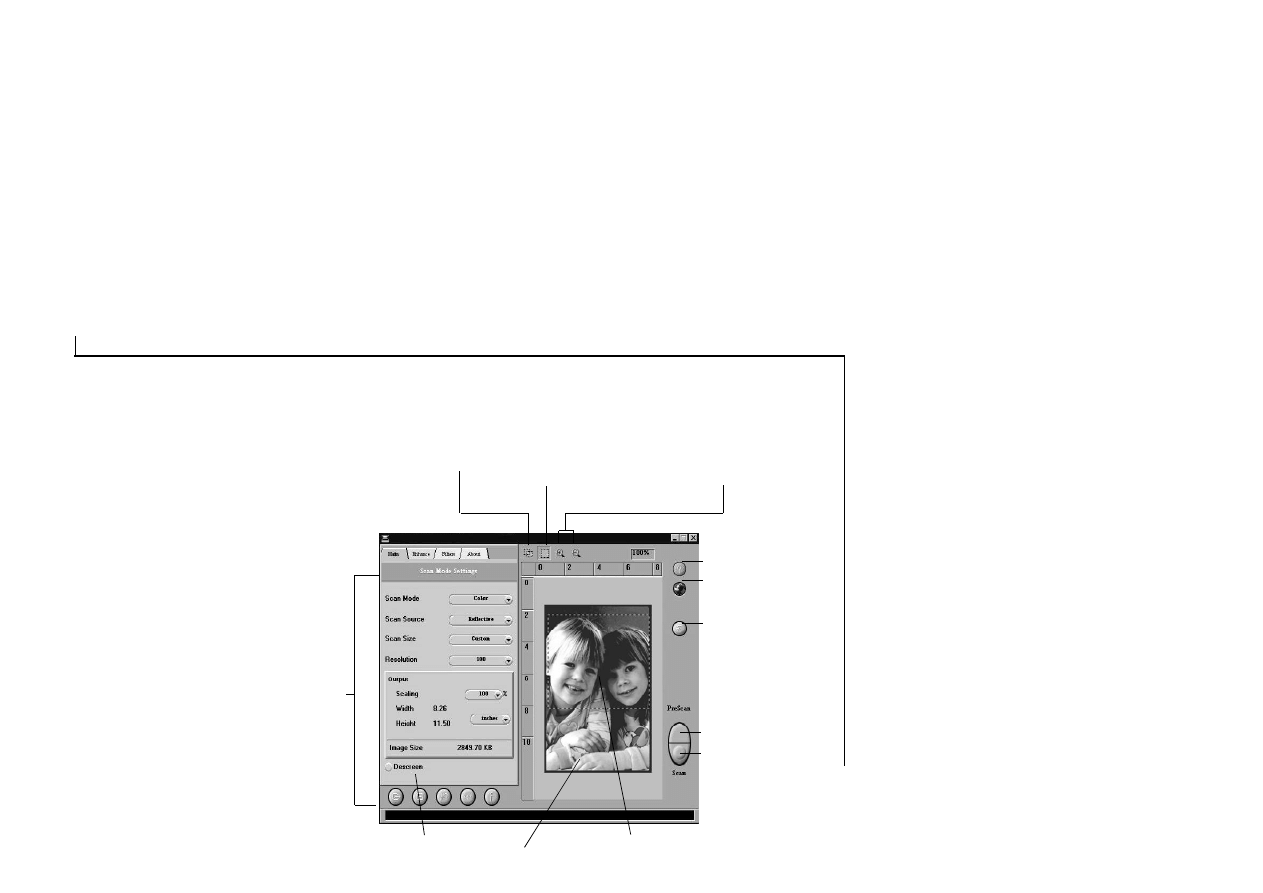
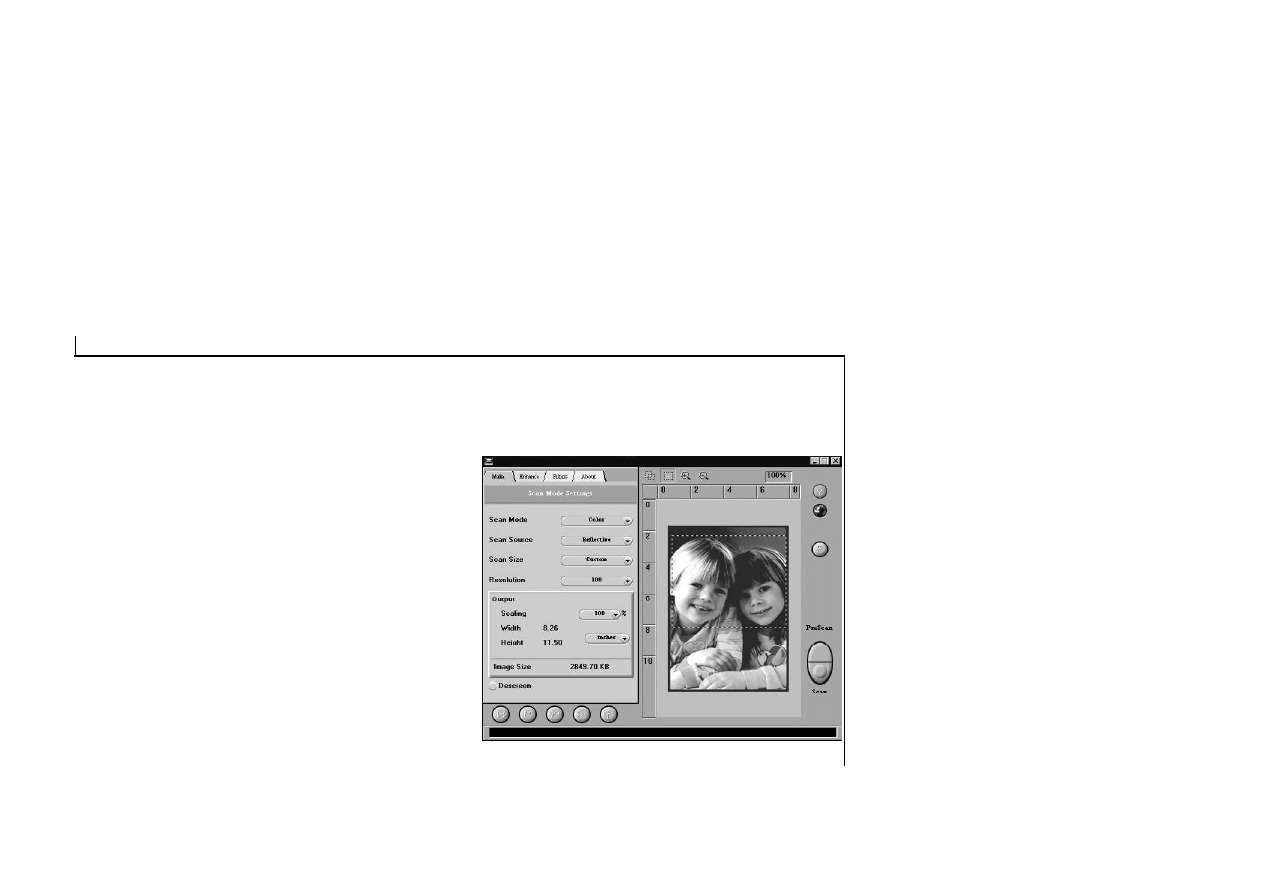
The TWAIN Dialog Box
The TWAIN dialog box consists of two
sections - the left section where most of
the TWAIN control settings are found and
the right section, which is the Preview
window.
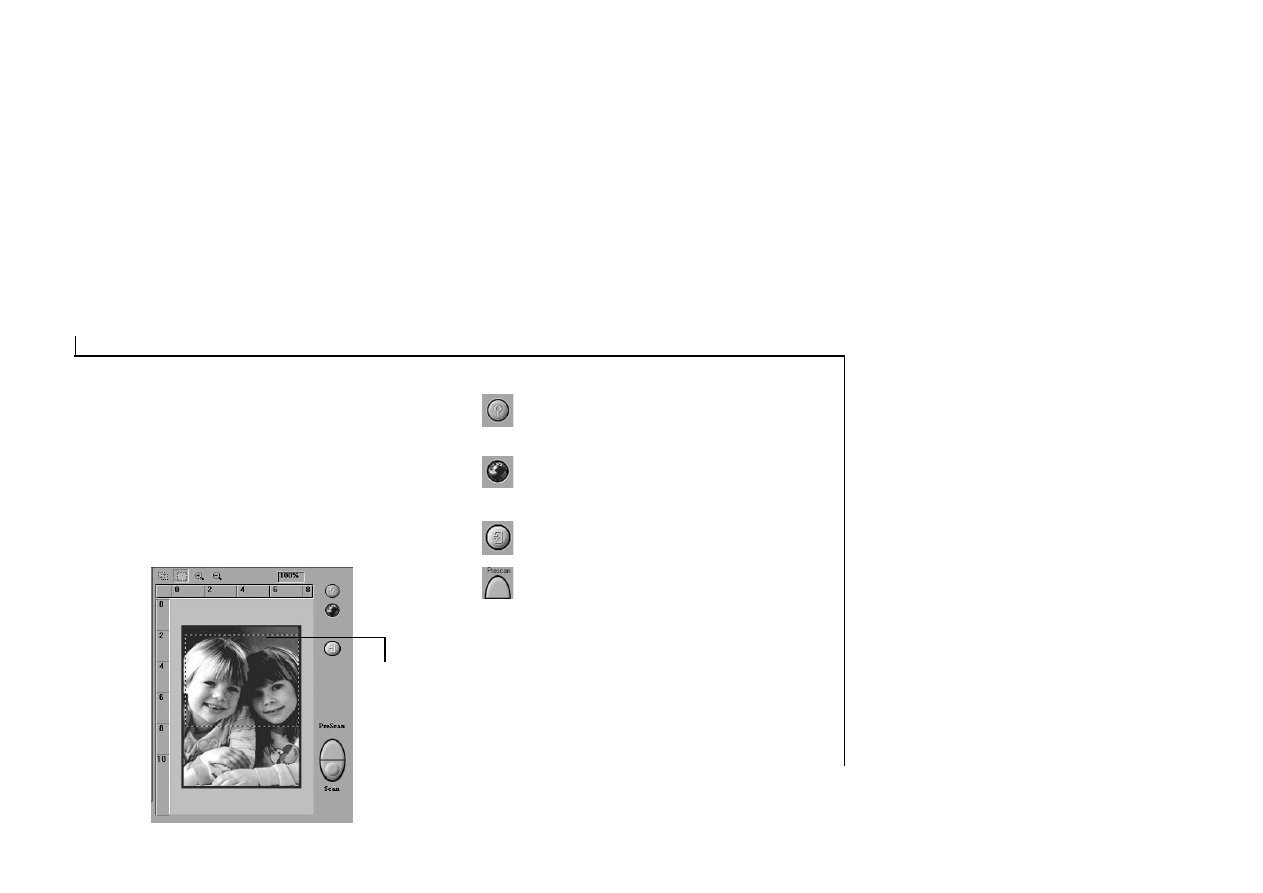
Single Scan Button
Allows only one Crop
Frame or scan region.
Zoom Buttons
Magnifies or shrinks the
image in the Preview
Window.
Batch Scan Button
Allows creation of up to
10 scan regions (or Crop
Frames) for multiple
scanning.
Descreen Button
Reduces image
Preview Window
Crop Frame
Outlines the image area or region that
Scanner
Controls
Exit
Exits the program
Language Box
Selects the language
Help
Prescan Button
Scan Button

8
The steps to follow when scanning are:
1. Select the scan size.
2. Prescan the image.
3. Using the crop frame set the desired scan
image size.
4. Select the desired scan mode.
5. Select the desired resolution.
6. Click on the Scan button.
These steps are explained in detail in the
following sections.
Select the Scan Size
From the list of available paper sizes, select the
size of the document you wish to scan. Custom
will automatically be selected when you use the
Crop Frame to change the image area to be
scanned.
3
Performing a Simple Scan
Prescan the Image
A Prescan is a quick low-resolution scan of the
entire original image. From this low-resolution
scan you can get a clearer idea of the image area
you want to include when you click Scan. To
prescan, the steps are:
1. Place the document face down on the scan
window glass.
2. Click on the Prescan button. After the
scanner has scanned the document, the
scanned image will appear in the Preview
Window. From the Prescan image, you can
now set the exact image area you wish to
include in your final scan.
Set the Image Size
Use the Crop Frame in the Preview Window to
outline the image area you wish to scan. Click
one of the sides or corners of the Crop Frame
and drag it to the desired length and width. To
move the entire Crop Frame, position the mouse
9
cursor inside it and drag with the (left)
mouse button. Only the area inside the Crop
Frame will be included in the resulting
scanned image when you click on the Scan
button.
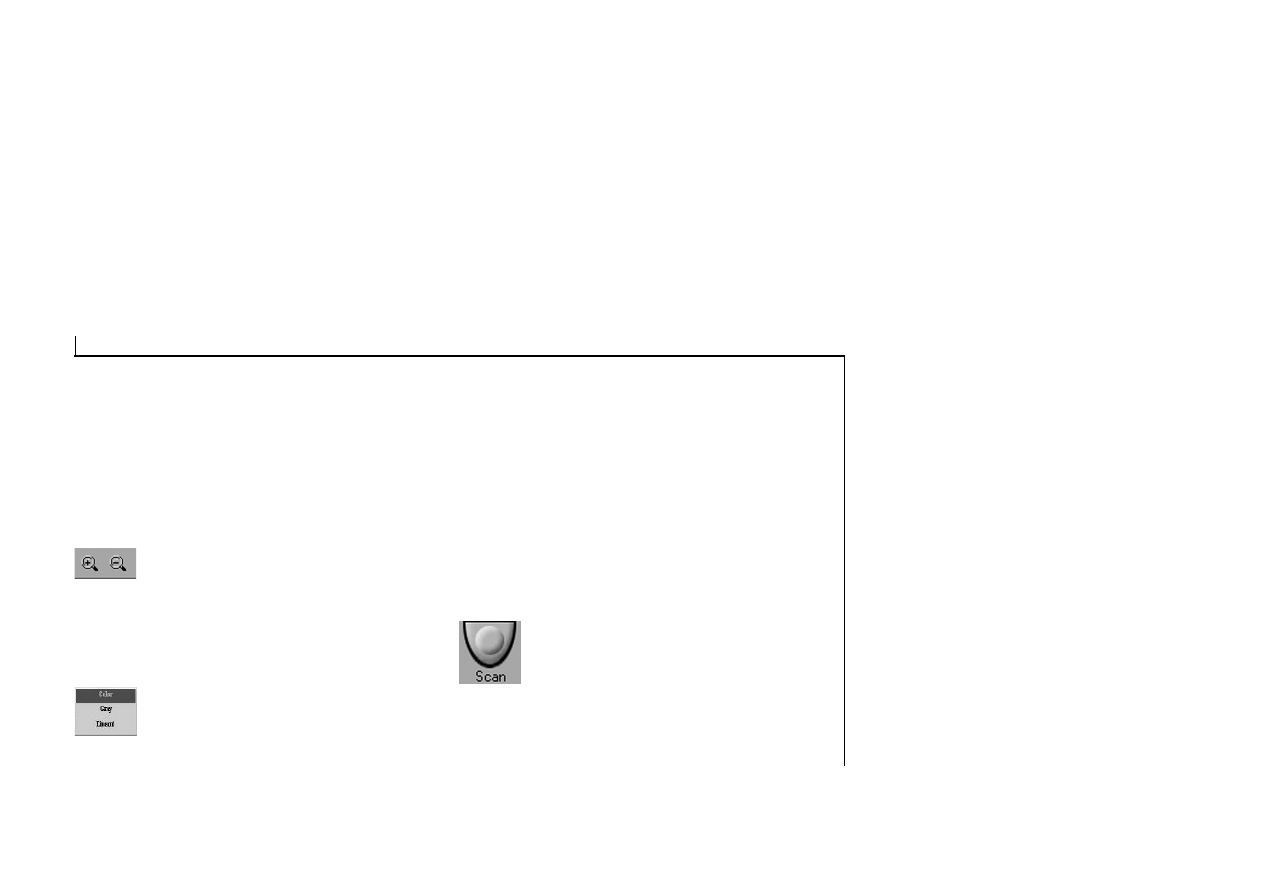
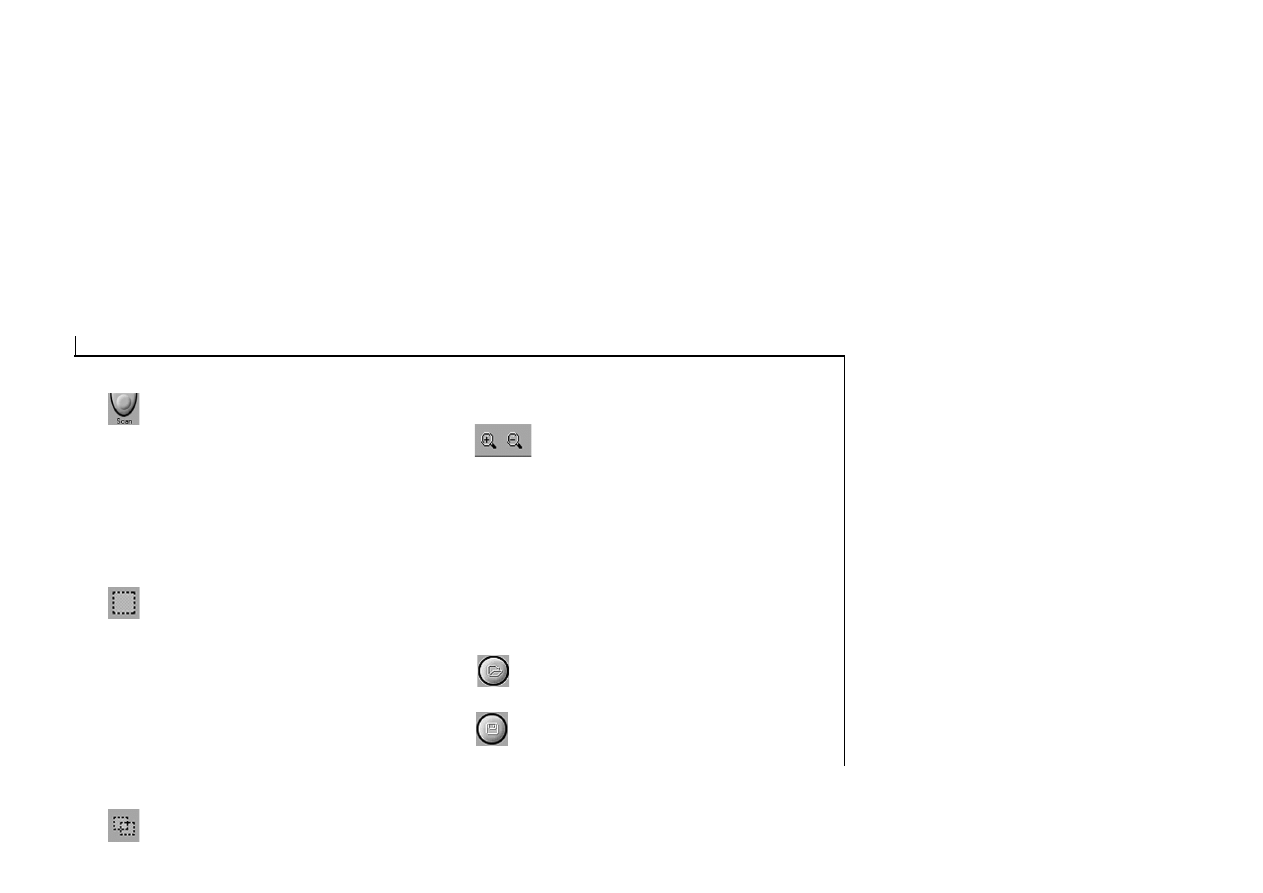
Using the Zoom Tools
The Zoom In tool doubles the magnification
of the image area. In magnified view, you can
then drag the Crop Frame to the exact area you
want to scan. Use the Zoom Out tool to shrink
the image.
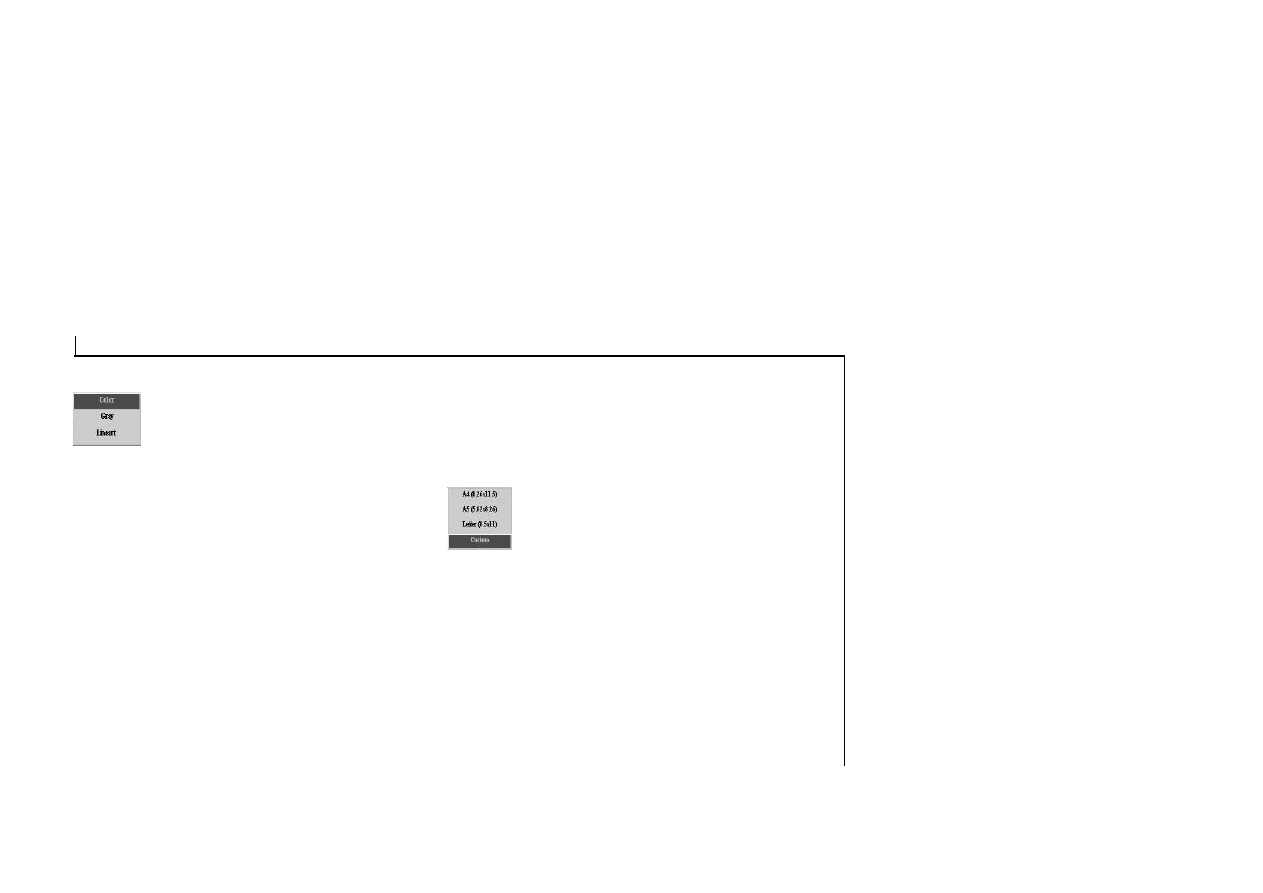
Set the Scan Mode
The Scan Mode determines how the scanner
will read the image. Select Color to capture
images in color. Select Gray to capture images
in shades of gray. When you wish to scan line
art or text for OCR (Optical Character
Recognition), select LineArt.
Set the Resolution
The Resolution, which is measured in dots per
inch (dpi) determines the effect of the image
as it is displayed or printed. Images scanned at
a high resolution appear sharp since the
scanner is capturing more information but take
note that high resolution images also take up
more disk space for storage.
Execute the Scan
The scan button is used once you have
completed the prescan and are finished with
the control settings and have selected the final
image adjustments that are to be used for this
scan.
10
For the best possible image scans, it is important
that you position your documents correctly and
carefully.
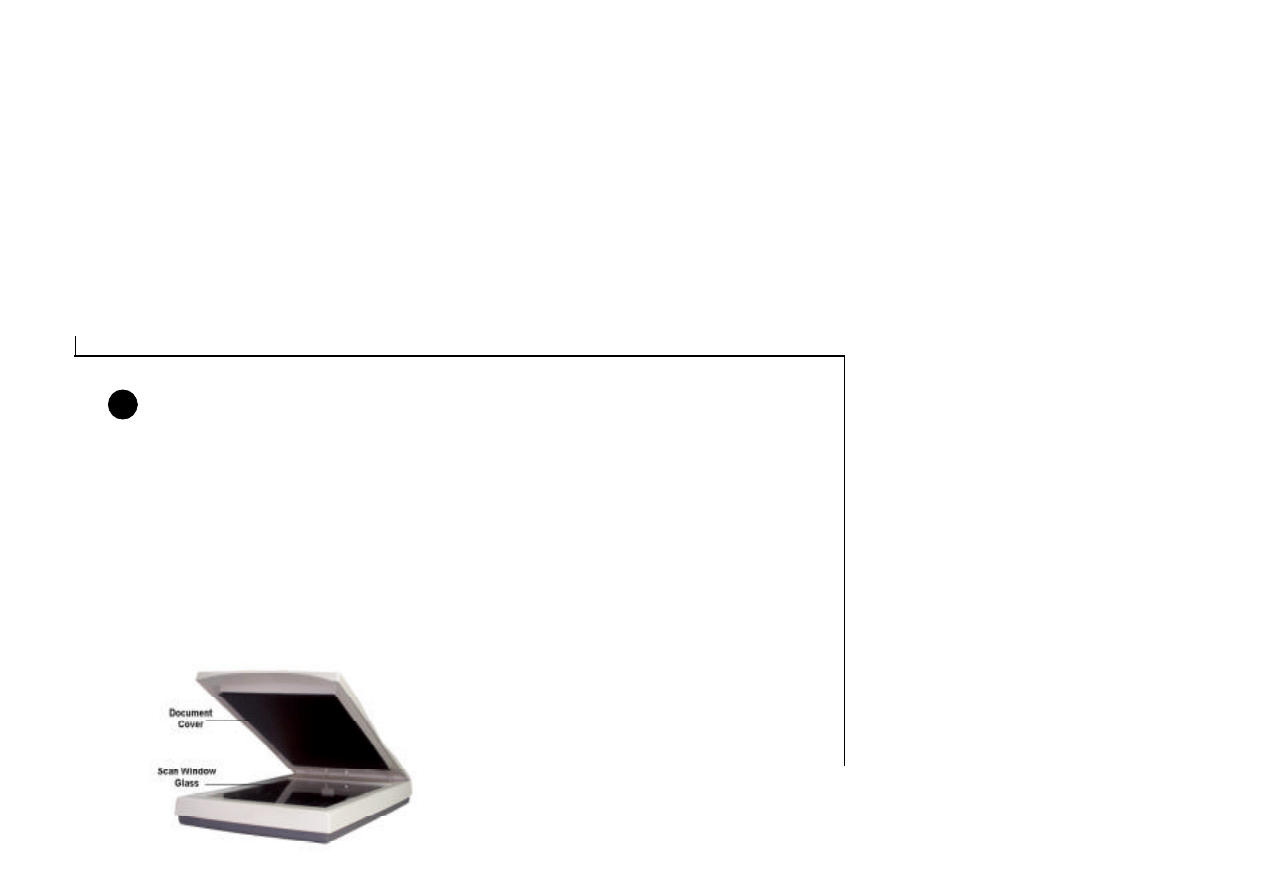
1. Lift the document cover.
2. Place the document face down on the glass
and in the upper right corner where the
alignment marks are located:
4
Document Positioning
3. Slowly lower the document cover, making
sure the document
remains in position.
4. In your scanning program, set up the
scanning parameters such as scan mode and
resolution.
5. Execute the scan command.
6. Remove the document after scanning is
complete.
11
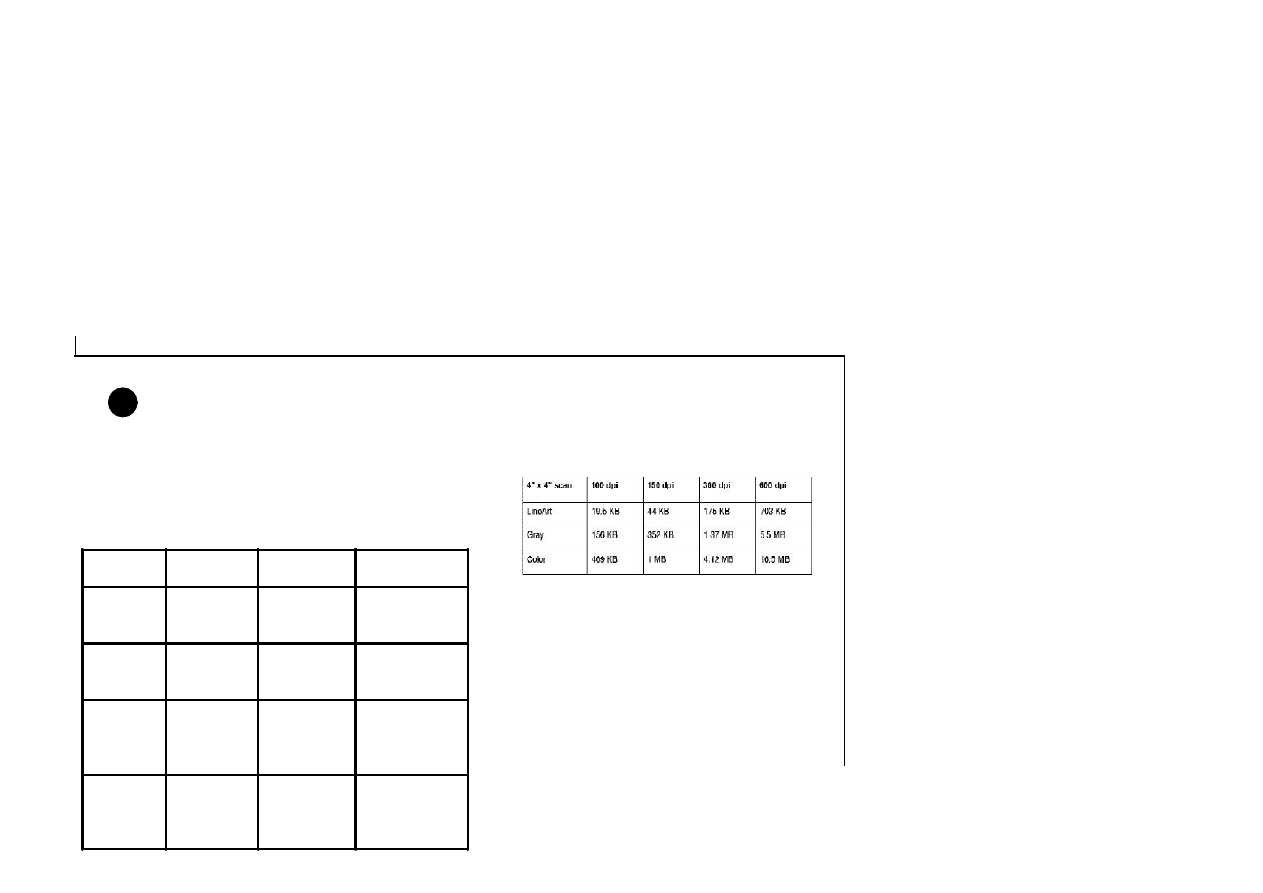
The following tables provide helpful
information you can use when setting the scan
mode and/or resolution. Recommended
scanning resolutions for various output
devices are listed as follows:
Scanning Tips
5
Space requirements for different scan modes:
PRINTER
TYPE
INPUT
MATERIAL
SUGGESTED
SCAN MODE
RESOLUTION
600-dpi
Laser or
Inkjet Printer
Color
G rayscale
Line Art/Text
G rayscale
G rayscale
Line Art/Text
150 dpi
150 dpi
600 dpi
300-dpi
Laser or
Inkjet Printer
Color
G rayscale
Line Art/Text
G rayscale
G rayscale
Line Art/Text
100 dpi
100 dpi
300 dpi
Color Inkjet
Printer
Color
G rayscale
Line Art/Text
Color
G rayscale
Line Art/Text
Check with
m anufacturer for
recommended
resolution
Dye
Sublimation
or Color
Laser Printer
Color
G rayscale
Line Art/Text
Color
G rayscale
Line Art/Text
Scan at maximum
resolution of
printer in all
modes
12
The TWAIN Dialog Box
The TWAIN dialog box is part of the scanning
module provided with your scanner. TWAIN is
an industry standard that allows scanning
directly into any TWAIN-compliant software.
It eliminates most compatibility problems
associated with software and input devices
supplied by different vendors.
You can call up the TWIAN dialog box from
within any TWAIN-compliant software such as
the application software bundled with the
scanner (e.g. iPhoto Plus 1.2 or 4.0).
The TWAIN dialog box consists of two sections
- the left section where most of the TWAIN
control settings are found and the right section,
which is the Preview window.
13
The Preview Window and Buttons
The Preview window is where you can view
the prescan image. The first time you want to
scan a document, it is better that you do a
prescan. With the prescan image, you can then
specify the final image area to be included in
the actual scan and/or apply the TWAIN
image-enhancement commands and filters.
Crop
Frame
Outlines
the scan
area or
region that
will be
included in
the final
scan.
•
Help
Provides on-line help for the scanner and
software functions.
•
Language Icon
Selects the language you would like to
view the screen in.
•
Exit Icon
Exits the program.
•
Prescan the Image
A Prescan is a quick low-resolution scan of
the entire original image. From this low-
resolution scan you can get a clearer idea
of the image area you want to include
when you click Scan. To prescan, the steps
are:
1. Place the document face down on the
scan window glass.
2. Click on the Prescan button. After the
scanner has scanned the document, the
scanned image will appear in the Preview
Window. From the Prescan image, you can
now set the exact image area you wish to
include in your final scan.
14
•
Scan
When you click on the Scan button, the
Scanner dialog box displays the progress of
your image transfer. When scanning is over,
the image will be displayed in the main
screen of the host software behind the
Scanner dialog box. This provides the option
of doing additional scans without re-
acquiring the Scanner dialog box each time.
•
Single Scan Button
When this button is selected, you can only
have one Crop Frame (or rectangle) in the
Preview window. With the Crop Frame you
can outline the image area you wish to scan.
Click one of the sides or corners of the Crop
Frame and drag it out or in to the desired
length and width. To move the entire Crop
Frame, position the mouse cursor inside it
and drag with the left mouse button.
•
Batch Scan Button
Clicking on this button allows you to have
multiple scans on any part of your document
using different control settings. A dialog box
•
Using the Zoom Tools
The Zoom In tool doubles the magnification
of the image area. In magnified view, you
can then drag the Crop Frame to the exact
area you want to scan. Use the Zoom Out
tool to shrink the image.
The Image Setting Buttons
The Image Setting Buttons allow you to create
scan settings for your own convenience. Saving
image settings allows you to use the same
settings again and again without the hassle of
resetting all the image options.
Load Button
Loads previously saved settings.
Save Button
Saves current image settings to a file.
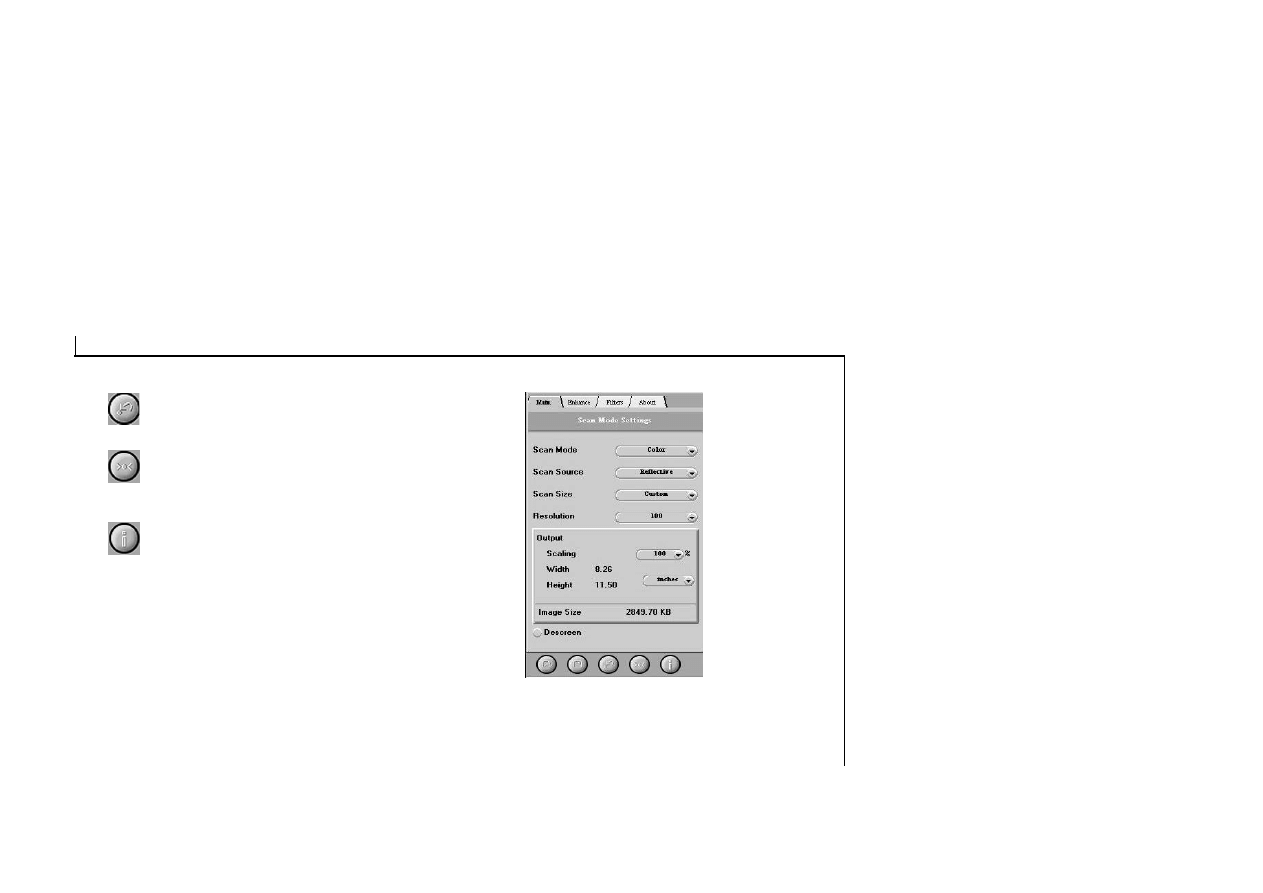
15
Previous Button
Reloads the last saved image setting.
Reset Button
Returns the image settings to their default
values.
Information Button
Simultaneously shows the current control
settings from all the TWAIN folders.
TWAIN Control Settings
The Main Folder
The Main folder contains the control settings
needed for specifying the scanning parameters
such as scan mode, scan source, resolution,
etc. These parameters will determine how the
original image or document will be scanned,
displayed or printed.
Scan Mode
The Scan Mode determines how the scanner
reads the original image or document. When
choosing a scan mode, it is wise to consider
for what purpose the resulting scanned image
will be used for.
16
•
LineArt
Use this mode to scan text documents for
use in OCR (Optical Character Recognition)
or when you wish to scan black-and-white
drawings.
•
Gray
Select Gray to capture images in shades of
gray. Our Gray mode generates 10-bit (1024
shades of gray) internal images and 8-bit
(256 shades of gray) external images.
•
Color
Select Color to capture images in colors. Our
Color mode generates 30-bit (1.074 billion
colors) internal images and 24-bit (16.7
million colors) external images.
Note: Internal images refer to images that are
originally captured by the scanner. External
images refer to images that are transferred to
the computer.
Scan Source
The Scan Source setting is used to select the
type of document you will be scanning.
•
Reflective
Use Reflective when you wish to scan a
paper-based document such as photographs
or text.
Select the Scan Size
From the list of available paper sizes, select the
size of the document you wish to scan. Custom
will automatically be selected when you use the
Crop Frame to change the image area to be
scanned.
Resolution
The Resolution, which is measured in dots per
inch (dpi) determines the effect of the image as
it is displayed or printed. Images scanned at a
higher resolution appear sharp since the scanner
is capturing more information but also take up
more disk space for storage. You can select from
a wide range of preset resolutions.
17
100 dpi
400 dpi
Output Scaling
Output scaling allows you to enlarge the size
of the final output image. For example,
setting the Output Scaling to 200% will
enlarge the output image four times its
original size.
Width and Height
The Width and Length values show the
dimensions of the image area inside the
Crop Frame in the Preview window. You
can change the measurement unit to
centimeters or inches.
Image Size
Image Size displays the amount of computer
memory or disk space needed to display or
save the image outlined by the Crop Frame in
the Preview window. The Image Size
information is automatically updated anytime
you change any of the control settings or
resize the Crop Frame.
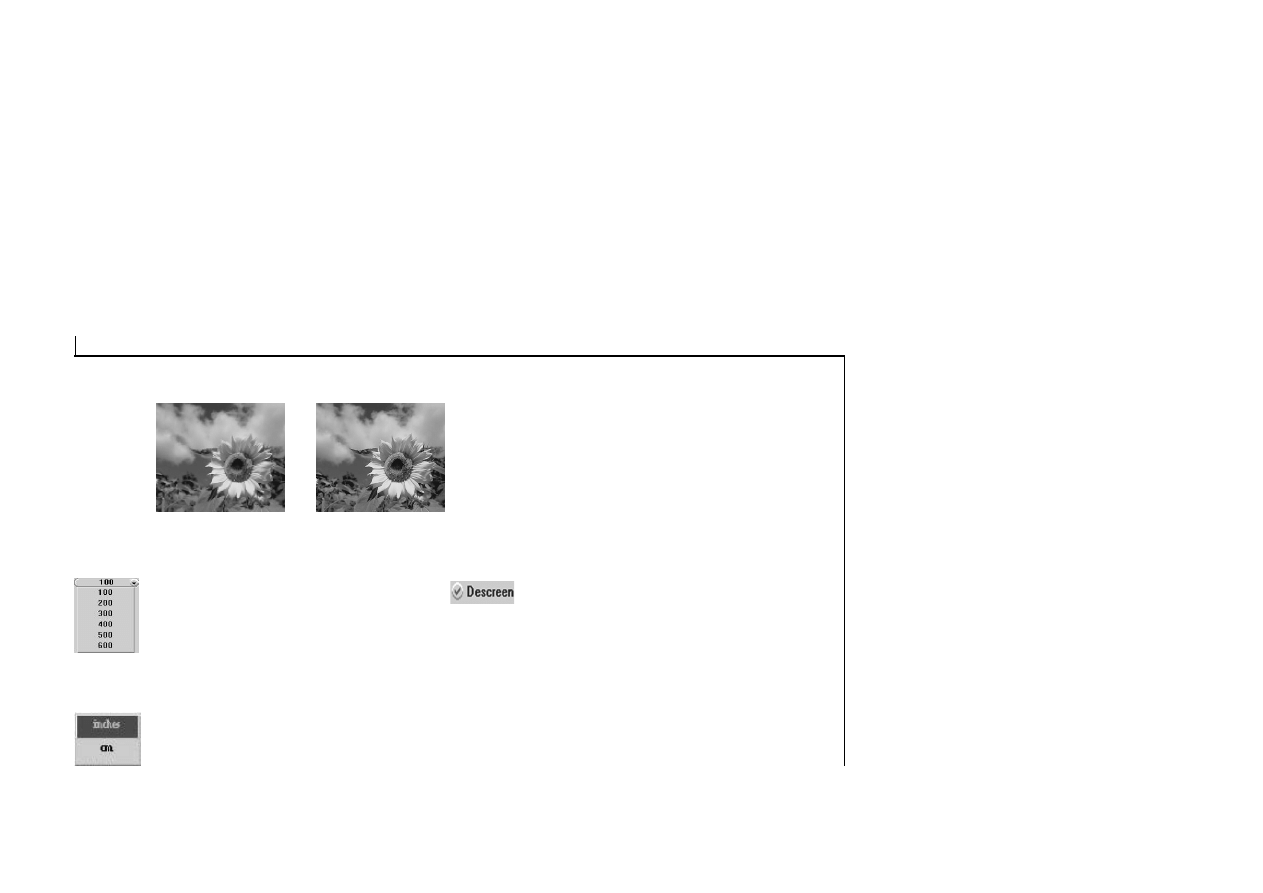
Descreen
Descreen is a useful tool for reducing moiré
patterns in scanned images of originals that
were created by a halftone process. Moiré
patterns appear as unsightly interference
patterns.
18
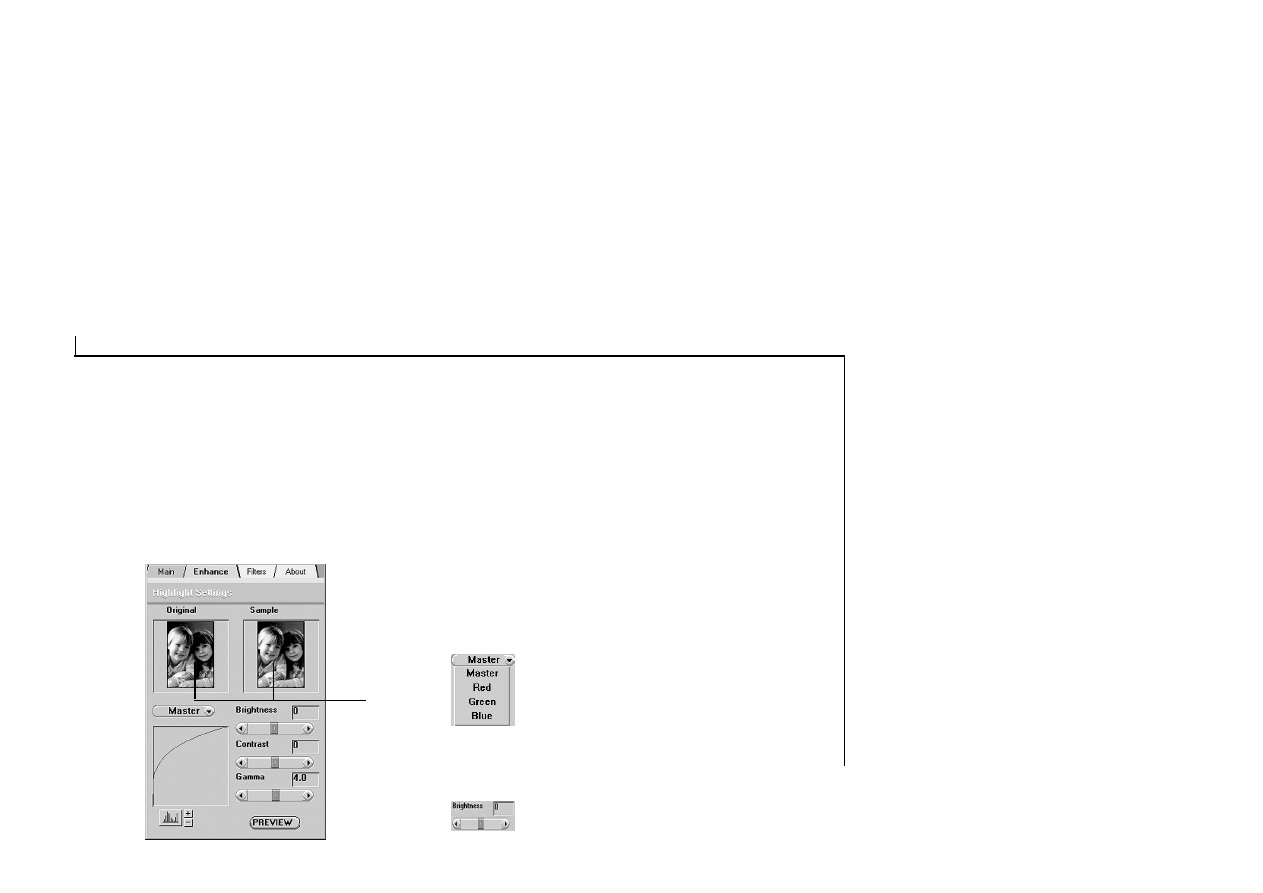
The Enhancement Folder
The Enhancement folder contains preprocessing
controls you can apply to the image before
making your final scan. Using these
preprocessing controls, you can alter the
appearance of the final output image. To view
the Enhancement folder, click the Enhance tab.
Thumbnails
The Enhancement folder contains two
thumbnails of the prescan image, several control
settings, and a histogram of the image. Changes
you make to the control settings will appear in
the sample thumbnail.
If you wish to change the image that appears in
the thumbnails, drag the Crop Frame in the
Preview window.
If you wish to see the effects of your changes in
the Preview window image, click on the Preview
button.
•
Channel Selector
Channel refers to the red, green, and blue
layers that make up a color image. You can
choose to change the channels individually
or choose Master to change all channels
equally and simultaneously. An image in
Gray Mode has one channel.
•
Brightness Control
The Brightness control allows you to adjust
the overall amount of light in the image.
19
Brightness 0
Brightness 50
•
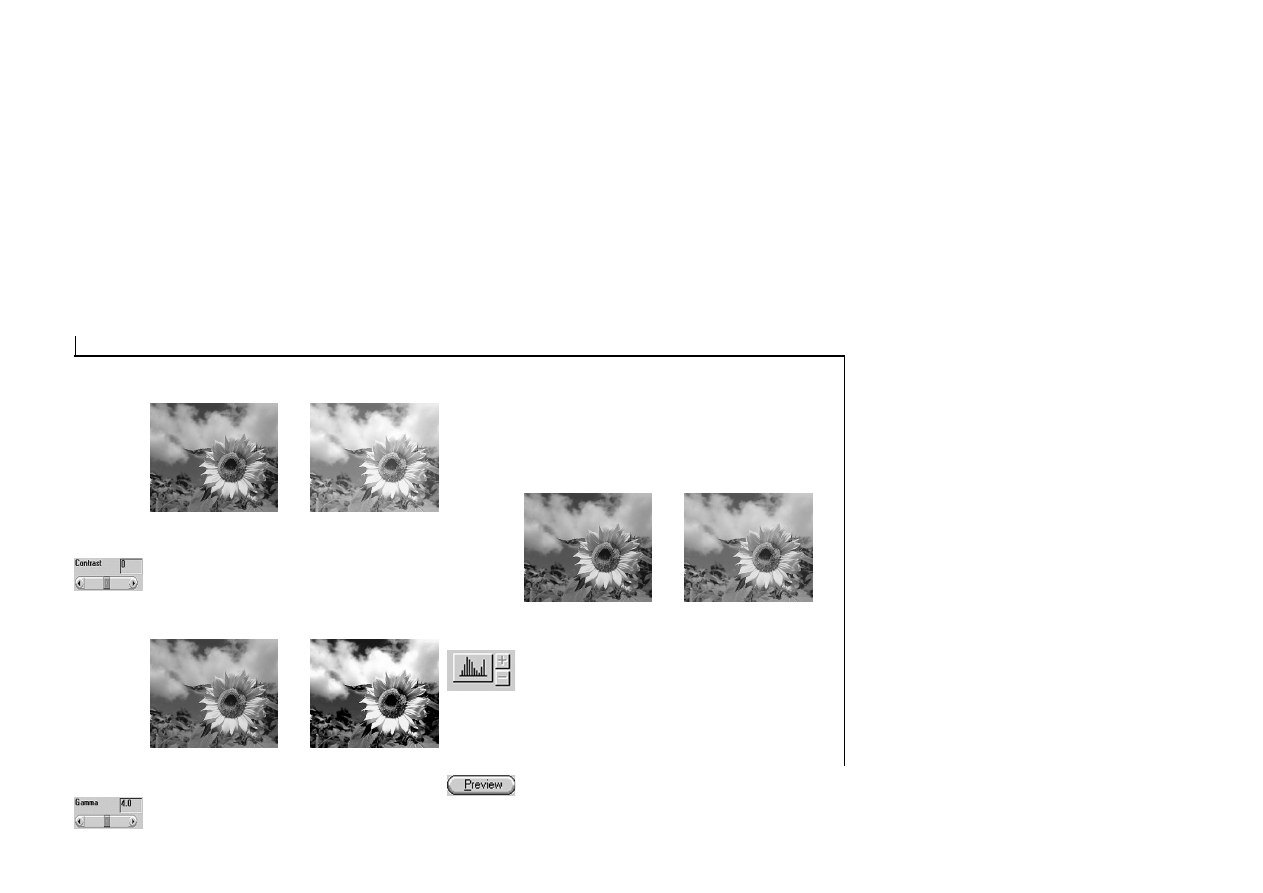
Contrast Control
The Contrast control allows you to adjust
the overall amount of white and black in
the image.
Contrast 0
Contrast 50
•
Gamma Control
The Gamma control is used for adjusting
the brightness level in the highlights,
midtones, and shadows of the image.
Values of 0.1 to 2.0 primarily affect the
shadow areas of the image.
Values of 2.1 to 6.0 primarily affect the
midtone areas, and values of 6.1 to 7.9
primarily affect the highlight areas.
Gamma 1.0
Gamma 1.3
•
Histogram Button
The histogram shows the distribution of
the brightness levels
in the image. To
adjust the display of the histogram, click
on the Histogram button and then click on
the + or - button.
•
Preview Button
Click the Preview button to see any
changes made to the image. The changes
will appear in the Preview window image.
20
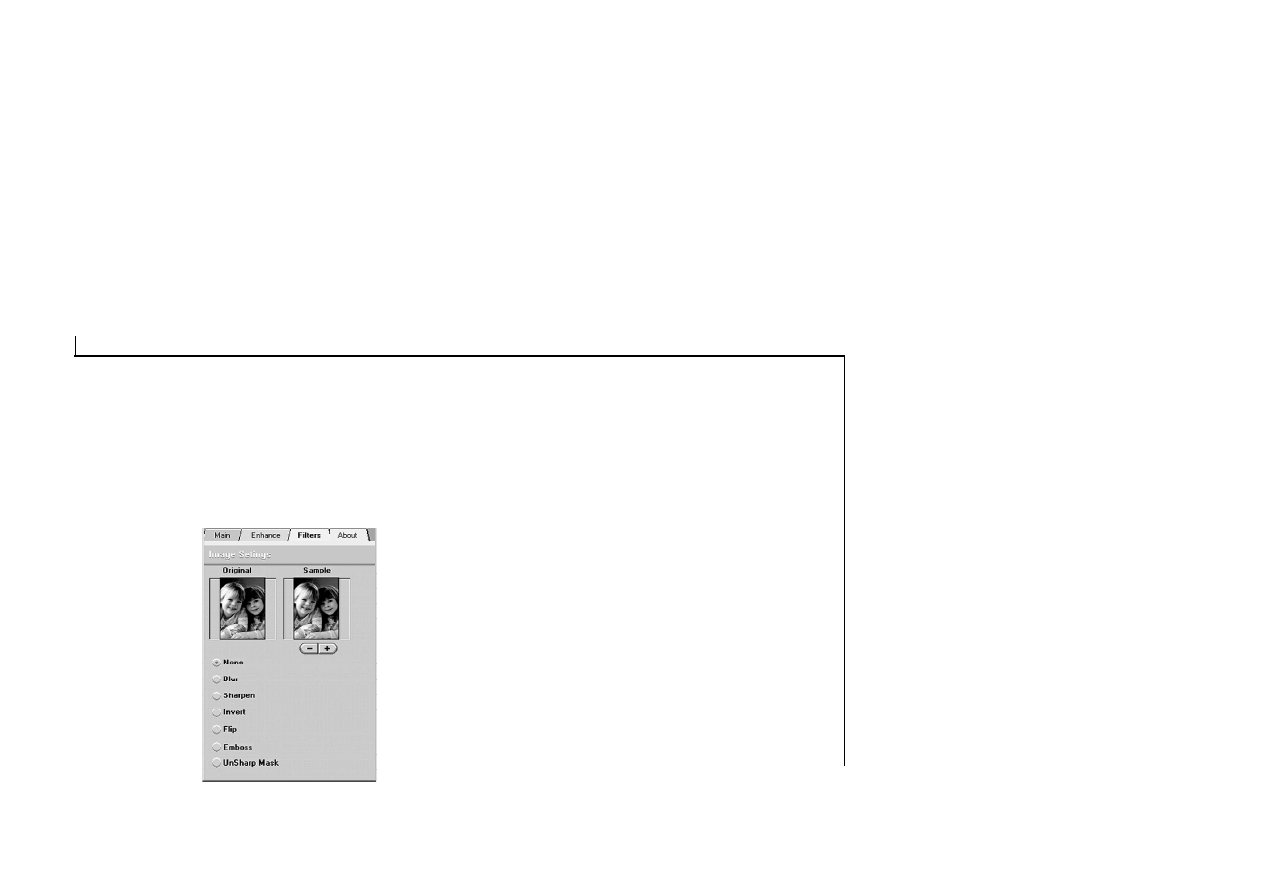
The Filters Folder
The Filters folder contains preprocessing
controls that allow you to apply special effects
to the image before making your final scan. To
view the Filters folder, click the Filters tab.
The Filters folder contains two thumbnails of a
sample image. Any filter you choose will
immediately show its effect in the sample
thumbnail.
•
None
The None setting means no filter is applied.
This is the default setting.
•
Blur
The Blur filter (controlled with the plus and
minus buttons) smoothes the image by
lightening the pixels that are in sharp
contrast to their neighboring pixels.
•
Sharpen
The Sharpen filter (controlled with the plus
and minus buttons) enhances the detail in
blurry images by improving the focus and
increasing the contrast in the image.
•
Invert
The Invert filter reverses an image to its
negative or compliment.
•
Flip
The Flip filter creates a mirror image of the
original by flipping the image horizontally.
21
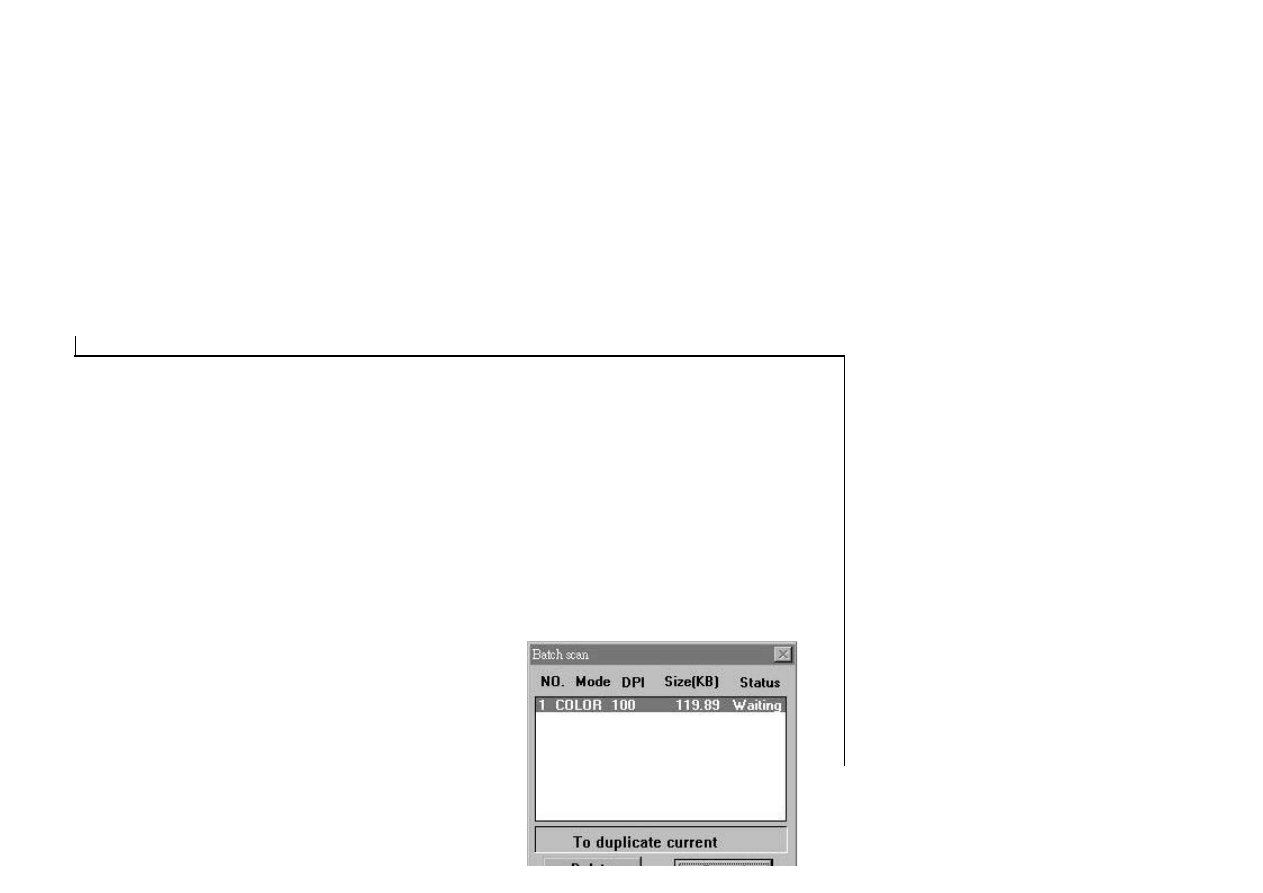
Using Batch Scan
Batch scanning is an easy way to multi-scan any
part of your document using different scan modes
and resolutions (however, certain application
programs do not support this function). In batch
scanning, you can specify up to a maximum of
10 scan regions or you can scan a single region
several times using different combinations of
scan modes and resolutions.
•
Unsharp Mask
The Unsharp Mask filter detects shape edges
and color boundaries and then emphasizes
them.
•
Emboss
The Emboss filter makes the elements in an
image appear raised or sunken.
About Folder
The About folder contains the current driver
version number and the copyright notice. To
view the About folder, click the About tab.

22
To do a batch scan, the steps are:
1. Click on the Batch Scan button. The Batch Scan
dialog box appears.
2. Create a scan region:
(a) Move the cursor inside the preview window.
(b) Hold down the Shift key, press the left mouse
button and drag the mouse to create a crop frame.
(c) Reposition or resize the crop frame if necessary.
3. Set the desired scan mode and resolution for the
current scan region.
4. Repeat steps 2 and 3 if you wish to create more
scan regions. You can have up to 10 scan regions.
5. Click Scan. The scanner will begin to scan the scan
regions one after the other.
Appendices
A: Troubleshooting
Note:
It is not possible to print and scan at the same
time.
Do not dissemble the device to fix problems
by yourself!
Q 1.
The computer fails to recognize the
scanner.
1. Check if the scanner is correctly connected
to the computer.
> Make sure the cable connection is correct.
Turn off your computer and the scanner, and
reconnect them by following our instructions
in the hardware setup.
Q 2.
After powering up the scanner, it
does not work any further.
1. The AC power outlet may be bad.
> Connect the power cord to another power
outlet.

23
It is recommended to keep the scan window
glass and the document cover clean. They should
be cleaned on a regular basis. The cleaning steps
are:
1. Turn off the scanner and unplug the power
cord.
2. Open the document cover and use a cloth
slightly damped with a little alcohol to clean
the scan window glass and the cover
separately.
3. Use a lint-free dry cloth to dry the glass and
cover.
B: Maintenance
2. The power cable is not connected correctly to the
outlet.
> Correctly plug the power cable.
3. If you still have difficulty, the computer or the
power supply may be defective.
> Ask your dealer to solve the problem.
Q 3.
The scan command is not executed.
1. The scanner cable may be connected loosely.
> Check if the connection is correct or not (as the
solution in Q1). If this problem persists, contact
your dealer.
Q 4.
During scanning, the scanner makes a
lot of noise while moving along the sub-scanning
rail shafts.
1. The surface of the rail shafts is dirty.
> Ask your dealer to clean them for you.
Q 5.
The scanned picture is not clear.
1. The scan window glass is not clean.
> If the outside surface is dirty, please refer to our
maintenace instruction to clean it. If the inside is
dirty, please call your dealer to clean it.
Wyszukiwarka
Podobne podstrony:
Instrukcja CCD 2001 w 1000, A4, W2 04
Instrukcja CCD 2001 w C02 A4 W1-01, Alarmy, domofony, P.Poż, Wekta
instrukcja skaner2448CUPro id 2 Nieznany
Instrukcja Gazowa BNGS pl 1 4 A4
Instrukcja CCD 2001 w C02 A4 W1 01
Instrukcja CCD 2001 w 1000, A4, W2 04
Instrukcja CCD 2001 w 1000, A4, W2 04
Instrukcja montażu przycisku podłokietnika a4 b6 b7
flat portfolio A4
Instrukcja CCD 2001 w C02 A4 W1 01
Instrukcja obslugi Audi A4 up by dunaj2
więcej podobnych podstron