
Do-it-Yourself Brakes
Pads and rotors, front and rear
Specific model: 210.065 (E 320)
Generally applicable to all late-model
Mercedes vehicles

OVERVIEW, DISCLAIMER AND SAFETY PRECAUTIONS
•
As you review the pictures, be advised that this car started life in NYC, so it's got quite a bit of rust on
some components, which looks really scary in some of the shots -- particularly some of those looking
down into the vents of the front rotor. :)
•
Disclaimer: You assume any and all responsibility for your decision to use (or misuse) any or all of the
information contained herein. In other words, I'm not in any way at fault or to blame if you die or even just
get a hangnail. If you're unhappy in any way, your sole and complete remedy is a full refund of the price
you paid me for this information.
•
Overview: The entire job took about 6 hours, including periodically cleaning up and partial reassembly so
I could take certain pics. The single most time consuming task (and the most difficult thing) was removing
the old rotors. Three of them were rusted on and it took me between 20-30 minutes each to remove
them. If you've never removed frozen rotors before, don't try it unless you have someone handy who can
show you how. It may involve hammers, pry bars, a torch and lubricants, and if done improperly the result
will be damage to other components which will prove to be expensive and potentially dangerous.
•
If you're not changing rotors, the job is much easier all around. Not only do you not have to struggle with
rotor removal, but you also don't have to remove the front caliper mounting bracket (18MM bolt heads,
very tight). Rather, for the front you just remove the two torx bolts under plastic caps and lift the caliper
out of the way. And you don't have to remove the rear caliper at all (in fact if all you're doing is rear pads,
it actually takes less time to change the rear pads than it does to get to them and then put the tires back
on).
•
Jacking/support precautions: As with anything related to maintenance, safety must be a primary concern
and working partially under a car can be dangerous. Be sure you understand the proper operation of the
jack and jackstand(s) you'll be using, and confirm the correct location for raising and supporting the
vehicle. If you don’t have a lift, then the best surface for jackstands is a flat, smooth concrete driveway. It
is most stable to raise one corner at a time, and be sure not to raise the car higher than you need to. Use
wheel chocks to provide additional stability, at least one placed opposite to the corner you're working on.
Additionally, if I'm removing a wheel, I typically lay it flat behind the jackstand and under the car, so as to
provide backup protection should a jackstand fail (I have had that happen) or in the event of some other
unforseen circumstance (if you live in earthquake country, you always have to have that in the back of
your mind).

PARTS LIST
Pads
If you are satisfied with your braking performance and don’t mind the dust, then you can purchase
OEM pads from any number of on-line sites for a good price. There are also many excellent
premium pads available, such as Axxis, EBC and Porterfeld. I selected Axxis Ultimate pads and
purchased them through Evobreed on Ebay for about $130 for both front and rear sets.
Rotors
If your rotors are not warped, damaged or worn beyond minimum thickness then you don’t need to
replace them. If they are warped, note that Mercedes-Benz does not approve resurfacing rotors,
so you should instead replace them. If you do have to replace your rotors, then replacement OEM
rotors can be sourced online for a good price. You may also wish to consider premium rotors that
are drilled, slotted or both. Be advised, however, that slotted rotors will reduce the longevity of
your brake pads and drilled rotors are more susceptible to cracks and breaks than are stock solid
rotors. If you decide on aftermarket rotors, you can purchase premium ones that are
manufactured with slots or drilled holes, or you can select OEM blank rotors that are drilled and/or
slotted by a machinist. In my case I went the last route and purchased genuine Brembo blanks
that were drilled (no slots for me, thanks) by Night's Auto in Canada. They did an excellent job
and also painted the hubs of the rotors (visible in the pictures). I also located them on eBay and
with shipping and the monetary conversion they were right at $250 for all four.
Miscellaneous
Brake paste is applied to the back of the brake pads to reduce noise; some have used afermarket
pastes with good results, the genuine stuff is cheap enough online. If you buy the genuine MB
paste, purchase one packet per pair of pads, so if you’re doing front and rear you’ll need four
packets. You will also need new brake wear sensors (if they’re not worn, you can re-use them,
but they’re very inexpensive). Some models only use them on the front wheels, some have them
on all four wheels, you’ll have to inspect yours to see how many to order. If you anticipate having
to bleed your brakes, be sure to have the proper fluid on hand for your vehicle. Brake cleaner will
come in handy. Finally, if you’re replacing rotors, you may want to purchase new allen-head set
screws for the rotors; if you don’t, you’ll need to have threadlock, such as Loc-tite.
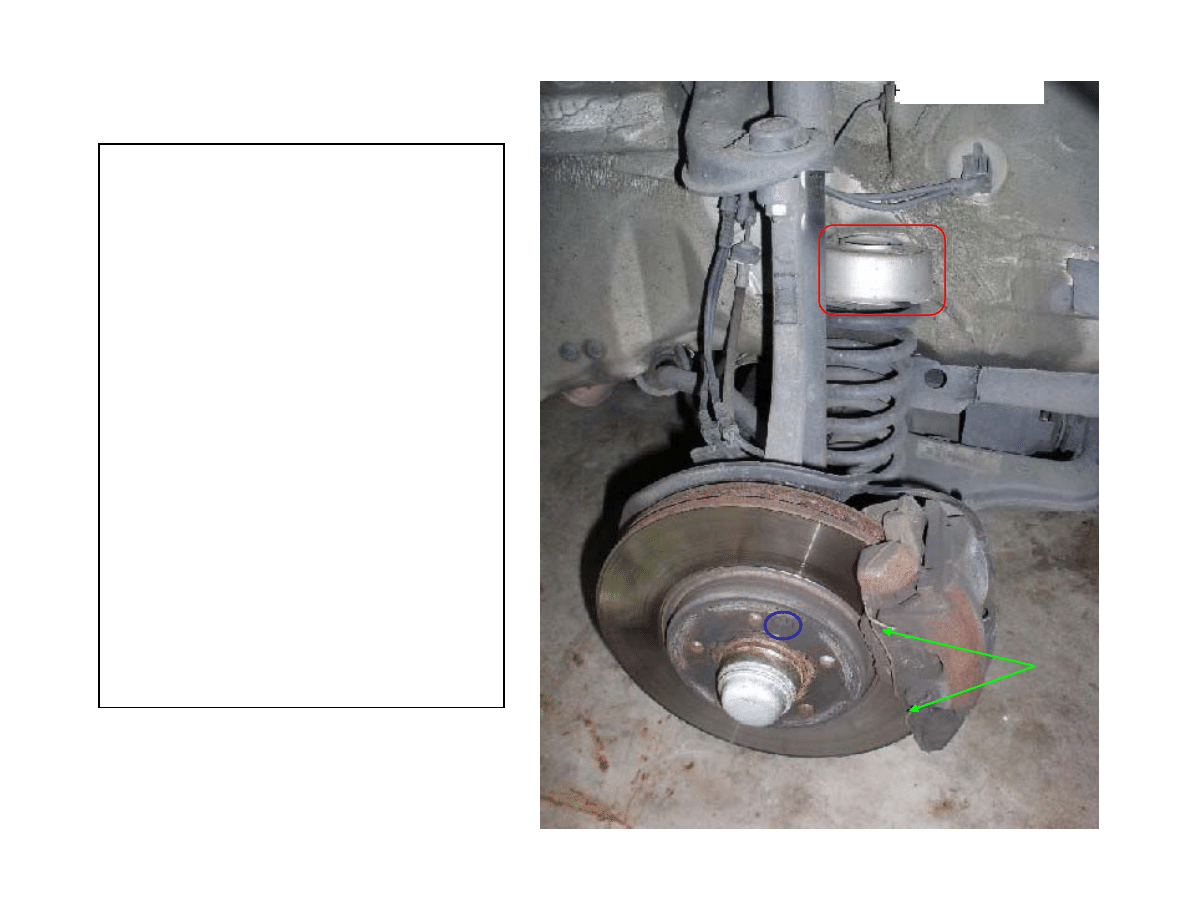
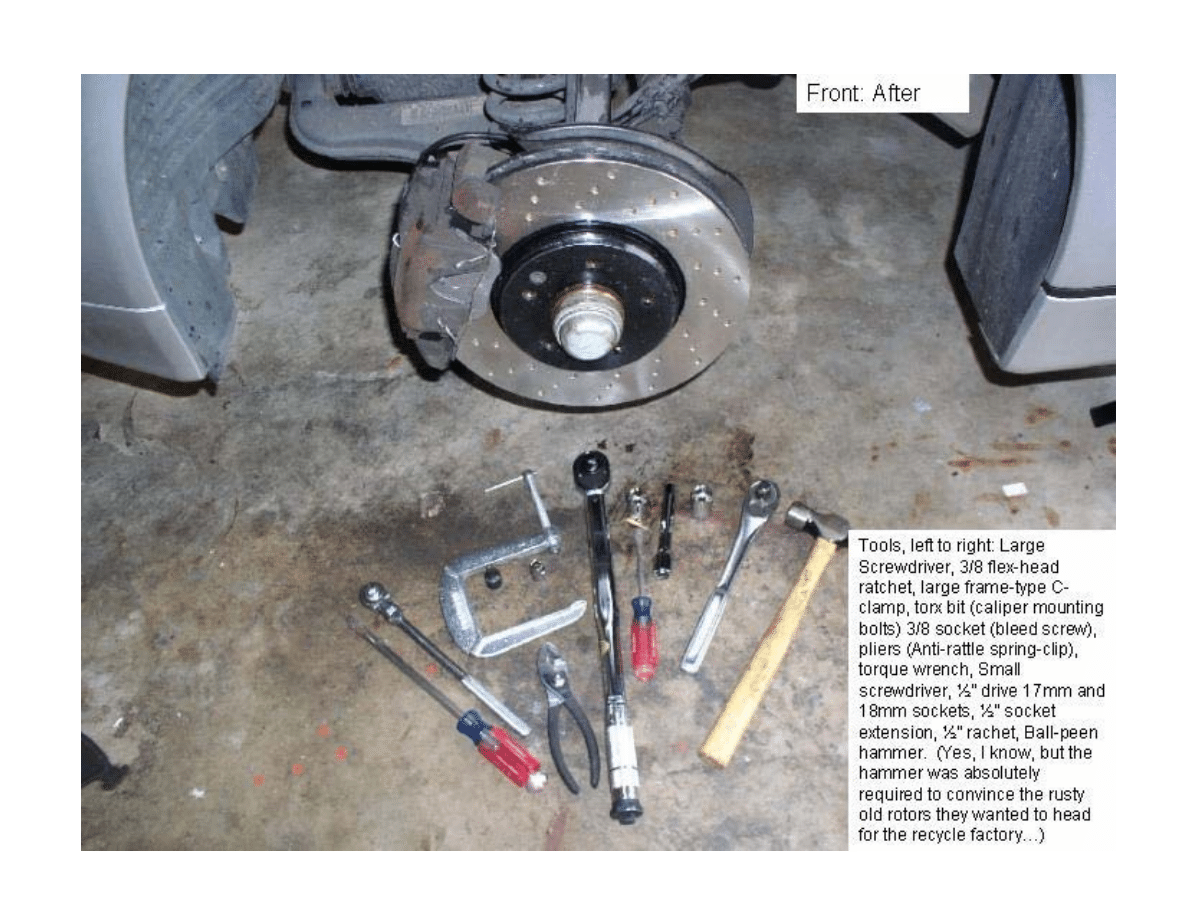
Front, Before
Front Brake (basics)
1. Inside the blue oval is the
set screw that keeps the
rotor aligned with the hub. If
you are removing the rotors,
be sure to replace this
screw, or reinstall it with
fresh thread-lock.
•
The green arrows point to
the anti-rattle spring.
Note: The area in the red
rectangle is the dreaded
“spring perch” which is an
occasional weakness.
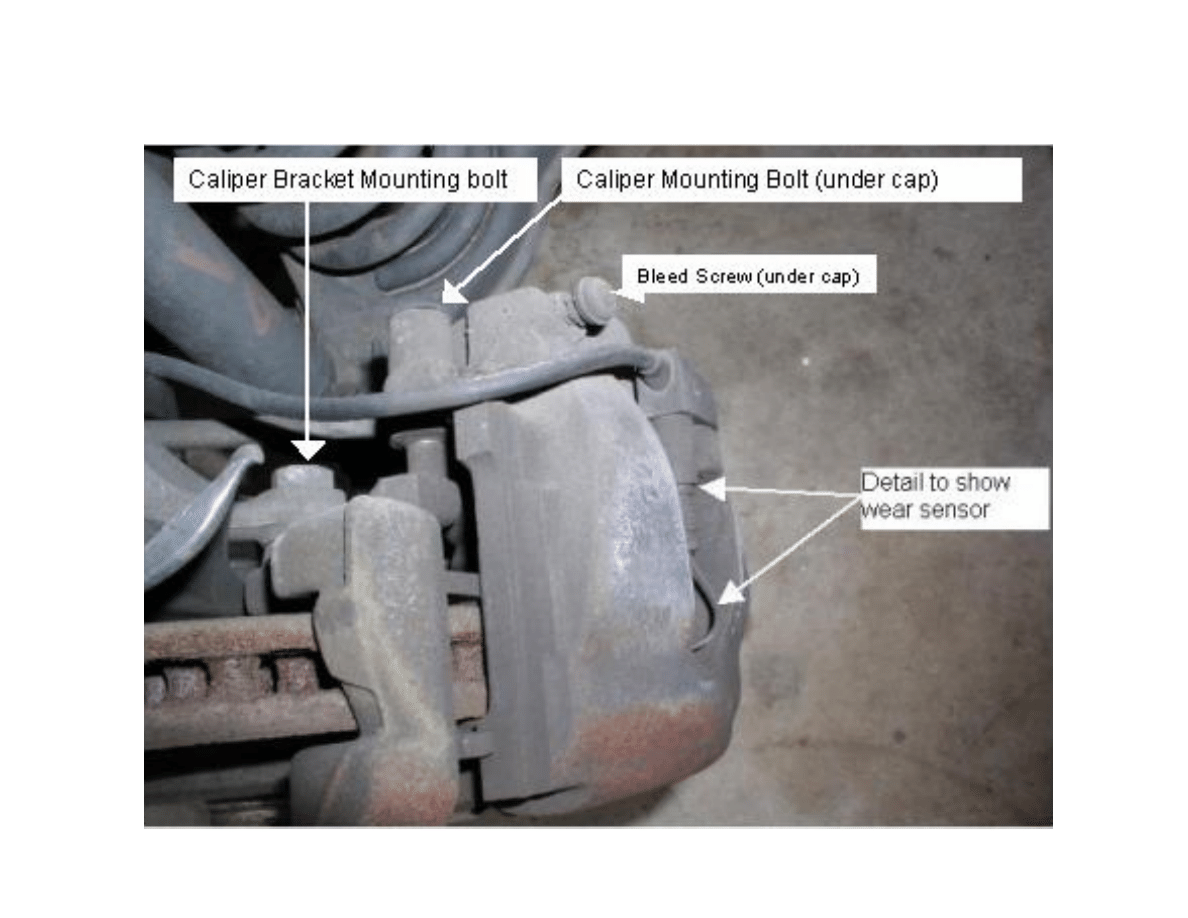
Front, Detail (top view)
Pry gently against one of the pads to
partially press the piston back into the
caliper.
Remove the anti-rattle spring. Remove
the two plastic caps and loosen the two
caliper bolts (do not remove them unless
you plan on relubricating them). If you
are NOT removing the rotors, then do
NOT remove the caliper bracket
mounting bolts, just loosen (but do not
remove) the caliper mounting bolts
Slide the caliper off and remove the
pads. Rotate the caliper so the highest
point is the bleed screw (pointing up) and
then barely crack it (this prevents you
from pushing dirty fluid back up into the
tiny passages of the ABS system and
master cylinder).
Using a hose (clear is best, you can buy
it at any hardware store) to catch the
fluid and direct it to a container, press the
piston back into the caliper until it is
seated fully, then close the bleed screw
and replace the rubber dust cap. You
may wish to use a large C-Clamp to
slowly press the piston in.

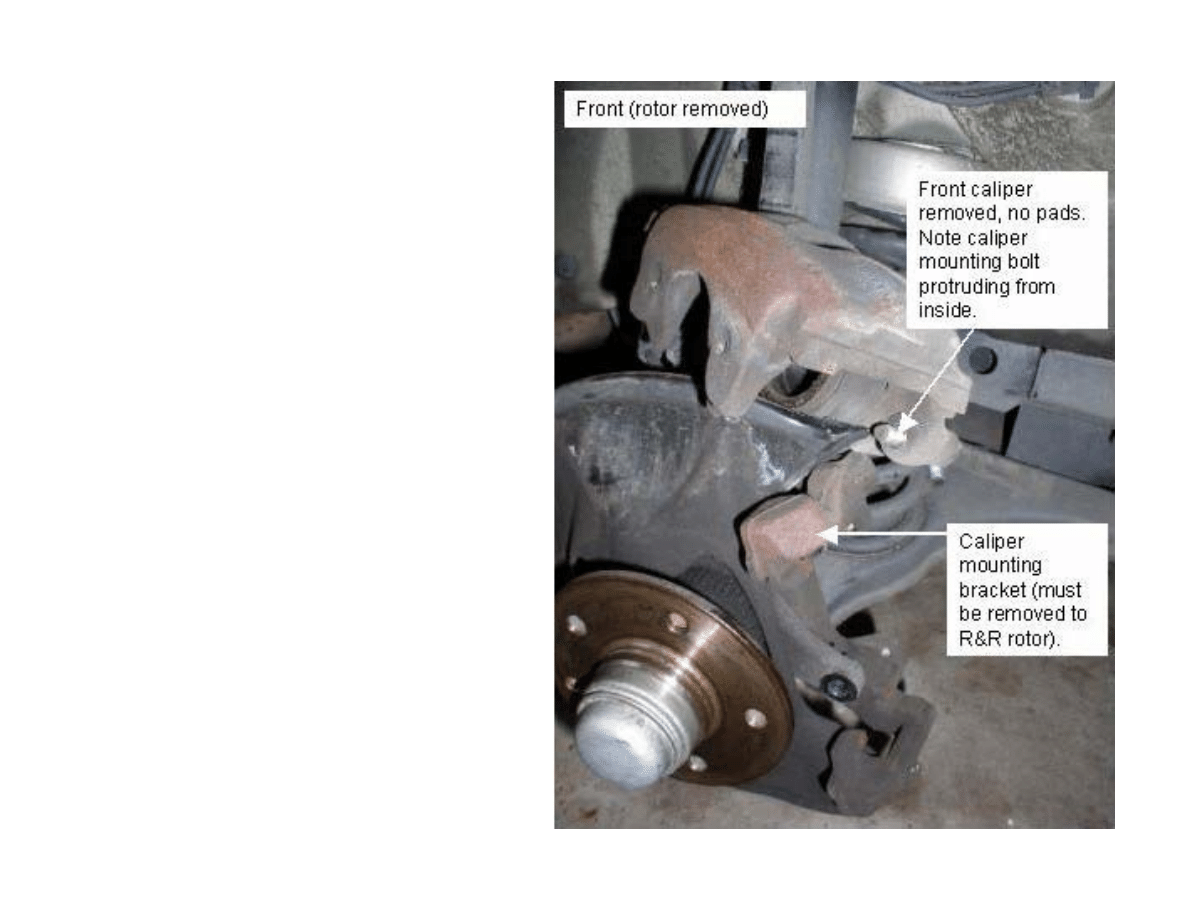
If you are removing the rotors, then remove the caliper bracket
mounting bolts and remove the caliper mounting bracket.
Unscrew the tapered, allen-head set screw that secures the rotor to the
hub. Remove the old rotor.
Clean off any rust from the hub and install the new rotor. If you are
installing premium rotors that are slotted, drilled, or both, review the
directions closely to insure that you install them with the proper direction
of rotation.
Align the rotor on the hub and fit a new set screw (they are cheap and
come precoated with thread-lock), or clean the threads on the old one
and coat it with thread-lock before reinstallation.
Reinstall the caliper mounting bracket.
NOTE: Rotors may be “frozen” to the hub. If you are not very familiar
with removing frozen rotors, then the best advice is to seek professional
assistance to remove them.
ROTOR REMOVAL AND REPLACEMENT
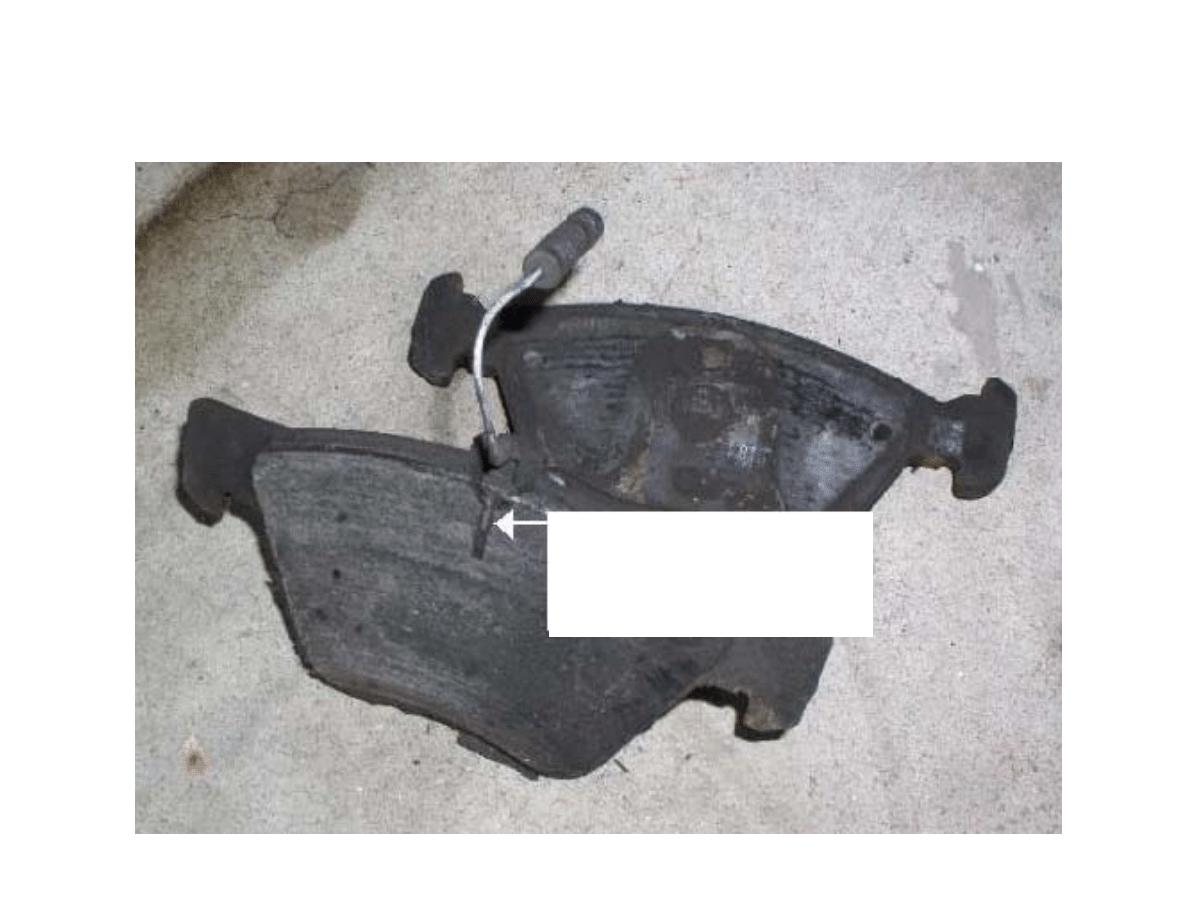
This shot shows the old front pads, with the worn wear-sensor.
Note wear on the brake pad
wear sensor, shiny where
the plastic insulation has
worn through.

This shot shows the installation of the new sensor into the new pad.
Align the post and press it straight into the pad until it seats.

Apply Mercedes Benz paste to the back of the pads and insert a new pad
wear sensor into the inner pad. You can re-use the old sensor if it is not
worn through; refer to the preceding picture.
Fit the new pads into the caliper and carefully slide the caliper back on,
align the bolts and tighten to spec using torque wrench.
Reinstall the anti-rattle spring.
Reinstall the wheel and torque the lug bolts to the specification for your
vehicle. When you’re finished with the job you’re ready to bed them in
according to the rotor/pad manufacturer's recommended procedure.
REASSEMBLY
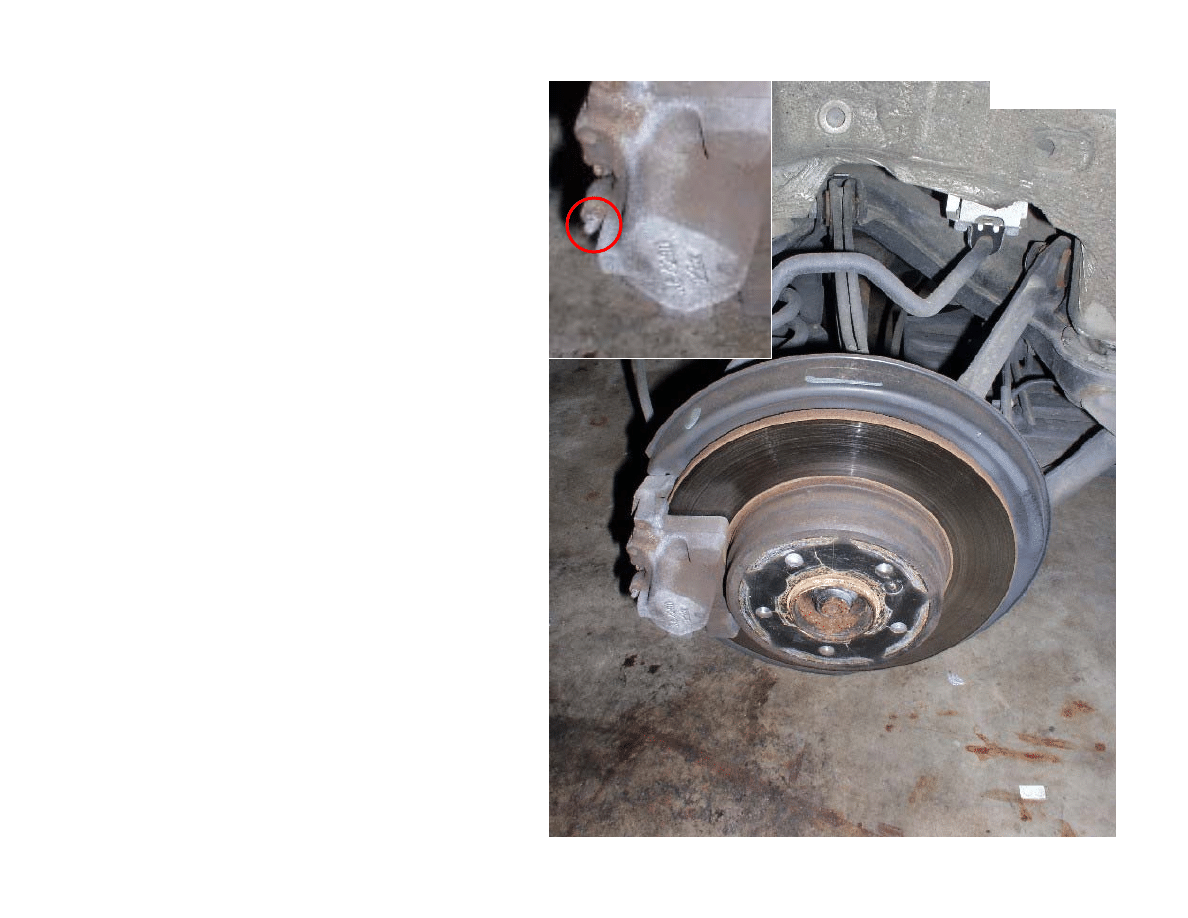
Rear, Before
This is the best shot of the rears I
took. Not too much detail, but
they’re so simple, you’ll see what’s
necessary pretty easily. Note that
these are the single-pin pads,
double-pin pads are the same
procedure, but have two mounting
pins and different retaining springs.
First, gently pry against a pad on
each side to partially compress the
piston. Tap gently on the front end
of the retaining pin (it pokes through
to the front, circled in red on the inset
shot) until you can grab it with pliers
in the back. If you have a long awl
and can press it further, so much the
better. Then press down on the
spring pressure clip and remove the
pin and pressure clip.
Next, slide the pads out of the caliper
and remove the anti-rattle spacers
from them. It's tricky to press the
pistons back into the calipers with
the caliper installed but you can do it.
I'd recommend cracking this bleed
screw as well, although with the twin-
piston calipers it’s a bit more difficult
to coordinate everything.

If you are replacing the rotor, remove the rear caliper. NOTE:
examine the caliper closely and be very careful, for if you remove the
bolts that hold the caliper together you will lose brake fluid and
introduce air into the caliper, and you’ll end up spending lots more time
on this job than you intended.
Remove the allen-head set screw and remove the rotor. Clean up any
rust and dirt on the hub, and then fit the new rotor. If you’re installing
premium drilled/slotted rotors review the manufacturer’s instructions to
ensure proper rotational direction. Install a new set screw or clean the
threads on the old one and apply thread lock, then reinstall it.
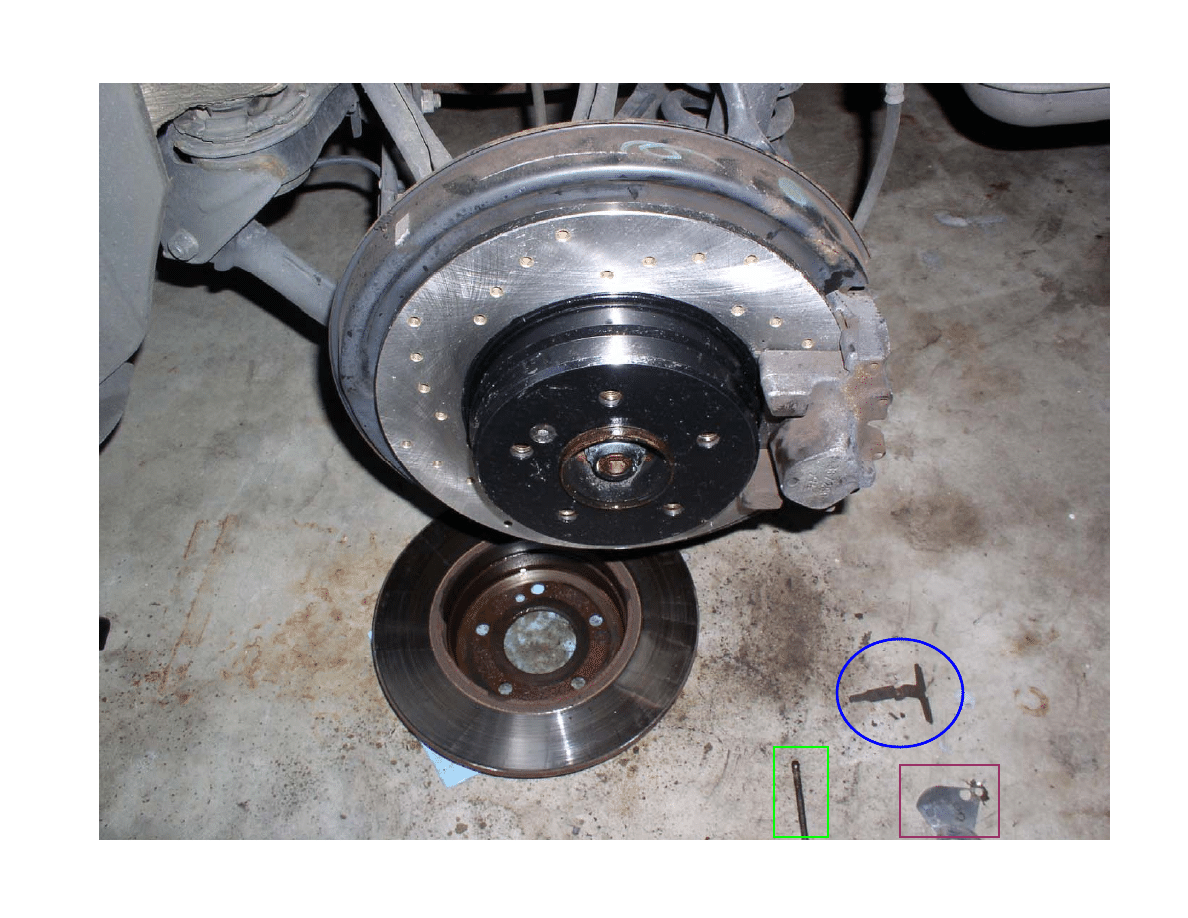
In the next shot, note the new rotor in place. Circled in blue is the
spring pressure clip; the retention pin is in the green rectangle, and the
anti-rattle spacers are in the purple rectangle. These parts may look
different from yours.
Install the wear sensors if your car is equipped with them in the rear.
Apply the Mercedes-Benz paste to the back of the new pads, install
the anti-rattle spacers and insert them into the caliper. Start the
retaining pin and then insert the spring clip and depress it so you can
pass the retaining pin through the other pad and out the front as
before. Drift the retaining pin fully into the caliper body.
Reinstall the wheel and torque the lug bolts to the specification for your
vehicle. When you’re finished with the job you’re ready to bed them in
according to the rotor/pad manufacturer's recommended procedure.
ROTORS AND REASSEMBLY

That’s it, you’re all through.
Congratulate yourself –
and enjoy your new brakes!
Wyszukiwarka
Podobne podstrony:
12 brake system
DIY Mortis Dreadmought Plans & Templates
DIY Combination Solar Water and Nieznany
original c68 retail diy auto diagnostic tool manual
Popular Mechanics Calming A Pulsating Brake Pedal
electric brake service tool ebs301
PARKING BRAKE
DIY 1000 watt wind turbine id 1 Nieznany
Diy How To Paint Woodwork
DIY Land Speeder Plans & Templates
DIY Auto Computer Reset
Popular Mechanics Servicing Front Brake Calipers
Montaż i regulacja hamulców V- brake
Diy Aquariums
Hood Strut Shock replacement DIY
Instalacje elektryczne Instalacje niskiego napięcia w domu EN DIY
Popular Mechanics Dealing With A Low Brake Pedal
DIY Small Plot Vegetable Gardening
więcej podobnych podstron