
University of California Vegetable Research and Information Center
VEGETABLE
GARDENING
Starting Seeds Indoors
The authors are Harwood Hall, Farm Advisor, Susan Wada, Technician, and Ronald E.
Voss, Extension Vegetable Specialist.
VEGETABLE GARDENING
WHEN AND WHERE TO START
TRANSPLANTS
For most vegetables, transplants should be
started in a sunny, warm room about 6 to 8
weeks before the recommended planting
time. Germinating seeds need temperatures
of between 60°and 75° F; seedlings
between 50°and 65° F.
SOIL FOR SEEDLINGS
POINTS TO REMEMBER
Starting seeds indoors can be helpful
because: transplants lengthen the
growing season and planting transplants
reduces some of the hazards (birds,
insects, heavy rains, weed competition)
common to seedlings.
Requirements for successful raising of
transplants include:
Disease-free growing medium
Warmth and moisture for seed
germination
Adequate light for vigorous
growth
Adjustment of indoor plants to
outdoor conditions.
Soil for starting seedlings should be
disease-free. You may purchase a
commercial mixture at a local nursery or
garden supply center, or you may mix it at
home. A good soil mixture consists of equal
parts of garden soil, sphagnum peat moss,
and sand.
To protect seedlings from damping off (a
fungus disease caused by disease
organisms in the soil which make the
seedlings rot before coming to the surface),
sterilize soil before mixing. First preheat
your oven to about 200° F, fill a container
with the moist but not wet soil and bake.
The soil should reach a temperature of at
least 180° F for at least 30 minutes. An easy
way to determine when the soil is done is to
place a raw potato in with the mixture before
placing in the oven. The soil will be done
when the potato is cooked. Mix ingredients
together and sift out lumps, rocks and other
debris.
PLANTING CONTAINERS
Clay or plastic pots, nursery flats,
commercially available peat pots, and metal
pots may be used for planting seeds
indoors. However, after soil is sterilized any
introduced disease organisms will multiply
Page 1
University of California Vegetable Research and Information Center
more rapidly than before. To avoid damping
off, use pasteurized fiber seed flats or peat
pots.
If you use wooden boxes, flats, clay flower
pots, or metal containers, clean them
thoroughly. A solution of 1 part chlorine
bleach to 10 parts water can be used as a
rinse. Place containers in the oven for
sterilization at the same time as the soil.
If the containers don't have holes for
drainage, drill at least four holes of not less
than '/z inch in diameter in the base sides of
the containers.
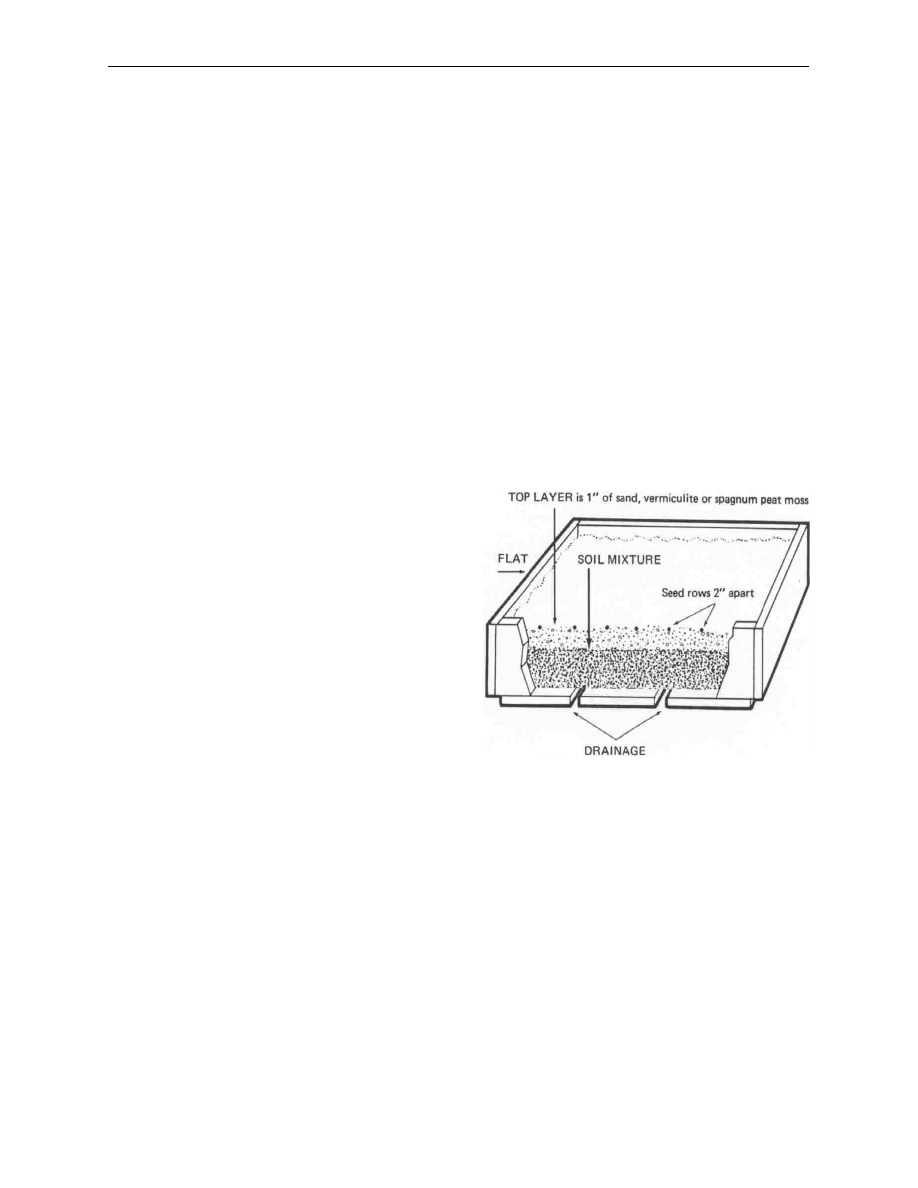
PLANTING
After you have prepared the soil mixtures
and sterilized the container, fill the planting
container with soil mixture to 1 inch from the
top and firm the soil. Water thoroughly then
add '/Z inch of vermiculite, sand or
sphagnum peat moss to the container.
Sow seeds % inch apart. If using
commercially available peat pots, plant two
seeds per pot. Cover seeds with a light
covering of the planting medium and water
gently (mist them, if possible). Label each
container with plant name and planting date
and cover with plastic film, (a plastic bag will
do) or a piece of glass. Water only enough
to keep the soil moist. Most seeds start best
at 60° to 75° F. Don't place the covered
containers in direct sunlight--heat
accumulation can kill emerging seedlings.
Once seeds have sprouted, take off the film
and put the seedlings in a sunny window or
under a fluorescent light. Room
temperatures between 50° and 65° F are
preferable.
The new seedlings will need water and
fertilizer. Provide this by watering them with
a solution of 1 tablespoon of soluble
fertilizer in one gallon of water. Water
seedlings thoroughly but carefully so that
you don't wash them out of the soil.
After two sets of leaves have developed,
transfer seedling to an individual peat pot or
set in groups in larger flats, using more of
the sterile soil mixture. To transfer, carefully
dig up the small plants with a large knife,
putty knife or spatula. Let the group of
seedlings fall apart and pick out individual
plants. Poke holes 2'/2 inches apart in the
soil mixture of the new container and set the
seedlings in, taking care not to pinch the
tender seedlings. Firm the soil and water
gently. For seeds sown in individual pots,
thin to one plant per pot.
Shade plants for a few days or replace
under a fluorescent light where there is little
or no heat buildup. Continue fertilizing and
watering with the solution until the plants
reach transplant size.
HARDENING, TRANSPLANTING
Before planting in the garden, plants should
be gradually "hardened", or toughened.
About 10 days before transplanting date
gradually withhold watering--but don't let the
plant wilt--and gradually expose them to
outside temperatures and direct sun by
setting flats or containers outside during the
day. Avoid fertilizing during this period.
Transplant seedlings in the ground as close
as possible to the recommended date.
Prepare the garden soil by adding 1 to 2
pounds of 5-10-5 fertilizer per 100 square
Page 2
University of California Vegetable Research and Information Center
feet of garden area, scattering it on the
surface. (The numbers refer to the
respective percentages of nitrogen,
phosphorus, and potassium within the
fertilizer. Law requires that these
percentages must be listed on the packages
of all commercial fertilizer.) Then turn the
soil 6 to 8 inches deep by spading, rototilling
or plowing.
Immediately before transplanting, water the
plants well.
Plants grown in fiber, plastic or clay pots
should be removed from their containers
before planting. Plants grown in peat pots
can be transplanted intact, but you may
wish to remove the container bottom to
improve drainage. However, in extremely
sandy soil the peat pot should be removed
or it may act like a wick, evaporating
moisture and causing seedlings to wilt or
possibly die.
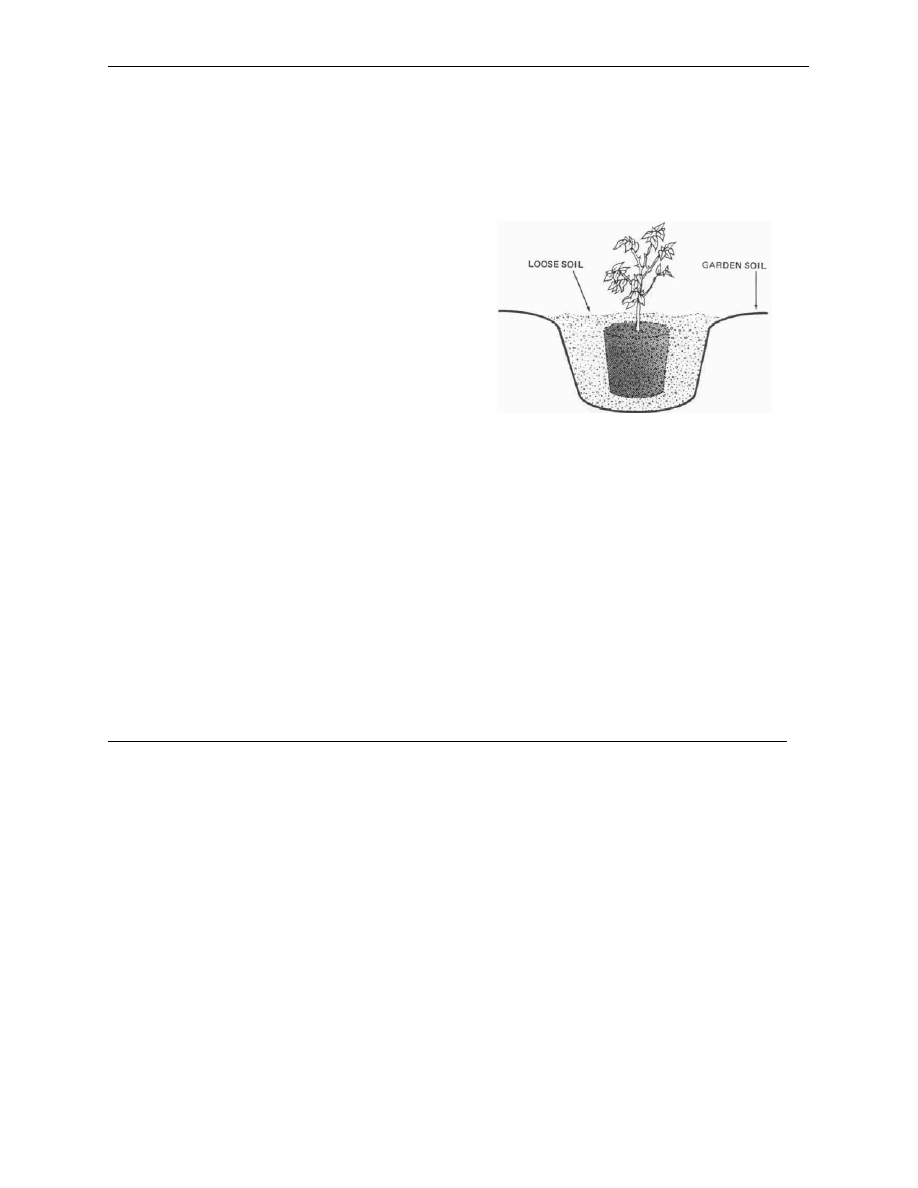
To transplant, dig a hole roughly twice the
size of the individual plant soil ball. Then set
the plant only slightly deeper than it was in
the pot. Place soil loosely around the roots,
filling the hole to ground level and add one
cup of starter solution (1 tablespoon of a
fertilizer, 5-10-5 or 4-12-4, to 1 gallon of
water). After the solution has soaked in,
sprinkle some dry soil around the plant.
Protect young transplants for the first few
days. If the two or three days following
transplanting are sunny and hot, cover
plants with newspaper "tents" to prevent
wilting. Water as necessary. If the weather
is cold, cover the transplants with hotcaps. If
the weather is windy, cover the plants with
either newspaper tents or hotcaps,
depending on the temperatures.
COOPERATIVE EXTENSION UNIVERSITY OF CALIFORNIA
This information is provided by Cooperative Extension, an educational agency of the University of California and the United States
Department of Agriculture. Support for Cooperative Extension is supplied by federal, state, and county governments. Cooperative
Extension provides the people of California with the latest scientific information in agriculture and family consumer sciences, It also
sponsors the 4-H Youth Program. Cooperative Extension representatives, serving 56 Counties in California, are known as farm,
home or youth advisors. Their offices usually are located in the county seat. They will be happy to provide you with information in
their fields of work.
The University of California's Cooperative Extension programs are available to all, without regard to race, color, or national origin.
Issued in furtherance of Cooperative Extension work, acts of May 8 and June 30, 1914, in cooperation with the United States
Department of Agriculture. James B. Kendrick, Jr., Director, Cooperative Extension, University of California.
Page 3
Document Outline
Wyszukiwarka
Podobne podstrony:
(gardening) Growing Herbs Indoors 2pp
(Gardening) Crop Rotationid 1322
Potting and Garden Shed Gazebo
Gardena 02
130821122154 bbc vwitn garden
Betsy Powell Bad Seeds, The True Story of Toronto's Galloway Boys Street Gang (2010)
Build a Garden Bench(1)
6) Market Garden
Akumulator do?LOS Garden tractor Garden tractor?6?7
Barańczak Garden party interpretacja
19 Starting Charging
HaMC Garden of my heart
Wykłady, indoor-folie, IARC( S
Gardening Bench
Flowered fences flowers garden
Gardena 01
więcej podobnych podstron