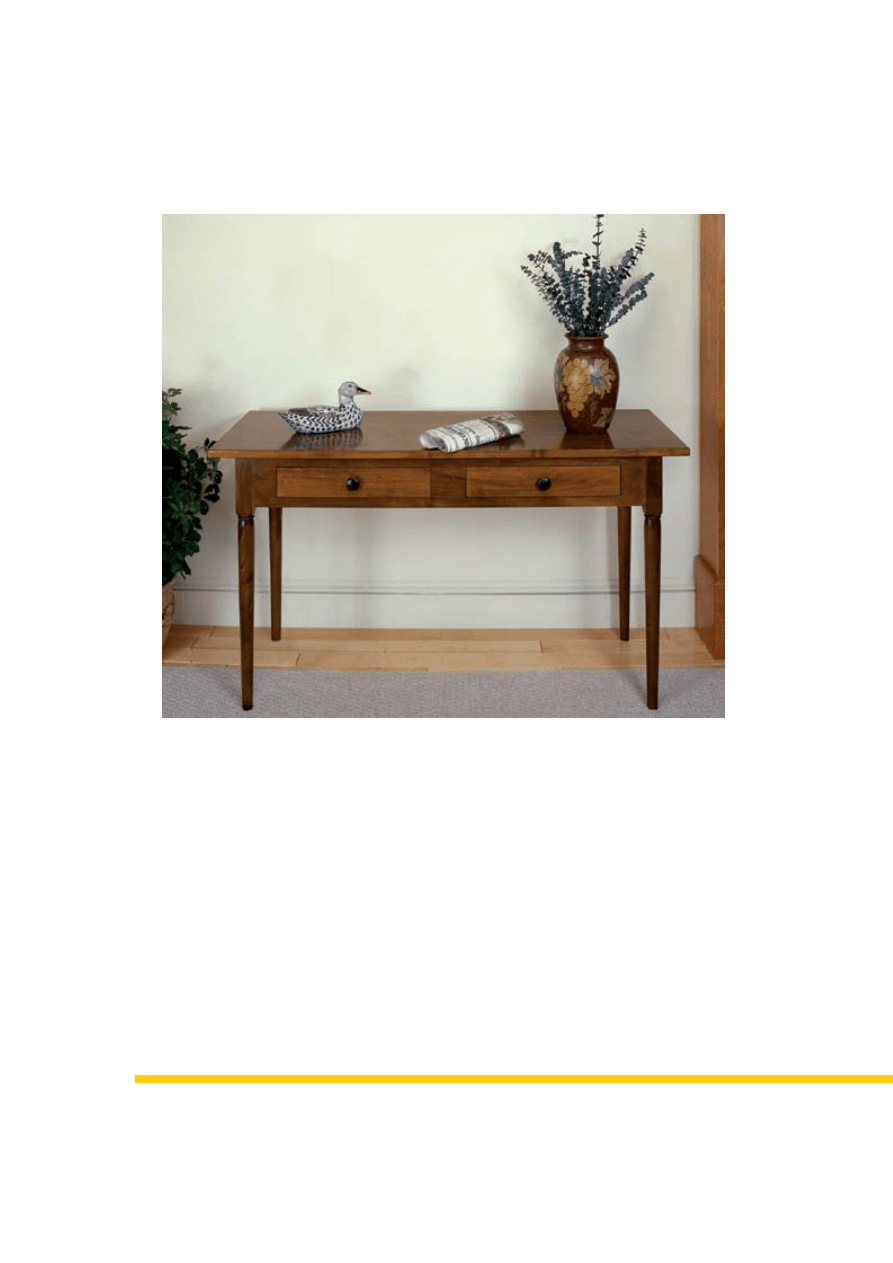
Simple Pleasures
A Shaker console table for any room in the house.
Our Shaker console table is a very versatile piece of
furniture. Its simple lines make it appropriate in any décor
and in any room. You can use it in the dining room as a
serving table, in the living room behind a sofa, or place it in
the entry to serve as a console table. Its two drawers can
accommodate anything from scarves to silverware.
We built our table of hard maple, a traditional wood for this
type of furniture. An antique maple stain and tung oil finish
complete the piece. You could substitute another wood
species or finish for equally fine results.
The table legs were cut from 10/4 stock planed to 2 in., and
the top and aprons were cut from 5/4 stock planed to 1 in.
Drawer stretchers and guides are 3/4-in. material, and the
drawer sides and back are 1/2 in. If you cannot find 10/4
tock, glue up 5/4 lumber for the legs.
s
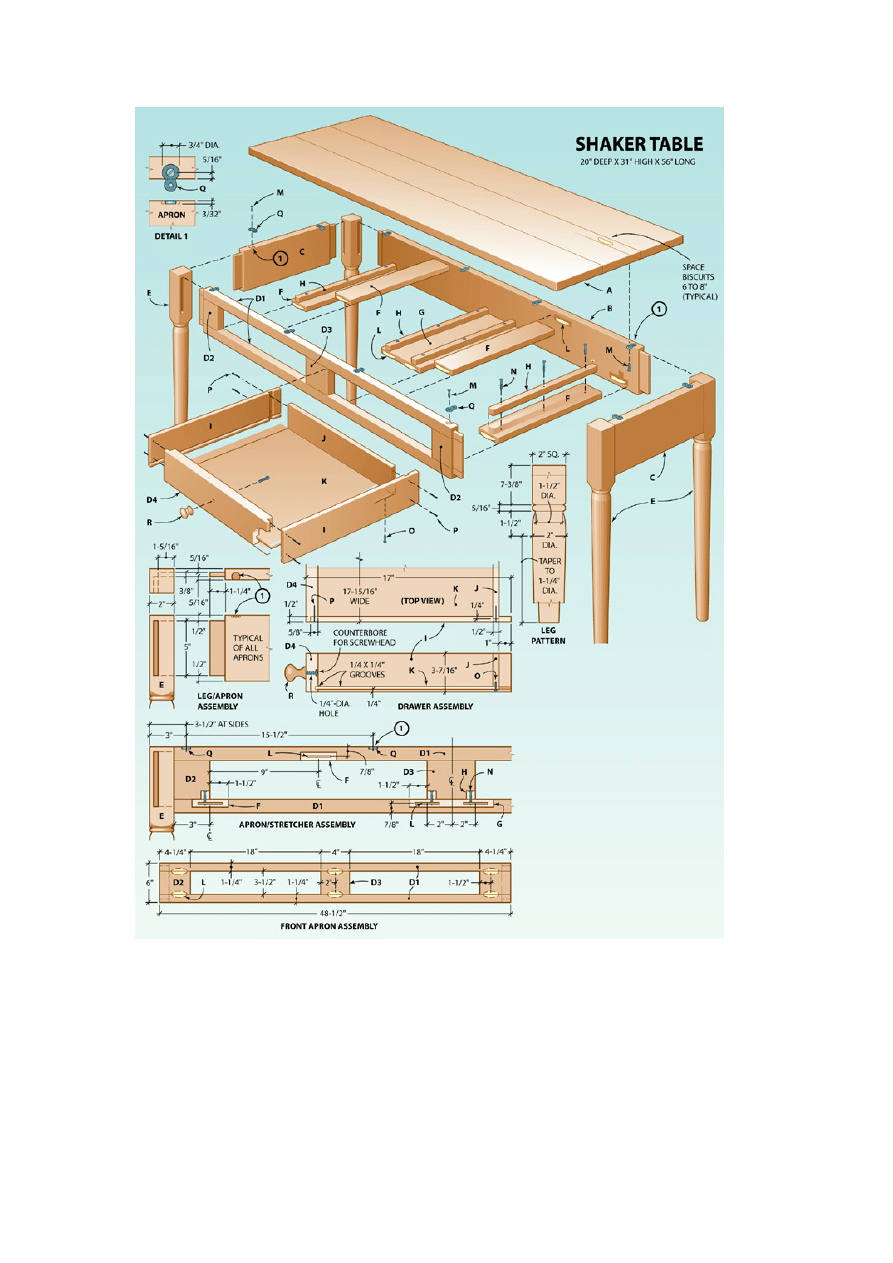
MATERIALS LIST--SHAKER TABLE
Key
No.
Size and description (use)
A
1
1 x 20 x 56" maple (top)
B
1
1 x 6 x 48-1/2" maple (apron)
C
2
1 x 6 x 16-1/2" maple (apron)
D1
2
1 x 1-1/4 x 48-1/2" maple (apron)
D2
2
1 x 3-1/2 x 4-1/4" maple (apron)
D3
1
1 x 3-1/2 x 4" maple (apron)
D4
2
1 x 3-7/16 x 17-15/16" maple (drawer face)
E
4
2 x 2 x 30" maple (leg)
F
4
3/4 x 3 x 16" maple (stretcher)
G
1
3/4 x 7 x 16" maple (stretcher)
H
4
3/4 x 3/4 x 16" maple (guide)
I
4
1/2 x 3-7/16 x 16-5/8" maple (drawer side)
J
2
1/2 x 2-5/16 x 17-7/16" maple (drawer back)
K
2
1/4 x 15-5/8 x 17-7/16" birch plywood (drawer
bottom)
L
as reqd. No. 20 plate
M
24
3/4" No. 8 fh woodscrew
N
12
1-1/4" No. 8 fh woodscrew
O
4
3/4" No. 6 rh woodscrew
P
as reqd. 4d finishing nail
Q*
12
tabletop fasteners
R*
2
1-1/2"-dia. drawer knobs
*Knobs No. 23119 and tabletop fasteners No. 21650 available
from Rockler Woodworking and Hardware, 4365 Willow Dr.,
Medina, MN 55340; 800-233-9359; www.rockler.com.
Misc.: Sandpaper, wood glue, finish.
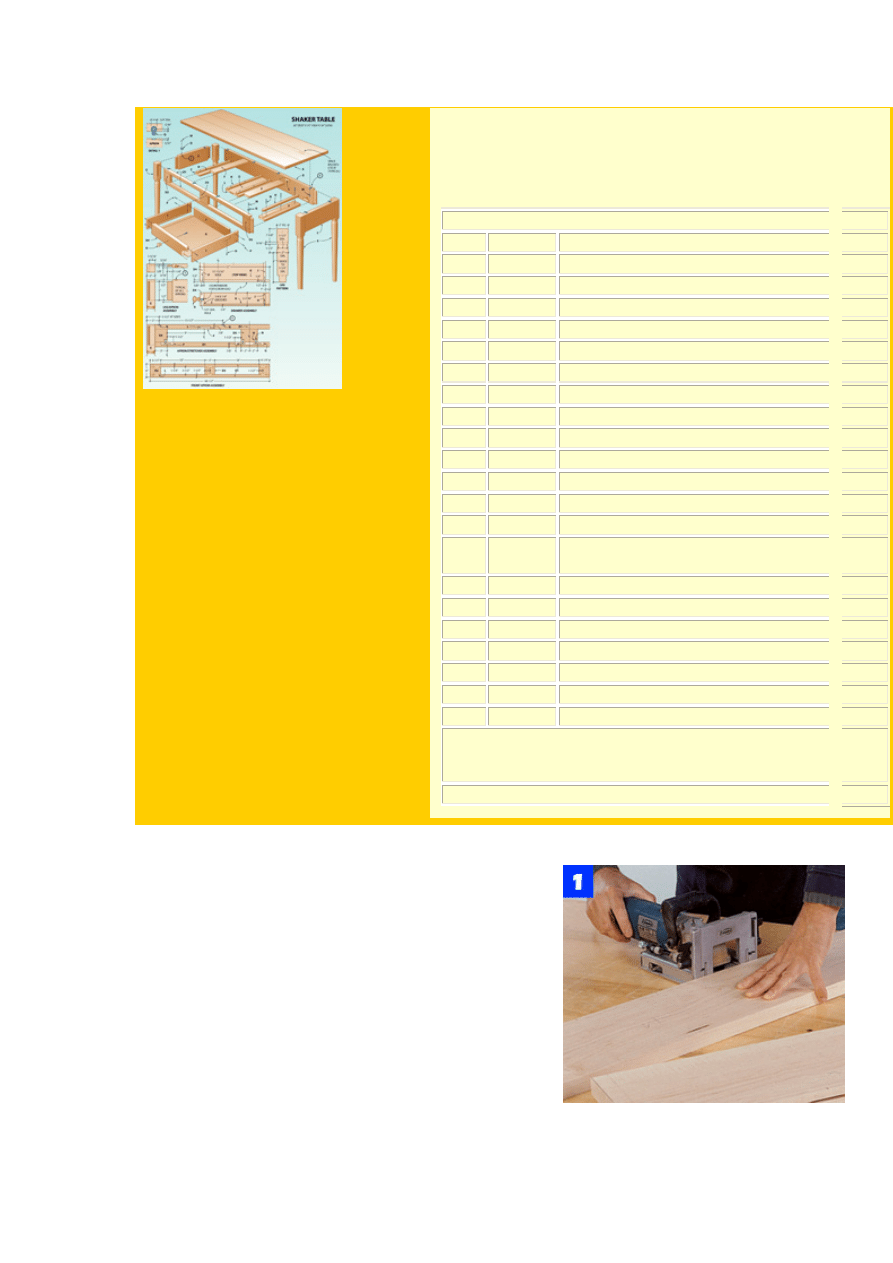
Making The Top
Begin construction with the top. Rip and crosscut
three pieces of stock, and select each piece for
matching grain to give the top a uniform
appearance. Use a plane or jointer to make the
stock edges straight and square. This will ensure
good glue joints. Mark the locations of joining
plate slots along the mating edges, 6 to 8 in. on
center. Use the plate joiner to cut the slots (Photo
1). Hold the joiner and workpiece tight to the top
of the workbench to ensure that the slots are
located properly in the stock edges.
Use a plate joiner to cut the plate slots in
each of the three boards that make up the
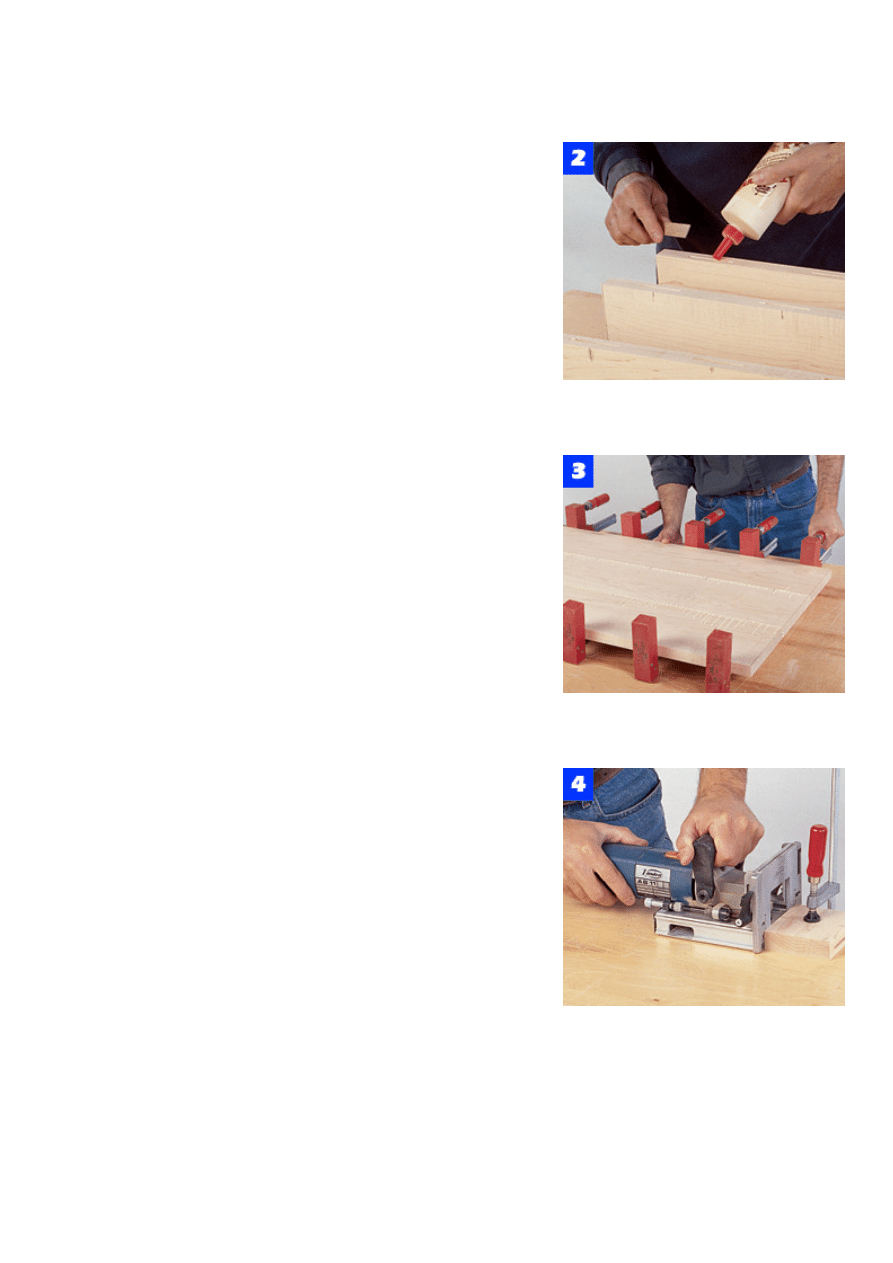
Spread glue in the plate slots and on the mating
joint edges, then apply glue to the joining plates
and place them in their slots (Photo 2). Assemble
the panel and use clamps every 4 to 6 in. to pull
the joints tight (Photo 3). After about 20 minutes,
scrape off any excess glue from the panel
surfaces. Then, let the glue set for at least 1 hour
before removing the clamps. Plane, scrape and
sand the top to level any uneven joints, then set it
aside while you work on the base.
Apron And Leg Construction
Rip and crosscut the stock for the side and rear
aprons. Since the front apron includes openings
for two drawers, the material that you cut for it
must be treated differently. In order to maintain a
continuous grain pattern across the apron, start
with a slightly oversize blank--7 in. wide x 50 in.
long--and rip it in three pieces. The first piece
should be 1-1/4 in. wide, the second 3-1/2 in.
wide and the last 1-1/4 in. wide. Mark these strips
so you can keep them in sequence for
reassembly. Crosscut the center strip to yield both
apron and drawer front pieces, again making the
cuts in sequence to keep the grain continuous.
Then, cut the top and bottom strips to finished
length.
Put the drawer faces aside for now, but mark
them for proper alignment in the apron. Mark the
remaining pieces for joining plate slots, then use
the plate joiner to cut the slots. When cutting the
joints in these small pieces, be sure to clamp the
workpiece to the table so your hands are far from
the cutting blade (Photo 4).
tabletop.
Spread glue in the plate slots, on the
plates themselves and on the edges of
the boards that make up the top.
Clamp the top together until the glue has
set. Use an old chisel to pare away
excess glue while it is rubbery.
Clamp small apron blocks to the
workbench in order to safely cut the
oining plate slots.
j
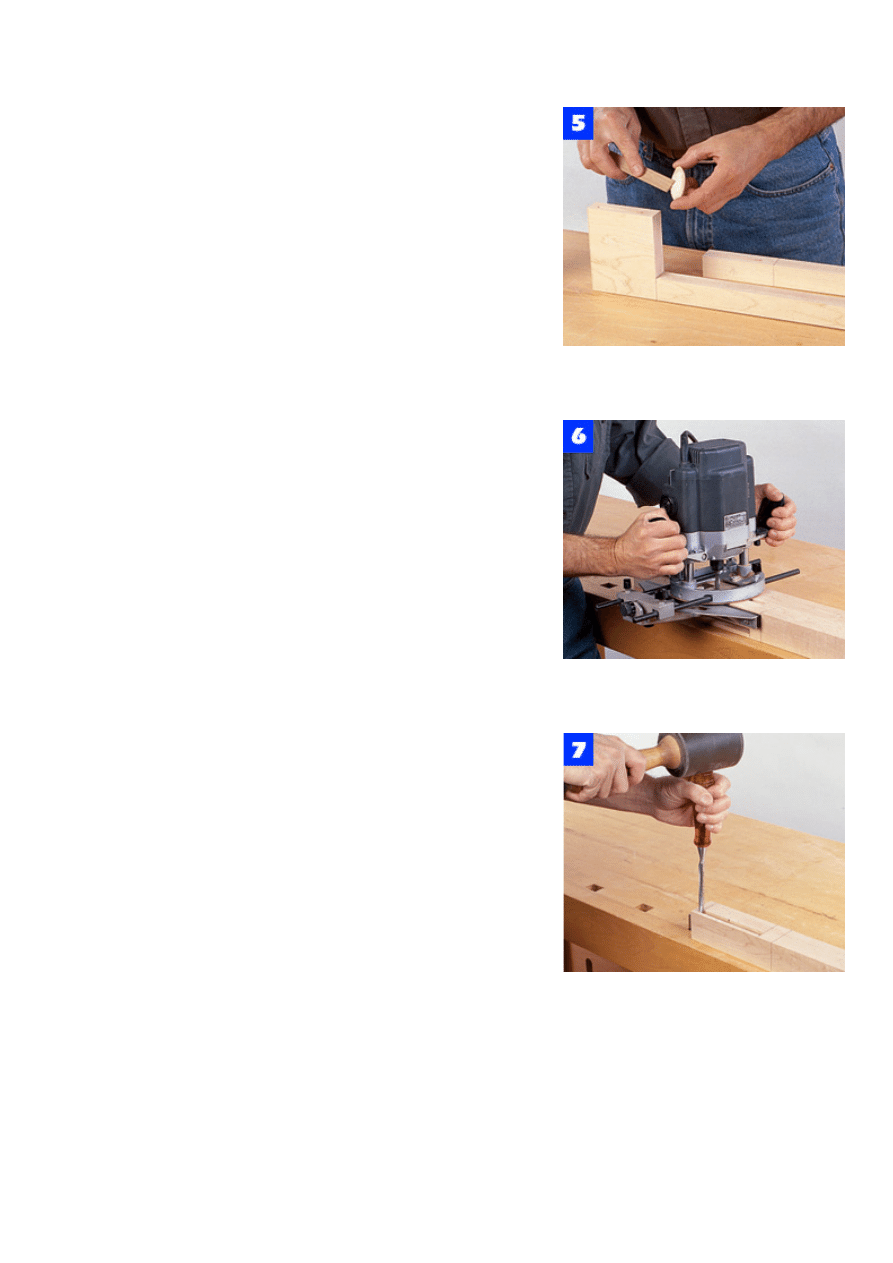
Spread glue on the joints and joining plates, and
assemble the front apron (Photo 5). Use clamps
to hold the joints tight while the glue sets.
Rip blanks for the table legs to 2 in. square, then
crosscut them to finished length. Clamp the legs
together with ends held flush and mark across the
legs to lay out the apron mortises.
Next, use a router with an edge guide and a spiral
up-cutting bit to cut the mortises (Photo 6). You
should make two or three passes with the router
for each mortise, to avoid overloading the motor
or breaking the bit. Chop the ends of the mortise
square using a sharp chisel (Photo 7).
Mount a leg blank between centers on the lathe,
then use a parting tool to divide the square, top
portion of the leg from the round, bottom section.
Next, use a gouge to turn the leg into a rough
cylinder. Use a skew chisel to form the bead
(Photo 8) and relieve the bottom corners of the
square section. Finish turning the leg by shaping
its tapered lower portion.
Install dado blades in the table saw to cut tenons
on the aprons. Use the rip fence as a stop to
ensure that all tenons are the same length. First
cut the tenon cheeks, then readjust the blade
height and hold the aprons on edge to cut the
shoulders at the top and bottom of each tenon
(Photo 9).
Rip and crosscut 3/4-in.-thick stock to finished
dimension for the drawer stretchers. Then, mark
the locations of joining plate slots in the ends of
the stretchers and on the inside surfaces of the
front and rear aprons. Use the plate joiner to cut
the required slots.
Apply glue to all the pieces in the apron
assembly, including joining plate slots and
the plates themselves.
Clamp two legs together to provide
additional support for the plunge router,
and cut the apron mortises.
With a leg clamped firmly to the bench,
chop the ends of the apron mortise
square using a chisel.
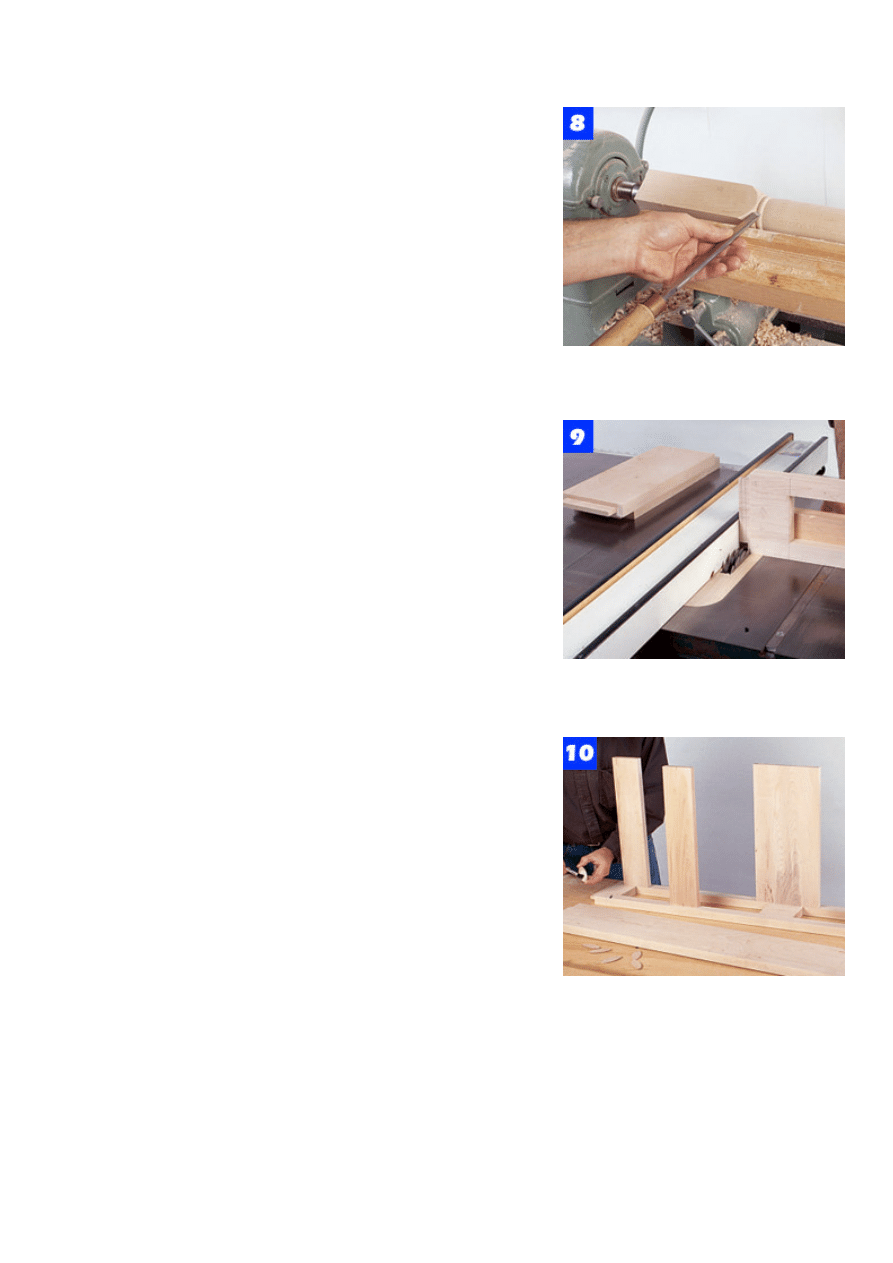
Shape the leg taper with a gouge, and
then cut the bead at the leg top with a
parting tool and a skew chisel.
Cut the apron tenons using a dado blade
in the table saw. Stand the apron on edge
o cut the tenon to width.
t
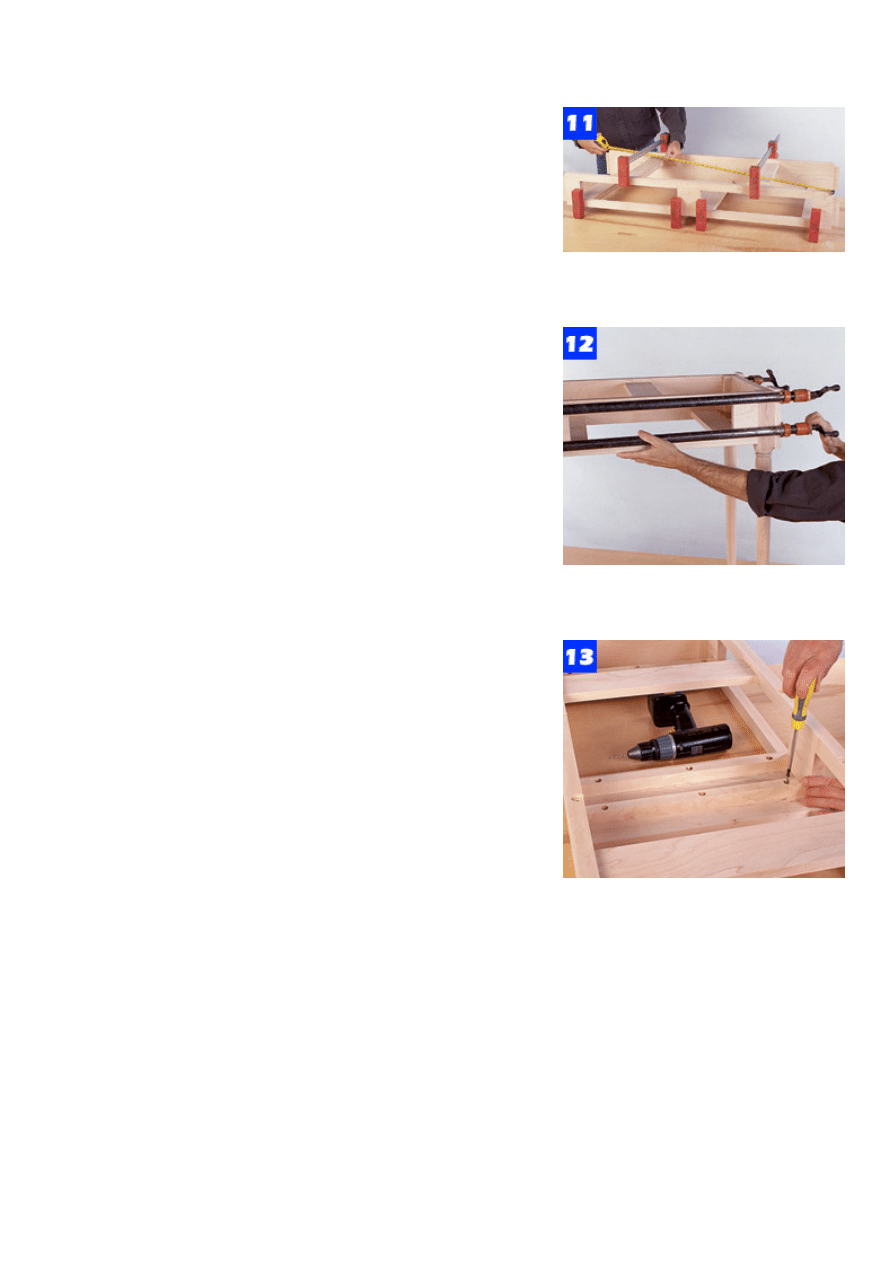
Assemble the stretchers and front apron with glue
and joining plates (Photo 10). Next, join the rear
apron to the assembly with glue and joining
plates. Now clamp the assembly together and
compare opposite diagonal measurements to be
sure that it is square (Photo 11). Let the glue set
for at least 1 hour before removing the clamps.
Next, join the side aprons to the legs. A small
brush is perfect for spreading glue on the mortise
walls and on the tenons. Clamp the joints to pull
them tight, then let the glue set.
Join the side assemblies to the front and rear
aprons (Photo 12). Be sure to perform this final
assembly on a flat tabletop to ensure that the legs
all sit evenly on the surface.
Mark the locations of the tabletop fasteners (see
Materials List) on the aprons, then use a 3/4-in.-
Place the front apron facedown, then use
joining plates and glue to attach the top
and bottom stretchers to it.
dia. multispur bit to bore the recess for each
fastener. Test the fit of a fastener in each recess,
then drill pilot holes for the screws and install
them.
Place the tabletop upside down on a work
surface, then invert the base over it. Adjust the
position of the base, then mark the location of the
screwholes for each fastener. Remove the base
and drill pilot holes in the tabletop--but do not
attach the top until after the finish is applied.
Rip and crosscut the drawer-side guides, then drill
and countersink pilot holes for the screws. Install
the guides to the lower drawer stretchers (Photo
13). Note that the guides must be flush with the
drawer opening in the front apron and they must
also stay parallel along their length.
With the stretchers in place, join the rear
apron to the assembly and clamp it
together until the glue has set.
Join the legs to the apron-stretcher
subassembly, then provide pressure with
long pipe clamps.
Bore three pilot holes in each drawer
guide and attach it to the stretcher below.
Drawers And Finishing
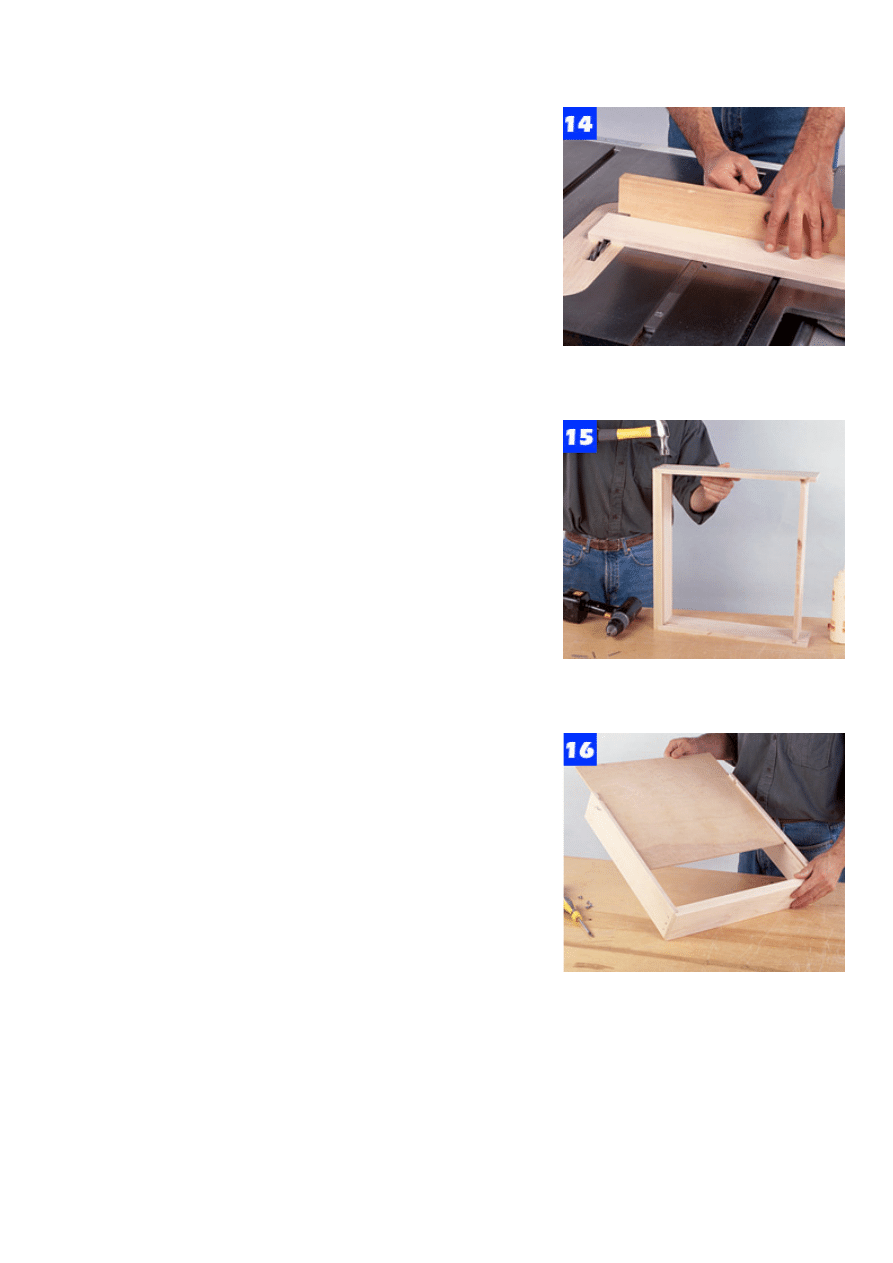
Rip and crosscut 1/2-in.-thick stock to size for the
drawer sides and backs. Also cut the drawer
faces to specified dimension. Install dado blades
in the table saw, then use them to cut the rabbets
at the ends of the drawer faces and to cut the
dadoes in the drawer sides (Photo 14). Re-adjust
the dado blades to cut the grooves for the drawer
bottoms in the drawer sides and faces.
Assemble the drawer boxes using glue and 4d
finishing nails (Photo 15). Drill pilot holes in the
drawer sides to reduce the risk of bending the
nails or splitting the sides or the front. Set the
nailheads and fill the holes with matching filler.
Cut the drawer bottoms from 1/4-in. plywood, then
slide them into place (Photo 16). Fasten each
panel by screwing it to the bottom edge of the
drawer back. Bore and counterbore pilot holes for
the knob screws, then temporarily mount the
knobs.
Test the fit of the drawers in their openings. The
fit should be snug, but the drawers should slide
smoothly. If a drawer is too tight, carefully sand
the sides to adjust it.
Remove the drawer knobs and leave the tabletop
off for finishing. Begin the finishing process by
sanding all table surfaces with 120-grit
sandpaper, followed by 150-, 180- and 220-grit
sandpaper. Use a tack cloth to remove sanding
dust from surfaces when switching to the next
finer grit.
We stained our table with a water-soluble aniline
dye (W1460--Pilgrim Maple from Woodworker's
Supply, 1108 N. Glenn Rd., Casper, WY 82601;
800-645-9292). Since water-soluble dyes tend to
raise the grain of the wood, you should prepare
the table by first wiping all surfaces with a damp
rag or sponge. Use warm, clean water to dampen
the surface, then let it dry thoroughly. You will
notice that the wood feels quite rough as tiny
fibers stand up. Take a piece of 220-grit
sandpaper and lightly wipe the wood surfaces to
remove the raised grain. Do not be too aggressive
with this process. You are supposed to remove
only the raised grain.
Install a dado blade in the table saw and
cut the rabbets, dadoes and grooves in
the drawer parts.
Bore pilot holes through the drawer sides,
then use glue and nails to assemble the
drawer box.
Cut the plywood drawer bottom to size,
then slide it into its groove. Screw the
bottom to the drawer back.

Apply the stain following the manufacturer's
directions, and allow it to dry overnight before
proceeding.
We finished our table with Waterlox Original
Sealer/Finish (Waterlox Coatings Corp., 9808
Meech Ave., Cleveland, OH 44105). Apply the
first coat liberally and let it soak into the wood.
After overnight drying, lightly sand the surface
with 320-grit paper and remove the dust. Apply
the next coat of finish and wipe off the excess,
leaving only a damp surface. After overnight
drying, repeat the process. When the last coat is
dry, you can burnish the surface with 4/0 steel
wool. For additional protection and to add a bit
more gloss to the finish, you can apply a light coat
of paste wax.
Install the tabletop on the base and reinstall the
drawer knobs. Apply a bit of wax to the outside of
the drawer sides and also to the stretchers and
guides, then install the drawers.
Wyszukiwarka
Podobne podstrony:
Console Table
Table Shaker pedestal table
Table European Telephone Console
Shaker Single Drop leaf Table
oak dining table
Coffee Table 1
table style2, ♥Dokumenty
table cellspacin5, ❀KODY RAMEK I INNE, Ramki
table border (2)
Foresight Resolution Table
Chess Table
multiplication table
Effic Table (Table 4(V18)
Drill Press Table
table styl4, MOJE RAMKI, RAMKI 2
table cellspacin9, MOJE RAMKI, RAMKI 2
więcej podobnych podstron