2707N–01
–
REAR SUSPENSION
REAR SUSPENSION SYSTEM
27–1
1252
Author:
Date:
2004 COROLLA (RM1037U)
REAR SUSPENSION SYSTEM
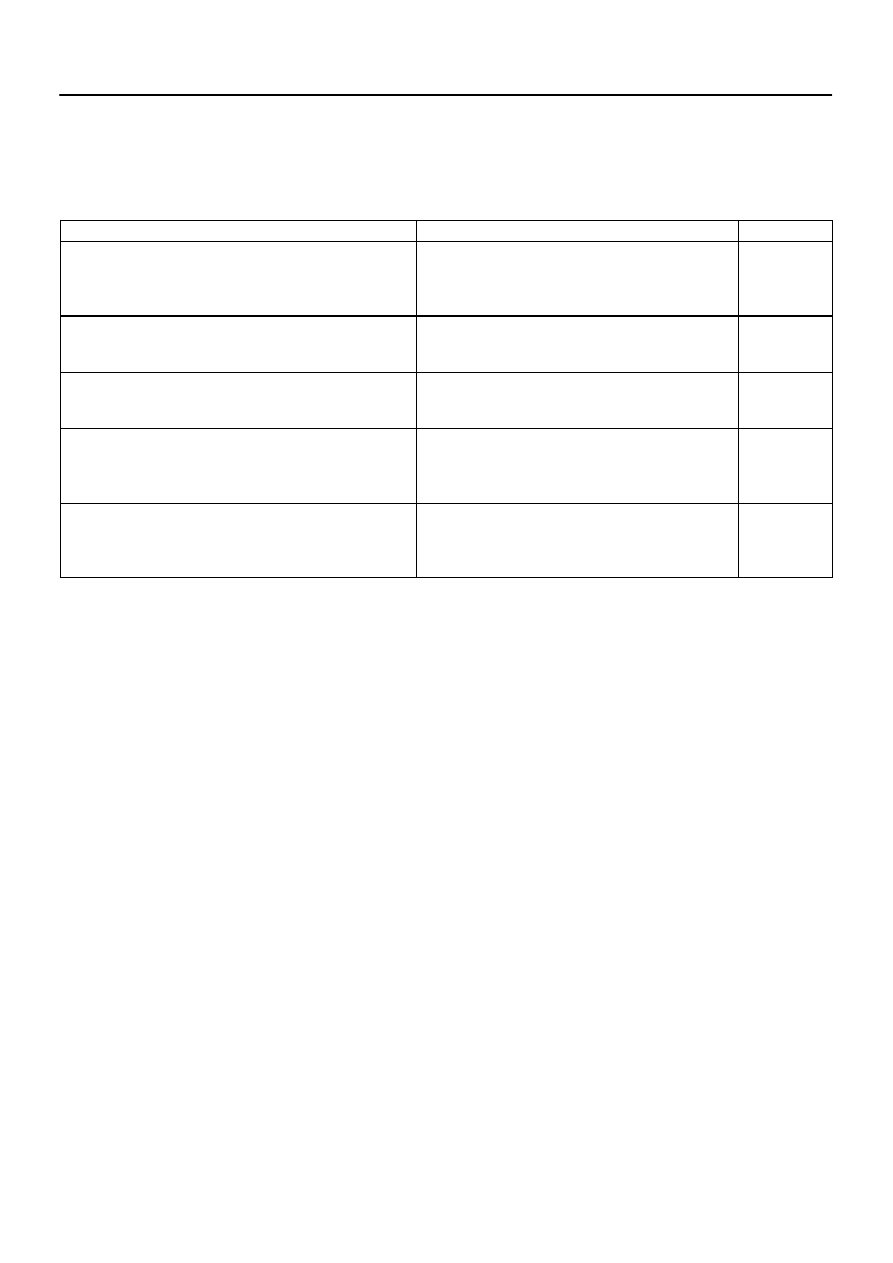
PROBLEM SYMPTOMS TABLE
Use the table below to help you find the cause of the problem. The numbers indicate the priority of
the likely cause of the problem. Check each part in order. If necessary, replace these parts.
Symptom
Suspect Area
See page
Wander/pulls
1. Tire (Worn or improperly inflated)
2. Wheel alignment (Incorrect)
3. Hub bearing (Worn)
4. Suspension parts (Worn)
28–1
27–3
30–24
–
Bottoming
1. Vehicle (Overloaded)
2. Spring (Weak)
3. Shock absorber (Worn)
–
27–4
27–4
Sways/pitches
1. Tire (Worn or improperly inflated)
2. Stabilizer bar (Bent or broken)
3. Shock absorber (Worn)
28–1
27–13
27–4
Rear wheel shimmy
1. Tire (Worn or improperly inflated)
2. Wheel (Out of balance)
3. Shock absorber (Worn)
4. Wheel alignment (Incorrect)
28–1
28–1
27–4
27–3
Abnormal tire wear
1. Tire (Worn or improperly inflated)
2. Wheel alignment (Incorrect)
3. Shock absorber (Worn)
4. Suspension parts (Worn)
28–1
27–3
27–4
–
2707O–01
C95124
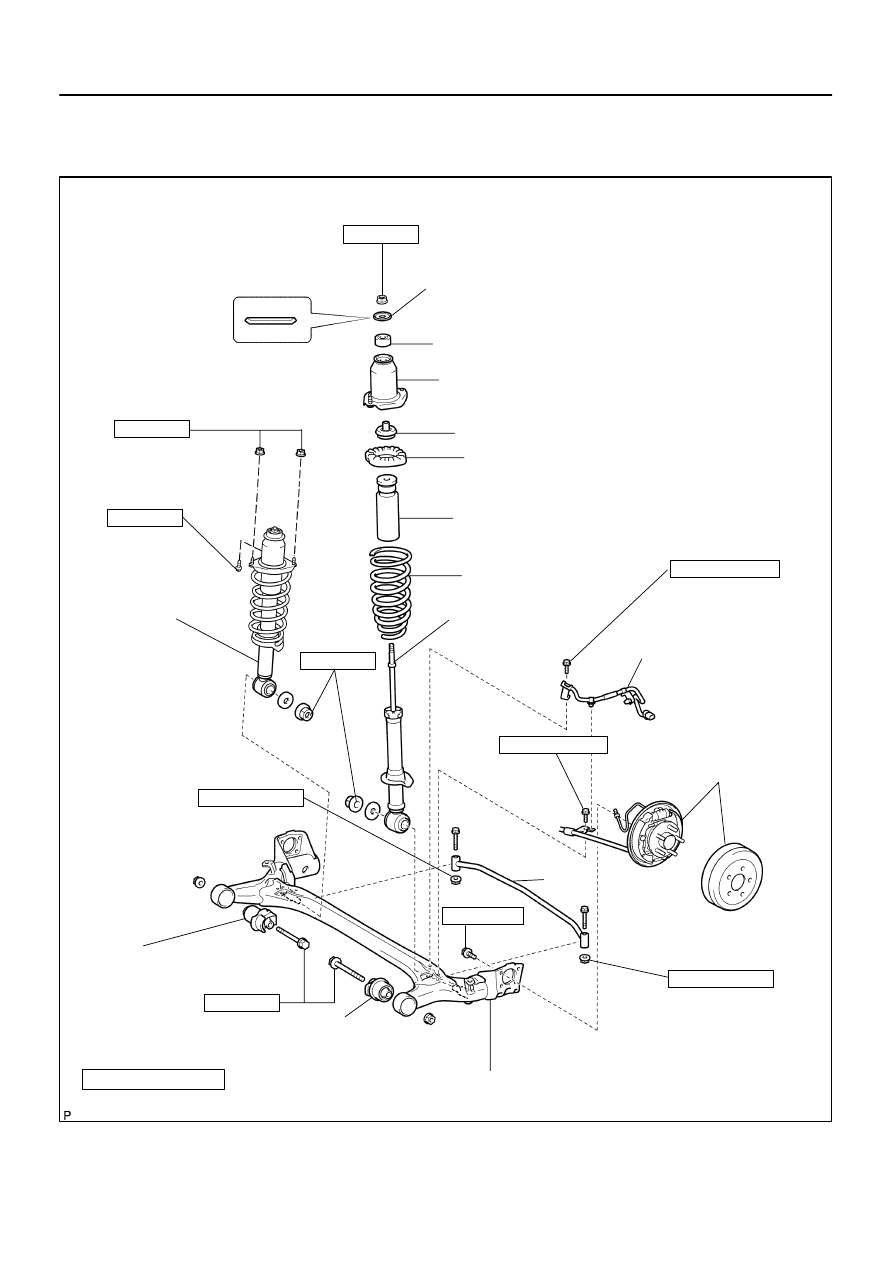
Suspension Support
Suspension Plate
Cushion
Spring Bracket
Upper Insulator
Spring Bumper
Coil Spring
Rear Shock Absorber
Assy Rear LH
Speed Sensor Wire
Rear Brake
Drum Sub–Assy
Stabilize Bar Rear
Rear Axle Beam Assy
Rear Axle Carrier
Bush LH
Rear Shock Absober
w/Coil Spring
N
⋅
m (kgf
⋅
cm, ft
⋅
lbf)
: Specified torque
Rear Axle Carrier
Bush LH
80 (816, 59)
80 (816, 59)
56 (571, 41)
5.0 (51, 44 in.
⋅
lbf)
5.4 (55, 48 in.
⋅
lbf)
195 (1,990, 144)
85 (867, 62)
80 (816, 59)
195 (1,990, 144)
Non–reusable part
X4
61 (622, 45)
27–2
–
REAR SUSPENSION
REAR SUSPENSION
1253
Author:
Date:
2004 COROLLA (RM1037U)
REAR SUSPENSION
COMPONENTS
2707P–01
SA3213
A
D
B
Front
C
–
REAR SUSPENSION
REAR WHEEL ALIGNMENT
27–3
1254
Author:
Date:
2004 COROLLA (RM1037U)
REAR WHEEL ALIGNMENT
INSPECTION
1.
INSPECT TIRE(See page
28–1
)
2.
MEASURE VEHICLE HEIGHT(See page
26–5
)
NOTICE:
Before inspecting the wheel alignment, adjust the vehicle height to the specified value.
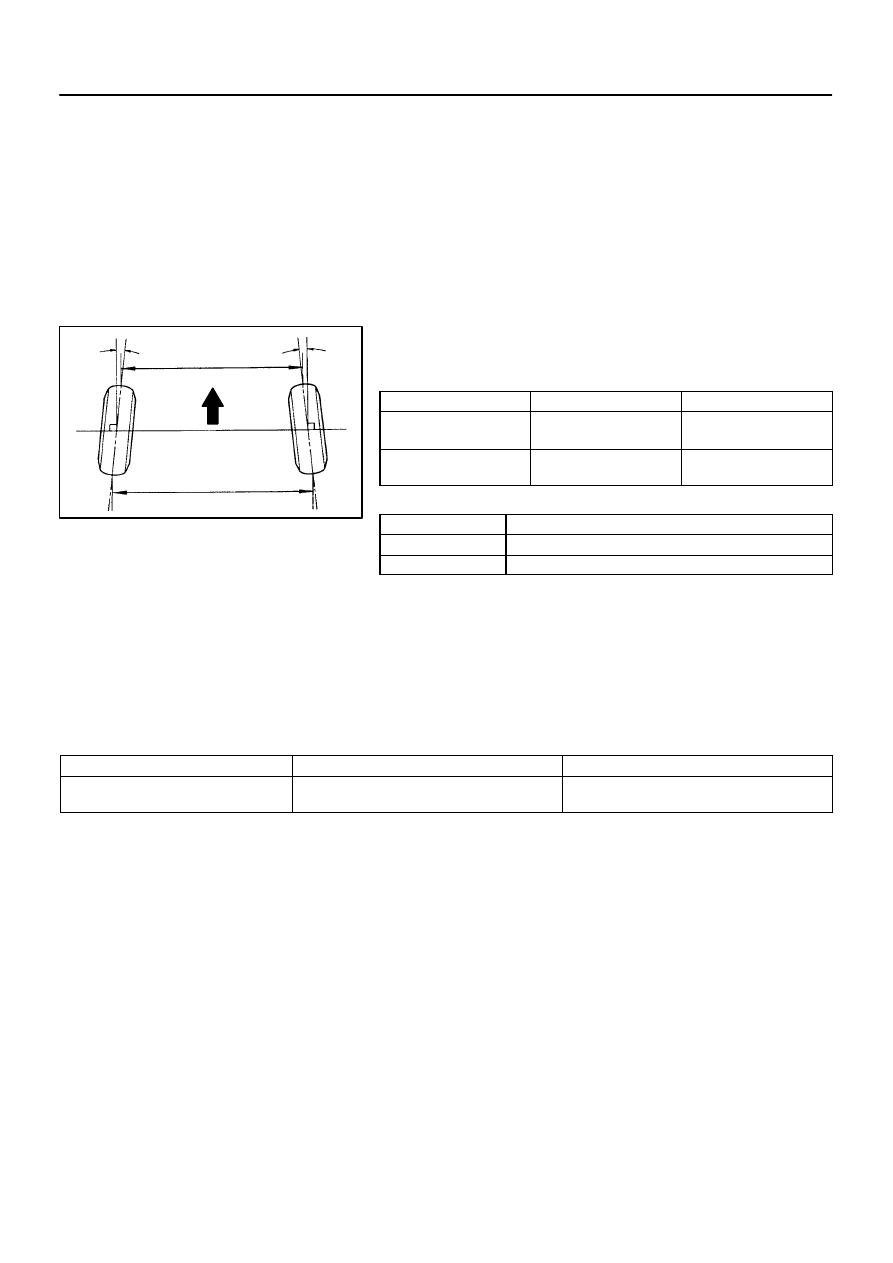
3.
INSPECT TOE–IN
Toe–in:
USA, Canada:
P195/65R15 89S
P185/65R15 86S
A + B
0
°
16’
±
16’
(0.26
°
±
0.26
°
)
0
°
16’
±
16’
(0.26
°
±
0.26
°
)
C – D
2.6
±
2.5 mm
(0.10
±
0.10 in.)
2.5
±
2.5 mm
(0.10
±
0.10 in.)
Mexico:
P195/65R15 89H
A + B
0
°
01’
±
16’ (0.16
°
±
0.26
°
)
C – D
1.6
±
2.5 mm (0.06
±
0.10 in.)
If the toe–in is not within the specified value, inspect and re-
place the suspension parts as necessary.
4.
INSPECT CAMBER
(a)
Install the camber–caster–kingpin gauge or position vehicle on wheel alignment tester.
(b)
Inspect the camber.
Camber:
USA, Canada
Mexico
Camber
Right–left error
–1
°27
’
±
30’ (–1.45
°
±
0.5
°
)
30’ (0.5
°
) or less
–1
°26
’
±
30’ (–1.43
°
±
0.5
°
)
30’ (0.5
°
) or less
If the measured value is not within the specified value, inspect the suspension parts for damage and/or wear
and replace them if necessary become camber is not adjustable.
2707R–01
F40125
Wood
Block
C80891
C67565
F40126
SST
27–4
–
REAR SUSPENSION
REAR SHOCK ABSORBER WITH COIL SPRING
1255
Author:
Date:
2004 COROLLA (RM1037U)
REAR SHOCK ABSORBER WITH COIL SPRING
OVERHAUL
HINT:
COMPONENTS: See page
27–2
1.
REMOVE REAR WHEEL
2.
REMOVE SPARE WHEEL COVER ASSY
3.
REMOVE REAR FLOOR FINISH PLATE(See page
76–21
)
4.
REMOVE LUGGAGE COMPARTMENT TRIM COVER INNER LH(See page
76–21
)
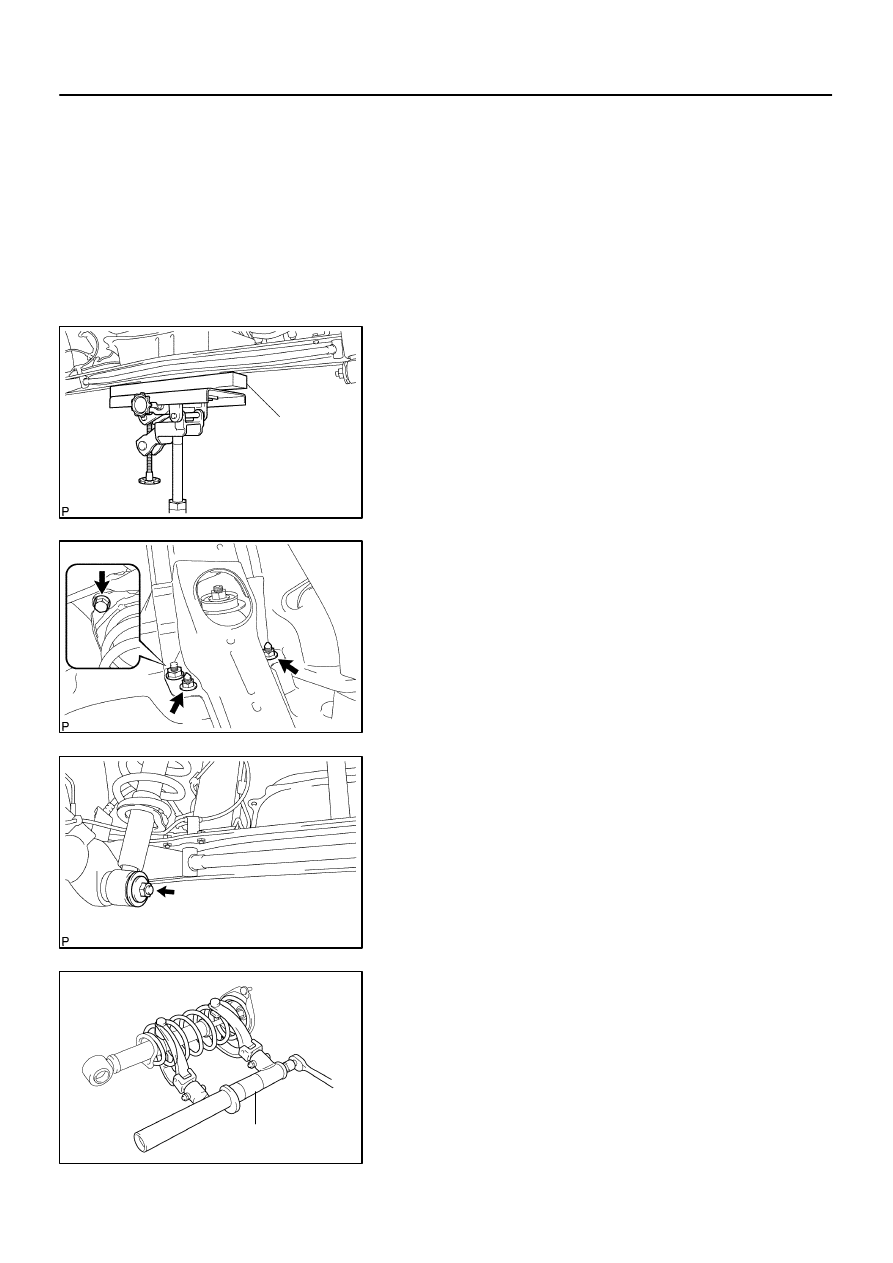
5.
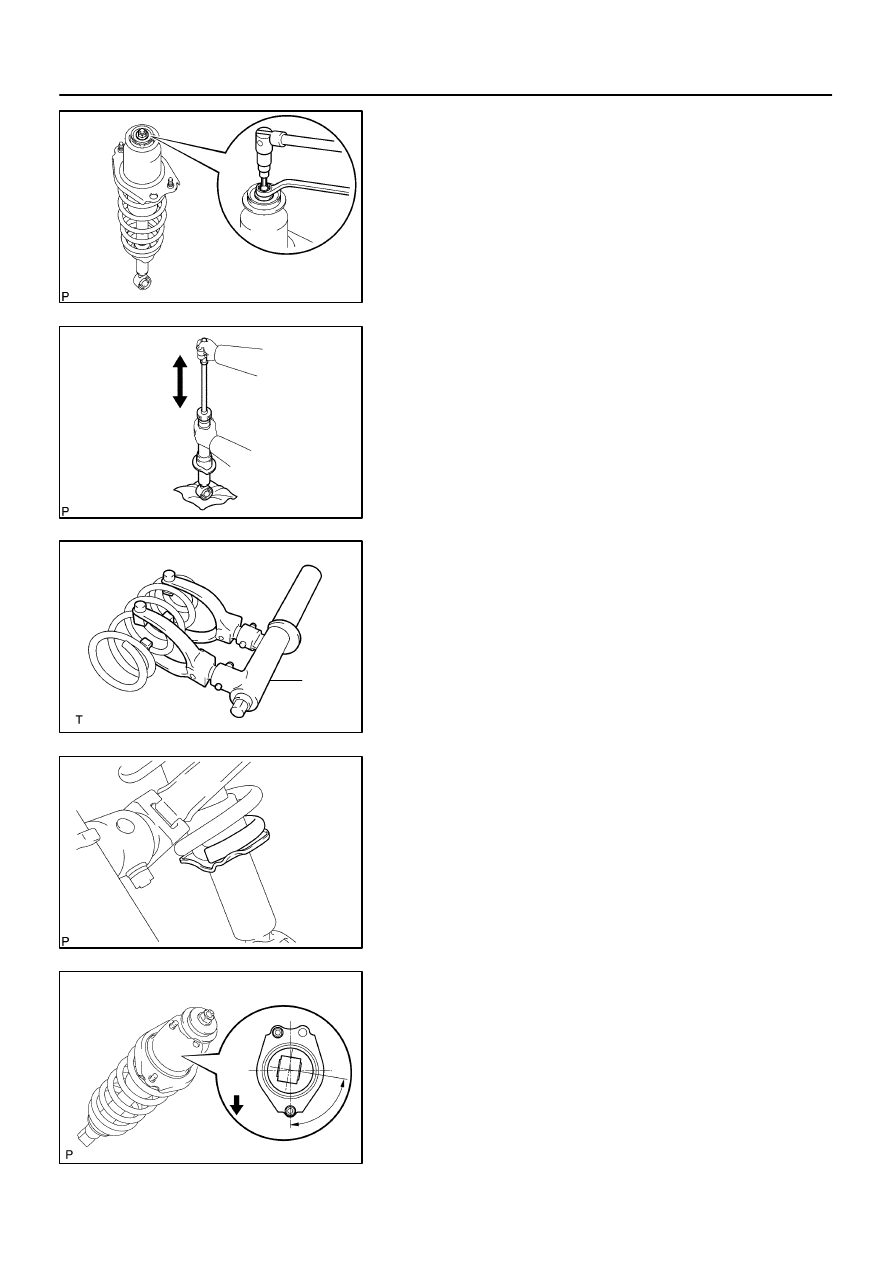
REMOVE REAR SHOCK ABSORBER WITH COIL
SPRING
(a)
Support the rear axle beam with jack.
(b)
Remove the 2 nuts and bolt.
(c)
Remove the nut, washer and shock absorber.
6.
REMOVE SHOCK ABSORBER ASSY REAR LH
(a)
Using SST, compress the coil spring.
SST
09727–30021
NOTICE:
Do not use an impact wrench. It will damage the SST.
F40127
C67568
F40128
SST
F40129
F40274
80.6
Front
–
REAR SUSPENSION
REAR SHOCK ABSORBER WITH COIL SPRING
27–5
1256
Author:
Date:
2004 COROLLA (RM1037U)
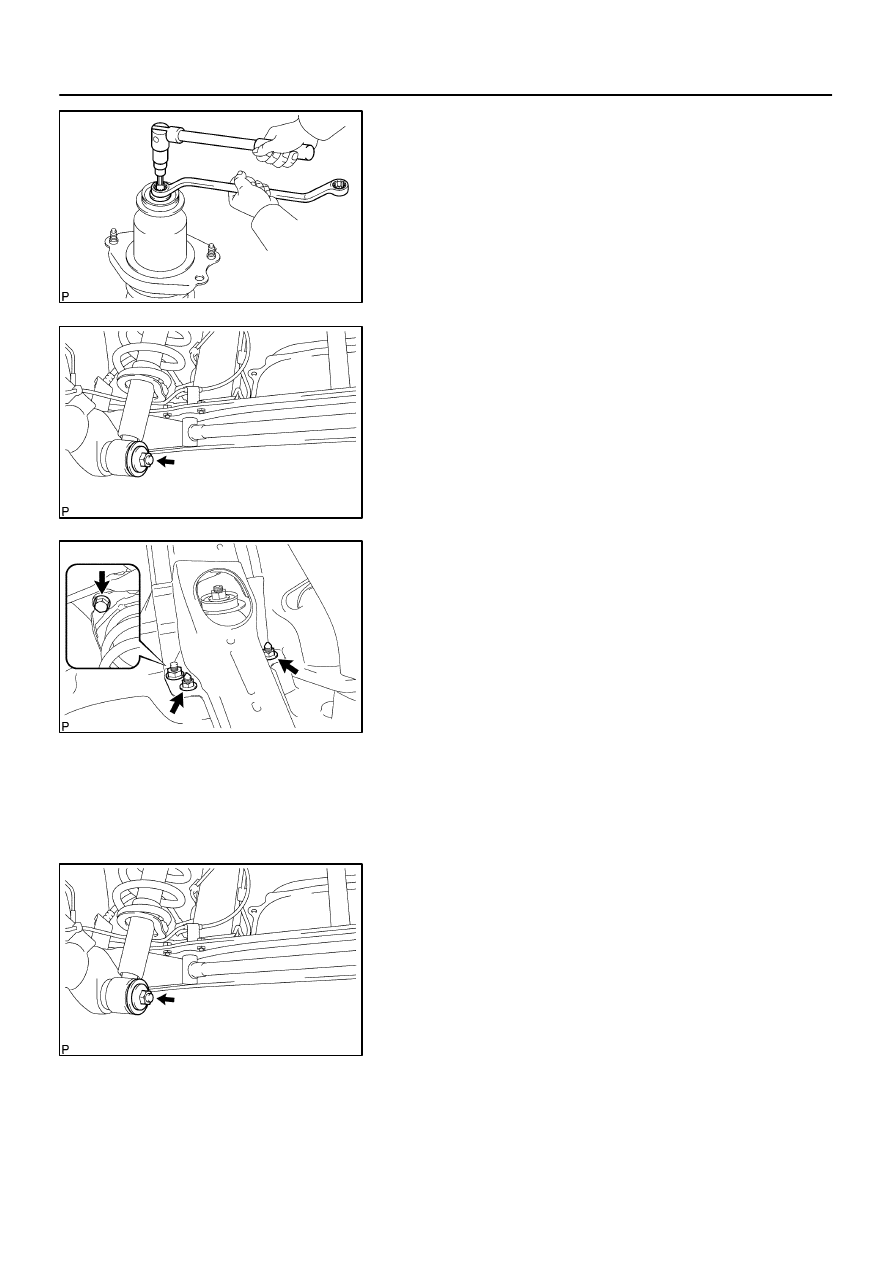
(b)
Using a 6 mm hexagon wrench to hold the piston rod, re-
move the nut.
(c)
Remove the support plate, cushion, spring bracket, upper
insulator, suspension support, spring bumper and coil
spring.
7.
INSPECT SHOCK ABSORBER ASSY REAR LH
(a)
Compress and extend the shock absorber rod and check
that there is no abnormal resistance or unusual sound
during operation.
If there is any abnormality, replace the shock absorber with a
new one.
NOTICE:
When disposing the shock absorber, see DISPOSAL on
page
27–7
.
8.
INSTALL SHOCK ABSORBER ASSY REAR LH
(a)
Using SST, compress the coil spring.
SST
09727–30021
NOTICE:
Do not use an impact wrench. It will damage the SST.
(b)
Insert the coil spring to the shock absorber.
HINT:
Fit the lower end of the coil spring into the gap of the spring low-
er seat.
(c)
Install the spring bumper and suspension support.
(d)
Set the upper insulator to the spring bracket.
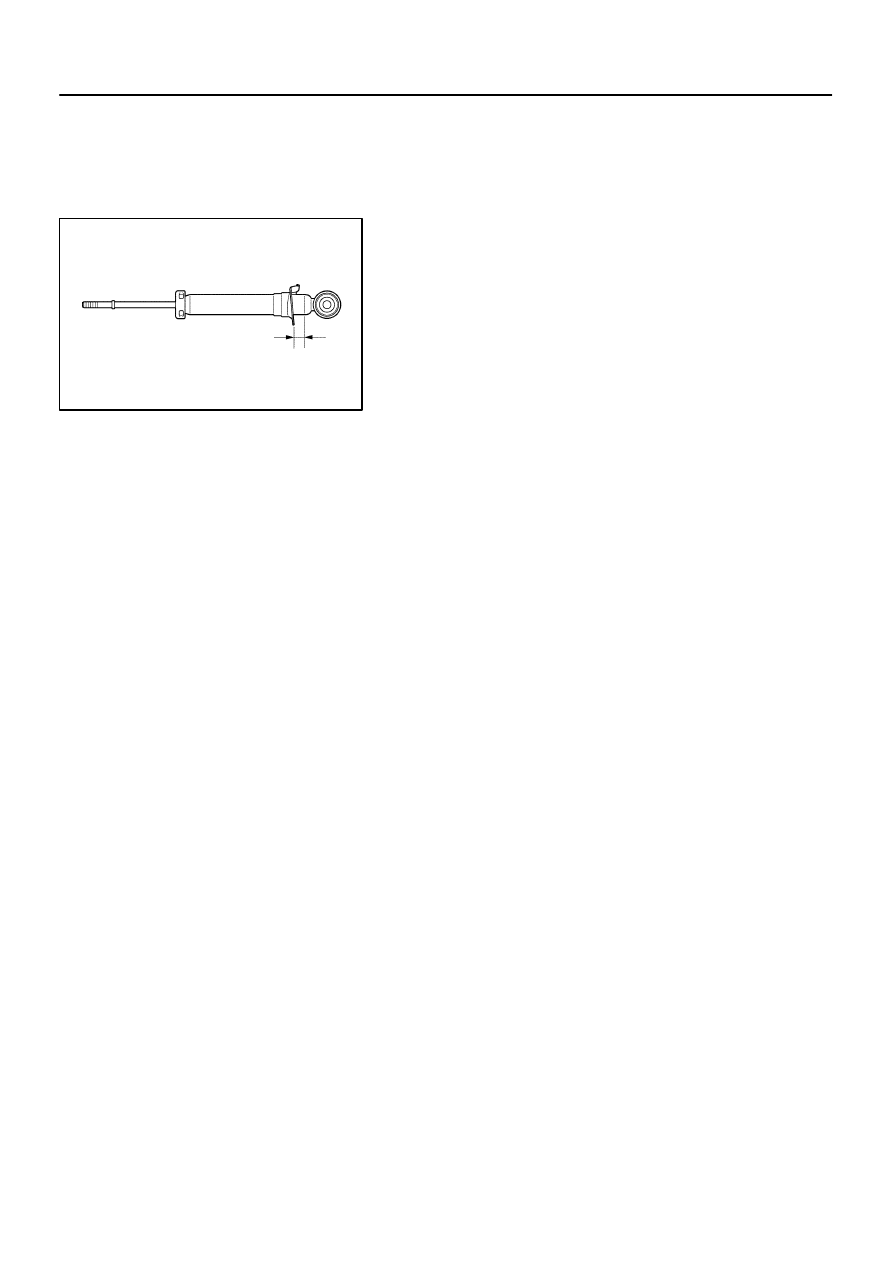
(e)
Position the spring bracket with upper insulator as shown
in the illustration.
HINT:
Place the RH side on the symmetric position to the illustration.
(f)
Install the cushion and support plate.
(g)
Temporarily tighten a new center nut.
(h)
Remove the SST.
SST
09727–30021
(i)
Recheck the direction of the spring bracket.
F40130
C67565
C80891
C67565
27–6
–
REAR SUSPENSION
REAR SHOCK ABSORBER WITH COIL SPRING
1257
Author:
Date:
2004 COROLLA (RM1037U)
(j)
Using a 6 mm hexagon wrench to hold the piston rod,
tighten a new nut.
Torque: 56 N·m (571 kgf·cm, 41 ft·lbf)
9.
INSTALL REAR SHOCK ABSORBER WITH COIL
SPRING
(a)
Install the shock absorber, temporary tighten the nut and
washer.
(b)
Install the 2 nuts and bolt.
Torque: 80 N
⋅
m (816 kgf
⋅
cm, 59 ft
⋅
lbf)
10.
STABILIZE SUSPENSION
(a)
Install the rear wheel and jack down the vehicle.
Torque: 103 N
⋅
m (1,050 kgf
⋅
cm, 76 ft
⋅
lbf)
(b)
Bounce the vehicle up and down several times to stabilize the suspension.
11.
FULLY TIGHTEN REAR SHOCK ABSORBER WITH
COIL SPRING
(a)
Fully tighten the nut.
Torque: 80 N
⋅
m (816 kgf
⋅
cm, 59 ft
⋅
lbf)
12.
INSPECT REAR WHEEL ALIGNMENT(See page
27–3
)
2707Q–01
F40131
–
REAR SUSPENSION
REAR SHOCK ABSORBER WITH COIL SPRING
27–7
1258
Author:
Date:
2004 COROLLA (RM1037U)
DISPOSAL
1.
DISPOSE SHOCK ABSORBER ASSY REAR LH
(a)
Fully extend the shock absorber rod.
(b)
Using a drill, make a hole in the cylinder as shown in the
illustration to discharge the gas inside.
CAUTION:
When drilling, chips may fly out, work carefully.
The gas is colorless, odorless and non–poisonous.

2707S–02
C68929
C66800
C67565
27–8
–
REAR SUSPENSION
REAR AXLE BEAM ASSY
1259
Author:
Date:
2004 COROLLA (RM1037U)
REAR AXLE BEAM ASSY
REPLACEMENT
HINT:
COMPONENTS: See page
27–2
1.
REMOVE REAR WHEEL
(a)
Remove the RH and LH rear wheels.
2.
REMOVE REAR BRAKE DRUM SUB–ASSY(See page
32–31
)
3.
SEPARATE SKID CONTROL SENSOR WIRE
(a)
Disconnect the skid control sensor connector.
(b)
Remove the 2 bolts and separate the wire harness
clamps.
(c)
Remove the bolt and separate parking brake cable
clamp.
(d)
Using the same manner desoribed above to the other
side.
4.
REMOVE STABILIZER BAR REAR(See page
27–13
)
5.
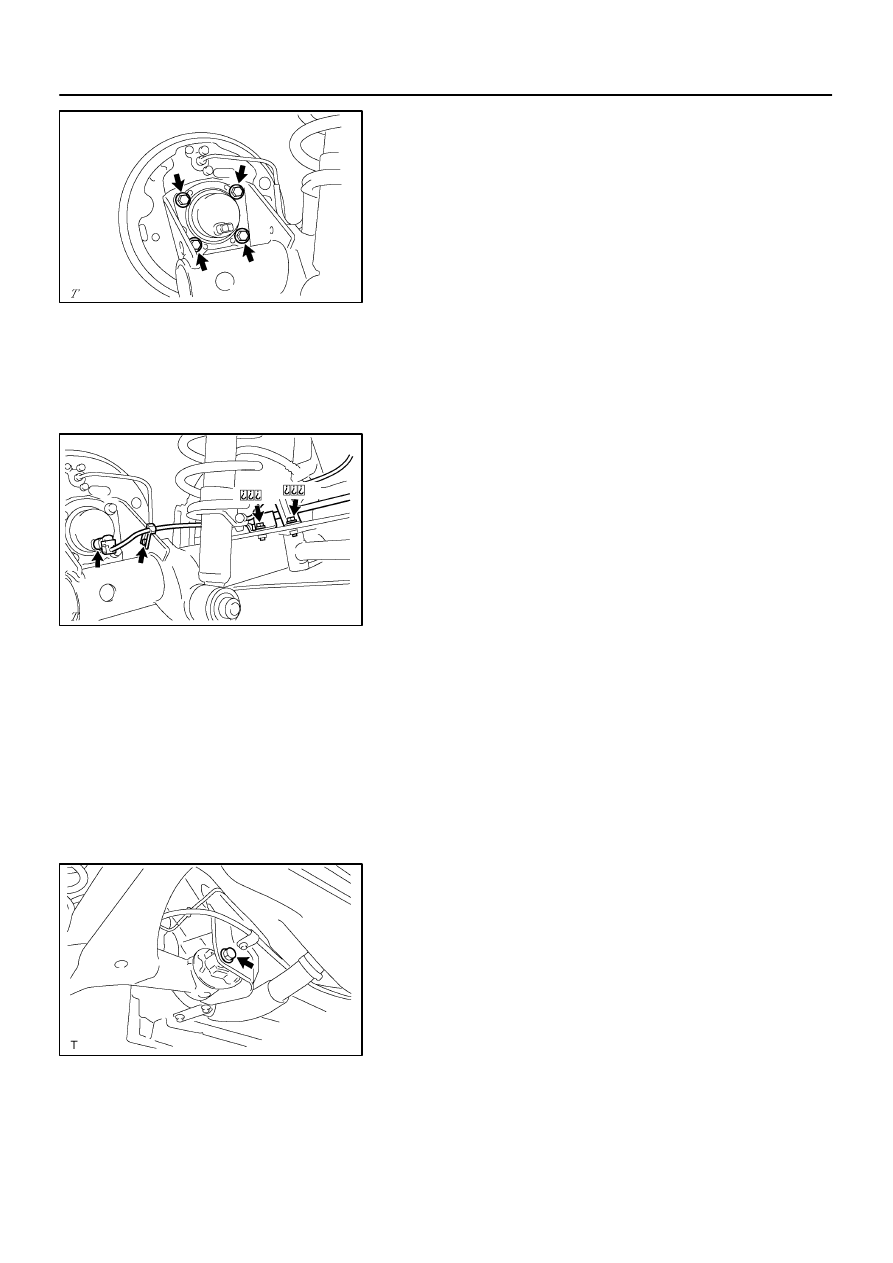
REMOVE REAR AXLE HUB & BEARING ASSY LH
(a)
Remove the 4 bolts and rear axle hub from the axle beam.
6.
REMOVE REAR AXLE HUB & BEARING ASSY RH
HINT:
Remove the RH side by the same procedures with the LH side.
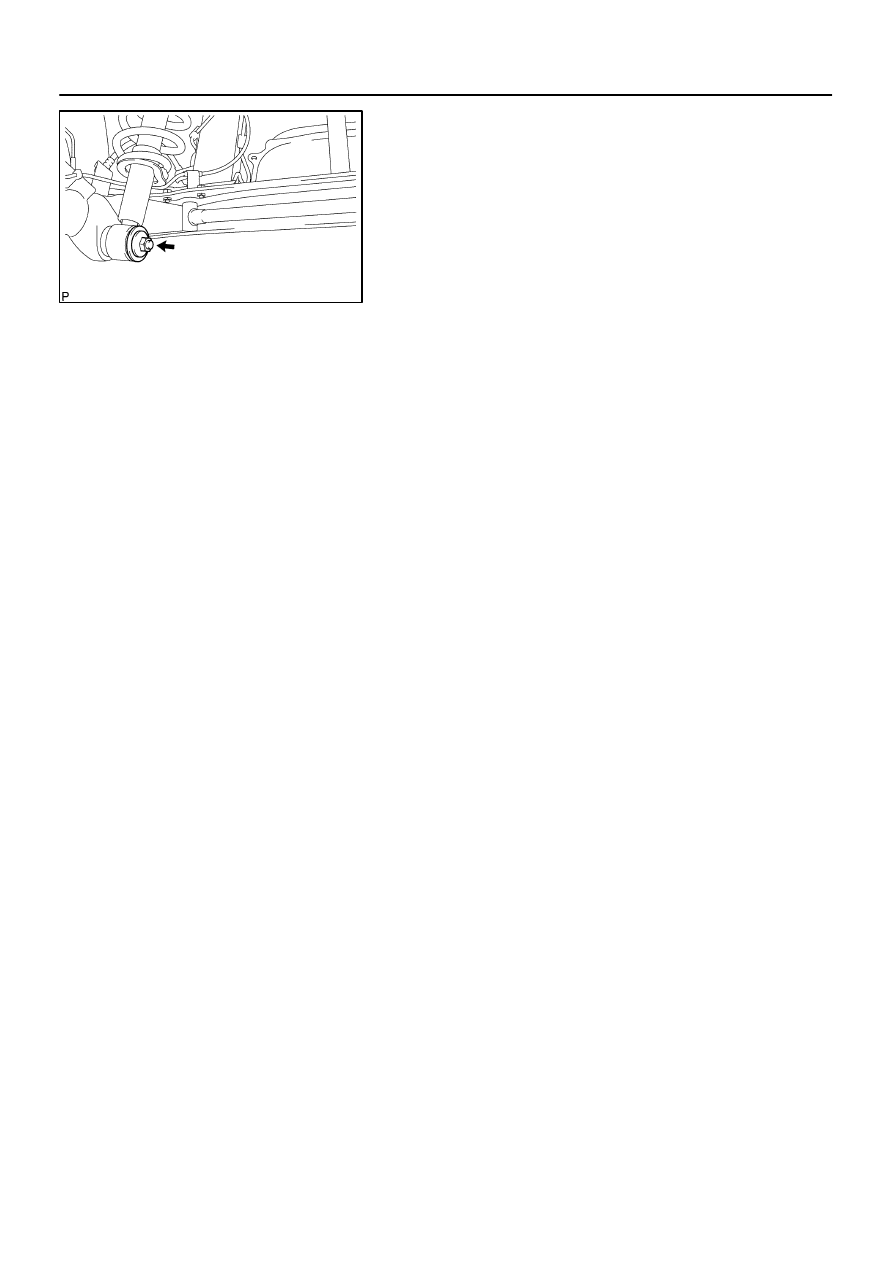
7.
SEPARATE REAR SHOCK ABSORBER WITH COIL
SPRING
(a)
Remove the nut, washer and separate the rear shock ab-
sorber w/coil spring (lower side) from the rear axle beam.
(b)
Using the same manner desoribed above to the other
side.
C66806
Wood
Block
C81494
F40275
SST
Matchmarks
Bend Portions
Notch
Notch
–
REAR SUSPENSION
REAR AXLE BEAM ASSY
27–9
1260
Author:
Date:
2004 COROLLA (RM1037U)
8.
REMOVE REAR AXLE BEAM ASSY
(a)
Support the rear axle beam with jack.
(b)
Remove the 2 bolts, nuts and rear axle beam.
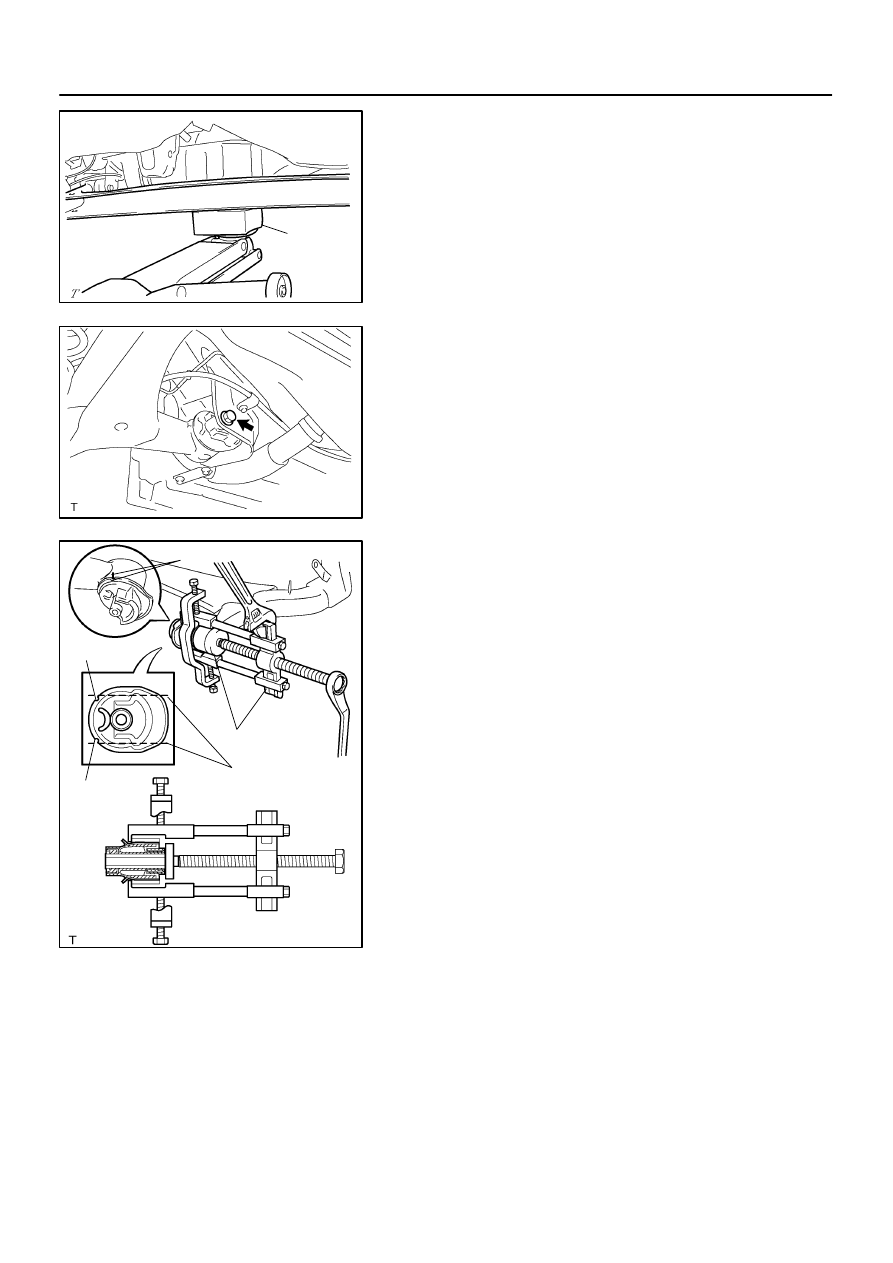
9.
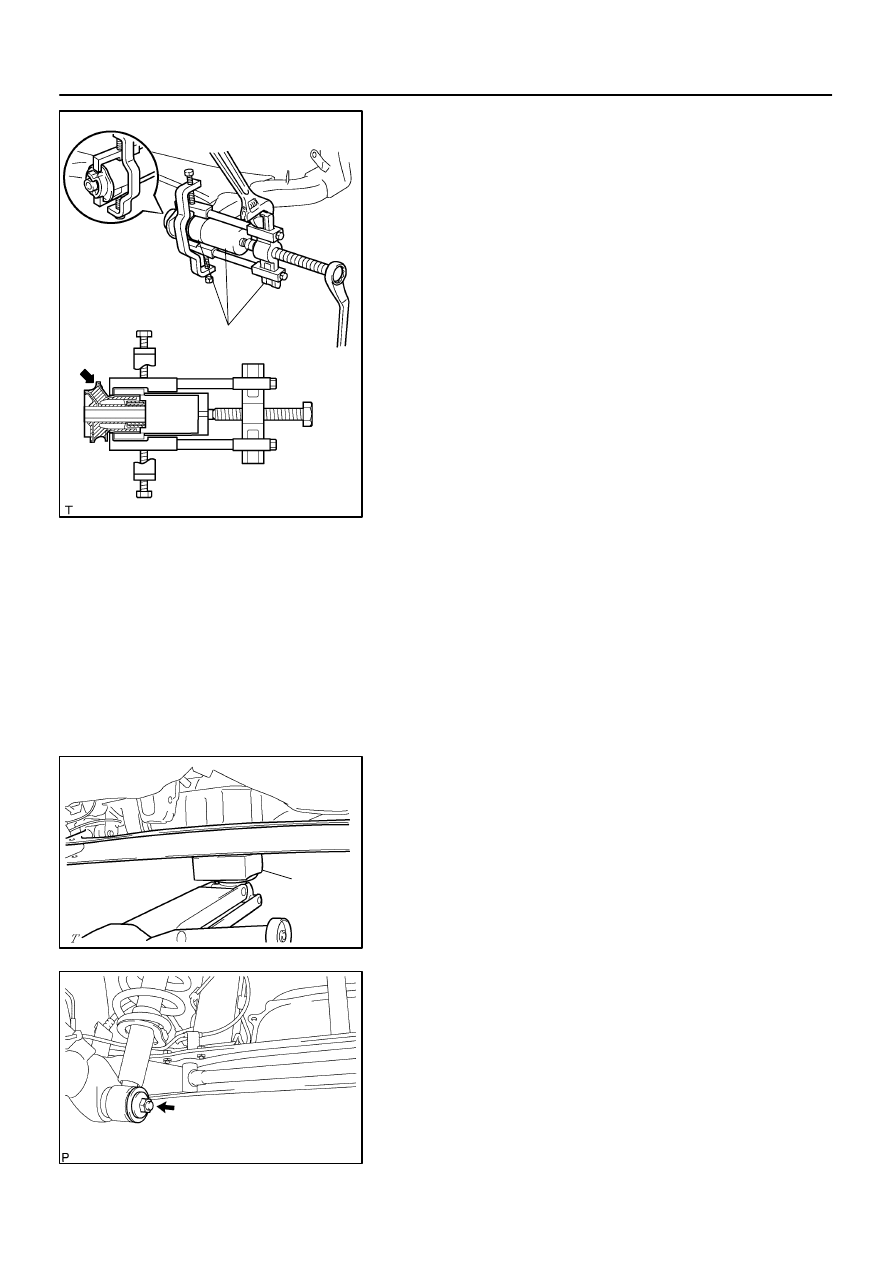
REMOVE REAR AXLE CARRIER BUSH LH
(a)
Place matchmarks on the 2 notches of the bushing and
axle beam.
(b)
Using a chisel and a hammer, bend the 2 portions of the
bushing rib.
HINT:
Bend the bushing rib until the claw of SST can be hung.
(c)
Using SST, remove the bushing from the axle beam.
SST
09950–40011 (09951–04020, 09952–04010,
09953–04030, 09954–04020, 09955–04051,
09957–04010, 09958–04011), 09950–60010
(09951–00630)
NOTICE:
If the axle beam has been scratched, apply the paint.
10.
REMOVE REAR AXLE CARRIER BUSH RH
HINT:
Remove the RH side by the same procedures with the LH side.
SST
09950–40011 (09951–04020, 09952–04010, 09953–04030, 09954–04020, 09955–04051,
09957–04010, 09958–04011), 09950–60010 (09951–00630)
F40276
SST
Rubber
Portion
C66806
Wood
Block
C67565
27–10
–
REAR SUSPENSION
REAR AXLE BEAM ASSY
1261
Author:
Date:
2004 COROLLA (RM1037U)
11.
INSTALL REAR AXLE CARRIER BUSH LH
(a)
Align the matchmarks on the axle beam with the 2
notches of a new bushing and temporarily install the
bushing to the axle beam.
(b)
Using SST, install the bushing to the axle beam.
SST
09950–40011 (09951–04020, 09952–04010,
09953–04030, 09954–04020, 09955–04051,
09957–04010, 09958–04011), 09950–60010
(09951–00620), 09710–04101
NOTICE:
Hang the claw of SST to the bushing deeply and firm-
ly.
Do not scratch the rubber portion of the bushing.
Do not deform the bushing rib.
12.
INSTALL REAR AXLE CARRIER BUSH RH
HINT:
Install the RH side by the same procedures with the LH side.
SST
09950–40011 (09951–04020, 09952–04010, 09953–04030, 09954–04020, 09955–04051,
09957–04010, 09958–04011), 09950–60010 (09951–00620), 09710–04101
13.
TEMPORARY TIGHTEN REAR AXLE BEAM ASSY
(a)
Support the rear axle beam with jack.
(b)
Install the rear axle beam, 2 bolts, and temporary tighten
the 2 nuts.
14.
TEMPORARY TIGHTEN REAR SHOCK ABSORBER
WITH COIL SPRING
(a)
Install the rear shock absorber, washer and temporary
tighten the nut.
(b)
Using the same manner described above to the other
side.
C66800
C95125
C81494
–
REAR SUSPENSION
REAR AXLE BEAM ASSY
27–11
1262
Author:
Date:
2004 COROLLA (RM1037U)
15.
INSTALL REAR AXLE HUB & BEARING ASSY LH
(a)
Install the rear axle hub with the 4 bolts.
Torque: 61 N
⋅
m (622 kgf
⋅
cm, 45 ft
⋅
lbf)
16.
INSTALL REAR AXLE HUB & BEARING ASSY RH
HINT:
Install the RH side by the same procedures with the LH side.
17.
INSTALL STABILIZER BAR REAR(See page
27–13
)
18.
INSTALL SKID CONTROL SENSOR WIRE
(a)
Install the wire harness and parking brake cable with the
2 bolts and clip.
Torque:
(A): 5.4 N
⋅
m (55 kgf
⋅
cm, 48 in.
⋅
lbf)
(B): 5.0 N
⋅
m (51 kgf
⋅
cm, 44 in.
⋅
lbf)
(b)
Connect the skid control sensor connector.
(c)
Using the same manner desoribed above to the other
side.
19.
INSTALL REAR BRAKE DRUM SUB–ASSY(See page
32–31
)
20.
STABILIZE SUSPENSION
(a)
Install the rear wheel and jack down the vehicle.
Torque: 103 N
⋅
m (1,050 kgf
⋅
cm, 76 ft
⋅
lbf)
(b)
Bounce the vehicle up and down several times to stabilize the suspension.
21.
FULLY TIGHTEN REAR AXLE BEAM ASSY
(a)
Fully tighten the bolt.
Torque: 85 N
⋅
m (867 kgf
⋅
cm, 62 ft
⋅
lbf)
(b)
Using the same manner described above to the other
side.
C67565
27–12
–
REAR SUSPENSION
REAR AXLE BEAM ASSY
1263
Author:
Date:
2004 COROLLA (RM1037U)
22.
FULLY TIGHTEN REAR SHOCK ABSORBER WITH
COIL SPRING
(a)
Fully tighten the nut.
Torque: 80 N
⋅
m (816 kgf
⋅
cm, 59 ft
⋅
lbf)
(b)
Using the same manner described above to the other
side.
23.
INSPECT REAR WHEEL ALIGNMENT(See page
27–3
)
24.
CHECK ABS SPEED SENSOR SIGNAL(See page
05–297
)

2707T–01
C66799
C94614
Mark
Front
–
REAR SUSPENSION
STABILIZER BAR REAR
27–13
1264
Author:
Date:
2004 COROLLA (RM1037U)
STABILIZER BAR REAR
REPLACEMENT
HINT:
COMPONENTS: See page
27–2
1.
REMOVE STABILIZER BAR REAR
(a)
Remove the 2 bolts, nuts and stabilizer bar.
2.
INSTALL STABILIZER BAR REAR
(a)
Install the 2 bolts, nuts and stabilizer bar.
Torque: 195 N
⋅
m (1,990 kgf
⋅
cm, 144 ft
⋅
lbf)
HINT:
Install the stabilizer bar so that the mark is positioned onthe rear
right side of the vehicle.
Wyszukiwarka
Podobne podstrony:
27 Rear Suspension
27 Rear Suspension
27 Rear Suspension
M32d Rear Suspension
10 rear suspension
PIRVC Rear Suspension
M32d Rear Suspension
rear suspension 2
rear suspension
g3 rear suspension
Group 017 Rear Suspension
PIRVC Rear Suspension
Rear suspension
ARTICLE SUSPENSION STABILIZER BAR REAR SERVICE
12 Rear Wheel Suspension
66 SUSPENSION REAR
ARTICLE SUSPENSION UPPER CONTROL ARM REAR SERVICE
więcej podobnych podstron