
1
HARVESTING RAINWATER
FOR LANDSCAPE USE
Funding provided through a Conservation Assistance Grant from
Arizona Department of Water Resources
Tucson Active Management Area
First Edition, September 1998
P
ATRICIA
H. W
ATERFALL
Extension Agent, University of Arizona Cooperative
Extension/Low 4 Program


HARVESTING RAINWATER FOR LANDSCAPE USE
Arizona Department of Water Resources
Rita P. Pearson, Director
Arizona Department of Water Resources
Tucson Active Management Area
Katharine Jacobs, Area Director
This document was prepared by
Patricia H. Waterfall, Extension Agent
Pima County Cooperative Extension, Low 4 Program
Artwork prepared by Silvia Rayces
With editorial assistance from
Joe Gelt, Editor, Water Resources Research Center, University of Arizona
Dale Devitt, Professor, Soil and Water, University of Nevada/Reno
Christina Bickelmann, Water Conservation Specialist, Arizona Department of Water Resources,
TAMA
Document may be ordered from the Arizona Department of Water Resources, Tucson Active
Management Area, Water Conservation Specialist, 400 W. Congress, Suite 518, Tucson AZ
85701, (520)770-3816, Fax (520)628-6759. Visit our website at: www.adwr.state.az.us.

Issued in furtherance of Cooperative Extension work, acts of May 8 and June 30, 1914, in cooperation with the U.S. Department
of Agriculture, James A. Christenson, Director, Cooperative Extension, College of Agriculture, The University of Arizona.
The University of Arizona College of Agriculture is an equal opportunity employer authorized to provide research, educational
information and other services only to individuals and institutions that function without regard to sex, race, religion, color, national
origin, age, Vietnam Era Veterans status, or disability.
Any products, services, or organizations that are mentioned, shown, or indirectly implied in this publication do not imply
endorsement by The University of Arizona.
Cooperative Extension
College of Agriculture
The University of Arizona
Tucson, AZ 85721
September 1998 AZ1052
Printed on recycled paper

INTRODUCTION .................................................................................................................................................... 1
WATER HARVESTING SYSTEM COMPONENTS .............................................................................................. 3
SIMPLE WATER HARVESTING SYSTEM DESIGN AND CONSTRUCTION .................................................... 6
COMPLEX WATER HARVESTING SYSTEMS .................................................................................................. 11
Elements of a Complex Water Harvesting System ................................................................................... 12
Complex Water Harvesting System Design and Construction ............................................................... 16
CONCLUSION ..................................................................................................................................................... 37
Contents

6

7
INTRODUCTION
In the arid Southwest, rainfall is scarce and evapotranspiration ( ET
o
)
1
rates are high. In
Tucson the average historical ET
o
rate is approximately 77 inches and average rainfall is 11
inches, in Phoenix average historical ET
o
is approximately 80 inches and average rain is 10
inches. For Tucson, this is a 7:1 ratio between water that is evapotranspired and what is
available from rainfall, for Phoenix the ratio is 8:1. Only natives and some desert-adapted
plants (plants from other desert areas that can flourish in our soils and our climate) can live
on 10 or 11 inches of annual rainfall. Other desert-adapted plants may require some
supplemental irrigation. Plants from non-arid climates require a great deal of supplemental
irrigation.
Harvesting rainwater can reduce the use of drinking water for landscape irrigation. Coupled
with the use of native and desert-adapted plants, rainwater harvesting is an effective water
conservation tool because it provides free water that is not from the municipal supply.
There are many benefits to harvesting rainwater. Water harvesting not only reduces
dependence on ground water and the amount of money spent on water, but also reduces
off-site flooding and erosion by holding rainwater on the site. If large amounts of water are
held in highly pervious areas (areas where water penetrates easily), some of the water may
percolate to the water table. Rainwater is a clean, salt-free source of water for plants. In
addition, rainwater harvesting can reduce salt accumulation in the soil which can be harmful
to root growth. When collected, rainwater percolates into the soil, forcing salts down and
away from the root zone area. This allows for greater root growth and water uptake, which
increases the drought tolerance of plants. Limitations of water harvesting are few and are
easily met by good planning and design.
Series of planted water harvest-
ing
basins on a slope.
8
Water harvesting is the capture, diversion, and storage of rainwater for plant irrigation and
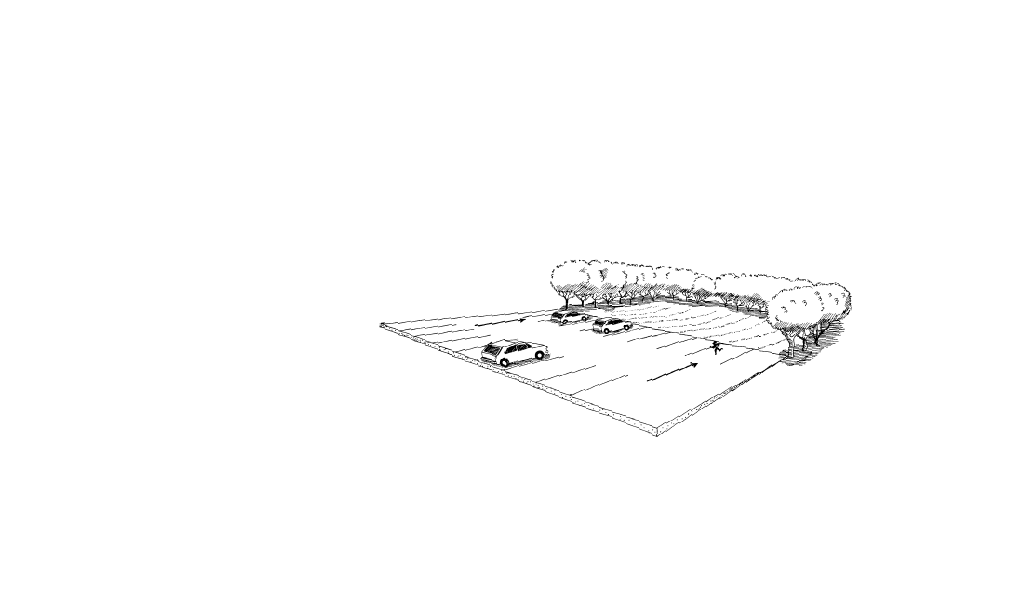
other uses. It is appropriate for large scale landscapes such as parks, schools, commercial
sites, parking lots, and apartment complexes, as well as small scale residential landscapes.
System design ranges from simple to complex. But whether your landscape is large or
small, the principles outlined in this manual apply. There are many water harvesting
opportunities on developed sites, even very small yards can benefit from water harvesting.
And, water harvesting can easily be planned into a new landscape during the design phase.
Parking lot draining into concave lawn area.

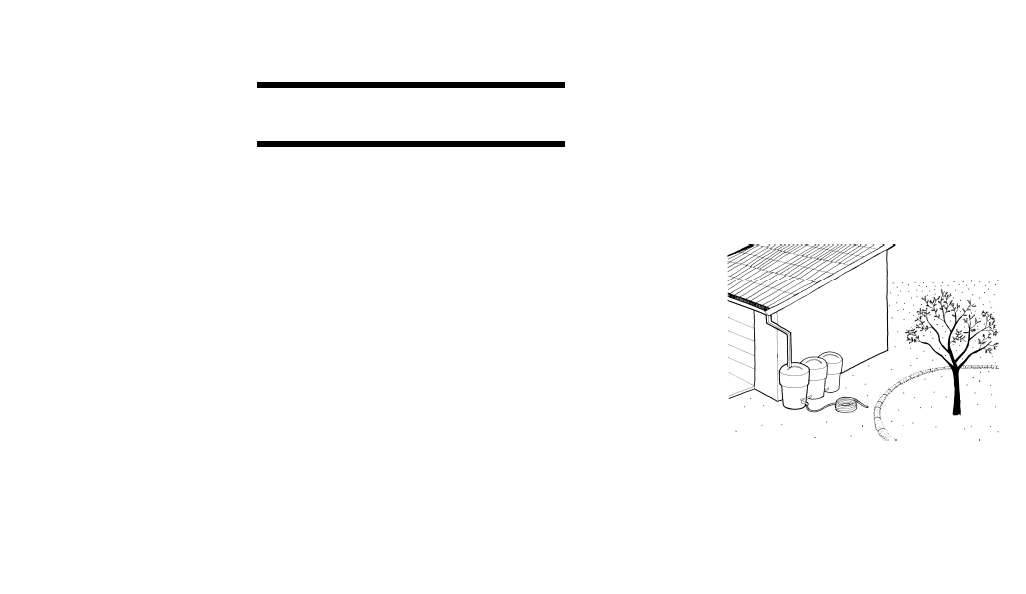
9
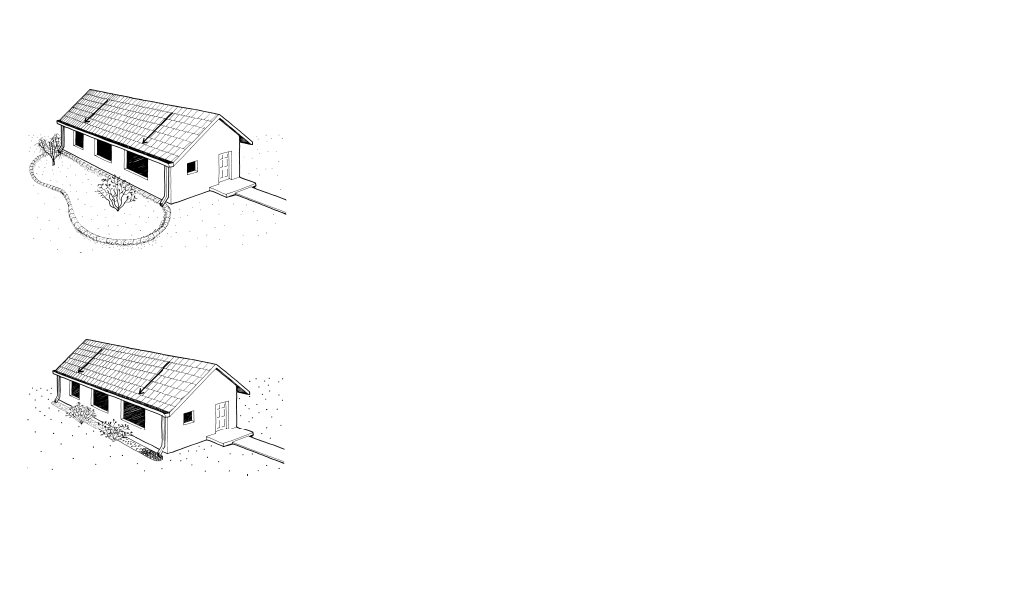
Simple system - Roof catchment, channel,
and planted landscape holding area.
WATER HARVESTING SYSTEM COMPONENTS
A rainfall water harvesting system has three components: the supply (rainfall), the demand
(landscape water requirement), and the system that moves the water to the plants. Storage
is an additional element which is optional.
Rainfall. Rainwater runoff refers to rainwater which flows off a surface. If the surface is
impervious (water cannot penetrate it), then runoff occurs immediately. If the surface is
pervious (water can penetrate it), then runoff will not occur until the surface is saturated.
Runoff can be harvested (captured) and used immediately to water plants or can be stored
for later use. Several factors affect runoff, the most important being the amount of rainfall.
Rainfall duration refers to the length of time the rain falls, the longer the duration, the more
water available to harvest. The intensity of the rainfall affects how soon the water will begin
to run off and also how fast it runs off. The harder it rains and the longer it lasts the more
water there is for harvesting. The timing of the rainfall is also important. If only one rainfall
occurs, water percolates into the dry soil until it becomes saturated. If a second rainfall
occurs soon after the first, more water may runoff because the soil is already wet.
Plant Water Requirement. The type of plants selected, their age and size, and how closely
together they are planted all affect how much water is required to maintain a healthy
landscape. Because rainfall is scarce in arid regions, it is best to select plants with low
water requirements and control planting densities to reduce overall water need. Native plants
are well-adapted to seasonal, short-lived water supplies, and most desert-adapted plants
can tolerate drought, making them good choices for landscape planting.
10
Water Collection and Distribution System. Water harvesting systems range from simple
to complex. In a simple system the rainwater is used immediately. Most homeowners can
design simple water harvesting systems to meet the needs of their existing site. Designing
water harvesting systems into new construction allows the homeowner to be more elaborate
and thorough in developing a system. In the case of very simple systems, the pay back
period may be almost immediate.
A simple system usually consists of a catchment area, and a means of distribution, which
operates by gravity. The water is deposited in a landscape holding area, a concave area or
planted area with edges to retain water, where it can be used immediately by the plants.
Water collects on roofs, paved areas or the soil surface. A good example of a simple
system is water dripping from the edge of the roof to a planted area or diversion channel
directly below. Gravity moves the water to where it can be used. In some cases, small
containers are used to hold water for later use.
A catchment area is any area from which water can be harvested. The best catchments
have hard, smooth surfaces, such as concrete or metal roofing material. The amount of
water harvested depends on the size, surface texture, and slope of the catchment area.
The distribution system connects the catchment area to the landscape holding area.
Distribution systems direct water flow, and can be very simple or very sophisticated. For
example, gutters and downspouts direct roof water to a holding area, and gently sloped
sidewalks distribute water to a planted area. Hillsides provide a perfect situation for moving
water from a catchment area to a holding area. Channels, ditches, and swales all can be
utilized to move water. Elaborate open channel distribution systems may require gates and
Simple system Roof catchment, gutters,
downspouts, and french drain.
Simple system Roof catchment, gutters,
downspouts, and bermed landscape holding
area.

11
diverters to direct the water from one area to another. Standard or perforated pipes, and
drip irrigation systems can be designed to distribute water. Curb cutouts can channel street
or parking lot water to planted areas. If gravity flow is not possible, a small pump may be
required to move the water.
Landscape holding areas store water in the soil for direct use by the plants. Concave
depressions planted with grass or plants serve as landscape holding areas, containing the
water, increasing water penetration, and reducing flooding. Depressed areas can be dug
out, and the extra soil used to berm (a bank of soil used to retain water) the depression.
With the addition of berms, moats, or soil terracing, flat areas also can hold water. One
holding area or a series of holding areas can be designed to fill and then flow into adjacent
holding areas via spillways (outlets for surplus water).
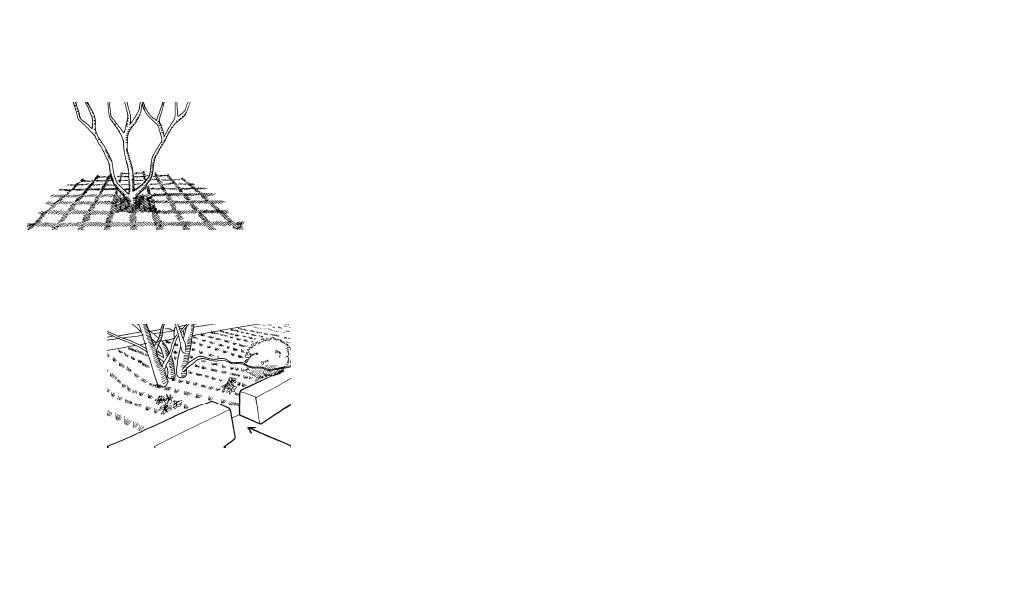
Soil erosion can be a problem with water moving quickly over the soil surface. Basins and
spillways help reduce this. Crescent-shaped berms constructed around the base of the
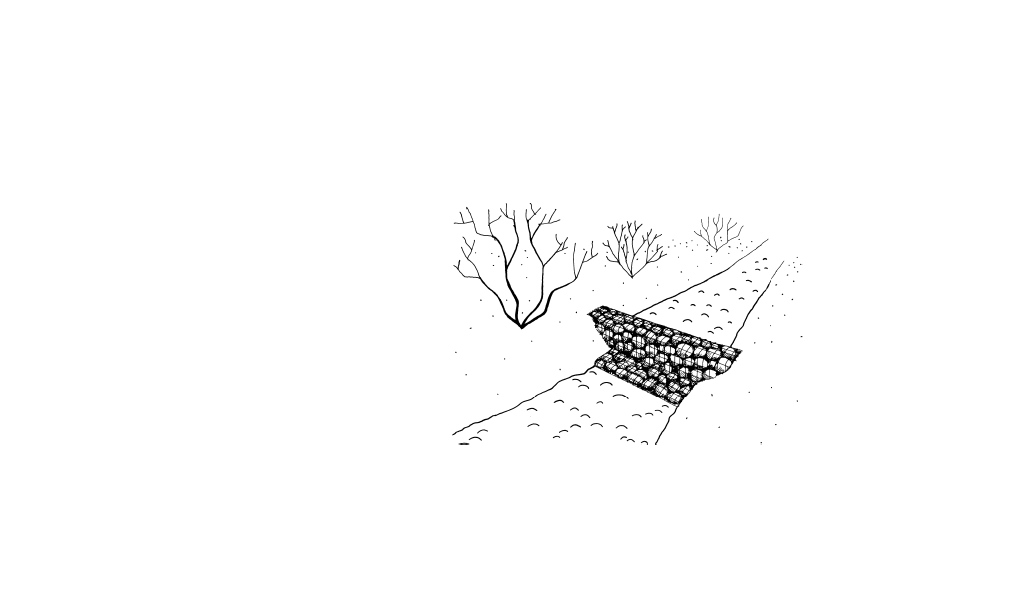
plant on the down-hill side are useful on slopes for slowing and holding water. Gabions (a
stationary grouping of large rocks encased in wire mesh) are widely used to contain water
and reduce erosion. French drains (holes or trenches filled with gravel) can also hold water
for plant use. And lastly, pervious paving materials, such as gravel, crushed stone, open
paving blocks, and pervious paving blocks, allow water to infiltrate into the soil to irrigate
plants with large, extensive root systems, such as trees.
Crescent-shaped landscaped holding
areas on a slope.
12
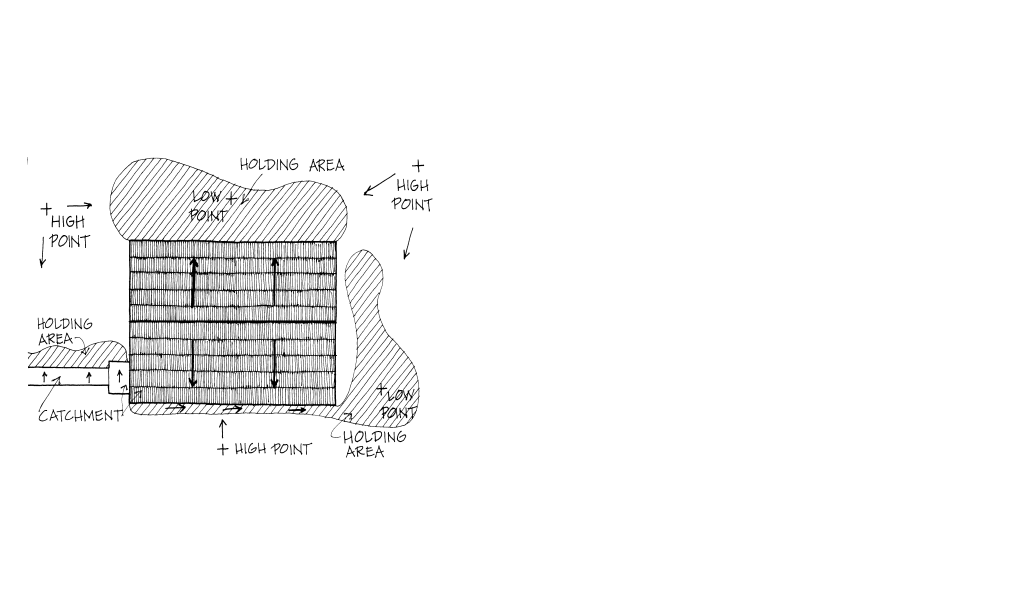
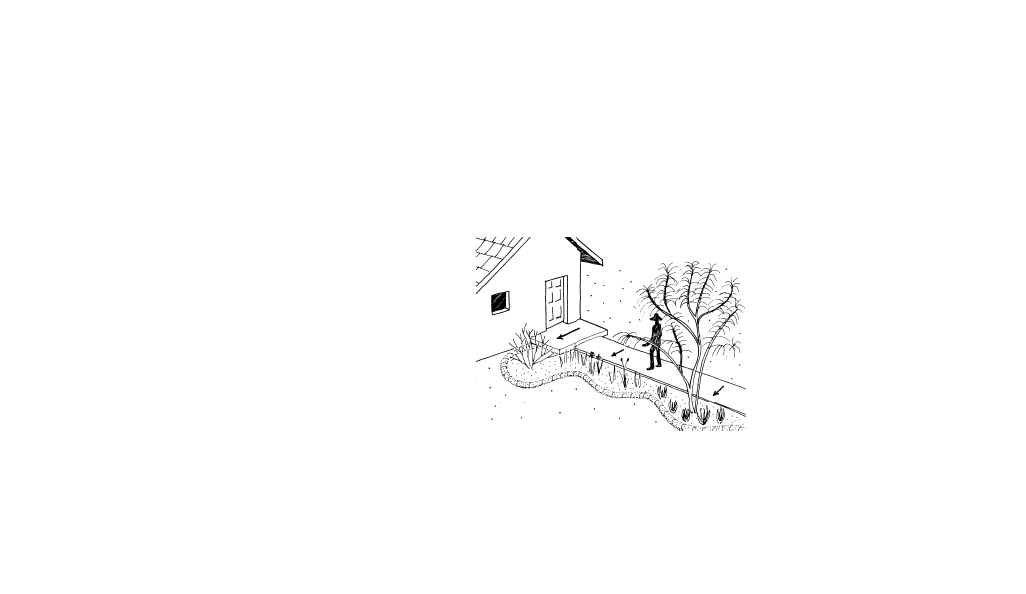
By observing your landscape during a rain, you can locate the existing
drainage patterns on your site. Identify low points and high points.
Utilize these drainage patterns and gravity flow to move water from
catchment areas to planted areas. If you are harvesting rainwater
from the roof, extend downspouts to reach planted areas or provide a
path, drainage, or hose to move the water where it is needed. Take
advantage of existing sloped paving to catch water and redistribute it
to planted areas.The placement and slope of new paving can be
designed to increase runoff. If sidewalks, terraces, or driveways are
not yet constructed, slope them two percent (
1/4
inch per foot) toward
planting areas and utilize the runoff for irrigation. Bare dirt can also
serve as a catchment area by grading the surface to increase and
direct runoff.
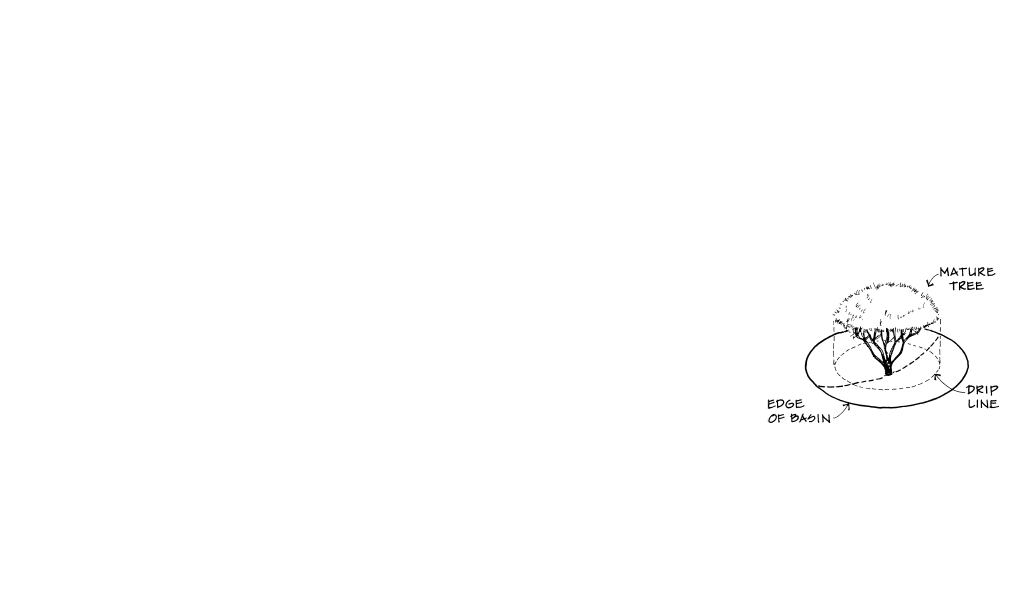
Next locate and size your landscape holding areas. Locate landscape
depressions that can hold water or create new depressions where
you want to locate new plants. Rather than digging a basin around
existing plants, construct berms or moats on the existing surface to
avoid damaging roots. Do not mound soil at the base of trees or other
plants. Holding areas around existing plants should extend beyond
the drip line to accommodate and encourage extensive root systems.
The more developed a plants root system, the more drought tolerant
SIMPLE WATER HARVESTING SYSTEM DESIGN AND CONSTRUCTION
Site plan showing drainage patterns
and landscape holding areas (aerial view).
13
the plant becomes because the roots have a larger area to find water. For new plantings,
locate the plants at the upper edge of concave holding areas to encourage extensive rooting
and avoid extended inundation (flooding). With either existing or new landscapes you may
want to connect several holding areas with spillways or channels to distribute the water
throughout the site.
Selecting Plant Material. Proper plant selection is a major factor in the success of a water
harvesting project. Native and desert-adapted plants can be grown successfully using
harvested rainwater for irrigation. Some plants cannot survive in the actual detention area
if the soil is saturated for a long period of time. Careful plant selection for these low lying
areas is important. Select plants that can withstand prolonged drought and prolonged
inundation--native plants or plants adapted to the Sonoran Desert. If plants are going to be
planted in the bottom of large, deep basins, low water use, native riparian trees may be the
most appropriate choice (hackberry, desert willow, acacia, mesquite).
To take advantage of water free-falling from roof downspouts (canales) plant large rigid
plants where the water falls or hang a large chain from the downspout to the ground to
disperse and slow the water. Provide a basin to hold the water for the plants and also to
slow it down. It may be necessary to use rocks or other hard material to break the fall and
prevent erosion. If this is a sloped site, large, connected, descending holding areas can be
constructed for additional plants.
Tree dripline and basin
edge.
14
Seeding is another alternative for planting holding basins. Select seed mixes containing
native or desert-adapted wildflowers, grasses, and herbaceous plants. Select annual plants
for instant color and perennial plants for extended growth. Perennial grasses are particularly
valuable for holding the soil and preventing erosion and soil loss.
Construction Hints. If you are going to dig, particularly if you are going to be using a
bobcat, small tractor, or rototiller, call Arizona Blue Stake (18007825348) to locate where
utility lines come into your property. This will eliminate leaks and breaks. Even if you are
constructing a simple system with a rake and shovel, be aware of utility line locations. Soils
in the landscape holding areas should not be compacted because this inhibits the water
moving through the soil. If the soil is compacted, loosen it by tilling. If the soil is too sandy
and will not hold water for any length of time, you may wish to add composted organic
matter to the soil to increase moisture holding potential (This is not necessary with native or
desert-adapted plants). After planting apply a 1
1/2
2 inch layer of mulch to reduce
evaporation.
System Maintenance. Developing a water harvesting system is actually an on-going
process that can be improved and expanded over time. Water harvesting systems are
always in a state of construction. It is necessary to reality test your system during rain
events. Determine whether the water is moving where you want it, or whether you are
losing water. Also determine if the holding areas are doing a good job of containing the
water. Make changes as your system requires. As time goes on you may discover additional
areas where water can be harvested and where water can be channeled. Water harvesting
systems should be inspected before each rainy season and ideally after every rain event to
Parking lot curb cutout directing
water into planted area.
Pervious paving block with grass.

15
keep the system operating at optimum performance.
TABLE - 1
MAINTENANCE CHECKLIST
·
Keep holding areas free of debris.
·
Control and prevent erosion, block erosion trails.
·
Clean, repair channels.
·
Clean, repair dikes, berms, moats
·
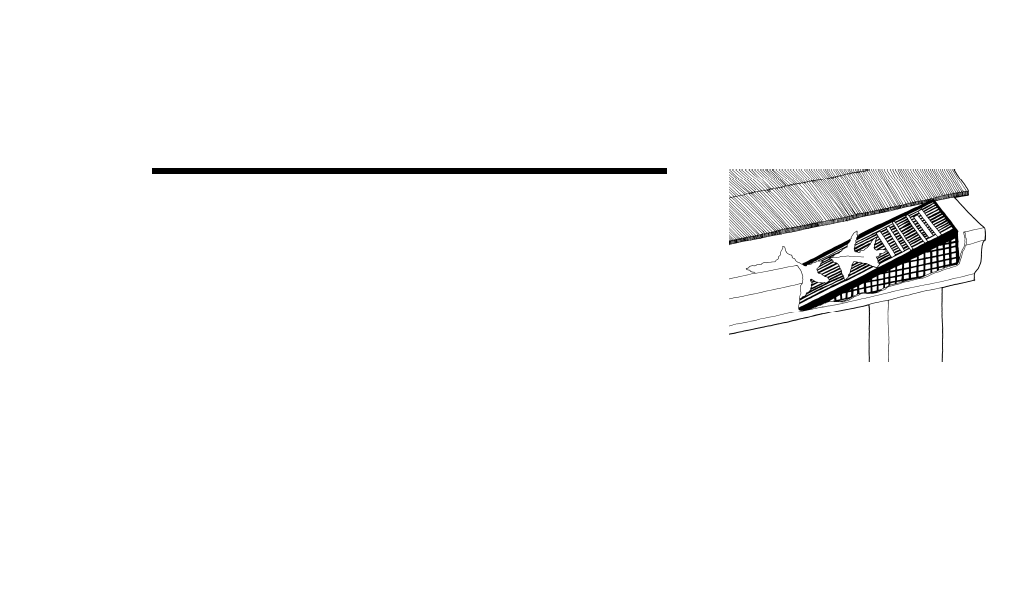
Keep gutters and downspouts free of debris
·
Flush debris from the bottom of storage containers,
if possible.
·
Clean and maintain filters, including drip filters.
·
Expand the area of concentration as plants grow.
Gutter leaf filter.
16
Monitor Water Use. Now that you have your system operating, it is a good idea to monitor
your landscape water use. If you have constructed water harvesting basins in an existing
landscape, use last year's water bills to compare your pre-water harvesting use to your
post-water harvesting use. If you have added new plants to a water harvesting area, the
water savings begins when they are planted. Every time they can be irrigated with har-
vested rainwater there is a water savings!
Gabion in a stream bed.

17
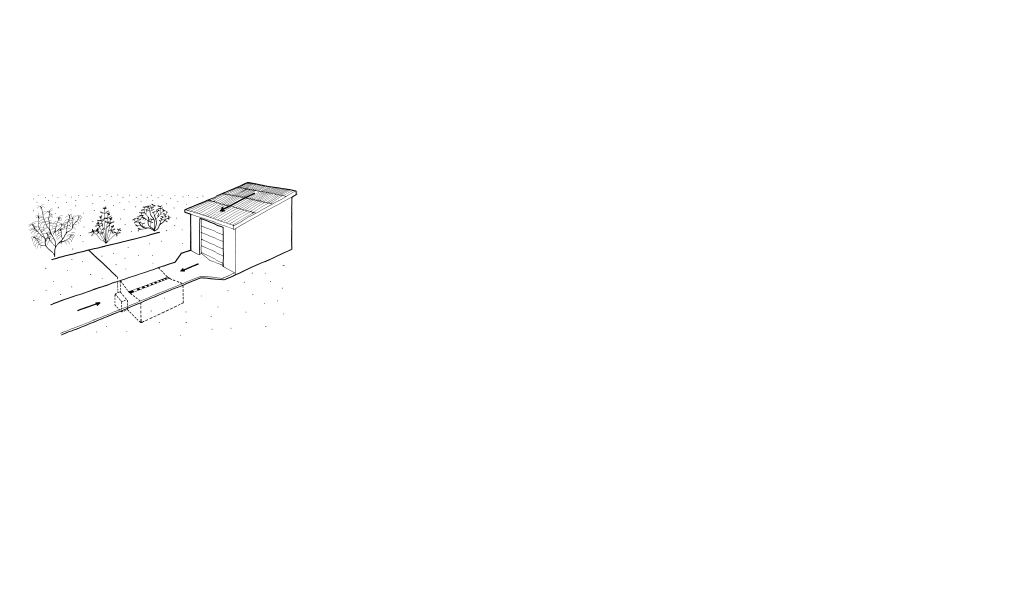
COMPLEX WATER HARVESTING SYSTEMS
Water harvesting cannot provide a completely dependable source of irrigation water because
it is dependent on the weather, and weather is not dependable. To get the maximum benefit
from rainwater harvesting, some storage can be built into the water harvesting system to
provide water between rainfall events. In Southern and Central Arizona there are two rainy
periods (summer and winter) with long dry periods between the two. Heavy rain events can
produce more water than is needed by a landscape during that rainfall. Once the root zone
of the plants have been thoroughly wetted, the rainwater begins to move below the root
zone. At this point plants are well irrigated. As the soil becomes saturated, water begins to
run off or stand on the surface. The saturation point and the onset of runoff is dependent on
the texture and condition of the soil. (Sandy soils accept more water than clayey soils.)
Many people ask whether they can harvest enough water in an average year to provide
sufficient irrigation for an entire landscape. The answer is, it depends. If you are interested
in designing a totally self-sufficient water harvesting system, then the amount of water
harvested and the water needed for landscape irrigation should be in balance. Storage
capacity plays a big role in this equation by making rainwater available in the dry seasons
when the plants need it.
Rainfall harvesting systems that utilize storage result in larger water savings and higher
construction costs. These more complex systems are more appropriate for larger facilities
and may require professional assistance to design and construct. With such a system the
cost of storage, particularly the disposal of soil and rock from underground storage
construction, is a major consideration. The investment pay back period may be several
Complex water harvesting system with roof
catchment, gutter, downspout, storage, &
drip irrigation distribution system.

18
years. Is the cost of storage greater than the cost of water? In many cases, yes. In this case
the personal commitment to a water conservation ethic may come into play. A more realistic
goal, and one that is followed by most people is to harvest less than the total landscape
requirement. Another option is to reduce your demand by reducing planting areas or planting
densities. This involves less storage and is therefore less expensive.
Elements of a Complex Water Harvesting System
Components of complex systems that utilize storage include catchment areas, usually a
roof, conveyance systems, storage, and distribution systems, to control where the water
goes. The amount of water or yield that the catchment area will provide depends on the
size of the catchment area and its surface texture. Concrete, asphalt, or brick paving and
smooth-surfaced roofing materials provide high yields. Bare soil surfaces provide harvests
of medium yield, with compacted clayey soils yielding the most. Planted areas, such as
grass or groundcover areas, offer the lowest yields because the plants hold the water longer
allowing it to infiltrate into the soil. This is not necessarily a problem, depending whether
you want to use collected water directly or store it for later use.
Conveyance systems direct the water from the catchment area to the storage container.
With a roof catchment system the gutter and downspouts are the means of conveyance.
Gutters and downspouts are either concealed inside the walls of buildings or attached to
the exterior of buildings. They can be added to the outside of a building at anytime. Proper
sizing of gutters is important to collect as much rainfall as possible.
19
TABLE - 2
ANNUAL SUPPLY
FROM ROOF CATCHMENT
Inches/Rainfall Gallons/Square Foot
0
0
1
.6
2
1.3
3
1.9
4
2.5
5
3.1
6
3.7
7
4.4
8
5.0
9
5.6
10
6.2
11
6.8
12
7.5
13
8.1
14
8.7
15
9.3
Area of flat roof Length x width.
Area of sloped roof Length x width.
20
Before the water is stored it should be filtered to remove particles and debris. The degree
of filtration is dependent on the size of the distribution tubing (drip systems would require
more and finer filtering than water distributed through a hose). Filters can be in-line or a
leaf screen can be placed over the gutter at the top of the downspout. Many people divert
the first part of the rainfall to eliminate debris from the harvested water. The initial rain
washes debris off the roof, the later rainfall, which is free of debris and dust, is then
collected. Always cover the storage container to prevent mosquito and algae growth and
also to prevent debris from getting into the storage container.
Storage allows full utilization of excess rainfall, by making water available later when it is
needed. Locate storage near downspouts or at the end of the downspout. Storage can be
underground or above-ground. Storage containers can be made of polyethylene, fiberglass,
wood, or metal. Underground containers are a more expensive choice because of the cost
of soil excavation and removal. Pumping the water out of the container adds an additional
cost. Swimming pools, stock tanks, septic tanks, ferrocement culverts, concrete block,
poured in place concrete, or building rock can be used for underground storage. Look in
the Yellow Pages under Tanks, Feed Dealers, Septic Tanks, and Swimming Pools to
locate storage containers. Estimates for the cost of storage ranges from $100 to $3500,
depending on the system, degree of filtration, and the distance between the storage and
the place of use.
2
Examples of above ground containers include large garbage cans, 55-
gallon plastic or steel drums, barrels, tanks, cisterns, stock tanks, fiberglass fishponds,
storage tanks, and above ground swimming pools. Above ground storage buildings or
large holding tanks made of concrete block, stone, plastic bags filled with sand, or rammed
Roof catchment with sloping driveway,
french drain, and underground storage.

21
earth also can also be used.
If storage is unsightly, it can be designed into the landscape by placing it in an unobtrusive
place or hiding it with a structure, screen, and/or plants. In all cases, storage should be
located close to the area of use and placed at an elevated level to take advantage of gravity
flow. Ideally, on a sloped lot the storage area is located at the high end of the property to
facilitate gravity flow. Some times it is more useful to locate several smaller cisterns near
where water is required because they are easier to handle and camouflage. If the landscaped
area is extensive, several tanks can be connected to increase storage capacity. In the case
that all storage tanks become full and rainfall continues, alternative storage for the extra
water must be found. A concave lawn area would be ideal as a holding area where the rain
water could slowly percolate into the soil.
The distribution system directs the water from the storage containers to landscaped areas.
The distribution device can be a hose, constructed channels, pipes, perforated pipes, or a
manual drip system. Gates and diverters can be used to control flow rate and flow direction.
A manual valve or motorized ball valve located near the bottom of the storage container can
assist gravity fed irrigation. If gravity flow is not possible, an in-line electric pump hooked to
a hose can be used. The distribution of water through an automatic drip irrigation system
requires extra effort to work effectively. A small submersible pump will be required to provide
enough pressure to activate the remote control valve (minimum 20 psi). The pump should
have the capability of turning off when there is no water in the tank to avoid burning the
Vine used to screen storage tank.

22
pump out.
Complex Water Harvesting System Design & Construction
If you are designing a complex water harvesting system, draw your system on paper before
you begin to construct it to save time and effort. You may not want to do any calculations,
but if you do, a more functional and efficient system will result. However, doing the calculations
does not eliminate the need to field test the system. The steps involved in designing a
complex water harvesting system include site analysis, calculation, design, and construction.
If the project is complicated, divide the site into sub-drainage areas and repeat the following
steps for each sub-area.
Site Analysis. If you are starting with a new landscape or working with an existing one,
draw your site and all the site elements to scale. Plot the existing drainage flow patterns by
observing your property during a rain. Show the direction of the water flow with arrows.
Also, indicate high and low areas on your plan. Look for catchment areas to harvest water;
for example, paved areas, roof surfaces, and bare earth. Next, find planted areas or potential
planting areas that require irrigation. Also, locate above or below ground storage near planted
areas. Decide how you are going to move water from the catchment area to the holding
area or storage container. Rely on gravity to move water whenever you can. Also decide
how you are going to move the water through the site from one landscaped area to another
landscaped area. Again, if the site is too large or the system too complicated divide the area
into sub-drainage systems.
Calculations. Calculate the monthly supply (rainfall harvest potential) and the monthly
demand (plant water requirement) for a year. Next, calculate your monthly storage
23
requirement if you are designing a more complex system.
1 CUBIC FOOT (CF) = 7.48 GALLONS
100 CUBIC FEET (CCF) = 748 GALLONS
Calculate supply (TABLES 5 and 6) - The equation for calculating supply measures the
amount of water (in gallons) capable of being harvested from a catchment area.
SUPPLY ( Gallons ) =
(CATCHMENT AREA ( FT
2
) x RAINFALL ( FT )) x RUNOFF COEFFICIENT
x 7.48 GAL/CF
The area of the catchment is expressed in square feet, for example a 10 x 20 FT catchment
area is 200 SF (square feet). Measure a sloped roof by measuring the area that is covered
by the roof, usually the length and width of the building. The catchment area is multiplied by
the amount of rainfall converted to feet to get the volume of water which is expressed in
cubic feet (TABLE 3). The runoff coefficient tells what percent of the rainfall can be harvested
from specific surfaces (TABLE 4). The conversion number 7.48 converts cubic feet to
gallons. The higher numbers represent a smoother surface that the lower numbers.
Tables 5 and 6 give monthly amounts for 1000 SF of roof area in Tucson or Phoenix. ET
o
data for other Arizona locations is available from AZMET (5206219742 or http://
ag.arizona.edu/azmet/). (All Phoenix data is from the Greenway weather station.)
Roof catchment with multiple storage cans
connected to a hose adjacent to
a landscape holding area.

24
TABLE - 3
AVERAGE MONTHLY RAINFALL
Tucson and Phoenix (Greenway)
TUCSON, ARIZONA
PHOENIX, ARIZONA
Month
Inches
Feet
Month
Inches
Feet
JAN
1.2
0.1
JAN
1.6
0.1
FEB
1.0
0.1
FEB
0.9
0.1
MAR
0.9
0.1
MAR
1.4
0.1
APR
0.3
0.0
APRIL0.3
0.0
MAY
0.3
0.0
MAY
0.2
0.0
JUN
0.0
0.0
JUNE
0.1
0.0
JUL1.3
0.1
JUL
Y
1.4
0.1
AUG
1.8
0.2
AUG
1.2
0.1
SEPT
1.0
0.1
SEPT
0.9
0.1
OCT
0.7
0.1
OCT
0.8
0.1
NOV
0.7
0.1
NOV
0.9
0.1
DEC
1.4
0.1
DEC
1.1
0.1

25
TOTAL10.6
1.0
10.8
0.9
TABLE - 4
RUNOFF COEFFICIENTS
HIGH LOW
ROOF
Metal, gravel, asphalt,
0.95
0.90
shingle, fiber glass, mineral
paper
PAVING
Concrete, asphalt
1.00
0.90
GRAVEL0.70
0.25
SOIL
Flat, bare
0.75
0.20
Flat, with vegetation
0.60
0.10
LAWNS
Flat, sandy soil
0.10
0.05
Flat, heavy soil
0.17
0.13

26
TABLE - 5
TOTAL MONTHLY SUPPLY
Tucson
Roof Area = 1000 Square Feet Runoff Coefficient = .90
Roof
Runoff
Rainfall
Convert
Yield
Month
SF
Coeff
Feet
Gallons
Gallons
JAN
1000
0.90
0.1
7.48
673
FEB
1000
0.90
0.1
7.48
673
MAR
1000
0.90
0.1
7.48
673
APR
1000
0.90
0.0
7.48
0
MAY
1000
0.90
0.0
7.48
0
JUN
1000
0.90
0.0
7.48
0
JUL1000
0.90
0.1
7.48
673
AUG
1000
0.90
0.2
7.48 1346
SEPT
1000
0.90
0.1
7.48
673
OCT
1000
0.90
0.1
7.48
673
NOV
1000
0.90
0.1
7.48
673
DEC
1000
0.90
0.1
7.48
673
TOTAL1.0
6730

27
TABLE - 6
TOTAL MONTHLY SUPPLY
Phoenix (Greenway)
Roof Area = 1000 Square Feet Runoff Coefficient = .90
Roof
Runoff
Rainfall
Convert
Yield
Month
SF
Coeff
Feet
Gallons
Gallons
JAN
1000
.90
0.1
7.48
673
FEB
1000
.90
0.1
7.48
673
MAR
1000
.90
0.1
7.48
673
APR
1000
.90
0.0
7.48
0
MAY
1000
.90
0.0
7.48
0
JUN
1000
.90
0.0
7.48
0
JUL1000
.90
0.1
7.48
673
AUG
1000
.90
0.1
7.48
673
SEPT
1000
.90
0.1
7.48
673
OCT
1000
.90
0.1
7.48
673
NOV
1000
.90
0.1
7.48
673
DEC
1000
.90
0.1
7.48
673

28
TOTAL0.9
6057
Calculate demand The demand equation tells you how much water is required for a
given landscaped area. There are two methods you can use Method 1 is used for new or
established landscapes, Method 2 can only be used for established landscapes. HINT:
Grouping plants with similar water requirements simplifies the system by making the amount
of water needed to maintain those plants easier to calculate.
METHOD 1 :
DEMAND = ( ET
o
x PLANT FACTOR ) x AREA x 7.48
The equation for calculating demand for new or established landscapes is based on monthly
evapotranspiration (ET
o
) information. TABLE 7 provides ET
o
information for Tucson and
Phoenix. (Evapotranspiration data for other Arizona areas is available through AZMET, the
state-wide weather service.) For this equation use ET
o
values in feet. The Plant Factor
represents the percent of ET
o
that is needed by the plant (TABLE 8). This is determined by
the type of plant high, medium, or low water use. In the example shown, the plants
require approximately 26 percent of ET
o
, the high range of low water use.
These plant factor values are approximate, specific plant values (coefficients) for landscape
plants are not available. These values approximate what is needed to maintain plant health
and acceptable appearance. Irrigation experience tells us where plants fall within each
category. Consult the Arizona Department of Water Resources Low Water Use/Drought
Tolerant Plant List for the Tucson or Phoenix areas to determine the approximate water
requirement of landscape plants common to the area you live in. The irrigated area refers
to how much area is planted and is expressed in square feet. The conversion factor 7.48

29
converts cubic feet into gallons. (TABLES 9 and 10).
TABLE - 7
AVERAGE MONTHLY ET
o
Tucson and Phoenix (Greenway)
TUCSON, ARIZONA
PHOENIX, ARIZONA
Month
Inches
Feet
Month
Inches
Feet
JAN
2.9
0.2
JAN
2.6
0.2
FEB
3.7
0.3
FEB
3.5
0.3
MAR
6.0
0.5
MAR
5.6
0.5
APR
8.1
0.7
APR
7.8
0.7
MAY
9.8
0.8
MAY
9.7
0.8
JUN 10.6
0.9
JUN 10.3
0.9
JUL9.6
0.8
JUL
10.1
0.8
AUG
8.1
0.7
AUG
9.0
0.8
SEPT
7.3
0.6
SEPT
7.4
0.6
OCT
5.9
0.5
OCT
5.8
0.5
NOV
3.6
0.3
NOV
3.5
0.3
DEC
2.5
0.2
DEC
2.3
0.2
TOTAL 78.1
6.5
TOTAL 77.6
6.6

30
TABLE - 8
PLANT WATER USE
PLANT TYPE
PERCENT RANGE
High
Low
Low Water Use0.26
0.13
Medium Water Use
0.45
0.26

31
High Water Use
0.64
0.45
TABLE - 9
TOTAL MONTHLY DEMAND
New or Established Landscapes - Tucson
Irrigated Area = 450 Square Feet Plant Factor = .26/ Low Water Use
ET
o
Plant
Area
Convert
Demand
Month
Feet
Factor
SF
Gallons
Gallons
JAN
0.2
0.26
450
7.48
175
FEB
0.3
0.26
450
7.48
263
MAR
0.5
0.26
450
7.48
438
APR
0.7
0.26
450
7.48
613
MAY
0.8
0.26
450
7.48
700
JUN
0.9
0.26
450
7.48
788
JUL0.8
0.26
450
7.48
700
AUG
0.7
0.26
450
7.48
613
SEPT
0.6
0.26
450
7.48
543
OCT
0.5
0.26
450
7.48
438
NOV
0.3
0.26
450
7.48
263
DEC
0.2
0.26
450
7.48
175

32
TOTAL6.5
5709
TABLE - 10
TOTAL MONTHLY DEMAND
New or Established Landscapes - Phoenix (Greenway)
Irrigated Area = 450 Square Feet Plant Factor = .26/ Low Water Use
ET
o
Plant
Area
Convert
Demand
Month
Feet
Factor
SF
Gallons
Gallons
JAN
0.2
0.26
450
7.48
175
FEB
0.3
0.26
450
7.48
263
MAR
0.5
0.26
450
7.48
438
APR
0.7
0.26
450
7.48
613
MAY
0.8
0.26
450
7.48
700
JUN
0.9
0.26
450
7.48
788
JUL0.8
0.26
450
7.48
700
AUG
0.8
0.26
450
7.48
700
SEPT
0.6
0.26
450
7.48
543
OCT
0.5
0.26
450
7.48
438
NOV
0.3
0.26
450
7.48
263
DEC
0.2
0.26
450
7.48
175

33
TABLE - 11
TOTAL MONTHLY DEMAND
Established Landscapes - All Locations
Average Winter Use=9 CCF Household Size = 3
Monthly
Winter
Convert
Month
Use
Ave
Use
CCF
Use
CCF
CCF
CCF
CCF
Gallons
Gallons
JAN
7
9
0
748
0
FEB
11
9
2
748
1496
MAR
13
9
4
748
2992
APR
15
9
6
748
4488
MAY
18
9
9
748
6732
JUN
19
9
10
748
7480
JUL18
9
9
748
6732
AUG
15
9
6
748
4488
SEPT
14
9
5
748
3740
OCT
12
9
3
748
2244
NOV
10
9
1
748
748
DEC
9
9
0
748
0
TOTAL 161
55
41140

34
TOTAL6.6
5796
METHOD 2 :
This method of determining demand for established landscapes (TABLE 11) is based on
actual water use. Use your monthly water bills to roughly estimate your landscape water
demand. With this method we assume that during the months of December, January, and
February most of the water is used indoors and that there is very little landscape watering.
(If you irrigate your landscape more than occasionally during these months use Method 1.)
The water company measures water in ccfs (100 cubic feet).To use this method average
December, January, and February water use. In the example, the combined average winter
monthly use is 9 ccf. Because we can assume that indoor use remains relatively stable
throughout the year, you can subtract the winter average monthly use from each months
combined use and get a rough estimate of monthly landscape water use. To convert ccfs to
gallons, multiply by 748.
Calculate storage/municipal water requirement (TABLE 12) Use a checkbook
method to determine the amount of irrigation water available from water harvesting and the
amount of municipal water needed in case there is not enough stored rainwater. This
example is based on the supply and demand numbers from TABLES 5 and 9. For simplicity,
the calculations are done on a monthly basis. However, in reality the amount of water available
fluctuates on a daily basis. The Storage column is cumulative and refers to what is actually
available in storage. This is calculated by adding together the previous months storage and
the previous months yield. The current months demand is then subtracted from this. If the
amount is positive, the amount left over is added to that months yield to provide for the
following months demand. If the amount of water available is negative, that is, if the demand

35
is greater than the supply, municipal water would be required to supplement the storage
supply. During the first year there will be a deficit of harvested water because the year
begins with an empty storage container (TABLE 12). However, beginning with Year 2 the
storage has built up and there will always be enough harvested water for this landscape
unless a drought occurs. The reason for this is that the winter rainwater is not all used up in
winter when evapotranspiration rates are low, so this water can be saved for the leaner
summer months. You will notice in this example (TABLE 13) that each year the overall
storage numbers will increase slightly because supply will likely exceed demand.
Each site presents its own set of supply and demand amounts. Some water harvesting
systems may always provide enough harvested water, some may provide only part of the
demand. Remember that the supply will fluctuate from year to year depending on the weather
and also which month the rainfall occurs. Demand may increase when the weather is hotter
than normal and will increase as the landscape ages and plant sizes increase. Demand is
also high during the plant establishment period which requires more frequent irrigation for
new landscapes.
To determine storage
3
, find the highest number in the Store column under Year 2. This
would be the maximum storage requirement. In this example, March will be the month with
the most water 2221 gallons. You will need approximately a 2300 gallon storage capacity
to be self-sufficient using harvested water.

36
TABLE - 12
MONTHLY STORAGE/MUNICIPAL
Year 1
Cumulative Municipal
Yield
Demand
Storage
Use
Month
Gallons
Gallons
Gallons
Gallons
DEC
0
JAN
808
210
0
210
FEB
539
271
537
0
MAR
539
429
647
0
APR
202
595
591
0
MAY
135
718
75
0
JUN
0
779
0
569
JUL 808
691
0
691
AUG
1010
586
222
0
SEPT
337
534
698
0
OCT
404
420
615
0
NOV
404
263
756
0
DEC
808
184
976
0
TOTAL5994 5680
976 1470

37
TABLE - 13
MONTHLY STORAGE/MUNICIPAL
Year 2
Cumulative
Municipal
Yield
Demand
Storage
Use
Month
Gallons
Gallons
Gallons
Gallons
DEC
808
976
JAN
808
210
1574
0
FEB
539
271
2111
0
MAR
539
429
2221
0
APR
202
595
2165
0
MAY
135
718
1649
0
JUN
0
779
1005
0
JUL 808
691
314
0
AUG
1010
586
536
0
SEPT
337
534
1012
0
OCT
404
420
929
0
NOV
404
263
1070
0
DEC
808
184
1290
0
TOTAL5994 5680
1290
0

38
TABLE - 14
MONTHLY STORAGE/MUNICIPAL
Year 3
Cumulative
Municipal
Yield
Demand
Storage
Use
Month
Gallons
Gallons
Gallons
Gallons
DEC
808
1290
JAN
808
210
1888
0
FEB
539
271
2425
0
MAR
539
429
2535
0
APR
202
595
2479
0
MAY
135
718
1963
0
JUN
0
779
1319
0
JUL808
691
628
0
AUG 1010
586
850
0
SEPT
337
534
1326
0
OCT
404
420
1243
0
NOV
404
263
1384
0
DEC
808
184
1604
0
TOTAL 5994 5680
1604
0

39
If there is not enough water harvested for landscape watering, there are several options:
· increase the catchment area,
· reduce the amount of landscaped area,
· reduce the plant density,
· replace the plants with lower water use plants,
· use mulch to reduce surface evaporation,
· use greywater,
4
· use municipal water.
Final design and construction Use your site analysis information and your potential
supply and demand calculations to size and locate catchment areas. For new construction,
if possible, size the catchment area to accommodate the maximum landscape water
requirement. If you cannot do this you may want to reduce plant water demand by either
lowering planting density or selecting lower water use plants. Roofs or shade structures
can be designed or retrofitted to maximize the size of the catchment area. If you are planning
a new landscape, create a landscape that can live on the amount of water harvested from
the existing roof catchment area. This can be accomplished by careful plant selection and
control of the number of plants used. For the most efficient use of the harvested water,
group plants with similar water requirements together. Remember that new plantings, even
native plants, require special care and will need supplemental irrigation during the
establishment period which can range between one and three years. (Use the supply and
demand calculations to determine this.) Use gutters and downspouts to convey the water
from the roof to the storage area. Consult TABLE 15 and 16 for tips on selecting and
installing gutters and downspouts.

40
TABLE - 15
GUIDELINES
Gutters
·
Select gutters that are 5 inches wide.
·
Select galvanized steel (26 gauge minimum) or aluminum
(.025 inch minimum) gutters.
·
Slope gutters 1/16" per 1' of gutter, to enhance flow.
·
Use an expansion joint at the connection, if a straight run of gutter
exceeds 40 feet.
·
Keep the front of the gutter one-half inch lower than the back.
·
Provide gutter hangers every 3 feet.
·
Do not exceed 45 degree angle bends in horizontal pipe runs.
·
Select elbows in 45, 60, 75, or 90 degree sizes.
41
TABLE - 16
GUIDELINES
Downspouts
·
Space downspouts a minimum of 20 feet apart, a maximum of 50
feet apart.
·
Provide 1 square inch of downspout area, for every 100 square
feet of roof area.
·
Select downspouts in different configurations -- square, round,
and corrugated round, depending on your needs.
·
Use 4-inch diameter Schedule 40 PVC to convey water to the
storage container or filter.
Gutter drain filter.

42
Size your storage container(s) large enough to hold your calculated supply. Provide for
distribution to all planted areas. Water collected from any catchment area can be distributed
to any landscaped area; however, to save effort and money, locate storage close to plants
needing water and higher than the planted area to take advantage of gravity flow. Pipes
(Schedule 40), hoses, channels, and drip systems can distribute water where it is needed.
If you do not have gravity flow or if you are distributing through a drip system you will need
to use a small
1/2
HP pump to move the water through the lines. Select drip irrigation
system filters with 200 mesh screens. The screen should be cleaned regularly.

43
CONCLUSION
Historically, people relied on harvested rain water to provide water for drinking, landscape
watering, and for agricultural uses. Once urban areas started to develop, large, centralized
water supply systems replaced the need to harvest water. More recently, people have become
reacquainted with water harvesting, using it to provide water for home gardens, parking lot
trees, multi-housing lawns, and commercial landscapes featuring desert-adapted plants.
Homes, schools, parks, parking lots, apartment complexes, and commercial facilities all
provide sites where rainfall can be harvested. Many methods are available to harvest rain
water for landscape use. Some of them inexpensive and easy to construct, for example,
storing water in a barrel for later use or constructing small berms and drainages to direct
water to a row of trees. All you need to get started is rainfall and plants that require irrigation.
Even the most simple methods provide benefits. The water customer benefits from lower
bills and the community achieves long-term benefits which reduce groundwater use and
promote soil conservation.
44

45
Footnotes
1
Evapotranspiration ET
o
is an estimate of atmospheric demand and is a useful reference
point when determining plant irrigation need. ET
a
is an estimate of the water lost when a
plant transpires or sweats through its leaves plus the water evaporated from the soil
surface. This value is always a percent of ET
o
and varies according to species and other
factors.
2
California Department of Water Resources, Captured Rainfall: Small-Scale Water Supply
Systems, Bulletin 213. May 1981.
3
The tables are for determining potential storage, they are not for weather prediction.
Weather may vary from the average at any time.
4
Household water collected from sinks, showers, washing machines for reuse as landscape
irrigation. In Arizona greywater systems require a permit from the Arizona Department of
Environmental Quality.

46
Wyszukiwarka
Podobne podstrony:
business?rds for general use 3XHH6HVLSWV7KM7LH3RN2JRMUQYDYKYWRZYCKLA
CCI Job Interview Workbook 20 w PassItOn and Not For Group Use
Development of wind turbine control algorithms for industrial use
Kalmus, Realo, Siibak (2011) Motives for internet use and their relationships with personality trait
Efficient harvest lines for Short Rotation Coppices (SRC) in Agriculture and Agroforestry Niemcy 201
INSTRUMENT AND PROCEDURE FOR THE USE OF PYRAMID ENERGY
(gardening) Postharvest Handling for Organic Crops
(gardening) Weed Management for Organic Crops
(Gardening) Harvesting and storing vegetables
(gardening) Weed Management in Landscapes
uk ttps for the use of warrior in coin operations 2005
English Language For Daily Use
(Gardening) Native Landscaping For Birds, Bees, Butterflies, And Other Wildlife
(Gardening) Landscaping For Energy Efficiency
Schools should provide computers for students to use for all their school subjects
Anatomical evidence for the antiquity of human footwear use
Brainwashing How The British Use the Media For Mass Psychological Warfare by L Wolfe
więcej podobnych podstron