1
PM 731 Revised November 2002
Iowa State University Horticulture Guide
Home Gardening
Harvesting and
storing vegetables
by Richard Jauron
Harvesting vegetables at the right stage of maturity
results in high quality, nutritious products. If properly
harvested and stored, some vegetables will keep most
of their original flavor and food value for months.
Temperature and relative humidity are the keys to
successful vegetable storage. This publication will help
you harvest and store your vegetables at their peak
flavor. See Table 1 for optimal storage conditions for
each crop.
Asparagus
Cut or break stems at the soil line when shoots are 6 to
8 inches tall and before tips start to open. Discontinue
harvest by early June in southern Iowa and June 15 in
northern Iowa for best flavor and plant health. Eat or
process asparagus within a few hours after harvest for
the highest quality.
Beans (green or wax, snap)
Harvest when pods are almost full-sized but before seeds
begin to bulge. Pick often to keep plants bearing longer.
Beans (broad, green shell, lima)
Pick when seeds and pods reach full size but before pods
turn yellow. Store in pods.
Beans (dry)
Pick when seeds are dry and mature on the plant.
Protect beans from moth or weevil damage by freezing
at 0
°
F for 3 to 4 days or by heating in an oven at 180
°
for 15 to 20 minutes. Store in a sealed glass jar.
Beets
Use as greens when the leaves are 4 to 6 inches tall; as
tops and small beets when roots are 1 to 1
1
⁄
2
inches in
diameter; and as roots only when they are 1
1
⁄
2
to 3 inches
in diameter. Remove tops to
1
⁄
4
to
1
⁄
2
inch and store.
Black-eyed pea or cowpea
Pick when seeds are near full sized but still bright green.
Harvest as mature or dry seeds when seeds are full size
and dry.
Broccoli
Cut when flower heads are blue-green and 6 to 7 inches
across but before small yellow flower buds start to open.
The stem below the flower head and small leaves is also
very nutritious. Tender side shoots (1 to 3 inches across)
should develop after the central head is removed.
Brussels sprouts
Harvest individual sprouts or buds from the base of
the plant as they become solid. Buds should be 1 to
1
1
⁄
2
inches in diameter and still tender and green.
Remove buds higher up on the plant as they become
firm. Do not strip the lower leaves from the plant since
they are necessary for further growth. Brussels sprouts’
flavor is improved by light frost.
Cabbage
Cut when heads become large and solid. Remove the
loose cover leaves and store.
Large heads are prone to splitting if not harvested
promptly. Splitting is caused by excessive water uptake;
the resulting pressure splits the heads. Splitting of large
heads can be reduced by pulling the plants upward
and gently twisting. This procedure breaks some of
the plant’s roots, reducing water intake. Splitting also
can be reduced by planting cultivars that hold well,
such as ‘Stonehead’ and ‘Dynamo’.

2
Table 1. Recommended storage temperatures, relative humidities, and storage life for fresh vegetables.*
Relative
Approximate
Suggested Methods
Temperature
Humidity
Length of
for Extended
Vegetable
°
F
(
°
C)
(percent)
Storage Period
Preservation
Asparagus
32–35
(0–2)
95–100
2–3 weeks
Freeze or can
Beans
green or snap
40–45
(4–7)
95
7–10 days
Freeze or can
lima or broad
37–41
(3–5)
95
5–7 days
Freeze or can
Beets, topped
32
(0)
98–100
4–6 months
Freeze, can, or pickle
Broccoli
32
(0)
95–100
10–14 days
Freeze or can
Brussel sprouts
32
(0)
95–100
3–5 weeks
Freeze or can
Cabbage
early
32
(0)
98–100
3–6 weeks
Sauerkraut
late
32
(0)
98–100
5–6 months
Sauerkraut
Carrots, mature
32
(0)
98–100
7–9 months
Freeze, can, or pickle
Cauliflower
32
(0)
95–98
3–4 weeks
Freeze or can
Celery
32
(0)
98–100
2–3 months
Cucumbers
50–55
(10–13)
95
10–14 days
Eggplants
46–54
(8–12)
90–95
7 days
Can
Garlic, dry
32
(0)
65–70
6–7 months
Kohlrabi
32
(0)
98–100
2–3 months
Freeze
Leek, green
32
(0)
95–100
2–3 months
Lettuce
32
(0)
98–100
2–3 weeks
Melons
muskmelon (full-slip)
32–36
(0–2)
95
5–14 days
Freeze
watermelon
50–60
(10–15)
90
2–3 weeks
Freeze
Okra
45–50
(7–10)
90–95
7–10 days
Can, freeze, or pickle
Onion
green
32
(0)
95–100
3–4 weeks
dry
32
(0)
65–70
1–8 months
Parsnips
32
(0)
98–100
4–6 months
Can or freeze
Peas, green
32
(0)
95–98
1–2 weeks
Freeze or can
Pepper, sweet
45–55
(7–13)
90–95
2–3 weeks
Freeze
Potatoes
38–40
(3–4)
90–95
5–10 months
Can
Pumpkins
50–55
(10–13)
50–70
2–3 months
Radishes, spring
32
(0)
95–100
3–4 weeks
Rhubarb
32
(0)
95–100
2–4 weeks
Freeze
Spinach
32
(0)
95–100
10–14 days
Freeze or can
Squash
summer
41–50
(5–10)
95
7–14 days
Can or freeze
winter
50
(10)
70
1–6 months
Can or freeze
Sweet corn
32
(0)
95
5–8 days
Freeze or can
Sweet potatoes
55–60
(13–16)
85–90
4–7 months
Can or freeze
Swiss chard
32
(0)
95–100
10–14 days
Freeze or can
Tomatoes
ripe
46–50
(8–10)
90–95
4–7 days
Can or freeze
mature green
55–70
(13–21)
90–95
1–3 weeks
Pickle
Turnips
32
(0)
95
4–5 months
*Based on information from United States Department of Agriculture Publication No. 66,
The Commercial Storage of
Fruits, Vegetables, and Florist and Nursery Stocks.

3
Cantaloupe
See Muskmelon.
Carrots
Dig when roots are
3
⁄
4
inch or more across. Remove tops
to
1
⁄
4
to
1
⁄
2
inch. If they are to be stored, plant for a late
harvest and leave them in the ground until just before
heavy frost.
Cauliflower
Harvest when heads are full sized (6 to 8 inches across)
but still compact and smooth. Overmature heads will
begin to open up and become “ricey.” Heads exposed
to sunlight are cream colored. To obtain white heads,
blanch the heads when approximately 2 to 3 inches in
diameter. Using twine or cloth strips, loosely tie the
inner leaves over the heads. Or, cover the heads with
large cabbage leaves.
Celery
Harvest when 12 to 15 inches tall. For immediate use,
harvest when smaller or cut a few leaves as the plant
grows. If left in the garden until early winter, pile straw
and soil around the plants to protect against freezing.
Cucumbers
Pick when fruits are 1
1
⁄
2
to 3 inches long for pickling and
3 to 4 inches long for dills. Slicing cucumbers should be
6 to 9 inches long and 1
1
⁄
2
to 2 inches in diameter but
still bright green and firm. Remove fruit by pulling up
and giving a quick snap. Promptly harvest fruits when
they reach the desired size. Overmature cucumbers left
on the vine inhibit additional fruit production.
Eggplant
Harvest any time after fruits are 2 inches across until
they are 4 to 6 inches in diameter but still firm and shiny.
Light thumb pressure will leave a dent at the proper
harvest stage. Old fruit is dull, seedy, and tough. Store
with an inch of stem on fruit.
Garlic
Pull when tops become dry and begin to fall over or just
before first frost if not mature. Cure the bulbs in a warm,
well-ventilated place for 10 days. Then remove the tops
about 1 inch above the bulb and trim roots close to bulb.
Kohlrabi
Has mildest flavor when thickened stems are 2 to 3
inches in diameter. Store with leaves and roots removed.
Leek
Pull when less than 1 inch in diameter for use in salads.
Use large ones in stews and soups.
Lettuce
Leaf lettuce is crispest when outer leaves are 4 to
6 inches long. Harvest largest plants and allow small
ones in between to develop.
Harvest head lettuce when heads are full size and
moderately firm but before seed stalks form. Outer
leaves may be removed from leaf or head lettuce when
leaves are 4 to 6 inches. New inner leaves will provide
continuous harvest. Hot weather causes bitter flavor
and seed stalk formation.
Muskmelon or cantaloupe
Muskmelon is most tasty when fully ripe. Fruit is nearly
ripe when the base of the fruit stem starts to separate
from the fruit. It is fully ripe when a crack appears
completely around the base of the fruit stem allowing
easy separation from the fruit. At the same time, the skin
between the netting will turn from green to yellow and
the fruit begins to give off a muskmelon aroma. Place
refrigerated melons in sealed plastic bags to prevent the
musky aroma from flavoring other foods.
Okra
Cut when pods are 3 inches long but are still bright
green (or purple on some cultivars). Use quickly
as okra deteriorates rapidly after harvest. Continue
removing all pods to keep plant producing.
Onion (green)
Any standard variety of onion can be used as a green
onion when the bulbs are small. Harvest when 6 to
8 inches tall. Onion greens are nutritious and can
be chopped into salads.
Shallots are a multiplier type of onion that divide
into clumps of small bulbs. Harvest shallots as green
onions in summer or as dry onions in fall when the
tops fall over.
Onion (dry)
Onions grown from seeds and plants usually store better
than those from sets. Harvest when tops fall over and
begin to dry. Pull with tops on and dry them in a pro-
tected place for 3 to 4 days, then cut tops 1 inch above
the bulb and place in mesh bags for further curing. Cure

4
for 2 to 3 weeks at room temperature until the neck
tightens up and outer scales begin to rustle. Then store
onions in a well-ventilated place.
Use ‘Bermuda’ and ‘Sweet Spanish’ onions soon after
harvest because they store only 1 to 2 months. Globe-
type onions keep up to 8 months in storage.
Parsnips
Dig from late fall until early spring. Parsnips need some
frost to give the characteristic sweet nutlike flavor. If the
roots are to be left in the soil during winter, cover after
early frosts with a layer of straw and 3 to 5 inches of soil
to prevent winter injury.
Peas
Peas are tender and flavorful if picked when pods are
well filled but not hard and starchy. Pick often and don’t
miss any—overripe pods retard production. Store peas in
the shell.
Harvest edible podded snow or sugar peas when pods
reach nearly full size (about 3 inches) and while the
seeds are still small. If seeds only are to be eaten, harvest
when seeds are fully developed but pods are still fresh
and bright green.
Snap peas, another edible podded pea, are best picked
when the seeds are nearly full size.
Pepper, sweet
Harvest when fruits are large, firm, crisp, and dark green.
Fully ripe peppers are slightly sweeter and may be red,
orange, yellow, or other colors.
Potatoes
Potatoes can be harvested when the tubers are small and
immature (“new” potatoes) or when the crop is fully
mature. New potatoes are harvested when the vines are
lush and green. The small, immature potatoes have thin
skins and do not store well. Refrigerate new potatoes and
use as soon as possible.
Potatoes grown for fall and winter use should be care-
fully dug after the plants have died (turned brown)
and the crop is fully mature. To check crop maturity,
dig up one or two hills after the plants have died. If the
skin is thin and rubs off easily, the potatoes are not fully
mature and will not store well. Allow the crop to mature
in the soil for several more days before harvesting the
rest of the hills. When harvesting, avoid cutting or
bruising the potatoes. Use damaged tubers as soon
as possible.
Before placing the potatoes in storage, cure the tubers at
a temperature of 45 to 60
°
F and relative humidity of
85 to 95 percent for 2 weeks. Curing promotes healing
of minor cuts and bruises and thickening of the skin.
Once cured, sort through the potatoes and discard any
soft or shriveled tubers. These potatoes may spoil in
storage and destroy much of the crop. Potatoes should
be stored in a dark location with a temperature of
38 to 40
°
F and a relative humidity of 90 to 95 percent.
Potatoes will sprout if temperatures are too warm, while
they will taste sweet if temperatures are too cool. Do not
allow potatoes to freeze.
Pumpkins
See Squash (winter).
Radishes
Pull when roots are 1 to 1
1
⁄
2
inches in diameter, remove
tops, and store up to 15 days. Large winter radishes store
2 to 4 months.
Rhubarb
When stalks are 10 to 15 inches long, grasp the stalk
below the leaf blade and pull upward and slightly to one
side to harvest. Discard leaf portion—eating this material
can cause illness. Harvest only for 8 to 10 weeks ending
in mid-June.
Spinach
Harvest when larger leaves are 6 to 8 inches long.
Early spring plantings go to seed as days get longer.
Early August seedings do not go to seed during the
shorter days of fall.
Squash (summer)
Harvest long fruited cultivars when they are about
2 inches in diameter and 6 to 12 inches long. Flat or
scalloped types are best when 3 to 5 inches in diameter.
The rind should be easy to puncture with a fingernail
and seeds should be soft and edible. However, such
surface punctures are likely to result in brown or
discolored blemishes. Some professional growers require
pickers to wear gloves to avoid surface injuries.

5
Squash (winter) and pumpkins
Mature winter squash have hard skins (rinds) that
cannot be punctured with the thumbnail. Additionally,
most mature winter squash have dull-looking surfaces.
Pumpkins should be uniformly orange. When harvest-
ing, leave a 1-inch stem on the winter squash and a 3- to
4-inch stem on pumpkins.
Store winter squash and pumpkins in single layers to
allow air circulation and reduce fruit rots. Acorn squash
can be stored for 5 to 8 weeks. Butternut squash and
pumpkins will keep 2 to 3 months. Hubbard squash can
be stored for 3 to 6 months.
Sweet corn
Harvest sweet corn at the milk stage. At this stage the
silks are brown and dry at the ear tip. When punctured
with a thumbnail, the soft kernels produce a milky juice.
Overmature corn is tough and doughy. An immature ear
will not be completely filled to the tip and the kernels
produce a clear, watery liquid when punctured.
Sweet corn remains in the milk stage for a short time. As
the sweet corn approaches maturity, check it frequently
to ensure high quality.
Harvest sweet corn by grasping the ear at its base and
then twisting downward. Use or refrigerate immediately
as quality declines rapidly after harvest.
Sweet potatoes
Harvest late in fall before frost. Dig carefully to avoid
cuts, bruises, and broken roots. Sweet potatoes do
not store well unless the growing season is long and
the roots are large. Use small, younger roots soon
after harvest.
When mature, a broken or cut surface dries on exposure
to air, while an immature one remains moist and turns
dark in color. If vines are damaged by frost, harvest
immediately to prevent entrance of decay organisms
from dead stems.
Sweet potatoes must be cured after harvest for good
storage. Cure for 1 week at 85
°
F and 90 to 95 percent
relative humidity and then store at 55–60
°
F. Increase
curing time if temperatures are lower.
Swiss chard
Use outer, older leaves as they become 8 to 10 inches
long but are still young and tender. New leaves growing
from the center of the plant produce a continuous
harvest. Cut carefully to avoid injury to the center bud.
Tomatoes
For fully ripe tomatoes, leave completely red fruits on
plants for an additional 5 to 8 days. Pick only ripe but
firm tomatoes for juice or canning to ensure proper
acidity, full flavor, and good color. Overripe tomatoes
may be lower in acidity and not be safe to can. Ripe
tomatoes should be stored at 46–50
°
F and 90 to
95 percent relative humidity. Harvest green tomatoes
before frost and keep at 55–70
°
F to ripen.
A few green tomatoes can easily be ripened on the
kitchen counter. Ripen large numbers by wrapping
individual fruits in newspaper. Place the wrapped
tomatoes in single layers in boxes or on shelves. Check
ripening every few days. Light is not necessary for
ripening of immature tomatoes.
Turnips
Dig when fruits are 2 to 2
1
⁄
2
inches in diameter but
before heavy frosts. Store with tops for 4 to 5 months.
Watermelon
Harvest when fruits are full sized, dull in appearance,
and the bottom part (portion touching the soil) turns
from greenish white to cream. Leave 2 inches of stem on
the watermelon for storage.
Storing vegetables
Many fresh vegetables can be successfully stored in your
home. Refrigeration is helpful but not necessary. Base-
ments, cellars, outbuildings, and pits can be used for
storage if they are vented to the outside.
Store only healthy, fresh produce that is free from
disease, insect, and mechanical damage. Use any
damaged ones immediately. Select late ripening cultivars
with late planting dates and harvest as late as possible.
(See Table 1 for the best vegetable storage conditions.)
For best results, store fruits (apples, pears, etc.) and
vegetables separately. For the most part, fruits and
vegetables have different storage requirements. Addition-
ally, some fruits may adversely affect the storage of
vegetables and vice versa. For example, ripening apples,

6
pears, and other fruits release ethylene gas that may
shorten the storage life of winter squash and pumpkins.
When stored together, cabbage may affect the flavor of
apples and pears.
Storage conditions
Temperature control
Accurate temperature control is necessary for long-term
storage of vegetables. Two thermometers are needed.
One is placed in the coldest part of the storage area and
the other outdoors. Early in fall open the vent whenever
the outside temperature is lower than the inside tem-
perature and close it when the outside temperature is
higher. This means daily opening and closing of the
vents to cool the storage area in fall. When the weather
gets cold, only a small opening is needed.
Be careful produce doesn’t freeze during extremely cold
weather. For most vegetables, the ideal storage tempera-
ture is 32–40
°
F. A lower temperature could result in
injury. Vegetables stored at higher than 40
°
F could rot.
Humidity control
Stored vegetables quickly shrivel and lose quality
without proper moisture. Most storage areas must have
the humidity raised to reach the ideal 90 to 95 percent
relative humidity that most vegetables need. A simple
humidity gauge from most hardware stores is the best
way to measure the relative humidity.
Sprinkling the floor with water or using a humidifier will
raise the humidity. Large pans of water or a floor cover-
ing of wet straw or sawdust will also work. However, the
easiest and most effective way to control moisture loss
and prevent shrinkage is to place vegetables in polyethyl-
ene bags or to line storage boxes with polyethylene.
Make several
1
⁄
4
- to
1
⁄
3
-inch holes in the sides of the bags
and liners to permit ventilation. Three or four
1
⁄
4
-inch
holes per pound of vegetables results in a high relative
humidity of 90 to 98 percent. When moisture collects
on the inside of the bag, the relative humidity is 98 to
100 and a few more holes should be punched to reduce
it slightly.
If stored vegetables shrink and shrivel, the humidity
must be raised. Excessive spoilage or decay indicates the
humidity is too high or that the vegetables have been
stored too long.
Waxing
Wax or wax emulsion has been used commercially
for many years to improve vegetable storage. Waxing
reduces moisture loss and thus retards shriveling. On
some vegetables, waxing simply improves appearance.
Because the wax thickness is critical and difficult for the
home gardener to control, waxing is not recommended
for home use. Coatings that are too thin may give little,
if any, protection against water loss; a thick coat may
increase decay and breakdown. Storing vegetables in
perforated plastic bags will accomplish the same purpose
with less effort.
Sanitation of storage room
Storage facilities must be kept clean or vegetables
deteriorate. Watch vegetables carefully to avoid losses
from decay, growth, or excessive shriveling. Remove
decaying vegetables at once to prevent rot from
spreading. At least once a year remove all containers
from your storeroom, clean them with a disinfectant,
and air them in the sun. Thoroughly wash walls,
ceilings, and floors of the storeroom before putting
the containers back into storage.
Storage structures
Refrigerator
A second refrigerator is useful for storing small to
moderate amounts of vegetables. However, a properly
regulated basement storage area is more economical to
use and holds much larger quantities of vegetables. Most
refrigerated vegetables store best if kept in perforated
plastic bags.
House basement
A basement under a house with central heating may be
used for ripening tomatoes and short-term storage of
potatoes, sweet potatoes, onions, pumpkins, and winter
squashes. However, it is necessary to provide a separate
room for long-term storage of most vegetables in a
basement with a furnace.
Locate this room in the northwest corner of your
basement. Insulate inner walls and ceiling to prevent
entrance of heat or chilling of the floor above the room.
If possible, do not have heating pipes or ducts running
through the room.
The room should have at least one window or vent to
allow outside air to cool the room. Bring cool outside
air into the storage room through a cold air intake with

7
a ventilating flue extending down to the floor. Another
part of the window near the ceiling can serve as the
warm air outlet (Figure 1). Cover openings to the
outside with screen to keep mice out. Shade the window
or vents so the room will be kept dark for storage
of potatoes.
If large amounts of fruit are to be stored, add a partition
and separate vent to avoid injury to the vegetables from
gases given off by ripening fruit.
Equip the room with shelves so produce will be kept off
the floor to increase air circulation.
Temporary mounds or pits
Cone-shaped mounds or pits can be constructed to store
potatoes, root vegetables, and cabbage through most
of the winter. While not very convenient, they are an
economical way to store fresh vegetables.
For storage until early winter, dig a hole 10 to 24 inches
deep and several feet in diameter in a well-drained
location where surface water runoff will not be a
problem. Storage through the winter requires the pit
to be 3 to 4 feet deep. Place the pit where it will receive
winter sunlight to prevent freezing of the vegetables.
Add a layer of straw to the surface of the ground and
stack the vegetables on the straw in a cone-shaped pile.
Never store fruits and vegetables in the same pit. Place a
12-inch layer of straw over the vegetables and then add
an 8- to 12-inch layer of soil over the entire pile. Use an
additional layer of straw and soil for storage through the
winter. Pack the outer layer of soil with the back of a
shovel to make the pit waterproof. Finish by digging a
shallow drainage ditch around the pit to allow water to
drain away from the stored vegetables.
With small pits, provide ventilation by extending the
straw layer to the top of the pile. Cover the opening with
a piece of screen and a stone to prevent rodent damage.
In late fall, when the soil starts to freeze, cover the
opening with two pieces of board nailed together at
right angles.
Pits are difficult to open in cold weather. Once a pit is
opened, its entire contents should be removed to prevent
freezing of the remaining vegetables. Therefore, it is
advisable to make several small pits, each containing a
mixture of vegetables. This makes it easy to open only
one pit to get a variety of vegetables.
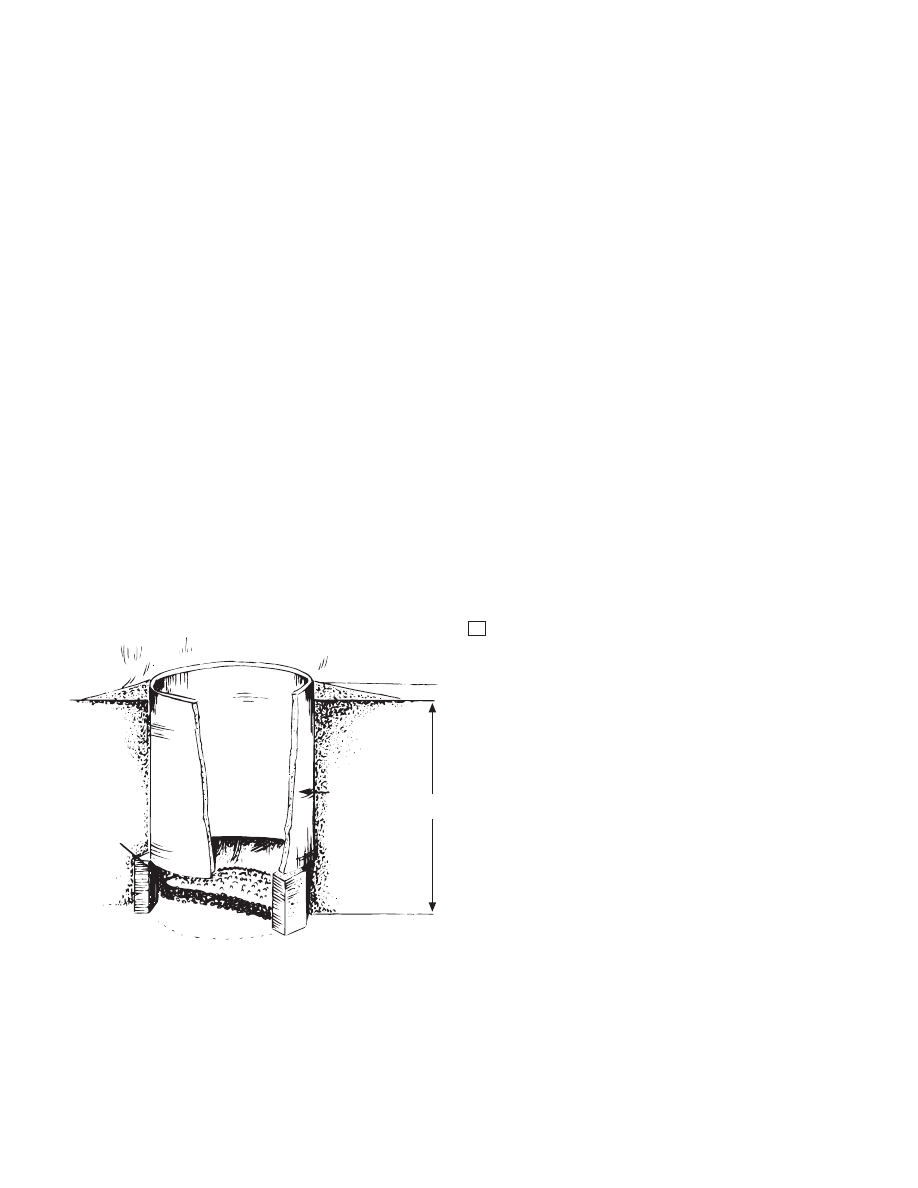
Tile storage
Another method of outdoor storage is a buried drain tile.
Root crops, potatoes, and other vegetables that require
cool, moist storage are well adapted to tile storage.
Tile size may vary from 18 to 30 inches inside diameter
and 2 to 3 feet in length. Concrete or clay tiles are best
because they are more durable than wood and conduct
less heat than steel. Locate the tile in a convenient, well-
drained place, away from possible overflow water and
downspouts. Dig a hole just large enough in diameter to
let the tile fit snugly. The hole should be 6 inches deeper
Figure 1. Overall view into storage room
(Courtesy University of Wisconsin)
Vapor Barrier
(Polyethylene)
Fiberglass
Blanket
Insulation (6”)
Outlet Door
Plywood
Paneling
Cold Air Duct
Vapor Barrier
Redwood or
Pressure-treated Plates
Potato
Bin
Outdoor buildings and cellars
Outdoor buildings are a difficult place to store
vegetables. However, if they are well insulated, have
adequate ventilation, and a source of supplemental heat,
they will work satisfactorily.
Outdoor cellars, properly constructed, are excellent
for storing many vegetables, especially the root crops,
potatoes, kohlrabi, and cabbage. Outdoor cellars should
have at least one vent to the outside to provide cooling
and ventilation during the fall.
If you do not already have an outdoor cellar for vegetable
storage, it is probably not a good investment to build
one. A well-constructed and managed basement storage
room is not only more convenient and just as good but
more economical.
8
2” Drainage
Material
8” Brick
24”
⫻ 24” Tile
Earth Fill
2’6”
Figure 2. A 24"
⫻ 24" tile will store about 6
1
⁄
2
bushels.
(Courtesy University of Wisconsin)
than the length of the tile. Place three or four standard
size bricks on end, flat side to the wall, for a base (see
Figure 2). This will leave 8 inches of exposed soil below
the tile to supply moisture to the vegetables. Lower the
tile into the hole and mound the soil up to the top edge
of the tile. Add a 2- to 3-inch layer of coarse gravel or
sand to the bottom for drainage.
Chill the ground around the tile by removing the lid in
the evening and replacing it every morning for a week.
Then water the tile and drainage material in the bottom
and cover for several days to raise the humidity. The
vegetables should be thoroughly cooled in the refrigera-
tor or in outside air before being packed for storage.
Adding warm vegetables to the tile will raise the tem-
perature in the storage area.
Place vegetables in bushel baskets, mesh bags, or other
ventilated containers. Vegetables kept in containers will
store better and be easier to remove than if they are solid
packed in the tile.
Covering the tile with a layer of hardware cloth or wire
screen prevents rodents and provides ventilation. Spread
several inches of straw, chopped cornstalks, or other
coarse mulch over the screen. Cover entire pile with a
waterproof cover.
When the average outdoor temperature is less than 32
°
F,
the tile will have to be protected from cold temperatures.
Place a layer of insulation, such as fiberglass, over the
vegetables and then place a weatherproof cover, such
as wood, over the top of the tile. Increase the mulch to
2 feet or more in depth and several feet in diameter over
the cover. This will help prevent freezing of the
vegetables during winter. Finally, cover mulch with
a waterproof cover.
Vegetables can be stored until May in a tile storage. The
tile may be opened any time. A long handled hook made
from heavy wire makes removal of baskets or bags easier.
For more information
For more information on selection, planting, cultural
practices, and environmental quality, contact your Iowa
State University Extension office or visit these Web sites:
ISU Extension publications
http://www.extension.iastate.edu/pubs/
ISU Food Safety (home food preservation)
http://www.extension.iastate.edu/foodsafety
ISU Horticulture
http://www.hort.iastate.edu/
A
File: Hort and LA 2-9
Originally prepared by Linda Naeve, former extension
horticulturist. Revised by Richard Jauron, extension
horticulturist; Diane Nelson, extension communication
specialist; and Creative Services, Instructional Technology
Center, Iowa State University.
. . . and justice for all
The U.S. Department of Agriculture (USDA) prohibits discrimination
in all its programs and activities on the basis of race, color, national
origin, gender, religion, age, disability, political beliefs, sexual
orientation, and marital or family status. (Not all prohibited
bases apply to all programs.) Many materials can be made available
in alternative formats for ADA clients. To file a complaint of
discrimination, write USDA, Office of Civil Rights, Room 326-W,
Whitten Building, 14th and Independence Avenue, SW, Washington,
DC 20250-9410 or call 202-720-5964.
Issued in furtherance of Cooperative Extension work, Acts of May 8
and June 30, 1914, in cooperation with the U.S. Department of
Agriculture. Stanley R. Johnson, director, Cooperative Extension
Service, Iowa State University of Science and Technology, Ames, Iowa.
Wyszukiwarka
Podobne podstrony:
(Gardening) Care Of The Vegetable Garden
41 Lung health and fruit, vegetable consumption PL
(Gardening) Blackberries And Raspberries In Home Gardens
(gardening) Composting and peat free gardening
(Gardening) Harvesting Rainwater For Landscape Use
Harvesting And Drying Herbs Handbook
(gardening) Pests and Diseases
(gardening) Garden ponds and boggy areas havens for wildli
Potting and Garden Shed Gazebo
fruits and vegetables
12 FRUITS AND VEGETABLES
(Gardening) Grow Your Own Beans And Peas
DIY Small Plot Vegetable Gardening
Supply chain for vegetables and fruits
Organic Vegetable Gardening
Herbs Of The Field And Herbs Of The Garden In Byzantine Medicinal Pharmacy
fruit and vegetables decoding
(gardening) Roses in the Garden and Landscape Cultural Practices and Weed Control
więcej podobnych podstron