
A
RMSCOR
USER’S MANUAL
MODEL 1600
SEMI AUTOMATIC RIFLE
WARNING
READ THE INSTRUCTIONS AND SAFETY PRECAUTIONS IN THIS MANUAL
CAREFULLY BEFORE USING THIS FIREARM.
DISCHARGING FIREARMS IN POORLY VENTILATED AREAS, CLEANING
FIREARMS OR HANDLING AMMUNITION MAY RESULT IN EXPOSURE TO
LEAD AND OTHER SUBSTANCES KNOWN TO THE STATE OF
CALIFORNIA TO CAUSE BIRTH DEFECTS, REPRODUCTIVE HARM AND
OTHER SERIOUS PHYSICAL INJURY. HAVE ADEQUATE VENTILATION
AT ALL TIMES. WASH HANDS YOUR THOROUGHLY AFTER EXPOSURE.
M 1600 OPERATING INSTRUCTIONS
This rifle is shipped from the factory fully assembled and ready to shoot after
removing the grease from its bore.
TO LOAD MAGAZINE:
Hold the magazine box firmly with one hand and, with the other, insert
cartridge at the throat of the magazine. Push the cartridge against the spring
follower head down and forward towards the supporting notch until it is securely
locked. A maximum of fifteen rounds can be loaded.
Page 1 of 10

TO ATTACH MAGAZINE:
Load the magazine into the magazine box clearance of the trigger guard
housing. Keep it ahead of the magazine catch by pushing it inward until it locks in
place.
TO DETACH MAGAZINE:
Press magazine release and, simultaneously, pull the magazine from guard. The
catch opens up and releases the magazine from lock.
TO MAKE GUN SAFE:
Safety lever is at the right side of the receiver and rearward of the bolt operating
handle. Pull safety latch towards the “S” mark engraved on the receiver. Trigger is
locked up in the process and gun can no longer be fired.
TO LOAD CHAMBER:
Draw safety on and insert a loaded magazine into the rifle. Retract bolt handle
fully to the rear of the receiver slot and release. Allow the bolt to be snapped back
under the full force of the operating springs. Bolt automatically picks up a
cartridge from the magazine and feeds it into the chamber. Do not ease bolt
forward.
TO FIRE:
Be sure gun is pointed at a safe target. Release safety and pull the trigger.
Pressure from the burning powder opens up bolt, ejects empty shell, and reloads the
chamber for the next shot. Pull the trigger again. Gun fires as fast as the trigger is
pulled until magazine is empty.
TO UNLOAD WITHOUT FIRING:
Draw safety on and release the magazine from guard. Work action several times
to remove any cartridge left inside the chamber. Slide bolt handle rearward and
lock piece. Inspect the chamber to make sure no cartridge is left. Empty magazine
can be placed back if desired.
Page 2 of 10

I. DISASSEMBLY
A. STOCK AND TRIGGER GUARD HOUSING
1. Remove the magazine by depressing the magazine catch.
2. Remove front screw of trigger guard housing and detach barrel-receiver
assembly from the stock.
B. TRIGGER GROUP
1. Remove the trigger by punching out trigger stop pin and pivot pin.
2. Remove the trigger spring and spring follower at the end of the housing.
3. Loosen the rear and front (trigger) housing hold down screws to disengage
the housing from the receiver.
CAUTION: Step number 3 is not recommended unless necessary. If it could
not be avoided, make sure to apply “Loctite” or Epoxy Glue on rear screw
threads when re-attaching the housing to the receiver.
C. BOLT ASSEMBLY
1. Loosen the receiver cap lock screw and unscrew the receiver cap. Be careful
as springs inside are under compression.
2. Pull out the unit assembly (recoil spring, recoil spring retainer and guide
sleeve, firing pin spring and firing pin spring guide head and stem). Keep all
of this in order together with the receiver cap to avoid confusion I re-
assembly.
3. With the muzzle pointing in an upward direction, retract bolt handle fully to
the rear end of the receiver slot.
4. Push firing pin forward so as to align its tail end approximately even with the
receiver cap lock screw. (Firing pin is visible and is even with the rear end of
the bolt).
5. Pull out bolt handle and operating stud and remove bolt from the receiver.
II. ASSEMBLY
A. BOLT ASSEMBLY
1. Place firing pin at the rear end of the slot.
Page 3 of 10

2. Push bolt and firing pin into the receiver and align them with respect to the
receiver slot so that the bolt handle can be inserted through it past the bolt
and firing pin stud clearance. Slide bolt forward with bolt handle and stud
already inserted into it until it stops against the rebound lever.
3. While holding the trigger back with one hand, use any pointed object to trip
the rebound lever by moving it to the rear away from the sear in the
direction indicated by an arrow on the rebound lever. (See small sketch
engraved on the trigger housing).
4. Push bolt handle forward sliding the bolt over the rebound lever. Release the
trigger.
5. Insert recoil spring guide sleeve and retainer sleeve in recoil spring.
6. Insert firing pin spring guide into the firing pin spring.
7. Insert assembly #6, spring end first, into the recoil spring through the guide
sleeve (shorter sleeve).
8. Insert the entire unit inside the receiver, shorter sleeve resting against the
bolt. Place the receiver cap at the rear end of the unit assembly and
compress the springs carefully to return receiver cap into its original
position. Tighten the receiver cap lock screw.
9.
Pull bolt handle back and forth several times to check the action of bolt and
trigger assembly.
B. TRIGGER ASSEMBLY
1. With gun in upside down position, insert trigger spring follower into the
trigger spring and mount it onto the spring hole.
2. Insert the trigger, locating the catch of the rebound lever with the rear catch.
3. Insert the trigger stop pin and pivot pin into their respective holes.
4. Squeeze trigger several times to check the action of trigger spring. (Pull bolt
handle back and forth several times to check if trigger will release cocked
firing pin spring).
Page 4 of 10

CAUTION
The safety in your firearm is correctly designed, fitted and tested. However, any
mechanical device can fail. Never point your firearm at anything but a safe target
and never rely upon the safety to justify careless handling. USE HIGH VELOCITY
CALIBER 22 LONG RIFLE CARTRIDGES ONLY.
When loading, pull bolt handle fully rearward and allow it to snap forward sharply.
Breech area and magazine should be cleaned thoroughly.
SPECIFICATIONS
Model
: 1600 Cal.22LR
Semi-automatic
Rifle
Barrel Length
: 18 inches (457.20 mm)
Overall Length
: 38.375 inches (720.73 mm)
Weight : 6.5
lbs.
(2.95
kg.)
Magazine Capacity : 15 rounds
Sights
: Fixed peep rear sight, Post front sight
Stock
: Wooden
stock,
black
finish
Safety
: Positive
thumb
operated
safety
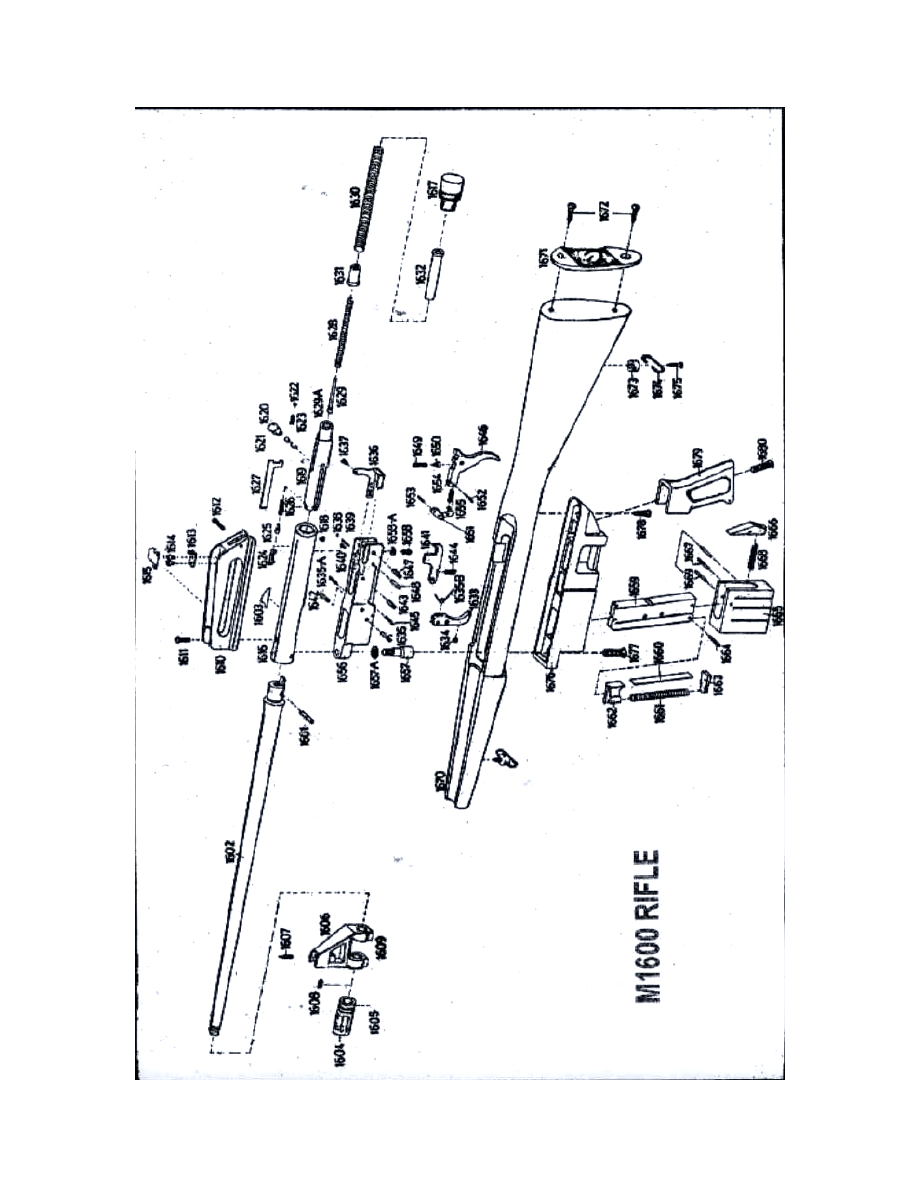
Part
No.
Part
Name
A. Barrel Receiver Assembly
1601
Barrel receiver cross pin
1602 Barrel
1603 Ejector
1604 Muzzle
brake
1605
Muzzle brake set screw
1606 Front
sight
1607
Front sight stud
1608
Front sight stud lock screw
1609
Front sight set screw
1610
Rear sight carrying handle
Page 5 of 10

1611
Rear sight carrying handle screw
1612
Rear sight carrying handle lock screw
1613
Rear sight leaf
1614
Rear sight leaf screws
1615 Flash
deflector
1616 Receiver
1617 Receiver
cap
1618
Receiver cap lock screw
B. Bolt Assembly
1619 Bolt
1620
Bolt operating handle
1621
Bolt operating stud
1622
Bolt handle locating bearing
1623
Bolt handle locating spring
1624 Extractor
1625 Extractor
plunger
1626 Extractor
spring
1627 Firing
pin
1628
Firing pin spring
1629
Firing pin spring guide head and stem
1629a
Firing pin spring guide head insert
1630 Recoil
spring
1631
Recoil spring guide sleeve
1632
Recoil spring retainer sleeve
C. Trigger Housing Assembly
1633 Magazine
catch
1634
Magazine catch button
1635
Magazine catch pivot pin
1635a
Magazine
catch
stop
pin
1635b
Magazine
catch
spring
Page 6 of 10

1636 Safety
latch
1637
Safety latch button
1638
Safety latch bearing
1639
Safety latch spring
1640
Safety latch screw
1641 Sear
1642
Sear pivot pin
1643
Sear stop pin
1644 Sear
spring
1645
Sear spring pin
1646 Trigger
1647
Trigger pivot pin
1648
Trigger stop pin
1649 Trigger
spring
1650
Trigger spring follower
1651 Rebound
lever
1652
Rebound lever pivot pin
1653
Rebound lever safety pin
1654
Rebound lever spring
1655
Rebound lever spring bearing
1656 Trigger
housing
1657
Trigger housing hold down screw (front)
1657a
Trigger housing hold down screw washer (front)
1658
Trigger housing hold down screw (rear)
1658a
Trigger housing hold down screw washer (rear)
D. Magazine Box Assembly
1659 Magazine
box
1660
Magazine box inner strip
1661 Magazine
spring
1662
Magazine spring follower
Page 7 of 10

1663
Magazine spring retainer
1664
Magazine spring retainer pin
1665 Magazine
cover
1666 Magazine
release
1667
Magazine release pivot pin
1668
Magazine release spring
1669
Magazine box retainer pin
E. Gun stock Assembly
1670 Gun
stock
1671 Butt
plate
1672
Butt plate retainer screw
1673 Swivel
head
1674 Swivel
ring
1675
Swivel screw (front)
1676
Swivel screw (rear)
1677 Grip
1678 Grip
screw
Page 8 of 10
Page 9 of 10

Manufactured by
ARMS CORPORATION of the PHILIPPINES
Parang, Marikina City, Philippines
Tel. Nos. (63) 941-62-43
• (63) 941-62-44 • (63) 941-54-80
Page 10 of 10
Document Outline
Wyszukiwarka
Podobne podstrony:
Żuraw POTAIN MD 1600
cps d1u 1600 48 hx
Instrukcja startowa Prestige 1600 1600V
Kyocera FS 1600 Parts Manual
30 A 1570 r 1600 r renesans, manieryzm
Nokia 1600 UG pl
Armscor Airpistol
1600 1 General Specs
nokia 1600
1600
ROZBICIE GOSPODARCZE I RELIGIE EUROPY 1500-1600, NAUKA, WIEDZA
1600 3200 man
31 B 1600 1640 r barok
cps d1u w 1600
1600
Curtea de Argeş 1600 - Bitwa o Rumunię, ★ Wszystko w Jednym ★
1600
KONFIGURACJA POZ, $$$$prace 2013$$$, energa, 04.MBST 20-1000 i 1600 POZ
31 A 1600 1640 r barok
więcej podobnych podstron