
May 16, 2010
Release notes
V2.1 (24 June 2004)
1. Added comments relating to the Net naysayers.
2. Added tutorial on how the AF system works.
3. Shot down a few myths about how the focus test works.
4. The test chart itself is unchanged from version 2.0.
V2.0 (12 June 2004)
This is a major release, hence the change to version2.x.
The test chart has been completely redesigned. It is now much easier to use and it produces more detailed information. The cut-out-and-fold-
into-a-box part has been done away with.
After much research into the focusing system of the Nikon D70, I realised that it’s totally unnecessary to have the focus panel that was part of
the design of earlier versions of this test. See notes further on about how the focus system works for more info.
This makes the whole thing so much easier to use and a lot less prone to the errors that I’ve seen with incorrectly set up tests and poorly
folded charts, boxes etc.
The Internet is wonderful
The Internet is a wonderful thing. Among its many benefits is that it provides a platform for anyone with Internet access to publish their
thoughts and ideas. That’s how it is that you’re reading this.
One of the disadvantages to this is that it’s all too easy for unhelpful, misleading or even harmful information to be published too.
Trying to sort the wheat from the chaff can be a daunting task, especially for those new to the Net or to the topic they’re reading up on.
Internet discussion forums, in particular, are very often spoiled by juvenile tit-for-tat jibes and silliness or by people who seem to exist solely
to cause problems.
Sometimes it’s as simple as a forum having a few detractors lurking about and spewing a little garbage now and then.
The Internet and this test
There has been some discussion in forums on the Internet about this focus test with some folks claiming with a blind, almost religious fervour,
that it gives flawed results and trying to dissuade people from using it.
Sadly this is not of much use to people looking for answers. In fact it just adds to their problems.
These zealots have justified what they have erroneously presented as fact by occasionally making reference to the works of others that they
have either misunderstood or that are not relevant to the context of this test or, in some cases, are simply incorrect.
None of these people has yet presented a single piece of conclusive evidence to support their scurrilous claims; much less provided a
mechanism for others to put those claims to the test. This is in stark contrast to what I have done with this test.
In other circumstances their behaviour would be actionable.
However, my intent here is not to tussle with these ignoramuses but rather to provide as much useful information as I can on the subject of
focus and, in particular, back focus, to anyone who wants it.
I welcome ALL constructive discussion on this subject as long as it’s intelligent and any claims presented as facts are supported. I’m always
open to learning new things and to admitting my mistakes.
This is not a business venture. I’m just a photographic hobbyist with a good technical background who has researched the subject thoroughly
and who has had a lot of fun in putting this all together.
I really like my Nikon D70 and have had loads of fun getting to know it and I continue to do so. It’s a brilliant camera and I’ll bet it’ll go down
in history as a benchmark.
Although there have been many incidents in Internet forums where the aforementioned individuals have falsely stated that the test described
in this document is worthless, there have been many, many more people who have entered into private exchanges with me via email (in order
Nikon D70 Focus test chart
Copyright Tim Jackson 2004
Version 2.1 - (24 June 2004)
Download
and print out this document (it's a PDF file).
If you simply print this web page, the test chart will be useless.
Previous versions of the test chart are
here
Sale Nikon D90 Body € 467
Available for delivery now! Save up to 40%
on a new Cameras
DSLR Astrophotography
A Guide to Astrophotography with Digital
SLR Cameras
Page 1 of 8
Nikon D70 Focus Chart
2010-05-16
to avoid those few forum cretins) and who have praised the work, thanked me for my efforts, offered suggestions for improvements and
additions, asked me to offer my opinion on their test shots and more.
I have been greatly encouraged by these folks. Thank you all!
On the next few pages is a wealth of detailed information on the auto focus system used in the Nikon D70 and how it works.
This includes some simple practical exercises you can do to help you better understand the system.
Following this is a useful test that will allow you to accurately test your auto focus system and lenses.
I hope this will be of use to you, both in determining whether your D70 needs attention, as well as being both fun and informative.
Read on!
The auto focus system in the D70
The auto focus (AF) system in the D70 is similar to a lot of other AF systems in that it works, essentially, by adjusting the focus to achieve the
best contrast between adjacent pixels on the focus sensor. If you’re not sure what this means, read on and it should become clearer.
If you have a subject with little or no contrast, like a clear sky, a white wall or even a just a plain sheet of paper, the AF system cannot
function.
Try it yourself:
First of all, try focusing on the centre of a blank sheet of paper. As long as you’re close enough or zoomed in close enough to the page so that
the centre focus sensor can see only the paper and nothing that surrounds it, the camera will not be able to focus.
The reason for this is that there is no contrast - no dark and light objects for the AF system to see in order to set the focus.
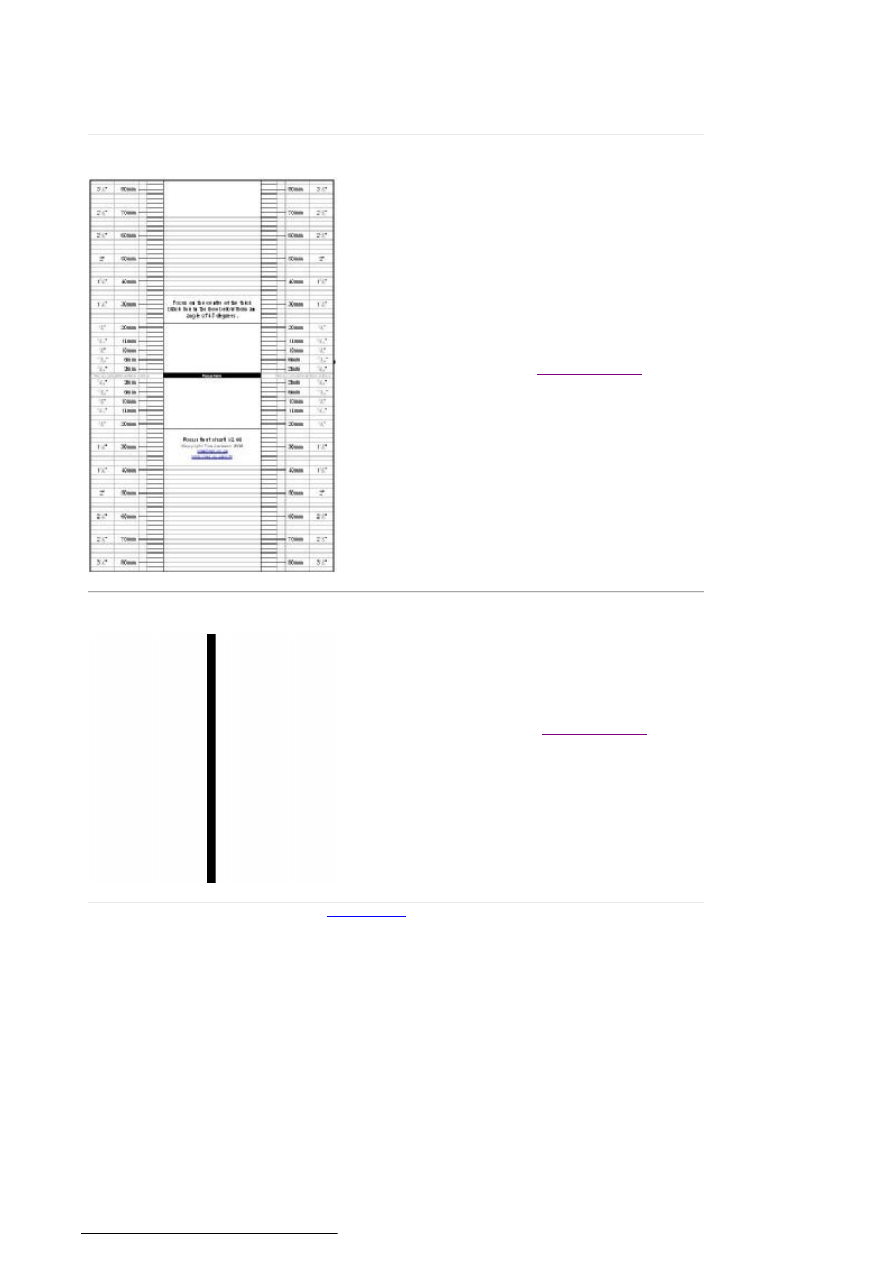
Now, imagine if you will the simplest possible focus target: A white page with a black line on it. (One is
included at the end of this document for you try out.)
If you were to aim your camera at the line on the page, placing your focus area over the black line, as
shown in the pic on the right, you’d find your camera would lock focus with ease.
Go on, try it out!
Try aiming at the line on the page square-on as well as from various angles. Notice how you easily get
focus lock.
This is because the camera’s AF system is easily able see a point of contrast and to adjust the focus until
this contrast is maximised for best focus.
Focus area markers and focus sensors
As you may already know, the focus area outlines you see when looking through the viewfinder are not identical to the actual focus sensors.
Please note that a number of practical exercises are included in this tutorial and you are encouraged, even urged, to try them all out for
yourself as you read through this. The understanding you’ll gain will help you a lot when using your camera.
Please make sure that your camera is set up correctly first, by following steps 7 through 11 in the Instructions section below.
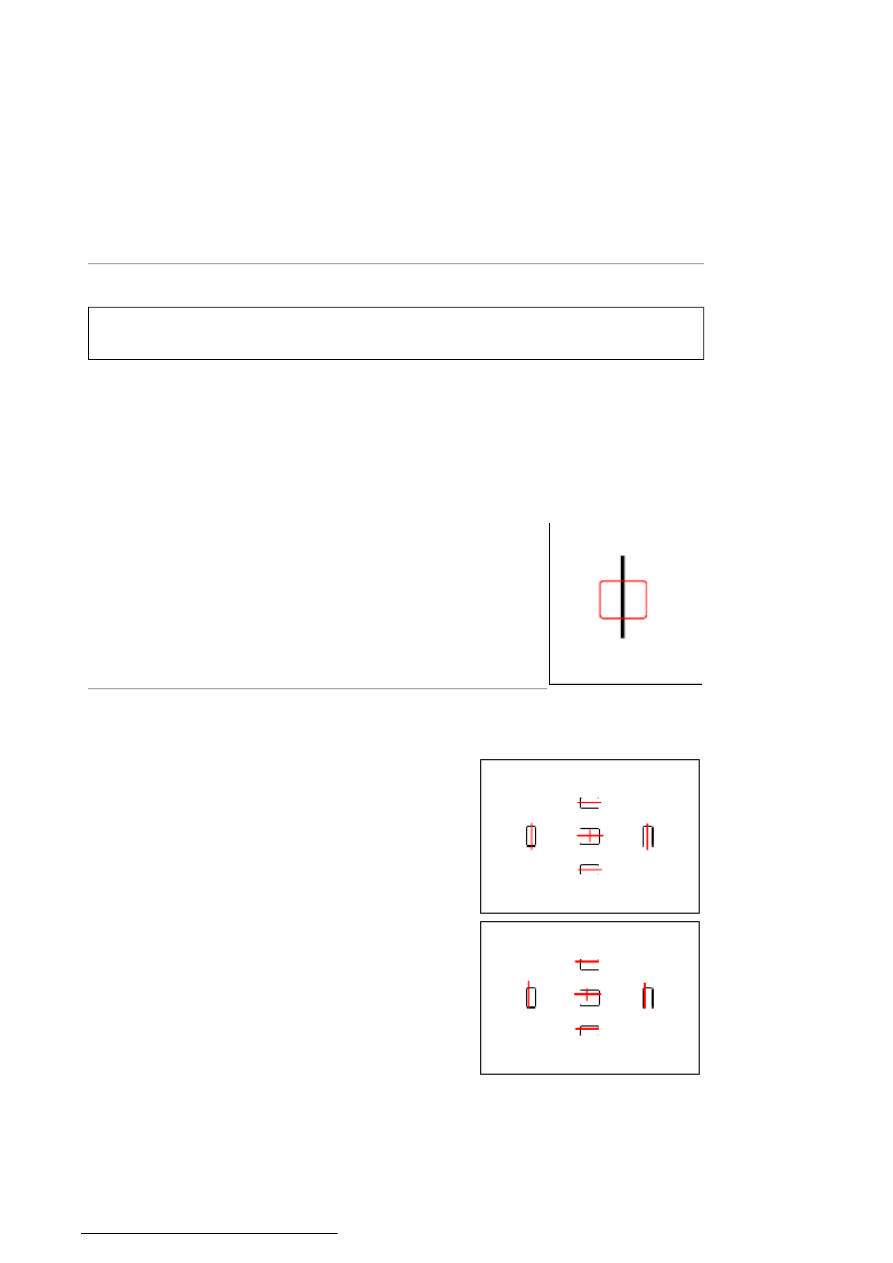
The outlines you see when you look through the view finder look like the black outlines
in this picture.
The actual electronic focus sensors are really looking at the areas shown in red.
So, the black outlines in the viewfinder are a guide rather than a precise definition.
Also, it can happen that the precise location of the sensors is not in the centre of the
viewfinder outline. You could have something like the pic on the right, for example. This
is a bit extreme but it illustrates the point.
You aim using the black outlines but the camera actually focuses using the sensors
shown in red.
Also notice how the focus sensors are not so much rectangles as they are lines.
Think of each of those red lines, or AF sensors, as tiny digital cameras, except, instead
of being a rectangle filled with rows and columns of pixels, as a normal camera would
be, they’re each just a row or column – a line of pixels.
Let’s go back to the white page with the black line on it.
Page 2 of 8
Nikon D70 Focus Chart
2010-05-16
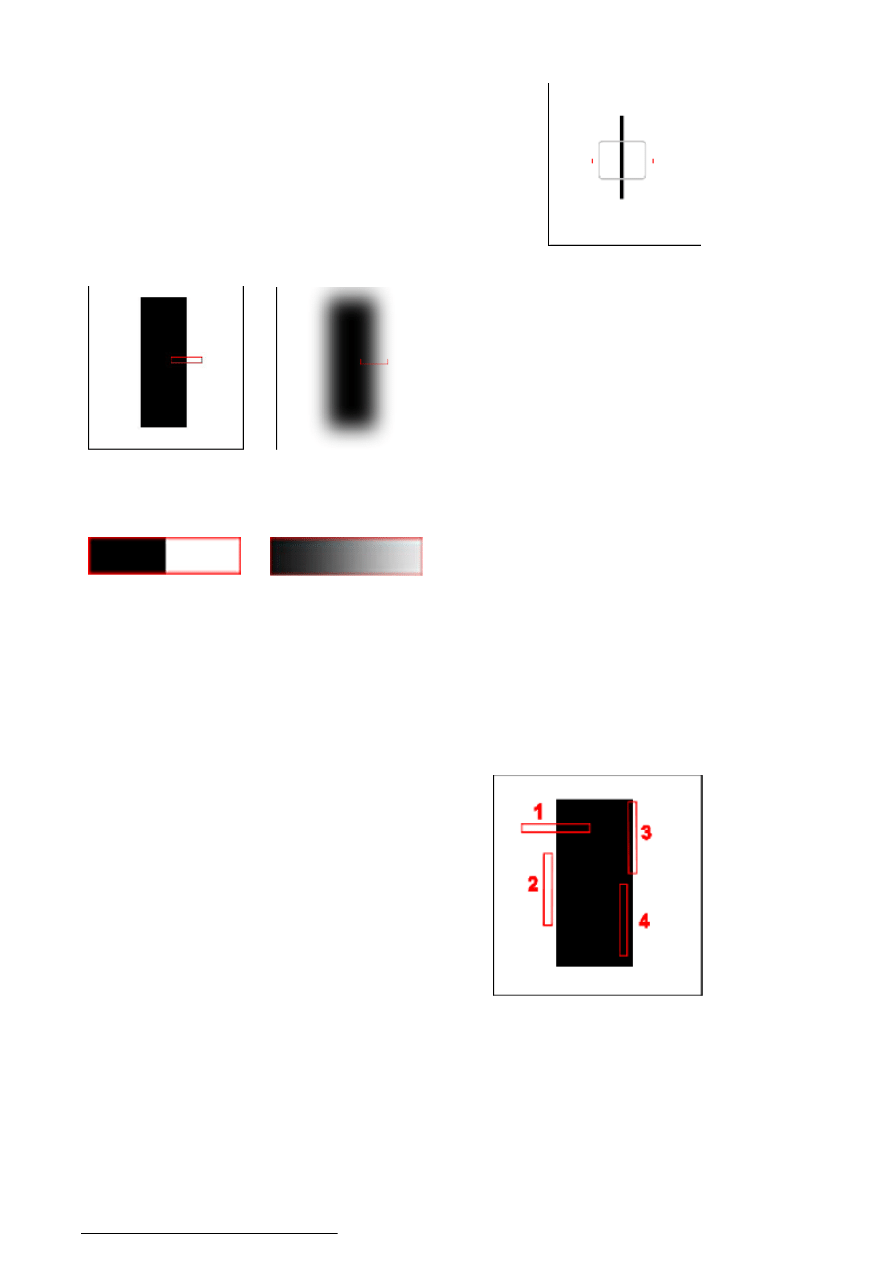
Here we have a section of the black line on our page. On the left, it’s in focus. On the right it’s out of focus. No kidding! J
Notice the small red selection on each image? That’s the bit the AF system is really interested in.
Let’s get microscopically close to see what the AF sensor sees.
Here’s what’s in the red zone for each of the above pictures:
Remember that the focus sensor is made up of pixels which are evaluated to determine when adjacent pixels have the greatest difference in
light level. This equals highest contrast.
In the image on the left, it’s pretty obvious that near the middle there are gonna be some very happy pixels because right next to each other
is a pair of pixels, one of which is dark and one of which is light. Huge contrast!
In the picture on the right, however, each pixel has a neighbour that is only very slightly brighter or darker than it is. Not so much contrast. L
The AF system sees this and adjusts the lens until it gets to the point where it achieves the greatest possible difference in light levels between
adjacent pixels.
Clever, huh?
Look back at the pictures on page 5 for a moment. Notice how some of the AF sensors are horizontal and some vertical. You’ll also notice that
the centre focus area has both horizontal and vertical sensors.
Each sensor is only able to assess areas of contrast that are not parallel to the sensor. The
area of contrast must cross the length of the sensor as in sensor 1 in this pic.
Remember how our black line ran at ninety degrees to the sensor so that the sensor could
see the edges of the line.
If the sensor is aligned parallel to the line (as are sensors 2, 3 and 4 in this pic) then it
cannot focus because all of the pixels in the sensor would always be at the same light level.
No contrast.
In this pic, only sensor 1 would provide useful focus info by virtue of having some pixels in
sharp contrast.
Remember that the sensor only sees a straight line. It is one-dimensional.
Sensor 2 in the pic would see all white.
Sensor 3 would see all grey.
Sensor 4 would see all black.
Here’s another exercise for you to try:
Change the AF sensor from the centre sensor to any one of the other four.
Try focusing on the line on the paper with the sensor at right angles to the line and then try it with the sensor parallel to the line.
Interesting, isn’t it! Not a lot of folks have a good understanding of that phenomenon.
When the sensor is anywhere near to being parallel to the black line the AF system won’t work.
Rotate your camera to various angles to see how much of an angle the sensor needs to be at relative to the black line before the system will
focus reliably.
If we use just one horizontal focus sensor for the sake of this explanation, then, when
we aim our camera so that a single focus sensor is over the black line, we would have
something like the pic on the right.
The focus sensor is positioned so that it can “see” the black line on our test page.
Page 3 of 8
Nikon D70 Focus Chart
2010-05-16

Ok, now switch back to the centre sensor, which has both horizontal and vertical elements.
Try the above focusing exercise again. You should find that you can rotate your camera to any angle relative to the line and it will focus.
Clever system indeed.
And now… The dreaded 45 degree debate
As most of you reading this will know, there are folks out there who say that the focus test chart included in this document is, amongst other
things:
l
Unreliable
l
Gives false positives for back focus
l
Is flawed
l
Cannot work
l
Should not be relied upon
l
Yada yada yada
Why do they say these things?
According to them, there are three main reasons:
1. The AF system doesn’t like the parallel lines on the chart. The parallel lines throw the AF system off track. The Nikon D70 manual
contains a warning about this.
2. The AF system doesn’t like focusing on a subject from an angle of 45 degrees as it is required to do in tests using the focus chart. It
won’t focus accurately and consistently.
3. The focus sensors aren’t actually where we think they are. They aren’t perfectly aligned with the focus area outlines as seen in the
viewfinder. This will lead to the focus sensor not being aimed perfectly at the black line, producing erroneous results.
Right, let me quickly squash these myths.
Number one is easy. The AF system doesn’t even get to see those parallel lines. Anyone who’s read the instructions and done the test
accordingly will know that the test involves the use of the centre focus sensor only and that this sensor is positioned over a single black line
which is surrounded by more than enough white space that the sensor has no chance of seeing anything other than the single black line.
Don’t forget that although we use the centre sensor, which has two segments (horizontal and vertical), only one of the two segments plays a
role as the other segment is parallel to the black line and therefore is ignored by the AF system.
The evil parallel lines on the chart are completely out of the picture. As far as the AF system is concerned they don’t exist.
Right, on to number two: Because the AF sensor only sees the single black line and nothing else except white, it is oblivious to the angle of the
chart.
The AF system is seeing a black line on a white background. If half of the white background happens to be a little closer to the camera and the
other half is a little further away it makes NO DIFFERENCE! It’s just a white background with nothing on it except for the black line.
All that the AF system sees is that single black line and it doesn’t make ANY difference whether the surface of that line is angled or not. It only
matters that the length of the line be perpendicular to the lens and the active AF sensor. If you follow the instructions then this occurs
automatically.
Let me ask you this: If you’re out in the street trying to focus on a lamp post at a height equal to your eye
level then which is the front of the lamp post? Which is the back? Which is the left or right? When are you
facing it square-on and when are you at 45 degrees to it?
It doesn’t matter WHERE you are relative to the lamp post. It’s just a vertical object and you will have the
same AF system response no matter which “side” you try and shoot from.
The same thing applies to the black line on the focus chart.
Still not sure?
Ok, get a long ruler or other straight-edged implement.
Grab a broad black felt-tipped pen.
On the back of a white door in your house, draw a vertical line from the top of the door down to the floor.
Stand facing the door square-on.
Focus on that line at eye level. Did the AF system work correctly? You betcha!
Take a few steps to your left. Try focusing again? Still working? Of course it is!
The camera still sees the edge of the black line against the white background perfectly, whether you’re square-on or at 45 degrees to the
white surface. It simply isn’t an issue.
As long as the AF system can see that high-contrast edge then you’re in business.
Ok, number three: Unless you have a SERIOUSLY defective camera, the focus sensors are close enough to the focus
area markers seen in the viewfinder that you WILL have an AF sensor straddling the black line on the chart when you
aim at it.
If you aim at the middle of the black line and your camera focuses with ease then you’re in business. No problem.
Sure, the black line may not be exactly in the centre of the AF sensor but that doesn’t matter.
As long as any part of the focus sensor can see the edge of the line, it is able to lock focus on it and, because all parts
of the sensor are at the same distance from the black line, it doesn’t matter which part of the sensor is used.
Page 4 of 8
Nikon D70 Focus Chart
2010-05-16
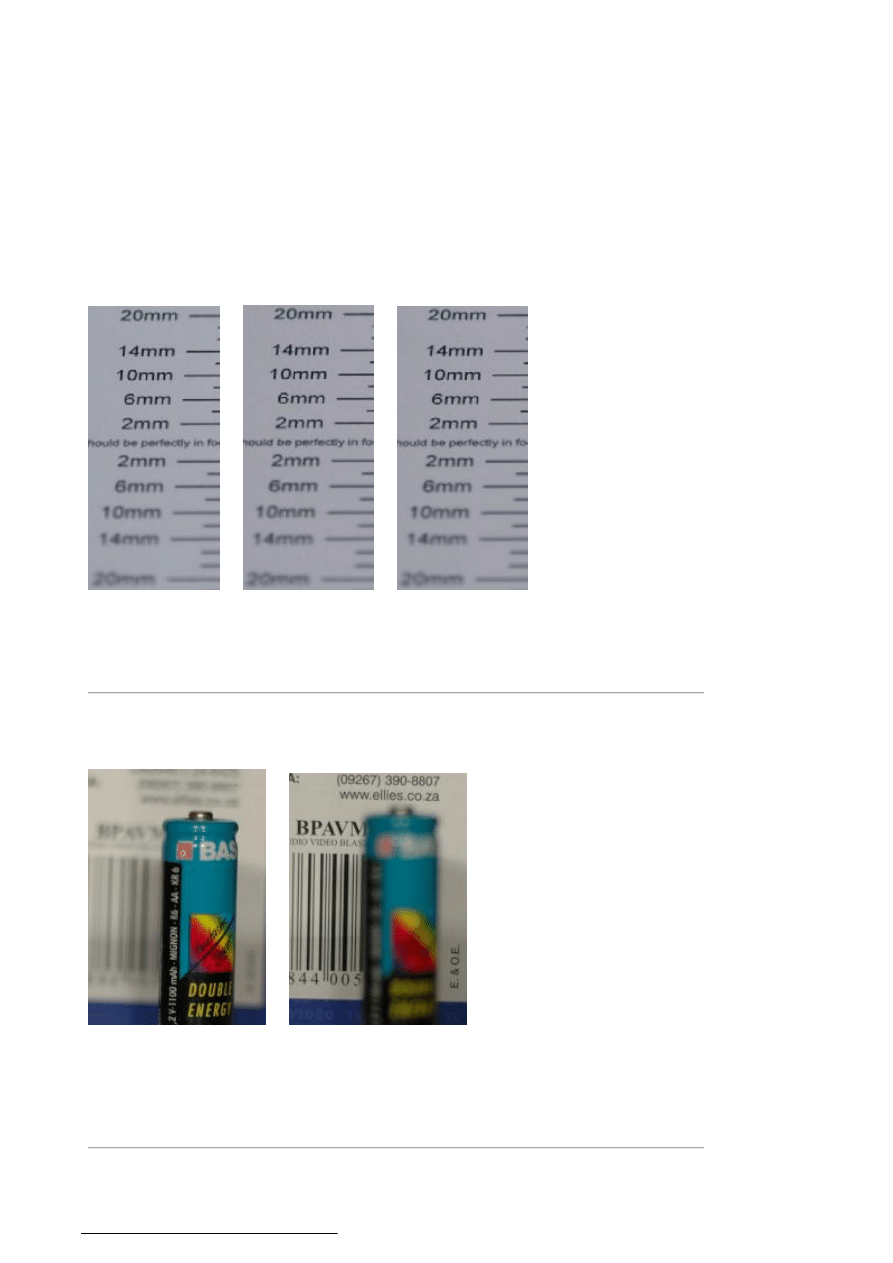
Need more convincing? Here are three images taken using precisely the three different sensor alignments shown at the bottom of the previous
page.
Can you tell them apart?
Can you see any sign at all that the different sensor alignments affected the depth of field or the point of focus?
No, I thought not. Neither can I or anyone else.
There’s math to explain it all but we don’t all understand the math. A picture’s worth a thousand words so, there you go: Three thousand
words for you. J
Ok, now it’s time to move on to the main purpose of this document: Focus testing!
What is back focus?
Back focus is when you shoot a pic like the one below, expecting to get the result shown on the left but, instead, you get the result on the
right.
That’s back focus. Your focus is set to a distance further back than your subject. You’re focused behind, or to the back of, your subject. (Front
focus is simply where everything’s the other way around.)
It’s VERY annoying to shoot your pic of the day of your wife/husband/child/friend and then find out that their face is out of focus but their ears
are tack sharp. Not nice.
There are many things that can cause this problem and almost all of them can be chalked up to operator error. Occasionally though, the
camera and/or lens is to blame and that’s what this test is for.
The D70
Page 5 of 8
Nikon D70 Focus Chart
2010-05-16
Although this test was originally devised in response to the back focus issue that manifest in some Nikon D70 cameras, it can be used to check
any camera.
Human nature is such that when we’re happy with a new toy we tend to simply enjoy it quietly but, if our new toy gives us grief, we want to
tell everyone who’ll listen. And some who won’t.
So, in evaluating Internet discussions on the back focus issue, one has to be careful not to be misled into believing that every Nikon D70
suffers from back focus just because it’s a hot topic.
The truth is that only a minority of D70s have been faulty in this regard. The majority work just fine.
Why this test then?
Well, if you’re a new D70 owner and have read all about the trials and tribulations of other D70 owners who have the dreaded back focus then
you probably want to know if YOUR new baby suffers from it or not.
Most people who think their D70 has back focus are mistaken. (Please note that I said “most”, not “all”.)
In other words, they’re in a tizz for no reason. If they’re having problems then, usually, it’s operator error.
This test is intended to help any curious D70 owners check their cameras in order to either heave a sigh of relief that their Nikon D70 is fine or
to arm themselves with the info needed to return their D70 for exchange or recalibration.
Instructions
Important!
There are many factors that can lead to erroneous and misleading results when doing this test. Make sure you read these instructions carefully
and follow them in detail.
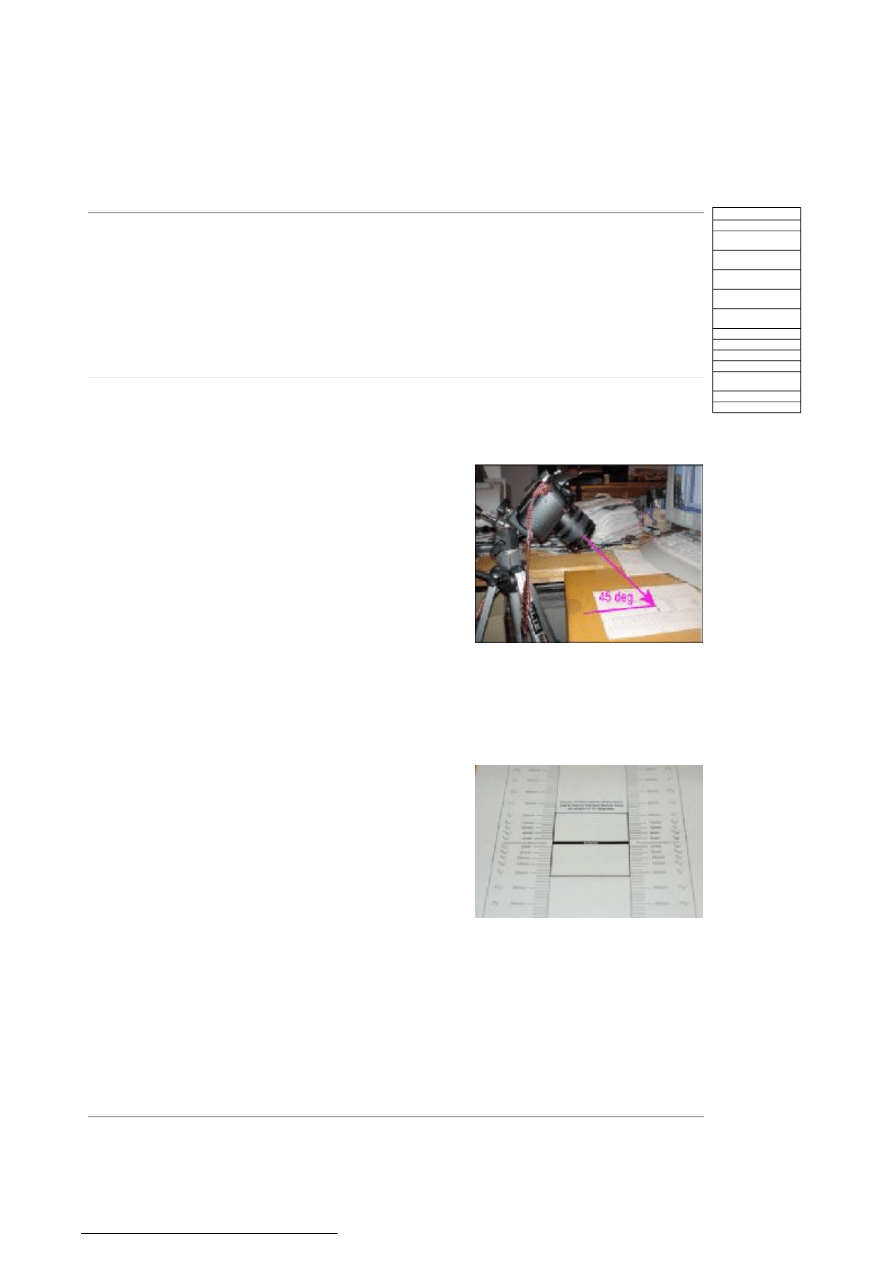
1. Print out this document.
2. Place the test chart absolutely flat on a level surface. There must be no visible
lumps or bumps in the chart. It needs to be flat.
3. Aim your camera at 45 degrees to the chart.
4. Focus on the centre of the focus line in the focus box at the centre of the chart.
5. When shooting your test pics, you need to be close enough that the test chart
somewhat more than fills the frame. Get nice and close.
6. Ensure that you are not so close that the auto focus system is unable to focus due to you being at the limit of the range of focus of your
lens.
You can check this by moving your camera closer and closer to the image and testing when it is no longer able to focus and then
making sure that you are set up at least a few inches back from this point.
7. Set your camera to aperture priority mode (“A” on the rotary dial) and adjust the aperture setting as wide as it will go (lowest f-stop
number) for the lens you have on the camera. This gives you the shallowest depth of field, which is crucial to this test.
8. Set the Autofocus system to “AF-S” mode (CSM Menu item 2).
9. Set the AF-area mode to “Single area” (CSM Menu item 3).
10. Ensure that you have the centre focus area selected. If not then adjust this using
the multi selector button (up/down/left/right). The focus selector lock switch (just
below the multi selector button) must be unlocked in order to change/select the
appropriate focus area.
11. If you have extra lighting available, use it to light up the test chart. The chart
must be lit more or less from the front. I like to use a bright constant light source,
like a halogen flood or similar, but the flash seems to work just fine too. If you’re going to depend on the flash then make sure there’s
enough ambient light for the auto focus system to work reliably.
12. Metering mode and centre weighting is not critical. As long as you’re getting a well lit, bright image out of the camera then it’s fine.
13. First shoot an initial pic and have a good look at it before you go further. Make sure the test chart is bright and white. Adjust your white
balance and shutter speed to get this right. Use more light and/or the flash if necessary.
14. Use either the remote control (if you have one) or the camera’s self timer to trigger the shutter release in order to avoid any camera
shake.
15. Now go ahead and shoot your test pics.
Interpreting your results
Once you’ve taken a bunch of test pics you’ll want to know what they mean.
Shortcuts
Release notes
The Internet is
wonderful
The Internet and this
test
The auto focus system
in the D70
Focus area markers
and focus sensors
The dreaded 45 degree
debate
What is back focus?
The D70
Why this test then?
Instructions
Interpreting your
results
The chart
Back to the top
Page 6 of 8
Nikon D70 Focus Chart
2010-05-16

You’re welcome to email me at:
I’m happy to look at your test pics and to offer an opinion.
By the way: If you happen to measure the spacing of the lines on the chart you’ll notice that they are further apart than the markings suggest.
This is deliberate. When the chart is at 45 degrees to your camera, the spacing becomes correct. This is done so that when you see those
When you view your test pic/s, you should be able to clearly see, as in the example on
the right, that part of the chart is in focus, and that it gets obviously and progressively
more out of focus as you move up or down, away from the in-focus part.
Notice how the sharpest part of the image is in the centre, between the two 2mm
marks and how it gets blurry as you move away from the centre line, either up or
down.
This is as good as it gets. Spot on focus, bang on the centre line, right where the
camera was aimed. This represents the ideal.
It’s normal, particularly with longer focal lengths, to see the focused area, or depth of
field, shifted slightly rearward, as in the pic on the right. This is not a problem as long
as the focus line is still within the area that’s in focus.
If the part of your pic that’s in focus is so far back that the focus line is way out of
focus then you have a problem with back focus, as in this example.
If the point that’s in focus is too far forward, as in this example, then you have a
problem with front focus.
Page 7 of 8
Nikon D70 Focus Chart
2010-05-16
markings in the resultant image you can read them as-is without having to make extra calculations. They’re pre-compensated.
Tim
The chart
Simple focus target
To get your own copy of this test chart,
download this document
. Printing this
web page directly will not give you a usable chart.
To get your own copy of this focus target,
download this document
. Printing this
web page directly will not give you a usable target.
Designed by
Xenon Web Services
© Tim Jackson 2004. All rights reserved.
Page 8 of 8
Nikon D70 Focus Chart
2010-05-16
Wyszukiwarka
Podobne podstrony:
Focus test chart report
KM Integrated Test Chart
Test 1-B-2009, Instruktor Nauki Jazdy, Testy, Testy2009 WORD Olsztyn, Testy specjalistyczne
focus test
Test 5-B-2009, Instruktor Nauki Jazdy, Testy, Testy2009 WORD Olsztyn, Testy specjalistyczne
Test podstawowy 4, Instruktor Nauki Jazdy, Testy, Testy2009 WORD Olsztyn, Testy podstawowe
Test podstawowy 3, Instruktor Nauki Jazdy, Testy, Testy2009 WORD Olsztyn, Testy podstawowe
Test podstawowy 9, Instruktor Nauki Jazdy, Testy, Testy2009 WORD Olsztyn, Testy podstawowe
Test podstawowy 5, Instruktor Nauki Jazdy, Testy, Testy2009 WORD Olsztyn, Testy podstawowe
Test podstawowy 8, Instruktor Nauki Jazdy, Testy, Testy2009 WORD Olsztyn, Testy podstawowe
Test podstawowy 7, Instruktor Nauki Jazdy, Testy, Testy2009 WORD Olsztyn, Testy podstawowe
Test 4-B-2009, Instruktor Nauki Jazdy, Testy, Testy2009 WORD Olsztyn, Testy specjalistyczne
Test 3-B-2009, Instruktor Nauki Jazdy, Testy, Testy2009 WORD Olsztyn, Testy specjalistyczne
02. Test motywacji instrukcja Schneider(1), Terapia
Test podstawowy 6, Instruktor Nauki Jazdy, Testy, Testy2009 WORD Olsztyn, Testy podstawowe
Test podstawowy 1, Instruktor Nauki Jazdy, Testy, Testy2009 WORD Olsztyn, Testy podstawowe
więcej podobnych podstron