Bench Top Router Table - Jeff Greef Woodworking
Order Print Plans
Click photo for details.
|
Jeff Greef Woodworking
|
Sign up for Email Notices of new projects
To see more Shop Plans on this site, go to:
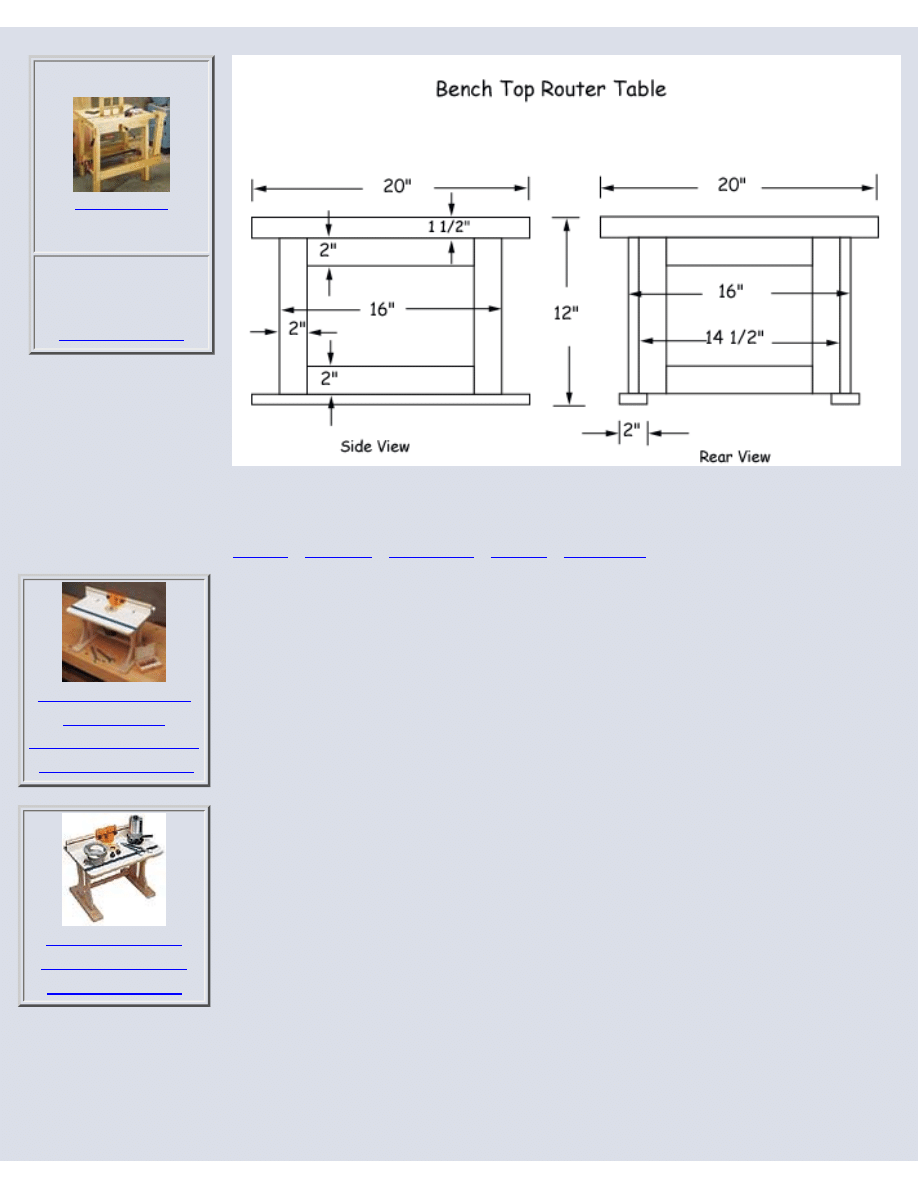
Bench Top Router Table
This project has 2 pages.
This is Page 1.
Cut List Bench Top Router Table
27- 3/4 x 2 x 21 laminations for the top
2- 3/4 x 2 x 20 feet
4- 3/4 x 2 x 16 side rails
2- 3/4 x 2 x 14-1/2 rear rails
6- 3/4 x 2 x 11-1/4 legs
http://www.jeffgreefwoodworking.com/pnc/ShopProj/benchrout/index.html (1 of 3)29/12/2003 18.07.52
BookmarkThis Page
Bench Top Router Table - Jeff Greef Woodworking
Download Digital
Plans Immediately
Click photo for details.
Resources For Building A Bench Top Router Table
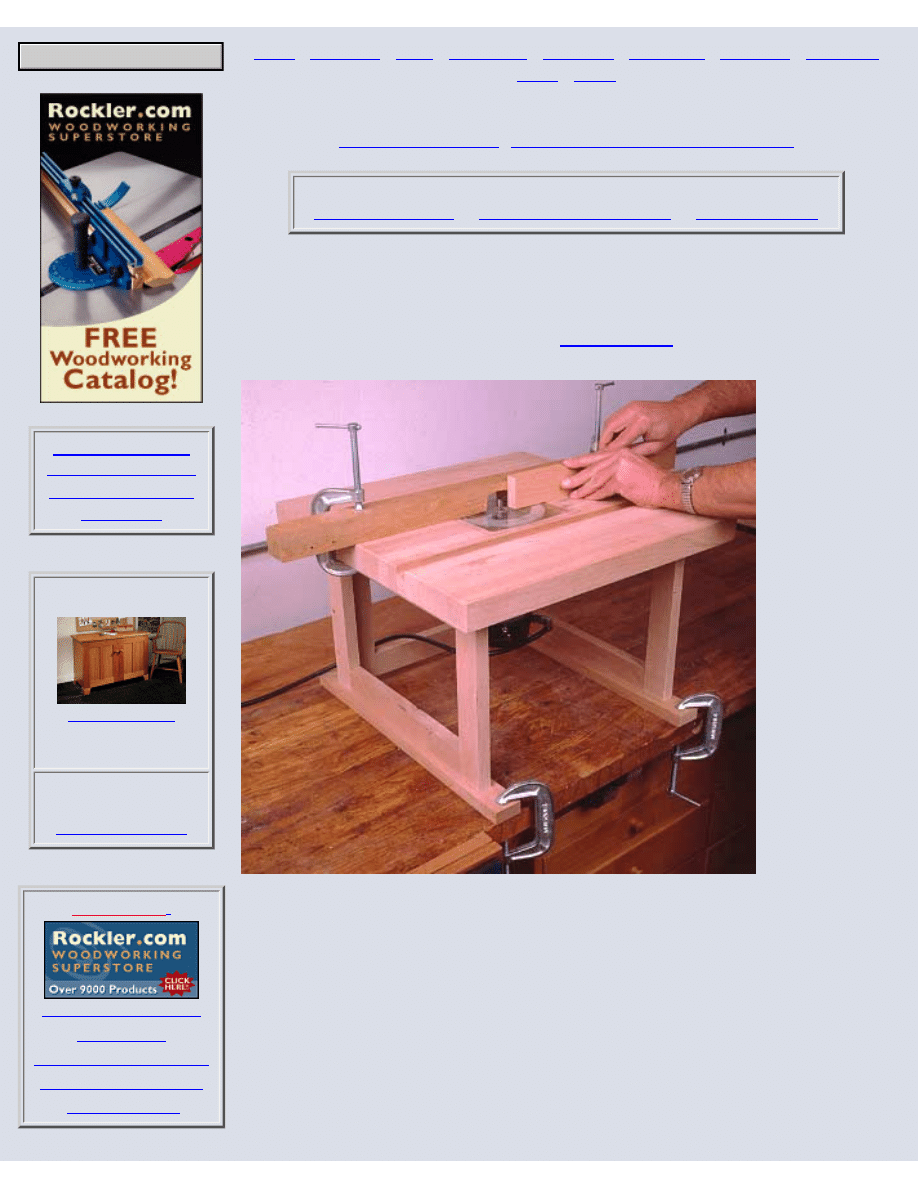
If you don't have space in your shop for a floor mounted router table, or if you want a simpler
route to a router table so to speak, consider this project. Remember, also, that at times it is
handy to have two router tables and you certainly don't need to build two floor mounted units.
This smaller model is easy to build, store, and use, and will function just as well for most
routing purposes as any other larger model.
On this router table you'll make a heavy duty top, using stack laminations of hardwood. This
takes time to make, but over the long run a top like this will hold up to crushing by clamps
and other hard use. If you prefer, you can use a particleboard or plywood top to make it easier.
Begin by getting out all the parts. Note that they are all the same width, but most of the parts
for the undercarriage are shorter than those needed for the top. This is useful for making
efficient use of your stock. As you look for length combinations in your stock that will give
you the numerous 20" long pieces needed for the top, often you will find combinations that
give you, say, two 20" and one 18". "Darn," you think, "if only it were two inches longer!"
Well don't go buy a board stretcher yet, just use that 18" piece for one of the 16" side rails.
As you get out the pieces, remember that you can use pieces with bad defects in the stack
lamination. There is no need to cut out all the knots and rough edges, so long as each part has
one clean edge that you can turn upward for the top. Glue together all the pieces for the top in
one gluing operation. Use a lot of glue on the lamination faces, because you are gluing a
broad area and much of the glue will be absorbed. If you lay down only a thin layer you run
the risk of it all being absorbed so that the joint itself is starved. Keep hot water and rags
close by to deal with the mess.
http://www.jeffgreefwoodworking.com/pnc/ShopProj/benchrout/index.html (2 of 3)29/12/2003 18.07.52
Bench Top Router Table - Jeff Greef Woodworking
Keep a close eye on how flat your glue up is. Put your clamps onto a flat surface to begin
with so that what is put on them will be relatively flat too. As you tighten the clamps on the
laminations some of them will slide and shift around under pressure and with the slippery
glue. Lay a straight edge across the top and correct any discrepancies greater than 1/8". Later
you'll rout off that last 1/8", but for now just guarantee that they stay close.
Note that the whole thing can become twisted, like an oriental fan beginning to open.
Conceptually this is a neat idea but it's devastating for your router table, so watch that the two
end laminations stay parallel. To do so use winding sticks, which are two straight sticks, of
uniform width, about three feet long. Place one on one of the end laminations (perpendicular
to them), the other on the other end. Stand to the side and align your line of sight along the
top edge of both sticks. If the two laminations are not parallel, you will immediately see the
discrepancy along the winding sticks. A little out of parallel is not bad at this stage, but use
the winding sticks to guarantee that things aren't real bad.
This is Page 1 of this project.
|
You are visitor number 31205 to this page.
http://www.jeffgreefwoodworking.com/pnc/ShopProj/benchrout/index.html (3 of 3)29/12/2003 18.07.52
Jeff Greef Woodworking
|
|
Jeff Greef Woodworking
|
Sign up for Email Notices of new projects
To see more Shop Plans on this site, go to:
Page 2, Bench Top Router Table
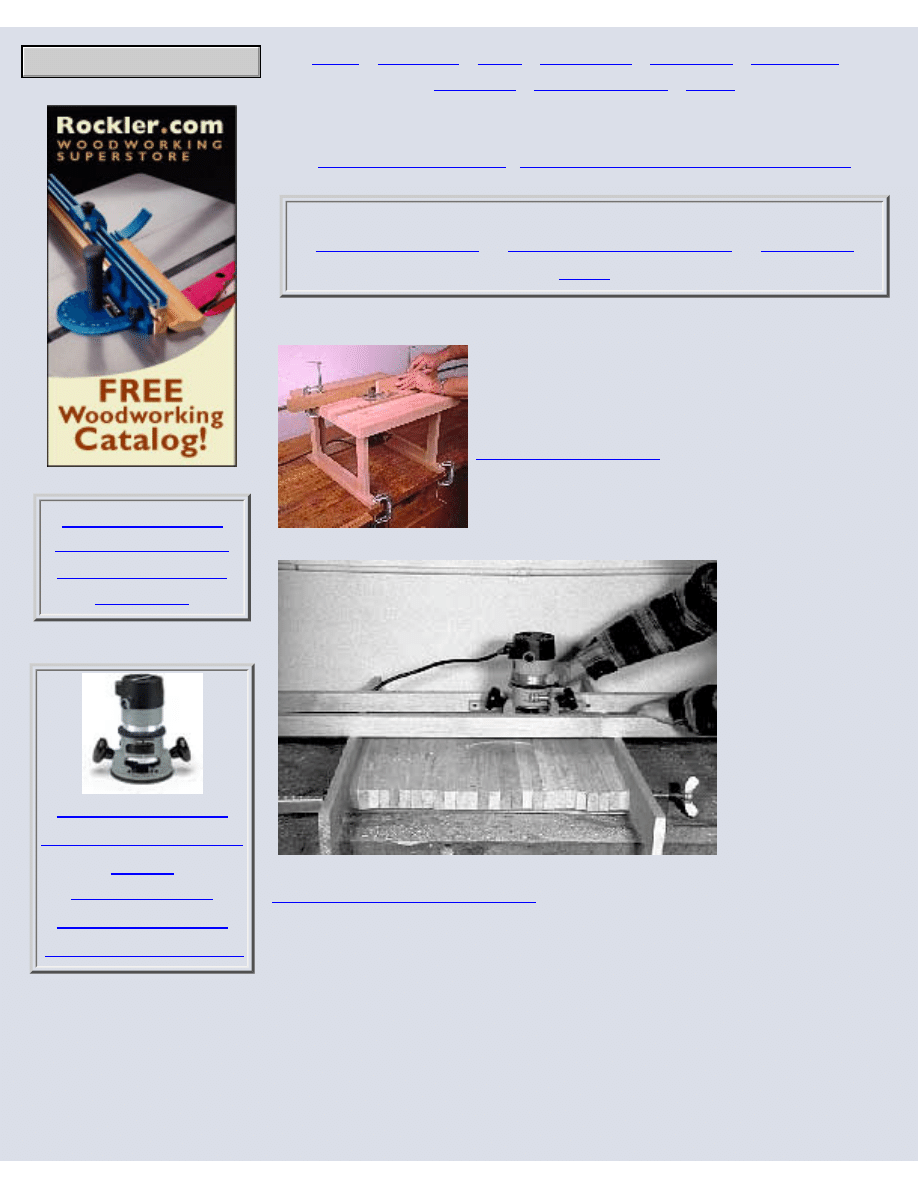
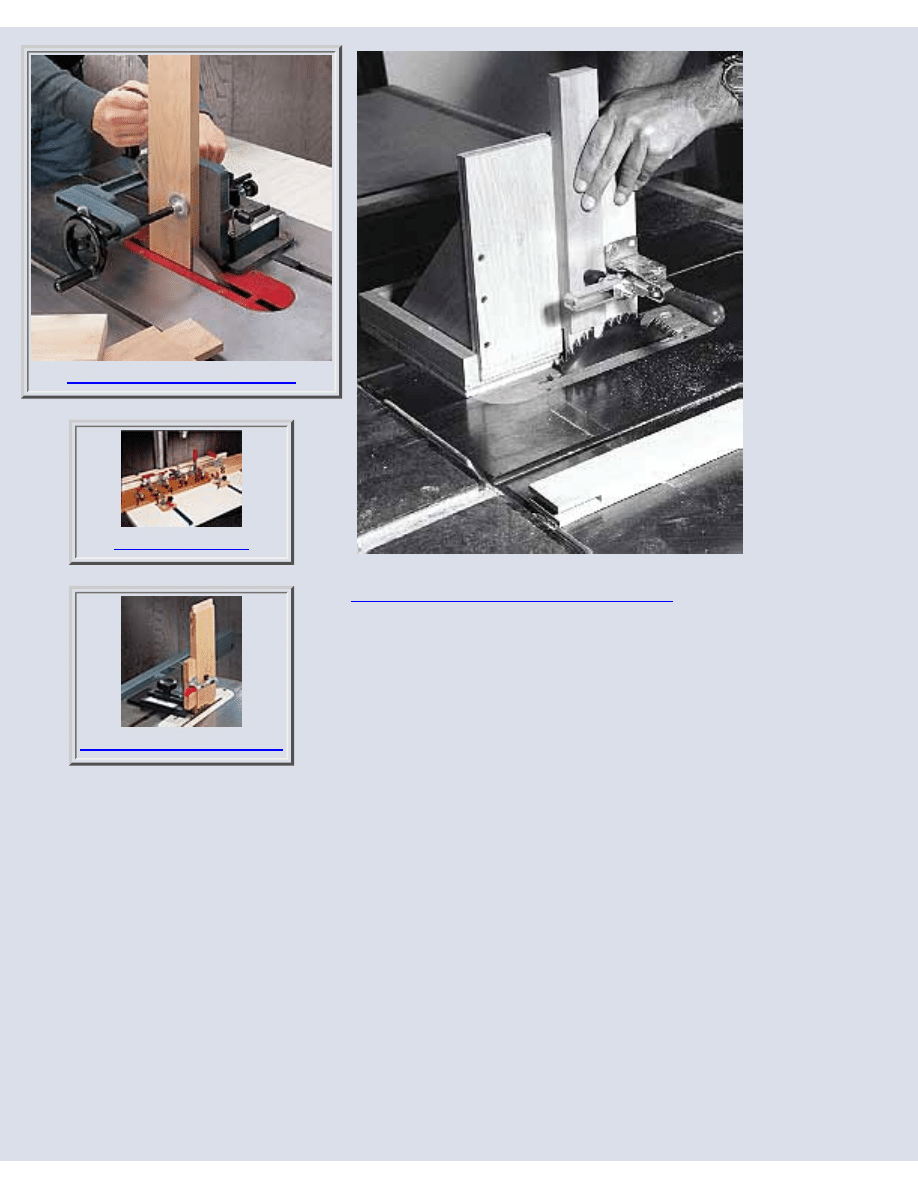
Photo 1- Flatten
the router table top
with this router
jig, which causes
the router to travel
in straight lines in
both directions.
If you need a router, click here.
When the lamination is dry, set up to flatten it by clamping two boards
with straight edges onto either side of the lamination as in photo 1. The
top edges of these boards must meet three requirements. They must be
straight, they must be parallel, and they must be clamped at close to
equal distances from all four corners of the lamination. These boards act
like winding sticks, so you can sight down them to ensure that they are
parallel. Measure carefully to align the glue up with the tops of the
http://www.jeffgreefwoodworking.com/pnc/ShopProj/benchrout/index2.html (1 of 5)29/12/2003 18.09.50
BookmarkThis Page

Jeff Greef Woodworking
Bosch
New $229.99!
(Prices May Change)
boards.
The last component in the operation is the router slide jig. This is simply
two straight pieces of 1x2 with a plywood router mount in the middle, as
shown in photo 1. The slide jig rides on top of the straight edge boards
clamped to the glue up, and guides the router along a straight path
between the two boards.
Mount a 1/2" or greater diameter straight flute bit in the router, and set
the depth of cut so that it reaches the lowest area on the lamination
surface. Wax the straight edges on the guide boards, turn on the router,
and gradually move the router back and forth until you have skimmed
over the entire surface of the lamination.
This procedure will produce a flat surface only if the guide boards and jig
boards are straight and parallel. Another threat to flatness is distortion to
the lamination from clamps. Your bar clamps may bow the glue up as
pressure is applied. When you cut the surface it will be flat, but when you
let off the clamps it springs back and is no longer flat. If your bar clamps
bow the lamination, place clamp blocks between the clamp jaws and the
wood they contact. Shift the location of these blocks up or down to
change the point at which pressure is applied. When pressure is applied
at the center of the lamination, it should not bow.
When the top is flat, flip it over and flatten the bottom. This is important
so that when you screw the base on, the top won't distort if the screws
pull on an uneven surface along the bottom. The top and bottom needn't
be exactly parallel, but challenge yourself and see if you can get them
close. It's perfect when the thickness is even all the way around.
Make three rectangular frames for the base of the table, using the legs
and rails shown on the cut out list. Note that you may wish to increase
the height of the six legs according to the height you require beneath the
table to fit your particular router. The given dimensions allow one foot
clearance beneath which is adequate for most routers.
http://www.jeffgreefwoodworking.com/pnc/ShopProj/benchrout/index2.html (2 of 5)29/12/2003 18.09.50
Jeff Greef Woodworking
Photo 2- You
can use a
simple
tenoning jig
such as this to
cut open
mortise and
tenon joints on
the ends of
parts.
If you need a toggle clamp, click here.
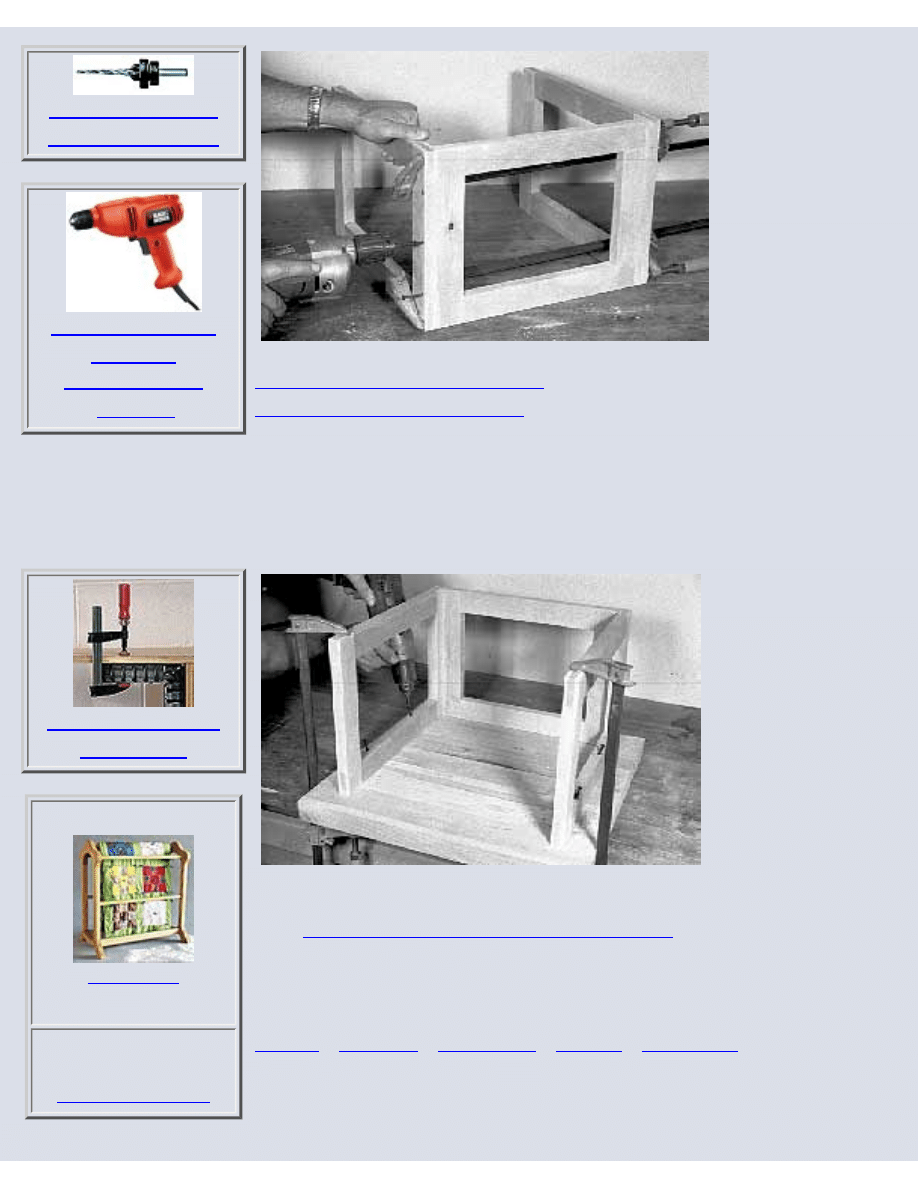
Use a table saw tenoning jig to cut open mortise and tenon
joints to join the parts of the three frames as in photo 2. Or, cut
the rails shorter and use dowels and a dowel jig. Either way,
glue up the frames, then clamp the smaller of the three between
the inside faces of the two larger ones as in photo 3, and screw
them together. Use 2" screws and predrill holes for them. Next
take this frame and clamp it to the underside of the top as
shown in photo 4. Use 2-1/2" screws to secure the frame and
top together as shown, again predrilling for the screws.
http://www.jeffgreefwoodworking.com/pnc/ShopProj/benchrout/index2.html (3 of 5)29/12/2003 18.09.50
Jeff Greef Woodworking
Photo 3- Screw
together the three
frames that make
up the base.
If you need a handdrill, click here.
If you need drill bits, click here.
Lastly screw the two feet onto the bottom of the two side frames. The
function of these is primarily to give you an easy area to clamp to for
securing the table to your bench top.
Order Print Plans
Click photo for details.
Photo 4- Screw the
base to the table top
through the top rails
as shown, and lastly
screw the feet onto
the bottom rails.
Now you've got a router table, but you need to get a router into it. For that,
go to
Mounting a Router in a Bench or Table Top
Resources For Building A Bench Top Router Table
This is Page 2 of this project.
http://www.jeffgreefwoodworking.com/pnc/ShopProj/benchrout/index2.html (4 of 5)29/12/2003 18.09.50

Jeff Greef Woodworking
|
|
|
You are visitor number 12757 to this page.
http://www.jeffgreefwoodworking.com/pnc/ShopProj/benchrout/index2.html (5 of 5)29/12/2003 18.09.50
Document Outline
- jeffgreefwoodworking.com
Wyszukiwarka
Podobne podstrony:
Router Table Fence Jeff Greef Woodworking
Traditional Workbench Jeff Greef Woodworking
Building Wooden Vises Jeff Greef Woodworking
Amateur Woodworker Router Table
2 Woodworking Plans Standing Router Table
woodwork dewalt router table tips construction (4 pgs)
Router Table mate
Router Table Fence Plans
Router Table 2
Router table plans
Professional Router Table
Quick and Easy Router Table
Router Table
Woodwork Plans Outdoor Table And Bench
Outdoor Table and Bench
Build a leather top mahogany writing table
Firearms Reloading Woodworking Nrma Reloading Bench
Table maple coffee table with storage (Hinge Top)
więcej podobnych podstron