Building Wooden Vises - Jeff Greef Woodworking
Order Print Plans
Click photo for details.
|
|
Jeff Greef Woodworking
|
Sign up for Email Notices of new projects
To see more Shop Plans on this site, go to:
or
Making
Wooden Vises
This project has 2 pages.
This is Page 1.
There are two vises described in this article, first a tail vise and then at the end a
front vise.
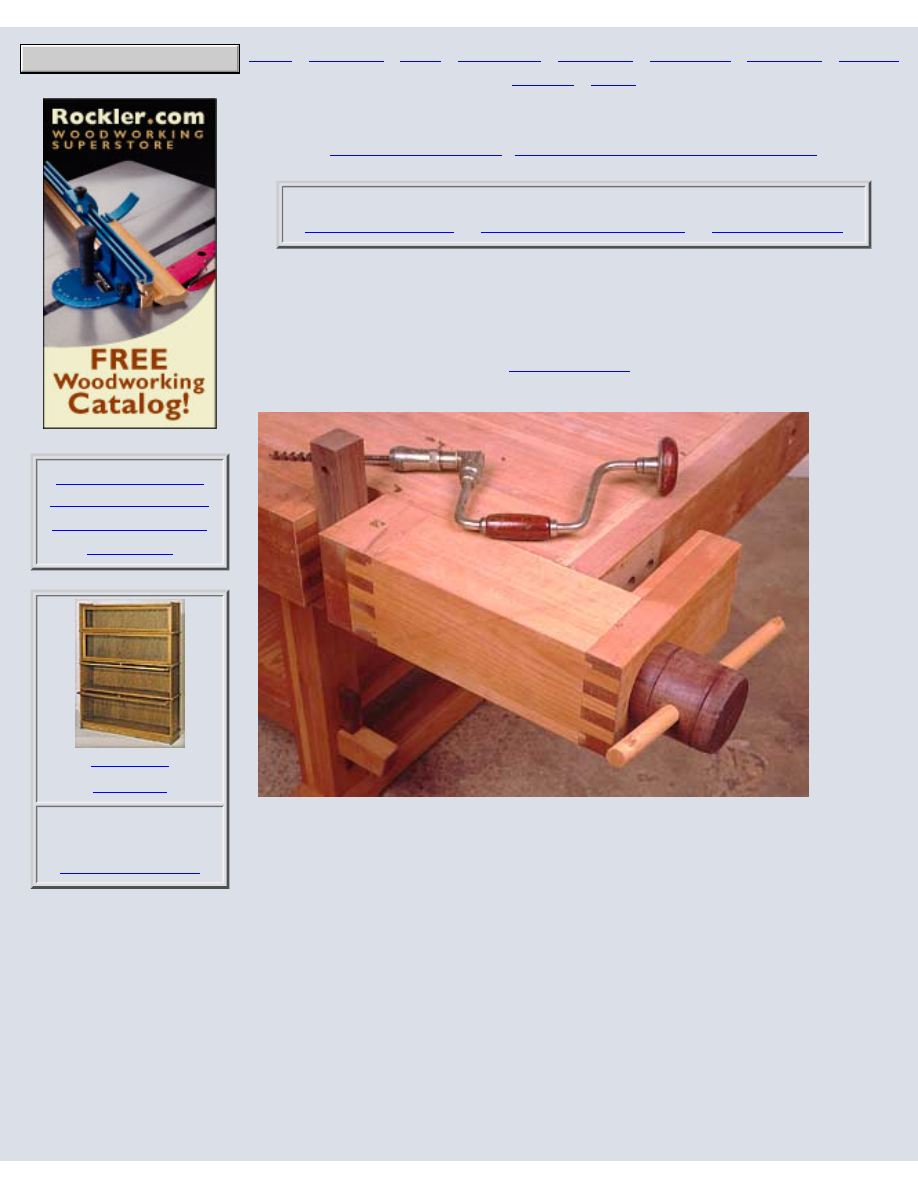
You'll find tail vises on many traditional benches because of their versatility. One
advantage they have over front vises is that there are no support members directly
below the jaws, so that a long board will fit vertically in the jaw center where
holding pressure is best. Also, the vise jaw and bench top can be fitted with slots
for bench dogs which let you hold long or short boards horizontally on the bench
top.
http://www.jeffgreefwoodworking.com/pnc/ShopProj/woodvice/index.html (1 of 8)29/12/2003 18.19.44
BookmarkThis Page
Building Wooden Vises - Jeff Greef Woodworking
Download Digital
Plans Immediately
Click photo for details.
Download Digital
Plans Immediately
Click photo for details.
Order Print Plans
Click photo for details.
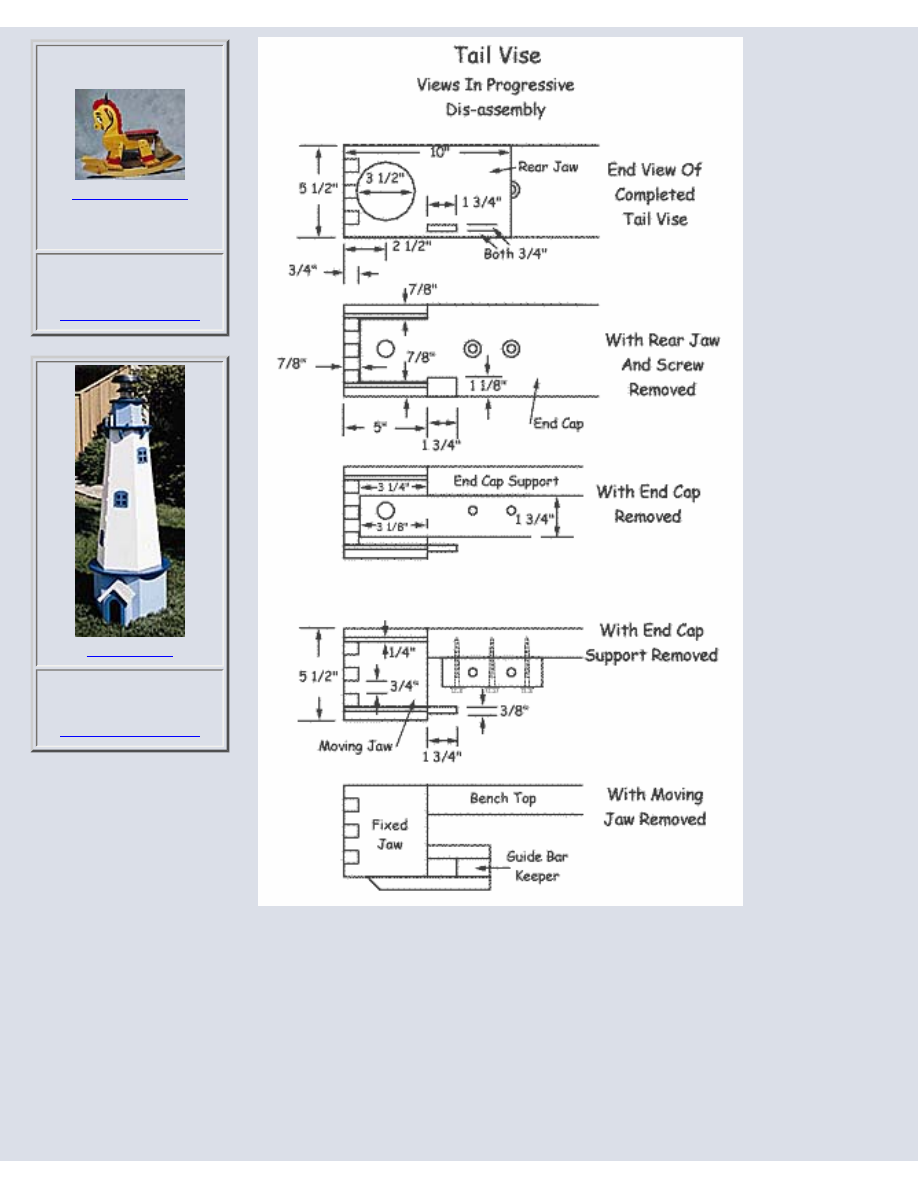
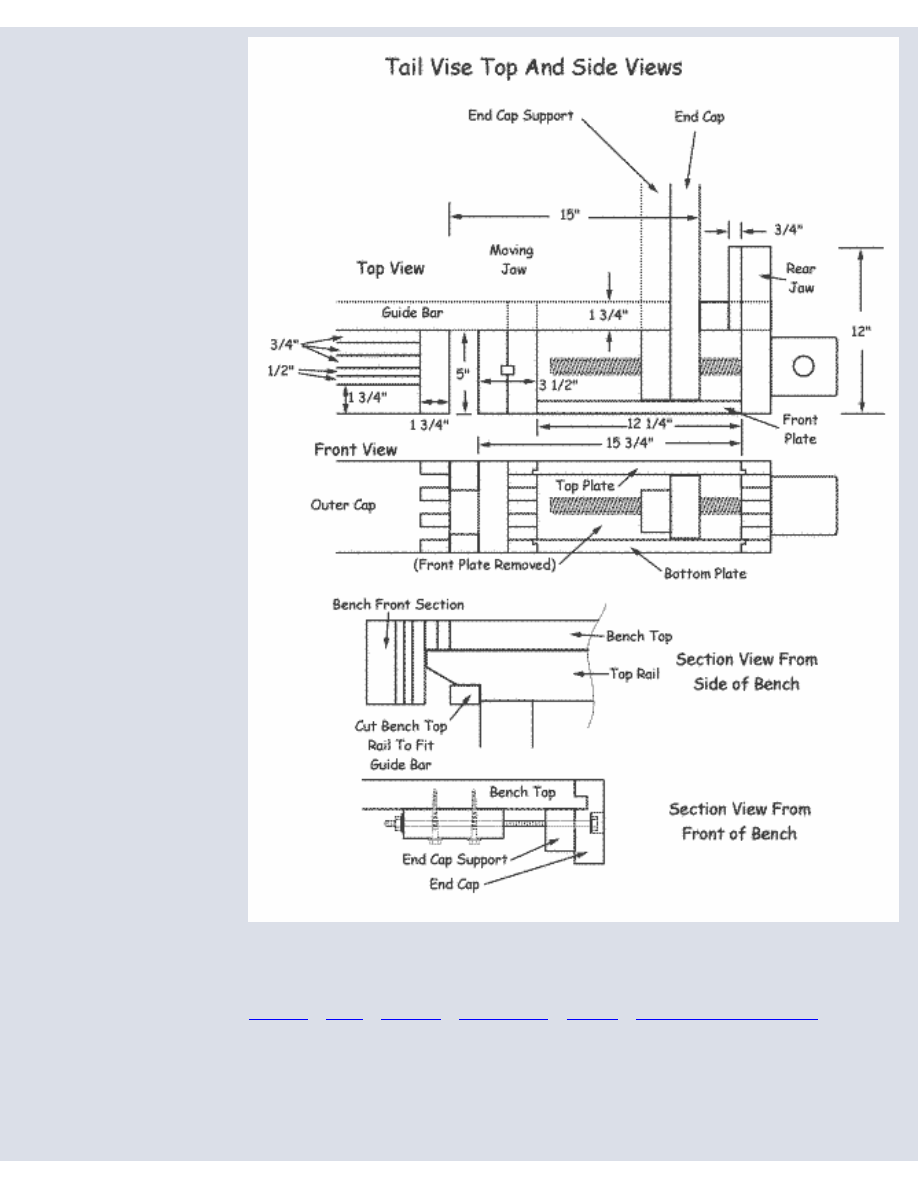
Cut out list, Tail Vise
2- 1-3/4 x 5-1/2 x 5 jaws (fixed and moving)
1- 1-3/4 x 5-1/2 x 6-3/4 moving jaw
1- 1-3/4 x 5-1/2 x 12 rear jaw
1- 1-3/4 x 5-1/2 x 36 end cap
1- 1-3/4 x 2-1/2 end cap support
1- 1-3/4 x 5-1/2 x 70 front of bench front section
1- 1-1/8 x 1-3/4 x 32 guide bar
1- 3/4 x 3-3/4 x 15-3/4 front plate
2- 3/4 x 5 x 13 top and bottom plates
http://www.jeffgreefwoodworking.com/pnc/ShopProj/woodvice/index.html (2 of 8)29/12/2003 18.19.44
Building Wooden Vises - Jeff Greef Woodworking
Order Print Plans
Click photo for details.
Order Print Plans
Click photo for details.
Wooden screws are not very hard to make with the screw boxes and taps available
from tool suppliers, and you'll save some money since boxes and taps are cheaper
than steel screws. Wooden screws will hold up well for a long time, and can apply
more than enough pressure for your needs. However, you do need a lathe to make
a round shaft for the threads, as well as a drill press to accurately align the
threaded hole. If you prefer, steel screws can be fitted onto either of the two vises
described here.
http://www.jeffgreefwoodworking.com/pnc/ShopProj/woodvice/index.html (3 of 8)29/12/2003 18.19.44
Building Wooden Vises - Jeff Greef Woodworking
Resources For Building Wooden Vises
|
http://www.jeffgreefwoodworking.com/pnc/ShopProj/woodvice/index.html (4 of 8)29/12/2003 18.19.44

Building Wooden Vises - Jeff Greef Woodworking
Wood Tips
To see another tip- hit
"Refresh" or "F5"
#3- TABLE SAW
TENONING. Build a
table saw tenoning jig to
make cuts on the ends
of parts held vertically.
The jig rides in a miter
gauge slot on a tongue
attached on the bottom.
Construct the carrier
portion of the jig so that
it slides toward and
away from the blade,
while staying parallel to
it. Secure the carrier to
the base with T-nuts
mounted in the base
itself.
Download Digital
Plans Immediately
Click photo for details.
Search from over
9000 products!
TAIL VISE
Before you build your tail vise, take a close look at how it's designed so you'll
understand where the forces are transferred when the vise clamps down on work.
You'll be better able to build a properly functioning vise when you understand the
function of each of the parts.
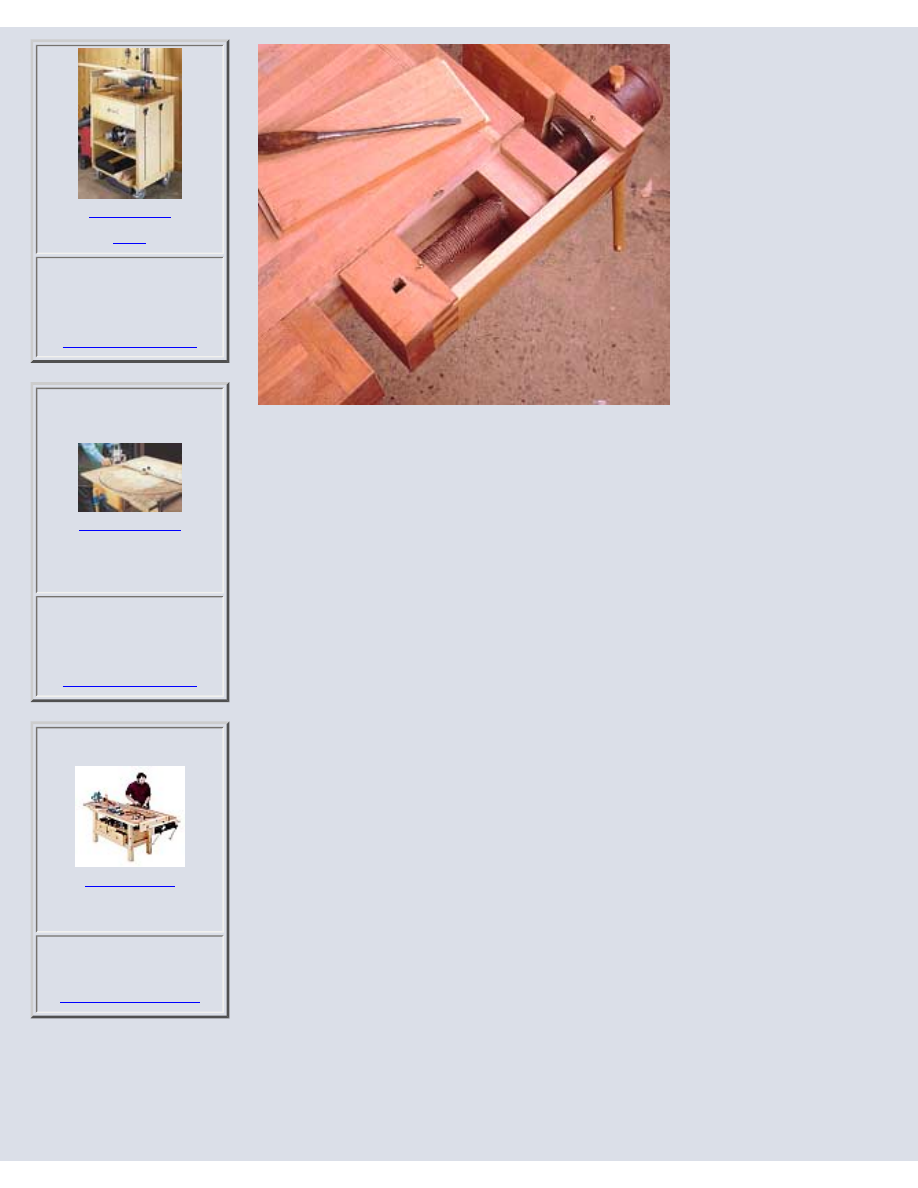
The moving jaw pushes your work against the fixed jaw. The screw, however, does
not directly push against the moving jaw. If it did, the end of the screw would bore a
hole into the back of the moving jaw with time. So, the moving jaw gets pushed by
the rear jaw, which gets pushed itself by the knuckle of the screw. Because the rear
jaw pushes the moving jaw, it is very important to have a solid connection between
the two. The outer plate, top and bottom plates, and guide bar all transfer force from
the rear to the moving jaw, and must be joined with care for a tight fit.
The screw knuckle shoulder pushes the rear jaw by pulling against the screw threads.
These threads pull against their corresponding threads within the end cap. Thus as the
vise clamps down on work, it pulls the end cap away from the bench. Threaded rods
hold the cap firmly against the end of the bench. A heavy block, lag screwed to the
underside of the bench top, connects the threaded rods to the bench top.
But that doesn't complete the chain of force transfer on this particular bench design,
which has the bench top in four sections so that it can be easily disassembled. The
first of these sections contains the fixed jaw, but the threaded rods are attached to the
second of the four. These two sections must be securely fixed together, else as the
vise is tightened it will push the first away from the second, shearing along the edges
where they join. A dozen or so 1/2" dowels installed along this joint hold the two
together and complete the circle of forces between the two jaws.
Begin building the tail vise by cutting out all your parts to size as shown on the list.
Choose very straight pieces for these parts. Set up a finger joint jig at the table saw,
using a dado set stacked out to 3/4" wide. Use this setup to cut finger joints in the
fixed, moving, and rear jaws, as well as the outer cap that joins the fixed jaw, and the
front plate that joins the moving and rear jaws.
Note that this front plate is 3/4" thick, whereas the jaws it joins are both 1-3/4" thick.
This means you must alter the height of the dado to accommodate the thickness of the
joining part. Also note that the front plate does not come flush to the top or bottom of
the jaws, but is inset 3/4" both at top and bottom. The top and bottom plates, both
3/4" thick, slide in above and below the front plate to take this up. Thus, make the
front plate with fingers on its outer edges as shown (rather than slots), and make the
jaws with fingers on the outer edges too. Make the moving jaw out of two pieces of 1-
3/4" stock. Put finger joints into only one of the two. Cut a bench dog dado along the
inside face of each of these on the table saw with multiple cuts. The exact dimensions
of the dado will depend on the size of the dogs you use, get them first so that you can
make test dados in scrap to determine the exact size. Fit the dado so that the dog will
http://www.jeffgreefwoodworking.com/pnc/ShopProj/woodvice/index.html (5 of 8)29/12/2003 18.19.44
Go
Building Wooden Vises - Jeff Greef Woodworking
Download Digital
Plans Immediately
Click photo for details.
slide easily within but will stay up by itself without dropping in by gravity. Don't glue
the two jaw pieces together yet.
Cut 1/4" by 1/4" dadoes along the inside faces of the moving and rear jaws for the
tongues of the top and bottom plates. Locate the inner edges of these dadoes at 3/4"
from the outer edges of the jaws. Stop the dadoes on the rear jaw so that they are no
longer than 5". Make these stopped cuts on the table saw by measuring 5" from the
front of the blade toward the back of the table, and draw a line on the table. Make
multiple cuts with the saw, adjusting the fence to establish the width of the dadoes.
During each cut, push the rear jaw only as far as the 5" line, then pull it back. Use the
same setups for the moving jaw, stopping the cut at 5" along the bottom of the jaw,
but going through at the top. Use a 1/4" chisel to complete the stopped dadoes, which
will be rounded on the ends from the blade.
Cut 3/8" by 1-3/4" mortises on the rear jaw to fit the guide bar, and on the guide bar
itself for the moving jaw. Use a mortising chisel on the drill press to cut the mortises,
or bore holes with the drill press or dowel jig and chisel the mortises square.
Cut tenons on the guide bar and moving jaw to fit the mortises. Cut the tenon on the
jaw using a table saw cutoff box as a guide. Place the box on the table saw, and raise
the blade to 1-3/4" above the box plywood. Mark out the inside end of the jaw to
show where the tenon will go. Place the jaw on end against the fence of the box, and
cut the waste away from either side of the tenon. Then make more cuts toward the top
of the jaw to remove the waste from that area, but don't remove all of the waste. You
need some of it to support the part as it is cut. Leave 1/4" or so at the end, then cut
that off with a hand saw. Cut a tenon on the end of the guide bar with a table saw
tenoning jig.
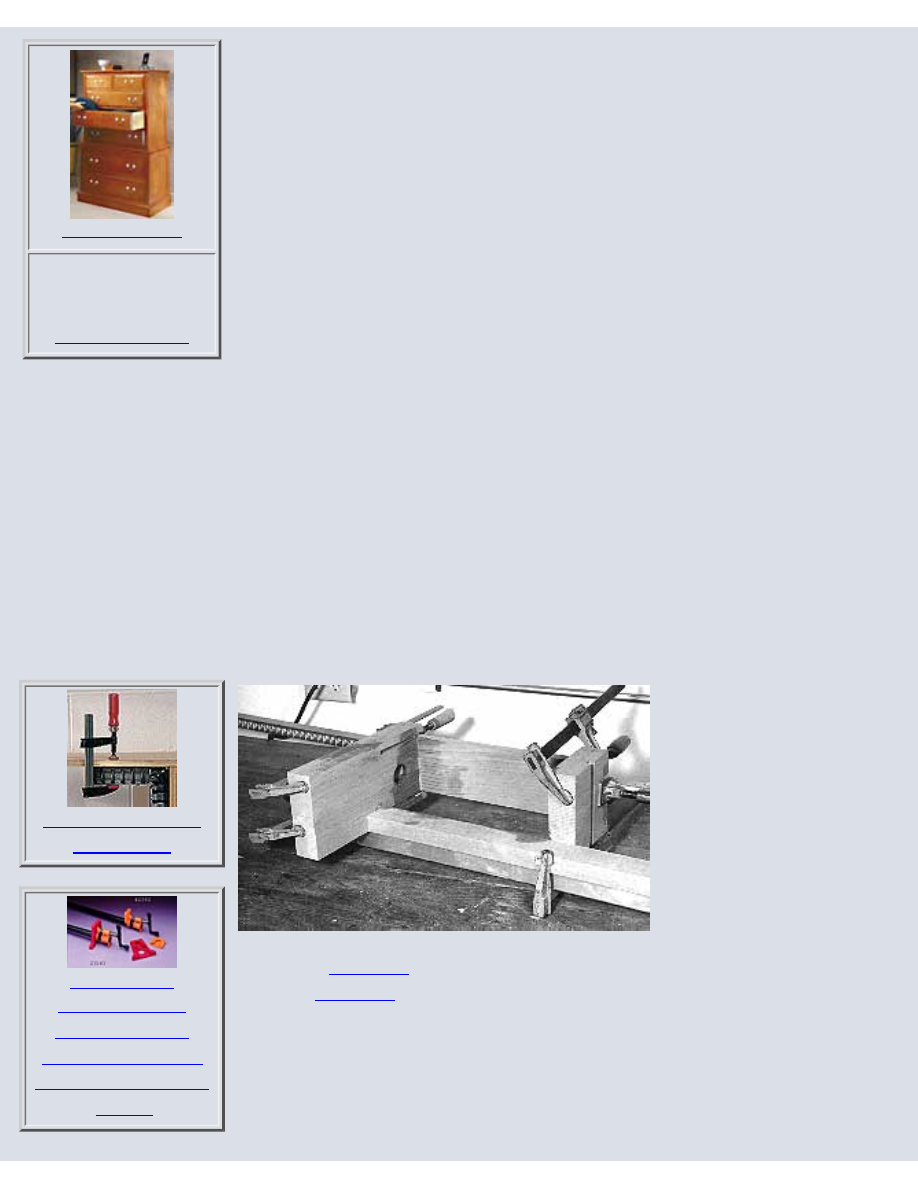
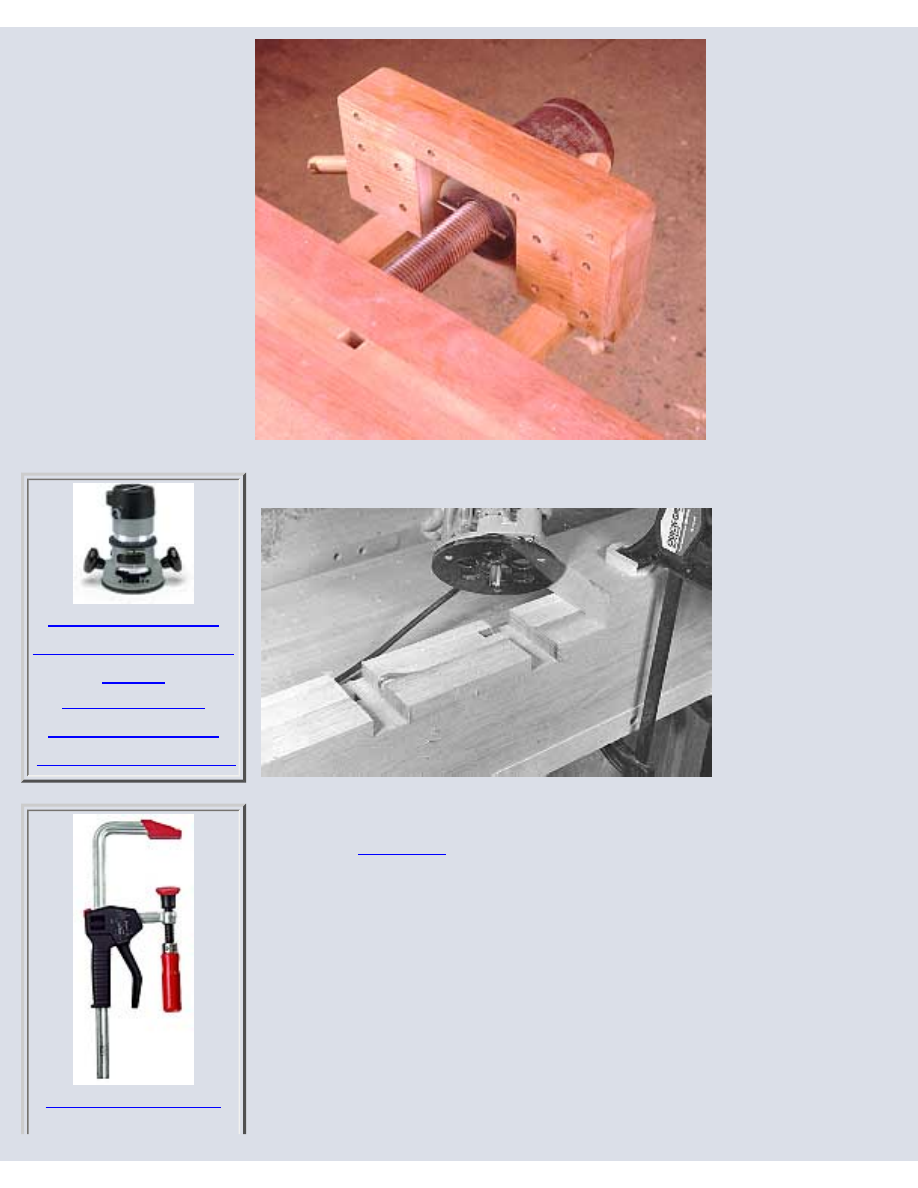
Photo 1- Glue together the
moving jaw, rear jaw, guide
bar and front plate of the tail
vise. Ensure that the four
pieces are square to each
other.
For clamps,
For glues,
Bore a hole in the rear jaw for the screw shank. The diameter you use will depend on
the screw box you use (or size of steel screw), since the box will work only with one
diameter shaft. Glue together the rear and moving jaws with the guide bar and front
plate as in photo 1.
http://www.jeffgreefwoodworking.com/pnc/ShopProj/woodvice/index.html (6 of 8)29/12/2003 18.19.44

Building Wooden Vises - Jeff Greef Woodworking
Download Digital
Plans Immediately
Click photo for details.
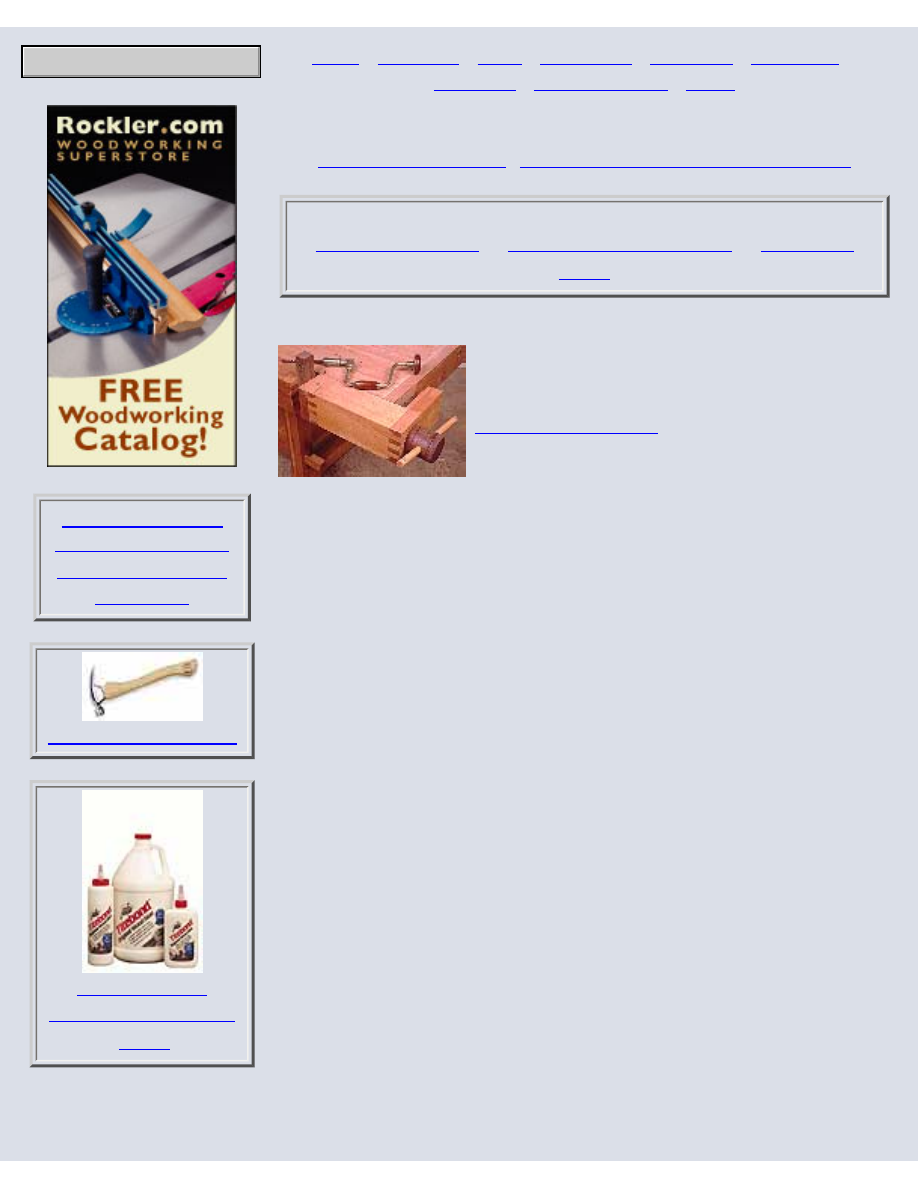
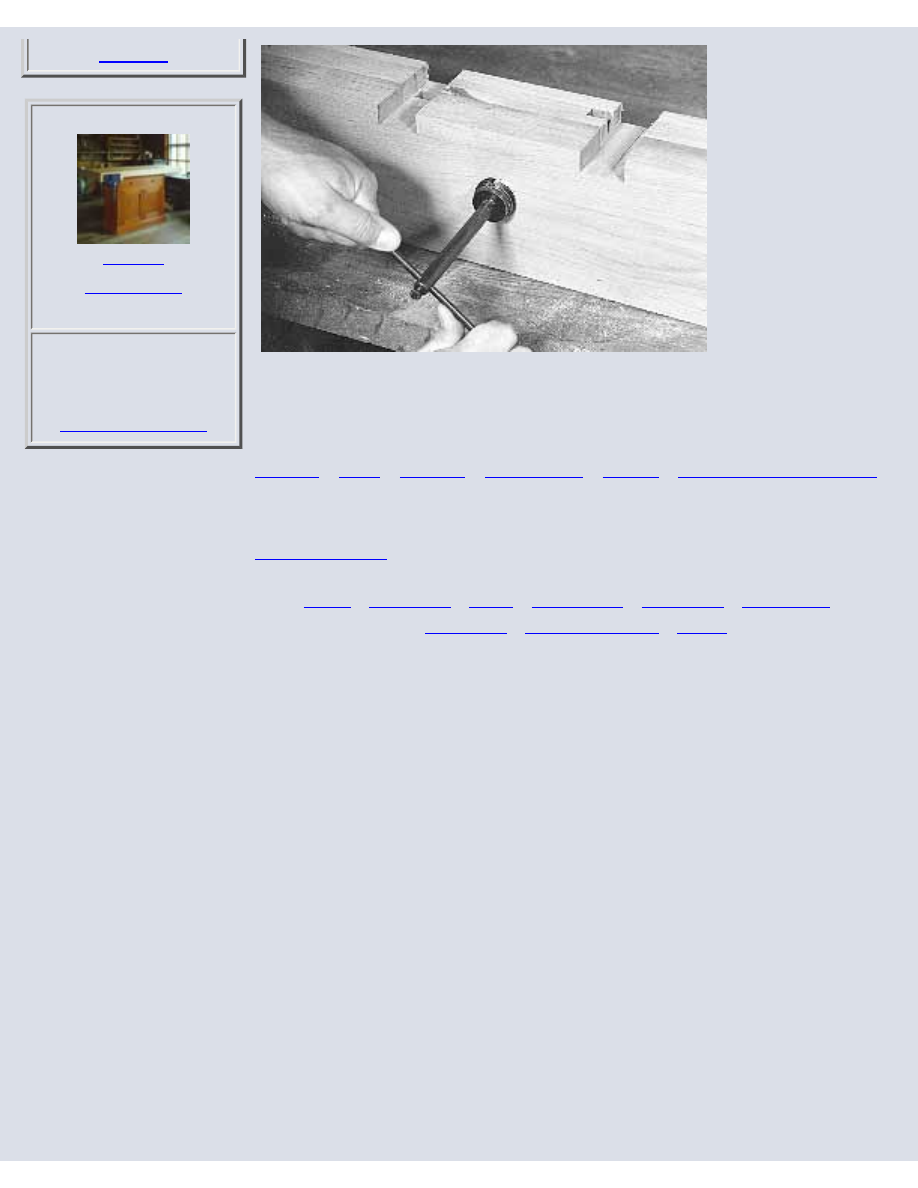
Photo 2- Glue up a turning blank out
of hardwood for the vise screw. Be
sure all parts are of equal thicknesses,
and are square, so that all surfaces
contact for a solid glue bond.
Make a turning blank for the screw by gluing together blocks for the knuckle as in
photo 2. Let dry thoroughly, then turn the shaft down to the exact diameter specified
by the instructions that come with the screw box. Use the box to cut the threads as in
photo 3.
Tools-Plus will beat
some lower prices on the
web by 10%. See their
Download Digital
Plans Immediately
Click photo for details.
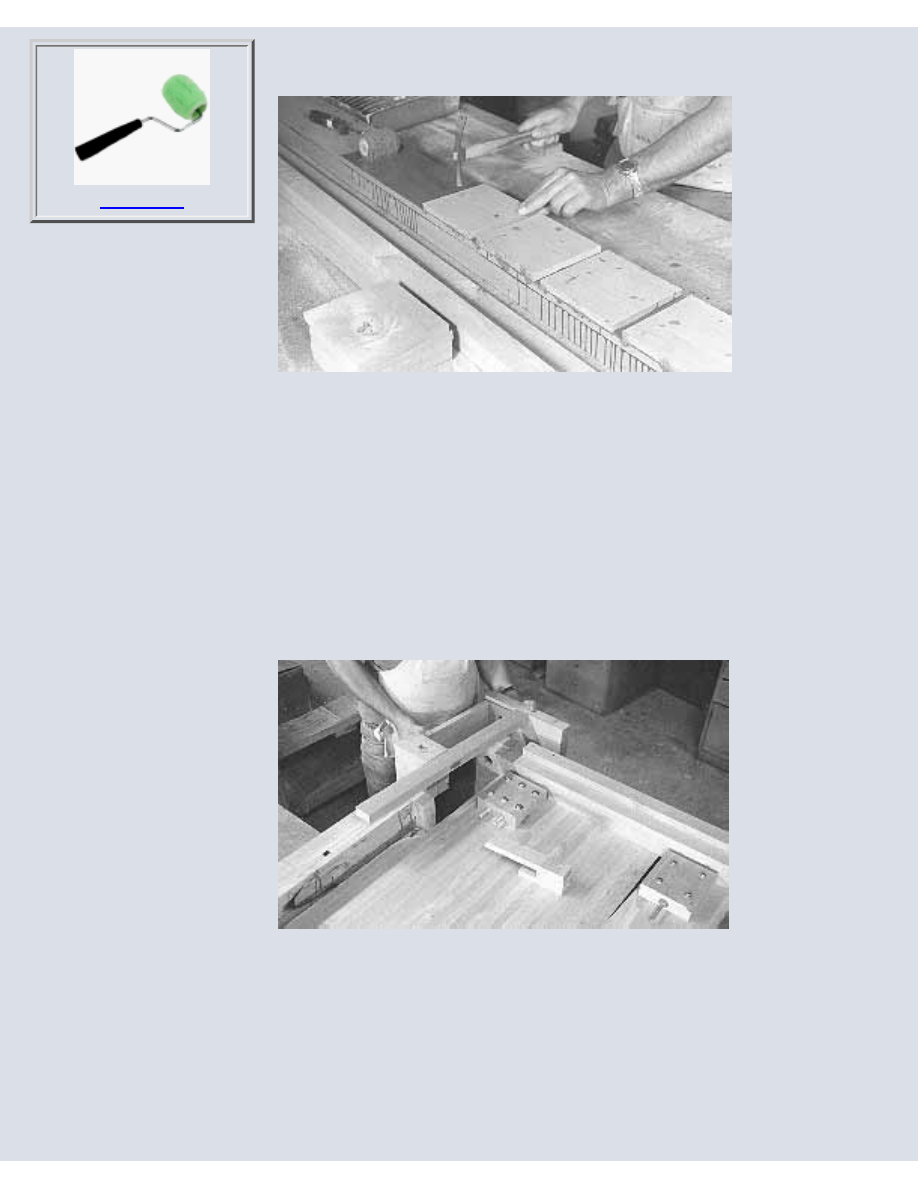
Photo 3- Turn the blank on a lathe to the exact
diameter specified in the instructions with your
thread cutting tool. Make a test blank and make
sample threads, then cut your vise screw threads.
For lathes,
This is Page 1 of this project.
|
http://www.jeffgreefwoodworking.com/pnc/ShopProj/woodvice/index.html (7 of 8)29/12/2003 18.19.44

Building Wooden Vises - Jeff Greef Woodworking
You are visitor number 30550 to this page.
http://www.jeffgreefwoodworking.com/pnc/ShopProj/woodvice/index.html (8 of 8)29/12/2003 18.19.44
Jeff Greef Woodworking
|
|
Jeff Greef Woodworking
|
Sign up for Email Notices of new projects
To see more Shop Plans on this site, go to:
Page 2, Wooden Vises
Make the end cap out of two pieces as shown in the drawings. Cut a
groove along the inside edge of the outer piece, to fit a tongue on the
edge of the bench top itself. Make this tongue along the bench top edge
with a router and a straight flute bit. Clamp a fence to the top to guide the
router and limit its cut. Bore a hole in the end cap on the drill press for
the screw to fit. Take extra care that this hole is bored at 90o. Tap the
hole for threads as in photo 8.
Laminate together pieces for the front bench section, as described in the
project in this site on making a Traditional Workbench. However, this
front section differs from the other bench slabs in several respects, it is
much thicker, not as wide, and has the fixed jaw with its finger joint.
Bore holes into the layers for threaded rods that will hold all the top
sections together, as described in the Traditional Workbench project on
this site.
http://www.jeffgreefwoodworking.com/pnc/ShopProj/woodvice/index2.html (1 of 5)29/12/2003 18.20.30
BookmarkThis Page
Jeff Greef Woodworking
Photo 4-
Laminate
together a front
section for the
bench,
incorporating
within this
section slots for
bench dogs. Nail
the short parts
between slots in
place during the
glue up to hold
them steady
while clamped.
Incorporate into these laminations bench dog slots by spacing short
pieces closely together as in photo 4. Ensure that the pieces are uniformly
spaced by making a spacer that you place between them as they are
located on the lamination. Nail down each section in its proper location
during the glue up, then proceed with gluing and clamping the remainder
of the pieces.
Photo 5- Fit the
tail vise to the
bench top with
the all the top
pieces bolted
together, and the
whole top placed
upside down.
Check that the
guide bar slides
easily in its notch
in the end cap.
Glue the front of the moving jaw to the inside moving jaw, taking care to
align the two dados for the dog slot. Join the front bench section to the
other sections with a dozen dowels as discussed above, then bolt together
all the bench top sections and turn them upside down. Fix the end cap
onto the end with short threaded rod sections as in photo 5. Put the tail
vise in place as shown in that photo.
http://www.jeffgreefwoodworking.com/pnc/ShopProj/woodvice/index2.html (2 of 5)29/12/2003 18.20.30
Jeff Greef Woodworking
Order Print Plans
Click photo for details.
Wood Tips
To see another tip- hit
"Refresh" or "F5"
#12- TABLE SAW
SAFETY TIP. Roll up
your sleeves at the table
saw. If cloth touches the
blade it will grab it, and
pull your arm into the
blade.
Search from over
9000 products!
Photo 6- Install the
screw in the vise,
check that the jaws
slide easily as the
screw is turned,
and install keepers
as shown to hold
the vise in place.
The tail vise is held in place by two keepers on the guide bar, as well as by
the screw itself. Install the screw and keepers as shown in photo 6. Cut
tongues on the ends of the top and bottom plates at the table saw, and slide
them into place within their dadoes on the moving and rear jaws. Hold the
plates in place with one small screw at each end, which comes from the top
or bottom of the jaw and contacts the plate tenon within its groove.
Mount the bench top onto the leg assembly with the right top rail just to the
left of the fixed jaw. Let the guide bar come close to the front edge of the
front right post. You will have to cut off about 3/4" from the bottom of the
front end of the top rail to make way for the guide rail, as shown in the
drawing.
FRONT VISE
http://www.jeffgreefwoodworking.com/pnc/ShopProj/woodvice/index2.html (3 of 5)29/12/2003 18.20.30
Go
Jeff Greef Woodworking
Photo 7- Cut slots
for front vise
guides on the
bottom of the front
section of the
bench. Use a
straight bit in the
router, guide the
cut with a fence
clamped to the
piece upon which
the router base
rubs.
After the tail vise, a front vise is very simple. Remove the front bench top
section, and cut grooves in the bottom of it for guides with a router and
straight flute bit. Clamp a fence to the underside of the work to guide the
router during the cut. Rub the router base against the edge of the fence as
shown in photo 7. Bore a hole for the screw, and tap it as in photo 8. Join
the guides to the jaw with mortise and tenon joints, much as you joined the
guide bar for the tail vise. When the guides are in place, screw a keeper
over them to hold them in place.
http://www.jeffgreefwoodworking.com/pnc/ShopProj/woodvice/index2.html (4 of 5)29/12/2003 18.20.30
Jeff Greef Woodworking
Download Digital
Plans Immediately
Click photo for details.
Photo 8- Cut
internal threads for
the screw in the
front section of the
bench top.
Resources For Building Wooden Vises
This is Page 2 of this project.
|
|
|
You are visitor number 10285 to this page.
http://www.jeffgreefwoodworking.com/pnc/ShopProj/woodvice/index2.html (5 of 5)29/12/2003 18.20.30
Document Outline
- jeffgreefwoodworking.com
Wyszukiwarka
Podobne podstrony:
Router Table Fence Jeff Greef Woodworking
Traditional Workbench Jeff Greef Woodworking
Bench Top Router Table Jeff Greef Woodworking
Woodworking Projects Building Tables
Boat Planst Small Craft Woodwork Wooden Boats Yachtdesign Boatbuilding Sailboat Caravela1 7
Building a Greenhouse
LOGO! in Building Automation
'Building the Pack 3 The Alpha's Only
Building A Wind Machine
Dahmer Jeff m76
4 2 2 7 Lab Building an Ethernet Crossover?ble
Woodworking Tips1
Steps in Building a Shed
Noon Wurt Jeff
konspekt obwód stacyjny z użyciem body building
Expedicio Jeff Vandermeer
Composite Construction Wooden Comb
24 foot pole utility building
Diy How To Paint Woodwork
więcej podobnych podstron