Woodworking Projects Building Tables - Overview
Project Introduction
Everyone enjoys the look and feel of
fine wood furniture. It has a warmth
and elegance that enhances every
home. With the prices of quality wood
furniture increasing, many do it
yourselfers are making their own
custom pieces. In this pamphlet, we
are going to demonstrate the correct
way to build a beautiful end table in
your own workshop. We will take you
through step by step, from initial
planning to the finished product. As
you build this project, remember,
every new skill and technique you
learn building this table can be carried
over into other woodworking
projects.
Planning
Review the videotape and pamphlet
thoroughly before proceeding with
this project. Go through the tools and
materials check-list and study your
plan carefully. Know the safety
standards for the project. Plan ahead
and gather the items that you will be
using, and place them where you will
build the table. The plans shown here are for the table built on the video. You may
want to adapt them to a design of your choice.
Before you begin your project, you will want to become familiar with the wood
working terms shown below.
Terminology
Miter Cut - Angle cut across the width or thickness of the board
Rabbet - L-shaped cut
Dado - Channel cut across the board, into which a second piece of wood is fitted
Kerf - Width of the blade
Countersink - To set a screw head at or below the surface

Dowel - Wooden pin used to provide strength and alignment
Chamfer - Corner of a board beveled at a 45 degree angle
Crosscut - Cut across the grain
Ripcut - Cut with the grain
WOOD SELECTION
Before you purchase your wood and select a finish for your end table, you should ask
yourself some simple questions about how you plan to use and display it in your
home. Where will the end table be located? Do the dimensions of the end table fit
properly in the space you have allowed for it? Is it a high traffic area? Will people be
placing wet glasses, or propping their feet on it?
The two basic categories of wood are hardwood and softwood. Hardwood is more
durable and less prone to dents and scratches. It is also more expensive but will finish
to a better advantage. Soft woods, like pine, are more prone to dents and scratches and
do not have the durability of hardwood. Softwoods are much less expensive and easier
to find. Ask your lumber supplier to show you "Class 1 " or "Select Grade" lumber.
Make sure it is properly dried, straight, and free of knots and defects. (It may be
impossible to be completely free of defects but be sure you understand how to cut
around these.)
Wood selection for your end table should be of a durable hardwood. In the video tape
the choice was oak. Solid pieces used for the table top will expand and contract with
changes in humidity. So that this will not create a problem, be sure all your stock is of
a similar moisture content. To allow for seasonal changes, do not glue the top to the
rails. Many people use veneered wood to avoid this seasonal problem.
Usually it is best to purchase surfaced stock that is smooth and of a uniform thickness.
However, you can use a planer and purchase the less expensive rough stock and finish
it at home. Any areas of the wood that show cupping or crowning will need to be
planed by using a jointer or table saw as demonstrated in the videotape.
Now that you have reviewed the safety hints, learned the mistakes to avoid, reviewed
the basic components and gathered your tools and materials for your end table - you
are ready to BEGIN!
A Step By Step Approach
Don't let the job of building this end table make you apprehensive about beginning.
This section makes building an end table easy by dividing the project into six simple,
manageable steps. Each step is then broken down into a series of instructions. You
will find each step and the instructions for completing them NUMBERED to help you
remember exactly what stage of the project you are doing. Refer to the diagrams and
the videotape if you have questions.
The steps to follow in making this lovely end table are:

1. Preparing the Stock
2. Preparing the legs and Rails
3. Assembling the top
4. Assembling the frame
5. Attaching the top
6. Finishing the assembled table
Preparing the Stock
If you did not buy pre-planed stock, start with step 1 of step 1; if you did buy pre-
planed stock, start with step 2 of step 1.
1. Make the stock smooth and uniform. To do this use a planer. Plane the stock
to a uniform 3/4" thickness.
2. Mark the stock for cutting. Measure carefully and make your marks clearly.
Note: Stay away from a circular saw to make your cuts because it is very hard
to get a straight cut. Instead use a table saw, radial arm saw, or similar
multipurpose tool. Set your guides and use a push stick, fence straddler, or a
push block to keep your hands away from the blade.
3. Rip (cut with the grain) the stock to the proper width. Measure carefully and
extend mark with steel square to provide a guide for table saw. Cut to the
waste side of the wood for proper cutting. Set the fence carefully before
ripping. When ripping you must be sure that at least one side of the stock is
perfectly straight so the stock can be ripped straight. Use a jointer, or a straight
piece of plywood and a table saw to get this straight edge.
4. Crosscut (cut against the grain) the stock to its proper length. Measure and
mark the stock carefully. Be sure to cut the stock 1" 2" longer. The stock will
be cut to final length after the top is built.
Preparing the Legs and Rail
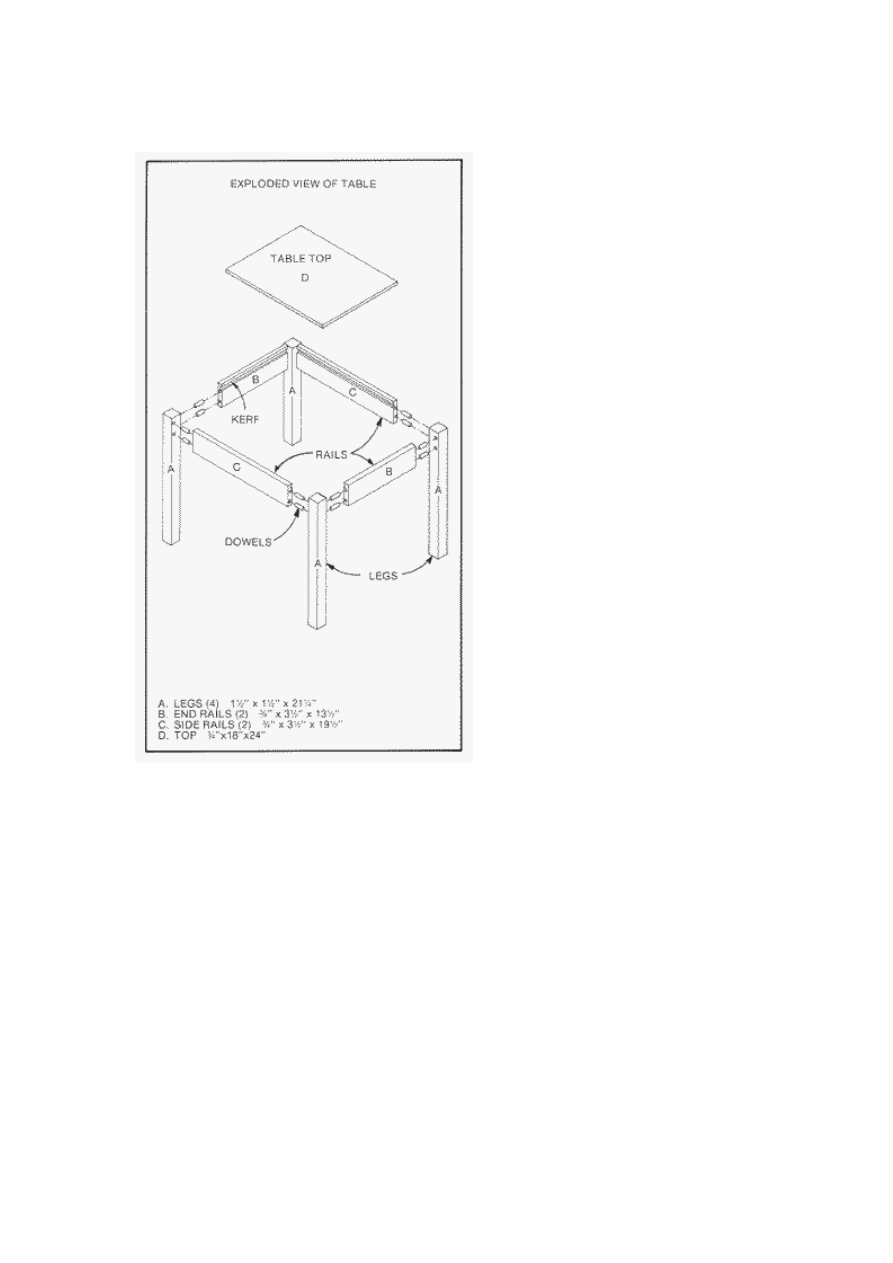
Choosing a style for the legs of your end table allows you a great deal of creativity.
We have selected the mission style leg which features a taper that is heavier at the top
than at the bottom.
•
Use a table saw to taper the legs. (A taper jig comes in handy here.)
•
Arrange and mark table legs and rails clockwise according to their locations
on the finished product.
•
To prepare the rails for attachment to the top, your plans will specify exactly
the dimensions of each piece. In our example, the rails are cut 3 1/2' by 13 1/2'
and 3 1/2' by 19 1/2'. There is a slot on the inside of each rail made by a kerf
cut to receive the mirror holder which holds the top. It is 1/8" wide and 3/811
deep and begins 5/16" from the top of each rail. You can use a router or a table
saw to make these slots.
Assembling the Top
The table top will be assembled from several individual pieces of wood and glued
together edge to edge. The three pieces will be longer and wider than the dimensions
indicated in the plans. The top will then be cut to exact specifications. Be certain that

the edges are properly jointed with no space between the
boards. If done correctly, the glue lines will be hard to
notice.
•
Arrange the top boards so that the grain is
pleasing to you, then mark them according to
their location. The videotape shows you how to
alternate the annular rings on each piece of board. This arrangement allows for
any cupping or warping and ensures the tabletop will remain flat.
•
Joint the edges if needed. Use either a stationary or hand jointer, both use a
cutter that planes the edges smooth and square, Note: If you don't have a
jointer, a table saw is the next best thing for smoothing rough edges. A hand
jointer plane does a good job, but requires a greater degree of skill. Whichever
method of jointing you use:
•
Check your edges for squareness before you start gluing.
•
Smooth out any roughness with sandpaper to your satisfaction.
•
Glue pieces together with yellow carpenters glue. This glue is usually stronger
than the wood itself. Place glue on the piece evenly and on both sides. Once
you have begun gluing, spread it evenly across the joint and don't stop until
you are finished. Avoid getting glue on the surface of the table.
•
Put waxed paper on the top and bottom of the table t o make sure the clamps
are not glued to your tabletop.
•
Apply clamps for pressure to make the tabletop as flat as possible. Look for a
slight squeeze out of glue which indicates adequate pressure.
o
Note: If you plan to use a planer to surface the top, the top will have to
be glued in two pieces, so that the pieces can fit through the planer.
o
Note: Clamps can mar the wood. In addition to using the wax paper,
you may want to use scrap wood to protect the finish of your table top
by putting the clamp face on the scrap and gently closing the clamp
down. Care must be taken when you slowly tighten the clamps, in case
you change the alignment of the table top.
•
Once it has dried, (approximately 24 hrs.) remove the clamps. If the surface
isn't smooth use your planer or belt sander. Scrape off any excess glue with a
glue scraper being careful not to dig into the top.
Assembling the Frame
There are many ways to assemble the frame. One of the best ways is to attach the legs
to the rails by using dowels because of their strength. Dowels provide strength and
easier alignment and can be made of wood, metal or plastic. Dowels can be pointed
with spirals; or can have square ends with no spirals. Use pointed dowels with spirals
to take out air pockets because they will set more glue and provide for maximum
stability.
The frame will be put together by using dowels. The dowels are 3/8' diameter by 1
1/2" in length. The dowel holes are 2" apart (or the setting of the dowel jig) and begin
3/4" from the top. The centers of the dowel holes should be centered on the inside

edges of the leg and rails.
1. Drill dowel holes according to the plans, using a dowel jig or a horizontal
boring machine. A dowel jig allows for accurate holes (directly in the center
regardless of the thickness of the wood) in both the legs and rails. A piece of
tape, or a depth gauge acts as a guideline for the depth of the hole (half the
length of the dowel plus 1/4").
2. Apply the glue to the dowels, holes, and flat surfaces. Tap the dowels in ? their
length with a mallet. Clamp the side rails and legs together.
3. Glue and clamp side rails to the end rails. At this point check the frame for
squareness by measuring on opposite corners. If the measurements are the
same, then your table is square. Let the glue dry completely (approximately 24
hours).
Attaching the Top
1. Make sure tabletop is properly dried. Rip tabletop to exact size.
2. Crosscut tabletop to exact size.
3. Use a belt sander until you have removed all traces of glue and have a smooth
finish.
4. To add the fancy edge, the videotape uses a router, but a shaper or
multipurpose tool could also be used. Start with your end grain first to allow
for a small tear out.
5. Draw lines on the underside of the table to make sure it is centered.

There are
two ways
to attach
the top.
The first
is to use
screw pockets, which attaches the top to the rails. This
requires using a brad-point bit with a smaller bit to drill a
pilot hole. You need at least two screw pockets per side,
for this table the total is eight. Drill your pilot holes into the tabletop, and secure the
top with round head wood screws. Be careful not to go through the top.
The other method uses mirror holders which attach the top to the rails. Screwed into
the underside of the top, these holders project into a saw kerf on the rail. This table
requires ten holders, two for each end and three for each side. To use mirror holders to
attach the top to the rails, locate and drill holes for the mounting screws and secure
tabletop in place. Be careful not to drill through top. Use a drill press to set correct
depth, or use a "stop collar" on your hand drill. Never glue the top to the frame as this
does not allow for the expansion and contraction of the wood.
Finishing the Assembled Table
Sanding
The best time to do any major sanding is BEFORE the main pieces are attached.
Sandpaper is graded as medium, or numbers 60, 80, and 100. Fine sandpaper numbers
are 150, 180, and very fine 220, 240, and 280. Medium is usually used for the first
sanding, fine for smoother results and very fine for smoothing finishes between coats.
Sandpaper can be used wet for some finishes.
You can fill in nail holes with wood putty before sanding if you are not planning to
stain the wood. If you are staining, fill the holes AFTER the stain is applied. In either
case, match the wood putty closely in color to the stock or use saw dust and wood
glue to make your own putty.
1. Sand with a fine, wet sandpaper (start with a 12O grit on plywood and 60-80
grit on other lumber) wrapped around a felt pad or use a pad or orbital sander.
Use aluminum oxide sandpaper because its grit material lasts longer.
2. Sand slowly so you get the best job possible. Vacuum frequently to remove
dust. Finish manufacturers recommend which grit of sandpaper to use with
their specific finishes to achieve the smoothest result. Feel the wood to check
on the smoothness as you work because touch is really the only way to get a
smooth surface. Make sure that you remove all dust, finger marks and excess
glue before applying the finish. First vacuum or brush the entire piece clean
and then wipe with a tack cloth.
When it is time to varnish, vacuum the room and let the remaining dust settle for 24
hours. Wear lint free clothes and use the fastest drying varnish available. Use a tack

rag to remove dust before applying varnish and between
coats. Do not apply urethane varnish over a coat of
shellac or lacquer.
Applying Filler
(Optional Step) The key to a beautiful finish is making sure the surface is as smooth
as possible.
1. Countersink all nails and repair all dents.
2. Apply a coat of filler to all surfaces of the table. (Paste wood filler thinned
with turpentine or paint thinner is best.) Filler is a compound mixed to the
consistency of yogurt which fills all the pores of the wood for a smoother
finish. Do not use the wood filler that is sold to repair rotted wood. Work the
filler into the wood instead of just brushing it on. A short-bristled brush is best
and can be made from an old paint brush. Using the filler gives your table that
"Extra" touch of beauty by providing a smoother finish. You can color the
filler after thinning for a perfect match of wood and filler.
3. Brush the filler on with the grain of the wood, making sure all pores are filled.
4. Wipe off the first coat of filler. Recoat, this time working across the grain.
Make sure the brush is heavily loaded with filler.
5. The instant the shiny wet surface looks dull, start scrapping off excess filler
with a straight, sharp edge implement like a playing card, ruler, stiff cardboard
or knife with a wide blade (like the knife used to apply drywall).
6. Use a rough cloth like burlap to rub briskly across the grain.
7. Once the surface is as clean of excess filler as possible, let it dry overnight. If
you are using a wood with an open grain, you may need two or three coats of
filler.
Applying the Finish
Apply your finish in a well ventilated space with lots of room. Cover the floor in the
area that you will be applying the finish so that if a spill occurs it will not leave a
permanent stain. Be sure the area is clean and dust free and can remain so during the
drying period. Follow the manufacturer's instructions. The finish is the first thing you
and your friends will notice, so take your time.
The choice in the videotape is a polyurethane finish applied with a foam applicator.
You could use an air compressor with a spray attachment or the traditional brush
method. Give the surface a fine sanding between each coat for a long-lasting, durable
shine.
Your handcrafted table is a personal source of pride and you will want to select a
finish which shows it off to its best advantage. Here are some suggestions to consider
when you choose your finish.
1. Appearance: do you want a clear finish or do you want a stain to blend with
the other pieces in your home. Do you prefer a high gloss or satin look?
2. Texture: Do you want the table to appear smooth and slick or do you want to
feel the wood's grain?

3. Durability and protection: how is this piece going to be used, and what are you
going to set on it? Do you need minimum protection from water marks and
scratches?
4. Ease of application: how do you want to apply the finish? Will you be using a
rag, brush, or spray? Why not visit an unfinished furniture store and talk to the
staff about your needs. Look at their finishes and don't hesitate to bring a part
of your project or a sample of a finish you may be trying to match. Try any
finish you are considering on a scrap piece of wood that has been smoothed
down to your table's finish. You can save a lot of heartache by taking the time
to check BEFORE applying a finish that doesn't work.
Another finish that can be used is an oil finish. The advantage of the oil finish is that
after the first coat a fine grit of sandpaper can be used when wet (220) to cause a
slurry of dust particles and oil. This mixture is continually absorbed into the wood
with each coat. Each coat builds up a very durable surface with a hand-rubbed look.
Though beautiful, those oil finishes, do not have the durability and water resistance of
the polyurethane finishes.
Some refinishers use a sanding sealer, which makes a light fuzz stiff so that it can be
sanded off. Test to make sure that a sealer will not adversely affect the finish by
applying to the underside of a shelf and then applying the stain to see if it goes on
smoothly.
If brushing on the finish, consider the following:
1. Position the piece in horizontal sections.
2. Apply the paint, varnish or stain across the grain.
3. Brush out the finish with the grain using the brush as a wiping tool. Clean the
brush as it collects liquid.
4. Pull the brush across the table's surface with the bristles held almost
vertically.
5. Let each side dry between coats.
Check the varnish to see if a certain stain is called for. Read the label for drying times
and how many coats to apply. Apply two, preferably three coats of urethane varnish
using a good quality natural bristle brush. Between coats wet sand the finish. Rub the
surface till it feels smooth. Wipe off any residue and then apply the next coat. Be
careful at the edges of the table so varnish doesn't drip or run down the sides. For the
final touch, rub down the table using a thin paste of rottenstone. Let the finish dry for
a week before buffing with a hard paste wax or lambs wool pad.
Completing this project gives you a beautiful addition to your home. It is an
expression of craftsmanship you and your family will be proud of.
Tools: (Other than common shop tools)
1. Table Saw
2. Jointer (optional)
3. A doweling jig or a horizontal boring tool
4. Jig saw

5. Router
6. Orbital sander
7. Shaper (optional)
8. Clamps for gluing
Materials:
1. Cabinet grade plywood for carcass
2. Plywood for door, false front insert and kick plate face.
3. 1" x 6" oak for face frame
4. Dowels
5. Hinges
6. Knobs
7. Glue
8. Finishing nails (6d)
9. Flathead wood screws
10. Drawer materials and slides (if needed)
11. Sandpaper
12. Counter top materials
Document Outline
Wyszukiwarka
Podobne podstrony:
American Woodworker Project Of Nieznany
Celtic Woodcraft, Authentic Projects For Woodworkers G Bennet
Celtic Woodcraft, Authentic Projects For Woodworkers G Bennet
Building Wooden Vises Jeff Greef Woodworking
Prezentacja ZPR MS Project
3 Data Plotting Using Tables to Post Process Results
Building a Greenhouse
Free Energy Projects 2
Microsoft Office Project Project1 id 299062
LOGO! in Building Automation
'Building the Pack 3 The Alpha's Only
Building A Wind Machine
project
89SXX Project Board
Boot Hill Loot Tables
Classic Battletech Technical Readout Project Omega
30 LED Projects
więcej podobnych podstron