www.blaupunkt.com
Zubehör / Accessories
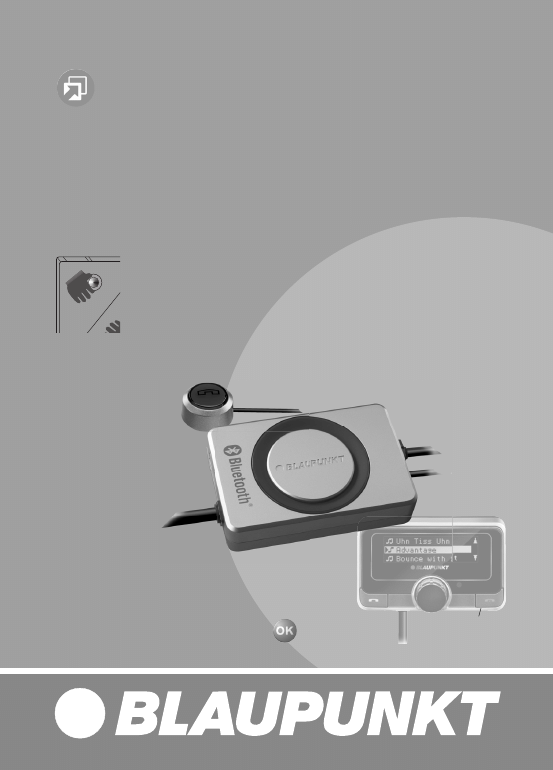
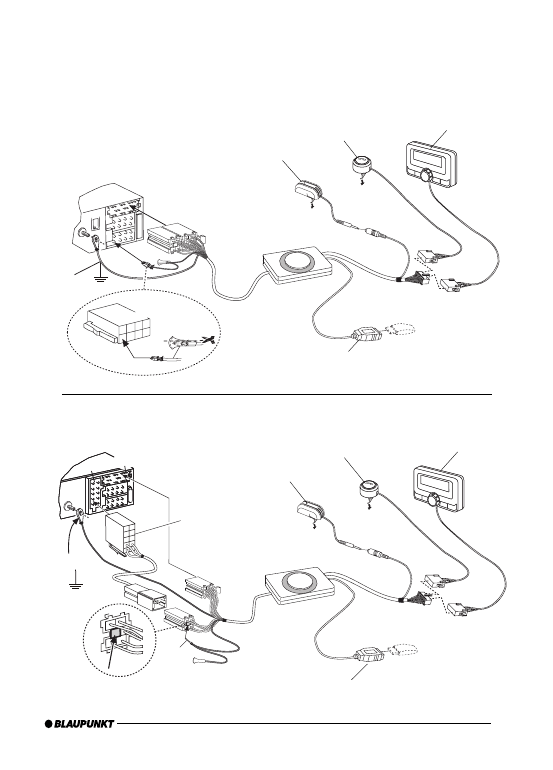
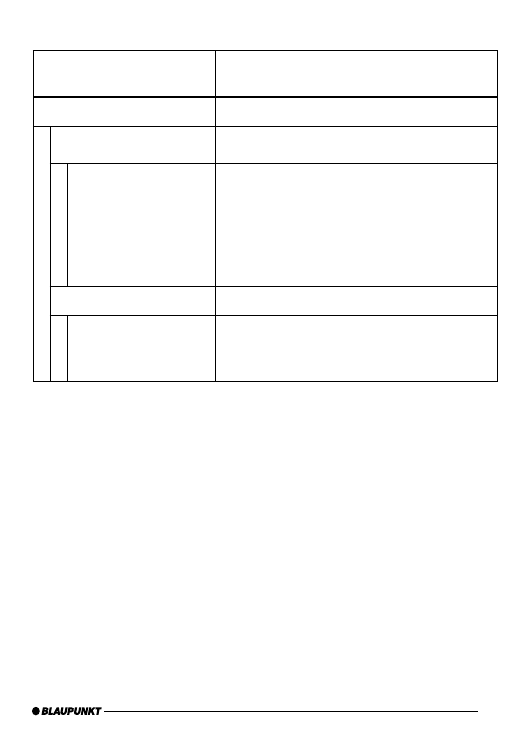
Bluetooth-/USB-Interface VW / Audi 7 607 545 550
mit / with PTT
mit / with OLED-Display (optional) 7 607 548 500
PTT
optional
2
Fakra
Pin9
(Fakra)
GROUND
GROUND
Radio Mute
Pin9
(Fakra)
Pin 2
(ISO)
10
Blue
to
ot
h
BLAUPUNK
T
oder/or
oder/or
Microphone
PTT (Push to talk) - key
USB socket
(Memory stick not included)
Fakra
OLED
(not included)
Connection / Anschluss
AK 7 607 001 539
Phone Mute
AK 7 607 001 543
Phone Mute
3
ISO
10
10
7
3
8
6
1
5
2
GROUND
BLAUPUNK
T
Blue
to
ot
h
Pin 2
(ISO)
oder/or
PTT (Push to talk) - key
Microphone
USB socket (Memory stick not included)
ISO Audi
BLAUPUNK
T
Blue
to
ot
h
Pin 9
GROUND
D
Pin 9
A
oder/or
C3
7 607 001 540
PTT (Push to talk) - key
Microphone
USB socket (Memory stick not included)
Connection / Anschluss
OLED
(not included)
OLED
(not included)

4
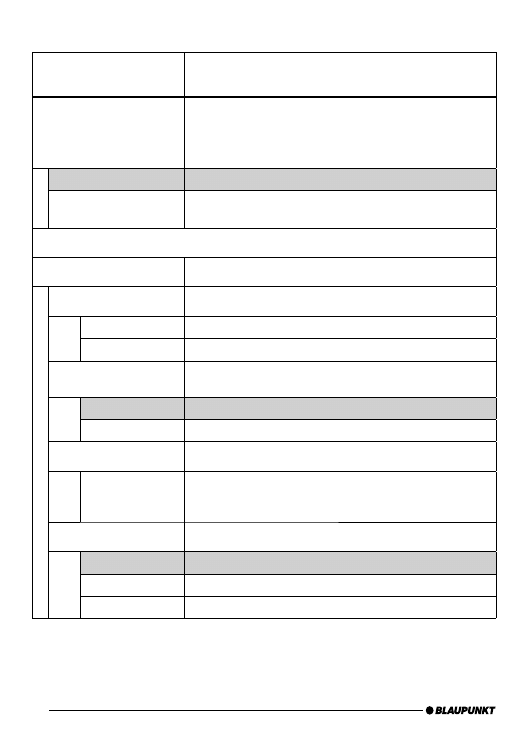
Bluetooth
1.2 (compatible with 1.x)
Supported Bluetooth profi les
Unterstützte Bluetooth-Profi le
HFP, SPP, GAP, SDAP. AADP (A2DP), AVRCP
Certifi cations
Standards
e1, CE, FCC, Bluetooth
USB
Version 2.0 (full speed), (compatible with 1.x)
Mass Storage Device Class
MP3-USB-Bitrate
max. 320 kb/s, max. 48 kHz sample rate
MP3 Meta Data
ID3 v1, v2 (ISO8859-1 and ASCII), max.32char Title,
Album, Artist
Playlist
M3U format supported, Latin-1 char set,
see e.g. http://en.wikipedia.org/wiki/M3U
Data Structure
max. 64000 fi les and directories, up to 16 directory levels
Temperature range
Temperaturbereich
- 40° C ... 85° C
USB voltage / current strength
USB-Spannung / -Stromstärke
5V / 0,5 A (1,0 A short term / kurzzeitig)
Power Supply
Spannungsversorgung
+12 ... 28 V
Dimensions (inch)
Abmessungen (mm)
1.1 x 3.2 x 4.8 (without cables)
28 x 81 x 121 (ohne Kabel)
Weight
Gewicht
300 g
For / Für VW, Audi, Seat, Skoda, Ford Radios see / siehe www.blaupunkt.com
Bluetooth USB Interface VW Compatibility list of OEM devices
Bluetooth-USB-Interface-VW Kompatibilitätsliste Erstausrüstergeräte
Technical Data / Technische Daten

24
Connection ............................................................... 2
Technical Data ........................................................... 4
Safety notes ............................................................ 25
Declaration of conformity ........................................ 25
Switch-on ................................................................ 25
Switch-off ............................................................... 25
Displays and controls ............................................... 26
Registering (pairing) your cell phone
with the interface .................................................... 26
Connecting two BT devices with
the interface at the same time .................................. 27
Overview of functions .............................................. 28
Telephone: incoming call .......................................... 30
Telephone: outgoing call .......................................... 30
Audio streaming via BT ............................................ 30
MP3 playback via USB .............................................. 31
Browsing (OLED) ..................................................... 31
Folder management /
Structure on USB removable data carrier ................... 32
Settings menu (OLED only) ....................................... 33
Settings .................................................................. 34
Software update ...................................................... 39
Reading out technical data ....................................... 39
Changing the confi guration (PTT) ............................. 40
FCC-Statements ...................................................... 42

25
ENGLISH
We provide a manufacturer's warranty for
our products purchased within the European
Union. You can view the warranty terms at
www.blaupunkt.de or request them directly
from:
Blaupunkt GmbH
Hotline
Robert Bosch Str. 200
D-31139 Hildesheim
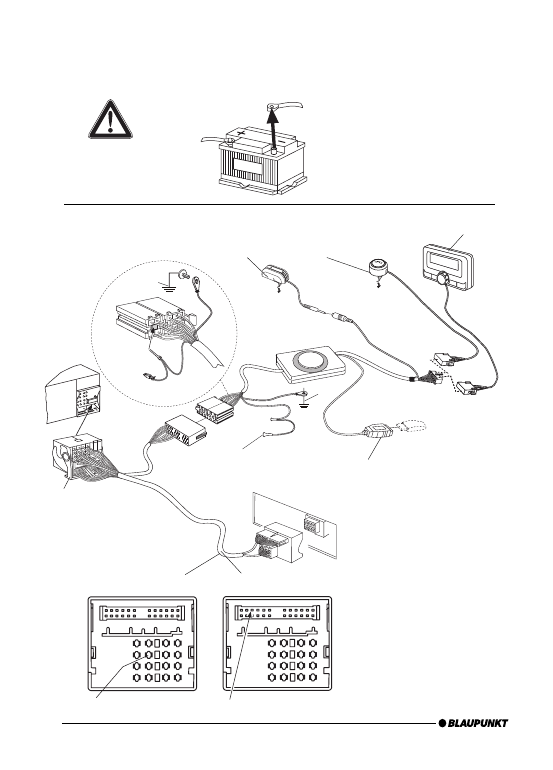
Safety notes
Before drilling holes for mounting, ensure that
no routed cables or vehicle components are
damaged!
Do not install the USB socket, microphone and PTT
button in the deployment area of the airbag, and
ensure that the tray is safe and solid so that passen-
gers in the vehicle are not at risk during emergency
braking. Use cable glands for holes with sharp
edges.
The negative terminal on the bat-
tery must be disconnected while
the device is being installed and
connected.
Observe the safety notes from the vehicle manu-
facturer (airbag, alarm systems, on-board com-
puters, immobilisers).
Recycling and disposal
Please use the return and collection systems avail-
able to dispose of the product.
Declaration of conformity
The Blaupunkt GmbH declares that the Bluetooth/
USB Interface device complies with the basic re-
quirements and the other relevant regulations of
the directive 1999/5/EG.
Dear customer,
the fi rmware
"SW8C01VW" for the Bluetooth USB
interface (BT-USB interface, 7607 545 500 001)
is now available and provides several new func-
tions that we would like to explain below.
A signifi
cant innovation since SW8625VW
is the
support for the OLED display
(7 607 548 500 001).
Caution:
Before startup of the OLED display, it is nec-
essary to update the fi rmware of your BT-USB
interface (see the
(see the section Software update).
Software update).
The following instructions assume that the
fi rmware of your BT-USB interface has already
been updated, and the language was set to English
(see the section Settings menu).
This fi rmware can also be used with your PTT like
the previous versions. The OLED-specifi c control
and display options listed below are not available
in this case.
Switch-on
The OLED display switches on
automatically as
soon as you switch on your radio or radio naviga-
tion device (RNS).
Switch-off
The OLED display switches off
automatically as
soon as you switch off your radio or radio naviga-
tion device (RNS).
You can also switch off the display
manually; to
do so, press and hold the
red phone button for
longer than
5 seconds. The buttons remain illumi-
nated to improve navigation at night.
In the "Display -> Standby" Settings menu, you
can
preselect a time after which the display au-
tomatically switches off with switched-on radio,
e.g. to reduce a possible distraction of the driver.

26
In the "Display -> Switch-on" menu item, you se-
lect how the display will be switched on again.
If a call should be received after manual or auto-
matic switch-off, the display switches on auto-
matically again (provided that the radio is still
switched on).
Displays and controls
The OLED display shows different information de-
pending on the current status of your BT-USB in-
terface. Which control options are available via
the green (left) and red right) phone button as
well as the central rotary pushbutton is listed in
the following sections.
Pressing the red and green phone button at the
same time calls up the
Settings menu. Here you
can adjust many properties to your personal pref-
erences, such as the language (English, French,
German) or ID3 tags from MP3 fi les to be dis-
played.
After initial switch-on
After switch-on, the OLED display greets you with
a Blaupunkt lettering which gives way for a smaller
lettering after a few seconds.
Registering (pairing) your cell phone
with the interface
Use your cell phone to search for Bluetooth de-
vices (see the instructions of the cell phone ->
Pairing). The telephone fi nds "Blaupunkt IF" and
asks for a PIN. Enter
PIN 1234 on your cell phone.
An existing BT handsfree connection is shown on
your OLED display by a non-fl ashing BT symbol in
the top left corner.
If you telephone does not request a PIN, please
check by means of the compatibility list for cell
phones (www.blaupunkt.com) whether a differ-
ent confi guration should be set for operation with
your type of telephone.
You can couple up to 5 cell phones with the inter-
face. If additional phones are coupled, the data of
the phone coupled fi rst are deleted from the list.
The
automatic reconnect for handsfree register-
ing is started by the interface under the following
conditions:
After
switch-on of the interface, every one
of the last up to 5 pairings is checked for
up to 15 seconds whether a pairing can
be re-established. During this time, the BT
symbol fl ashes. With active pairing, the BT
symbol is displayed constantly. If no pairing
is accomplished, the BT symbol goes out.
As long as the BT symbol fl ashes, acoustic
interference's are possible in an existing
audio stream connection, since all BT radio
channels (including those in which an audio
stream already exists) are checked for the
pairing.
An automatic pairing attempt (fl ashing BT
symbol) starts if an
existing pairing is dis-
solved with switching off BT in the cell phone
or removing it from the BT radio range.
Press on the
green phone button (as long as
no telephone is registered).
ntaste (solange
kein Telefon gekoppelt ist).
Note:
To initiate a pairing, it is NO LONGER required to
hold the PTT button pressed for 5 seconds. The
interface is always visible in the BT radio range
and ready for pairing.
Without any preparation at the interface of your
BT device, start the function
"Find other BT de-
vices" (may be called differently, see the in-
structions of your BT device) and select your
"Blaupunkt interface"
1.
2.
3.

27
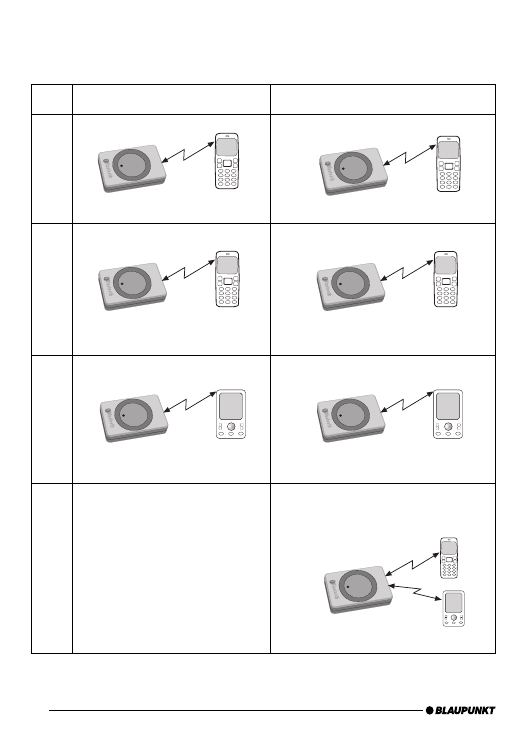
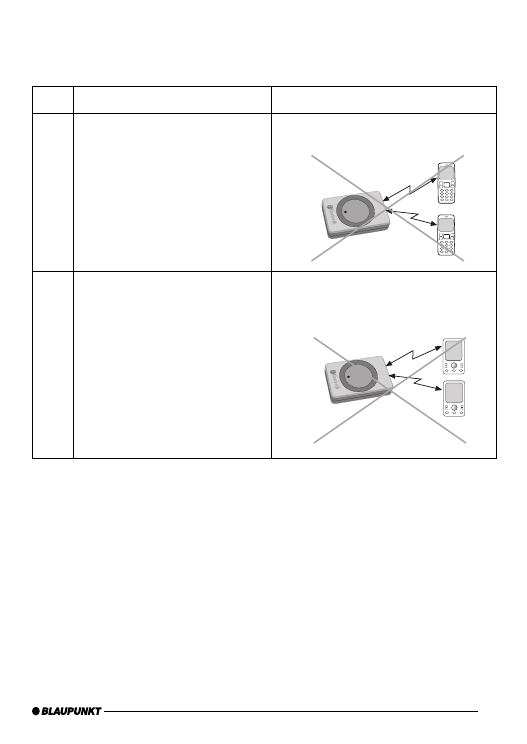
Connecting two BT devices with the
interface at the same time
The use of the services
"Hands-Free Calling" and
"Audio Streaming" can now (new) be performed
by
different BT devices that are connected with
the interface at the same time.
For example: cell phone for hands-free calling and
Music Player with Bluetooth transmitter (BT-TX)
for audio streaming.
Until now, it has only been possible to perform
both functions with the same BT device. The fol-
lowing illustrations (overview of functions) dis-
play the existing and the newly made possible
connections:
Each of the offered services
"Hands-Free Calling"
(BT profi le HFP) and
"Audio Streaming" (BT pro-
fi le A2DP and AVRCP)
can only be used by no
more than one BT device at the same time.
Notes:
A simultaneous hands-free connection with two
cell phones is NOT possible. Only after discon-
necting a hands-free connection is it possible to
activate the second one.
For audio streaming connections, there is no list
of the devices used last.
A Bluetooth Audio streaming transmitter (BT-TX)
connects itself only if the connection is actually
requested.
An interface that is switched on is always ready
for pairing with a BT-TX.
The pairing of a BT streaming device is NOT saved
in the interface, some streaming devices may re-
quest the PIN after every restart.
28
Overview of functions
Mode
Previously possible
Possible with SW8205 or higher
1
Hands-free calling with cell phone
Hands-free calling with cell phone
2
Hands-free calling and audio
streaming with cell phone
Hands-free calling and audio streaming
with cell phone
3
Audio streaming with BT
transmitter (BT-TX)
Audio streaming with BT transmitter (BT-TX)
4
Function not available!
Hands-free calling with cell phone and audio
streaming (connected at the same time) with
BT transmitter (BT-TX)
BT-Freisprechen
BT-Freisprechen
BLAUPUNKT
BLAUPUNKT
BLAUPUNKT
BT-Audio-Streaming
BT-Freisprechen
BT-Audio-Streaming
BT-Freisprechen
BLAUPUNKT
BLAUPUNKT
BT-Audio-Streaming
BT-Audio-Streaming
BLAUPUNKT
BLAUPUNKT
BT-Freisprechen
BT-Audio-Streaming
29
Mode
Previously possible
Technically not possible
Not
pos-
sible
Hands-free calling with 2 cell phones
Function not available!
Hands-free calling with 2 cell phones
Function not available!
Not
pos-
sible
Audio streaming with 2 BT
transmitters (BT-TX)
Function not available!
Audio streaming with 2 BT
transmitters (BT-TX)
Function not available!
BLAUPUNKT
BLAUPUNKT
BT-Freisprechen
BT-Freisprechen
BT-Audio-Streaming
BT-Audio-Streaming
Overview of functions

30
Telephone: incoming call
An incoming call is shown on the OLED display by
a vibrating telephone, the note "Call" and (if trans-
mitted) name or phone number of the call as well
as a fl ashing rotary button.
You can
reject the call by pressing the red tele-
phone button or pressing the PTT button for a
longer time.
You can
answer the call by pressing the green
telephone button, the rotary button or briefl y
pressing the PTT button.
"
Call Active" indicates that the phone connection
(GSM) is active. At the same time, the car sound
system is muted (Tel. Mute) and the voice of the
caller is played via the car loudspeakers.
You can
end the call by pressing the red tel-
ephone button or the rotary button or pressing
the PTT button.
Telephone: outgoing call
To make a phone call, press the
green telephone
button or the PTT button.
The
voice recognition of the cell phone is activat-
ed (if available and activated).
The OLED display shows "
Phone Book". Push the
rotary button to confi rm your selection and se-
lect the
fi rst letter of the desired contact by turn-
ing the button clockwise or counterclockwise.
Pressing the rotary button again displays a 3-line
segment from the list of all contacts whose name
starts with this letter. "No Phone Book" indicates
that no phone book could be loaded by your cell
phone. "Loading Phone Book" indicates that the
download by the cell phone has not been complet-
ed yet; please repeat your attempt at a later time.
Select the desired contact from the phone list by
turning the rotary button clockwise or counter-
clockwise. In addition to the contact name, the
phone number is also displayed now. You start the
dialing process with the green telephone button.
The OLED display shows a phone icon and the text
"Dialing …" with the selected phone number. You
can cancel by pressing the red phone button.
As soon as the contact you are calling has an-
swered the call, the OLED display shows "Call
Active" again. You can end the call by pressing the
red phone button.
If you turn the button during the "Phone book" dis-
play, "
Dial Number" appears as an alternate input
option, which you can select by pressing the rota-
ry button.
From the displayed list, select the fi rst digit of the
desired phone number and copy it to the 2nd line
containing your selected number by pressing the
button. If you inadvertently selected a wrong dig-
it, you can delete it by briefl y pressing once on the
red phone button. If you want to completely can-
cel the number entry, hold the red button pressed
for at least 2 seconds, and you are returned to
"Dial Number".
After completely entering the number, start dial-
ing by pressing the green phone button.
You can cancel or end by pressing the red phone
button
Audio streaming via BT
Activate the audio streaming on your cell phone
or BT streaming transmitter. Use
PIN 1234. If the
PIN of your BT streaming transmitter is perma-
nently set to "0000", you can also adjust the inter-
face to this PIN, see the Settings menu.
During the audio streaming, the OLED display
shows "
STREAM".
For some BT streaming transmitters with
remote
control option (BT AVRCP, Audio Video Remote
Control Profi le), it is possible to jump to the pre-
vious/next track by turning the rotary button to
the left or right or pressing the left/right radio
button.

31
MP3 playback via USB
You can connect a USB removable media drive
with MP3 fi les to the interface to play the MP3
fi les via the car sound system. The car sound sys-
tem must be switched on. During a hands-free
telephone call and with active audio streaming,
the USB playback is interrupted.
By turning the button left or pressing the radio
button <, you jump to the start of the track cur-
rently playing (playback time > 3 sec.) or to the
previous track.
By turning the button right or pressing the radio
button >, you jump to the next track.
Forward and reverse can be done as before with
a long press on the Right or Left button of your
radio.
Mix, Repeat and Scan settings should also be
performed on your radio.
During the
MP3 playback, the OLED display
shows
additional information from the MP3
fi les ("ID3 tags"). In the
Settings menu, you can
select
different views and confi gurations for
this purpose. If ID3 tags to be displayed should
not be fi lled out in MP3 fi les (e.g. no track), the
note "No Track" is displayed.
Browsing (OLED)
During the MP3 playback from the USB medium,
press the rotary button to reach the Browsing
mode. It allows you a convenient navigation
through the directories of your music collec-
tion on the USB medium. While selecting a new
song, the currently played song continues be-
ing played. Only after confi rmation does the new
song begin to be played.
"
Please wait" indicates that new list entries are
being searched.
The displayed 3-line list contains all the subdi-
rectories, playlists and MP3 fi les in the current-
ly used directory of your USB memory.
The
currently played MP3 fi le is preselected and
identifi ed with "
->".
You scroll through the list entries by turning the ro-
tary button left or right.
A list entry is a
subdirectory or a playlist:
Pressing on the rotary button opens the sub-
directory or the playlist.
The display corresponds to the aforementioned
one.
List entry is
MP3 fi le:
Pressing on the rotary button end the current
playback and starts the playback of the select-
ed fi le. The display corresponds to the aforemen-
tioned one.
Pressing on the
red phone button calls up the
higher-level directory.
With the up/down radio buttons, you reach the
next/previous directory or playlist according to
the memory order on the USB memory device.
Note:
The browsing mode is exited automatically 30 sec-
onds after the last button or rotary button acti-
vation or manually with a long press on the red
phone button.
Tip: (OLED or PTT)
The convenient navigation through your USB fi le
structure allows you to clearly organise your mu-
sic data and quickly access the data.
However, a large number of directories, particu-
larly on large USB hard disks, slow down access
to your music data. As an alternative, try to organ-
ise your music collection via playlists (M3U playl-
ists, for format see http://de.wikipedia.org/wiki/
M3U).
•

32
Folder management / Structure on
USB removable data carrier
Default Mode
Default Mode (see Settings menu) is factory set
with the following properties:
Direct selection of up to 6 directories with CD
selection buttons on the radio
Playback of up to 99 tracks from each of these
directories
Use of playlists (with OLED display only)
Please prepare your USB memory as follows for
this purpose:
Create a folder called
Blaupunkt.
Create 6 subfolders in this folder called
"CD01" to "CD06".
In every subfolder ("CD0x"), you can man-
age up to 99 tracks / pieces of music. The
operation corresponds to the VW / Audi CD
changer.
It is also possible to manage more than 99
music files, but then the display of the track
number can no longer be uniquely associated
with the music file.
Let's assume that the USB drive is U:
U:\
Blaupunkt\
Playlists (can only be used with OLED
display!)
U:\Blaupunkt\
CD01
containing up to 99 MP3 files
U:\Blaupunkt\
CD02
containing up to 99 MP3 files
U:\Blaupunkt\
CD03
containing up to 99 MP3 files
U:\Blaupunkt\
CD04
containing up to 99 MP3 files
•
•
•
쏅
쏅
쏅
•
•
•
•
•
U:\Blaupunkt\
CD05
containing up to 99 MP3 files
U:\Blaupunkt\
CD06
containing up to 99 MP3 files
Extended Mode
If you connected an OLED display (7607 548
500) to your interface, you can alternately acti-
vate the
Extended Mode with the following prop-
erties via the Settings menu:
Use of any directory structure on up to 16 di-
rectory levels
No limitation for the Blaupunkt directory and
the names CD01 … CD06
More than 99 tracks possible in every direc-
tory
Playlists possible in all directories
Operation and display on your radio are then lim-
ited to
No direct selection of directories
Track display of 01 to 99
No direct assignment of displayed track
number to music fi le
The Settings menu can be used again to activate
the Default Mode, if needed.
Notes:
After changing between Default and Extended
Mode, you should turn your car sound system off
and on again, so that all the changes also take ef-
fect in your radio.
In radios with integrated CD changer, the CD
count for the interface begins after the maximal
internal CD number.
Example:
Internal changer for 6 CDs (CD01 ... CD06)
BT-USB interface with 6 directories
Blaupunkt \ CD01 ... CD06 will be shown as
CD 07 ... CD12.
•
•
•
•
•
•
•
•
•

33
Settings menu (OLED only)
To call up the Settings menu, press the
green or
red phone button at the same time. The OLED
display shows "Settings Bluetooth". Music play-
back and data transfer to the radio are interrupted
to prevent interferences that could occur by sav-
ing the settings data.
The individual menu items can be reached by turn-
ing the rotary button left or right.
Briefl y pressing on the rotary button opens the se-
lected menu. Additional settings can be made by
turning and pressing on the rotary button. OK on
the display confi rms your selection, and the suc-
cessful storing of your defi ned values.
Briefl y pressing on the red phone button calls up
the previous/higher-level menu item.
Notes:
To avoid possible setting confl icts, you should
delete or rename the confi g.txt fi le from your
Blaupunkt directory when using an OLED display.
The following overview shows which settings
you can perform in your interface. The
basic
factory settings are marked in grey
•
•
Which settings are active?
In the Settings menu under
Settings -> Info ->
BT-USB-IF -> Confi g, the OLED display indicates
which confi guration settings are currently active.
The active settings appear inversely in the indivi-
dual setting menus.
This information can also be found in the id.txt
fi le, see the section Instructions for reading out
technical data.
Operation with PTT
Adjust the desired confi guration by loading a con-
fi g.txt fi le. See the section Instructions for confi g-
uration changes.
The following table shows the displayed
confi gurations in square brackets […].
34
Settings
[Confi g dispay]
Function
Bluetooth
Settings of various Bluetooth functions
Delete pairing
Deleting the pairings between interface and Bluetooth devices
Device Name
All pairings saved in the interface are deleted.
Start pairing
On
Opens the time window in which interface and
Bluetooth devices can be paired.
PIN
1234
Standard setting "1234"
0000
For streaming devices with fi xed setting of the PIN to "0000"
Comp. mode
Bluetooth compatibility mode
Off
Basic setting for all Bluetooth cell phones that
do not have the following specifi c feature.
On
[BT_COMP_MODE]
This setting should be activated if your cell phone does
not request the PIN for the "Blaupunkt IF" after the pai-
ring during the Bluetooth connection attempt. For exa-
mple, this applies to Nokia 6210, Motorola V300
Phone book
Which phone book should be loaded from the cell phone?
All
[CFG_PB_ALL]
All available phone books (SIM card, inside cell phone)
are loaded into the interface (max. total entries: 200)
SIM
[CFG_PB_SIM]
Only the phone book of the SIM card is being loaded
(max. total entries: 200)
internal
[CGF_PB_INT]
Only the internal phone book of the cell phone is being loaded
(max. total entries: 200)
No download
[CFG_PB_NONE]
No phone book is being loaded into the interface.
BT On / Off
[BT_ON_OFF]
Turns the Bluetooth function of the interfaces on or off.
HFP On / Off
[BT_HFP_ON_OFF]
Turns the Bluetooth hands-free function on (BT On/Off must be
On!) or off.
A2DP On / Off
[BT_A2DP_ON_OFF]
Turns the Bluetooth streaming receiver in the interface on
(BT On/Off must be On!) or off.
35
Settings
[Confi g dispay]
Function
Display
Settings of various display functions
Brightness
Brightness setting
Auto (Sensor)
The brightness of the display adjusts automatically
to the ambient light conditions.
Fix 20% … Fix 100%
The brightness value is permanently set to xx%
(xx = 20 | 40 | 60 | 80 | 100)
Standby
Activation of the Standby mode
Off
The display always remains active and is not switched off
10 sec. … 120 sec.
After xx seconds, the display switches to Standby mode (xx
= 10 | 20 | … | 110 | 120), display dark, button illumination
switched on, switches on again with a phone call or the event
selected in "Switch-on"
Switch-on
Criteria for switching on the display again from Standby mode
Press button +
display update
Display switches on after pressing the button or changing the
display content, e.g. playback of next track
Press button
Display switches on after pressing the button
or turning the rotary button
Scroll mode
Display of texts that are longer than one line
Continuous
Text is being fed through continuously
Once
Text is fed through once, then the fi rst part
of the text is permanently displayed
Off
First part of text is permanently displayed
Browsing
Standard or extended browsing options
Standard
Access to Blaupunkt directories only \ CD01 ... CD06.
Extended
Access to any directories (only possible with OLED display!).
36
Settings
[Confi g dispay]
Function
ID3 Confi g
Display of data from MP3 fi les (ID3 tags)
Display
Selection of display form
1 line
The data selected in "Info 1" are
displayed on one line
(display height)..
2 lines
The data selected in "Info 1" / "Info 2" are displayed on
the top and bottom line (half display height each).
Info 1
Selection of data displayed on line 1
Track
track data from ID3 tags
Album
Album data from ID3 tags
Artist
Artist data from ID3 tags
File name
File name
Directory or playlist name
Name of current directory or current playlist
Info 2
Track
Track data from ID3 tags
Album
Album data from ID3 tags
Artist
Artist data from ID3 tags
File name
File name
Directory or playlist name
Name of current directory or current playlist
37
Settings
Function
Info
Display of technical data
BT USB IF
The displayed technical data of the Bluetooth USB
interface correspond to the data listed in "id.txt"
Bluetooth USB interface
7 607 545 550 001
BT-ID: <0-19-61-xx-yy-zz>
HW ver: 1
SW ver: 8C01VW
P.Date 7113 P.Code: CN
Confi g:
[CDC_...] | [CFG_PB_...] | …
Product name of the interface
Blaupunkt product no
Bluetooth address (serial number of the interface)
Hardware version, here "1"
Software version, here "8C01VW"
Production date and code (coded)
Confi gurations defi ned in the interface
Details see below
Display module
technical data of the OLED display module
Blaupunkt display
7 607 548 500 001
SW ver: 02.05
HW ver: 0E.00
Product name of OLED display
Blaupunkt product number
Software version, here "02.05
Hardware version, here "0E.00"
38
Settings
[Confi g dispay]
Function
Radio Confi g.
Setting of the interface to the radio,
no change for the OLED dis-
play use.
Please delete existing confi g.txt fi les from the Blaupunkt directory of
your USB stick or USB hard disk stick or USB hard disk.
Standard
For all compatible VW radios, except for the following model.
VW Gamma
[RADIO_TYP_GAMMA]
Activate this setting if you are operating the interface with a VW
Gamma radio.
Startup
Basic settings
Mic. Test
This allows you to check the installation of your interface.
On
Switches the hands-free microphone to the loudspeaker
Mic. Test (fl ashes)
Microphone test is active. End with red phone button.
Mic. amplifi cation
Adjusting the microphone volume. The effect of this setting is redu-
ced by the automatic echo compensation during hand-free calling
Standard value
Factory settingg
Mic. 2 … 14
Softer (2) or louder (14) than standard value
Factory setting
Resetting of all settings to factory setting
Sure ?
Confi rmation dialogue
Yes = press the rotary button
No = cancel = red phone button
Language
Selection of the language for the operating menu
English
German
French

39
Software update
You can update the software of the interface your-
self to render the interface compatible with new-
er cell phones.
Note:
When you update the software, it is possible that
these operating instructions are no longer up-to-
date. Please download a current version of the in-
structions from www.blaupunkt.de.
The following are required to update the software:
USB data carrier (e.g. USB stick) with FAT16
or FAT32 formatting and at least 4 MB free
memory capacity
Computer with Internet access
ZIP software
Updating
On the USB device, create the "Blaupunkt"
directory at the top level. Example: "W:\
Blaupunkt"
Load the software of the Bluetooth/USB inter-
face from www.blaupunkt.de and store it in a
directory of your computer.
Unzip the ZIP fi le and copy the unzipped fi les
to the Blaupunkt directory on the USB device.
Deactivate the USB device at the computer.
Connect the USB device with the USB cable
of the interface.
Turn on the car sound system.
Press and hold the PTT button or the green
phone button while switching the car sound
system off and on again.
Release the PTT button or the green phone
button.
The loading process starts.
•
•
•
쏅
쏅
쏅
쏅
쏅
쏅
쏅
쏅
Select CD Changer (CDC) at the car sound
system as the audio source.
The display shows the progress of the load proc-
ess. At the same time, the title numbers "1"
through "5" are shown in ascending order and the
current time for every title number. After the load
process has completed, the display shows the
track number "99" and the time "59:59".
Notes:
If the progress indicator stops before the end
of the loading process, disconnect the USB
data carrier and reconnect it to the USB ca-
ble of the interface. If this is not successful,
repeat the update process.
If the time "00:00" is displayed at the end of
the loading process, an error occurred. In this
case, repeat the update process.
Switch the car sound system off and on
again.
The new software is now activated.
Reading out technical data
During the update, two fi les with information
about the interface and the update process are
created in the "Blaupunkt" directory of the USB
data carrier. Both fi les can be opened and read on
a computer using a plain text editor:
The "id.txt" fi le contains information about
the status of the interface, e.g. the current
hardware and software version as well as the
Bluetooth ID of the interface.
The "setup.log" fi le contains informa-
tion about the process of the update, e.g. the
message about a successful installation or
any errors that occurred.
쏅
•
•
쏅
•
•

40
Copy the fi
le "confi
g_universal.txt" from
the unpacked download archive into the
Blaupunkt directory of your USB data medi-
um.
Rename the fi le in "confi g.txt".
Open the "confi g.txt" fi le with a text editor,
e.g. Windows Notepad.
(De) activate the desired parameters.
Remove/add # in the fi rst column, see notes
in the fi le.
Store the fi le and close the editor.
Deactivate the USB data medium on your PC.
Carry out the operating steps on "Changing
the confi guration of your interface" described
in the following.
Changing the confi guration
in your vehicle:
Connect the USB device with the USB cable
of the interface.
Turn on your car sound system.
After a few seconds (max. one minute), the
interface recognises the fi le, analyses it and
stores the modifi ed confi guration in the in-
terface.
Switch the car sound system off and on
again.
The new confi guration is now activated.
쏅
쏅
쏅
쏅
쏅
쏅
쏅
쏅
쏅
쏅
쏅
쏅
id.txt:
Display of technical data
Bluetooth USB Interface
7 607 545 550 001
BT-ID: <0-19-61-xx-yy-zz>
HW ver: 1
SW ver: 8C01VW
P.Date 7113 P.Code: CN
Confi g:[CDC_..] [CFG_PB_..] |
Product name of the interface
Blaupunkt product no
Bluetooth address (serial number of the interface)
Hardware version, here "1"
Software version, here "8C01VW"
Production date and code (coded)
Confi gurations defi ned in the interface
Changing the confi guration (PTT)
This requires:
PC with Internet connection
Removable USB device with at least 4 MB
memory (FAT16 or FAT32 formatting)
ZIP software to unzip the confi guration fi les
Loading a confi guration fi le
The Bluetooth USB interface comes ex factory
with a standard confi guration that offers reliable
operation in combination with as many radio mo-
dels and Bluetooth devices as possible.
You can match various settings from the above ta-
bles to your personal preferences or technical re-
quirements by loading a confi guration fi le.
The following confi guration is available:
Confi g_VW_universal.txt
In the download archive you will fi nd the
fi le "confi g_VW_universal.txt". This fi le in-
cludes all possible confi guration settings. You
can select your favorite confi guration by ac-
tivating (remove # in the fi rst column) or deac-
tivating (add # in the fi rst column) the desired
parameters.
For this, proceed as follows:
Create a new "Blaupunkt" directory on the
USB removable media drive.
•
•
•
쏅

41
If you have
any questions, please take a look at
the
FAQ (Frequently Asked Questions) under
http://blaupunkt.com/de/infoservices_3.asp
or contact the
Blaupunkt Hotline
+49 (180) 5000 225 (0.14 EUR/min from the
German PSTN; for cell phone rates, please con-
tact your provider)
Additional notes about the USB interface
are located at:
www.blaupunkt.de
Subject to change!

42
FCC-Statements
All following FCC statements are valid for the
Industry Canada Standard (IC) as well.
1. General
Interference Warning: (according to FCC part
15.19)
This device complies with Part 15 of the FCC
Rules. Operation is subject to the following two
conditions:
(1) this device may not cause harmful interfer-
ence, and
(2) this device must accept any interference re-
ceived, including interference that may cause
undesired operation
Caution: (pertaining to FCC part 15.21)
Modifi cations not expressly approved by this
company could void the user’s authority to oper-
ate the equipment
2. Specifi c Part 15.105
Information to the user:
2.1 For Class A digital device
(A digital device that is marketed for use in a com-
mercial, industrial or business environment, ex-
clusive of a device which is marketed for use by
the general public or is intended to be used in the
home.)
Note: This equipment has been tested and found
to comply with the limits for a Class A digital de-
vice, pursuant to part 15 of the FCC Rules. These
limits are designed to provide reasonable protec-
tion against harmful interference when the equip-
ment is operated in a commercial environment.
This equipment generates, uses, and can radiate
radio frequency energy and, if not installed and
used in accordance with the instruction manual,
may cause harmful interference to radio commu-
nications. Operation of this equipment in a resi-
dential area is likely to cause harmful interference
in which case the user will be required to correct
the interference at his own expense.
RF Radiation Exposure
This equipment complies with FCC RF radiation
exposure limits set forth for an uncontrolled envi-
ronment. This equipment should be installed and
operated with a minimum distance of 20 centime-
ters between the radiator and your body.
This transmitter must not be co-located or op-
erating in conjunction with any other antenna or
transmitter.

Service numbers, Service-Nummern
Country: Phone:
Fax:
Germany
(D)
0180-5000225
05121-49 4002
Austria
(A)
01-610 39 0
01-610 393 91
Denmark
(DK)
44 898 360
44-898 644
Finland
(FIN)
09-435 991
09-435 99236
Great Britain
(GB)
01-89583 8880
01-89583 8394
Greece
(GR)
210 94 27 337
210 94 12 711
Ireland
(IRL)
01-46 66 700
01-46 66 706
Italy
(I)
02-369 62331
02-369 6464
Luxembourg
(L)
40 4078
40 2085
Norway
(N)
+47 64 87 89 60
+47 64 87 89 02
Portugal
(P)
2185 00144
2185 00165
Spain
(E)
902 52 77 70
91 410 4078
Sweden
(S)
08-750 18 50
08-750 18 10
Switzerland (CH)
01-8471644
01-8471650
Czech Rep.
(CZ)
02-6130 0446
02-6130 0514
Hungary
(H)
76 889 704
_
Poland (PL) 0800-118922
022-8771260
Turkey (TR) 0212-335
07
23
0212-3460040
USA (USA)
800-950-2528
708-6817188
Brasil
(Mercosur)
(BR)
0800 7045446
+55-19 3745 2773
Malaysia
(Asia Pacifi c)
(MAL)
+604-6382 474
+604-6413 640
Blaupunkt GmbH
Robert-Bosch-Str. 200
D-31139 Hildesheim
01.09
CM-BP/PRM-AC - 8 622 406 381
Document Outline
Wyszukiwarka
Podobne podstrony:
fich sign ba gb pl
7607545550001 BA PL
TK R0 071119DA BA UE 1107 GB(1)
Dz U 1997 109 704 R S u ba bezpiecze stwa i higi 3
500 GB Free Transferu
BA 2574 Ras el Dab'a to Masabb Dumyat (Damietta Mouth)
GB 0,299,342 Acetic anhydride
AR 7084A B gA gB M PL
BA TAD500 polnisch
oznaczanie Ba
BA 2074 Cyprus
ba br pl[444]
[050318] Beata Wieczorek B - BA NIOWY WIAT-Konspekt z (1), pedagogika
Akumulator do ASEA GB GB'E?nzinpetrol
BA dzienni study guide
więcej podobnych podstron