Forms Authentication in SharePoint Products and Technologies (Part 1):
Introduction
Summary: Explore several new features for authentication and authorization in Microsoft Office SharePoint Server (MOSS)
2007 and Windows SharePoint Services 3.0 that make it easier to develop and deploy solutions in Internet-facing and
extranet environments. This article is part 1 of 3. (19 printed pages)
Steve Peschka, Microsoft Corporation
December 2007
Applies to: Microsoft Office SharePoint Server 2007, Windows SharePoint Services 3.0
Contents
z
Introduction to Forms Authentication in SharePoint Products and Technologies
z
Deciding to Use Forms Authentication
z
Reviewing a Typical Scenario for Authentication
z
Reviewing Changes to Authentication Terminology
z
Setting Up Forms Authentication
z
Granting Permissions to Create My Sites
z
Additional Resources
Read part 2 and part 3:
Forms Authentication in SharePoint Products and Technologies (Part 2): Membership and Role Provider Samples
[ http://msdn2.microsoft.com/en-us/library/bb975135(printer).aspx ]
Forms Authentication in SharePoint Products and Technologies (Part 3): Forms Authentication vs. Windows Authentication
[ http://msdn2.microsoft.com/en-us/library/bb977430(printer).aspx ]
Introduction to Forms Authentication in SharePoint Products and Technologies
Deciding to Use Forms Authentication
©2008 Microsoft Corporation. All rights
reserved.
Microsoft Office SharePoint Server (MOSS) 2007 and Windows SharePoint Services 3.0 (in this article series, collectively
referred to as SharePoint Products and Technologies) contain several new features for authentication and authorization
that help to make it easier for you to develop and deploy solutions in Internet-facing—and especially extranet—
environments. In earlier SharePoint versions, at some point all security principals needed to resolve to a Windows
identity—either a user account or group.
MOSS 2007 and Windows SharePoint Services 3.0 are built upon the ASP.NET 2.0 Framework, which allows you to use
forms authentication to authenticate users into the system. Because SharePoint Products and Technologies are built upon
the ASP.NET 2.0 pluggable authentication provider model, they can now support authentication for users stored in Active
Directory, a Microsoft SQL Server database, in an LDAP directory, or in any other directory that has an ASP.NET 2.0
membership provider. Although Windows SharePoint Services 3.0 does not provide any default membership providers,
MOSS 2007 does provide a built-in LDAP V3 membership and role provider, and ASP.NET 2.0 includes a SQL Server
membership and role provider. However, if you want to use a directory and cannot find a membership provider for it, you
can write your own! This is a key technology enabler for heterogeneous environments.
Important:
When you use forms authentication, client integration is disabled by default because client integration does not
natively support forms authentication. You might be able to use many client integration features with forms
authentication, and there are workarounds available to implement varying levels of client integration
functionality with forms authentication. However, if published workarounds are inadequate, or if you find
unexpected issues when you use workarounds, Microsoft does not provide support and there are no product
changes to address these issues. If you plan to use client integration with forms authentication, you must fully
test any available solutions or workarounds to determine whether the performance and functionality are
acceptable in your environment. Microsoft Customer Support can provide commercially reasonable support to
help you troubleshoot published workarounds.
Some organizations want to use Windows users and groups in SharePoint Products and Technologies, but enter
credentials via forms authentication. Before using forms authentication, determine why to use forms authentication in
Strona 1 z 16
Forms Authentication in SharePoint Products and Technologies (Part 1): Introduction
2008-02-22
http://msdn2.microsoft.com/en-us/library/bb975136(printer).aspx

Reviewing a Typical Scenario for Authentication
Reviewing Changes to Authentication Terminology
Setting Up Forms Authentication
the first place: What is the business driver? If user accounts are stored in a location other than an Active Directory
domain controller, or if Active Directory is not available in a particular environment, using forms authentication with a
membership provider is a good choice. But if you want to force logon only via forms authentication, but still use Windows
and all of the integrated features it provides, you should consider an alternative such as publishing the SharePoint site
with Microsoft Internet Security and Acceleration (ISA) Server 2006. ISA Server 2006 allows users to log on by using a
forms authentication Web form, but treats them like Windows users after authentication. This implementation provides a
more consistent and compelling experience for end users.
A very common scenario is one in which you have an existing intranet SharePoint site, and the Web application that
hosts the site is configured to use Windows authentication. Users log on to corporate desktops and can navigate
seamlessly to the SharePoint site by using their logon credentials.
The organization now decides to make this site available on the extranet. Such availability can allow external partners to
access and share the content. The organization should not have to duplicate the content between the internal and
external sites, and managing both internal and external users' access rights should occur exclusively in the intranet. To
accomplish this, user accounts and groups for external users are stored in a SQL Server database. The zone uses the
SQL membership and role providers that are included with the Microsoft .NET Framework 2.0.
The rest of this article describes how to configure SharePoint Products and Technologies in this scenario.
Several new features in MOSS 2007 and Windows SharePoint Services 3.0 are used to create and configure forms
authentication access to a site. In addition, some concepts from SharePoint Products and Technologies 2003 are changed
or are renamed. Following are several important definitions to understand when configuring forms authentication in
MOSS 2007 or Windows SharePoint Services 3.0.
Web Application
Referred to as a virtual server in the previous version of SharePoint Products and Technologies, a virtual server is now a
Web application. When a Web application is created, it maps a set of properties, such as the load-balanced URL and the
authentication method that will be used, to its Default zone.
Zone
A zone is a way to map multiple Web application configuration settings to a single set of content databases. For example,
you can create a Web application, create a content database, and then configure the database to use Windows
authentication. All of these settings are configured for the Default zone for the Web application. You can then extend the
Web application and map it to a new zone. When you do that, you select a zone to map to, such as Intranet, Internet,
Custom, or Extranet. When you configure the second zone, you select an existing or new Internet Information Services
(IIS) virtual server and a new load-balanced URL, and determine whether to use NTLM or Kerberos authentication. You
can change the authentication provider, for example, to forms authentication, after the new zone is created.
Policy
A policy—useful in many scenarios including when you are configuring a Web application for forms authentication—allows
you to grant full access, grant read-only access, deny write access, or deny all access to a user or group on a Web
application. This policy grant applies to all sites in the Web application, and it overrides any permissions that are
established within individual sites, lists, or items.
Alternate Access Mapping
Alternate access mapping (AAM) is a way to define the different URLs that are associated with a Web application and its
set of content databases. It effectively manages the zone relationships described earlier. It also lets you map between
internal URLs, such as those a load balancer might use, and the external URLs that users see.
In the earlier versions of SharePoint Products and Technologies, it was less important in an extranet scenario to create
an AAM because SharePoint Products and Technologies would get the virtual server and host name information from IIS.
In MOSS 2007 and Windows SharePoint Services 3.0, you must use AAM or things just will not function correctly.
Authentication Provider
By default, MOSS 2007 and Windows SharePoint Services 3.0 use Windows as the authentication provider for new zones.
As described earlier, SharePoint Products and Technologies can also use the ASP.NET 2.0 pluggable authentication
provider model for the membership provider interface. In addition, SharePoint Products and Technologies also support
the role provider interface, which enables you to surface attributes such as group membership about your users. If you
are accessing your SharePoint site with forms authentication, you need a membership provider at a minimum. A role
provider is optional, but typically quite useful so that you can provision permissions to groups of users, rather than
having to add each user to a SharePoint Group.
Now that we have defined the basic scenario and terminology, we can step through how to configure forms
authentication. We make the following assumptions:
z
We created a Web application and the Default zone is using the load balanced URL http://contoso.
Strona 2 z 16
Forms Authentication in SharePoint Products and Technologies (Part 1): Introduction
2008-02-22
http://msdn2.microsoft.com/en-us/library/bb975136(printer).aspx
z
SQL Server is installed in the extranet on a server named spdb. The SQL membership and role provider are used
with this database server.
z
We access the external site at http://www.contoso.com.
Extending the Existing Web Application
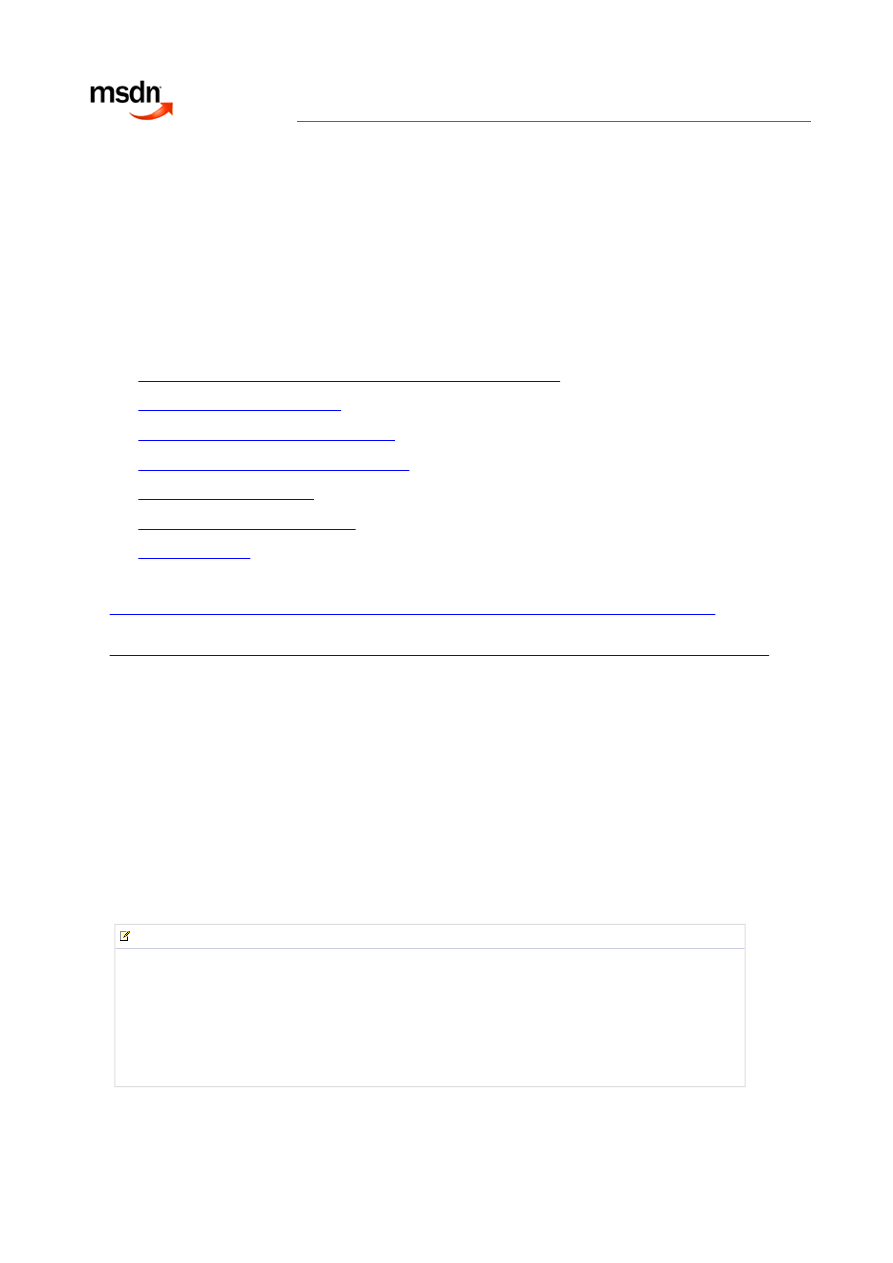
The existing Web application is located at http://contoso, and is secured with Windows authentication in the Default
zone. It resembles Figure 1.
Figure 1. Contoso Portal Web application
To extend the existing Web application into a new zone
1. Open your browser and navigate to the Central Administration Web site.
2. Click the Application Management tab, and then click Create or extend Web application.
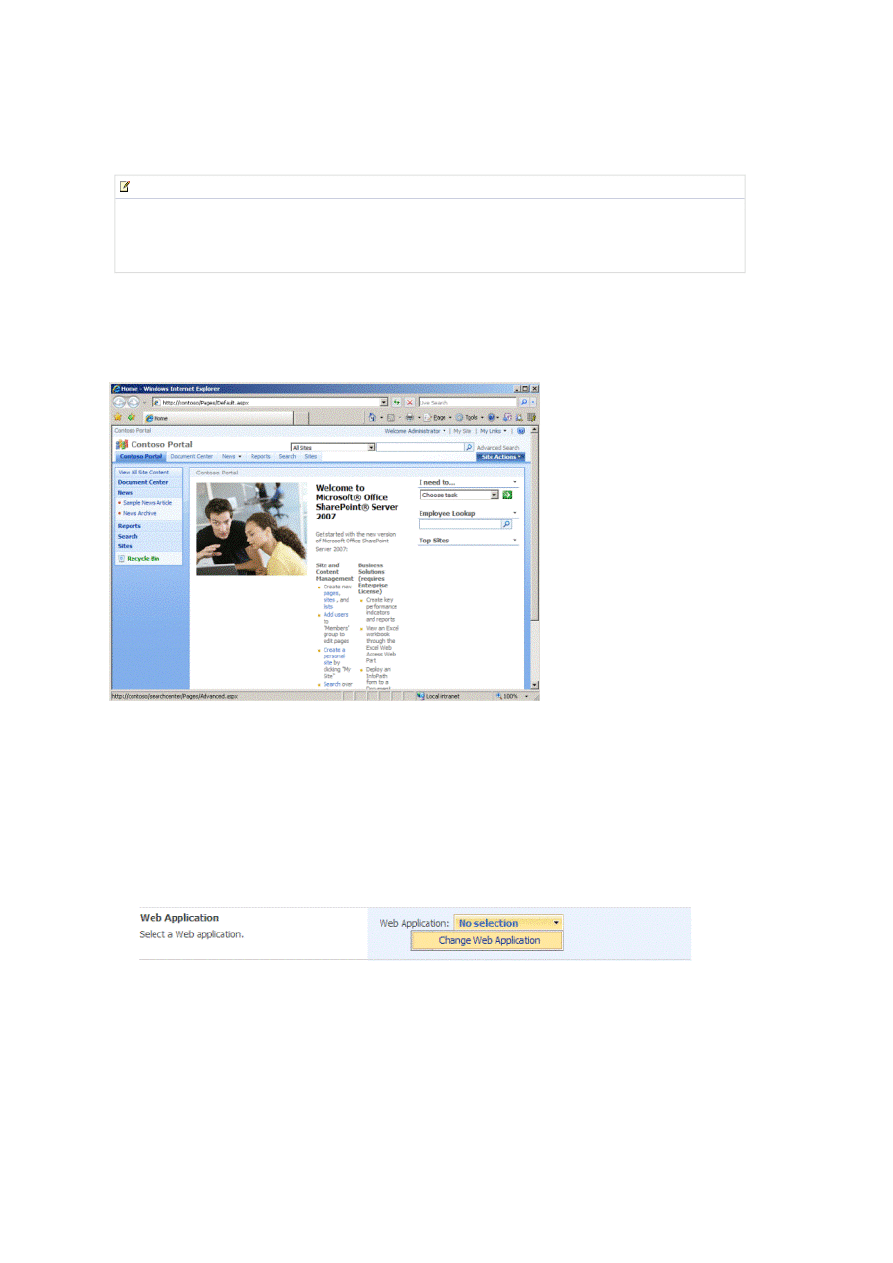
3. Click Extend an existing Web application to open the Extend Web Application to Another IIS Web Site page. To
select the Web site you are extending, in the Web Application list, click Change Web Application. In this case it
is the Contoso Web application.
Figure 2. Select Web application list
4. In the dialog box, click the link for the Contoso Web application to select it.
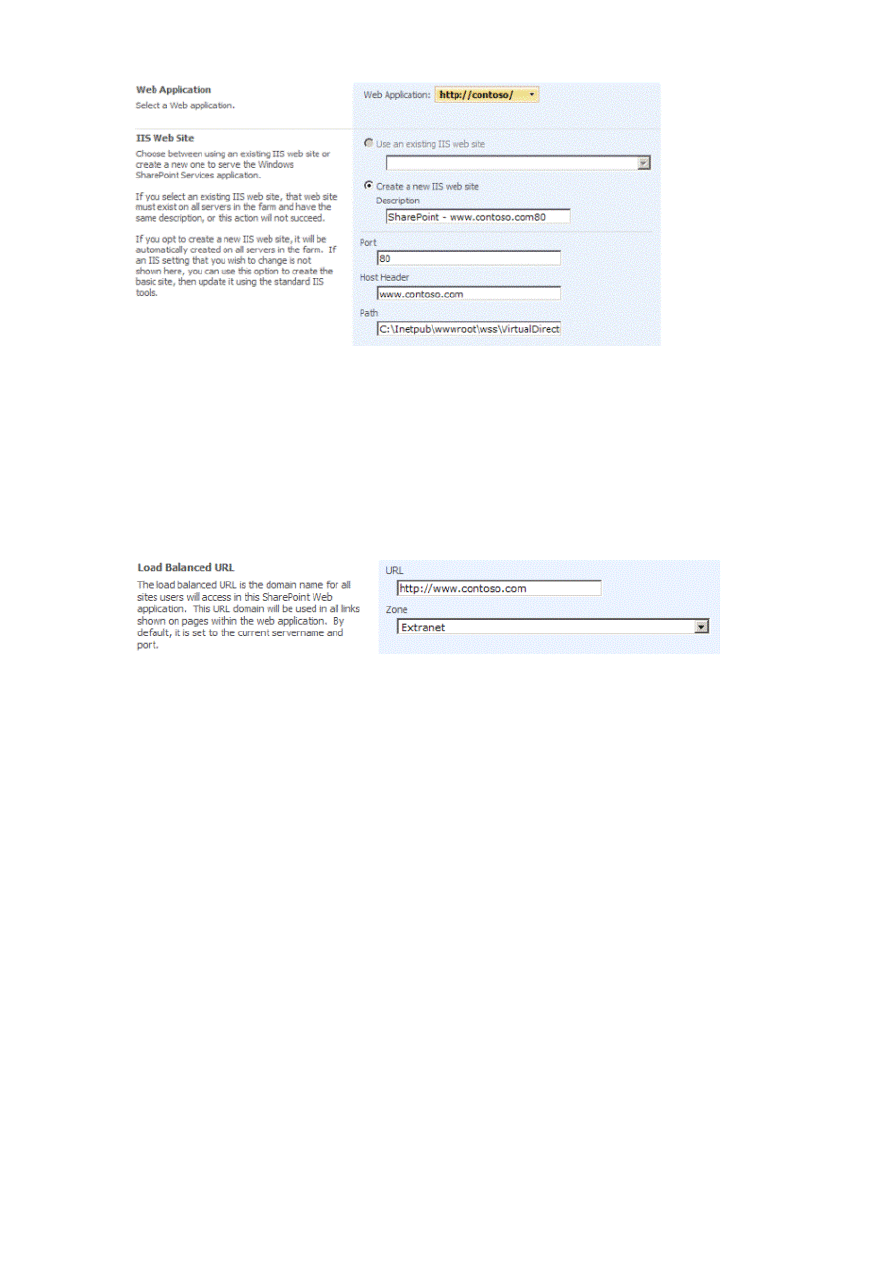
5. In our scenario, we want to extend the Web application by using the name www.contoso.com. To enable this,
create an IIS Web site and configure the Port to 80, and configure the Host Header to www.contoso.com.
Figure 3. Create IIS Web site
Note:
If you are using MOSS or Windows SharePoint Services in the extranet for collaboration, you should do so
securely over Secure Sockets Layer (SSL). In this case, your external site is located at
https://www.contoso.com
. We are excluding that step here only to simplify and focus on the processes we
are addressing in this article. In a true production environment, excluding that step would not be acceptable.
Strona 3 z 16
Forms Authentication in SharePoint Products and Technologies (Part 1): Introduction
2008-02-22
http://msdn2.microsoft.com/en-us/library/bb975136(printer).aspx
6. For default provider, click NTLM. We change this in a later step.
7. Retain the default selections for anonymous users and SSL. As mentioned earlier, in a true production environment
you would choose to enable SSL for an external site.
8. In the Load Balanced URL section, remove the ":80" from the end of the URL, so that the load-balanced URL is
http://www.contoso.com
.
9. In the Zone list, click Extranet, and then click OK to save your changes and extend the Web application.
Figure 4. Zone list
Managing Users and Roles
After you extend the Web application, you must create the database that will store user names and roles. In this case,
there is a database in the perimeter network for this purpose named spdb. We will use the ASP.NET membership and
role provider to authenticate users and determine their group memberships, so we must create the ASP.NET membership
database.
To create the ASP.NET membership database
1. On the spdb server, open Windows Explorer.
2. Navigate to the path %System Drive%\Windows\Microsoft.NET\Framework\v2.0.50727.
3. To start the ASP.NET SQL Server Setup Wizard, double-click aspnet_regsql.exe.
4. Start the wizard by clicking Next, and then complete the wizard as shown in Figures 5–9.
Figure 5. ASP.NET SQL Server Setup Wizard
Strona 4 z 16
Forms Authentication in SharePoint Products and Technologies (Part 1): Introduction
2008-02-22
http://msdn2.microsoft.com/en-us/library/bb975136(printer).aspx
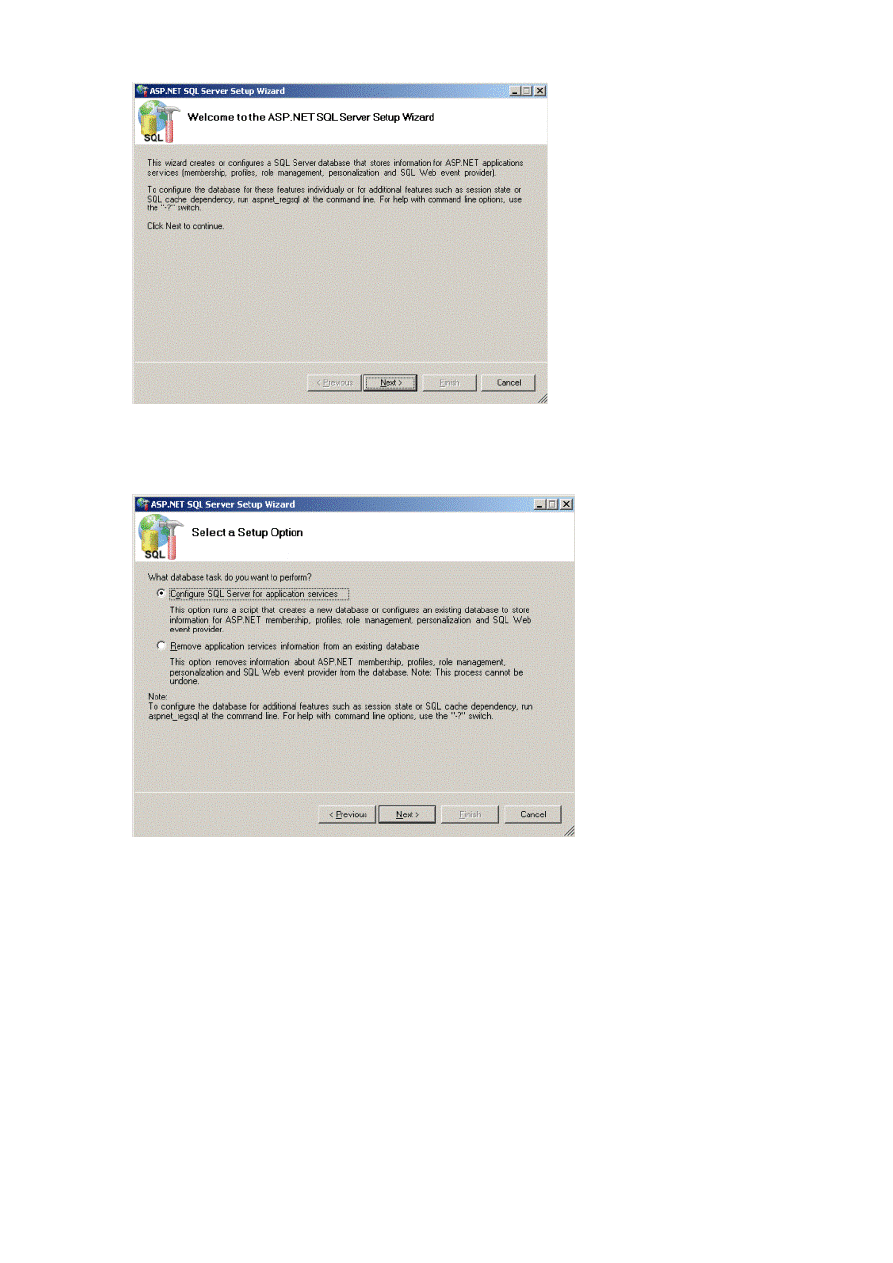
5. Click Configure SQL Server for application services, and then click Next.
Figure 6. Select a Setup Option page
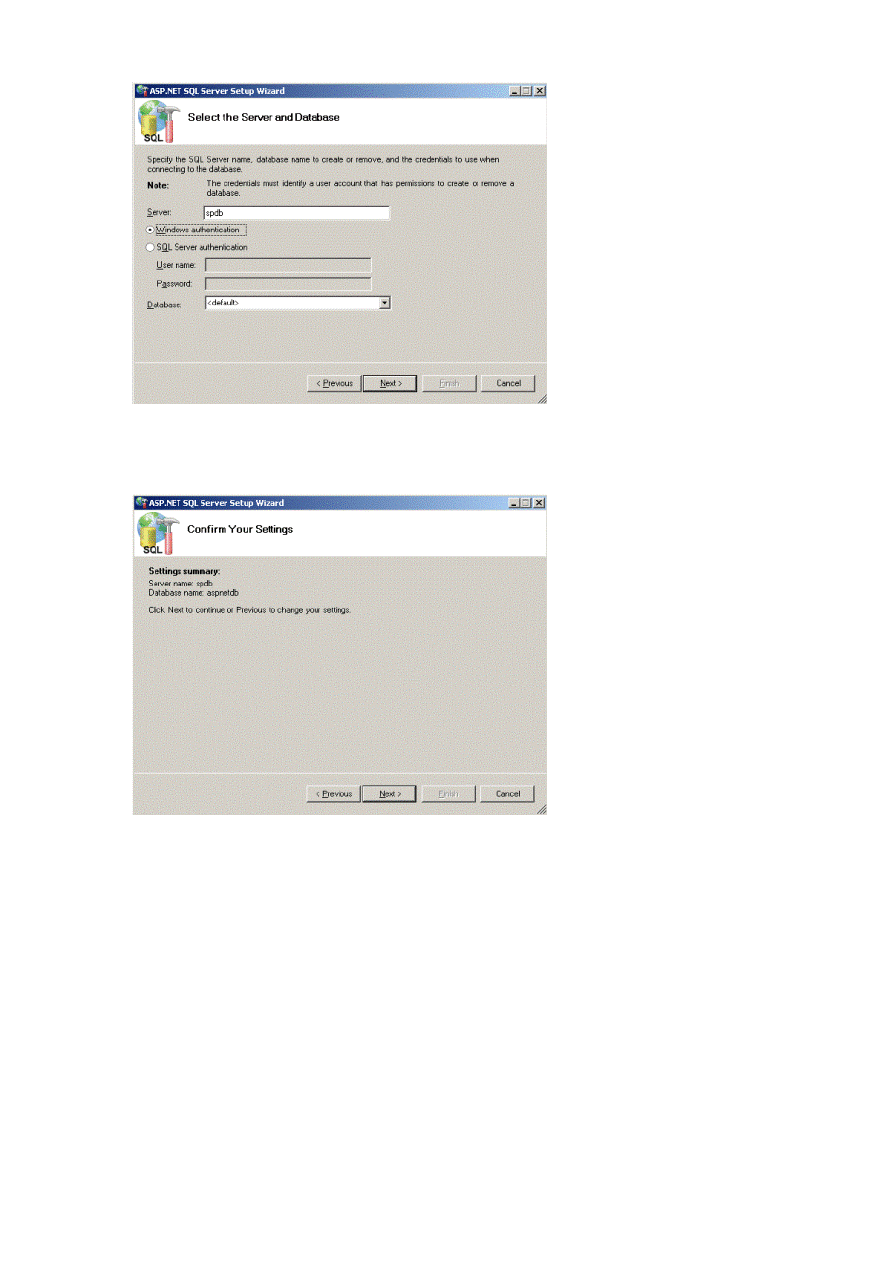
6. In the Server box, type spdb for the database name, and then click Next.
Figure 7. Select the Server and Database page
Strona 5 z 16
Forms Authentication in SharePoint Products and Technologies (Part 1): Introduction
2008-02-22
http://msdn2.microsoft.com/en-us/library/bb975136(printer).aspx
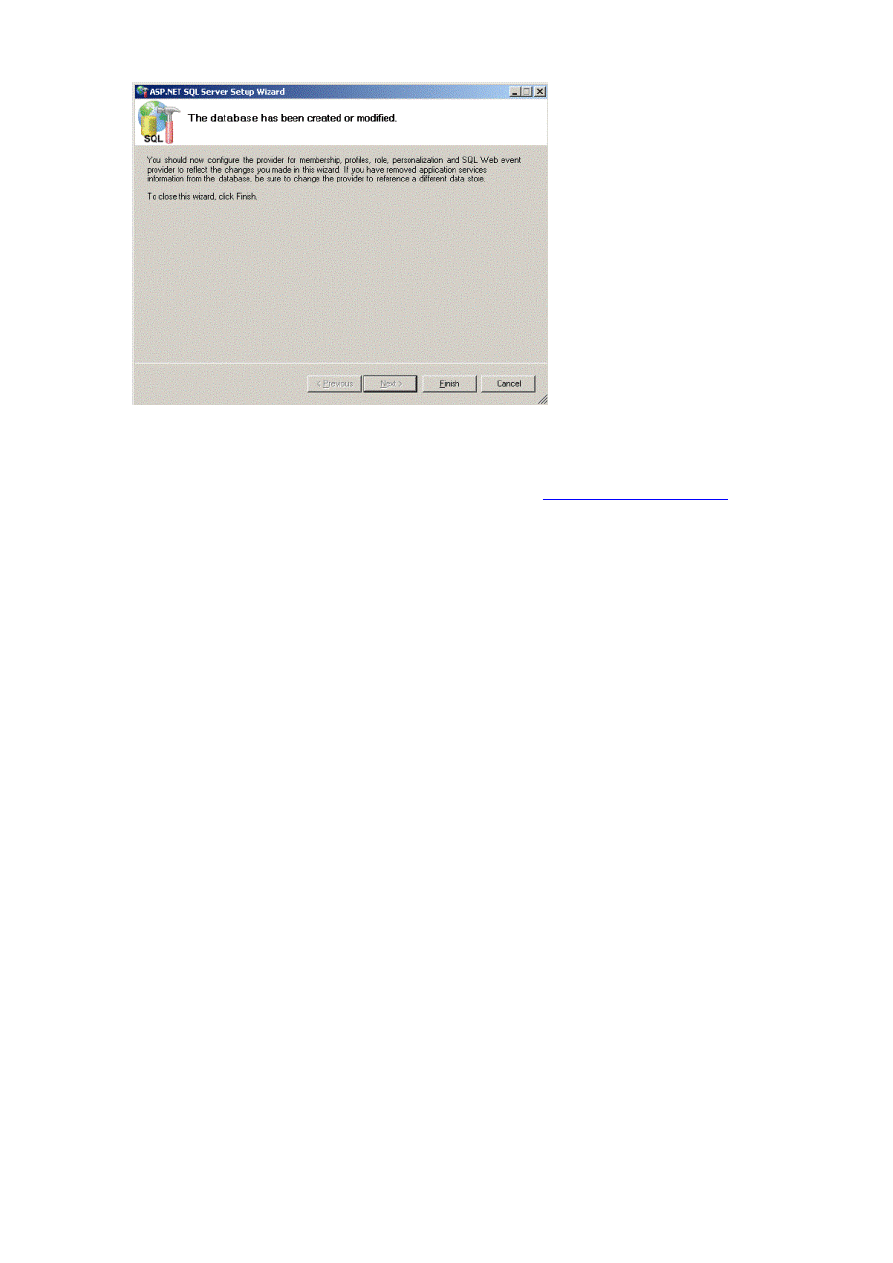
7. Confirm that the data you typed is correct, and then click Next.
Figure 8. Confirm Your Settings page
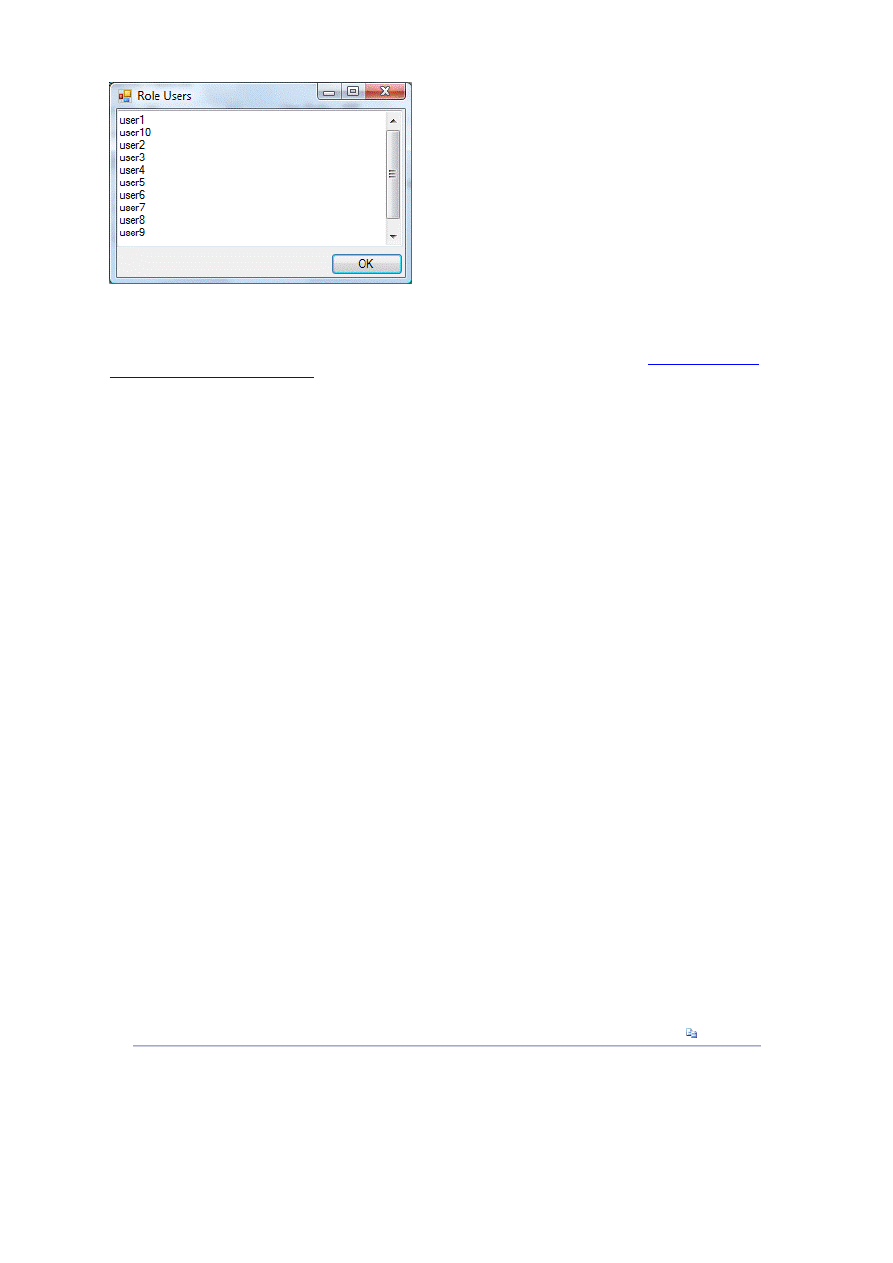
8. The database is created and the final status information is displayed. Click Finish to complete the wizard.
Figure 9. ASP.NET SQL Server Setup Wizard completion status
Strona 6 z 16
Forms Authentication in SharePoint Products and Technologies (Part 1): Introduction
2008-02-22
http://msdn2.microsoft.com/en-us/library/bb975136(printer).aspx
To perform actual tasks such as creating users and groups and managing passwords, you need a tool to manage that
information. Unfortunately, few existing tools are available to help you. The membership and role provider APIs are fairly
rich, however, and you can create both Web-based and Windows-based tools for this task.
For this article, we wrote a tool named MembershipSeeder that demonstrates how to use these APIs in a Windows-
based application. The tool and source code are available on CodePlex from the
Forms Based Authentication (FBA)
[ http://www.codeplex.com/CKS/Release/ProjectReleases.aspx?ReleaseId=7450 ] page. You can use the
MembershipSeeder tool as is for simple user and role management, or you can use the source code as a base on which
to create your own tool; however, Microsoft does not provide support for this tool.
To run the MembershipSeeder tool
1. Start the MembershipSeeder tool.
2. Click Configure.
3. In the dialog box that opens, type the name of the computer running SQL Server that hosts your SQL membership
database.
4. Save your changes, and then restart MembershipSeeder so that it will use the new server name.
To create users for testing purposes
1. In the User Prefix field, type a value.
2. In the Password field, type the password you want each user to have.
3. In the # of Users field, select the number of users to create.
4. Click Create to create users where the user name is the value of the User Prefix field with an incrementing number
added to the end.
For example, if the User Prefix field is user and # of Users is 2, two users are created and named user1 and
user2. To add only a single user and not add the numeric value to the end of the user name, select Only create or
delete 1 user; don't use the # of Users field check box. Deleting users works similarly to creating users.
Figure 10. Create users
Strona 7 z 16
Forms Authentication in SharePoint Products and Technologies (Part 1): Introduction
2008-02-22
http://msdn2.microsoft.com/en-us/library/bb975136(printer).aspx

5. To open a dialog box with a list of all roles that the tool is aware of, click Get Roles, as a shown in Figure 11.
Figure 11. Get Roles
6. To add a new role, type a name for the role in the Role field, and then click Create.
7. To add users to a role, type the role name in the Role field.
You can add multiple test users to the role and then provide the user credentials with the User Prefix and # of Users
fields, just as you created users. The Start Num field is designed to let you add a subset of those users. For example,
suppose you created user1 through user50. You created a role named Authors, and you want to add users 5 through
15 to that role. To do this, you type Authors in the Role field, set # of Users to 10 and set Start Num at 5. When you
click Add to Role, the users are added to the Authors role.
Also, similar to the process for creating and deleting users, if you want to add only a single user to a role and not a
group of users, select the Only add 1 user; don't use the # of Users field check box.
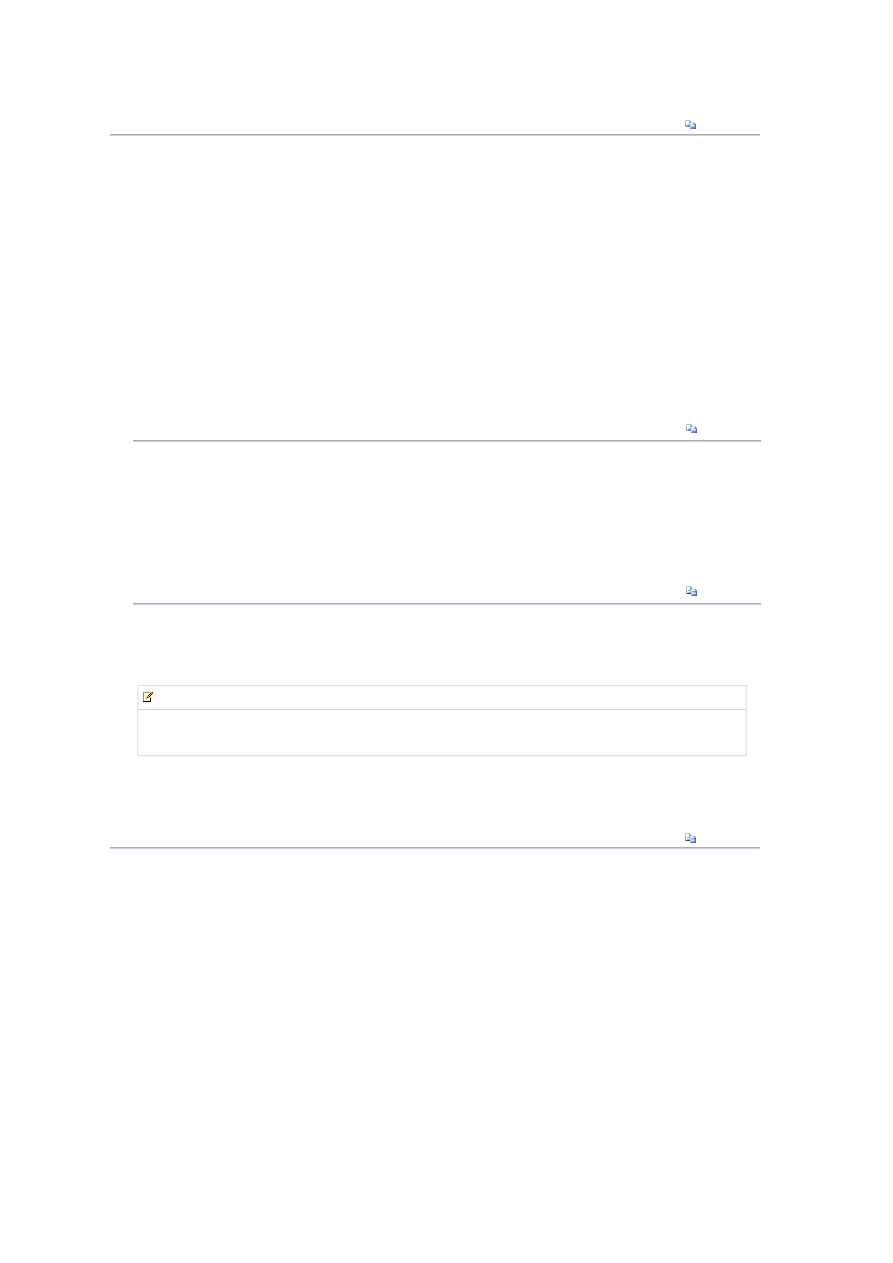
To see all of the users in a role, type the role name in the Role field, and then click Get Users. This displays a dialog
box that contains all the users found in that role, as shown in Figure 12.
Figure 12. Get users for role
Strona 8 z 16
Forms Authentication in SharePoint Products and Technologies (Part 1): Introduction
2008-02-22
http://msdn2.microsoft.com/en-us/library/bb975136(printer).aspx
By default, the MembershipSeeder tool is configured to use the SQL membership and role provider. However, you can
manually edit the MembershipSeeder.exe.config file to change providers. As long as the provider implements the
interfaces for managing users and groups that the tool uses, you can easily change providers in the .config file and
continue to use the tool. If you are using the SQL membership and role provider, there is also another tool available on
CodePlex that is useful for some of these account management tasks. You can read about it on the
Microsoft SharePoint
Products and Technologies Team Blog
[ http://blogs.msdn.com/sharepoint/archive/2007/08/28/more-useful-and-free-
sharepoint-features-available-at-http-www-codeplex-com-features.aspx ] . For a description of the tool that can be used
to add, edit, and delete users, see the Features for Administration section.
Now that you know the basics of working with the tool, we create the users and groups to use to test the forms
authentication implementation.
To create a batch of users for testing purposes
1. Create a batch of 20 users: user1 through user20.
2. Create two roles: Admins and Readers.
3. Add user1 through user3 to the Admins role.
4. Add user1 through user20 to the Readers role.
Configuringe web.config Files
At this point, we have two zones mapped to the Web application, and both are configured to use Windows
authentication. The database to store users and roles is created, and it is populated with some sample data to test the
forms authentication implementation. The next step is to configure the web.config file for several of the Web applications
in the farm to support the forms authentication membership and role providers.
To configure the web.config file for the new zone
1. Find the correct web.config file.
When the Web application was extended into the new zone, a directory was created on the SharePoint server that
contains files it uses, including web.config. By default, that directory is located in the path %SystemDrive%
\Inetpub\wwwroot\wss\VirtualDirectories\
zone name. So in our current example, the directory is located at
C:\Inetpub\wwwroot\wss\VirtualDirectories\www.contoso.com80
.
2. Open Windows Explorer and navigate to the directory that contains the web.config file for the new zone.
3. Open the file in a text editor such as Notepad. We need to make four entries: a PeoplePicker wildcard, a connection
string, a membership provider, and a role provider.
The entry for the PeoplePicker wildcard tells the PeoplePicker component in MOSS or Windows SharePoint Services
the character to use to do a wildcard search for an individual user. For the SQL membership provider, it supports the
percent sign (%) as a wildcard character.
4. In your text editor, search for the string "PeoplePickerWildcards". That should take you to a section of the
web.config file that looks like the following code.
To simplify the example in this article and prevent interference with any of the built-in settings, we will name our
membership provider fbaMembers and our role provider fbaRoles. To associate the wildcard search character with our
membership provider, we use the fbaMembers name when adding the add subelement to the PeoplePickerWildcards
<
PeoplePickerWildcards
>
<
clear
/>
<
add
name="AspNetSqlMembershipProvider" value="%"
/>
</
PeoplePickerWildcards
>
Xml
Copy Code
Strona 9 z 16
Forms Authentication in SharePoint Products and Technologies (Part 1): Introduction
2008-02-22
http://msdn2.microsoft.com/en-us/library/bb975136(printer).aspx
element. After it is added, the PeoplePickerWildcards element looks like the following code.
In the connectionString element, you define the connection string that the membership and role providers use to
connect to their data store. The connectionStrings element does not exist by default when you extend a Web
application. You need to create it, and then create the individual connectionString element under it.
The connectionStrings element can go directly above the system.web element in the web.config file.
To define the connection string
1. In your text editor, search for the string "<system.web>", which takes you to the opening tag for the system.web
element.
2. Directly above this tag, add an empty connectionStrings element, which looks like the following code.
3. Add a subelement add that has a name attribute, which is the name for the connection string, and a value
attribute, which is the actual connection string. In this example, we assume that the default Windows authentication
is being used on a computer running SQL Server. The database name is spdb, so after the connection string is
added, the entire connectionStrings element looks like the following code.
The membership and role provider information, which you can add at the same time, must be a subelement to the
system.web element. The membership and role provider elements resemble the following code. Important attributes
are described following the example.
Important Attributes for the Providers
Following are descriptions of the important attributes for providers, shown in the previous code example.
z
defaultProvider In the Membership and roleManager elements, this is the name of the provider to use by
default for this Web application. The name you provide here should be the same as the name attribute for the
provider.
<
PeoplePickerWildcards
>
<
clear
/>
<
add
name="AspNetSqlMembershipProvider" value="%"
/>
<
add
name="fbaMembers" value="%"
/>
</
PeoplePickerWildcards
>
Xml
Copy Code
<
connectionStrings
>
</
connectionStrings
>
Xml
Copy Code
<
connectionStrings
>
<
add
name="fbaSQL"
connectionString="server=spdb;database=aspnetdb;Trusted_Connection=true"
/>
</
connectionStrings
>
Xml
Copy Code
Note:
The application pool account or accounts for any Web applications that use this provider must have at least
Read rights to all of the objects in the aspnetdb database specified in the connection string.
<
membership
defaultProvider="fbaMembers"
>
<
providers
>
<
add
connectionStringName="fbaSQL" applicationName="/"
name="fbaMembers"
type="System.Web.Security.SqlMembershipProvider, System.Web,
Version=2.0.3600.0, Culture=neutral, PublicKeyToken=b03f5f7f11d50a3a"
/>
</
providers
>
</
membership
>
<
roleManager
enabled="true" defaultProvider="fbaRoles"
>
<
providers
>
<
add
connectionStringName="fbaSQL" applicationName="/"
name="fbaRoles" type="System.Web.Security.SqlRoleProvider, System.Web,
Version=2.0.3600.0, Culture=neutral, PublicKeyToken=b03f5f7f11d50a3a"
/>
</
providers
>
</
roleManager
>
Xml
Copy Code
Strona 10 z 16
Forms Authentication in SharePoint Products and Technologies (Part 1): Introducti...
2008-02-22
http://msdn2.microsoft.com/en-us/library/bb975136(printer).aspx
z
connectionStringName In the providers subelement for an individual membership or role provider, this is the
name of the connectionString element that contains the connection string the provider uses to communicate with
the data store.
z
name In the providers subelement for an individual membership or role provider, this is the name that is used to
refer to the provider. It is used in the defaultProvider attribute, and in the SharePoint Central Administration Web
site on the Policy configuration page.
z
type In the providers subelement for an individual membership or role provider, this describes the
Microsoft .NET Framework class type and strong name that implements the membership or role provider. The
previous examples include the type for the ASP.NET SQL membership and role provider; if you were using a
different provider, you would enter the type name for it in this attribute.
This completes the configuration changes needed for the new zone's web.config file. Changes to the other web.config
files are almost identical to these changes; however, other web.config files may have some of the parent elements
already present, such as the connectionStrings element.
Configure Central Administration and Existing Windows Authentication Web Application web.config Files
For the Central Administration and existing Windows authentication Web application web.config files, you make the same
changes as described previously for the forms authentication zone's web.config file—with one exception. In the
defaultProvider attribute for the roleManager element, the name should be AspNetWindowsTokenRoleProvider
instead of fbaRoles. It looks like the following code example.
The reason the default provider is different from the forms authentication zone is that the default role information for
these Web applications is provided by Windows. That is important for MOSS 2007 and Windows SharePoint Services to
know when trying to determine what groups an individual user belongs to. The default membership provider does not
need to be changed in the same way because authentication is managed by IIS; SharePoint Products and Technologies
recognize that the site is using Windows authentication.
Configuring the Zone’s Provider
You must configure the zone's Provider information to use forms authentication with the membership and role provider
that was added to the web.config files.
To configure the zone's provider
1. Open your browser and navigate to the Central Administration Web site.
2. Click the Application Management tab.
3. Click Authentication providers.
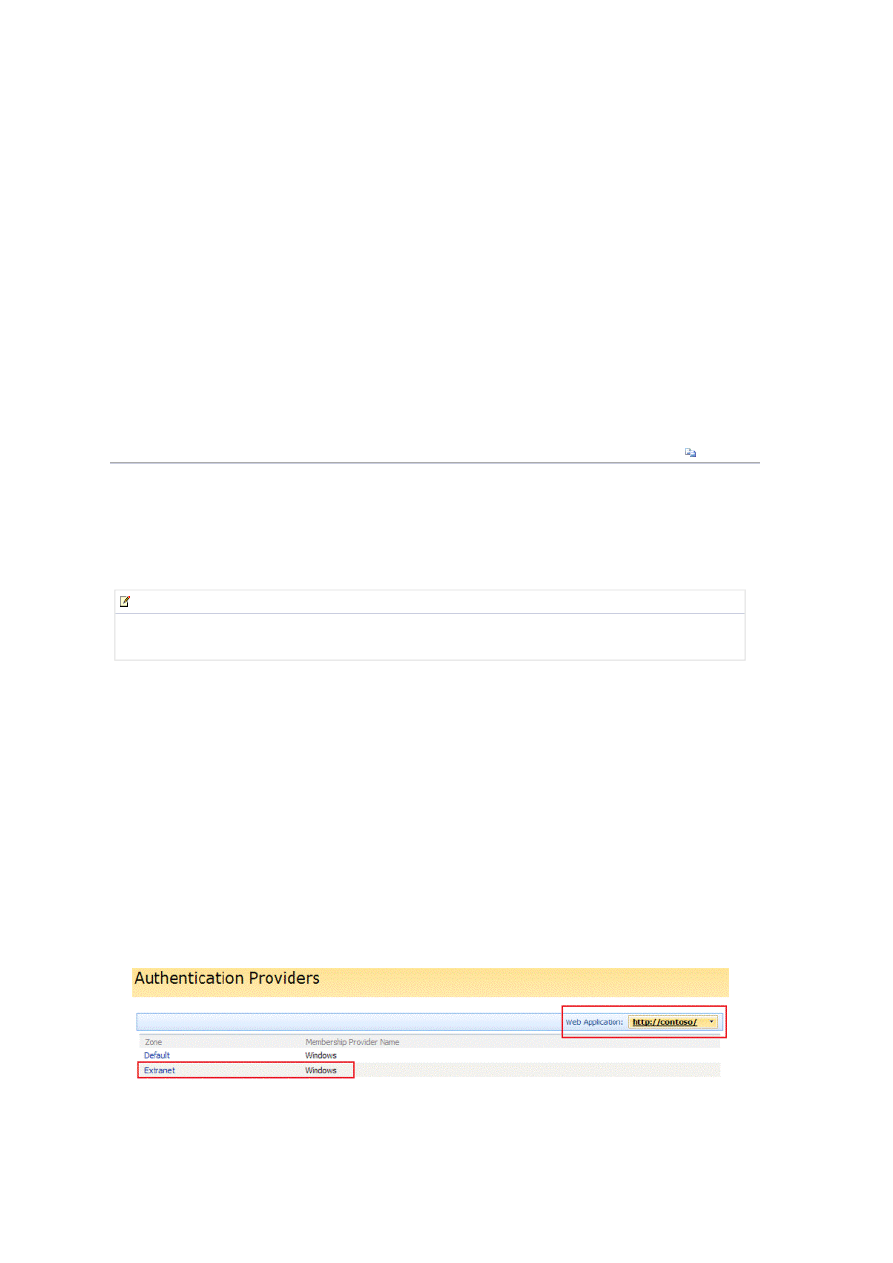
4. Ensure that the correct Web application is selected; it is displayed in the upper-right corner of the page. If the
correct Web application is not shown, click the Web application drop-down list to select the correct one. With the
correct Web application displayed, click the authentication type link that is displayed next to the Extranet zone. By
default, the link text is Windows, as shown in Figure 13.
Figure 13. Authentication Providers list
5. In the Authentication Type section, click Forms. The page updates and displays Membership provider name and
Role manager name boxes.
6. Type the appropriate values in the Membership and Role boxes. Based on the current scenario, the page should
<
roleManager
enabled="true" defaultProvider="AspNetWindowsTokenRoleProvider"
>
Xml
Copy Code
Note:
If you have multiple front-end Web servers, you must make these changes to the web.config files on each
server.
Strona 11 z 16
Forms Authentication in SharePoint Products and Technologies (Part 1): Introducti...
2008-02-22
http://msdn2.microsoft.com/en-us/library/bb975136(printer).aspx
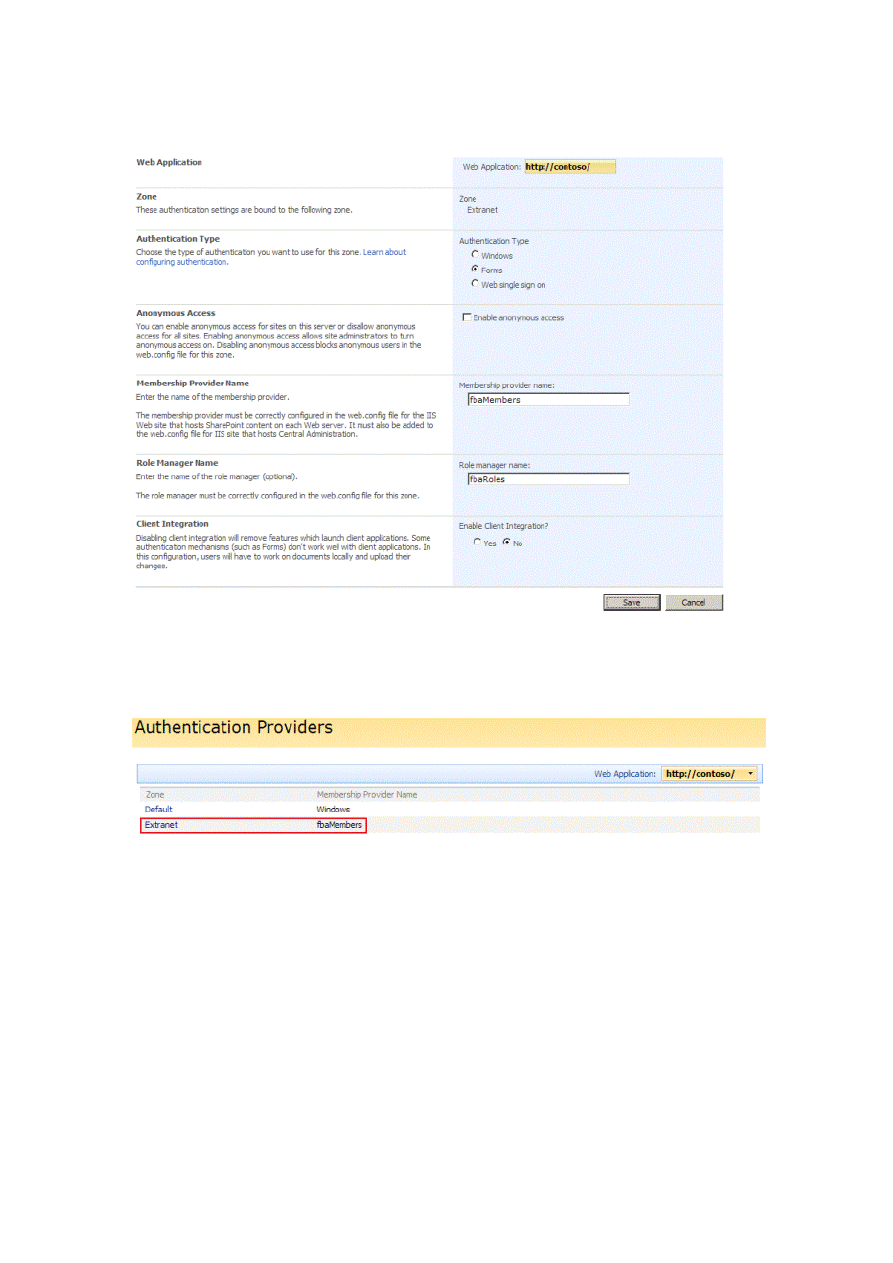
look like Figure 14.
Figure 14. Configure forms authentication Provider
7. Click Save to commit your changes. The browser returns to the Authentication Providers main page, which should
now display the new authentication provider name next to the Extranet zone, as shown in Figure 15.
Figure 15. Updated Authentication Providers list
The final configuration step is to grant the appropriate policy for forms authentication users.
Granting the Appropriate Policy
Policies provide a mechanism to grant or deny rights to all site collections and subsites in a Web application, and override
any permission settings that are applied on individual items or sites in that Web application. In this scenario, rights are
granted to at least one forms authentication user. This policy allows the user to log on to the site, and then enables the
user to add other forms authentication users and roles to SharePoint groups so that the rest of the forms authentication
users can access the site.
In the specific scenario used in this article, this step is not necessary because we configured the Windows-secured Web
application so that we can add and remove forms authentication users and roles and Windows users and roles from the
same Web application. However, you might encounter situations in which a Windows-secured Web application is not
being used. In that case, a policy is the only way to grant rights to a user.
For this scenario we grant a Full Rights policy to user1. That user can then log on to the site and provision other forms
authentication users and roles into SharePoint groups.
To create the Full Rights policy
1. Open your browser and navigate to the Central Administration Web site.
2. Click the Application Management tab, and then click Policy for Web application.
Strona 12 z 16
Forms Authentication in SharePoint Products and Technologies (Part 1): Introducti...
2008-02-22
http://msdn2.microsoft.com/en-us/library/bb975136(printer).aspx
Granting Permissions to Create My Sites
3. Ensure that the correct Web application is selected; it is displayed in the upper-right corner. Click Add Users.
4. In the Zones list, click the Extranet zone.
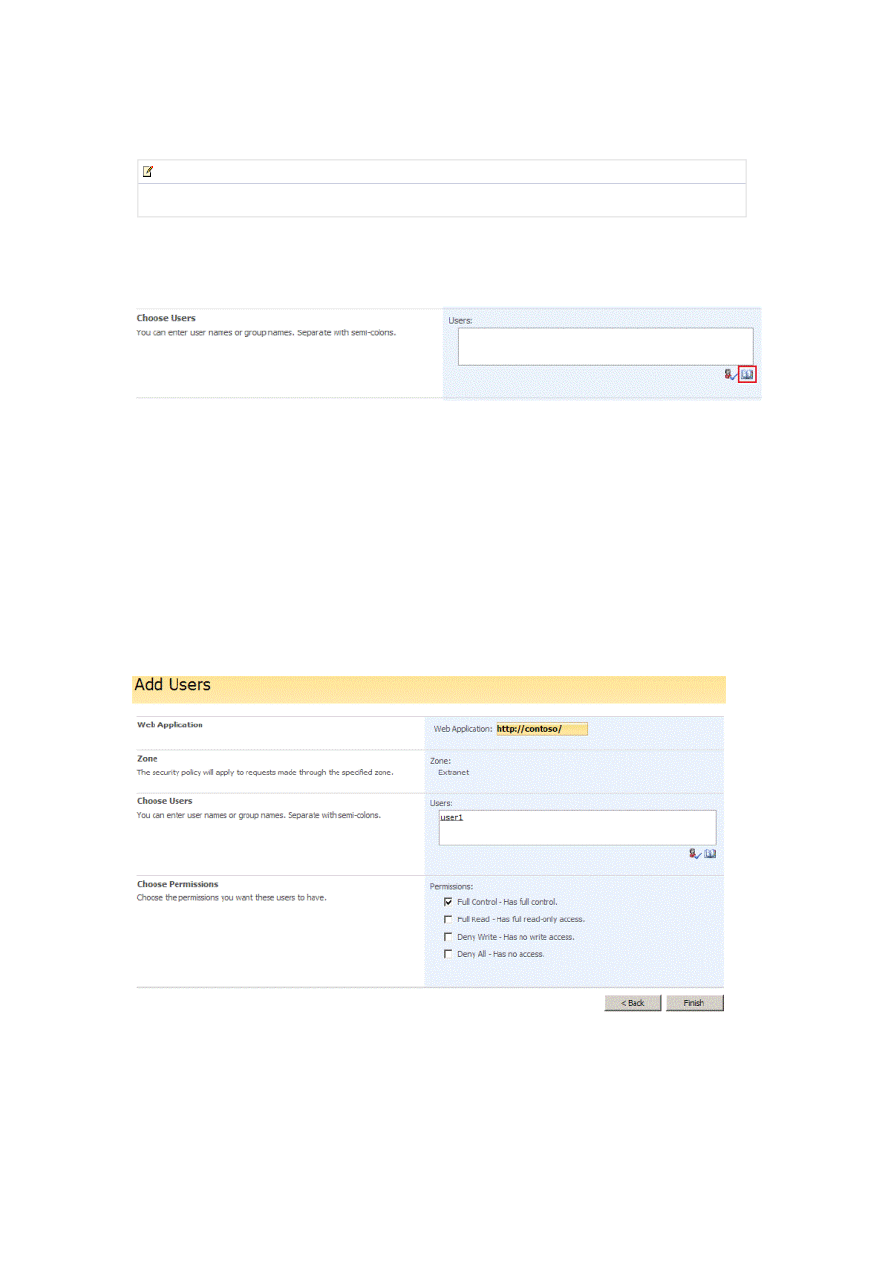
5. On the Add Users page, click the address book icon to open the People Picker dialog box, as shown in Figure 16.
Figure 16. Add Users page
6. In the People Picker dialog box, type user1 in the Find box, and then click the search button.
If you created 20 users, as described earlier in this article, 11 results should be returned: user1 through user19. If
so, the configuration you created in the web.config file is correct. If not, there is a problem in the web.config files,
which you must correct.
You should also notice that the account name is displayed in the format that SharePoint uses internally to keep track
of it: MembershipProviderName:accountName. In this scenario, that means the account name for user1 is
fbaMembers:user1.
7. Double-click user1 to add it to the Add box, and then click OK.
8. Select Full Control, as shown in Figure 17.
Figure 17. Choose permissions on Add Users page
9. Click Finish to save your changes.
The basic configuration is now complete; user1 should be able to log on to the site at www.contoso.com. Both forms
authentication and Windows users and roles can be added from either Web site.
Important:
This step is critical! If you select the wrong zone, you cannot correctly grant the policy rights.
When you log on to a site by using forms authentication, you may notice that by default, a My Site link does not appear
in the upper-right corner of the page, as it does with sites secured with Windows authentication. In Windows
Strona 13 z 16
Forms Authentication in SharePoint Products and Technologies (Part 1): Introducti...
2008-02-22
http://msdn2.microsoft.com/en-us/library/bb975136(printer).aspx
authentication, by default the configuration for My Sites is a special group named NT AUTHORITY\authenticated
users, who are granted rights to create My Sites. By default, each authenticated Windows user is granted the
appropriate permissions to create a My Site. When you access a site as a forms authentication user, however, you do not
have an associated Windows credential. Therefore, to MOSS or Windows SharePoint Services, you are not a member of
that Windows group so you do not have rights to create a My Site. As a result, the menu does not appear.
The process to grant forms authentication users the appropriate permissions to create My Sites is very similar to what
you do to extend an existing Windows authentication site with forms authentication. For those steps, refer to the details
provided in the section
Setting Up Forms Authentication
earlier in this article.
To enable forms authentication users to create My Sites
1. Extend the Shared Services Provider (SSP) Web application into a new zone.
For consistency, the zone you extend the SSP Web application into should be the same zone into which the forms
authentication was extended, but this is not required unless the My Sites are hosted in the same Web application as
the SSP. In the scenario described earlier in this article, forms authentication was used in the Extranet zone. In this
example, it is extended into the Extranet zone also.
2. Modify the web.config file for the new zone to use the same forms authentication membership and role providers.
3. Modify the web.config file for the default SSP zone to use the same forms authentication membership and role
providers. Because it is a Windows authentication site, remember to change the default role provider to
AspNetWindowsTokenRoleProvider.
4. Use the Authentication Provider administration page to configure the new zone to use forms authentication.
After you complete these steps, you can change the permissions in the My Sites section to allow forms authentication
users to create My Sites.
To configure the permissions
1. Open your browser and navigate to the SSP Web site.
2. Click Personalization services permissions.
3. Click Add Users/Groups.
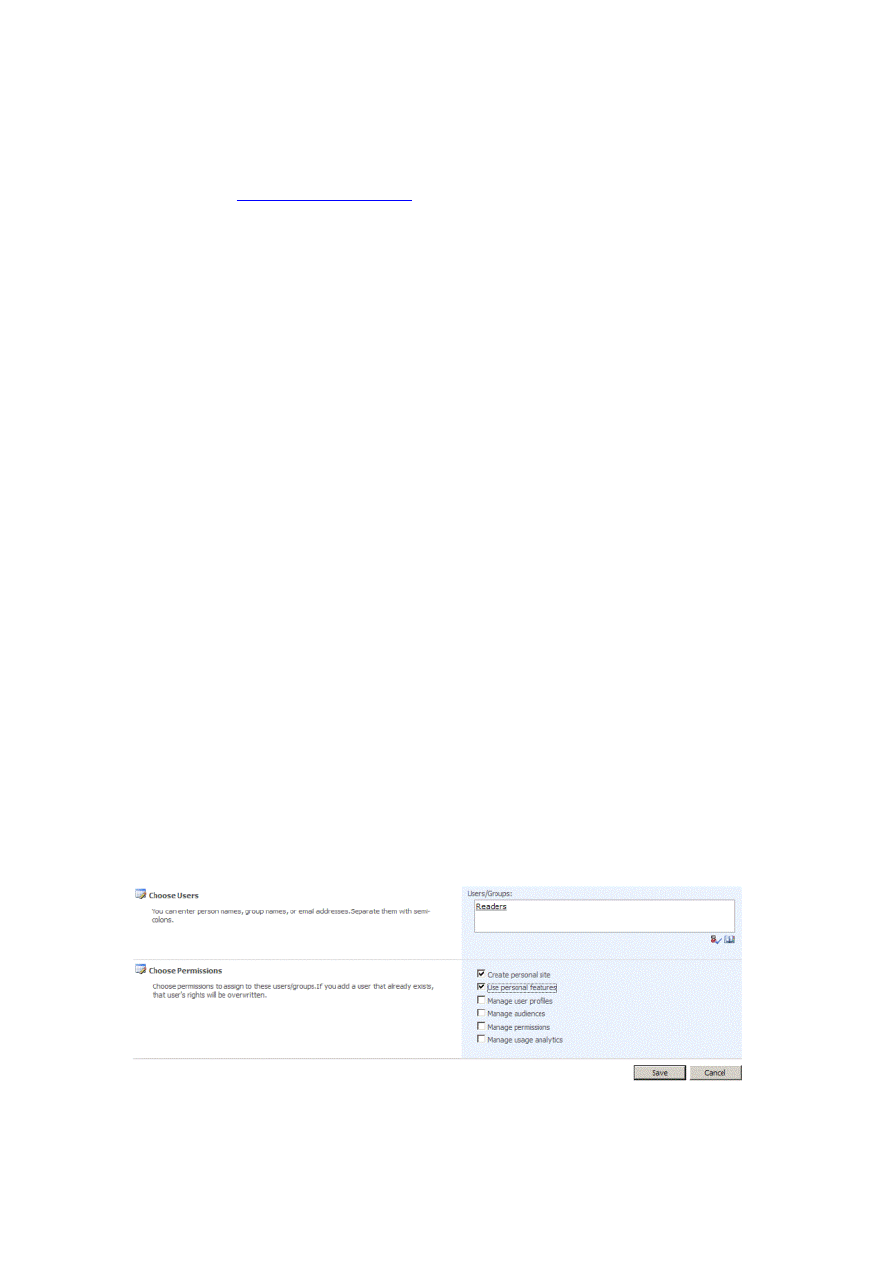
4. Click the address book button to open the People Picker dialog box.
5. You can use the picker to grant either individual users or roles the right to create My Sites. Assuming you created
and populated the Readers role as described earlier in this document, type Readers in the Find box, and then click
the search button. Search should find a group named Readers that has an account name of fbaRoles:Readers.
6. Double-click the Readers group in the search results pane. Selecting this group gives all members of the Readers
role the right to create My Sites.
7. Click OK to close the People Picker dialog box.
8. Select the Create personal site check box and the Use personal features check box. The completed page should
look like Figure 18.
Figure 18. Configure permissions to create My Sites
9. Click Save to save your changes.
All members of the Readers role now have the rights to create My Sites, and the My Site menu link appears in the
upper-right corner of the page for them also.
Strona 14 z 16
Forms Authentication in SharePoint Products and Technologies (Part 1): Introducti...
2008-02-22
http://msdn2.microsoft.com/en-us/library/bb975136(printer).aspx

Additional Resources
Before forms authentication users can actually create a My Site, you must perform one additional step. To create a My
Site, or view the public details of other users, you must grant rights to the My Site host site to all forms authentication
users who will use My Sites.
When a user clicks the My Site link, he or she is directed to the /_layouts/MySite.aspx page in the My Site host
application. That page determines whether the user already has a My Site created. If so, the user is automatically
redirected to his or her site. If not, the My Site is created for the user and then the user is redirected to it. But to be able
to navigate to the MySite.aspx page, a My Site user must have, at a minimum, Read rights on that site. Using the
example from this article, someone with administrative rights on the My Site host site must add the Readers role to a
SharePoint site group that has, at a minimum, Read rights on the site. After that is completed, forms authentication
users can create My Sites.
Hosting My Sites in a Separate Web Application
If My Sites are hosted in the same Web application that was already extended for forms authentication users, no further
action is needed. However, if you host your My Sites in a separate Web application, you must also extend it as described
previously.
To host My Sites in a separate Web application
1. Extend the My Site Web application into a new zone. The zone you extend it into MUST BE the same zone into which
the forms authentication zone was extended. For the My Sites to display the correct URL for both Windows users and
forms authentication users, you must also extend the Web application into the same zone; in this scenario, it is the
Extranet zone.
2. Modify the web.config file for the new zone to use the same forms authentication membership and role providers.
3. Modify the web.config file for the existing My Site zone to use the same forms authentication membership and role
providers. If it is a Windows authentication site, remember to change the default role provider to
AspNetWindowsTokenRoleProvider.
4. Use the Authentication Provider administration page to configure the new zone to use forms authentication.
From a configuration standpoint, you must consider one other aspect when configuring options for My Sites. If you intend
to host multiple authentication membership providers and allow all of them to create My Sites, there could potentially be
name collision issues. For example, if both membership providers had user accounts with the name user1, there would
be a conflict when the second user1 tried to create a My Site because a site collection named user1 would already exist.
In that scenario, you can configure the naming used when creating My Sites to include the provider name in addition to
the account name.
To configure My Sites to be created with a name in the format of provider_accountName
1. Open your browser and navigate to the SSP Web site.
2. Click My Site settings.
3. In the Site Naming Format section, click Domain and user name.
If you select the first or second option, all sites for forms authentication users are created with the user name only.
4. Click OK to save your changes.
There is one final point to make here. If your My Sites are hosted in a separate Web application, when forms
authentication users click the My Site link, they are taken to the forms logon page again, even if they have already
authenticated to their main corporate content site (in our example, http://www.contoso.com). The reason is that the
authentication cookie that is generated when a user logs on to a forms authentication site is associated with the domain
name. Domain name, in this case, refers to the URL namespace, not an Active Directory domain.
For example, if your corporate content is hosted on a site at domain www.contoso.com, and My Sites are hosted on a site
at domain mysites.contoso.com, the content requires two different authentication cookies. The user experience may
seem strange at first, because most users think of all the content as just "one Web site." It may cause some confusion
when the forms logon page is shown again just from clicking a link in the main corporate content site.
However, by following the steps described earlier in this article, both Windows and forms authentication users should be
able to create and use My Sites.
This concludes part 1 of this article series.
Next step:
Forms Authentication in SharePoint Products and Technologies (Part 2): Membership and Role Provider
Samples
[ http://msdn2.microsoft.com/en-us/library/bb975135(printer).aspx ] .
For more information about forms authentication, see the following additional resources:
z
Forms Authentication in SharePoint Products and Technologies (Part 2): Membership and Role Provider Samples
Strona 15 z 16
Forms Authentication in SharePoint Products and Technologies (Part 1): Introducti...
2008-02-22
http://msdn2.microsoft.com/en-us/library/bb975136(printer).aspx

[ http://msdn2.microsoft.com/en-us/library/bb975135(printer).aspx ]
z
Forms Authentication in SharePoint Products and Technologies (Part 3): Forms Authentication vs. Windows
Authentication
[ http://msdn2.microsoft.com/en-us/library/bb977430(printer).aspx ]
z
What Every SharePoint Administrator Needs to Know About Alternate Access Mappings Part 1 of 3
[ http://blogs.msdn.com/sharepoint/archive/2007/03/06/what-every-sharepoint-administrator-needs-to-know-
about-alternate-access-mappings-part-1.aspx ]
z
What Every SharePoint Administrator Needs to Know About Alternate Access Mappings Part 2 of 3
[ http://blogs.msdn.com/sharepoint/archive/2007/03/19/what-every-sharepoint-administrator-needs-to-know-
about-alternate-access-mappings-part-2-of-3.aspx ]
z
What Every SharePoint Administrator Needs to Know About Alternate Access Mappings Part 3 of 3
[ http://blogs.msdn.com/sharepoint/archive/2007/04/18/what-every-sharepoint-administrator-needs-to-know-
about-alternate-access-mappings-part-3-of-3.aspx ]
z
Configuring Multiple Authentication Providers for SharePoint 2007
[ http://blogs.msdn.com/sharepoint/archive/2006/08/16/702010.aspx ]
z
SharePoint Server 2007 Developer Portal
[ http://msdn2.microsoft.com/en-us/office/aa905503.aspx ]
z
How to Use ADFS to Turn MOSS 2007 into a Claims-Aware Application
[ http://blogs.msdn.com/sharepoint/archive/2007/02/15/how-to-use-adfs-to-turn-moss-2007-into-a-claims-aware-
application.aspx ]
z
Plan Authentication Settings for Web Applications in Office SharePoint Server
[ http://technet2.microsoft.com/Office/en-us/library/d3e0e0fc-77b6-4109-87d6-53ad088db01d1033.mspx?
mfr=true ]
z
How To: Encrypt Configuration Sections in ASP.NET 2.0 Using DPAPI
[ http://msdn2.microsoft.com/en-
us/library/ms998280(printer).aspx ]
z
How To: Encrypt Configuration Sections in ASP.NET 2.0 Using RSA
[ http://msdn2.microsoft.com/en-
us/library/ms998283(printer).aspx ]
z
User Security Attributes
[ http://msdn2.microsoft.com/en-us/library/ms677943(printer).aspx ]
z
Office Developer Center
[ http://msdn.microsoft.com/office ]
z
Windows SharePoint Services Developer Center
[ http://msdn.microsoft.com/wss ]
Community Content
The <connectionStrings> tag should look like this
<connectionStrings>
<add name="fbaSQL" connectionString="server=spdb;database=aspnetdb;Trusted_Connection=true" />
</connectionStrings>
Instead of this
<connectionStrings>
<add name="fbaSQL"
value="server=spdb;database=aspnetdb;Trusted_Connection=true" />
</connectionStrings>
Connection string correction
Last Edit 7:17 AM by dharmenb
Strona 16 z 16
Forms Authentication in SharePoint Products and Technologies (Part 1): Introducti...
2008-02-22
http://msdn2.microsoft.com/en-us/library/bb975136(printer).aspx
Wyszukiwarka
Podobne podstrony:
Forms Authentication 3 of 3
Forms Authentication 2 of 3
FORMS AUTHENTICATION
abbreviated forms overuse of 6RJE7LHBH7D6MBX3PJCQQESUBGJO72XTEVWOXGA
The Authenticity of Song Performance in Early American Sound Cinema
A Critical Look at the Concept of Authenticity
forms of concentration the landed property in italy
The comparison of two different forms of?vertisement
Forms of Grains
Cancer Proposed Common Cause and Cure for All Forms of Cancer David W Gregg, PhD
Racism, Racial Discrimination, Xenophobia and Related Forms of Intolerance, Follow up and Implementa
A software authentication system for the prevention of computer viruses
LITTLEWOOD Bringing Ritual to Mind psychological fundation of cultural forms by R N McCauley
network forms of organization
0415162866 Routledge On Durkheims Elementary Forms of Religious Life Mar 1998
Victoria Fontan Voices from Post Saddam Iraq, Living with Terrorism, Insurgency, and New Forms of T
więcej podobnych podstron